You can enter the basic settings for using the different sub menus of the Accounting service and view slip templates. You can also import data from existing accounting programs, download ERP slips for integration with the DOUZONE solution, and enter Smart Store integration settings.
Set Accounting
You can establish the basic settings for using the Accounting service by entering the month of settlement, company's date of establishment, accounting account, and currency settings. You can set the financial account integration status in addition to the basic accounting information.
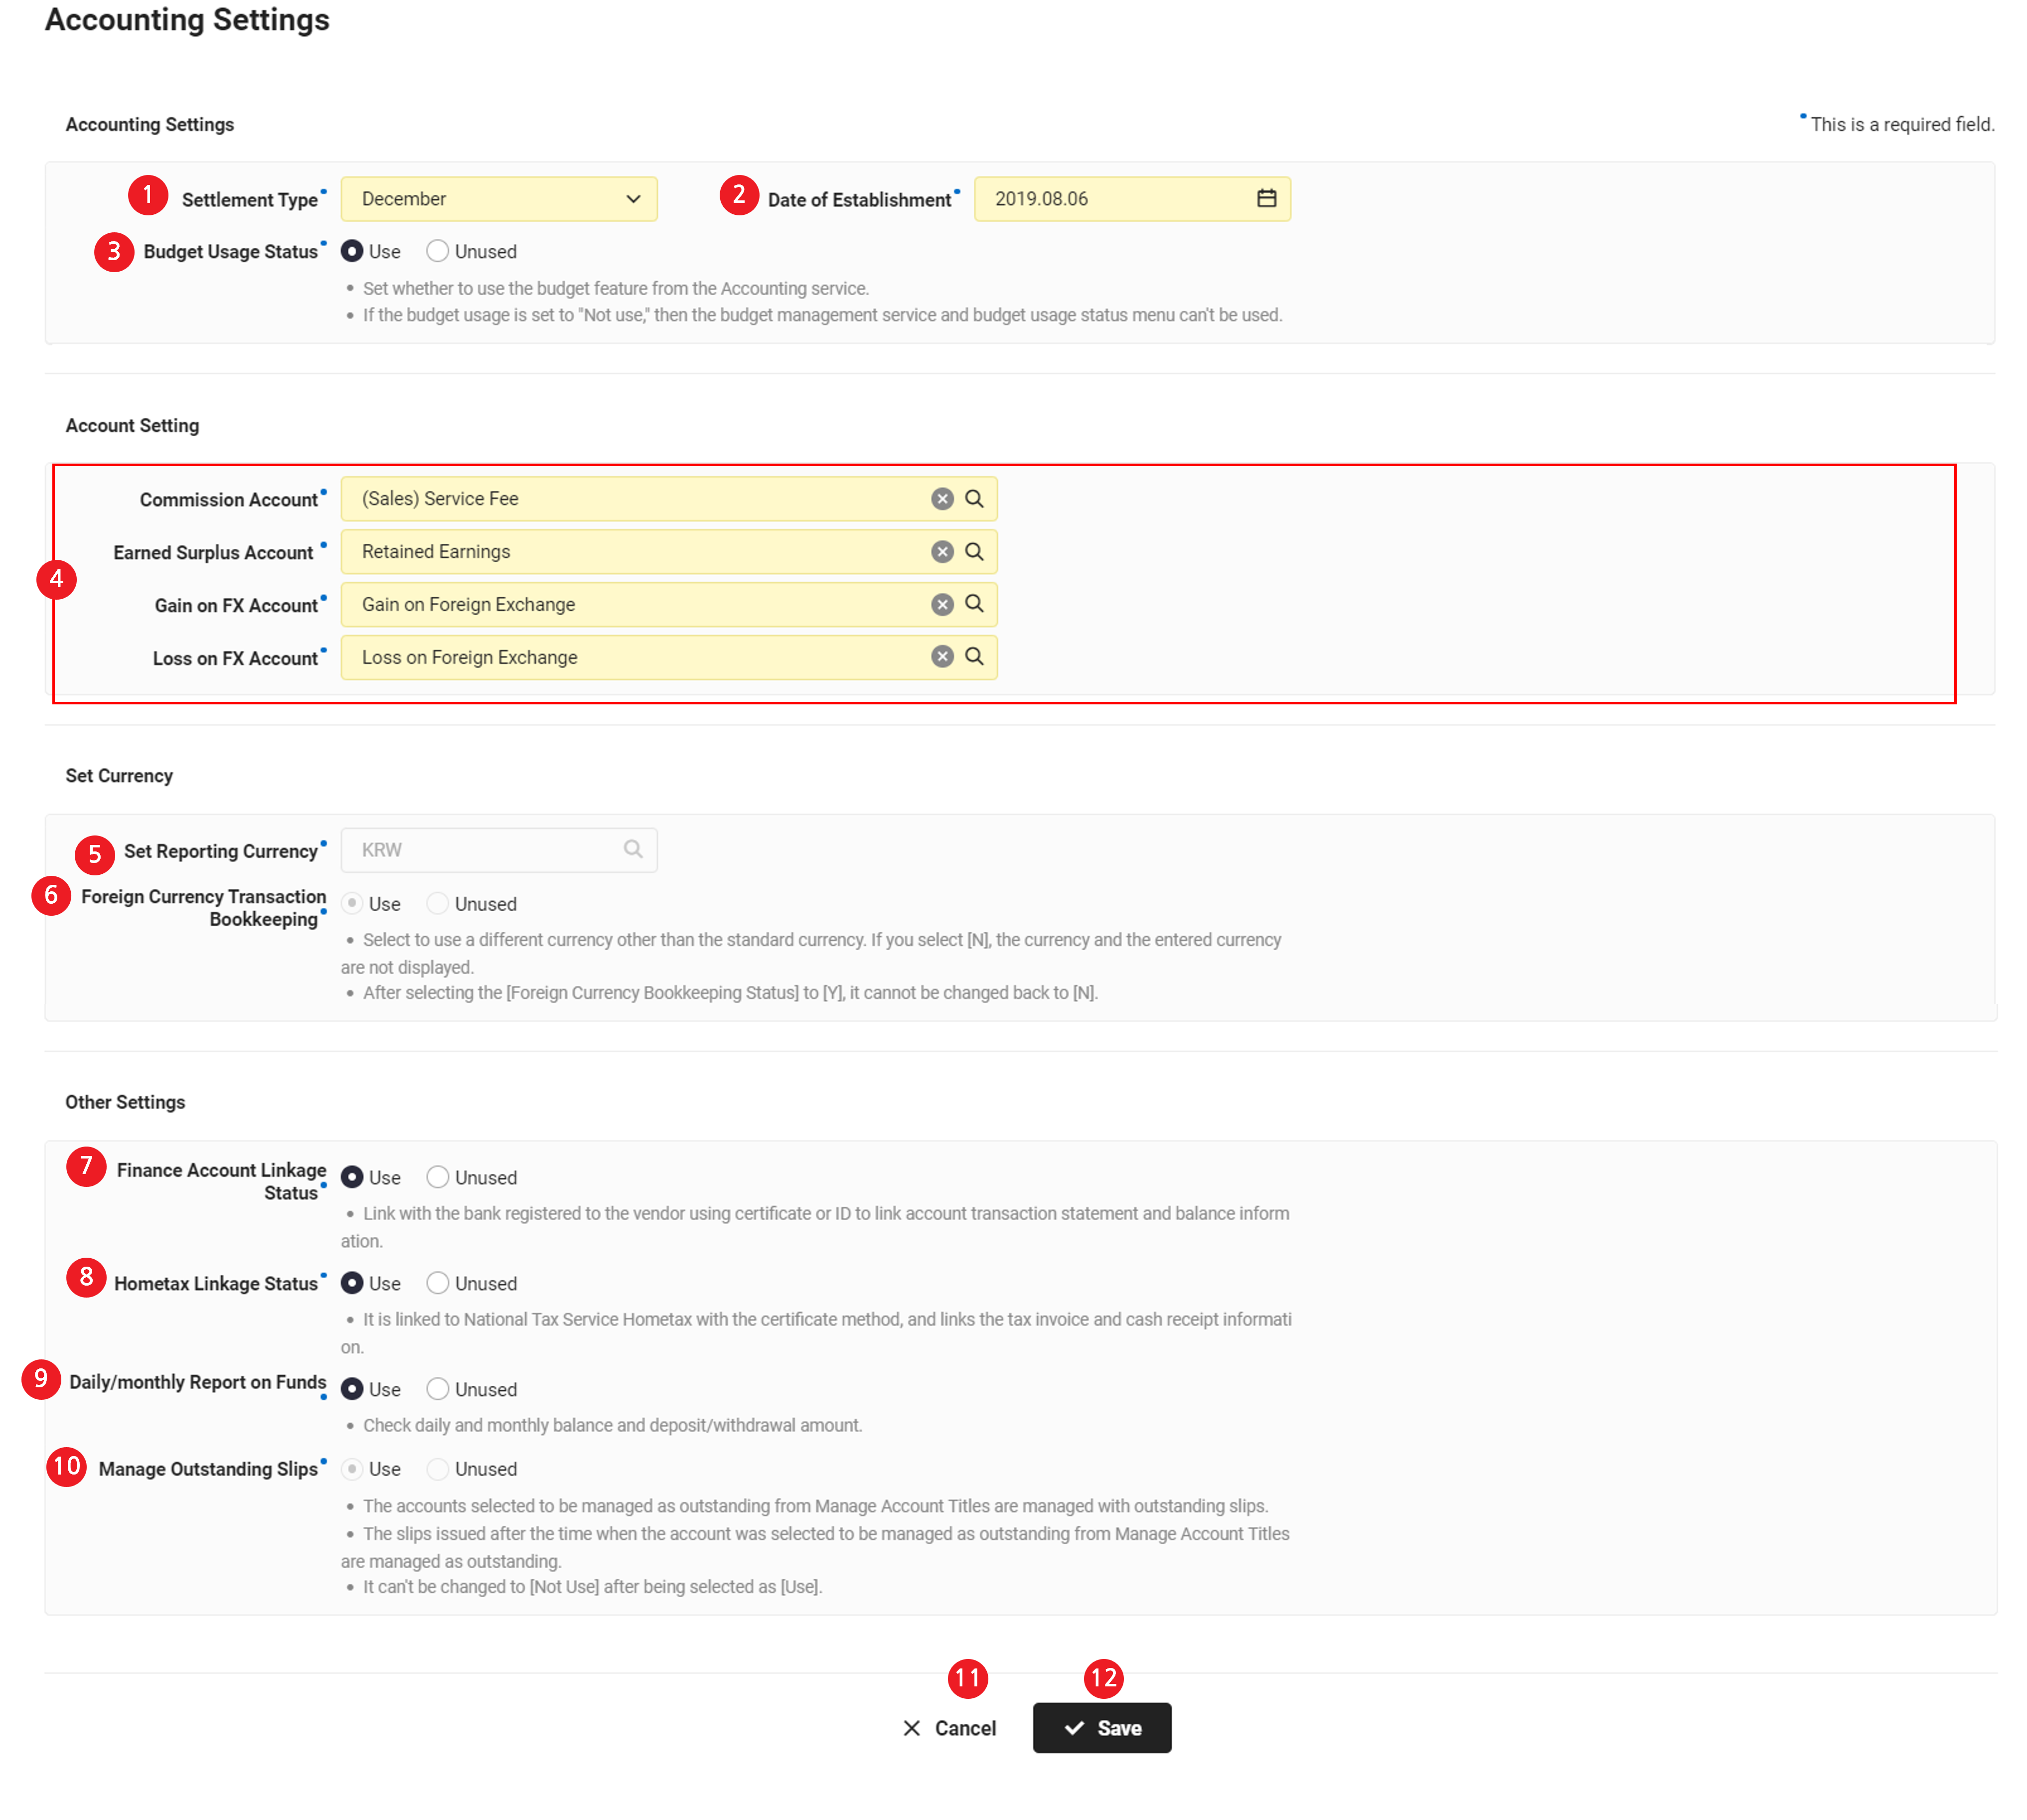
The Accounting Settings page is laid out as follows.
- Review carefully before entering the settlement type, date of establishment, and reporting currency as they cannot be changed after initial settings.
- Review carefully before setting the foreign currency bookkeeping status as it can be changed from ‘N’ to ‘Y’ only once.
If the foreign currency bookkeeping status is set as ‘N’, the currency and input currency are not displayed in the menus below. Select ‘Y’ if you are using foreign currency.
- Create/View Slips
- Manage Receivables/Payables
- View Transactions by Account
- View Balance by Account
- Ledger by Account
- Ledger by Vendor
| Field | Description |
|---|---|
| ① Settlement Type | Displays the month of accounting settlement
|
| ② Date of Establishment | Displays the date of establishment of the company
|
| ③ Budget Use Status | Set whether to use budgets in the Accounting service
|
| ④ Account Settings | Displays the required field accounts that must be defined for slip creation
|
| ⑤ Set Reporting Currency | Displays the standard currency
|
| ⑥ Foreign Currency Bookkeeping Status | Displays the foreign currency bookkeeping status
|
| ⑦ Financial Account Linkage Status | Displays the integration status of the Accounting service and finance accounts
|
| ⑧ Hometax Linkage Status | Displays the Hometax integration status
|
| ⑨ Daily/monthly Report on Funds | Set whether to display the Manage Funds > Daily/Monthly Reports on Funds menu, where you can view your company's daily and monthly fund status |
| ⑩ Manage Outstanding Slips | Displays the management status of outstanding slips
|
| ⑪ Cancel | Delete the setting, and refresh and open the previous page before making changes |
| ⑫ Save | It saves the settings |
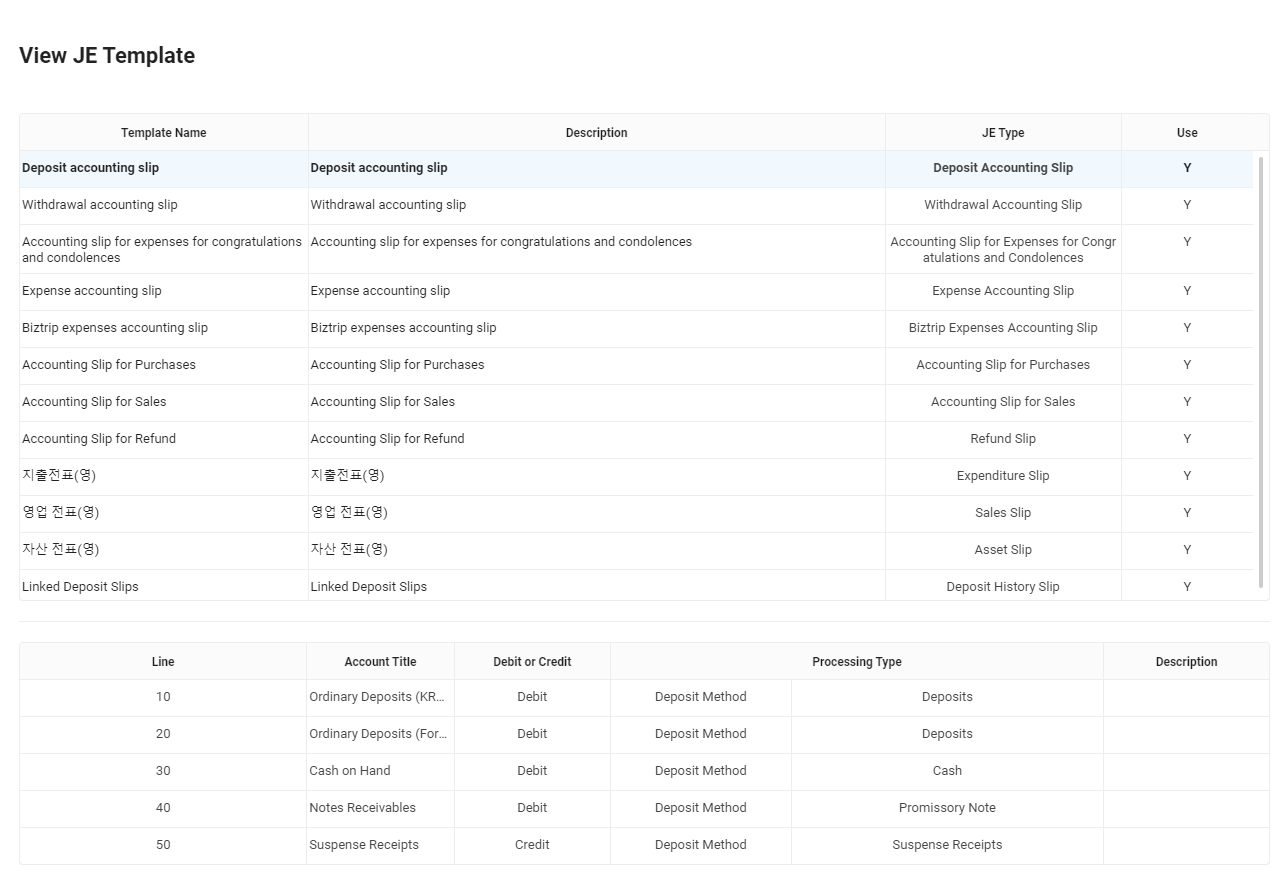
View Slip Templates
You can check the slip templates provided by the Accounting service. They consist of the slip type, account title, debit/credit classification, processing type, and notes.
To view the slip templates provided by the Accounting service, click ‘Accounting’ in the ‘Admin Menu,’ then select ‘Settings > View Slip Templates’ from the menu on the PC web page.
Import Data
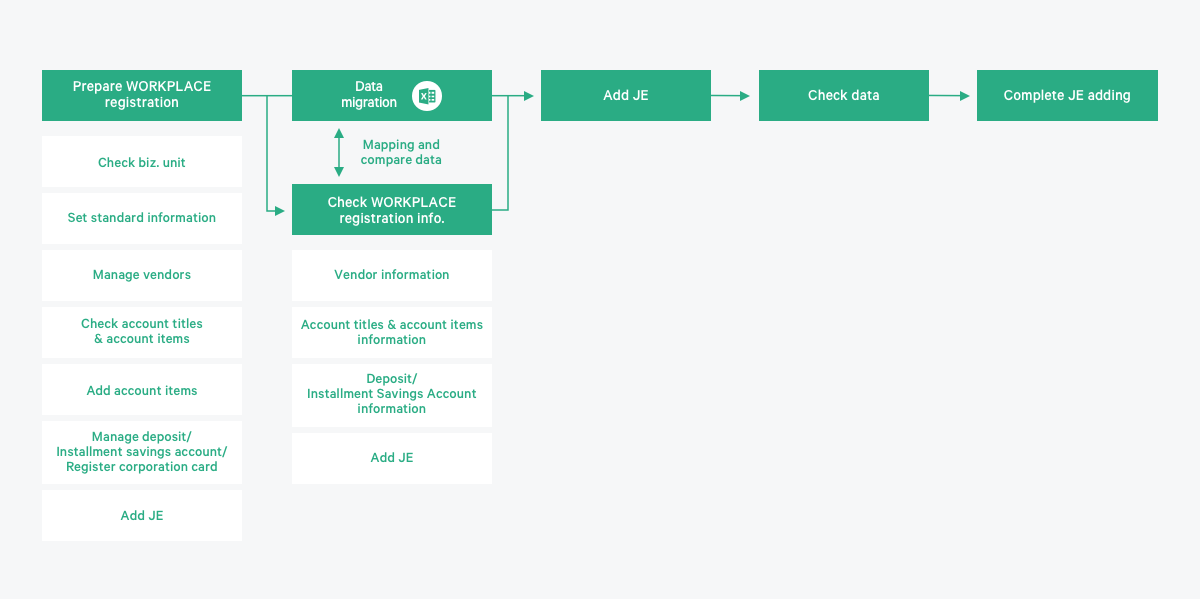
You can import and use the data of external accounting programs in the Accounting service by downloading the data and mapping them according to the code information of NAVER WORKS Accounting. Data are imported by using an Excel template to align the data of external programs with the code information of NAVER WORKS Accounting, and then registering the slip.
The process of migrating external data is as follows.
The following shows how to import external data to the NAVER WORKS Accounting service.
- Click ‘Accounting’ in the ‘Admin Menu.’ Then select ‘Settings > View Slip Templates’ from the menu on the PC web page.
- Click ‘Settings > Import Data’.
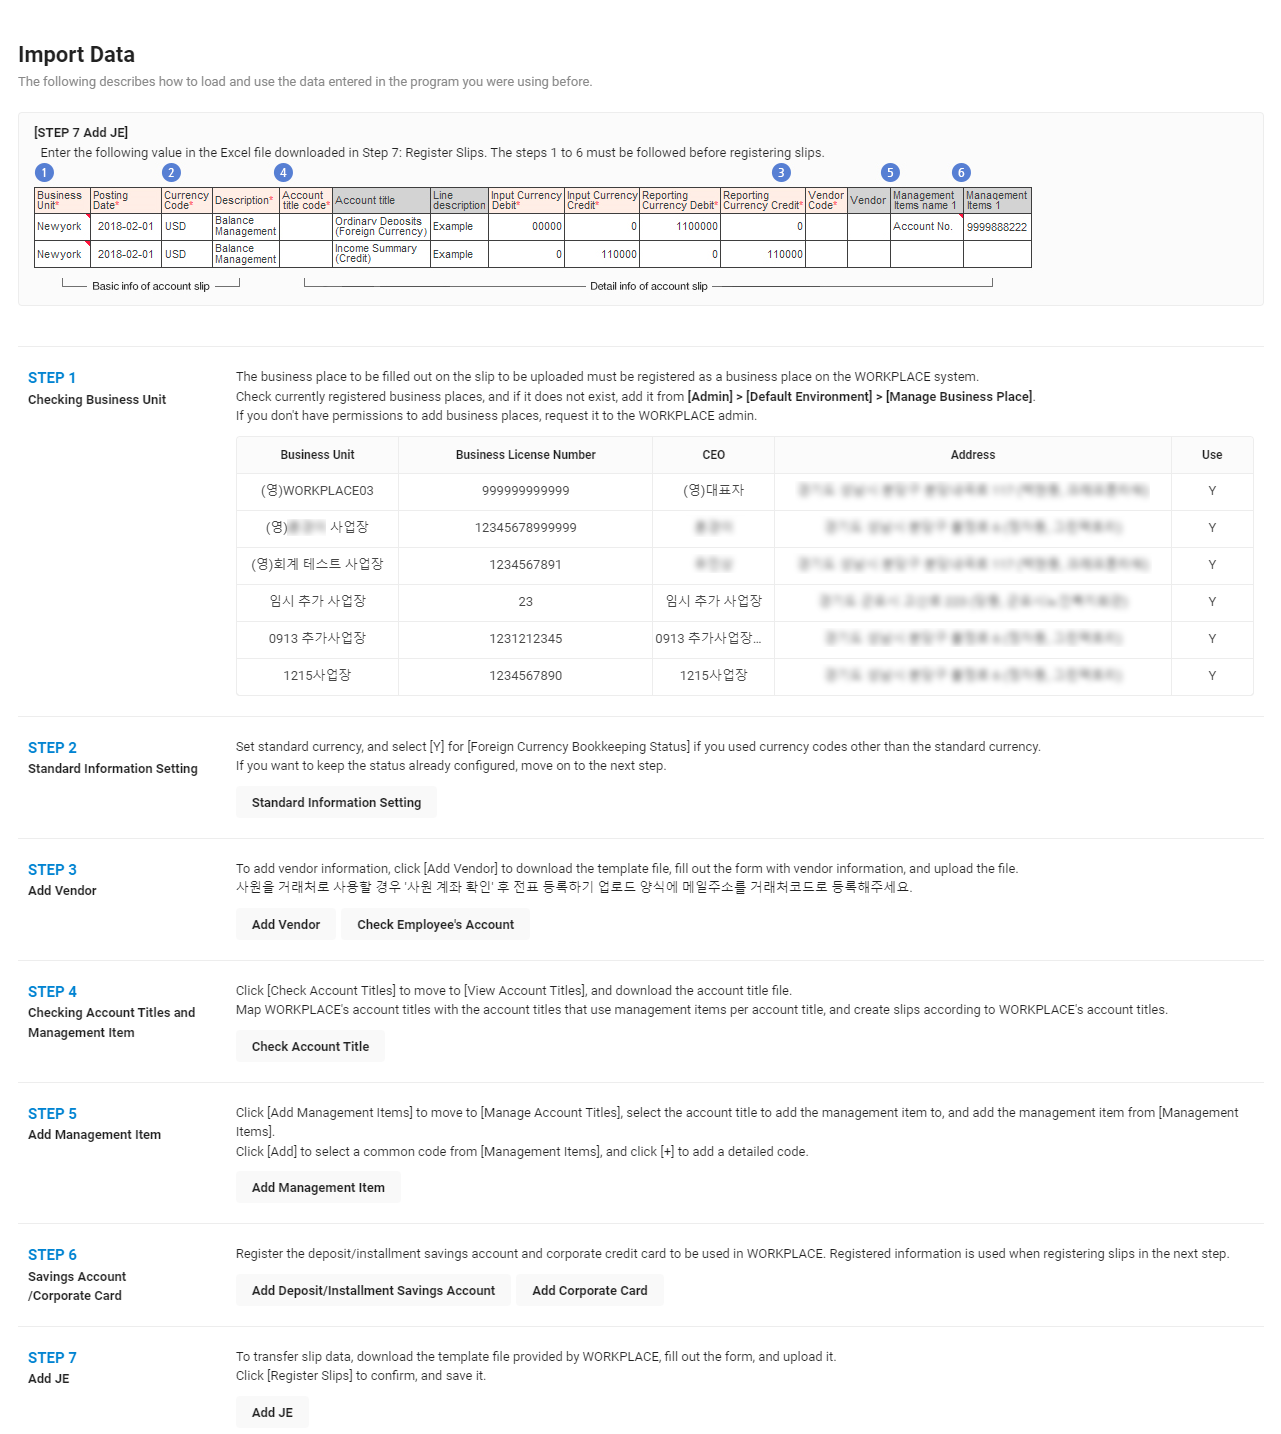
- Check the currently registered business place information in Step 1. View Business Place.
- If the business place information hasn't been registered, register business information by referring to Add Business Place.
- Click the link buttons provided in each step from Step 2 to Step 6 and proceed with the settings.
- Set Standard Information Guide
- Register Vendor Guide, Check Employee Account Guide
- Use NAVER WORKS Accounting forms to upload externally used vendor data.
- View Account Titles Guide
- Download the NAVER WORKS Accounting account information data and compare them with externally used account titles.
- Add Management Item Guide
- In the ‘Manage Account Titles’ menu, you can register and manage the common code of management items as well as add the detailed code of the common code.
- Register Deposit/Installment Savings Account Guide, Register Corporate Credit Card Guide
- Click 'Register Slip' of Step 7. Register Slips.
- Click each of ‘Download Vendors’ button, the ‘Download Account Titles/Management Items’, and ‘Download Deposit/Installment Savings Accounts’. Download the files and check the codes.
- Click 'Download Slip Template File' and check the code. Fill out the details based on the code and save.
- Click 'Upload Slip File' and upload the saved template.
- Click 'Check Data Registration' and then click 'OK’ in the confirmation pop-up window.
- Data are reviewed in units of rows. When an error is found in the data, it is displayed in the Details column.
- If an error occurs, see Troubleshoot Data Registration Errors to modify the data and upload them again.
- Click 'Register Slips' and complete the slip registration.
- You can check the registered slips in ‘Manage Slips > Create/View Slips’
Troubleshoot Data Registration Errors
If an error occurs despite checking the data registration of slip templates uploaded, see the following table.
| No. | Error Type Message | Solution |
|---|---|---|
| 1 | The account title code is invalid. Check the account title | Check the account in ‘Manage Standard Information > Manage Account Titles’ or in the ‘Download Account Titles/Management Items’ file |
| 2 | The account title does not match with the account title code. Check the account title name. | Check the account in ‘Manage Standard Information > Manage Account Titles’ or in the ‘Download Account Titles/Management Items’ file |
| 3 | Slip Number {0}: The sum of debit and credit does not match, or check the basic slip information (business place, slip date, notes, currency). | Check and modify the debit/credit amount based on the basic information of the slip |
| 4 | The currency code is invalid. Check the currency code. | Check the currency code of AC018 in ‘Manage Standard Information > Manage Common Codes’ |
| 5 | The vendor name does not match with the vendor code. Check the vendor name | Check the vendor code and name in ‘Manage Standard Information > Manage Vendors’ or in the Download Vendors file |
| 6 | You can only enter either one of the debit or credit amount. | Take the row where amounts have been entered for both debit and credit, and separate it into two rows. Enter only the debit amount and credit amount in each row. |
| 7 | The account title code has not been entered. Check the account title code | Check the account in ‘Manage Standard Information > Manage Account Titles’ or in the Download Account Titles/Management Items file |
| 8 | The currency code has not been entered. Check the currency code. | Check the currency code in ‘Manage Standard Information > Manage Account Titles’ or in the Download Account Titles/Management Items file |
| 9 | The vendor code has not been entered. Check the vendor code | Check the vendor code and name in ‘Manage Standard Information > Manage Vendors’ or in the Download Account Titles/Management Items file |
| 10 | The notes have not been entered. Check the notes | Enter details in the Note column |
| 11 | The slip date has not been entered. Check the slip date | Enter details in the Slip Date column. |
| 12 | The business place has not been entered. Check the business place. | Enter details in the Business Place column You can view the currently registered business places in ‘Admin > Company Information > Manage Business Place’ or in ‘Settings > Import Data’ |
| 13 | The management item has not been registered | Check the management item in ‘Manage Standard Information > Manage Account Titles’ or in the D’ownload Account Titles/Management Items’ file |
| 14 | The management item name 1 is invalid Check the management item name 1. | Check the management item in ‘Manage Standard Information > Manage Account Titles’ or in the ‘Download Account Titles/Management Items’ file |
| 15 | The slip date does not fit the date format. Check the slip date | Enter the slip date in the YYYYMMDD format |
| 16 | The slip date has been closed. Check the slip date | Check the closing status in ‘Settlement/Financial Statements > Monthly Closing’, and then register data on another slip date |
| 17 | It was not registered because the slip date has been closed | Check the closing status in ‘Settlement/Financial Statements > Monthly Closing’, and then register data on another slip date |
| 18 | You do not have permission or the business place has not been registered. Check the business place. | View the currently registered business places in ‘Admin > Company Information > Manage Business Place’ or in ‘Settings > Import Data’ |
Download ERP Slip
You can easily move the data of the NAVER WORKS Accounting service to an external solution by mapping the slips of NAVER WORKS Accounting and DOUZONE iCUBE and downloading the mapped slips.
The following shows how to map the slips and information of DOUZONE iCUBE, and then download them.
- From the DOUZONE iCUBE solution, download the business place, department, vendor, and account title data.
- You can download the business place data by searching management item D5 business places in ‘Manage System > Manage Basic Information > Accounting Personnel > Register Management History’, checking the business place data on the right, and then selecting ‘Context Menu > Convert Data > Output in Excel (Including Hidden Items)’.
- You can download the department data by searching management item C1 business places in ‘Manage System > Manage Basic Information > Accounting Personnel > Register Management History’, checking the business place data on the right, and then selecting ‘Context Menu > Convert Data > Output in Excel (Including Hidden Items)’.
- Vendor data can be downloaded according to the searched data.
- You can download the data by searching general vendors or financial vendors in ‘Manage System > Manage Basic Information > Register General Vendors’, checking the business place data on the right, and then selecting ‘Context Menu > Convert Data > Output in Excel (Including Hidden Items)’.
- You can download the account title data by clicking ‘By Account’ on the right in ‘Manage System > Manage Basic Information > Accounting Personnel > Register Account Titles’ of the DOUZONE iCUBE solution, checking the data searched by account, and then selecting ‘Context Menu > Convert Data > Output in Excel (Including Hidden Items)’.
- Click 'Service Menu' on the PC web screen, then select 'Accounting' from the 'Admin Menu'.
- Click ‘Settings > Download ERP Slip’ from the menu.
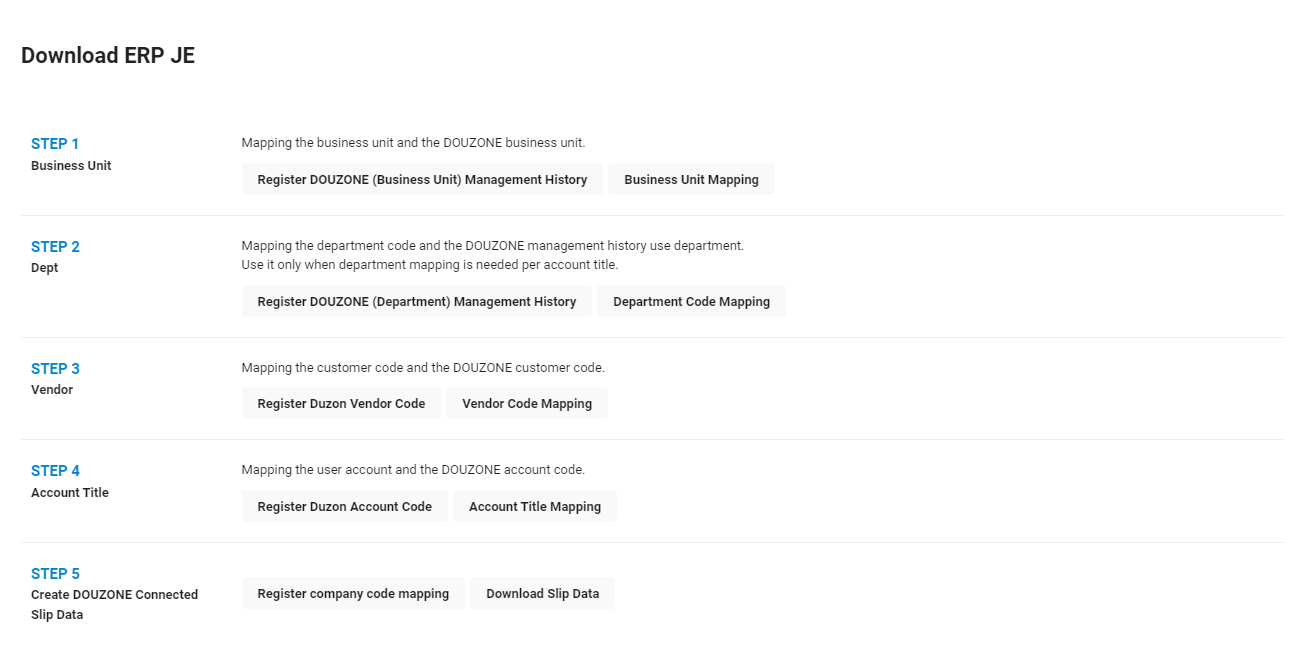
- Click 'Register DOUZONE Management History (Business Site)' of STEP 1.
- You will be redirected to the Register DOUZONE Management History page.
- Click 'Upload' and upload the DOUZONE iCUBE business place data.
- Click 'Map Business Locations' of Step 1.
- This maps the business place code used on NAVER WORKS Accounting with the business place code being used on DOUZONE iCUBE. Mapped business place codes are written in business place codes that fit DOUZONE iCUBE in Download Slip Data.
- The business place information registered on Business Support is displayed in Department/Business Place/Company.
- Click
 of the Code Name input field in DOUZONE Management History, and then select the business place to be mapped with the Business Support information on the left.
 - Click 'Save' and save.
- Proceed with mapping from Step 2 to Step 4 using the same method as steps 4 through 8.
- You can ignore Step 2 if departments are not used as a management item by account on DOUZONE iCUBE.
- Register and search data to use the vendor codes being used on DOUZONE iCUBE for Download Slip Data of NAVER WORKS Accounting in Step 3.
- If data are generated without mapping vendor codes, the DOUZONE vendor codes may be mapped with the business registration number or resident registration number from slip registration on DOUZONE iCUBE, or registered as a new vendor. It is recommended to map the vendor information of Business Support.
- When mapping the account titles of Step 4, check the account title and title type before selection as there are identical account names depending on the account group of DOUZONE iCUBE.
- Click 'Register Company Code Mapping' of STEP 5, and then enter each of the code and code name to be mapped in DOUZONE Management History.
- Click ‘Save’ and save. Return to the procedure screen by clicking ‘Settings > Download ERP Slip’ in order.
- Click ‘Download Slip Data’ and download the mapped slips.
- Click ‘Open File’ in the Automatic Slip Processing (Simplified) menu of DOUZONE iCUBE. Select and register the slip data downloaded on NAVER WORKS Accounting.
- Check the Automatic Slip Processing (Simplified) menu. You can register Excel data only when the menu exists.