You can set and manage vendor information, account titles, and common codes that are necessary for accounting work, as well as check exchange rates.
Manage Vendors
You can register and manage vendors individually or at once. You can also search and view the vendor list by condition and download the vendor list as an Excel file.
For more information about vendor management, see Manage Vendor.
Manage Account Titles
You can set and manage account titles used by the company. The set account titles are used generally in the Accounting service. You cannot delete account titles that are provided by default when requesting WORKS Finance.
The Manage Account Titles screen is laid out as follows.
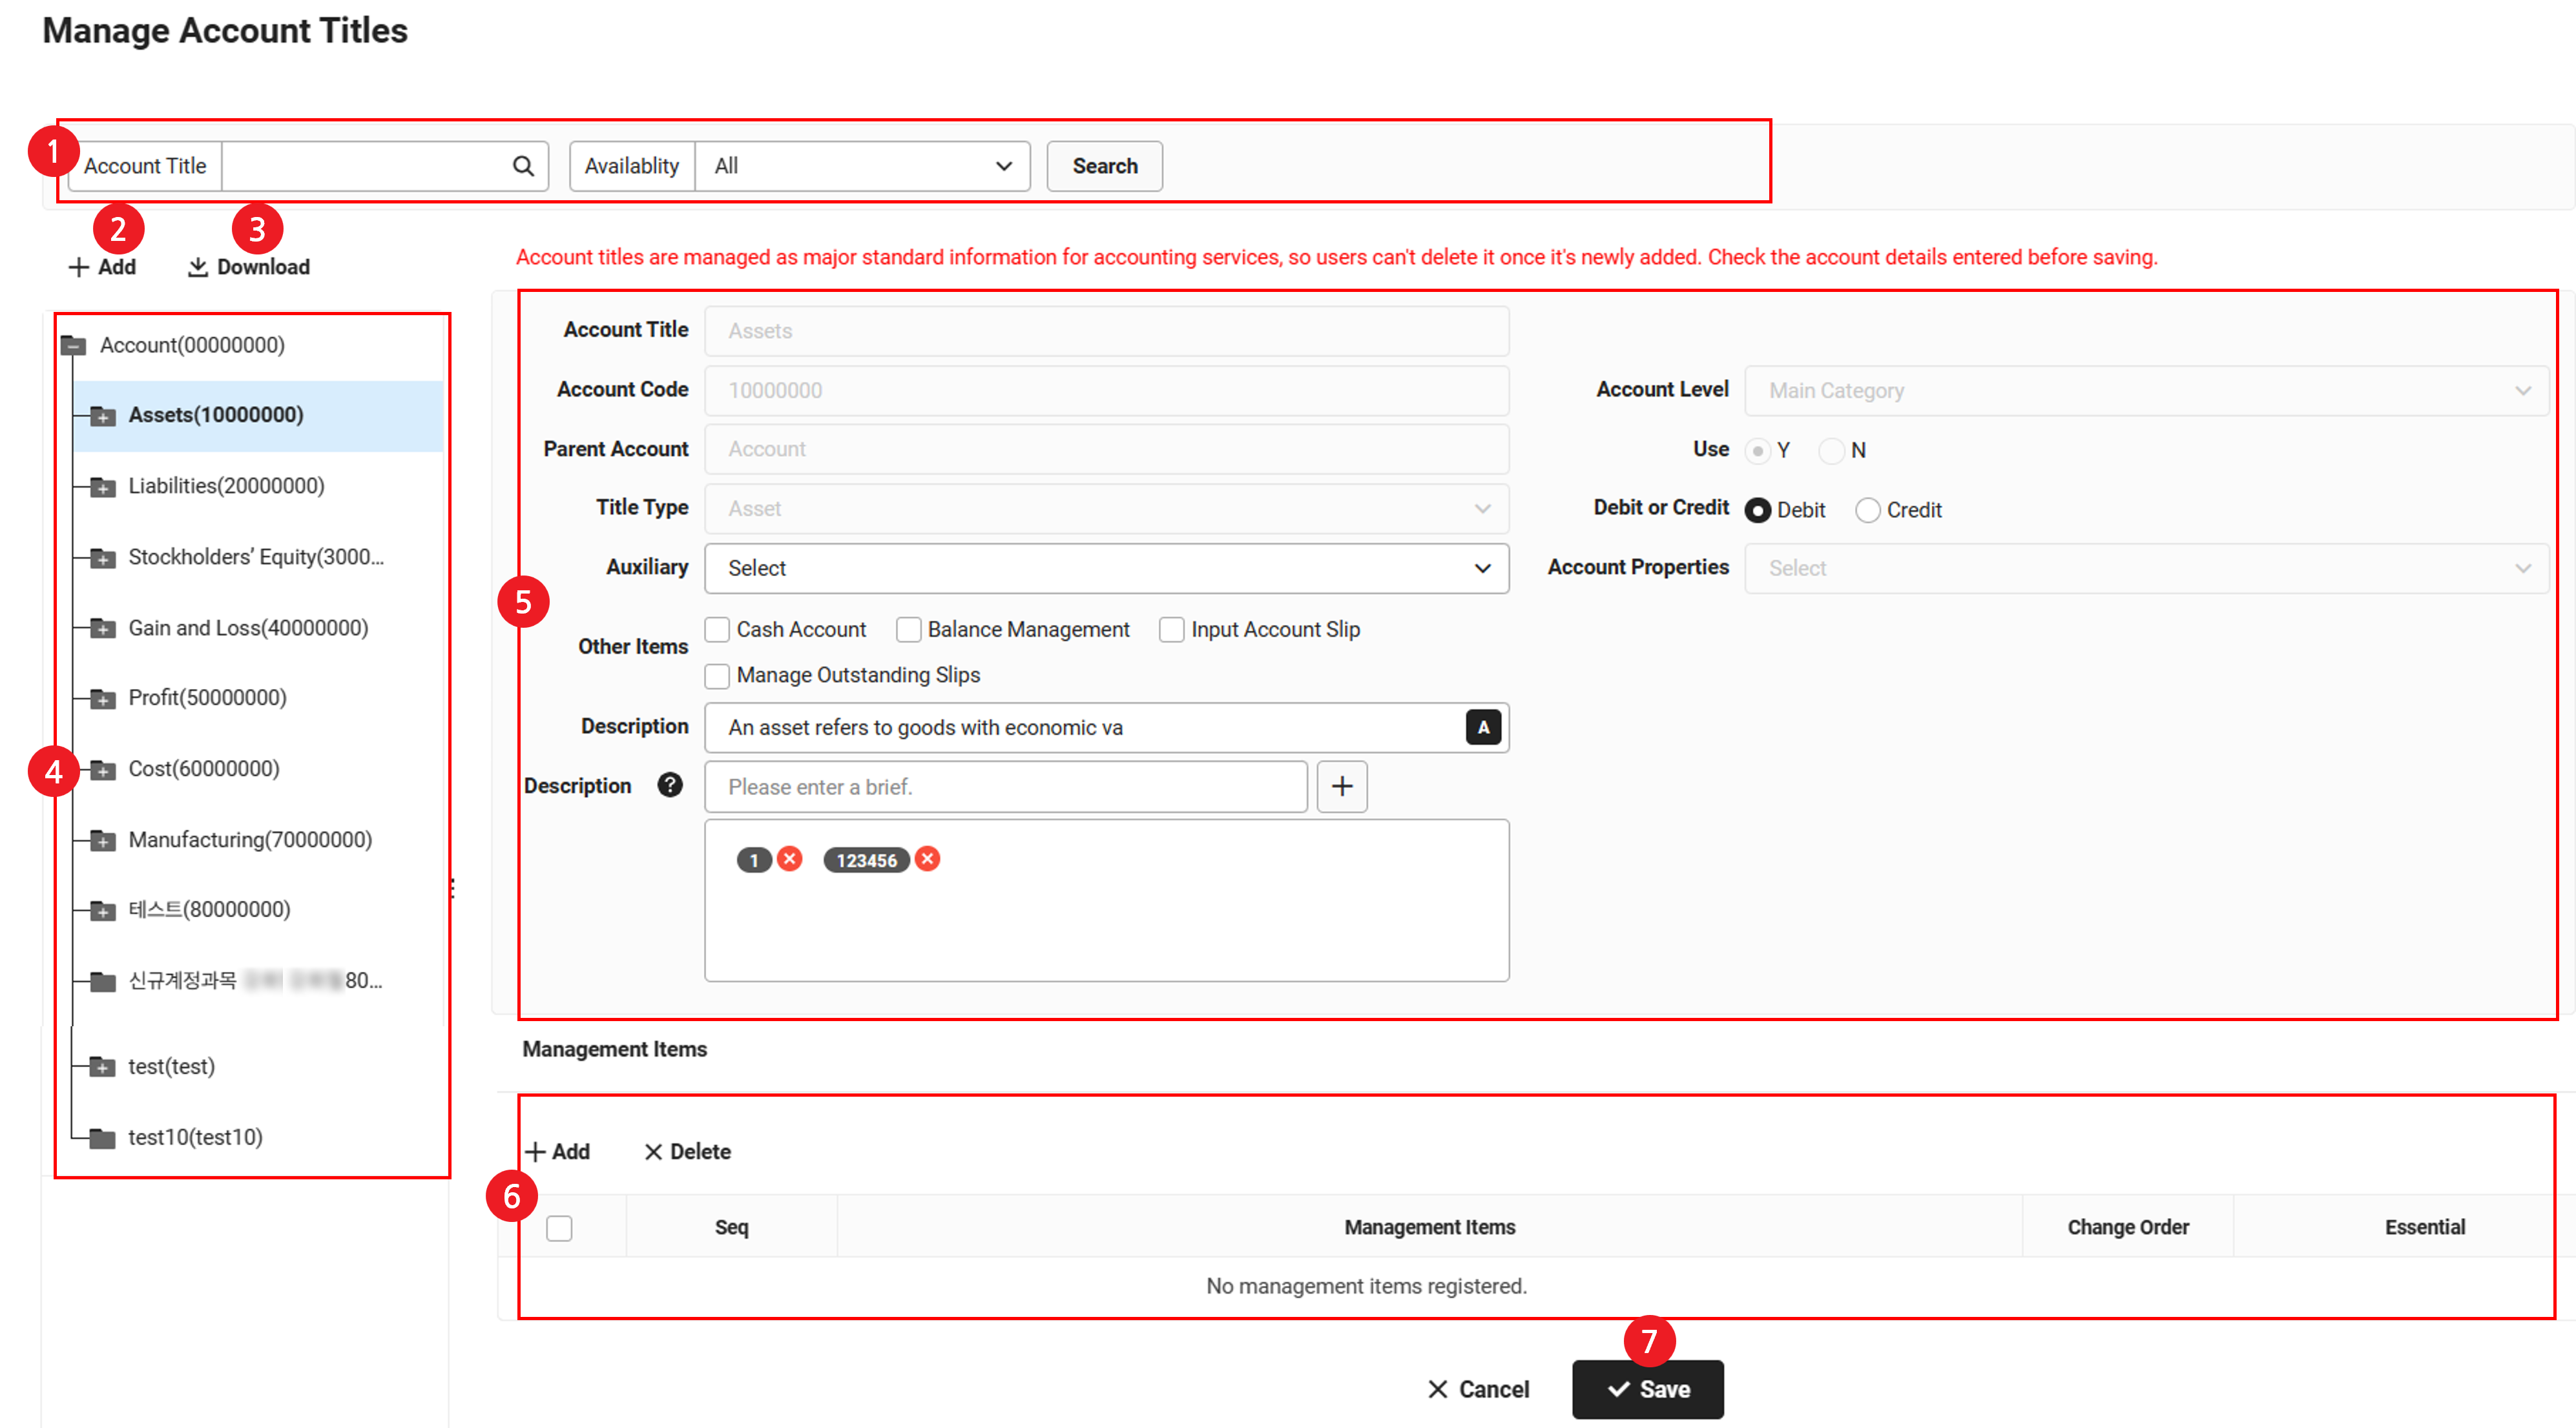
| Area | Description |
|---|---|
| ① Search Window | Search account title by conditions of title name and availability |
| ② Add | Add a new account title (See Add Account Title) |
| ③ Download | Download the details of a selected account title as an Excel file (See Download Account Title Details) |
| ④ Account Title Classifications | It displays registered account titles by level, starting from the top parent account You can view sub accounts by clicking each account title classification |
| ⑤ Account Title Details | It displays the details of a selected account title You can modify contents by changing the content of each account title and saving it (See Add Account Title) |
| ⑥ Management Items | It displays management items under a selected account title You can modify contents by changing the content of each item and saving it (See Add Account Title) |
| ⑦ Click save. | Click to save the edited content |
Add Account Title
The following shows how to add a new account title.
- Account titles cannot be deleted once they have been added, so review carefully before adding an account title for precise accounting work.
- The following items cannot be changed once they are added: Account Title, Account Code, Parent Account, Title Type, Account Level, and Account Properties.
- Click the ‘Admin Menu’ at the top right of the PC web screen, and then click ‘Accounting’ in the pop-up window.
- Click
 at the top left of the screen.
 - Click ‘Manage Standard Information > Manage Account Titles’ from the menu.
- Click 'Add'.
- Enter the following contents in the displayed account title details area.
- Account Title: Enter the account title name.
Click ‘A’ to enter names in English, Japanese, Chinese (Simplified), and Chinese (Traditional). - Account Code: Specify the code number of the account title.
- Account Level: Select the classification level of the account title.
- Parent Account: Specify the parent account of the account title.
- Use, Debit or Credit: Select the account title's availability and whether it is a debit or credit type.
- Title Type: Select the type of the account title.
- Info Page: Select the additional settings information that are displayed when creating accounting slips with the applicable account title (input VAT, output VAT, withholding tax, and promissory note).
- Account Properties: Select the account properties to be used in the related sub menu. (See Account Properties)
- Other Items: Select the additional settings to be entered and displayed in the related sub menu.
- Cash Account: Click to display the amount in the debit/credit column of the Daily Report menu.
- Manage Balance: Click to display the account's opening balance in the General Ledger menu.
- Enter Slip: Click to set the account available for input when creating accounting slips in the ‘Accounting > Manage Slips > Create/View Slips’ menus.
- Manage Outstanding Slips: Displays only accounts whose title type is asset, debt and capital, Click to select it as an outstanding account to be cleared in the ‘Accounting > Manage Slips > Manage Outstanding Slip’ page.
Outstanding accounts cannot be removed once selected, so please make your selection carefully.
- Description: Enter the account title description.
Click ‘A’ to enter names in English, Japanese, Chinese (Simplified), and Chinese (Traditional). - Note: Enter the note that can be selected when creating accounting slips with the applicable account title.
- Account Title: Enter the account title name.
- Click ‘Add’ from the Management Items area and enter the following management item details.
- Management Item: Select the management items that are displayed as additional settings when creating accounting slips with the applicable account title. (See ‘Management Items’.)
- Change Order: Change the order in which the items are displayed in a table.
- Required: Select to specify management items as required entries.
- Click ‘Save’.
Account Properties
The following are sub menus of the Accounting service where each account property is displayed.
| Account Properties | Description |
|---|---|
| Receivables Payables |
|
| Sales Purchase |
It can be selected in the slip account code of the Excel template for uploading purchase/sales data at once (for more details, see Bulk Upload Purchase Data) |
| Tangible Assets Intangible Assets Assets Under Construction Depreciation Cost Accumulated Depreciation Profit and Loss from Asset Sales Suspense Receipts |
It is displayed when setting up an account or creating a slip in the ‘Accounting > Fixed asset management’ menus. |
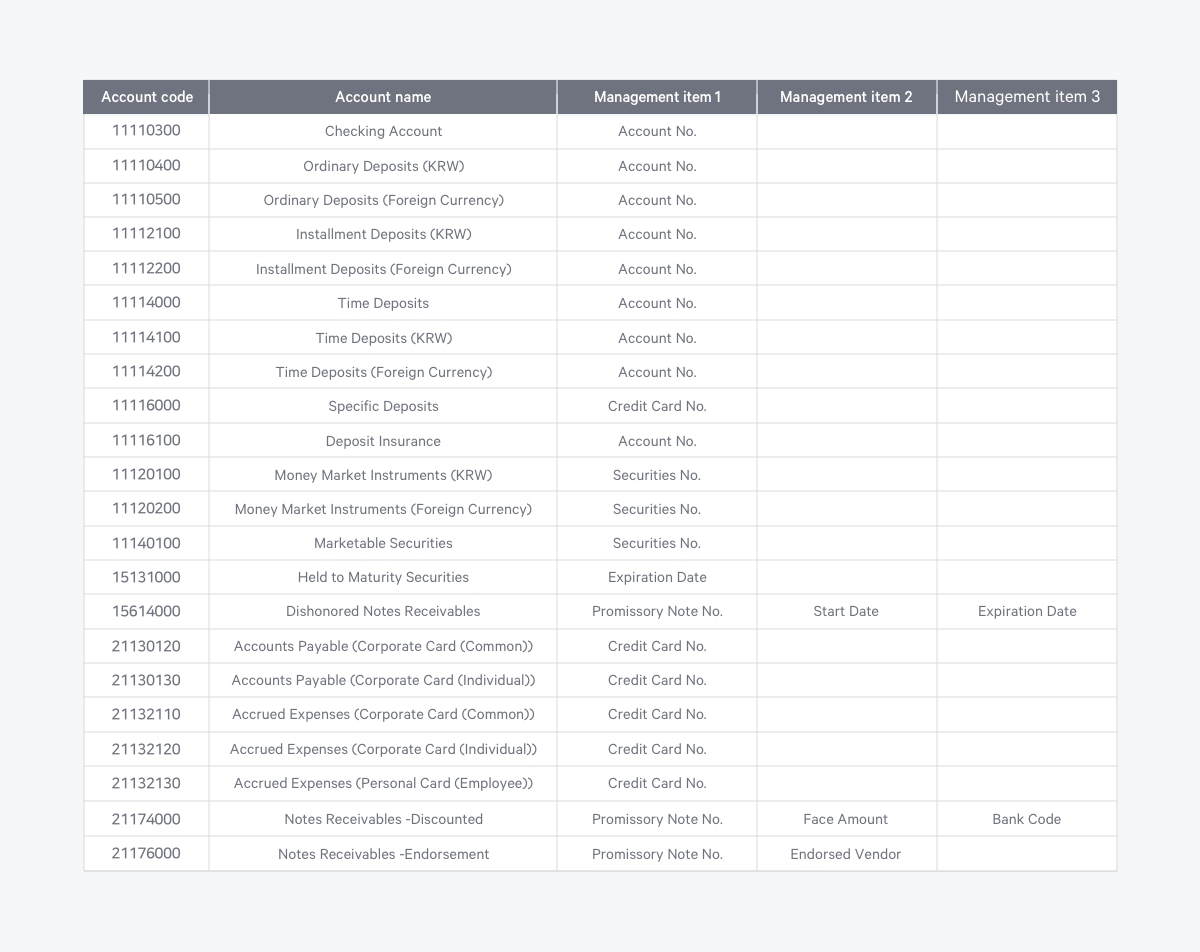
Management Items
The following management items can be entered by account title.
Download Account Title Details
The following shows how to download account title details as an Excel file.
- Click the ‘Admin Menu’ at the top right of the PC web screen, and then click ‘Accounting’ in the pop-up window.
- Click at the top left of the screen.
- Click ‘Manage Standard Information > Manage Account Titles’ from the menu.
- Select the account title for which details will be downloaded.
- Click 'Download'.
- The account title details are downloaded as an Excel file.
Manage Common Code
You can view and manage the common codes to be used in the Accounting service.
The Manage Common Codes screen is laid out as follows.
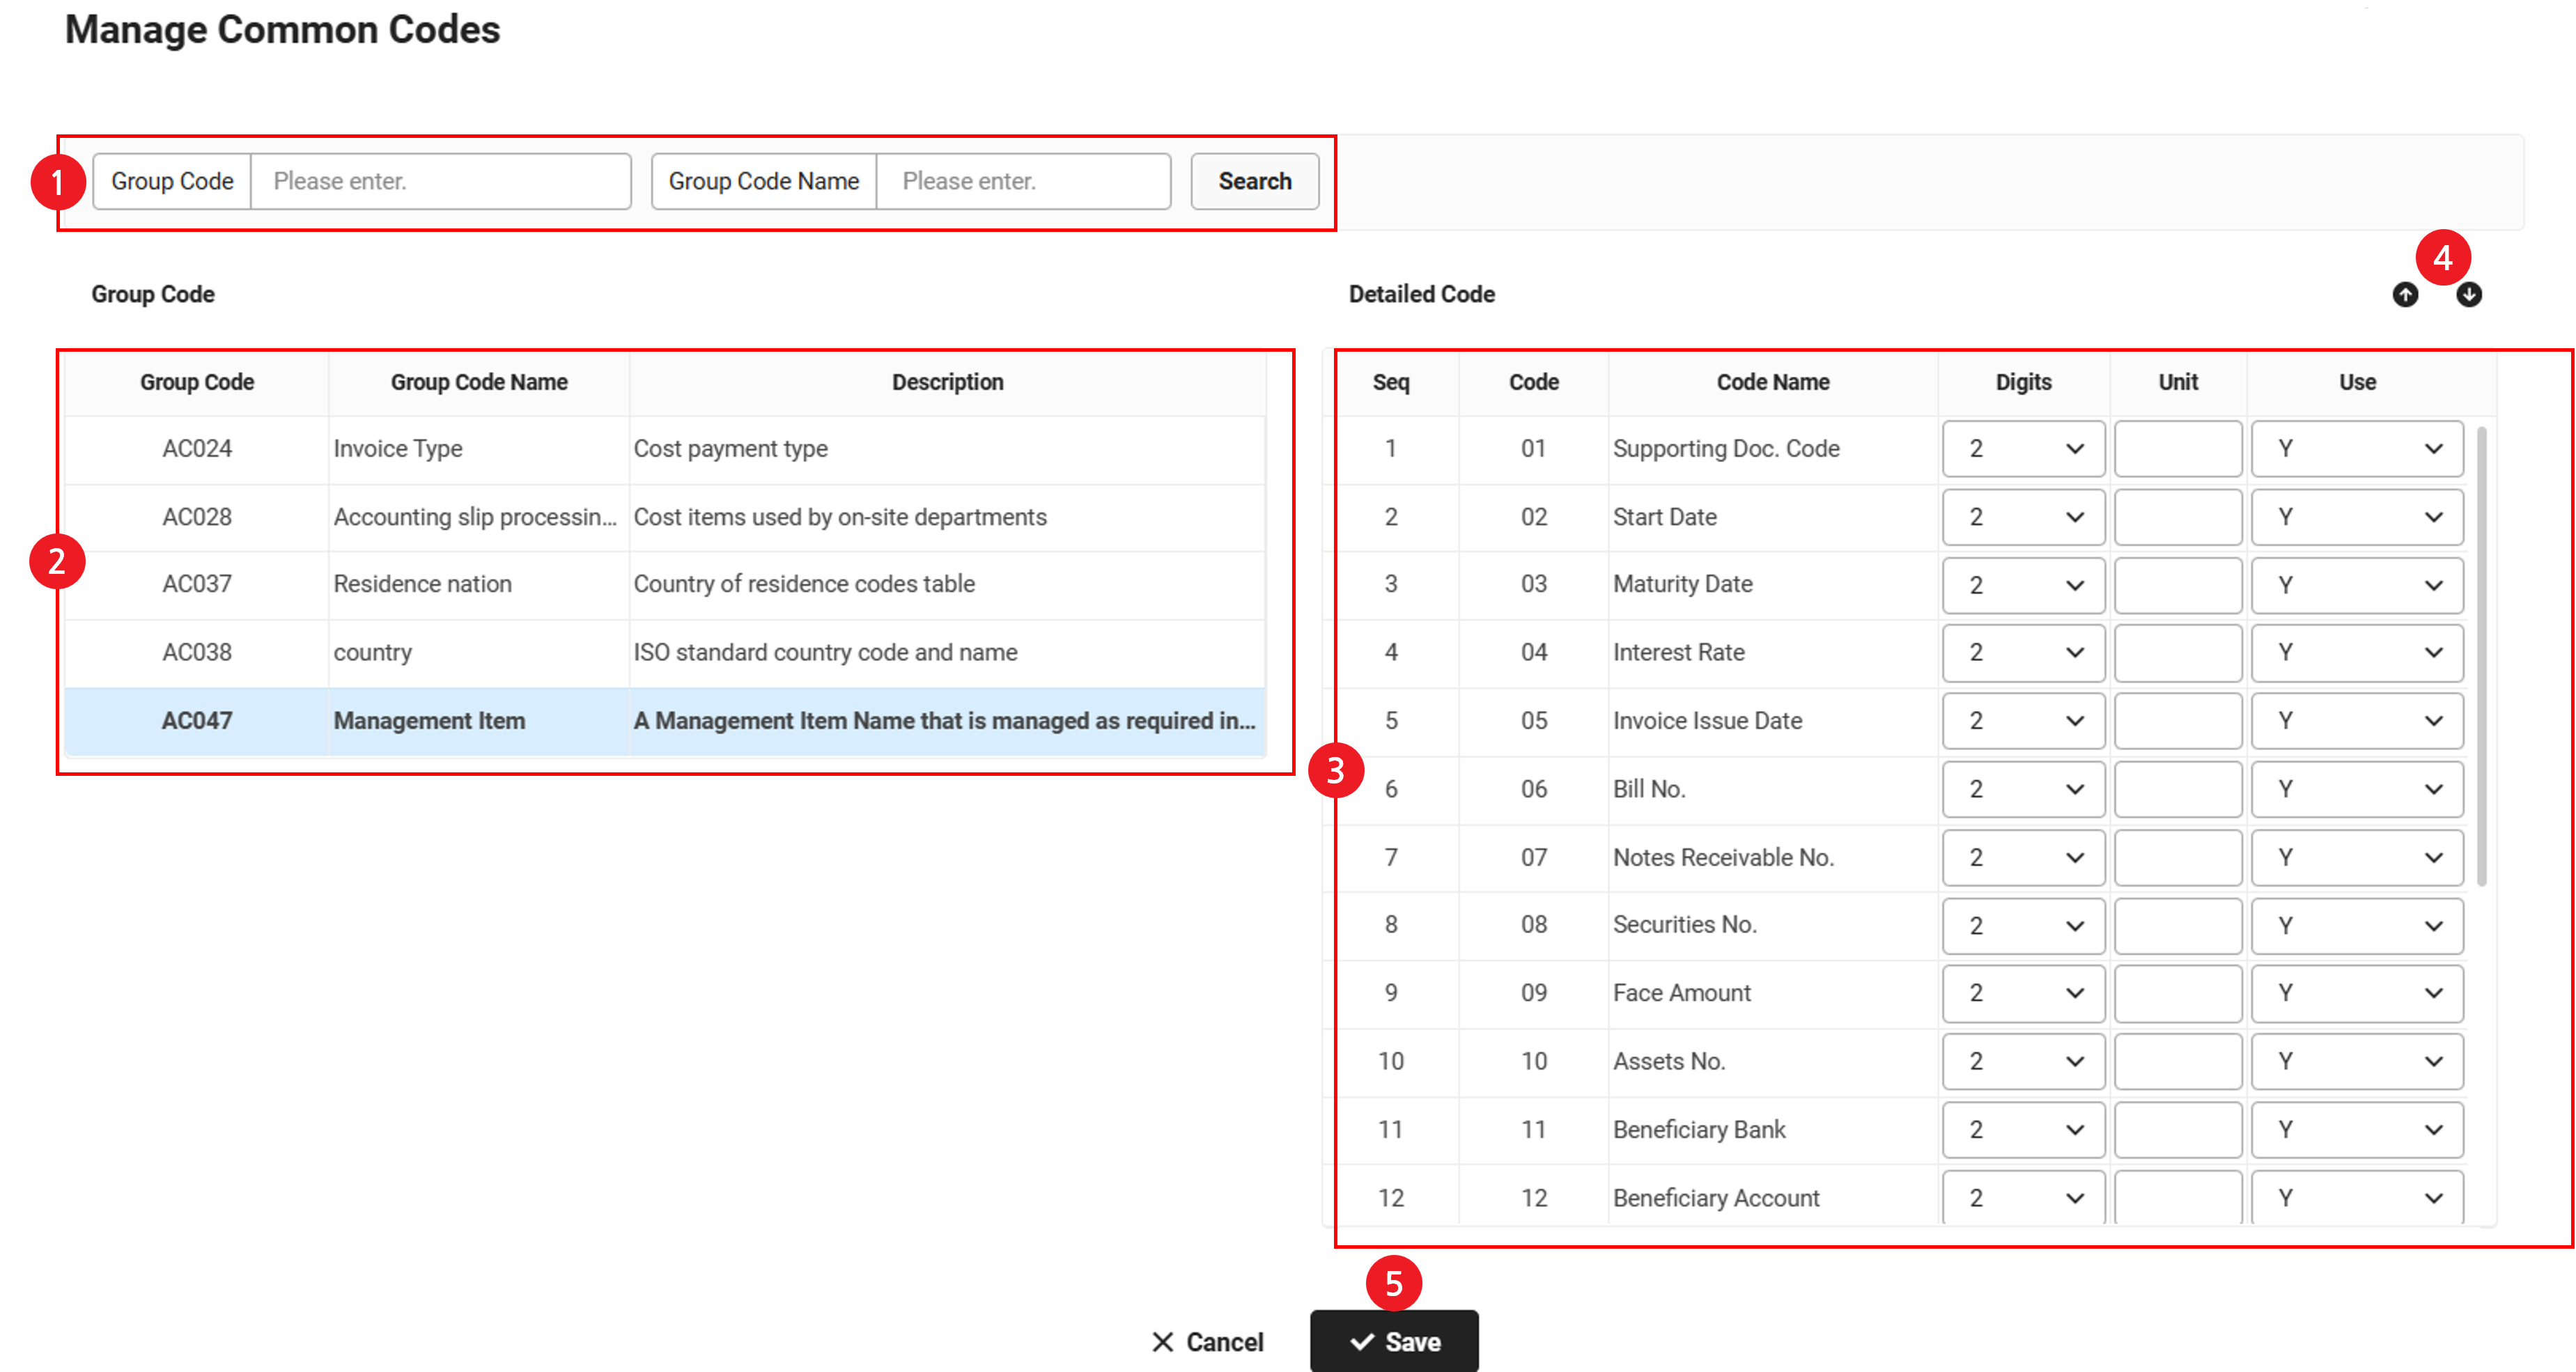
| Area | Description |
|---|---|
| ① Search Window | Search common codes by conditions of group code and group code name |
| ② List of Group Codes | It displays the provided group codes Click each group code to view the detailed codes that belong to it |
| ③ List of Detailed Codes | It displays the detailed codes that belong to the selected group code Digits, units, and used values can be modified |
| ④ Change Order of Detailed Codes | Changes the order in which the detailed code is displayed in the list upon clicking it |
| ⑤ Click save. | Click to save the edited content |
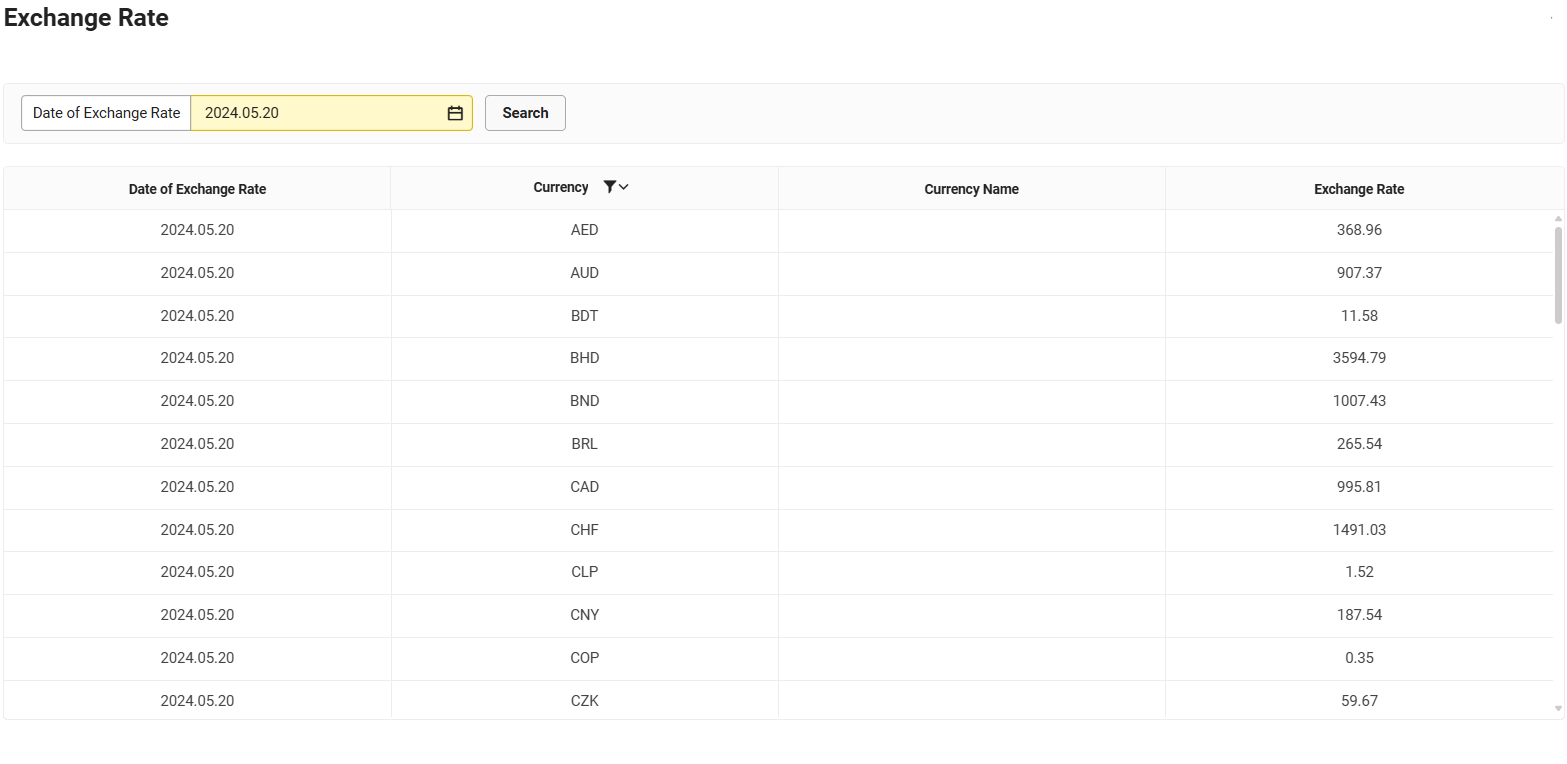
Check Exchange Rate
You can view exchange rates by date based on the exchange rate information announced by KEB Hana Bank.Exchange rates for the reporting currency set in the ‘Accounting > Settings > Accounting Settings’ menus are displayed.
To check exchange rates, click ‘Manage Standard Information > Check Exchange Rate’ in the ‘Accounting’ menu on the PC web page.