You can check the receivables/payables status of the company and perform accounting tasks by creating related slips. You can also create purchase and sales data by scraping invoice and cash receipt data from National Tax Service (NTS) Hometax.
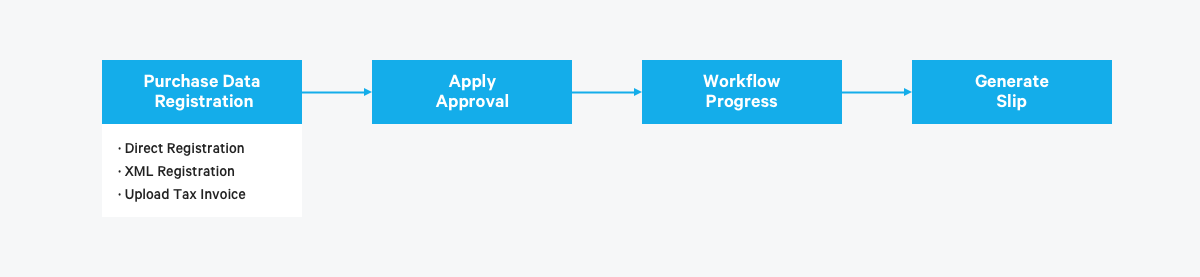
Create/View Purchase Data
You can register new purchase data and view registered purchase data. The registered purchase data is integrated to the Purchase Price Settlement Request form where you can manually request
approval and create the slips of the sales data created. In case of using the Electronic Tax Invoice service, you can request a reverse issuance of tax invoice for purchase data.
Register Data
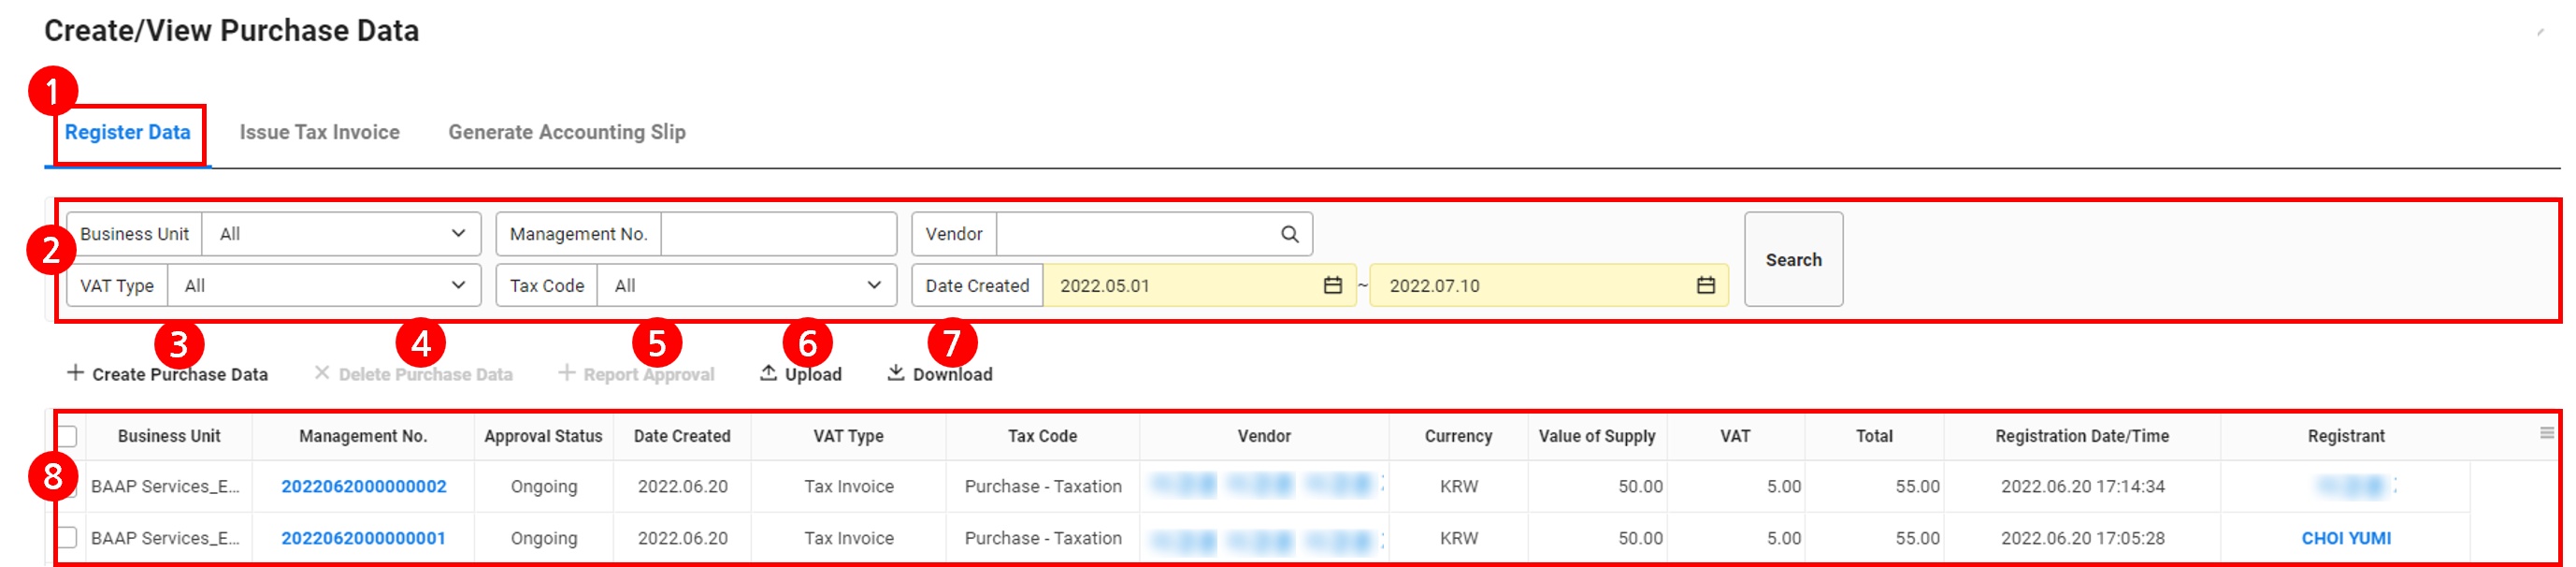
The Create Purchase Data page is laid out as follows.
| Area | Description |
|---|---|
| ① Content tab | Register purchase data by clicking the Register Data tab |
| ② Search window | Search purchase data according to the creation date, business place, vendor, VAT type, tax code, approval status, slip number, and approval document conditions |
| ③ Create Purchase Data | Create new purchase data (See Create Purchase Data) |
| ④ Delete Purchase Data | Delete the selected purchase data (See Delete Purchase Data) |
| ⑤ Report Approval | Report the approval of the selected purchase data (See Report Approval of Purchase Data) |
| ⑥ Upload | Bulk upload purchase data by using an Excel template (See Bulk Upload Purchase Data) |
| ⑦ Download | Download the list of purchased materials as an Excel file |
| ⑧ Purchase data list | Check the purchase data in the list View the data for which a tax invoice has been issued or a slip has been created in the ‘Issue Tax Invoice’ tab or ‘Create Slip’ tab
|
How to Register Purchase Data
You can register new purchase data using one of the following 5 methods. You can only register data if the month of the data to be registered hasn't been closed in the ‘Accounting Service > Settlement/Financial Statement > Monthly Closing’ menu.
- Register Purchase Data Manually
- Upload Purchase XML File
- Import Purchase Tax Invoice
- Register Scraped Purchase
- Bulk Upload Purchase Data
Register Purchase Data Manually
The following describes how to manually register purchase data.
- Click the ‘Admin Menu’ at the top right of the PC web screen, and then click ‘Accounting’ in the pop-up window.
- Click
 at the top left of the screen.
 - Click ‘Manage Receivables/Payables > Create/View Purchase Data’ from the menu.
- Click ‘Create Purchase Data’.
- Enter purchase data information in the Basic Information area.
- For Business Place, select the tax filing business place.
- Creation Date is the transaction date of eligible documented evidence and is also used as the date of purchase slip creation.
- By referring to the following table, select VAT Type and Tax Code, and enter details.
VAT Type Tax Code Entered Details by Tax Code Tax Invoice Purchase - Taxation
Purchase - Zero Tax- Submission Date: Enter the transaction date of eligible documented evidence (date of tax invoice issuance)
The entered submission date is used as the date of sales slip creation - Tax Invoice Type: Select whether the tax invoice is electronic or handwritten
- Issuance Type: Select forward issuance or reverse issuance status.
Purchase - Tax Exemption - Submission Date: Enter the transaction date of eligible documented evidence (date of tax invoice issuance)
The entered submission date is used as the date of sales slip creation - Tax Invoice Type: Select whether the tax invoice is electronic or handwritten
- Issuance Type: Select forward issuance or reverse issuance status.
- Deeming Type Classification: Select the deeming type classification
If you don't report VAT using the deemed input tax report or deemed input tax report for recycling waste resources and used cars, then select ‘Not Applicable’ - Purchase (Acquisition Amount): Enter the purchase amount before applying the deducted tax rate
- Deducted Tax Rate/Deeming (Deducted Tax): This item is automatically entered according to the deemed input tax rate set in the ‘Accounting > Settings > Set Accounting’ menu
If the deemed input settings are not displayed, then set them in the ‘Business Support Settings > Company Information > Manage Business Place’ menu.
Purchase - Nondeductible - Submission Date: Enter the transaction date of eligible documented evidence (date of tax invoice issuance)
The entered submission date is used as the date of sales slip creation - Tax Invoice Type: Select whether the tax invoice is electronic or handwritten
- Issuance Type: Select forward issuance or reverse issuance status.
- Reason for No Deduction (Right Side of Tax Code): Select the reason for no deduction
Credit Card Purchase - Card Taxation
Purchase - Card Zero Tax- Card Type: Select the purchase card type
- Card Number: Enter the purchase card number
Purchase - Card Tax Exemption - Card Type: Select the purchase card type
- Card Number: Enter the purchase card number
- Deeming Type Classification: Select the deeming type classification
If you don't report VAT using the deemed input tax report or deemed input tax report for recycling waste resources and used cars, then select ‘Not Applicable’ - Purchase (Acquisition Amount): Enter the purchase amount before applying the deducted tax rate
- Deducted Tax Rate/Deeming (Deducted Tax): This item is automatically entered according to the deemed input tax rate set in the ‘Accounting > Settings > Set Accounting’ menu
If the deemed input settings are not displayed, then set them in the ‘Business Support Settings > Company Information > Manage Business Place’ menu.
Invoice Purchase - Tax Exemption - Submission Date: Enter the transaction date of eligible documented evidence (date of tax invoice issuance)
The entered submission date is used as the date of sales slip creation - Tax Invoice Type: Select whether the tax invoice is electronic or handwritten
- Issuance Type: Select forward issuance or reverse issuance status.
- Deeming Type Classification: Select the deeming type classification
If you don't report VAT using the deemed input tax report or deemed input tax report for recycling waste resources and used cars, then select ‘Not Applicable’ - Purchase (Acquisition Amount): Enter the purchase amount before applying the deducted tax rate
- Deducted Tax Rate/Deeming (Deducted Tax): This item is automatically entered according to the deemed input tax rate set in the ‘Accounting > Settings > Set Accounting’ menu
If the deemed input settings are not displayed, then set them in the ‘Business Support Settings > Company Information > Manage Business Place’ menu.
Cash Receipt Purchase - Cash Taxation - Click ‘Import Cash Receipt’ and upload by selecting cash receipt.
Purchase - Cash Tax Exemption - Click ‘Import Cash Receipt’ and select the cash receipt to upload
- Deeming Type Classification: Select the deeming type classification
If you don't report VAT using the deemed input tax report or deemed input tax report for recycling waste resources and used cars, then select ‘Not Applicable’ - Purchase (Acquisition Amount): Enter the purchase amount before applying the deducted tax rate
- Deducted Tax Rate/Deeming (Deducted Tax): This item is automatically entered according to the deemed input tax rate set in the ‘Accounting > Settings > Set Accounting’ menu
If the deemed input settings are not displayed, then set them in the ‘Business Support Settings > Company Information > Manage Business Place’ menu.
Other Purchase - Import - Purchase - No Evidence - Deeming Type Classification: Select the deeming type classification
If you don't report VAT using the deemed input tax report or deemed input tax report for recycling waste resources and used cars, then select ‘Not Applicable’ - Purchase (Acquisition Amount): Enter the purchase amount before applying the deducted tax rate
- Deducted Tax Rate/Deeming (Deducted Tax): This item is automatically entered according to the deemed input tax rate set in the ‘Accounting > Settings > Set Accounting’ menu
If the deemed input settings are not displayed, then set them in the ‘Business Support Settings > Company Information > Manage Business Place’ menu.
- Submission Date: Enter the transaction date of eligible documented evidence (date of tax invoice issuance)
- After entering Asset Type, Remarks, and Vendor information, click the ‘Attach File’ button to attach eligible documented evidence.
- Enter remarks for purchase registration in Remarks. Entered details are displayed in the Additional Notes field of slip details history.
- Search and select the vendor (place of purchase, supplier) for purchase registration in Vendor.
- Vendor Manager Name, Contacts, Emails are the items required for the issuance of tax invoice. Please enter the information of the vendor manager.
- Enter the purchase details in the Details field.
- Click the ‘Add’ button to add history.
- Enter the specifications, quantity, unit price, supply value, VAT, and remarks for each item.
- When selecting the VAT type as Invoice, the VAT field is not provided.
- Search and select the expense account or asset account in Account Title.
- If you add purchase details, then the total amount of supply value and VAT is displayed in Details.
- Total = Supply value + VAT
- If the company has set project to ‘Use’, then search and select the project.
- You can add projects in the Manage Project Code menu.
- The Budget item is displayed if you've set the budget usage status in the ‘Accounting > Settings’ menu to ‘Use’. To use the budget, click
 to view and select the available budget.
- Only budgets that match the account title, department (affiliated department), and project (optional) entered will be searched.
- Check the available amount.
- If you've set Budget Control Status to ‘Yes’, then the budget can't be used if the sum of the supply value and VAT entered exceeds the available budget.
- Check the available amount.
- Only budgets that match the account title, department (affiliated department), and project (optional) entered will be searched.
- Click the ‘Add’ button to add history.
- Click ‘Save’ and then click ‘Yes’ in the notification pop-up window.
- Purchase data is created.
The additional description of each tax code is as follows.
- Purchase - Taxation: purchase of amount with tax invoice received, where the purchase tax is deducted (VAT rate 10%)
- Purchase - Zero Tax: purchase of amount with tax invoice received at zero tax rate (VAT rate 0%)
- Purchase - Tax Exemption: sales of amount with invoice received related to tax exemption (VAT rate 0%)
- Purchase - Nondeductible: tax invoice where the purchase tax is not deductible (VAT rate 10%)
- Purchase - Card Taxation: sales of amount with card slip received, where the sales tax is deductible (VAT rate 10%)
- Purchase - Card Tax Exemption: tax exempt purchase by credit card (VAT rate 0%)
- Purchase - Card Zero Tax: purchase by credit card at zero tax rate (VAT rate 0%)
- Purchase - Cash Taxation: sales of amount with cash receipt received, where the sales tax is deductible (VAT rate 10%)
- Purchase - Cash Tax Exemption: tax exempt purchase by cash receipt (VAT rate 0%)
- Purchase - Import: import of goods of amount with import tax invoice received, issued by the customs director (VAT rate 0%)
- Purchase - No Evidence tax exempt purchase with regular receipt not received (VAT rate 0%)
Upload Purchase XML File
You can create purchase data by uploading purchase tax invoices in the XML format received via email.
The following describes how to create purchase data by uploading XML files.
- Click the ‘Admin Menu’ at the top right of the PC web screen, and then click ‘Accounting’ in the pop-up window.
- Click at the top left of the screen.
- Click ‘Manage Receivables/Payables > Create/View Purchase Data’ from the menu.
- Click ‘Create Purchase Data’.
- Enter purchase data information in the Basic Information area.
- Creation Date is the transaction date of eligible documented evidence and is also used as the date of purchase slip creation.
- Select Tax Invoice for VAT Type, and then select Tax Code.
- Click ‘Register XML’.
- XML data is also used in ‘Accounting Service > Manage Tax > Register Hometax Data’.
- Click ‘Attach File’, upload the tax invoice in the XML format, and then click ‘Save’.
- Vendor Manager Name, Contacts, Emails are the items required for the issuance of tax invoice. Please enter the information of the vendor manager.
- Enter the purchase details in the Details field.
- Click ‘Add’ to add history.
- Click ‘Save’ and then click ‘Yes’ in the notification pop-up window.
- Purchase data is created.
Import Purchase Tax Invoice
You can create purchase data by importing tax invoices registered in the ‘Accounting > Manage Tax > Register Hometax Data’ menu.
The following describes how to create purchase data by importing tax invoices.
- Click the ‘Admin Menu’ at the top right of the PC web screen, and then click ‘Accounting’ in the pop-up window.
- Click at the top left of the screen.
- Click ‘Manage Receivables/Payables > Create/View Purchase Data’ from the menu.
- Click ‘Create Purchase Data’.
- Enter purchase data information in the Basic Information area.
- Creation Date is the transaction date of eligible documented evidence and is also used as the date of purchase slip creation.
- Select Tax Invoice for VAT Type, and then select Tax Code.
- You can check whether accounting VAT data is processed in the ‘Register Hometax Data’ menu.
- Click ‘Import Tax Invoice’.
- Select the tax invoice to be imported from the Electronic Tax Invoice List pop-up window, and click ‘Complete’.
You can search the tax invoice that you want according to Business Place and Vendor conditions. - Vendor Manager Name, Contacts, Emails are the items required for the issuance of tax invoice. Please enter the information of the vendor manager.
- Enter the purchase details in the Details field.
- Click ‘Add’ to add history.
- Click ‘Save’ and then click ‘Yes’ in the notification pop-up window.
- Purchase data is created.
Bulk Upload Purchase Data
You can bulk upload various purchase data using an Excel template. This feature can be used if you don't use eligible documented evidence data of NTS, register corporate card usage history that is not included in NTS data, or register purchase without documented evidence.
The following describes how to bulk upload purchase data using an Excel template.
- Click the ‘Admin Menu’ at the top right of the PC web screen, and then click ‘Accounting’ in the pop-up window.
- Click at the top left of the screen.
- Click ‘Register Data’ tab of the ‘Manage Receivables/Payables > Create/View Purchase Data’ from the menu.
- Click ‘Upload’.
- Click ‘Download Template File’ in the Upload pop-up window to download the template.
- Enter the purchase history according to the template, and save the file.
- The displayed fields are required fields. The value of Quantity 1 and Unit Price 1 columns must not be 0.
- For account titles that can be entered, see the ‘Accounting > Settings > Manage Account Titles’ menu.
- If the VAT type is Tax Invoice, then the Vendor Name column and Business Registration Number column are required fields.
- If the asset status is Y, then the Asset Type column is a required field.
- If the tax code is Purchase - Nondeductible, then the Reason for No Deduction column is a required field.
- If the business number is not registered as a vendor, then a new vendor is created automatically when uploading the Excel file.
- If the business number is not entered for a VAT type other then tax invoice, then the vendor is specified as the common vendor.
- Account titles can be added through the Manage Receivables/Payables field of the Manage Account Titles menu. (See Add Account Title)
- Vendor Manager Name, Contacts, Emails are the items required for the issuance of tax invoice. Please enter the information of the vendor manager.
- Select Business Place in the Upload pop-up window, and click ‘Attach File’ to upload the template file created.
- Click ‘Save’, and click ‘Yes’.
- Purchase data is bulk uploaded.
Check Purchase Data Details
You can check the details of purchase data, modify details, or report approval.
The following describes how to check the details of purchase data.
- Click the ‘Admin Menu’ at the top right of the PC web screen, and then click ‘Accounting’ in the pop-up window.
- Click at the top left of the screen.
- Click ‘Register Data’ tab of the ‘Manage Receivables/Payables > Create/View Purchase Data’ from the menu.
- Click the Management Number of the purchase data to check the details.
- View the details by referring to the below.
- Click ‘Save’ to save the modified content.
- Clicking ‘Report Approval’ will report approval of the purchase data.
- Cancel Reverse Issuance: In case of using the Electronic Tax Invoice service, you can cancel the request for the issuance of the data for reverse tax invoice issuance.
Report Approval of Purchase Data
You can report approval of the purchase data created.
You can only process approval if the month of the data to be registered hasn't been closed in the ‘Accounting > Settlement/Financial Statement > Monthly Closing’ menu.
The following describes how to report approval of purchase data.
- Click the ‘Admin Menu’ at the top right of the PC web screen, and then click ‘Accounting’ in the pop-up window.
- Click at the top left of the screen.
- Click ‘Register Data’ tab of the ‘Manage Receivables/Payables > Create/View Purchase Data’ from the menu.
- Select the purchase data to report approval for, and click ‘Report Approval’.
- In the notification pop-up window, click ‘Yes’.
- Enter the title and reason in the Purchase Price Settlement Request form.
- If necessary, then click ‘Attach File’ to attach additional documented evidence data.
- Specify the approval line and sharing options, and click ‘Report’.
- Approval is reported, and the approval status is changed to ‘In Progress’ in the Create/View Purchase Data menu.
- When approval is completed, purchase slips are created separately by eligible documented evidence, transaction date, vendor, and currency of the selected purchase data. You can check a slip by clicking the Slip Number in the ‘Create/View Purchase Data’ menu.
- Different groups will generate multiple slips.
Delete Purchase Data
Purchase data can be deleted before reporting approval. You can't delete purchase data if the approval status is ‘In Progress’ or ‘Completed’.
The following describes how to delete purchase data.
- Click the ‘Admin Menu’ at the top right of the PC web screen, and then click ‘Accounting’ in the pop-up window.
- Click at the top left of the screen.
- Click ‘Register Data’ tab of the ‘Manage Receivables/Payables > Create/View Purchase Data’ from the menu.
- Select the purchase data to be deleted, and click ‘Delete Purchase Data’.
- In the notification pop-up window, click ‘Yes’.
- The purchase data is deleted.
Issue Tax Invoice
You can request a reverse issuance of tax invoice for the approved purchase data.
- The ‘Issue Tax Invoice’ tab is displayed only when the you use the Electronic Tax Invoice service.
- On the ‘Create/View Purchase Data’ page, you can request for the reverse issuance of tax invoice for the purchase data with the issuance type classified as Reverse Issuance.
The Request Issuance page is laid out as follows.
| Area | Description |
|---|---|
| ① Content tab | Click the Issue Tax Invoice tab to request for reverse issuance of the invoice |
| ② Search window | Search purchase data according to the business place, management number, vendor, approval document, approval number and creation date conditions |
| ③ Request Reverse Issuance | Request Reverse Issuance for the tax invoice of purchase data |
| ④ Cancel reverse issuance | Cancel the issuance request of tax invoice for the purchase data with the issuance status at ‘Request’ |
| ⑤ Download | Download the list of purchased materials as an Excel file |
| ⑥ Purchase data list | Check purchase data of which the approval and VAT type is ‘tax invoice’ in a list
|
Request Reverse Issuance
The following describes how to request for the reverse issuance of tax invoice of purchase data.
- Click the ‘Admin Menu’ at the top right of the PC web screen, and then click ‘Accounting’ in the pop-up window.
- Click at the top left of the screen.
- Click the ‘Manage Receivables/Payables > Create/View Purchase Data > Issue Tax Invoice’ tab from the menu.
- Select the purchase data to request issuance, and click ‘Request Reverse Issuance’.
- You can cancel the issuance request of purchase data with the issuance status at Request by clicking ‘Cancel Reverse Issuance’.
- Click 'Yes'.
- You can check the tax invoice requested to be issued in the ‘Reverse Issuance’ tab on the ‘Electronic Tax Invoice Service > Manage Issuance > Manage Issuance Request’.
Cancel Reverse Issuance Request
The following describes how to cancel the reverse issuance request of tax invoice of purchase data that is requested to be issued.
- Click the ‘Admin Menu’ at the top right of the PC web screen, and then click ‘Accounting’ in the pop-up window.
- Click at the top left of the screen.
- Click the ‘Manage Receivables/Payables > Create/View Purchase Data > Issue Tax Invoice’ tab from the menu.
- Select the purchase data with the issuance status at Request, and click ‘Cancel Reverse Issuance’.
- Click 'Yes'.
Create Slip
You can create a slip for the approved purchase data or the one for which tax invoices have been issued (when using the Electronic Tax Invoice service).
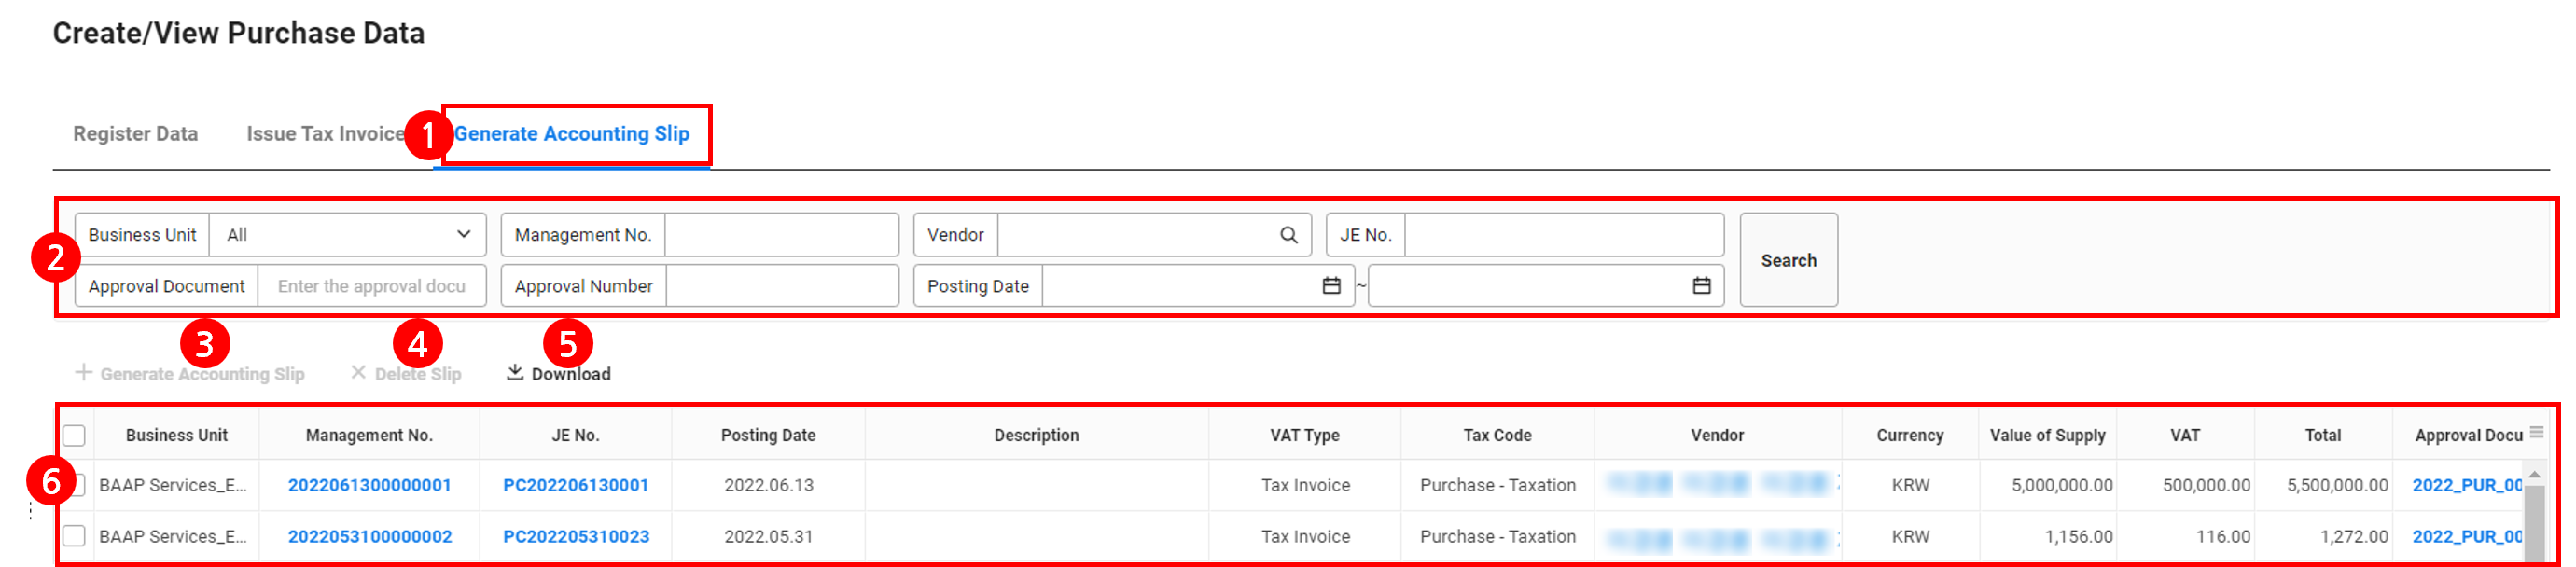
The Create Slip page of purchase data is laid out as follows.
| Area | Description |
|---|---|
| ① Content tab | Create purchase data by clicking the Create Slip tab |
| ② Search window | Search purchase data according to the business place, management number, vendor, slip number, approval document, approval number and creation date conditions |
| ③ Create slip | Click and manually create slips for purchase data |
| ④ Delete Slip | Delete the selected purchase slip |
| ⑤ Download | Download the list of purchased materials as an Excel file |
| ⑥ Purchase data list | Check the approved purchase data in a list
|
Create Purchase Slip
The approved purchase data can create slips.
The following describes how to create purchase slips.
- Click the ‘Admin Menu’ at the top right of the PC web screen, and then click ‘Accounting’ in the pop-up window.
- Click at the top left of the screen.
- Click ‘Create Slip’ tab of the ‘Manage Receivables/Payables > Create/View Purchase Data’ from the menu.
- Select the purchase data to create the slip for, and click ‘Create Slip’.
- Clicking ‘Yes’ to create a slip.
Delete Purchase Slip
If necessary, you can delete the created purchase slip. You can create a new purchase slip after deleting the purchase slip.
- If you need to modify a purchase slip, then delete the purchase slip and create it again by applying the content to be modified.
- You can't delete the slip if the month of the slip date (year and month) has been closed in the ‘Accounting > Settlement/Financial Statement > Monthly Closing’ menu.
The following describes how to delete purchase slips.
- Click the ‘Admin Menu’ at the top right of the PC web screen, and then click ‘Accounting’ in the pop-up window.
- Click at the top left of the screen.
- Click ‘Create Slip’ tab of the ‘Manage Receivables/Payables > Create/View Purchase Data’ from the menu.
- Select the purchase data to delete the slip for, and click ‘Delete Slip’.
- In the notification pop-up window, click ‘Yes’.
- The purchase slip is deleted.
Download Purchase Data List
The following describes how to download the purchase data list as an Excel file.
- Click the ‘Admin Menu’ at the top right of the PC web screen, and then click ‘Accounting’ in the pop-up window.
- Click at the top left of the screen.
- Click each tab in the ‘Manage Receivables/Payables > Create/View Purchase Data’ menu, in that order.
- If necessary, enter the purchase data conditions to be viewed in the search window, and click ‘Search’.
- You can view the list of purchase data that matches the entered conditions.
- Click 'Download'.
- The list of purchase data is downloaded as an Excel file.
Create/View Sales Data
You can register new sales data and view registered sales data. You can create slips using registered sales data or delete the created sales slips. In case of using the Electronic Tax Invoice service, you can request an issuance of tax invoice for sales data.
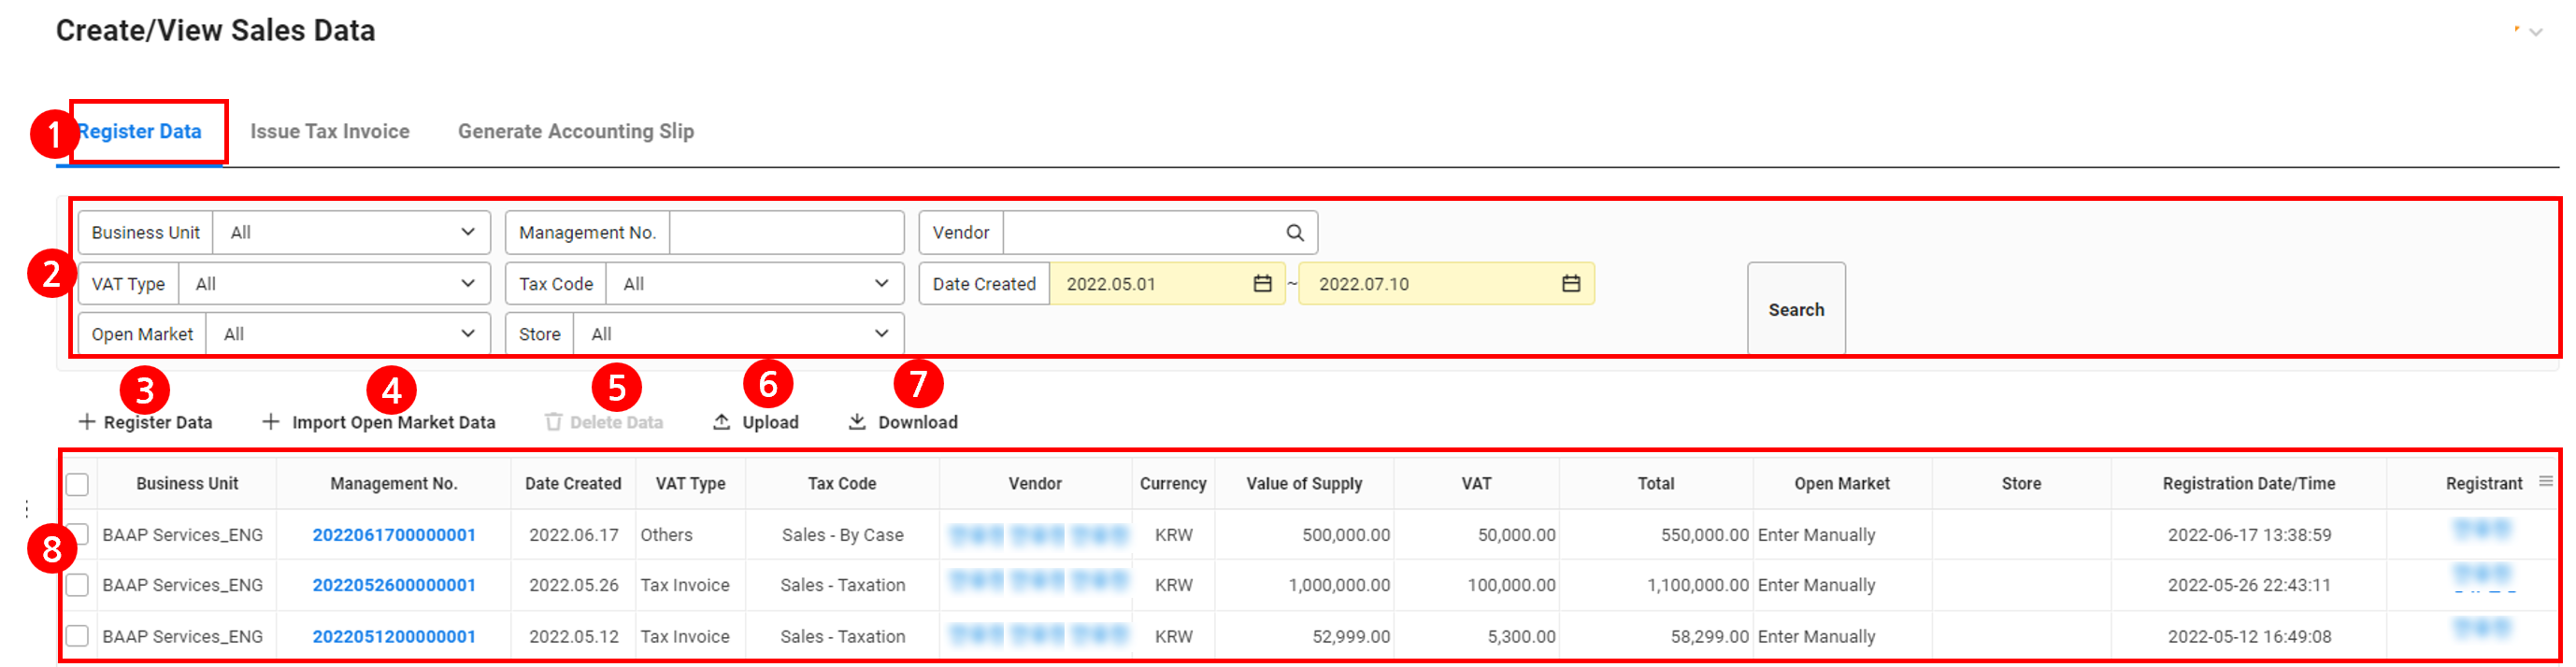
Register Data
The Register Sales Data page is laid out as follows.

| Area | Description |
|---|---|
| ① Content tab | Register sales data by clicking the ‘Register Data’ tab |
| ② Search window | Search sales data according to the business place, management number, vendor, VAT type, tax code and creation date conditions |
| ③ Create Sales Data | Create new sales data (See How to Register Sales Data) |
| ④ Delete Sales Data | Delete the selected sales data (See Delete Sales Data) |
| ⑤ Upload | Bulk upload sales data by using an Excel template (See Bulk Upload Sales Data) |
| ⑥ Download | Download the sales data list as an Excel file |
| ⑦ Print | Print the sales slip for the selected sales data (See Print Sales Slip) |
| ⑧ Sales data list | Check the sales data in a list View the data for which a tax invoice has been issued or a slip has been created in the ‘Issue Tax Invoice’ tab or ‘Create Slip’ tab
|
How to Register Sales Data
You can register new sales data using one of the following 5 methods.You can only register data if the month of the data to be registered hasn't been closed in the ‘Accounting > Settlement/Financial Statement > Monthly Closing’ menu.
- Register Sales Data Manually
- Upload Sales XML File
- Import Sales Tax Invoice
- Register Scraped Sales
- Bulk Upload Sales Data
Register Sales Data Manually
The following describes how to manually register sales data.
- Click the ‘Admin Menu’ at the top right of the PC web screen, and then click ‘Accounting’ in the pop-up window.
- Click at the top left of the screen.
- Click ‘Manage Receivables/Payables > Create/View Sales Data’ from the menu.
- Click ‘Create Sales Data’.
- Enter sales data information in the Basic Information area.
- For Business Place, select the tax filing business place.
- Creation Date is the transaction date of eligible documented evidence. It is also used as the date of sales slip creation.
- By referring to the following table, select VAT Type and Tax Code, and enter details.
VAT Type Tax Code Entered Details by Tax Code Tax Invoice Sales - Taxation
Sales - Tax Exemption- Submission Date: Enter the transaction date of eligible documented evidence (date of tax invoice issuance)
The entered submission date is used as the date of sales slip creation - Tax Invoice Type: Select whether the tax invoice is electronic or handwritten
- Issuance Type: Select forward issuance or reverse issuance status.
- Receipt/Claim Select receipt or claim
If you select Receipt, then click ‘View Advances’ and select the data registered with the advances account title (The advances selected when journalizing the sales slip account are cleared.) - Reason for Tax Invoice Modification: If the tax invoice has been modified, then enter the reason
- Original Invoice Number: Select Vendor, and select the original invoice number
You can check the original invoice number in the ‘Accounting > Manage Tax > Search Hometax Data’ menu.
Sales - Zero Tax - Submission Date: Enter the transaction date of eligible documented evidence (date of tax invoice issuance)
The entered submission date is used as the date of sales slip creation - Tax Invoice Type: Select whether the tax invoice is electronic or handwritten
- Issuance Type: Select forward issuance or reverse issuance status.
- Zero Tax Rate Type: Select the supply performance with zero tax rate applied necessary for creating the zero tax rate sales statement according to the type specified in the Value-added Tax Act and Restriction of Special Taxation Act
- Export Report Number: Enter the report number of the export performance statement
- Shipping Date: Enter the actual date on which exported goods were shipped (loaded)
- Foreign Currency Code: Enter the foreign currency code to receive the export price
- Exchange Rate: Enter the base exchange rate or arbitrage exchange rate according to the Foreign Exchange Transactions Act on the shipping (loading) date of exported goods
- Foreign Currency Supply Amount: Enter the total export amount to be received under the delivery conditions of exported goods to the nearest 2 decimal points (amount under Item 33 on the export declaration)
- Receipt/Claim Select receipt or claim
If you select Receipt, then click ‘View Advances’ and select the data registered with the advances account title (The advances selected when journalizing the sales slip account are cleared.) - Reason for Tax Invoice Modification: If the tax invoice has been modified, then enter the reason
- Original Invoice Number: Select Vendor, and select the original invoice number
You can check the original invoice number in the ‘Accounting > Manage Tax > Search Hometax Data’ menu.
Credit Card Sales - Card Taxation
Sales - Card Tax Exemption- Deposit Vendor: Enter the vendor (place of sales, supplier) of sales registration.
Sales - Card Zero Tax - Zero Tax Rate Type: Select the supply performance with zero tax rate applied necessary for creating the zero tax rate sales statement according to the type specified in the Value-added Tax Act and Restriction of Special Taxation Act
- Export Report Number: Enter the report number of the export performance statement
- Shipping Date: Enter the actual date on which exported goods were shipped (loaded)
- Foreign Currency Code: Enter the foreign currency code to receive the export price
- Exchange Rate: Enter the base exchange rate or arbitrage exchange rate according to the Foreign Exchange Transactions Act on the shipping (loading) date of exported goods
- Foreign Currency Supply Amount: Enter the total export amount to be received under the delivery conditions of exported goods to the nearest 2 decimal points (amount under Item 33 on the export declaration)
- Deposit Vendor: Enter the vendor (place of sales, supplier) of sales registration.
Invoice Sales - Tax Exemption - Submission Date: Enter the transaction date of eligible documented evidence (date of tax invoice issuance)
The entered submission date is used as the date of sales slip creation - Tax Invoice Type: Select whether the tax invoice is electronic or handwritten
- Issuance Type: Select forward issuance or reverse issuance status.
- Receipt/Claim Select receipt or claim
If you select Receipt, then click ‘View Advances’ and select the data registered with the advances account title (The advances selected when journalizing the sales slip account are cleared.) - Reason for Tax Invoice Modification: If the tax invoice has been modified, then enter the reason
- Original Invoice Number: Select Vendor, and select the original invoice number
You can check the original invoice number in the ‘Accounting > Manage Tax > Search Hometax Data’ menu.
Cash Receipt Sales - Cash Taxation
Sales - Cash Tax Exemption- Click ‘Import Cash Receipt’ and upload by selecting cash receipt.
Sales - Cash Zero Tax - Zero Tax Rate Type: Select the supply performance with zero tax rate applied necessary for creating the zero tax rate sales statement according to the type specified in the Value-added Tax Act and Restriction of Special Taxation Act
- Export Report Number: Enter the report number of the export performance statement
- Shipping Date: Enter the actual date on which exported goods were shipped (loaded)
- Foreign Currency Code: Enter the foreign currency code to receive the export price
- Exchange Rate: Enter the base exchange rate or arbitrage exchange rate according to the Foreign Exchange Transactions Act on the shipping (loading) date of exported goods
- Foreign Currency Supply Amount: Enter the total export amount to be received under the delivery conditions of exported goods to the nearest 2 decimal points (amount under Item 33 on the export declaration)
- Click ‘Import Cash Receipt’ and upload by selecting cash receipt.
Other Sales - By Case
Sales - No Evidence
Sales - Electronic Payment Method- Sales - Export - Zero Tax Rate Type: Select the supply performance with zero tax rate applied necessary for creating the zero tax rate sales statement according to the type specified in the Value-added Tax Act and Restriction of Special Taxation Act
- Export Report Number: Enter the report number of the export performance statement
- Shipping Date: Enter the actual date on which exported goods were shipped (loaded)
- Foreign Currency Code: Enter the foreign currency code to receive the export price
- Exchange Rate: Enter the base exchange rate or arbitrage exchange rate according to the Foreign Exchange Transactions Act on the shipping (loading) date of exported goods
- Foreign Currency Supply Amount: Enter the total export amount to be received under the delivery conditions of exported goods to the nearest 2 decimal points (amount under Item 33 on the export declaration)
- Submission Date: Enter the transaction date of eligible documented evidence (date of tax invoice issuance)
- After entering Asset Type, Remarks, and Vendor information, click the ‘Attach File’ to attach eligible documented evidence.
- Enter remarks for sales registration in Remarks. Entered details are displayed in the Additional Notes field of slip account journalizing.
- Search and select the vendor (place of sales, supplier) for sales registration in Vendor.
- Check the changes in Business Registration Number, CEO, Address, and Business Type/Category.
- Vendor Manager Name, Contacts, Emails are the items required for the issuance of tax invoice. Please enter the information of the vendor manager.
- Enter the detailed sales history in the Details field.
- Click ‘Add’ to add history.
- Account Title: Search and select the revenue account or the asset account.
- Item: You can enter it manually, or click to select from registered items. For the registration of item information, see the Business Support Settings > Common Codes > Manage Item Information menu.
- Enter the specifications, quantity, unit price, supply value, VAT, and remarks for each item.
- When selecting the VAT type as Invoice, the VAT field is not provided.
- If you add detailed sales history, then the total amount of supply value and VAT is displayed in Details.
- Total = Supply value + VAT
- Click ‘Add’ to add history.
- Click ‘Save’ and then click the ‘Yes’ button in the notification pop-up window.
- After saving, you can create a sales slip by clicking the [Create Sales Slip] button. (See Create Sales Slip)
The additional description of each tax code is as follows.
- Sales - Taxation: sales of amount with tax invoice received, where the sales tax is deducted (VAT rate 10%)
- Sales - Zero Tax: sales of amount with tax invoice received at zero tax rate (VAT rate 0%)
- Sales - Tax Exemption: sales of amount with invoice received related to tax exemption (VAT rate 0%)
- Sales - Nondeductible: tax invoice where the sales tax is not deductible (VAT rate 10%)
- Sales - Card Taxation: sales of amount with card slip received, where the sales tax is deductible (VAT rate 10%)
- Sales - Card Tax Exemption: tax exempt sales by credit card (VAT rate 0%)
- Sales - Card Zero Tax: sales by credit card at zero tax rate (VAT rate 0%)
- Sales - Cash Taxation: sales of amount with cash receipt received, where the sales tax is deductible (VAT rate 10%)
- Sales - Cash Tax Exemption: tax exempt sales by cash receipt (VAT rate 0%)
- Sales - Import: import of goods of amount with import tax invoice received, issued by the customs director (VAT rate 0%)
- Sales - No Evidence: tax exempt sales with regular receipt not received (VAT rate 0%)
Upload Sales XML File
You can create sales data by uploading sales tax invoices in the XML format received via email.
The following describes how to create sales data by uploading XML files.
- Click the ‘Admin Menu’ at the top right of the PC web screen, and then click ‘Accounting’ in the pop-up window.
- Click at the top left of the screen.
- Click ‘Manage Receivables/Payables > Create/View Sales Data’ from the menu.
- Click ‘Create Sales Data’.
- Enter sales data information in the Basic Information area.
- Creation Date is the transaction date of eligible documented evidence. It is also used as the date of sales slip creation.
- Select Tax Invoice for VAT Type, and then select Tax Code.
- Click ‘Register XML’.
- Click ‘Attach File’, upload the tax invoice in the XML format, and then click ‘Save’.
- Vendor Manager Name, Contacts, Emails are the items required for the issuance of tax invoice. Please enter the information of the vendor manager.
- Enter the detailed sales history in the Details field.
- Click ‘Add’ to add history. To add details, see Register Sales Data Manually.
- Click ‘Save’ and then click ‘Yes’ in the notification pop-up window.
- Sales data is created.
Import Sales Tax Invoice
You can create sales data by importing tax invoices registered in the ‘Accounting > Manage Tax > Register Hometax Data’ menu.
The following describes how to create sales data by importing tax invoices.
- Click the ‘Admin Menu’ at the top right of the PC web screen, and then click ‘Accounting’ in the pop-up window.
- Click at the top left of the screen.
- Click ‘Manage Receivables/Payables > Create/View Sales Data’ from the menu.
- Click ‘Create Sales Data’.
- Enter sales data information in the Basic Information area.
- Creation Date is the transaction date of eligible documented evidence. It is also used as the date of sales slip creation.
- Select Tax Invoice for VAT Type, and then select Tax Code.
- Click ‘Import Tax Invoice’.
- Select the tax invoice to be imported, and click ‘Complete’.
You can search the tax invoice that you want according to Business Place and Vendor conditions. - Vendor Manager Name, Contacts, Emails are the items required for the issuance of tax invoice. Please enter the information of the vendor manager.
- Enter the detailed sales history in the Details field.
- Click ‘Add’ to add history. To add details, see Register Sales Data Manually.
- Click ‘Save’ and then click ‘Yes’ in the notification pop-up window.
- Sales data is created.
Bulk Upload Sales Data
You can bulk upload various sales data using an Excel template. This feature can be used if you don't use eligible documented evidence data of National Tax Service, register corporate card usage history not included in National Tax Service data, or register sales without documented evidence.
The following describes how to bulk upload sales data using an Excel template.
- Click the ‘Admin Menu’ at the top right of the PC web screen, and then click ‘Accounting’ in the pop-up window.
- Click at the top left of the screen.
- Click ‘Manage Receivables/Payables > Create/View Sales Data’ from the menu.
- Click ‘Upload’.
- Click ‘Download Template File’ in the Upload pop-up window to download the template.
- Enter the sales history according to the template, and save the file.
- The displayed fields are required fields. The value of Quantity 1 and Unit Price 1 columns must not be 0.
- For account titles that can be entered, see the ‘Accounting > Settings > Manage Account Titles’ menu.
- If the receipt/claim type value is Receipt, then upload the Excel file and register the advances received in the Create Sales Data page.
- If the VAT type is Tax Invoice, then the Vendor Name column and Business Registration Number column are required fields.
- If the business number is not registered as a vendor, then a new vendor is created automatically when uploading the Excel file.
- If the business number is not entered for a VAT type other then tax invoice, then the vendor is specified as the common vendor.
- Vendor Manager Name, Contacts, Emails are the items required for the issuance of tax invoice. Please enter the information of the vendor manager.
- In the Upload pop-up window, select Business Place and click ‘Attach File’ to upload the file.
- Click ‘Save’, and click ‘Yes’.
- Sales data is bulk uploaded.
Check Sales Data Details
You can check the details of sales data, modify details, or create slips.
The following describes how to check the details of sales data.
- Click the ‘Admin Menu’ at the top right of the PC web screen, and then click ‘Accounting’ in the pop-up window.
- Click at the top left of the screen.
- Click ‘Register Data’ tab of the ‘Manage Receivables/Payables > Create/View Sales Data’ from the menu.
- Click the Management Number after selecting the sales data to check the details.
- View the details by referring to the below.
- Click ‘Save’ to save the modified content.
- Create Sales Slip: When using the Electronic Tax Invoice service, you can create a slip for the sales data after issuing tax invoice.
- Issuance Request: When using the Electronic Tax Invoice service, you can request the issuance of tax invoice.
- Cancel Issuance: When using the Electronic Tax Invoice service, you can cancel the issuance of tax invoice requested to be issued.
Delete Sales Data
Sales data can be deleted before creating slips. To delete sales data for which a sales slip has been created, the sales slip must be deleted first.
The following describes how to delete sales data.
- Click the ‘Admin Menu’ at the top right of the PC web screen, and then click ‘Accounting’ in the pop-up window.
- Click at the top left of the screen.
- Click ‘Manage Receivables/Payables > Create/View Sales Data’ from the menu.
- Select the sales data to be deleted, and click ‘Delete Sales Data’.
- From the notification pop-up window, click ‘Delete’.
- The sales data is deleted.
Download Sales Data List
The following describes how to download the sales data list as an Excel file.
- Click the ‘Admin Menu’ at the top right of the PC web screen, and then click ‘Accounting’ in the pop-up window.
- Click at the top left of the screen.
- Click ‘Register Data’ tab of the ‘Manage Receivables/Payables > Create/View Sales Data’ from the menu.
- If necessary, enter the sales data conditions to be viewed in the search window, and click ‘Search’.
- You can view the list of sales data that matches the entered conditions.
- Click 'Download'.
- The list of sales data is downloaded as an Excel file.
Print Sales Data
The following describes how to print the created sales data.
- Click the ‘Admin Menu’ at the top right of the PC web screen, and then click ‘Accounting’ in the pop-up window.
- Click at the top left of the screen.
- Click ‘Register Data’ tab of the ‘Manage Receivables/Payables > Create/View Sales Data’ from the menu.
- Select all sales data to print, and click ‘Print’.
- Check the details in the Print pop-up window, and click ‘Print’.
Issue Tax Invoice
You can request an issuance of tax invoice for the created sales data that requires the issuance of a tax invoice.
The Request Issuance page is laid out as follows.
| Area | Description |
|---|---|
| ① Content tab | Click the Issue Tax Invoice tab to request for the issuance of invoice |
| ② Search window | Search sales data according to business place, management number, vendor, issuance type, tax code and creation date conditions |
| ③ Request Issuance | Request Issuance for the tax invoice of sales data |
| ④ Cancel Issuance | Cancel the issuance request of tax invoice for the sales data with the issuance request |
| ⑤ Modify Sales | Issue modified tax invoice by reason for modification of sales data (See ‘Modify Sales’) |
| ⑥ Sales data list | Check sales data of which the VAT type is tax invoice in a list
|
Request Issuance
The following describes how to request for the issuance of tax invoice of sales data.
- Click the ‘Admin Menu’ at the top right of the PC web screen, and then click ‘Accounting’ in the pop-up window.
- Click at the top left of the screen.
- Click the ‘Manage Receivables/Payables > Create/View Sales Data > Issue Tax Invoice’ tab from the menu.
- Select the sales data to request issuance, and click ‘Request Issuance’.
- You can cancel the issuance request of sales data with the issuance status at Request by clicking ‘’Cancel Issuance’. (See ‘Cancel Issuance Request’)
- Click 'Yes'.
- You can check the tax invoice requested to be issued in the ‘Forward Issuance’ tab on the ‘Electronic Tax Invoice > Manage Issuance > Manage Issuance Request’.
Cancel Issuance Request
The following describes how to cancel the issuance request of tax invoice of sales data that is requested to be issued.
- Click the ‘Admin Menu’ at the top right of the PC web screen, and then click ‘Accounting’ in the pop-up window.
- Click at the top left of the screen.
- Click the ‘Manage Receivables/Payables > Create/View Sales Data > Issue Tax Invoice’ tab from the menu.
- Select the purchase data with the issuance status at Request, and click ‘Cancel Issuance’.
- Click 'Yes'.
Modify Sales
This is a feature that modifies sales if the issuance of modified tax invoice is necessary. If there is an electronic tax invoice sent to NTS among sales data, it cannot be canceled or modified so click ‘Modify Sales’ to request the issuance of modified tax invoice for appropriate modification reason and modified items.
The following describes how to modify sales.
- Click the ‘Admin Menu’ at the top right of the PC web screen, and then click ‘Accounting’ in the pop-up window.
- Click at the top left of the screen.
- Click ‘Issue Tax Invoice’ tab of the ‘Manage Receivables/Payables > Create/View Sales Data’ from the menu.
- Enter the conditions in the search window, and click ‘Search’.
- ‘Select the sales data to be modified and click Modified Issuance’.
- Click ‘OK’ in the confirmation pop-up window.
- Check the details and modify it, if necessary.
- Select the reason for modification.
- Editable items may vary according to the selected reason for modification.
- If the reason for modification is error correction of entered items and follow-up opening of the local letter of credit, the electronic tax invoice of negative (-) will be automatically created and issued in the Electronic Tax Invoice service.
Reason for Modification:

- Click
 to see the details of the reason for the modification.
 - Check the modified electronic tax invoice.
- If necessary, attach the file.
- Select the reason for modification.
Click 'Issue'. If the certificate is not registered at the business place or it does not match the one registered in SmartBill, it cannot be issued.Check the note box when issuing electronic tax invoices in the ‘Electronic Tax Invoice > Manage Issuance > New Issuance’ menu.
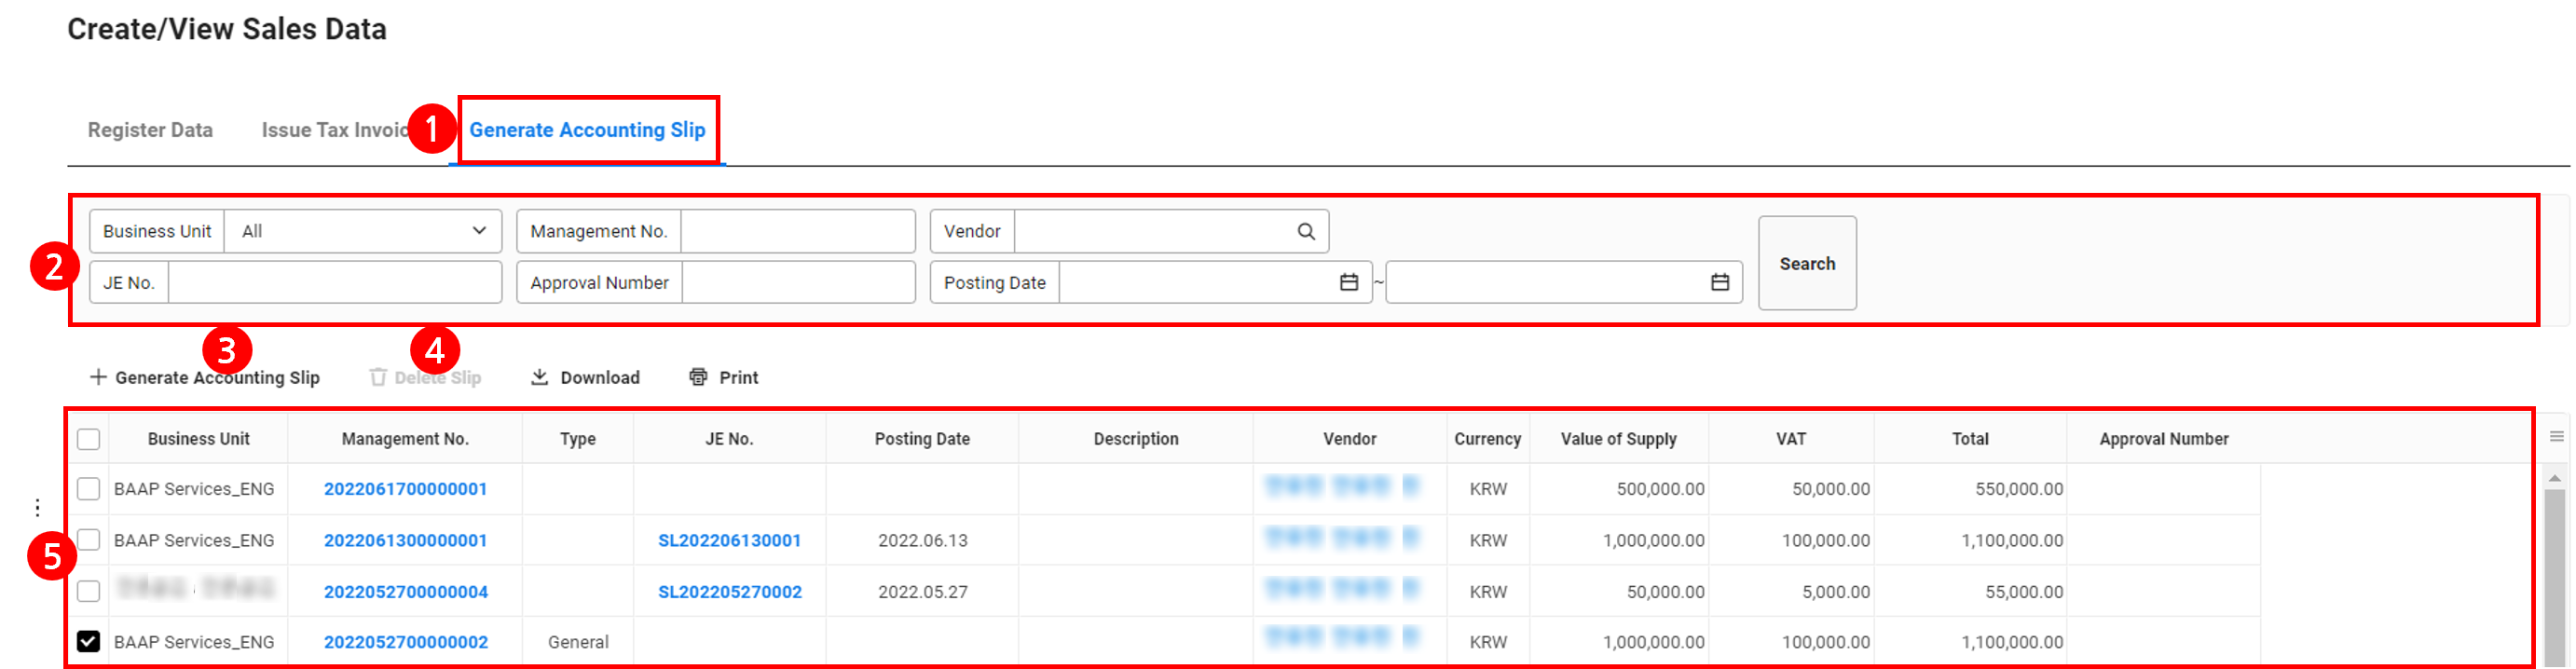
Create Slip
You can create a slip for the created sales data or the one for which tax invoices have been issued (when using the Electronic Tax Invoice service). You can only create sales slips if the month of the data registered hasn't been closed in the ‘Accounting > Settlement/Financial Statement > Monthly Closing’ menu.
The Create Slip page of sales data is laid out as follows.
| Area | Description |
|---|---|
| ① Content tab | Create sales data by clicking the ‘Create Slip’ tab |
| ② Search window | Search sales data according to the business place, management number, vendor, slip number, approval number, and creation date conditions |
| ③ Create Sales Slip | Create a sales slip for sales data |
| ④ Delete Sales Slip | Delete the sales slip of sales data |
| ⑤ Sales data list | Check the sales data in a list
|
Create Sales Slip
The following describes how to create sales slips.
- Click the ‘Admin Menu’ at the top right of the PC web screen, and then click ‘Accounting’ in the pop-up window.
- Click at the top left of the screen.
- Click ‘Create Slip’ tab of the ‘Manage Receivables/Payables > Create/View Sales Data’ from the menu.
- Select the sales data to create the slip for, and click ‘Create Sales Slip’.
- In the notification pop-up window, click ‘OK’ .
- When approval is completed, sales slips are created separately by eligible documented evidence, transaction date, vendor, and currency of the selected sales data. You can check a slip by clicking the Slip Number in the ‘Create/View Sales Data’ menu.
- Different groups will generate multiple slips.
- When approval is completed, sales slips are created separately by eligible documented evidence, transaction date, vendor, and currency of the selected sales data. You can check a slip by clicking the Slip Number in the ‘Create/View Sales Data’ menu.
Delete Sales Slip
You can delete the created sales slip. You can only delete sales slips if the month of the data registered hasn't been closed in the ‘Accounting > Settlement/Financial Statement > Monthly Closing’ menu. You can create a new sales slip after deleting.
- If you need to modify a sales slip, then delete the sales slip and create it again by applying the content to be modified.
- You can't delete the slip if the month of the slip date (year and month) has been closed in the ‘Accounting > Settlement/Financial Statement > Monthly Closing’ menu.
The following describes how to delete sales slips.
- Click the ‘Admin Menu’ at the top right of the PC web screen, and then click ‘Accounting’ in the pop-up window.
- Click at the top left of the screen.
- Click ‘Create Slip’ tab of the ‘Manage Receivables/Payables > Create/View Sales Data’ from the menu.
- Select the sales data to delete the slip for, and click ‘Delete Sales Slip’.
- From the notification pop-up window, click ‘Delete’.
- The sales slip is deleted.
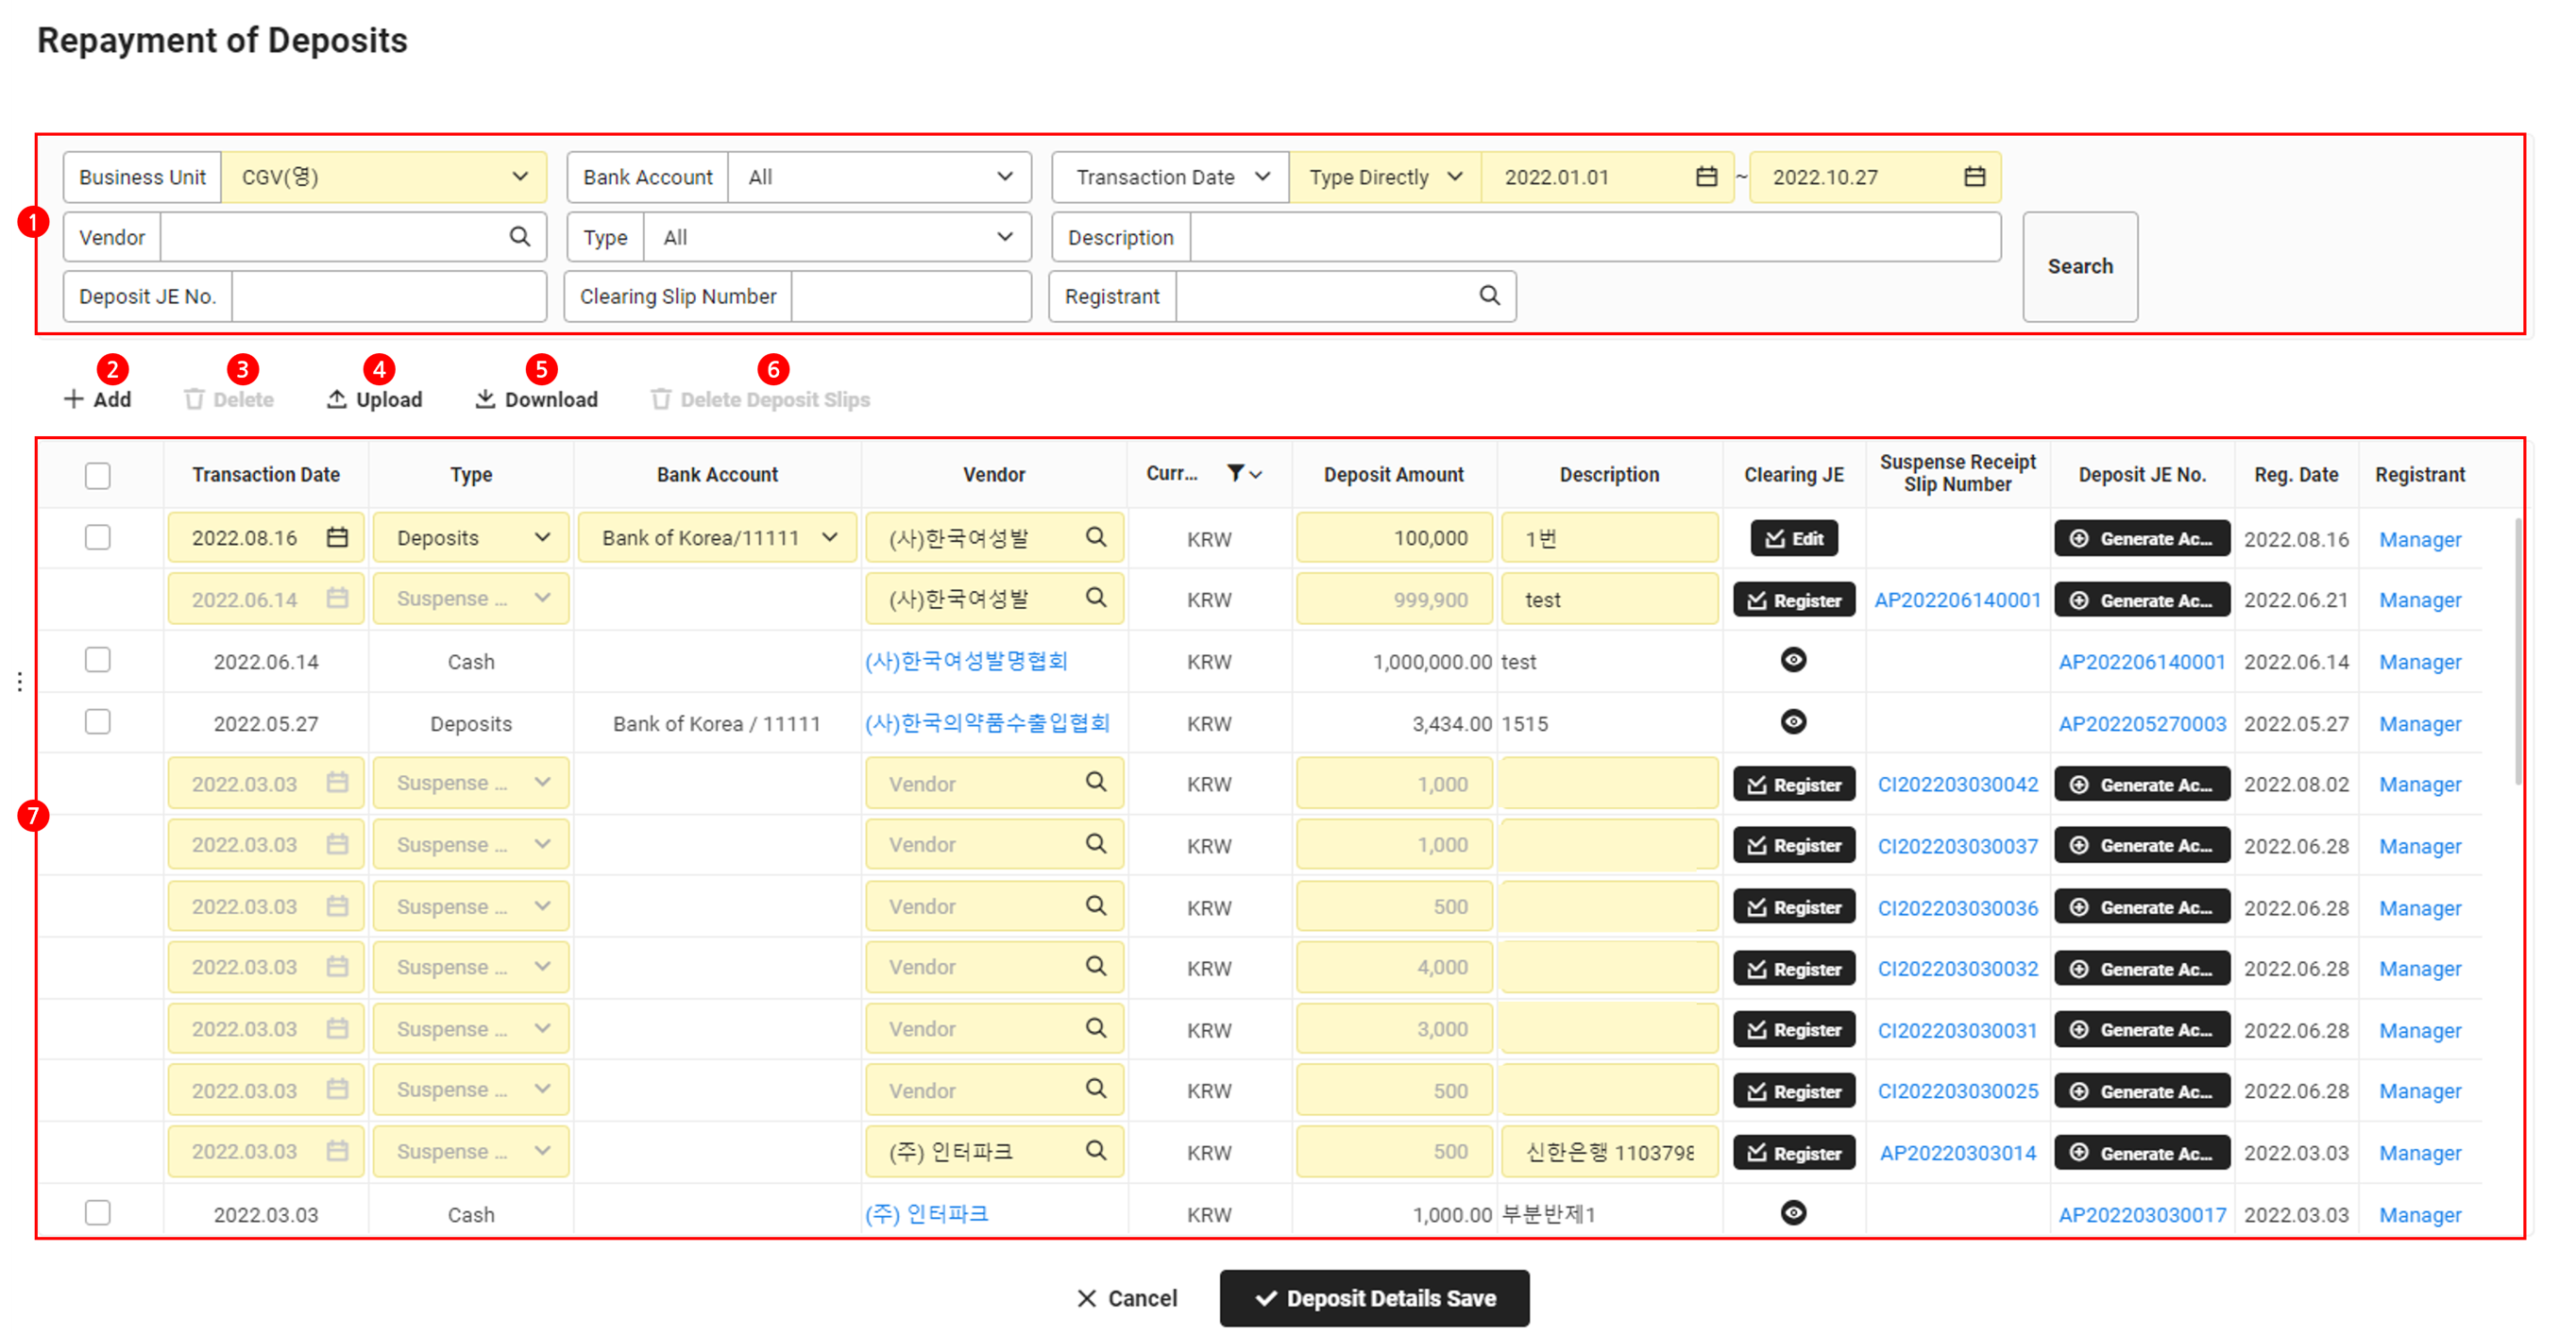
Clear Deposit
In the Clear Deposit menu, you can add deposit history and register clearing slips to process clearing. Deposit slips can be created for deposit history registered with clearing slips.
If you use Integrate Financial Account, then the automatically integrated deposit history and slips are displayed together.
The Clear Deposit page is laid out as follows.
| Area | Description |
|---|---|
| ① Search window | Search deposit history according to business place, company account, transaction date, vendor, type, notes, deposit slip number, clearing slip number, and registrant conditions |
| ② Add | Create new deposit history (See Add Deposit History) |
| ③ Delete | Delete the selected deposit history (See Delete Deposit History) |
| ④ Upload | Bulk upload deposit history by using an Excel template (See Bulk Upload Deposit History) |
| ⑤ Download | Download the deposit history list as an Excel file (See Download Deposit History List) |
| ⑥ Delete Deposit Slip | This button is activated when you select a history whose deposit slip is created. You can click it to delete the deposit slip (See Delete Deposit Slip) |
| ⑦ Deposit history list | It displays the deposit history in a list Slips can be created by clicking ‘Register’ in each column or ‘Create Slip’ (See Register Clearing Slip and Create Deposit Slip) You can check details of the user who registered the deposit history by clicking Registrant |
Add Deposit History
The following describes how to add a new deposit history.
- Click the ‘Admin Menu’ at the top right of the PC web screen, and then click ‘Accounting’ in the pop-up window.
- Click at the top left of the screen.
- Click ‘Manage Receivables/Payables > Clear Deposit’ from the menu.
- Click 'Add'.
- Enter the transaction date, type, company account, vendor, deposit amount, and notes information.
- Enter the deposit date in Transaction Date.
- Select the receipt type of receivables in Type.
- If you select ‘Deposit’ for Type, then select the bank account that received receivables in Company Account.You can select among bank accounts added in the ‘Integrate Bank/Account’ menu.
- If you select Promissory ‘Note’ for Type, then click
 to enter the promissory note information.
- Currency is displayed as the currency setting of the selected company account.
- Click ‘Save Deposit Details’.
- The deposit history is added.
Register Clearing Slip
The following describes how to register a clearing slip for registered deposit history.
- Click the ‘Admin Menu’ at the top right of the PC web screen, and then click ‘Accounting’ in the pop-up window.
- Click at the top left of the screen.
- Click ‘Manage Receivables/Payables > Clear Deposit’ from the menu.
- Select the deposit history to register the clearing slip for, and click ‘Register’.
- Select the slip to clear, and enter the clearing amount and fees.
- Click ‘Clear’, and click ‘Yes’.
- Click ‘Save Deposit Details’.
- ‘The button of the clearing slip changes to Modify’. You can modify the clearing slip by clicking this button.
Create Deposit Slip
The following describes how to create a deposit slip based on the deposit history registered with the clearing slip.
- Click the ‘Admin Menu’ at the top right of the PC web screen, and then click ‘Accounting’ in the pop-up window.
- Click at the top left of the screen.
- Click ‘Manage Receivables/Payables > Clear Deposit’ from the menu.
- Select the deposit history to create the deposit slip for, and click ‘Create Slip’.
- In the notification pop-up window, click ‘Yes’.
- The deposit slip is automatically created and added underneath the deposit history. The created deposit slip number is displayed as the suspense receipt slip number of deposit history.
- Click ‘Save Deposit Details’.
Delete Deposit History
The following describes how to delete the registered deposit history.
- Click the ‘Admin Menu’ at the top right of the PC web screen, and then click ‘Accounting’ in the pop-up window.
- Click at the top left of the screen.
- Click ‘Manage Receivables/Payables > Clear Deposit’ from the menu.
- Select the deposit history to delete, and click ‘Delete’.
- Click ‘Save Deposit Details’.
Bulk Upload Deposit History
The following describes how to bulk upload multiple deposit history using an Excel template.
- Click the ‘Admin Menu’ at the top right of the PC web screen, and then click ‘Accounting’ in the pop-up window.
- Click at the top left of the screen.
- Click ‘Manage Receivables/Payables > Clear Deposit’ from the menu.
- Click ‘Upload’.
- Click ‘Download Template File’ in the Upload pop-up window to download the template.
- Enter the deposit history according to the template, and save the file.
- Click ‘Attach File’ in the Upload pop-up window to upload the template file created.
- Click ‘Save’, and click ‘Yes’.
- Deposit history is bulk uploaded.
Download Deposit History List
The following describes how to download the deposit history list as an Excel file.
- Click the ‘Admin Menu’ at the top right of the PC web screen, and then click ‘Accounting’ in the pop-up window.
- Click at the top left of the screen.
- Click ‘Manage Receivables/Payables > Clear Deposit’ from the menu.
- If necessary, enter the deposit history conditions to be viewed in the search window, and click ‘Search’.
- You can view the list of deposit history records that match the entered conditions.
- Click 'Download'.
- The list of deposit history is downloaded as an Excel file.
Delete Deposit Slip
The Accounting admin can delete deposit slips that have been created, and create them again after deletion or modify the clearing information.
- You can't delete the slip if the month of the slip date (year and month) has been closed in the ‘Accounting > Settlement/Financial Statement > Monthly Closing’ menu.
- Deleted deposit slips are no longer viewed in the Accounting service.
- Delete integrated deposit slips from the ‘Accounting Service > Integrate Financial Account > Deposit Integration History’ menu.
The following describes how to delete deposit slips.
- Click the ‘Admin Menu’ at the top right of the PC web screen, and then click ‘Accounting’ in the pop-up window.
- Click at the top left of the screen.
- Click ‘Manage Receivables/Payables > Clear Deposit’ from the menu.
- Select the deposit history to delete the slip from, and click ‘Delete Slip’.
- In the notification pop-up window, click ‘Yes’.
- The deposit slip is deleted.
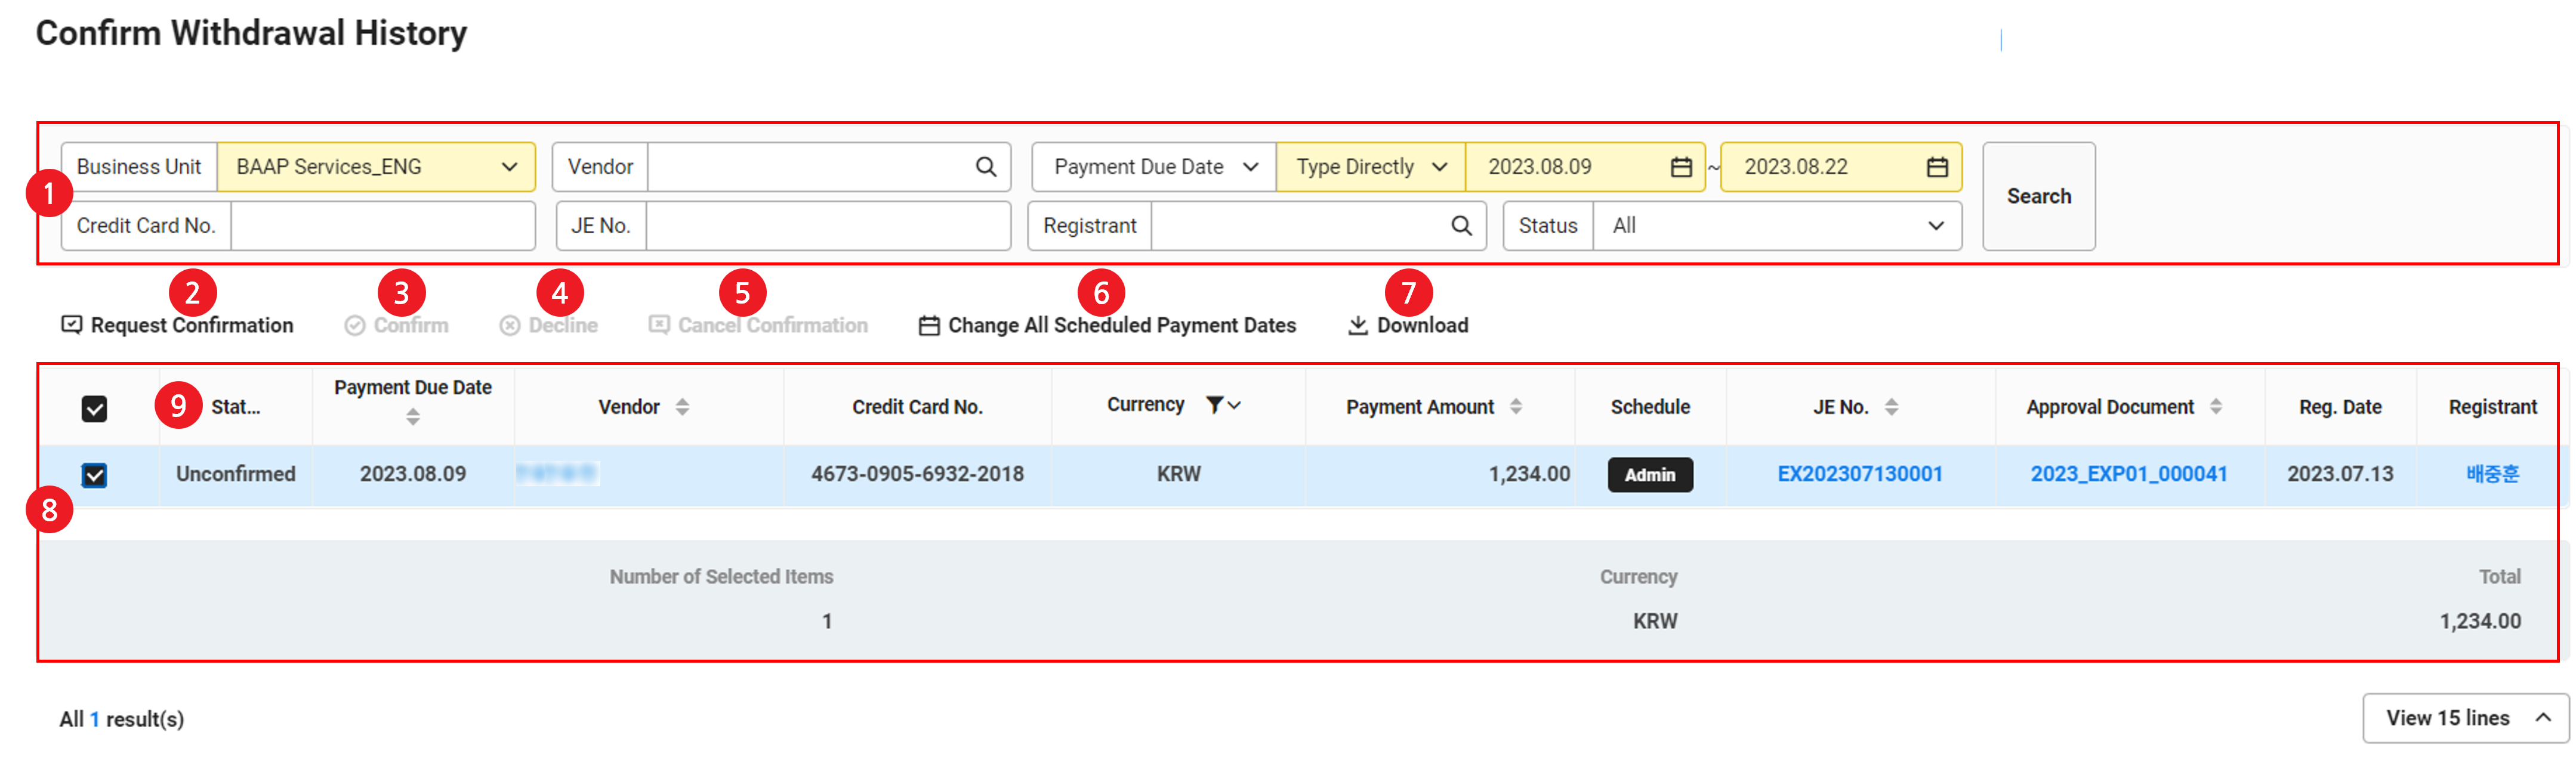
Confirm Withdrawal History
You can check the scheduled entered when creating slips in a list and request confirmation. When you request confirmation of a withdrawal case, the Accounting admin receives the request and confirms the withdrawal history or rejects the request. For the withdrawal history confirmed by the Accounting admin, you can create the withdrawal slip in the Create Withdrawal Slip menu.
The Confirm Withdrawal History page is laid out as follows.
| Area | Description |
|---|---|
| ① Search window | Searches withdrawal history according to business place, vendor, scheduled payment date, card number, slip number, registrant, and confirmation status conditions. |
| ② Request Confirmation | Click to request confirmation of withdrawal history in the Unconfirmed status Upon request, the status changes to ‘Confirmation Requested’ |
| ③ Confirm (Accounting admin) |
Click to confirm withdrawal history in the Confirmation Requested status The status of the confirmed withdrawal history changes to ‘Confirmed’, and you can create a withdrawal slip in the Create Withdrawal Slip menu |
| ④ Reject (Accounting admin) |
Click to reject withdrawal history in the ‘Confirmation Requested’ status The status of the rejected withdrawal history changes to ‘Rejected’ |
| ⑤ Cancel Confirmation (Accounting admin) |
Click the cancel confirmation of withdrawal history in the ‘Confirmed’ status The status of the canceled withdrawal history changes to ‘Confirmation Canceled’ |
| ⑥ Bulk Change Scheduled Payment Date | Click to change all scheduled payment dates for withdrawal history in the Unconfirmed, Rejected, or Confirmation Canceled status (See Bulk Change Scheduled Payment Date) |
| ⑦ Download | Download the withdrawal history list as an Excel file |
| ⑧ Withdrawal history list | Check withdrawal history in a list Click each detail to view information.
|
| ⑨ Condition | It displays the confirmation status of withdrawal history
|
Request Confirmation of Withdrawal History
The following describes how to request confirmation of withdrawal history.
- Click the ‘Admin Menu’ at the top right of the PC web screen, and then click ‘Accounting’ in the pop-up window.
- Click at the top left of the screen.
- Click ‘Manage Receivables/Payables > Confirm Withdrawal History’ from the menu.
- Select the withdrawal history to request confirmation among withdrawal history in the ‘Unconfirmed’ or ‘Rejected’ status.
- Click ‘Request Confirmation’.
- In the notification pop-up window, click ‘Yes’.
- The status of the selected withdrawal history changes to ‘Confirmation Requested’.
Confirm/Reject Withdrawal History
The following describes how to confirm or reject withdrawal history.
- Click the ‘Admin Menu’ at the top right of the PC web screen, and then click ‘Accounting’ in the pop-up window.
- Click at the top left of the screen.
- Click ‘Manage Receivables/Payables > Confirm Withdrawal History’ from the menu.
- Select the withdrawal history to be confirmed or rejected among withdrawal history in the Confirmation Requested status.
- Select the withdrawal history to be confirmed and withdrawal history to be rejected separately to process confirmation or rejection.
- Click ‘Confirm’ or ‘Reject’.
- In the notification pop-up window, click ‘Yes’.
- If you confirmed withdrawal history, then the status of the selected withdrawal history changes to ‘Confirmed’.
- If you rejected withdrawal history, then the status of the selected withdrawal history changes to ‘Rejected’.
Cancel Confirmation of Withdrawal History
The following describes how to cancel confirmation of withdrawal history.
- Click the ‘Admin Menu’ at the top right of the PC web screen, and then click ‘Accounting’ in the pop-up window.
- Click at the top left of the screen.
- Click ‘Manage Receivables/Payables > Confirm Withdrawal History’ from the menu.
- Select the withdrawal history to be canceled among withdrawal history in the Confirmed status.
- Click ‘Cancel Confirmation’.
- In the notification pop-up window, click ‘Yes’.
- Confirmation of the selected withdrawal history will be canceled.
Bulk Change Scheduled Payment Date
The following describes how to change all scheduled payment dates for withdrawal history.
- Click the ‘Admin Menu’ at the top right of the PC web screen, and then click ‘Accounting’ in the pop-up window.
- Click at the top left of the screen.
- Click ‘Manage Receivables/Payables > Confirm Withdrawal History’ from the menu.
- Select the withdrawal history to change scheduled payment dates among withdrawal history in the ‘Unconfirmed’ or ‘Rejected’ status.
- Only select together if the scheduled payment dates to be changed are identical.
- Click ‘Bulk Change Scheduled Payment Date’.
- Select the scheduled payment dates to be changed, and click ‘Confirm’.
- In the notification pop-up window, click ‘Yes’.
- All scheduled payment dates of the selected withdrawal history are changed.
Download Withdrawal History List
The following describes how to download the withdrawal history list as an Excel file.
- Click the ‘Admin Menu’ at the top right of the PC web screen, and then click ‘Accounting’ in the pop-up window.
- Click at the top left of the screen.
- Click ‘Manage Receivables/Payables > Confirm Withdrawal History’ from the menu.
- If necessary, enter the withdrawal history conditions to be viewed in the search window, and click ‘Search’.
- You can view the list of withdrawal history records that match the entered conditions.
- Click 'Download'.
- The list of withdrawal history is downloaded as an Excel file.
Create Withdrawal Slip
You can check the withdrawal history confirmed in the Confirm Withdrawal History menu and create withdrawal slips. The confirmed withdrawal history is displayed by adding the clearing amount and withdrawal amount by the scheduled payment date and vendor.
The following describes how to create a withdrawal slip based on the confirmed withdrawal history.
- Click the ‘Admin Menu’ at the top right of the PC web screen, and then click ‘Accounting’ in the pop-up window.
- Click at the top left of the screen.
- Click ‘Manage Receivables/Payables > Create Withdrawal Slip’ from the menu.
- Select all withdrawal history to create the withdrawal slip for.
- Enter the payment type, company account, vendor account, and fees of each history record.
- Payment Type
- Promissory Note: Click to enter the promissory note information (note number, maturity date, etc.).
- Advance Payment: Click to select the advance payment to be reversed, enter the reversal amount, and then click ‘Reverse’.
- It can be reversed if you have a remaining balance for the advance payment.
- You can select multiple advance payments to reverse.
- The sum of entered reversal amounts must be equal to the withdrawal amount.
- When selecting Advance Payment, the Fee item is disabled.
- If you only want to withdraw a partial amount from the advance payment (e.g., total amount of 100,000 KRW; advance payment (50,000 KRW) + deposit (50,000 KRW))
- Under Confirm Withdrawal History, separate the payment schedule by adding a schedule in the Manage Schedule item, and then individually confirm withdrawals that are on the same date (scheduled payment date), from the same vendor, and in the same currency for each payment type.
- Promissory Note: Click
- When selecting Deposit, Automatic withdrawal, or Giro, select the bank account from Company Account.
- Payment Type
- Click ‘Register Account’ to register the vendor account.
- You can temporarily save the entered content by clicking ‘Save Temporarily’.
- Click ‘Create Slip’, and then click ‘Yes’ in the notification pop-up window.
- The withdrawal slip of the selected history is created separately, and the withdrawal slip number is displayed in each history.
Delete Withdrawal Slip
The Accounting admins can delete withdrawal slips, and create new withdrawal slips after deletion.
- You can't delete the slip if the month of the slip date (year and month) has been closed in the ‘Accounting > Settlement/Financial Statement > Monthly Closing’ menu.
- Deleted withdrawal slips are no longer viewed in the Accounting service.
The following describes how to delete withdrawal slips.
- Click the ‘Admin Menu’ at the top right of the PC web screen, and then click ‘Accounting’ in the pop-up window.
- Click at the top left of the screen.
- Click ‘Manage Receivables/Payables > Create Withdrawal Slip’ from the menu.
- Select the withdrawal history to delete the slip from, and click ‘Delete Slip’.
- In the notification pop-up window, click ‘Yes’.
- The withdrawal slip is deleted.
Download Withdrawal Slip List
The following describes how to download the withdrawal slip list as an Excel file.
- Click the ‘Admin Menu’ at the top right of the PC web screen, and then click ‘Accounting’ in the pop-up window.
- Click at the top left of the screen.
- Click ‘Manage Receivables/Payables > Create Withdrawal Slip’ from the menu.
- If necessary, enter the withdrawal slip conditions to be viewed in the search window, and click ‘Search’.
- You can view the list of withdrawal slips that matches the entered conditions.
- Click 'Download'.
- The list of withdrawal slips is downloaded as an Excel file.
Create Offset Slip
If you have both receivables and payables for a specific vendor, then you can set them off by creating an offset slip.
Create Offset Slip can be utilized as follows.
- You can summarize credit sales/outstanding payables for a vendor and offset receivables/payables.
- If the department in charge of sales and the department managing deposit bankbooks are different, then the sales department can summarize suspense receipts/credit sales after the department managing bankbooks registers deposits (ordinary deposits/suspense receipts).
The Create Offset Slip page is laid out as follows.
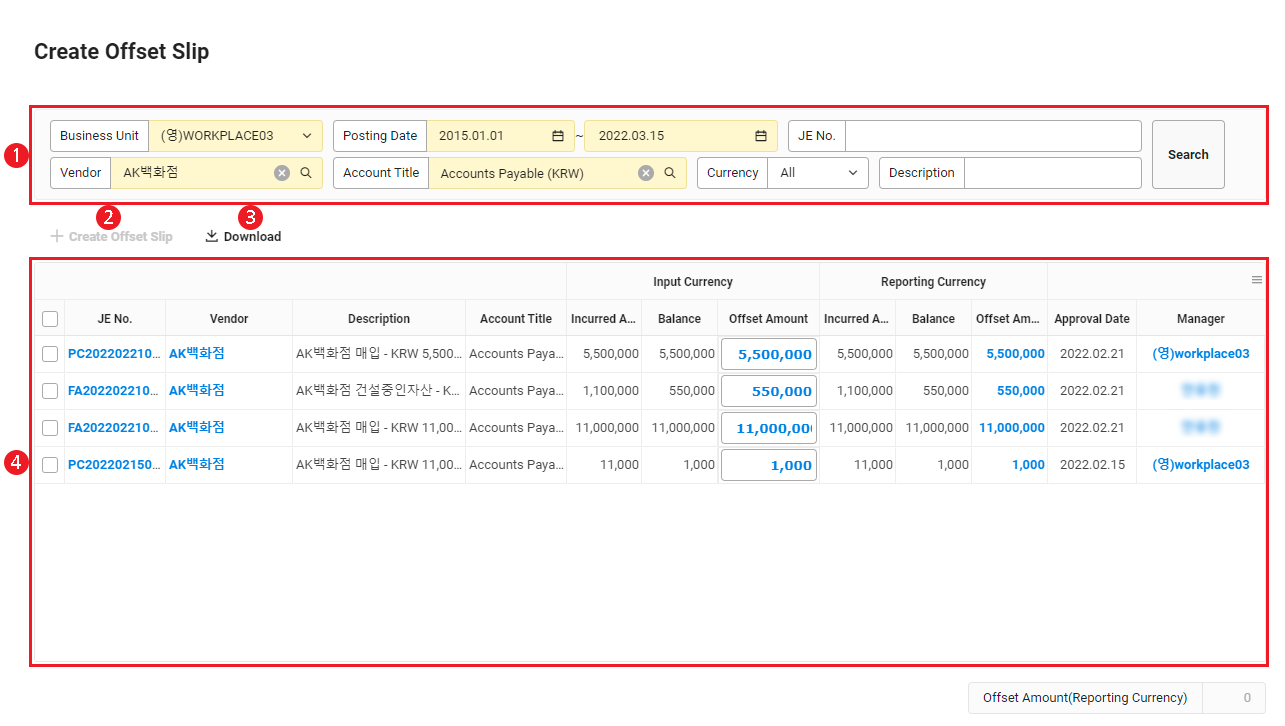
| Area | Description |
|---|---|
| ① Search window | Select the vendor and account title of the offset payables to be checked Search offset payables necessary according to business place, slip date, slip number, vendor, account title, currency, and notes conditions |
| ② Create Offset Slip | Create an offset slip for the selected offset payables (See Create Receivables/Payables Offset Slip) |
| ③ Download | Download the list of offset payables as an Excel file |
| ④ Offset receivables/payables list | Check the offset payables in a list Click each detail to view information.
|
Create Receivables/Payables Offset Slip
You can offset payables and receivables for a specific vendor by creating an offset slip. You can only offset if all of the following conditions are applicable.
- Receivables and payables are for the same vendor.
- The receivable amount is larger then the payable amount.
- Receivables and payables slips exist.
The following describes how to create offset slips.
- Click the ‘Admin Menu’ at the top right of the PC web screen, and then click ‘Accounting’ in the pop-up window.
- Click at the top left of the screen.
- Click ‘Manage Receivables/Payables > Create Offset Slip’ from the menu.
- Select the business place, slip date, vendor, and account title, and click ‘Search’.
- For Account Title, select the account title for which the receivables/payables type is ‘Payables’ in the ‘Accounting > Manage Standard information > Manage Account Titles’ menu.
- Compare with the ‘Accounting > View Ledger > Receivables/Payables Status’ page to check that the same data is viewed.
- After selecting the data to create the offset slip for, and enter the offset amount in Offset Amount.
- Offset Amount can be adjusted within the scope of not exceeding the balance.
- Click ‘Create Offset Slip’.
- Clicking opens the page that displays the list of payables/receivables and basic information for slip creation. You can search and select receivables data in this page.
- Select the Vendor that is same as the vendor of payables, and click ‘Search’.
- For Account Title, select the account title for which the receivables/payables type is ‘Receivables’ in the ‘Accounting > Manage Standard information > Manage Account Titles’ menu.
- Compare with the ‘Accounting > View Ledger > Receivables/Payables Status’ page to check that the same data is viewed.
- The receivables in possession are displayed in the Receivables List field.
- Select the receivables to be offset, and offset the amount.
- The selected receivables amount must be identical to the payables amount.
- If you select receivables, then the offset balance is displayed. When the same receivables are offset later, the amount calculated by subtracting the offset balance from the incurred amount is displayed in the incurred balance.
- Enter the slip date and notes in the ‘Basic Information’ area.
- Click ‘Create slip’ and then click ‘Yes’.
- The offset slip is created. You can check the created offset slip in the View Offset Slip menu.
Download Offset Payables List
The following describes how to download the offset payables list as an Excel file.
- Click the ‘Admin Menu’ at the top right of the PC web screen, and then click ‘Accounting’ in the pop-up window.
- Click at the top left of the screen.
- Click ‘Manage Receivables/Payables > Create Offset Slip’ from the menu.
- Select the business place, slip date, vendor, and account title, and click ‘Search’.
- Click 'Download'.
- The list of offset payables is downloaded as an Excel file.
Search Offset Slips
You can check the offset slips created in the Create Offset Slip menu and delete them if necessary.
The View Offset Slip page is laid out as follows.
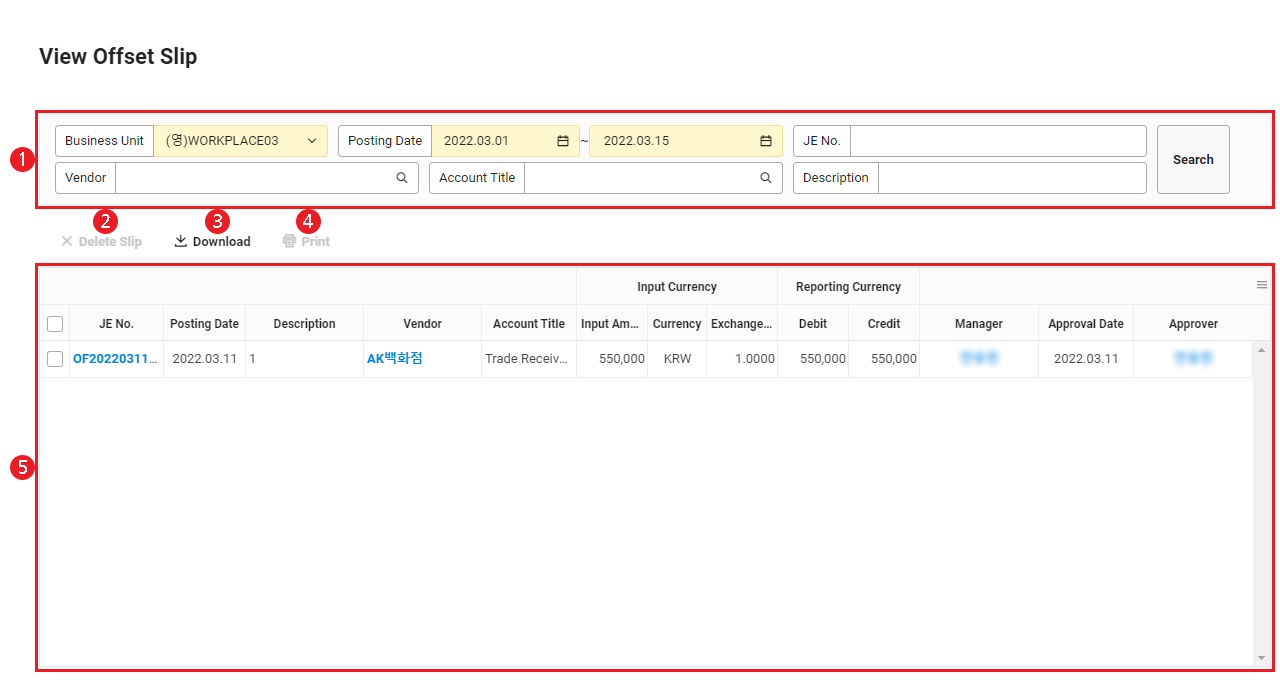
| Area | Description |
|---|---|
| ① Search window | Search offset slips according to business place, slip date, slip number, vendor, account title, and notes conditions |
| ② Delete Slip | Delete the selected offset slip (See Delete Offset Slip) |
| ③ Download | Download the list of offset slips as an Excel file (See Download Offset Slip List) |
| ④ Print | Print the selected offset slip (See Print Offset Slip) |
| ⑤ Offset slip list | It displays the offset slip created
|
Delete Offset Slip
You can cancel receivables/payables offset by deleting the offset slip.
- You can't delete the slip if the month of the slip date (year and month) has been closed in the ‘Accounting > Settlement/Financial Statement > Monthly Closing’ menu.
- You can view payables for which offset has been canceled in Create Offset Slip.
The following describes how to delete offset slips.
- Click the ‘Admin Menu’ at the top right of the PC web screen, and then click ‘Accounting’ in the pop-up window.
- Click at the top left of the screen.
- Click ‘Manage Receivables/Payables > View Offset Slip’ from the menu.
- ‘Select the offset slip to be deleted, and click Delete Slip’.
- In the notification pop-up window, click 'Yes' .
Download Offset Slip List
The following describes how to download the offset slip list as an Excel file.
- Click the ‘Admin Menu’ at the top right of the PC web screen, and then click ‘Accounting’ in the pop-up window.
- Click at the top left of the screen.
- Click ‘Manage Receivables/Payables > View Offset Slip’ from the menu.
- If necessary, enter the offset slip conditions to be viewed in the search window, and click ‘Search’.
- You can view the offset slips that match the entered conditions.
- Click 'Download'.
- The list of offset slips is downloaded as an Excel file.
Print Offset Slip
The following describes how to print offset slips.
- Click the ‘Admin Menu’ at the top right of the PC web screen, and then click ‘Accounting’ in the pop-up window.
- Click at the top left of the screen.
- Click ‘Manage Receivables/Payables > View Offset Slip’ from the menu.
- Select all offset slips to be printed, and click ‘Print’.
- Check the details in the Print pop-up window, and then click.
Register Purchase/Sales Scraped From Hometax
You can register the tax invoice, invoice, and cash receipt data scraped from NTS Hometax as purchase/sales data. Registered purchase/sales data can be checked in the ‘Create/View Purchase Data’ and ‘Create/View Sales Data’ menu.
- Scraping Hometax data is done automatically by registering a certificate in the ‘Business Support Settings > Manage Business Place > Manage Certificate’ menu. See Manage Certificate for more details.
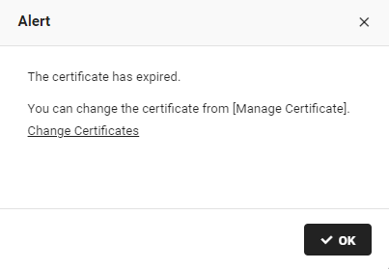
- When accessing the ‘Purchase/Sales Scraped From Hometax’ menu, the notification pop-up window may appear in the following cases.
- If there is no certificate registered in ‘Business Support Settings > Manage Business Place > Manage Certificate’
- Click ‘Register Certificate’ to register a certificate.

- If the certificate registered in ‘Business Support Settings > Manage Business Place > Manage Certificate’ has expired
- Click ‘Change Certificate’ to check the expired certificate, and register the certificate again.
The Register Purchase/Sales Scraped From Hometax page is laid out as follows.
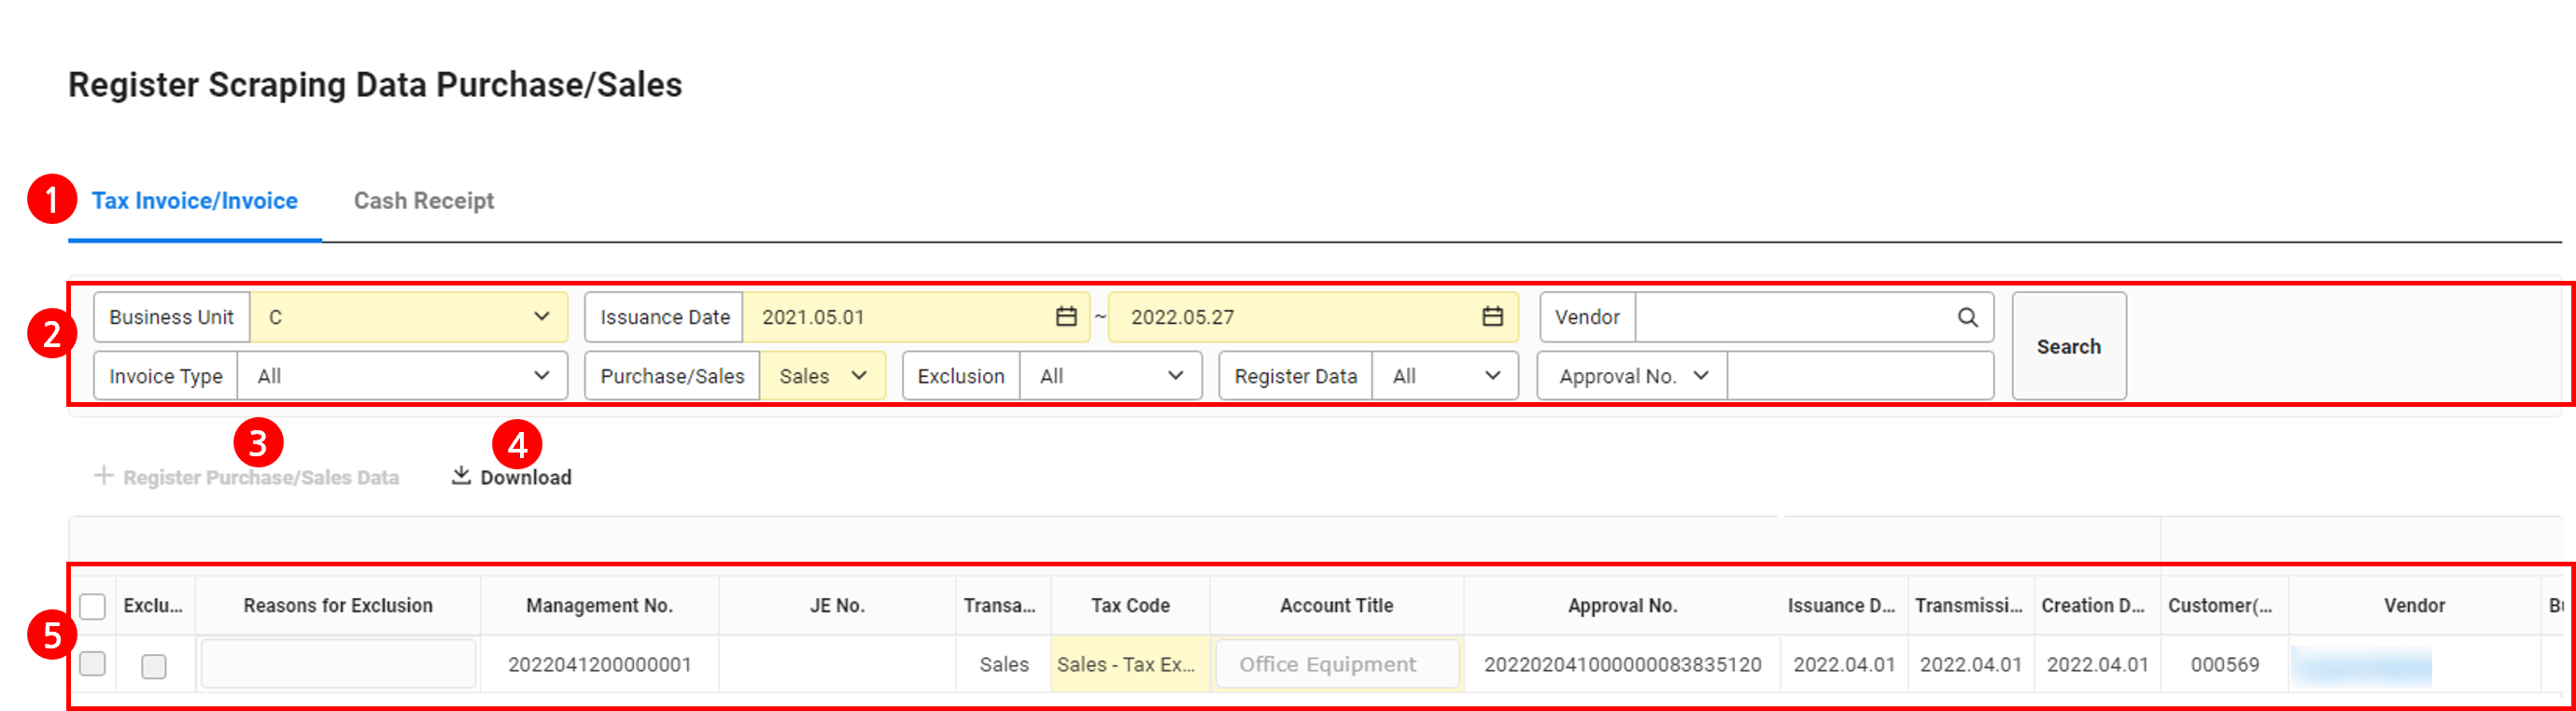
| Area | Description |
|---|---|
| ① Content tab | Click to display the Hometax tax invoice/invoice data or cash receipt data on the page |
| ② Search window | Search Hometax purchase/sales data according to business place, issue date, vendor, invoice type, purchase/sales type, exclusion status, data registration status, and approval number conditions For the ‘Tax Invoice/Invoice’ tab, you can additionally select the invoice type condition |
| ③ Register Purchase/Sales Data | Register selected Hometax purchase/sales data as purchase/sales data (See Register Purchase/Sales Data) You can check the management number of data registered as purchase/sales data |
| ④ Download | Download the Hometax purchase/sales data list as an Excel file |
| ⑤ Hometax purchase/sales data list | Check the scraped Hometax purchase/sales data in a list Click each detail to view information.
|
| ⑥ Save | Click to save the edited content |
Register Purchase/Sales Data
The following describes how to register scraped Hometax purchase/sales data as purchase/sales data in NAVER WORKS Accounting.
- Click the ‘Admin Menu’ at the top right of the PC web screen, and then click ‘Accounting’ in the pop-up window.
- Click at the top left of the screen.
- Click ‘Manage Receivables/Payables > Register Purchase/Sales Scraped From Hometax’ from the menu.
- Select the data to be registered as purchase/sales data.
- If you select Exclude, then the data is excluded, and the Reason for Exclusion input field is activated. The excluded data can't be registered as purchase/sales data.
- Select the tax code and account title.
- The tax code according to the transaction type and invoice type is viewed in Tax Code. Select a tax code.
- Search and select the purchase/sales account title when creating the slip in ‘Account Title’.
- Click ‘Save’ and then click ‘Yes’ in the notification pop-up window.
- Select the data to be registered as purchase/sales data again, and click ‘Register Purchase/Sales Data’.
- In the notification pop-up window, click ‘Yes’.
- Purchase/Sales data is created. Created data can be checked in the Create/View Purchase Data and Create/View Sales Data menu.
- Once purchase/sales data is created, Management Number is viewed in each data.
- Slip Number is viewed once the purchase slip and sales slip are created. Click the slip number to check the slip history.
- For purchase data, a purchase slip is created when approval is completed.
Download Hometax Purchase/Sales Data List
The following describes how to download the Hometax purchase/sales data list as an Excel file.
- Click the ‘Admin Menu’ at the top right of the PC web screen, and then click ‘Accounting’ in the pop-up window.
- Click at the top left of the screen.
- Click ‘Manage Receivables/Payables > Register Purchase/Sales Scraped From Hometax’ from the menu.
- If necessary, enter the Hometax purchase/sales data conditions to be viewed in the search window, and click ‘Search’.
- You can view the Hometax purchase/sales data that matches the entered conditions.
- Click 'Download'.
- The list of Hometax purchase/sales data is downloaded as an Excel file.