You can check the various ledgers for accounting work and download them as Excel files.
Journal
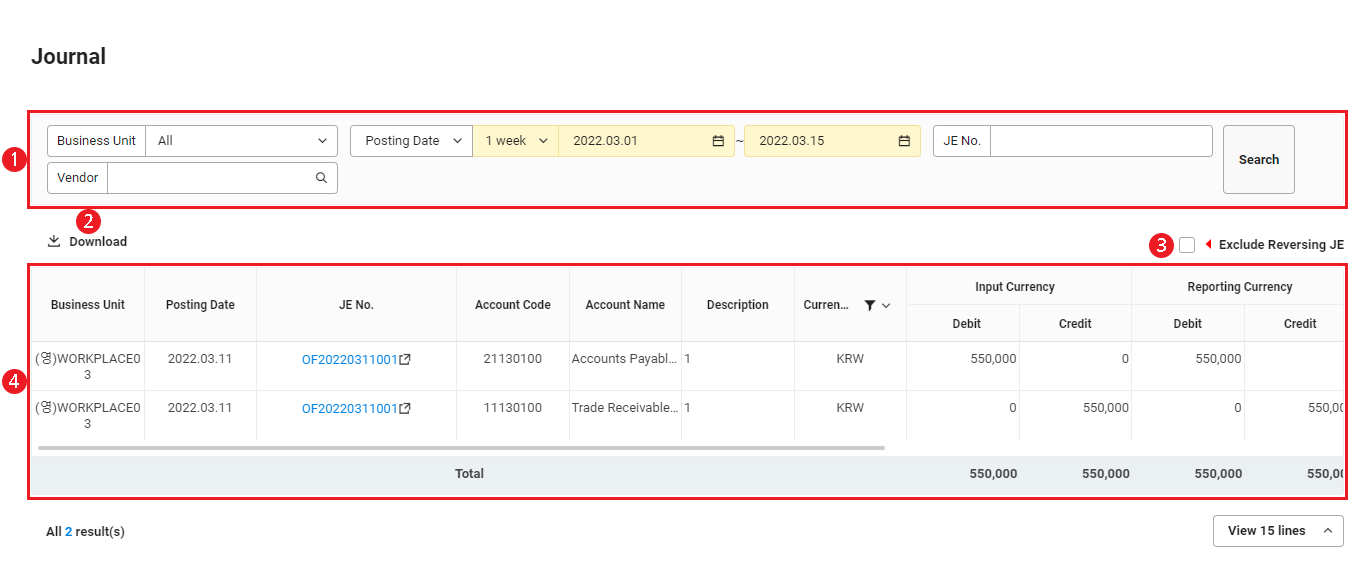
You can view the details of journal entries from transactions by business place.
The Ledger screen is laid out as follows.
| Area | Description |
|---|---|
| ① Search Window | Searches journal entries by business place, slip date, slip number, and vendor. |
| ② Download | Downloads the list of journal entries as an Excel file |
| ③ Exclude Reversing JE | Displays journal entries by excluding reversing entries. |
| ④ List of Journal Entries | Displays journal entries according to the debit/credit journal entry type by transaction history. Click each detail to view more information.
|
Download List of Journal Entries
The following describes how to download the list of journal entries as an Excel file.
- Click the ‘Admin Menu’ at the top right of the PC web screen, and then click ‘Accounting’ in the pop-up window.
- Click
 at the top left of the screen.
 - Click 'View Ledger > Ledger' from the menu.
- If necessary, enter the journal entry conditions to be searched in the search window, and then click ‘Search’.
- You can view the list of journal entries that match the entered conditions.
- Click 'Download'.
- The list of journal entries is downloaded as an Excel file.
Daily Trial Balance
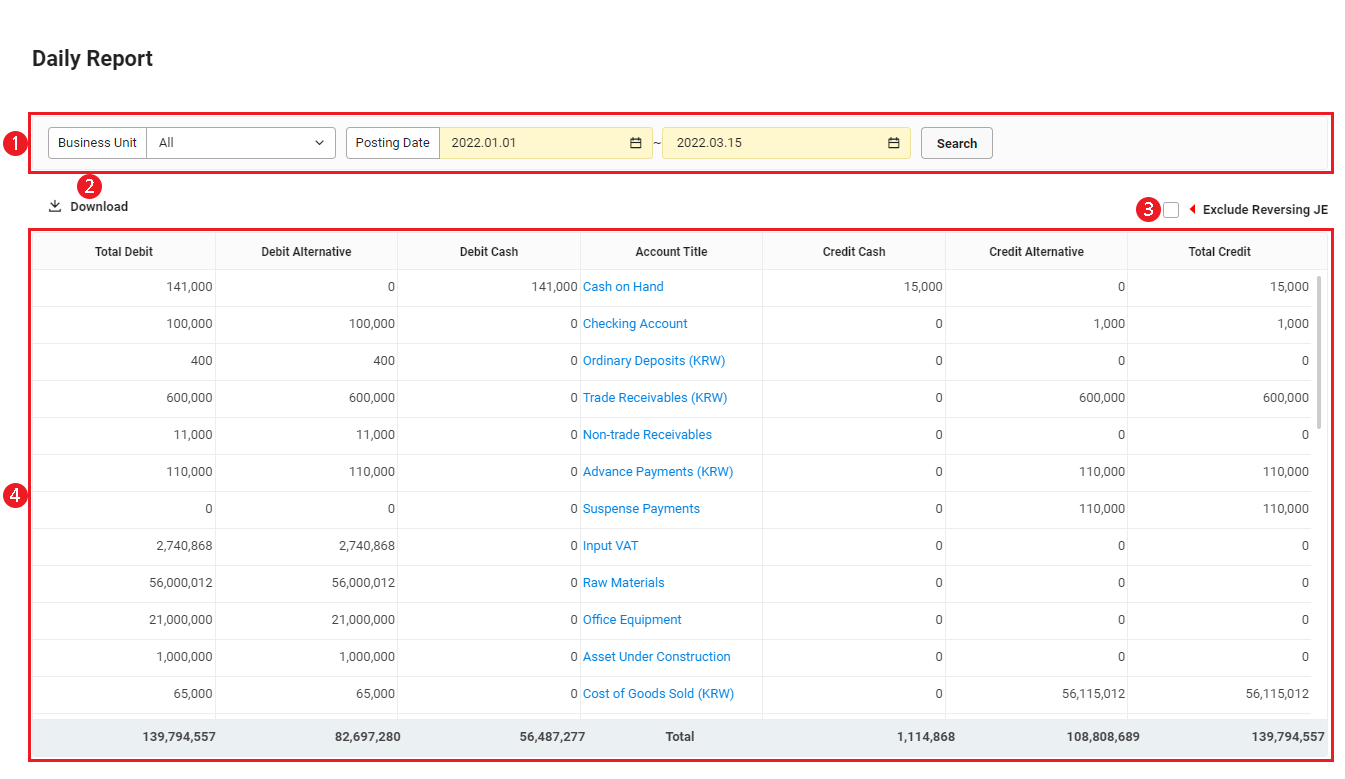
You can view the transaction history by period based on the approved slip records. When you specify and search the business place and slip date, the debit and credit amounts of the applicable period are displayed by account title.
The Daily Trial Balance screen is laid out as follows.
| Area | Description |
|---|---|
| ① Search Window | Specifies the conditions of business place and slip date for displaying the transaction history in the list. Click 'Search' to display the transaction history records that match the specified conditions. |
| ② Download | Downloads the list of transaction history as an Excel file |
| ③ Exclude Reversing JE | Displays transaction history by excluding reversing entries. |
| ④ List of Transaction History | Displays transaction history in a list. Click each account title to go to the Ledger by Account menu. |
Download List of Transaction History
The following describes how to download the list of transaction history records as an Excel file.
- Click the ‘Admin Menu’ at the top right of the PC web screen, and then click ‘Accounting’ in the pop-up window.
- Click at the top left of the screen.
- Click 'View Ledger > Daily Trial Balance' from the menu.
- If necessary, enter the transaction history conditions to be searched in the search window, and then click ‘Search’.
- You can view the list of transaction history records that match the entered conditions.
- Click 'Download'.
- The list of transaction history records is downloaded as an Excel file.
General Ledger
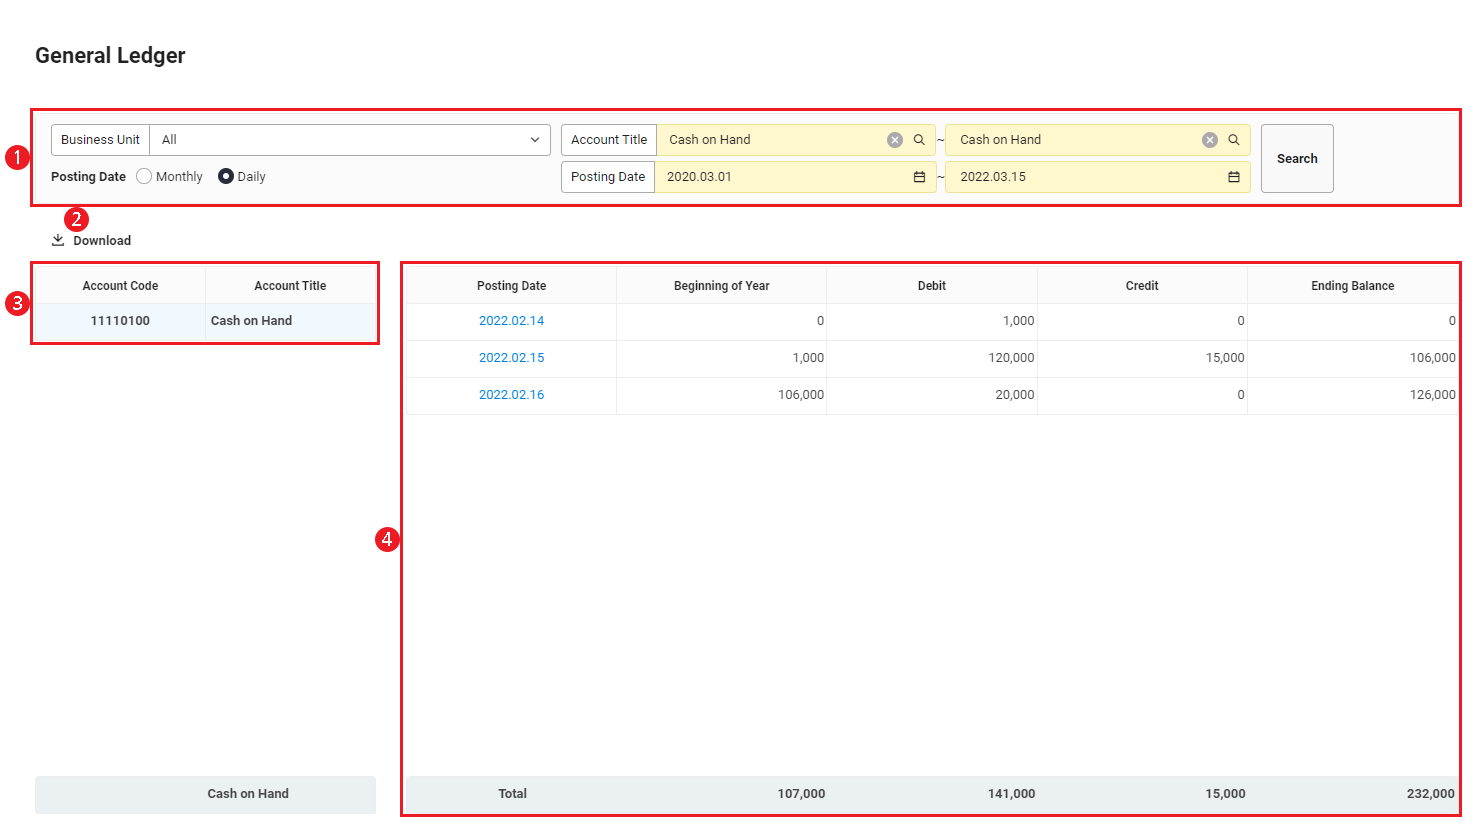
The general ledger includes items such as the income and expenditure of all accounts related to corporate accounting. You can create a general ledger to check the debit/credit amounts, balance, and accumulated amount of the accounting account title for the current year. The list of account titles is displayed when you search by specifying the business place, account title, and slip date. You can click each account title to check the amount.
The General Ledger screen is laid out as follows.
| Area | Description |
|---|---|
| ① Search Window | Specifies the conditions of business place, account title, monthly or daily display, and slip date for displaying the amounts by account title in the list. Click 'Search' to display the amounts by account title that match the specified conditions. |
| ② Download | Downloads the list of amounts by account title as an Excel file |
| ③ List of Account Titles | Displays the account titles that match the specified conditions. Click each account title to check the amount. |
| ④ List of Amounts by Account Title | Displays the amounts by account title in a list. Click each slip date to go to the Ledger by Account menu. |
Download List of Amounts by Account Title
The following describes how to download the list of amounts by account title as an Excel file.
- Click the ‘Admin Menu’ at the top right of the PC web screen, and then click ‘Accounting’ in the pop-up window.
- Click at the top left of the screen.
- Click 'View Ledger > General Ledger' from the menu.
- Enter the conditions of amounts by account title to be searched in the search window, and then click ‘Search’.
- Click the account title for which the list will be downloaded.
- Click 'Download'.
- The list of amounts by account title is downloaded as an Excel file.
Ledger by Account
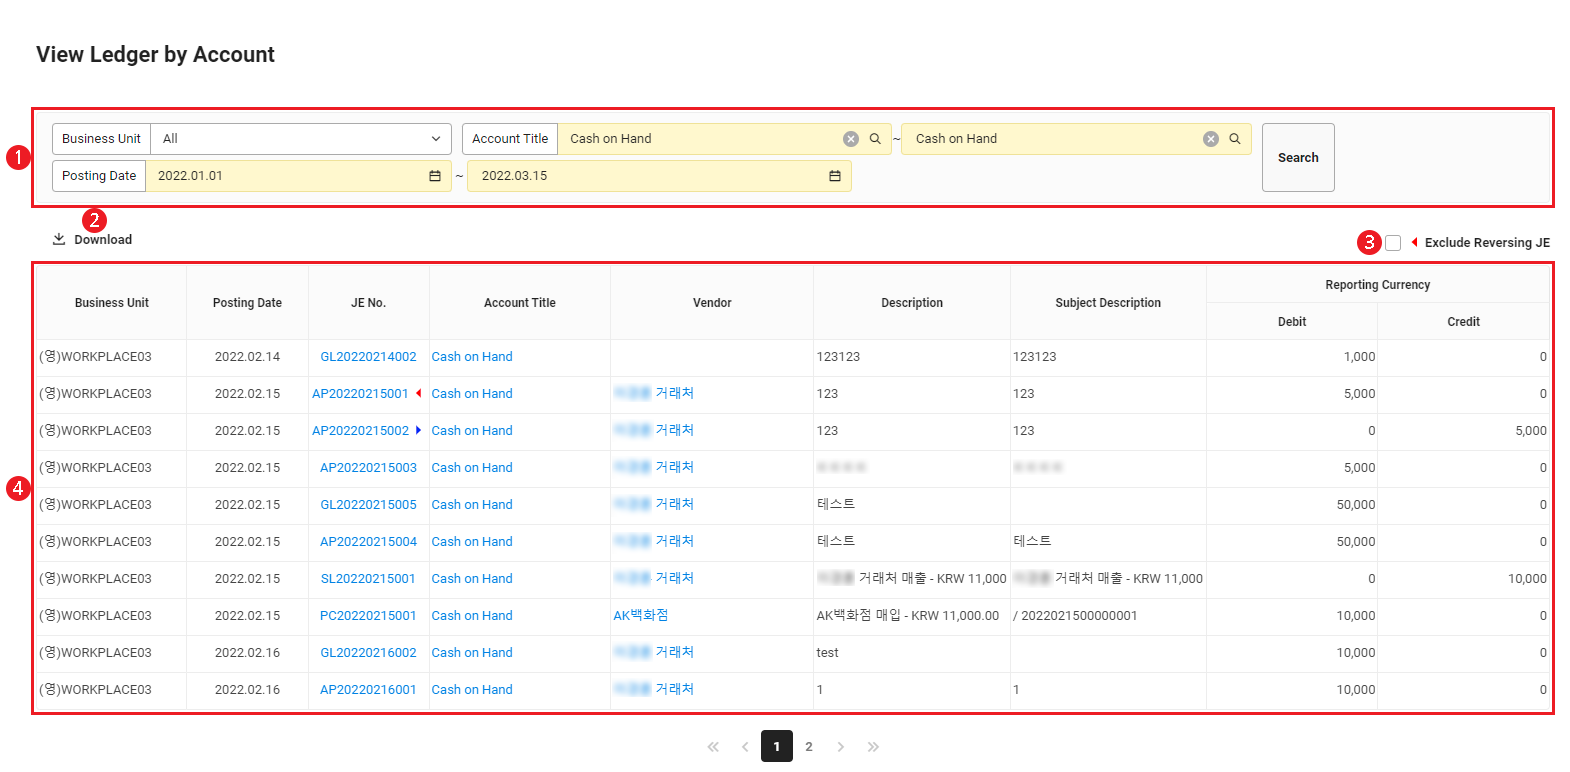
You can view the transaction history by account title. The transaction history by account is displayed when you search by specifying the business place, account title, and slip date.
The Ledger by Account page is laid out as follows.
| Area | Description |
|---|---|
| ① Search Window | Specifies the conditions of business place, account title, and slip date for displaying the transaction history by account title in the list. Click 'Search' to display the transaction history records by account title that match the specified conditions. |
| ② Download | Downloads the list of transaction history by account title as an Excel file |
| ③ Exclude Reversing JE | Displays transaction history by excluding reversing entries. |
| ④ List of Transaction History by Account Title | Displays the transaction history by account title in a list. Click each detail to view more information.
|
Download List of Transaction History by Account Title
The following describes how to download the list of transaction history records by account title as an Excel file.
- Click the ‘Admin Menu’ at the top right of the PC web screen, and then click ‘Accounting’ in the pop-up window.
- Click at the top left of the screen.
- Click 'View Ledger > Ledger by Account' from the menu.
- Enter the conditions of transaction history by account title to be searched in the search window, and then click ‘Search'.
- Click 'Download'.
- The list of transaction history records by account title is downloaded as an Excel file.
Ledger by Vendor
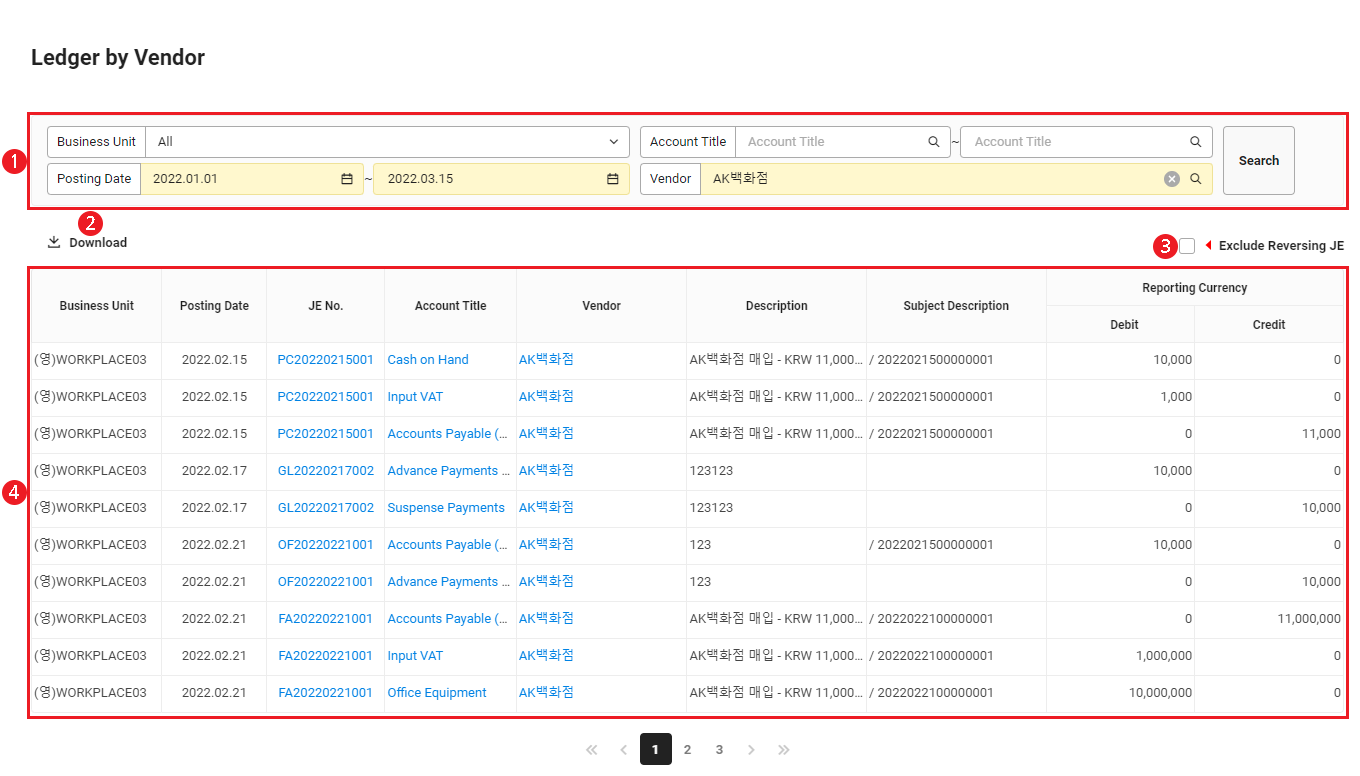
You can view the transaction history by vendor. The transaction history by account is displayed when you search by specifying the business place, slip date, and vendor.
The Ledger by Vendor screen is laid out as follows.
| Area | Description |
|---|---|
| ① Search Window | Specifies the conditions of business place, account title, slip date, and vendor for displaying the transaction history by vendor in the list. Click 'Search' to display the transaction history records by vendor that match the specified conditions. |
| ② Download | Downloads the list of transaction history by vendor as an Excel file |
| ③ Exclude Reversing JE | Displays transaction history by excluding reversing entries. |
| ④ List of Transaction History by Vendor | Displays the transaction history by vendor in a list. Click each detail to view more information.
|
Download List of Transaction History by Vendor
The following describes how to download the list of transaction history records by vendor as an Excel file.
- Click the ‘Admin Menu’ at the top right of the PC web screen, and then click ‘Accounting’ in the pop-up window.
- Click at the top left of the screen.
- Click 'View Ledger > Ledger by Vendor' from the menu.
- Enter the conditions of transaction history by vendor to be searched in the search window, and then click 'Search'.
- Click 'Download'.
- The list of transaction history records by vendor is downloaded as an Excel file.
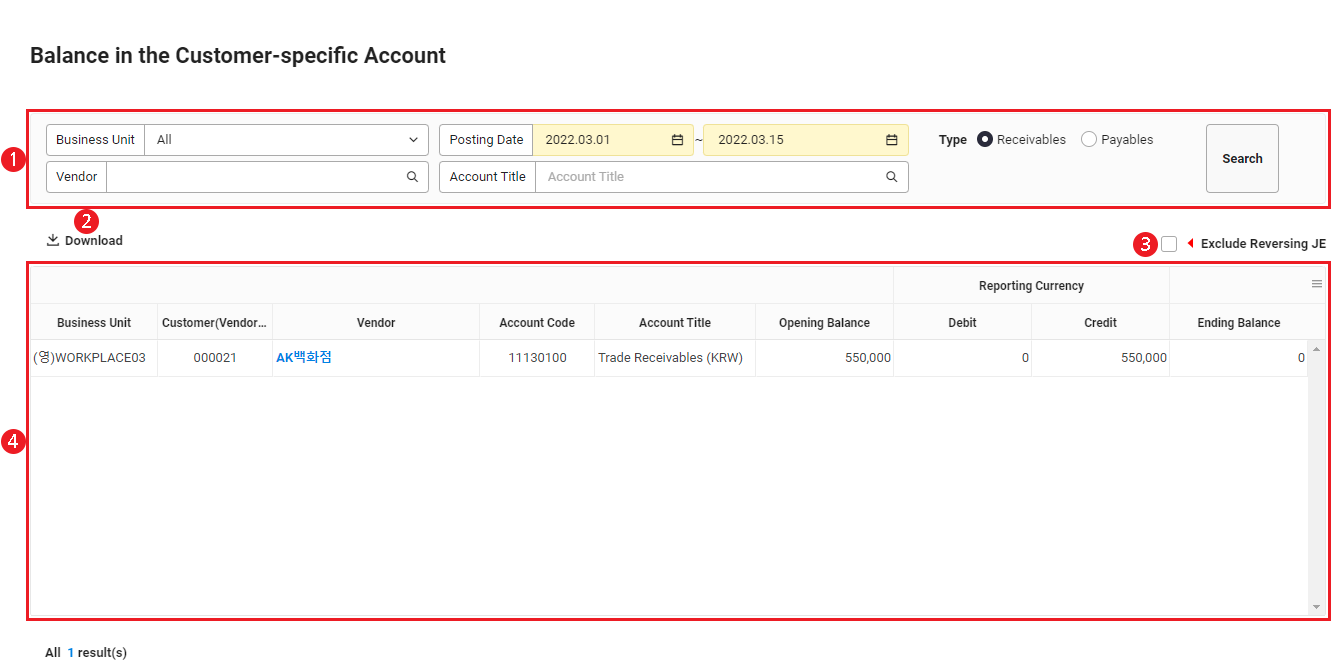
Account Balance by Vendor
You can view the debit/credit amounts, opening balance, and ending balance of each vendor by classifying them into account titles.
The Account Balance by Vendor screen is laid out as follows.
| Area | Description |
|---|---|
| ① Search Window | Searches the account balance by vendor using the conditions of business place, slip date, vendor, account title, and receivables or payables classification. |
| ② Download | Downloads the list of account balances by vendor as an Excel file |
| ③ Exclude Reversing JE | Displays account balances by excluding reversing entries. |
| ④ List of Account Balances by Vendor | Displays the account balances by vendor in a list. Click the vendor to view vendor information. |
Download List of Account Balances by Vendor
The following describes how to download the list of transaction history records by vendor as an Excel file.
- Click the ‘Admin Menu’ at the top right of the PC web screen, and then click ‘Accounting’ in the pop-up window.
- Click at the top left of the screen.
- Click 'View Ledger > Account Balance by Vendor' from the menu.
- Enter the conditions of transaction history by vendor to be searched in the search window, and then click 'Search'.
- Click 'Download'.
- The list of transaction history records by vendor is downloaded as an Excel file.
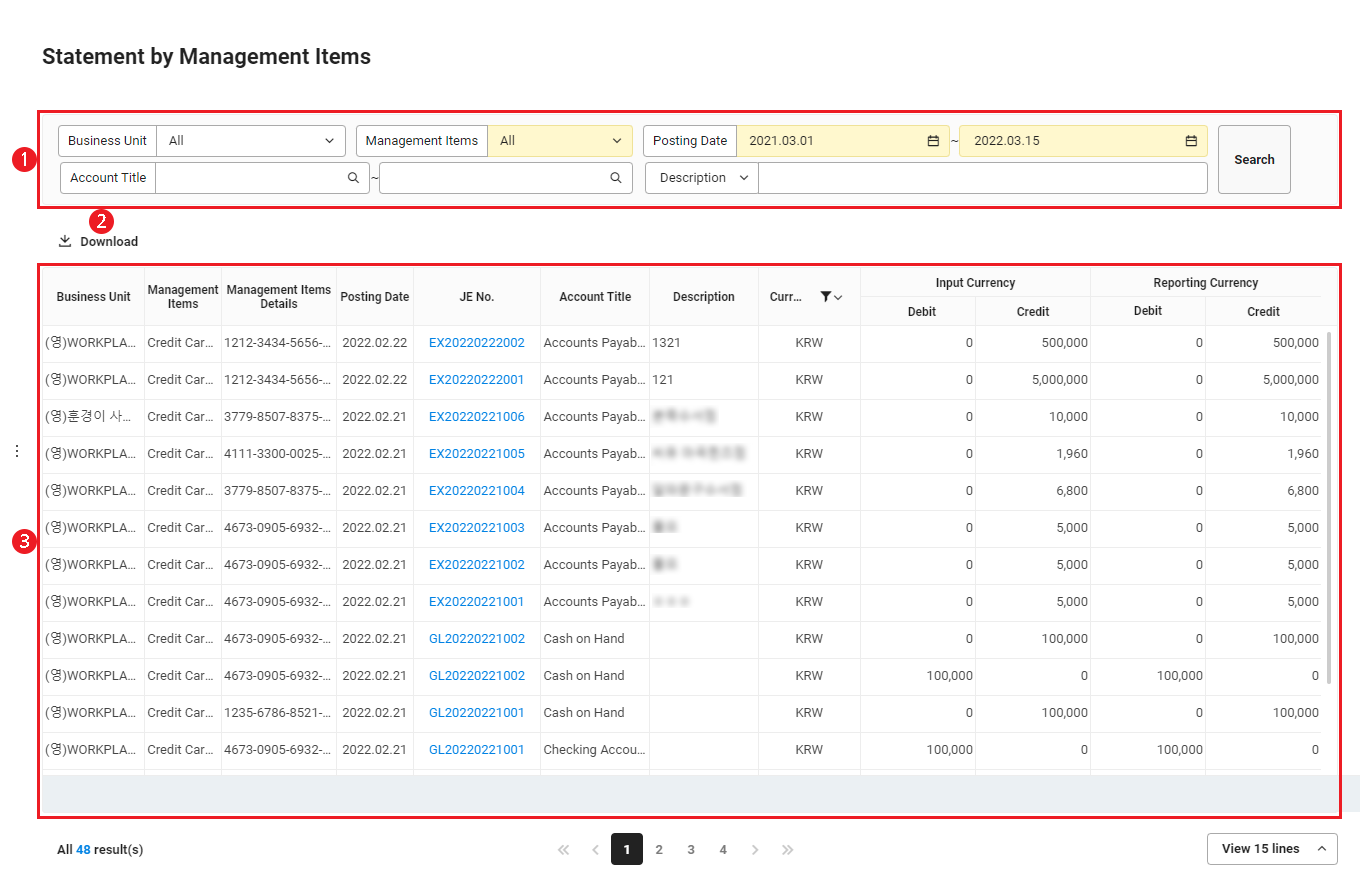
Statement by Management Item
You can view the journal entries by slip management item.
The Statement by Management Item screen is laid out as follows.
| Area | Description |
|---|---|
| ① Search Window | Searches the journal entries by management item using the conditions of business place, management item, slip date, account title, and notes. |
| ② Download | Downloads the list of journal entries by management item as an Excel file |
| ③ List of Journal Entries by Management Item | Displays the journal entries by management item in a list. Click the slip number to view the slip of the applicable transaction. |
Download List of Journal Entries by Management Item
The following describes how to download the list of journal entries by management item as an Excel file.
- Click the ‘Admin Menu’ at the top right of the PC web screen, and then click ‘Accounting’ in the pop-up window.
- Click at the top left of the screen.
- Click 'View Ledger > Statement by Management Item' from the menu.
- If necessary, enter the conditions of journal entries by management item to be searched in the search window, and then click ‘Search’.
- You can view the list of journal entries, by management item, that match the entered conditions.
- Click 'Download'.
- The list of journal entries by management item is downloaded as an Excel file.
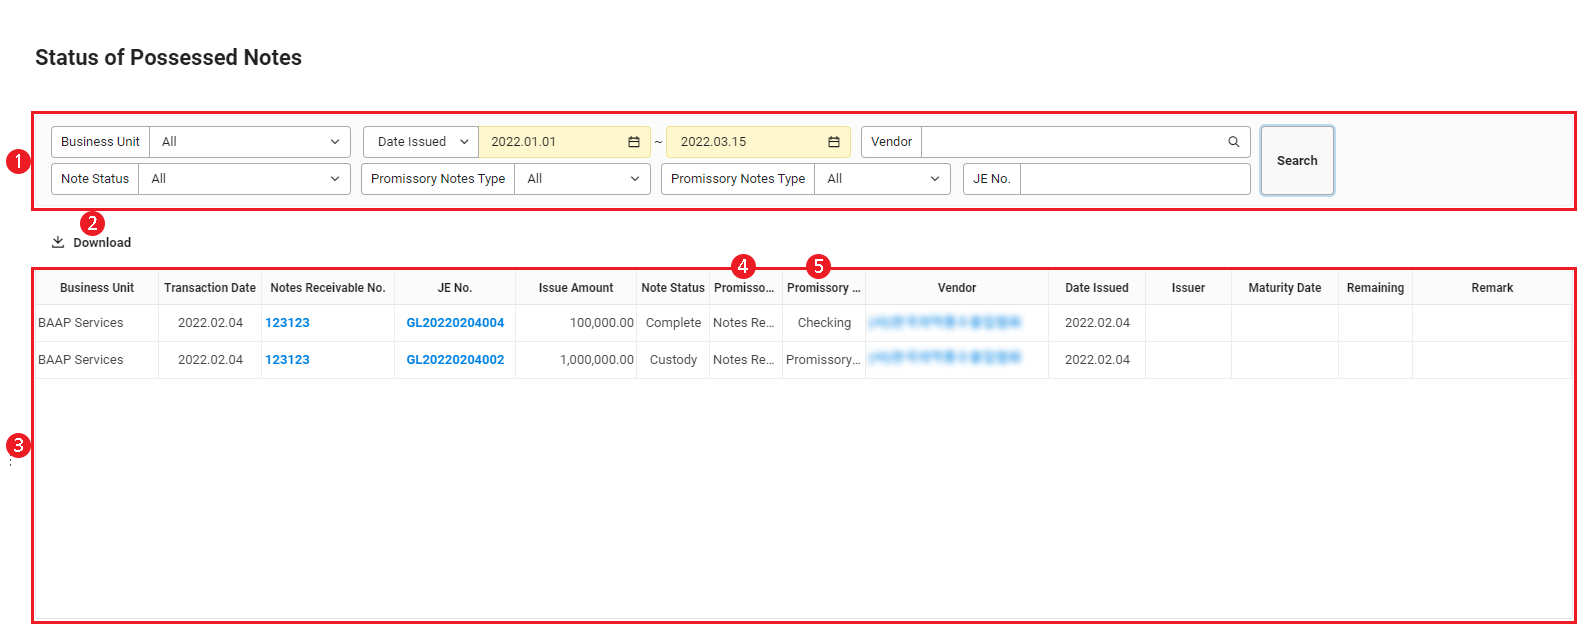
Status of Possessed Notes
You can view the notes owned by the company and edit the notes information. All account titles with the ‘Info Page’ item set as ‘Notes’ are displayed in addition to the note account provided by default on WORKS Accounting.
The Status of Possessed Notes screen is laid out as follows.
| Area | Description |
|---|---|
| ① Search Window | Searches possessed notes by business place, issuance date, vendor, note status, note classification, note type, and slip number. |
| ② Download | Downloads the list of possessed notes as an Excel file |
| ③ List of Possessed Notes | Displays the possessed notes in a list. Click each detail to view information.
|
| ④ Classification of Notes | Displays items by classifying the note type as notes receivable or notes payable.
|
| ⑤ Types of Notes | Displays the types of notes.
|
Edit Notes Information
You can view the details of possessed notes and edit the note status, issuance date and issuer, maturity date, and remarks information.
The following describes how to edit the notes information.
- Click the ‘Admin Menu’ at the top right of the PC web screen, and then click ‘Accounting’ in the pop-up window.
- Click at the top left of the screen.
- Click 'View Ledger > Status of Possessed Notes' from the menu.
- Click the note number of the note to edit its information.
- Change the note status by referring to the below.
- Stored: notes that are stored without being replaced by cash and cash equivalents
- Dishonored: notes that were processed as dishonored because they can't be received
- Completed: notes that have been replaced by cash and cash equivalents, or dishonored notes that were processed as bad debt expense
- Edit the issuance date, issuer, maturity date, and remarks information.
- Click ‘Save’.
Download List of Possessed Notes
The following describes how to download the list of possessed notes as an Excel file.
- Click the ‘Admin Menu’ at the top right of the PC web screen, and then click ‘Accounting’ in the pop-up window.
- Click at the top left of the screen.
- Click 'View Ledger > Status of Possessed Notes' from the menu.
- If necessary, enter the possessed note conditions to be searched in the search window, and then click ‘Search’.
- You can view the list of possessed notes that match the entered conditions.
- Click 'Download'.
- The list of possessed notes is downloaded as an Excel file.
Receivables/Payables Status
You can view the receivables/payables status of the company based on the accounting slips registered with the receivable and payable account titles.
The Receivables/Payables Status screen is laid out as follows.
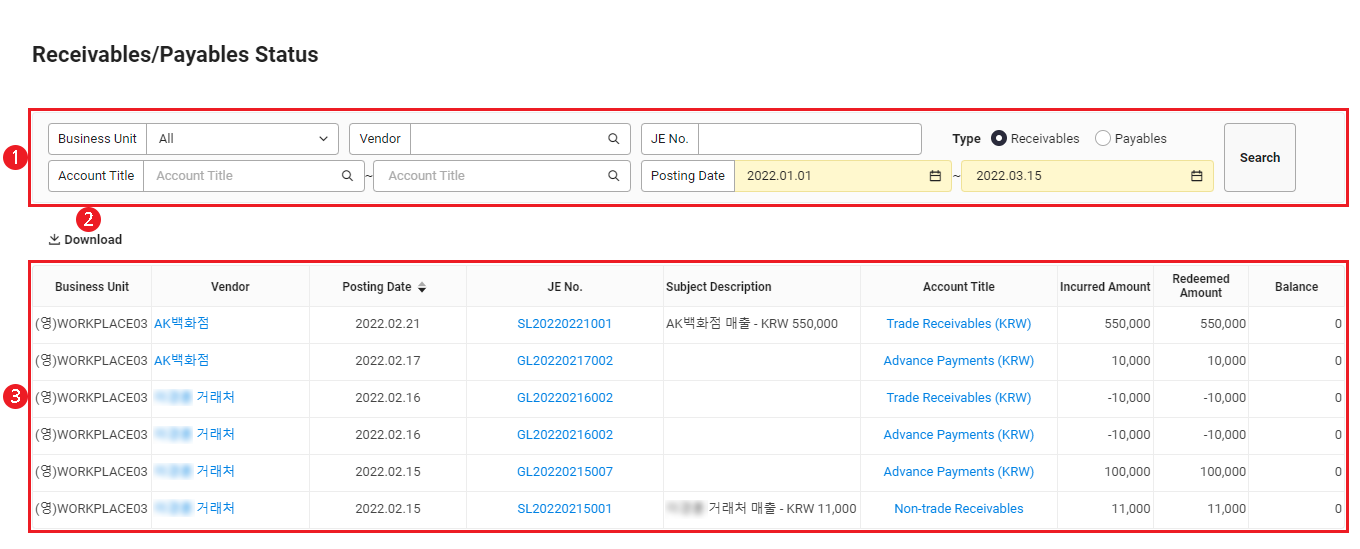
| Area | Description |
|---|---|
| ① Search Window | Searches the history of receivables/payables by business place, vendor, slip number, receivables or payables classification, account title, and slip date. |
| ② Download | Downloads the list of receivables/payables history as an Excel file |
| ③ List of Receivables/Payables History | Displays the history of receivables and payables owned by the company in a list. Click each detail to view information.
|
Download List of Receivables/Payables History
The following describes how to download the list of receivables/payables history records as an Excel file.
- Click the ‘Admin Menu’ at the top right of the PC web screen, and then click ‘Accounting’ in the pop-up window.
- Click at the top left of the screen.
- Click 'View Ledger > Receivables/Payables Status' from the menu.
- If necessary, enter the receivables/payables history to be searched in the search window, and then click 'Search'.
- You can view the list of receivables/payables history records that match the entered conditions.
- Click 'Download'.
- The list of receivables/payables history records is downloaded as an Excel file.
Budget Usage Status
You can view the status of budgets used in the Accounting service.
This menu is displayed if you're using the Budget service and have set the budget usage status in the ‘Accounting > Settings’ menu to ‘Use’.
The Budget Usage Status page is laid out as follows.
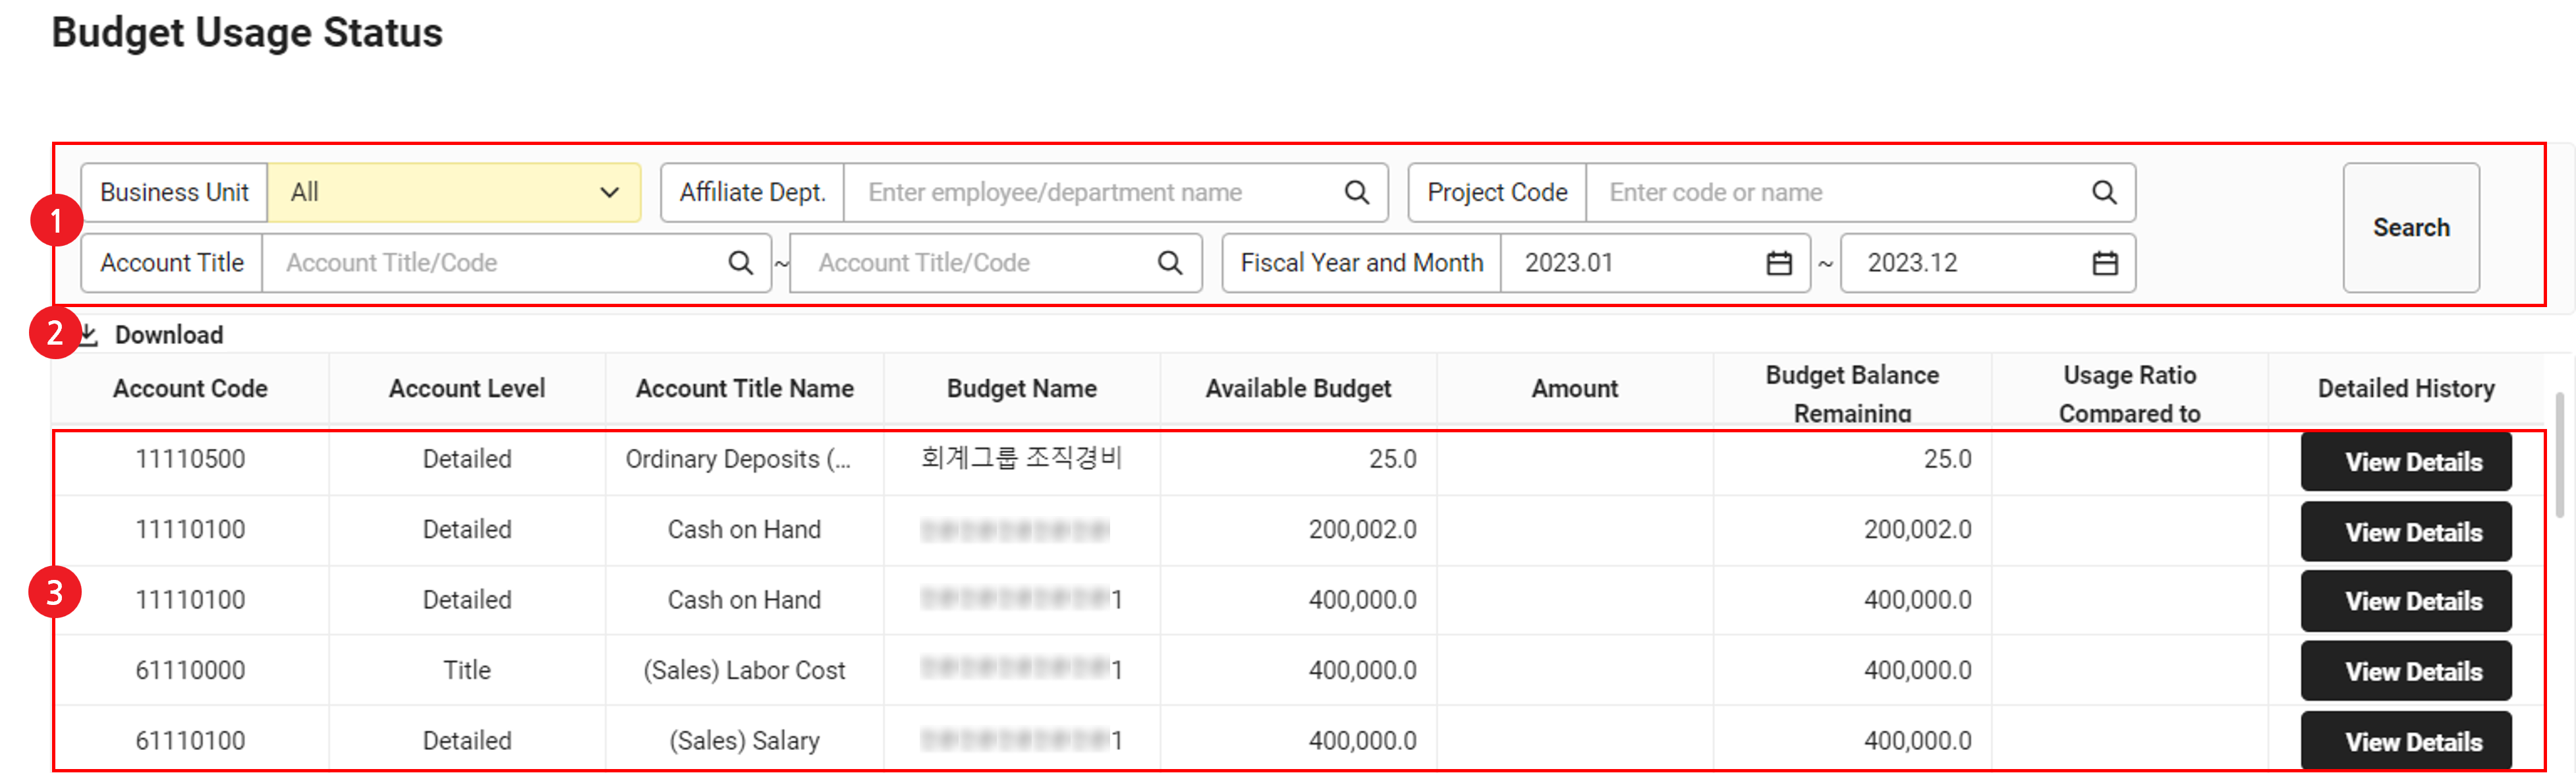
| Area | Description |
|---|---|
| ① Search Window | Search the budget usage history based on business place, affiliated department, project code, account title, and fiscal year and month conditions. |
| ② Download | Download the budget usage status. |
| ③ Budget usage history | View the budget history used in the Accounting service in a list.
|
Download Budget Usage Status
The following describes how to download the budget usage status as an Excel file.
- Click the ‘Admin Menu’ at the top right of the PC web screen, and then click ‘Accounting’ in the pop-up window.
- Click at the top left of the screen.
- Click 'View Ledger > Budget Usage Status' from the menu.
- If necessary, enter the budget usage status history to be viewed in the search window, and then click ‘Search’.
- You can view the budget usage status history that matches the entered condition.
- Click 'Download'.
- The list of budget usage status is downloaded as an Excel file.