You can view the deposit/withdrawal details, transaction history, and account balance of the bank that has been integrated through ‘Accounting Service > Manage Funds > Integrate Bank/Account’. You can also view the details of errors from integration failure. Data of the integrated bank is imported through scraping and displayed in each menu.
- The ‘Integrate Financial Account’ menu is displayed by selecting ‘Y’ for the financial account integration status in the ‘Settings > Set Accounting’ menu.
- For information on how to integrate banks and accounts, see Integrate Bank/Account.
- The Integrate Financial Account menu is for viewing the data imported from an integrated bank through scraping. It does not support deposit and withdrawal transactions with actual financial companies.
Deposit Integration History
You can view the deposit history of integrated bank accounts. Deposits are specified as the ‘Suspense receipt’ account by default, and you can manually select the account title. You can create a deposit slip with the deposit integration history, or map a related slip that already exists. Once created as a suspense receipt account, the deposit slip is cleared with accounts receivable. You can view it in ‘Accounting Service > Manage Receivable/Payable > Deposit Clearing’.
The Deposit Integration History page is laid out as follows.
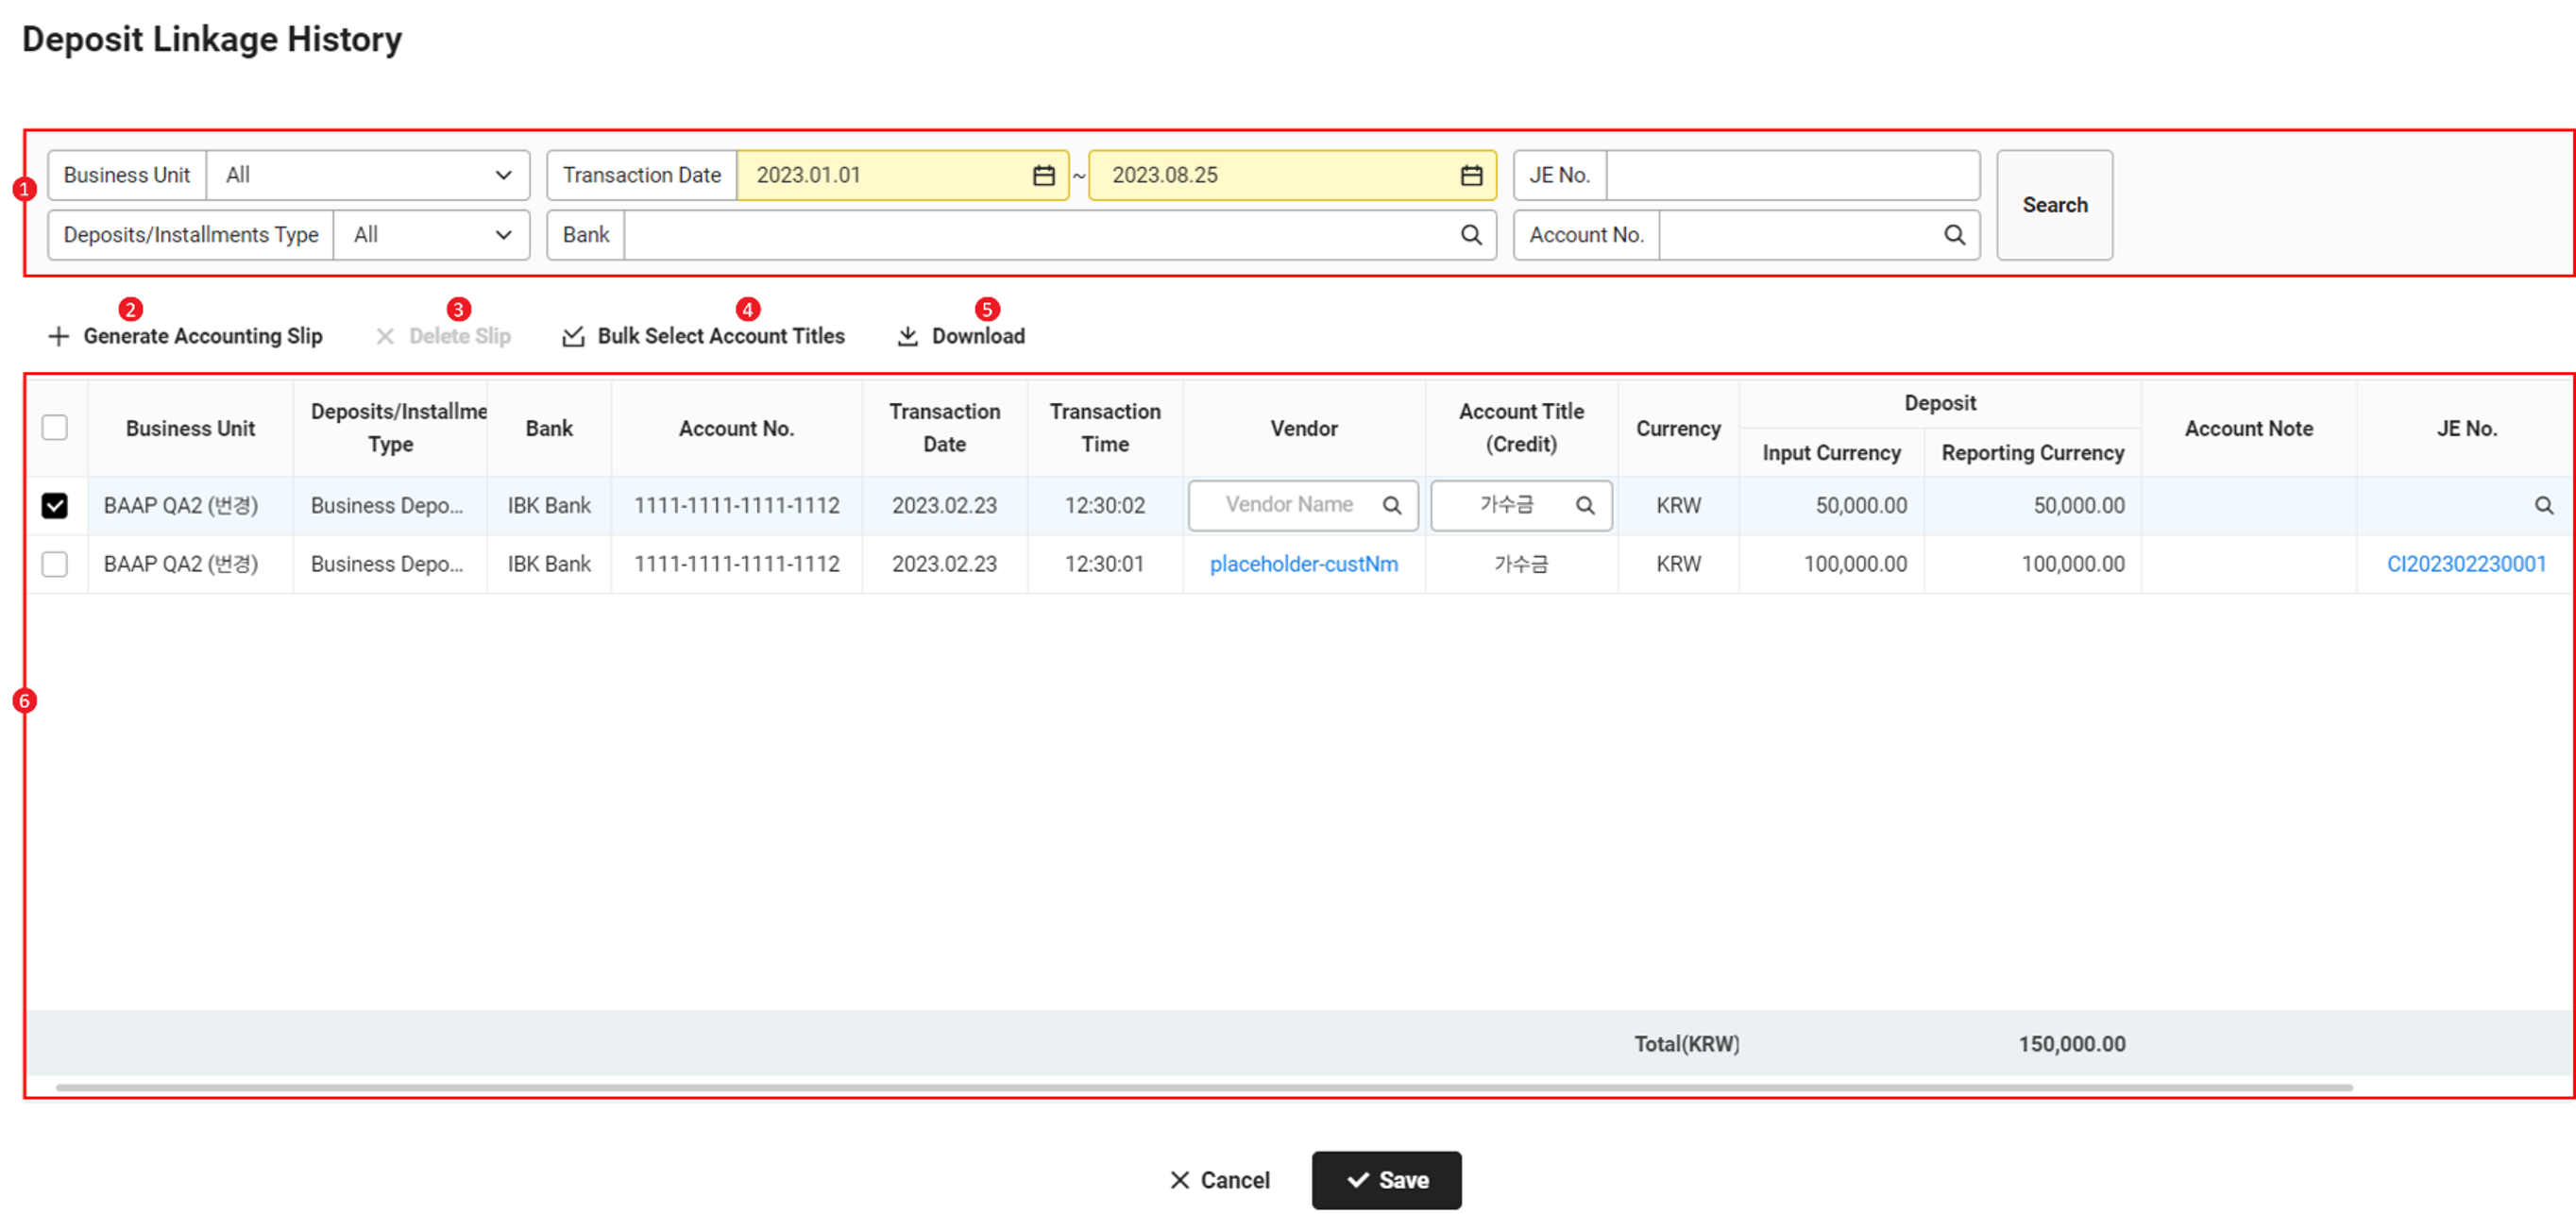
| Area | Description |
|---|---|
| ① Search window | Search deposit details by business place, transaction date, slip number, deposit/installment savings type, bank, and account number conditions |
| ② Create Slip | Create slips for the selected deposit details (See Create Integrated Deposit Slip) |
| ③ Delete Slip | Delete deposit slips for the currently selected purchase details upon clicking it |
| ④ Bulk Specify Account Titles | Click to bulk specify the account title of deposit integration history (See Bulk Specify Account Title) |
| ⑤ Download | Download the list of integrated deposit details as an Excel file upon clicking it (See Download Deposit Integration History) |
| ⑥ List of integrated deposit details | Check the deposit history in a list
|
Bulk Specify Account Titles
You can bulk specify account titles by selecting integrated deposit history for which no deposit slips have been created.
The following describes how to bulk specify an account title.
- Click the ‘Admin Menu’ at the top right of the PC web screen, and then click ‘Accounting’ in the pop-up window.
- Click
 at the top left of the screen.
 - Click ‘Integrate Financial Account > Deposit Integration History’ from the menu.
- After selecting deposit history to which you want to bulk specify an account title, click ‘Bulk Specify Account Title’.
- Select an account title you want to specify in bulk in the pop-up window, and click ‘OK’.
- Click ‘Save’.
- The account tile for the selected deposit integration history is specified in bulk.
Create Integrated Deposit Slip
The following describes how to create a new slip with integrated deposit history.
- Click the ‘Admin Menu’ at the top right of the PC web screen, and then click ‘Accounting’ in the pop-up window.
- Click at the top left of the screen.
- Click ‘Integrate Financial Account > Deposit Integration History’ from the menu.
- Select the deposit history to creating a slip for, and then click ‘Create Slip’.
- In the notification pop-up window, click 'Yes'.
- A slip is created for the applicable deposit integration history.
Map Existing Slip to Deposit History
The following describes how to map an existing related deposit slip to deposit details.
- Click the ‘Admin Menu’ at the top right of the PC web screen, and then click ‘Accounting’ in the pop-up window.
- Click at the top left of the screen.
- Click ‘Integrate Financial Account > Deposit Integration History’ from the menu.
- Select the deposit details for mapping an accounting slip, and then click
 of the ‘Slip Number’ column.
 - In the pop-up window for View Related Accounting Slips, set the slip date and other conditions to search for related deposit accounting slips.
- Select an existing deposit slip to be mapped, and then click ‘Save’.
- In the notification pop-up window, click 'Yes' .
- The existing slip is mapped to the applicable deposit integration history.
Download Deposit Integration History
The following describes how to download the deposit integration history as an Excel file.
- Click the ‘Admin Menu’ at the top right of the PC web screen, and then click ‘Accounting’ in the pop-up window.
- Click at the top left of the screen.
- Click ‘Integrate Financial Account > Deposit Integration History’ from the menu.
- If necessary, enter the deposit integration conditions to be searched in the search window, and then click ‘Search’.
- You can view the deposit integration history that applies to the entered conditions.
- Click 'Download'.
- The deposit integration history is downloaded as an Excel file.
Withdrawal Integration History
You can view the withdrawal details of an integrated bank account and map if there is a related withdrawal accounting slip.
The Withdrawal Integration History page is laid out as follows.
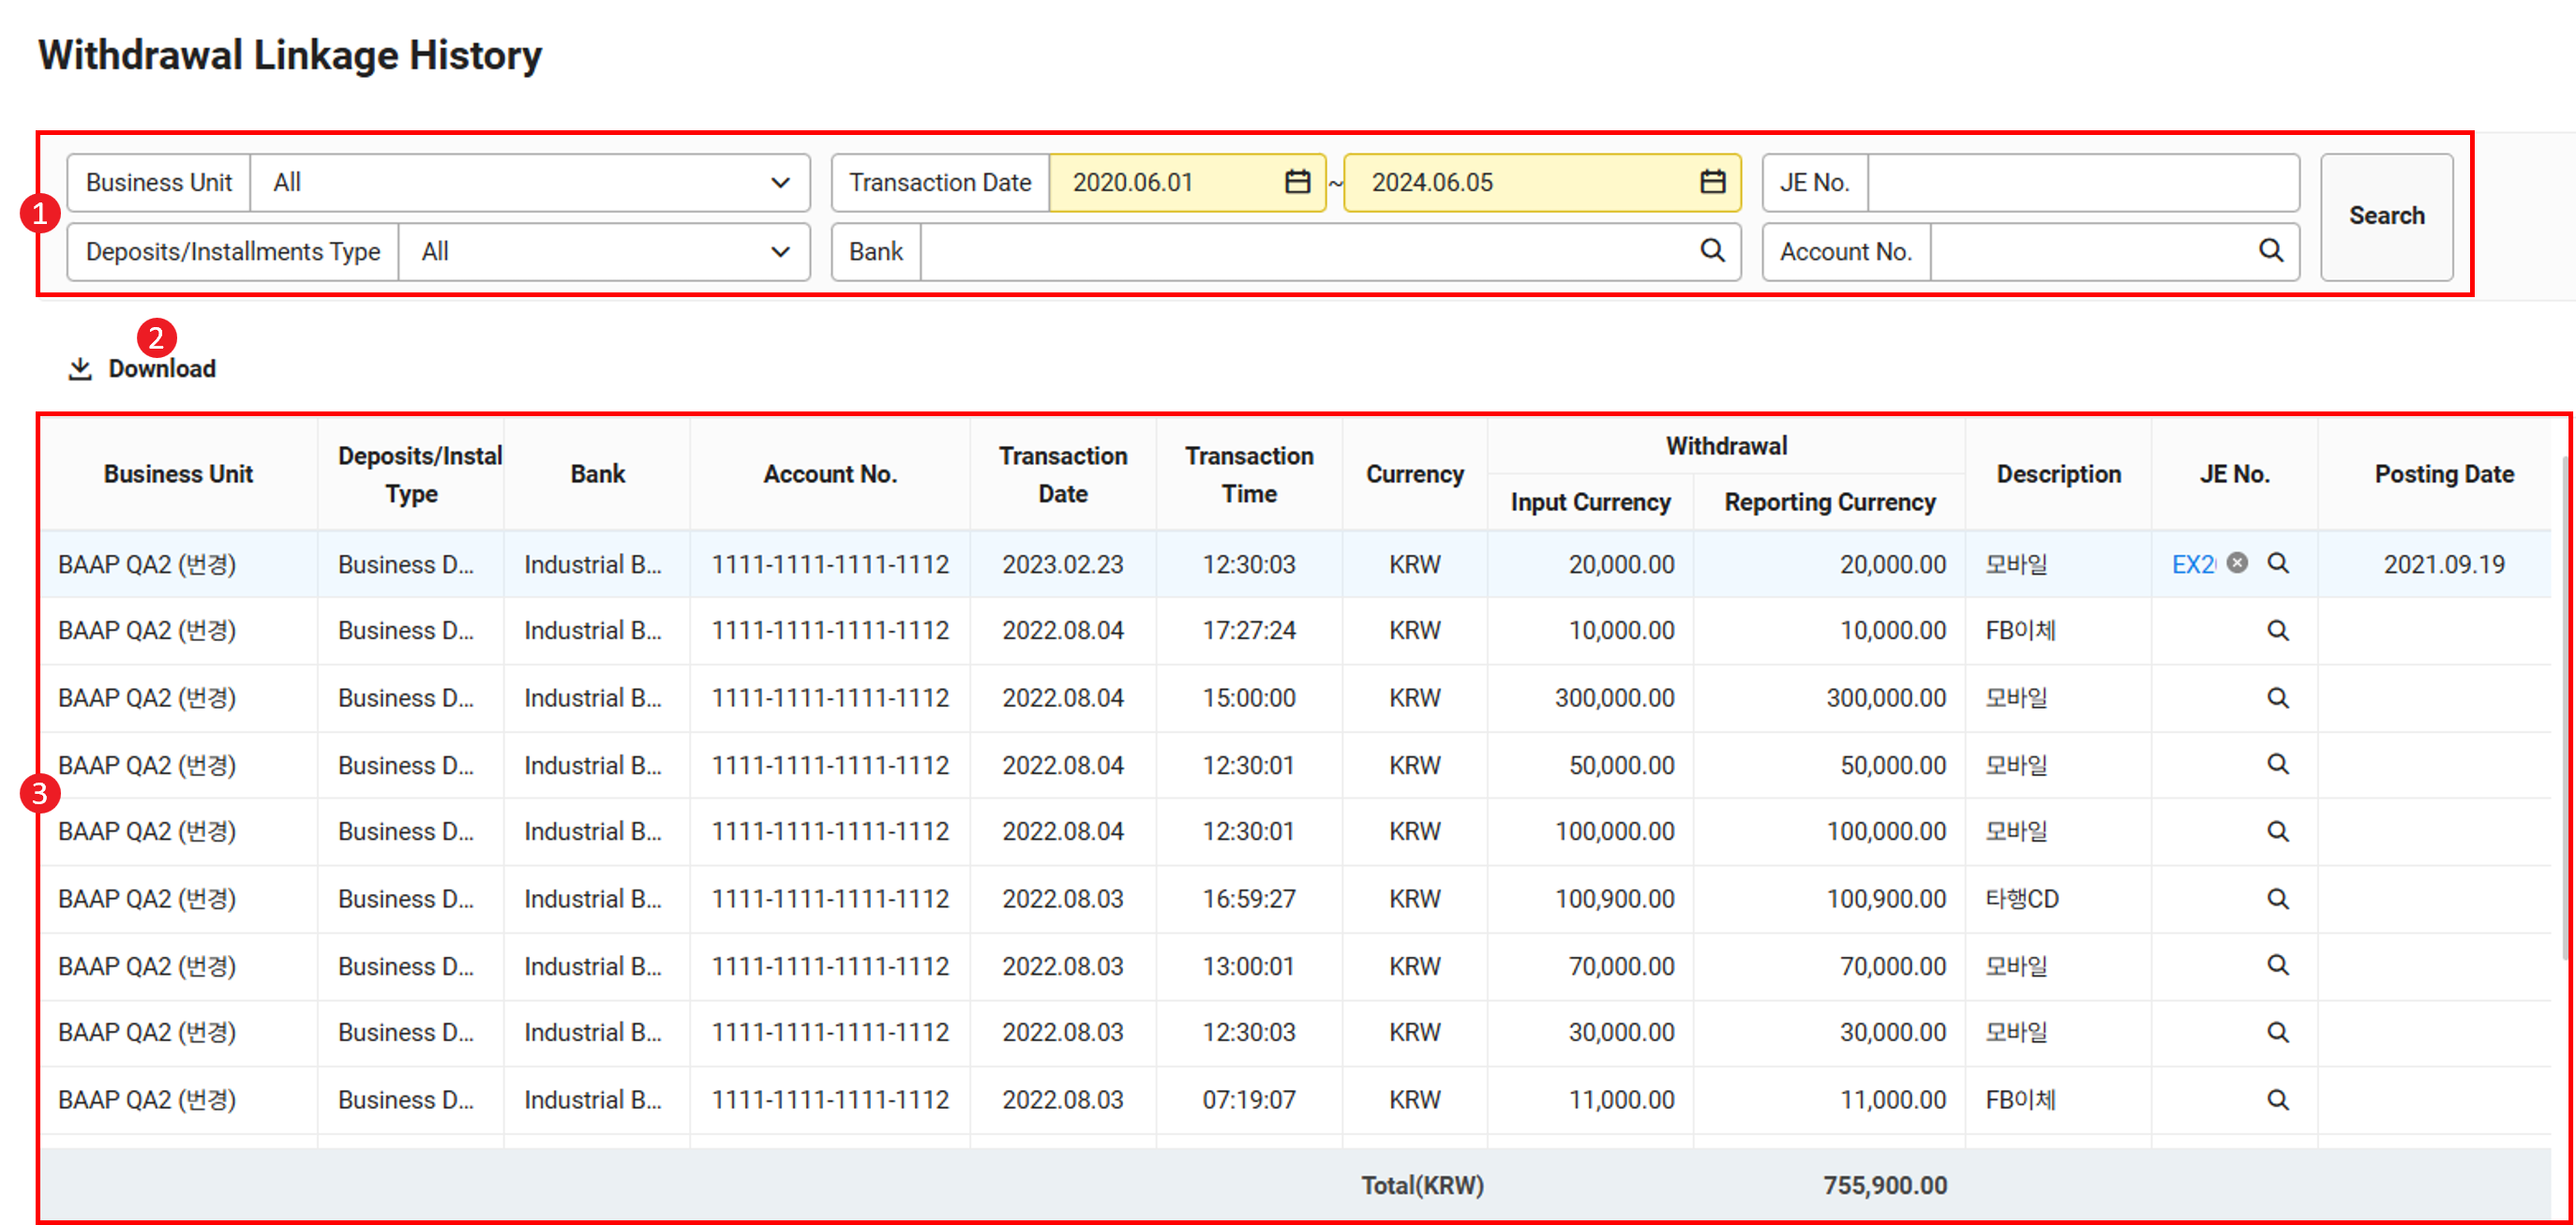
| Area | Description |
|---|---|
| ① Search window | Search withdrawal details by business place, transaction date, slip number, deposit/installment savings type, bank, and account number conditions |
| ② Download | Download the list of integrated withdrawal details as an Excel file upon clicking it (See Download Withdrawal Integration History) |
| ③ List of integrated withdrawal details | Check the withdrawal history in a list
|
Map Existing Slip to Withdrawal History
The following describes how to map an existing related withdrawal slip to withdrawal history.
- Click the ‘Admin Menu’ at the top right of the PC web screen, and then click ‘Accounting’ in the pop-up window.
- Click at the top left of the screen.
- Click ‘Integrate Financial Account > Withdrawal Integration History’ from the menu.
- Select the withdrawal details for mapping an accounting slip, and then click of the ‘Slip Number’ column.
- In the pop-up window for View Related Accounting Slips, set the slip date and other conditions to search for related withdrawal accounting slips.
- Select an existing withdrawal slip to be mapped, and then click ‘Save’.
- In the notification pop-up window, click ‘OK’ .
Download Withdrawal Integration History
The following describes how to download the withdrawal integration history as an Excel file.
- Click the ‘Admin Menu’ at the top right of the PC web screen, and then click ‘Accounting’ in the pop-up window.
- Click at the top left of the screen.
- Click ‘Integrate Financial Account > Withdrawal Integration History’ from the menu.
- If necessary, enter the withdrawal integration conditions to be searched in the search window, and then click ‘Search’.
- You can view the withdrawal integration history that applies to the entered conditions.
- Click 'Download'.
- The withdrawal integration history is downloaded as an Excel file.
View Transaction History of Integrated Account
You can view the deposit and withdrawal details of integrated bank accounts on one page.
The View Transaction History of Integrated Account page is laid out as follows.
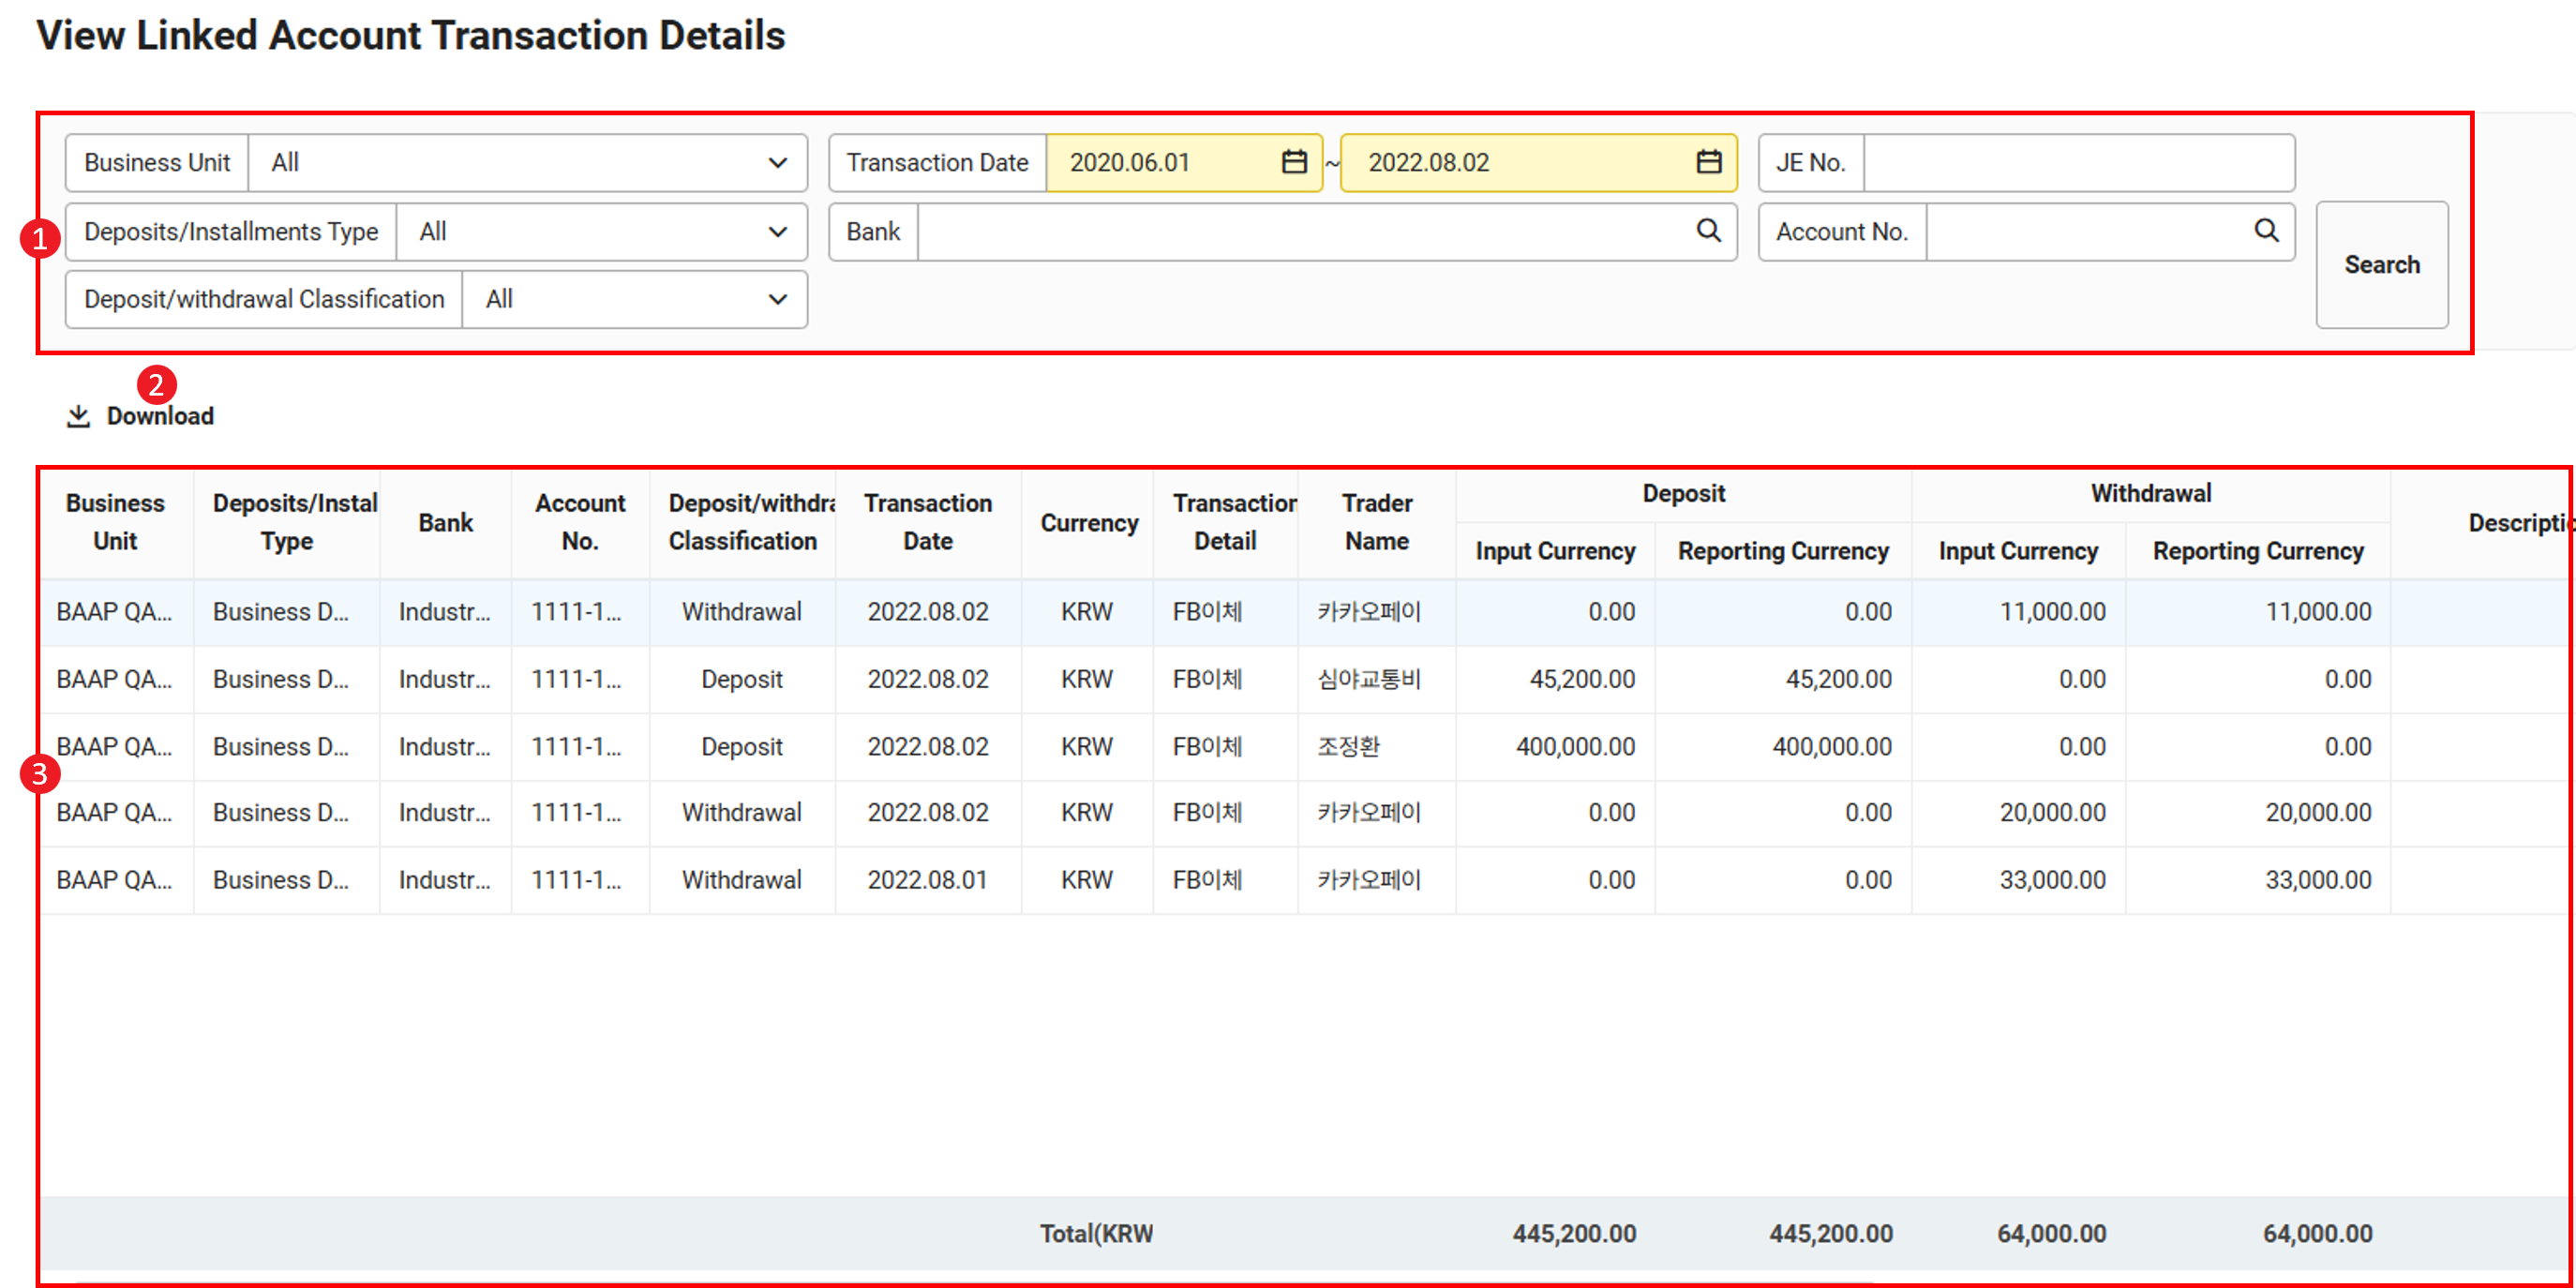
| Area | Description |
|---|---|
| ① Search window | Search deposit and withdrawal details by business place, transaction date, slip number, deposit/installment savings type, bank, account number, and deposit/withdrawal classification conditions |
| ② Download | Download the list of integrated deposit and withdrawal details as an Excel file upon clicking it |
| ③ List of integrated deposit and withdrawal history records | Check the deposit and withdrawal history in a list
|
Download Deposit and Withdrawal History
The following describes how to download the deposit and withdrawal history as an Excel file.
- Click the ‘Admin Menu’ at the top right of the PC web screen, and then click ‘Accounting’ in the pop-up window.
- Click at the top left of the screen.
- Click ‘Integrate Financial Account > View Transaction History of Integrated Accounts’ from the menu.
- If necessary, enter the transaction conditions to be searched in the search window, and then click ‘Search’.
- You can view the deposit and withdrawal history that apply to the entered conditions.
- Click 'Download'.
- The deposit and withdrawal history is downloaded as an Excel file.
Compare Account Balance
You can view the account balance and slip balance of each integrated bank account as well as view the difference between balances.
The Compare Account Balance page is laid out as follows.
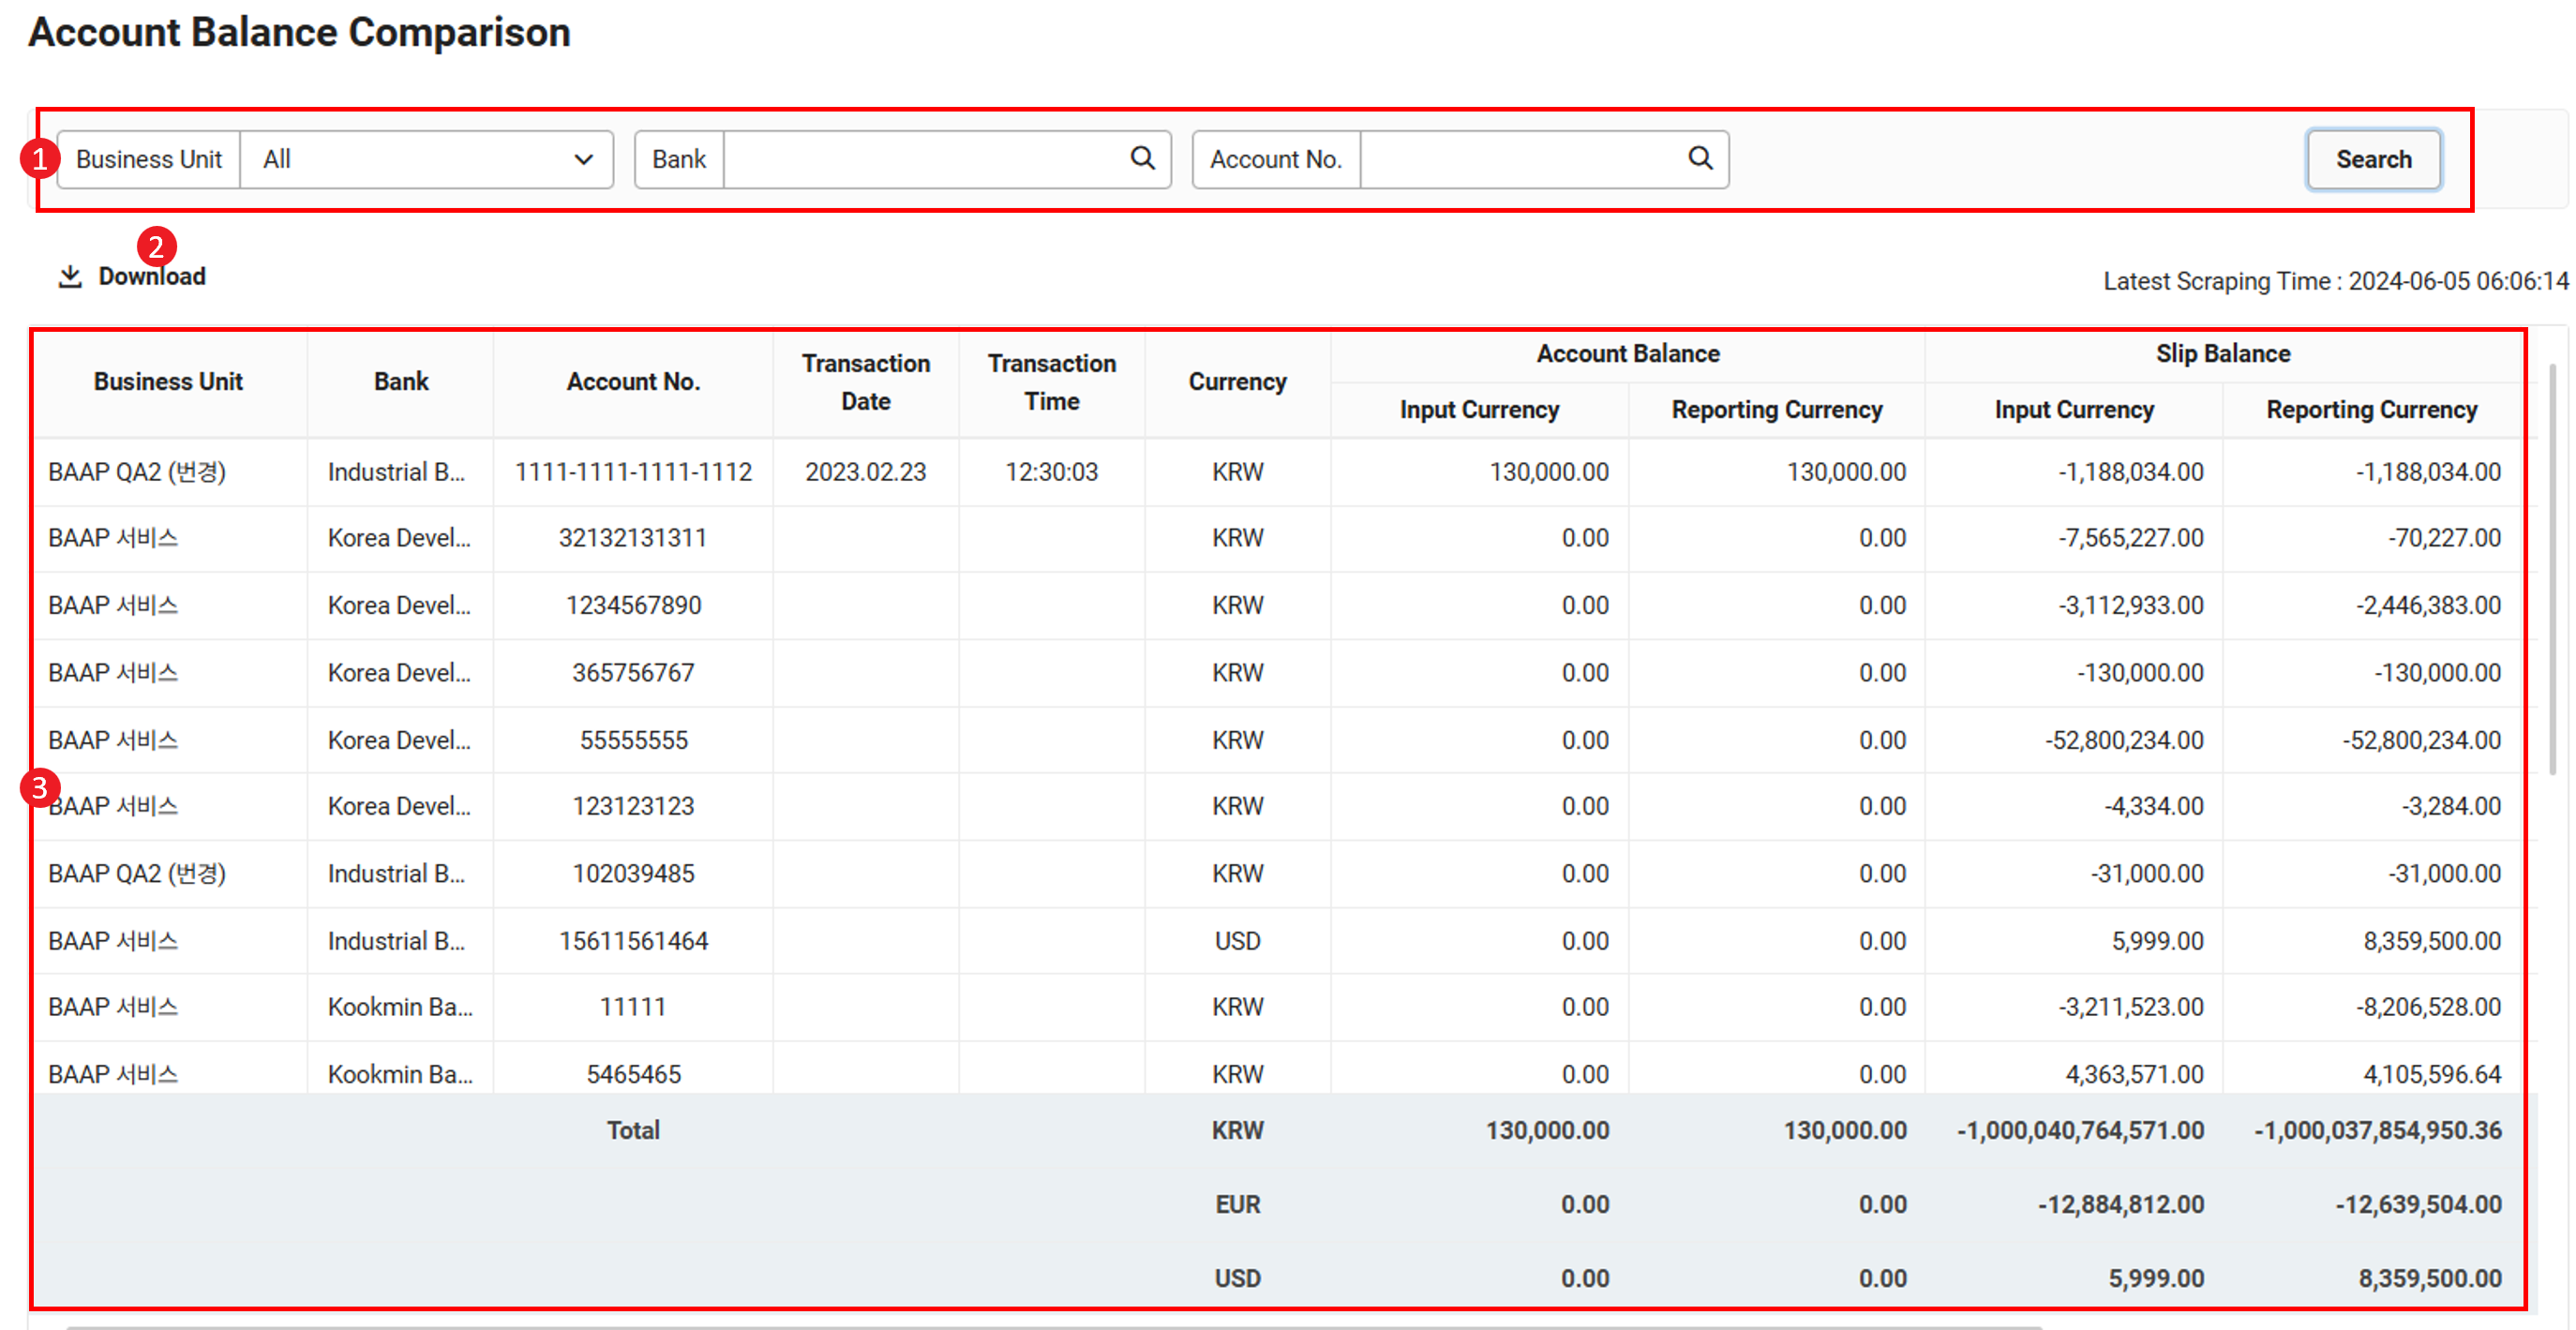
| Area | Description |
|---|---|
| ① Search window | Search account balance history by business place, bank, and account number conditions |
| ② Download | Download the list of integrated account balance history as an Excel file upon clicking it |
| ③ List of integrated account balance history records | It displays account balance history in a list, and displays the total amount by currency |
Differences in slip aggregation standards between Account Balance and Slip Balance:
- Account Balance: balance of the scraped account
- Slip Balance: aggregated based on the account of the aggregation/management item for the slip balance
Download Account Balance History
The following describes how to download the account balance history as an Excel file.
- Click the ‘Admin Menu’ at the top right of the PC web screen, and then click ‘Accounting’ in the pop-up window.
- Click at the top left of the screen.
- Click ‘Integrate Financial Account > Compare Account Balance’ from the menu.
- If necessary, enter the bank account conditions to be searched in the search window, and then click ‘Search’.
- You can view the account balance that applies to the entered conditions.
- Click 'Download'.
- The account balance history is downloaded as an Excel file.
Integration Error Status
You can view the details of errors that occurred in the process of integrating with banks.
The Integration Error Status page is laid out as follows.
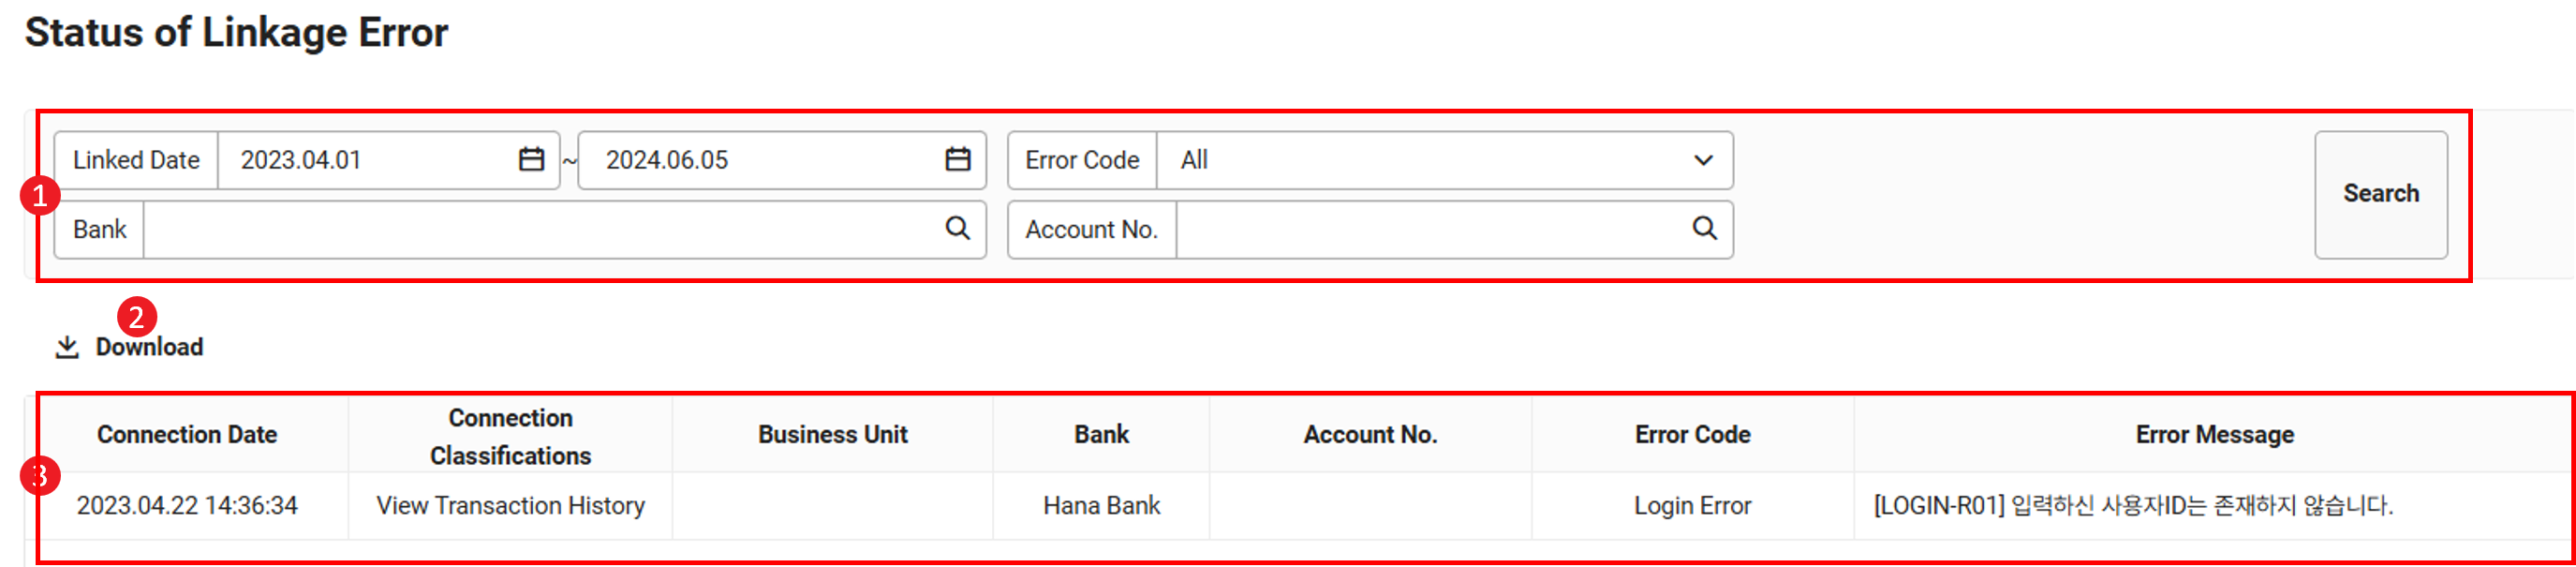
| Area | Description |
|---|---|
| ① Search window | Search status of integration error by integrated date, error code, bank, and account number conditions |
| ② Download | Download the list of integration errors as an Excel file upon clicking it |
| ③ List of integration errors | It displays status of integration errors in a list |
| ④ Error Message | It displays the details of an error that has occurred
|
- An integration error may occur if the effective period of a certificate has expired or if it has been reissued. In this case, see Manage Certificate to check the certification and register it again.
- For errors that cannot be successfully identified or are difficult to resolve, please contact us through the Contact Us page.
Download Integration Error List
The following describes how to download the list of integration errors as an Excel file.
- Click the ‘Admin Menu’ at the top right of the PC web screen, and then click ‘Accounting’ in the pop-up window.
- Click at the top left of the screen.
- Click ‘Integrate Financial Account > Integration Error Status’ from the menu.
- If necessary, enter the error conditions to be searched in the search window, and then click ‘Search’.
- You can view the details of integration errors that apply to the entered conditions.
- Click 'Download'.
- The list of integration errors is downloaded as an Excel file.