You can perform fixed asset accounting tasks, such as registering fixed asset type and increasing, decreasing and closing assets, calculating depreciation, viewing slips, etc., and manage asset information.
To manage fixed assets, you must first register fixed asset types and set the depreciation method, useful life, residual value, account title, etc. of each type. Afterward, you can register and manage fixed assets according to the types set. You can also register assets that were in possession before using the Manage Fixed Asset menu through the ‘Register Asset History’ menu, as well as manage omissions by comparing and checking with the book value of financial statements.
The flow of fixed asset management is as follows.
Registration of assets that were in possession before using the Manage Fixed Asset menu
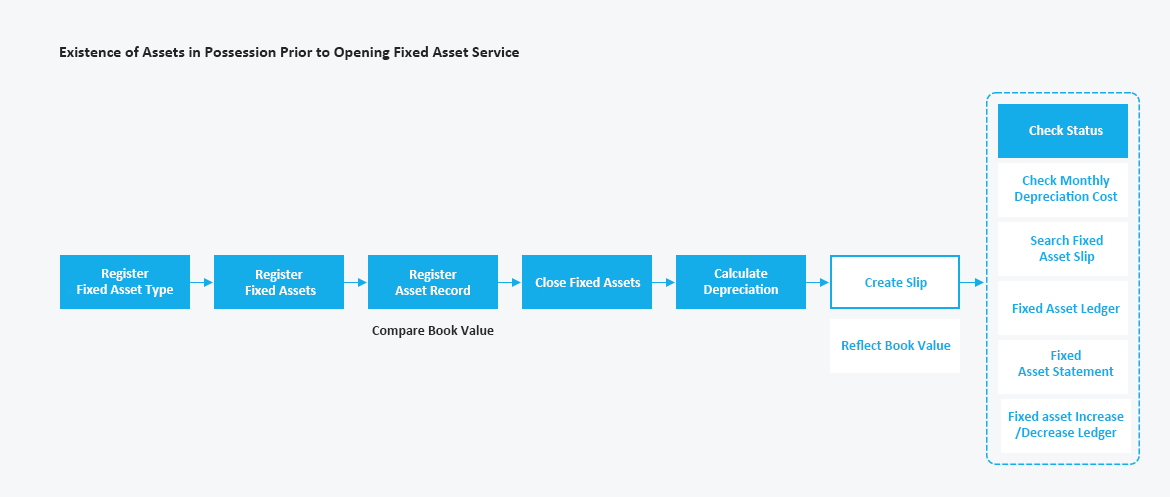
Acquisition of fixed assets

Register Fixed Asset Type
You can define the types of fixed assets possessed by the company, and set the depreciation method, useful life, residual value, account title, etc. of each type. You can classify and manage up to 5 types in addition to the 2 default types provided.
The Register Fixed Asset Type page is laid out as follows.
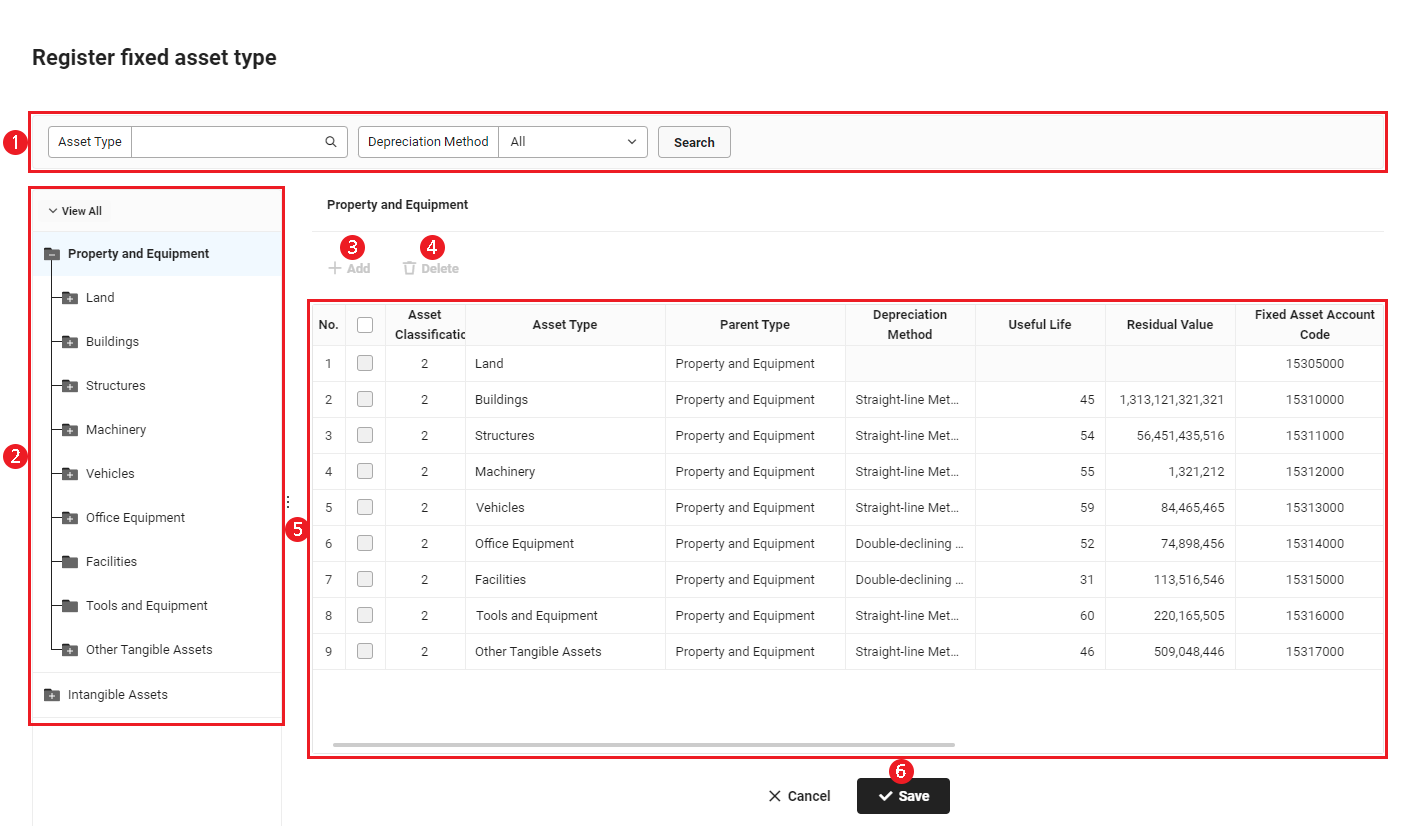
| Area | Description |
|---|---|
| ① Search Window | Search fixed asset types according to asset type and depreciation method conditions |
| ② Fixed Asset Type Classification | It displays registered fixed asset types by stage, starting from the top-level type Click each fixed asset type classification to check lower level classification The display order of 3rd level classification or lower types can be changed within the same level |
| ③ Add | Register a new fixed asset type (See Register Fixed Asset Type) |
| ④ Delete | Click to delete the selected fixed asset type Types already registered with fixed assets, types defined with sub-types, and 1st and 2nd classifications provided by default can't be deleted |
| ⑤ Fixed Asset Type Details | It displays the details of the selected fixed asset type You can edit details by changing and saving details for each account title |
| ⑥ Save | Click to save the edited content |
Register Fixed Asset Type
The following describes how to register a new sale fixed asset type.
- Click the ‘Admin Menu’ at the top right of the PC web screen, and then click ‘Accounting’ in the pop-up window.
- Click
 at the top left of the screen.
 - Click ‘Manage Fixed Asset > Register Fixed Asset Type’ from the menu.
- From the list of fixed asset type classifications, find and select the classification to register the new type for.
- Click 'Add'.
- Enter the settings of the type to be registered, as shown below.
- Asset Type: Enter the fixed asset type name.
If multilingual is enabled, ‘A’ can be used to enter a multilingual name. - Depreciation Method: Select the asset depreciation method between the straight-line method and double-declining balance method.
- Straight-line Method: Calculate the same amount as the depreciation cost during the useful life of the fixed asset.
- Double-declining Balance Method: Calculate the depreciation cost by multiplying a fixed depreciation rate to the book value.
- The depreciation method can't be selected for land assets, as they are not depreciated.
- The method is fixed as the straight-line method for buildings and structures, defined to be depreciated with the straight-line method under the tax law, as well as for intangible assets, generally depreciated with the straight-line method.
- Useful Life: Specify the useful life period during which the utility of the asset lasts, up to 99 years.
- Residual Value: Enter the asset value that remains after completing depreciation of the asset.
- Depreciation Cost Account: Select the depreciation cost account.
- The fixed asset account code and accumulated depreciation amount account are automatically set as asset account titles for the 1st and 2nd level classifications. Fixed asset types created under the 2nd level classification use the asset account and accumulated depreciation amount used by the 2nd level classification.
- Asset Type: Enter the fixed asset type name.
- Click 'Save' and then click 'Yes' in the notification pop-up window.
- The new fixed asset type is registered and displayed in the list of type classifications. You can create a sub-type by clicking the type in the list.
Register Fixed Asset
In the Register Fixed Asset menu, you can register the fixed assets possessed by the company.
The Register Fixed Asset page is laid out as follows.
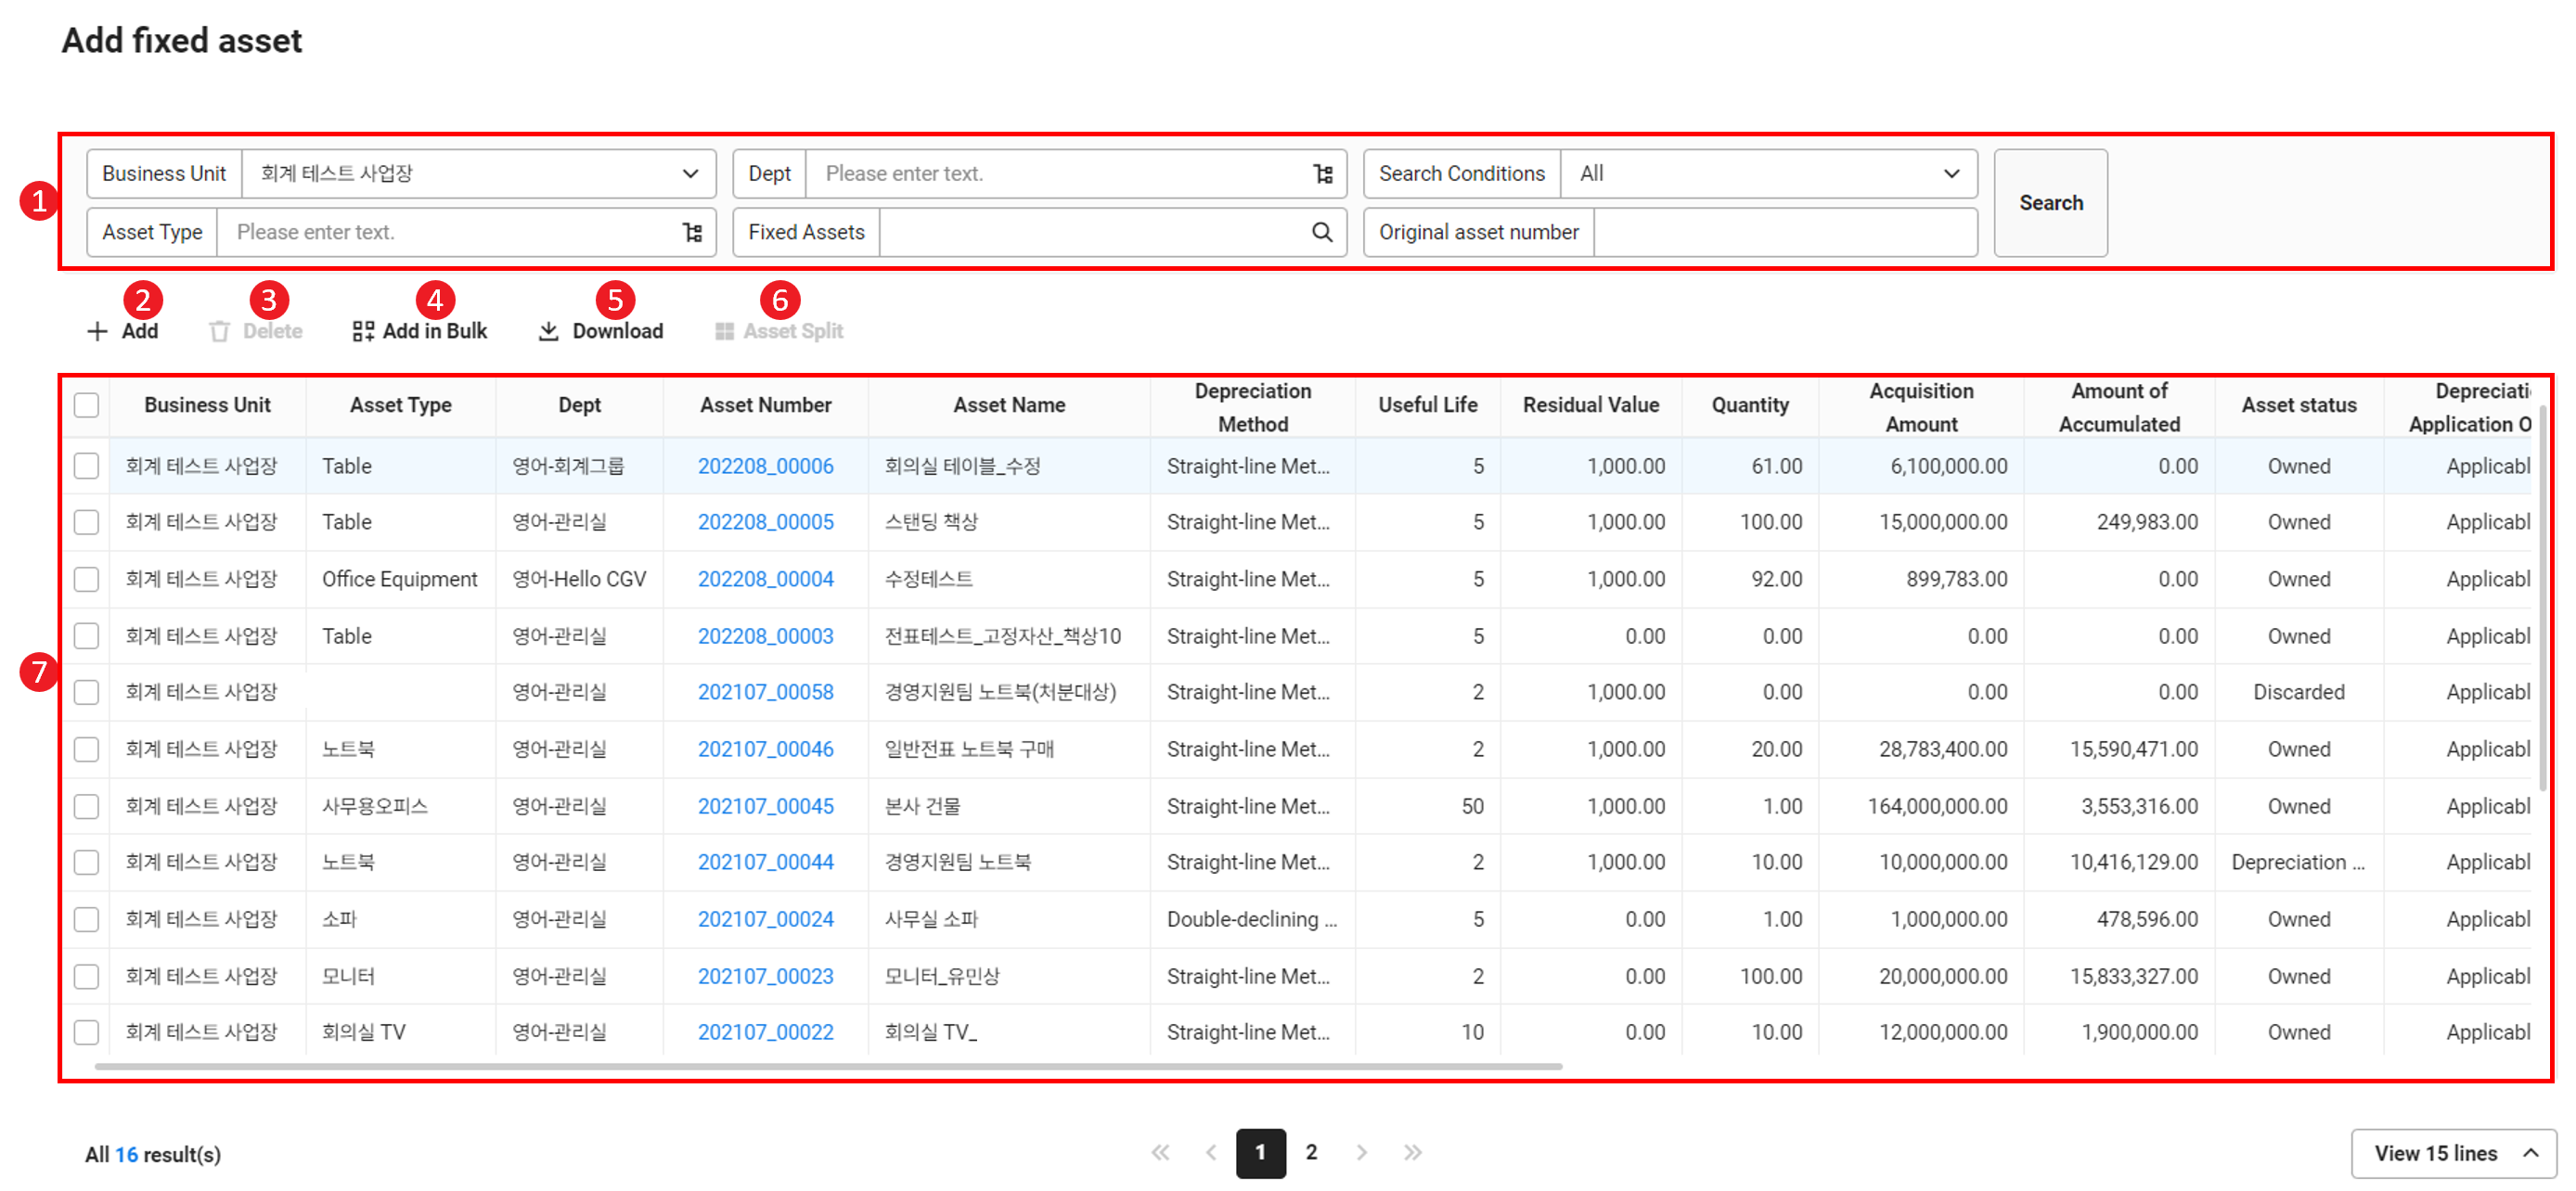
| Area | Description |
|---|---|
| ① Search Window | Search fixed assets according to business place, department, search condition, asset type, fixed asset, and original asset number conditions |
| ② Add | Register a new fixed asset (See Add Fixed Asset) |
| ③ Delete | Click to delete the selected fixed asset |
| ④ Bulk Add | Register fixed assets in bulk using an Excel template (See Bulk Register Fixed Assets) |
| ⑤ Download | Click to download the list of fixed assets as an Excel file (See Download Fixed Asset List) |
| ⑥ Asset Split | Create a new asset by splitting the selected fixed asset (See Split Fixed Asset) |
| ⑦ Fixed asset list | Check registered fixed assets in a list
|
Add Fixed Asset
The following describes how to add a new fixed asset.
- Click the ‘Admin Menu’ at the top right of the PC web screen, and then click ‘Accounting’ in the pop-up window.
- Click at the top left of the screen.
- Click ‘Manage Fixed Asset > Register Fixed Asset’ from the menu.
- Click 'Add'.
- Enter the details for the fixed asset to be added, as shown below.
- Asset Number: The fixed asset is numbered automatically by the system upon registration and can't be edited. (Year, month, and 5-digit serial number)
- Asset Name, Business Place, Department: Enter the name of the fixed asset, affiliated business place, and managing department.
- Asset Type: Select the type to classify the fixed asset.
When you select a type, the fixed asset account, depreciation method, useful life, residual value, depreciation cost account, and accumulated depreciation account information set for the type is automatically reflected. The depreciation rate is automatically calculated according to the useful life and depreciation method. - Depreciation Calculation Status: Select the calculation status of depreciation.
This can't be selected for fixed asset types that are non-depreciable, such as lands, etc. - Depreciation Cost Account, Accumulated Depreciation Amount Account, Residual Value: The information set for the fixed asset type is integrated and displayed.
- Special Depreciation Target: If the fixed asset is a target of special depreciation, then select Applicable and enter the special depreciation rate.
- Search Expenditure Resolution Report: It is displayed when using the Expenditure service. If set to ‘Allow,’ the fixed asset can be searched when creating an expenditure resolution with the ‘Asset acquisition’ type.
- Note: Enter the note for the fixed asset.
- Click 'Save' and then click 'Yes' in the notification pop-up window.
- The fixed asset is added.
Bulk Register Fixed Assets
The following describes how to register multiple fixed assets in bulk using an Excel template.
- Click the ‘Admin Menu’ at the top right of the PC web screen, and then click ‘Accounting’ in the pop-up window.
- Click at the top left of the screen.
- Click ‘Manage Fixed Asset > Register Fixed Asset’ from the menu.
- Click 'Bulk Add’.
- In the Bulk Add Assets pop-up window, click 'Download Template File' to download the template.
- Enter the details for the fixed asset according to the template, and save the file.
- The marked items are required field.
- Select Business Place in the Upload pop-up window, and then click ‘Attach the file from your PC, or drag the file here.’ area to select the file to attach or drag the file to that area.
- Click 'OK'.
- The fixed assets are registered in bulk.
Download Fixed Asset List
The following describes how to download the fixed asset list as an Excel file.
- Click the ‘Admin Menu’ at the top right of the PC web screen, and then click ‘Accounting’ in the pop-up window.
- Click at the top left of the screen.
- Click ‘Manage Fixed Asset > Register Fixed Asset’ from the menu.
- If necessary, enter the fixed asset conditions to be viewed in the search window, and then click ‘Search’.
- You can view the fixed assets that match the entered conditions.
- Click 'Download'.
- The list of fixed assets is downloaded as an Excel file.
Split Fixed Asset
You can create new assets by splitting a registered fixed asset. You can only split a fixed asset if the fixed asset has been closed for the previous month, the fixed asset is in the ‘Owned’ status, and there is no previous split history.
The following describes how to split a fixed asset.
- Click the ‘Admin Menu’ at the top right of the PC web screen, and then click ‘Accounting’ in the pop-up window.
- Click at the top left of the screen.
- Click ‘Manage Fixed Asset > Register Fixed Asset’ from the menu.
- Select the fixed asset to be split, and then click ‘Split Asset’.
- It takes you to the Split Fixed Asset page.
- Existing Asset: If there are data related to increase/decrease/depreciation of an existing asset, then they are integrated automatically.
- New Asset: The asset number of a new asset is numbered by the system, and it can't be edited. (Year, month, and 5-digit serial number)
- It takes you to the Split Fixed Asset page.
- Enter the asset name, quantity, and acquisition amount of the new asset to be created by splitting.
- The split quantity must be less than the total quantity of the existing asset.
- When you enter the acquisition amount of the new asset, it is automatically deducted from the acquisition amount of the existing asset.
- When you enter the quantity to be split, the quantity/acquisition amount/accumulated depreciation amount information of the existing asset is split.
- Click ‘Save’.
- The fixed asset will be split.
Fixed Asset Increase
You can register the data for a new fixed asset that is acquired or spent. You can also create fixed asset slips using registered increase data or delete fixed asset slips created.
The Fixed Asset Increase page is laid out as follows.
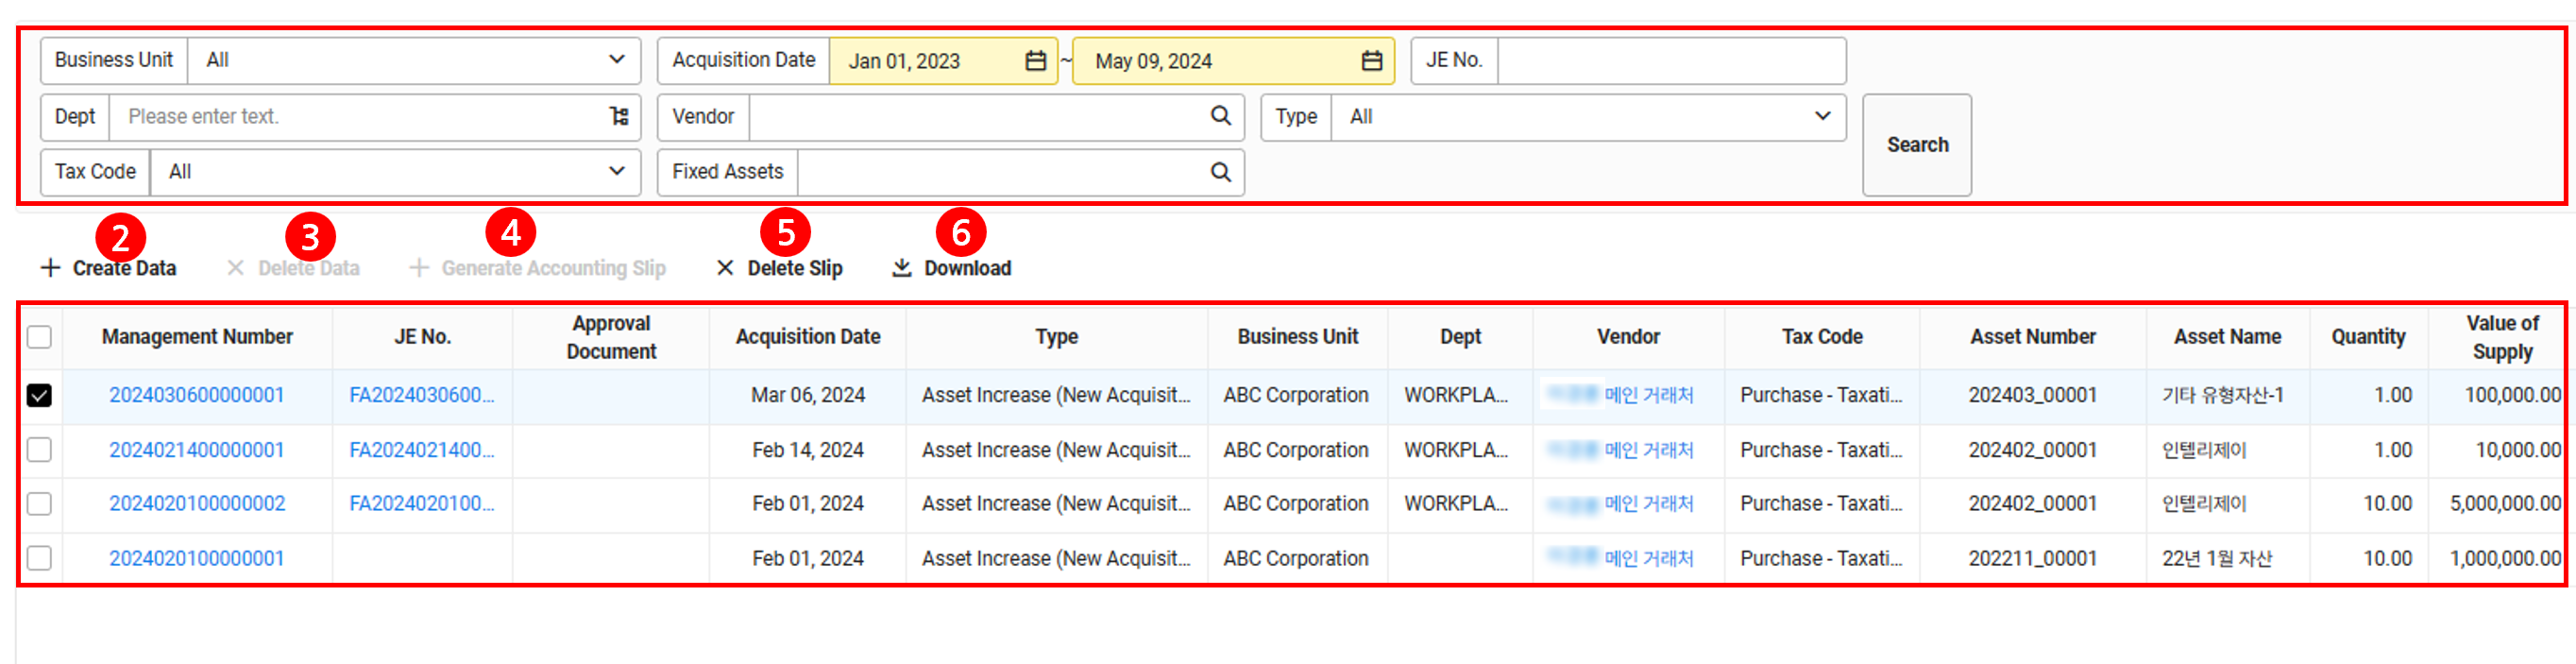
| Area | Description |
|---|---|
| ① Search Window | Search fixed asset data according to business place, acquisition date, slip number, department, vendor, type, tax code, fixed asset number, and name conditions |
| ② Create Data | Create new fixed asset increase data (See Create Fixed Asset Increase Data) |
| ③ Delete Data | Click to delete the selected fixed asset increase data (See Delete Fixed Asset Increase Data) |
| ④ Create Slip | Click to create a slip for the selected fixed asset increase data (See Create Fixed Asset Increase Slip) |
| ⑤ Delete Slip | Click to delete slips of the currently selected fixed asset increase data
|
| ⑥ Download | Click to download the list of fixed asset increase data as an Excel file (See Download Fixed Asset Increase Data List) |
| ⑦ Fixed asset data list | Check the fixed asset increase data in a list Click each detail to view information
|
Create Fixed Asset Increase Data
The following describes how to create fixed asset increase data.
- Click the ‘Admin Menu’ at the top right of the PC web screen, and then click ‘Accounting’ in the pop-up window.
- Click at the top left of the screen.
- Click ‘Manage Fixed Asset > Fixed Asset Increase’ from the menu.
- Click 'Create Data'.
- Enter the fixed asset increase data history, as shown below.
- Acquisition Date: Enter the transaction date of eligible supporting documents.
This date is reflected in the date of fixed asset increase slip creation. - Tax Code: Select the tax code to be applied to the increase history.
- Vendor: Enter the vendor of the increase history.
- Fixed Asset: Select the increasing asset.
- Type: Select new acquisition or capital expenditure.
- Quantity, Supply Value, VAT, Fee: Enter the quantity and amount information of the increasing fixed asset.
- Project: Enter the project code.
- You can add project code in the Manage Project Code menu.
- Project code is displayed only if the company has set to use the project code.
- Budget: It is displayed when setting to enable the use of budget in the ‘Accounting > Settings’ menu. To use the budget, click
 to view the available budget.
- Only budgets that match the business place of the asset, the department (affiliated department), and the project (optional) are searched.
- After checking the available amount, select the budget
- If the company has set the Budget Control Status to ‘Yes’, the budget can't be used if the sum of the entered supply value, VAT, and commission exceeds the available budget.
- Note: Enter the note for the increase history.
- Acquisition Date: Enter the transaction date of eligible supporting documents.
- Click 'Save' and then click 'Yes' in the notification pop-up window.
- Click 'Create Slip’ to create a slip for the data.
The additional description of each tax code is as follows.
- Purchase - Taxation: purchase of amount with tax invoice received, where the purchase tax is deducted (VAT rate 10%)
- Purchase - Tax Exemption: sales of amount with invoice received related to tax exemption (VAT rate 0%)
- Purchase - Card Taxation: sales of amount with card slip received, where the sales tax is deductible (VAT rate 10%)
- Purchase - Card Tax Exemption: tax exempt purchase by credit card (VAT rate 0%)
- Purchase - Cash Taxation: sales of amount with cash receipt received, where the sales tax is deductible (VAT rate 10%)
- Purchase - Cash Tax Exemption: tax exempt purchase by cash receipt (VAT rate 0%)
Delete Fixed Asset Increase Data
The following describes how to delete fixed asset increase data.
- Click the ‘Admin Menu’ at the top right of the PC web screen, and then click ‘Accounting’ in the pop-up window.
- Click at the top left of the screen.
- Click ‘Manage Fixed Asset > Fixed Asset Increase’ from the menu.
- Select the data to be deleted among data for which a slip hasn't been created.
- Click 'Delete Data’.
- In the notification pop-up window, click ‘Yes’.
- The fixed asset increase data is deleted.
Create Fixed Asset Increase Slip
The following describes how to create a fixed asset increase slip.
- Click the ‘Admin Menu’ at the top right of the PC web screen, and then click ‘Accounting’ in the pop-up window.
- Click at the top left of the screen.
- Click ‘Manage Fixed Asset > Fixed Asset Increase’ from the menu.
- Click 'Create Slip' according to the following cases.
- If you need to create data, create data by referring to Create Fixed Asset Increase Data, and then click ‘Create Slip’ button in the Create Fixed Asset Increase Data page.
- If there are data already created, then click ‘Create Slip’ in the Fixed Asset Increase page.
- In the notification pop-up window, click ‘Yes’.
- A slip for the data is created.
Delete Fixed Asset Increase Slip
The following describes how to delete a fixed asset increase slip.
- Click the ‘Admin Menu’ at the top right of the PC web screen, and then click ‘Accounting’ in the pop-up window.
- Click at the top left of the screen.
- Click ‘Manage Fixed Asset > Fixed Asset Increase’ from the menu.
- Select data for which the slip is to be deleted among data for which a slip has been created.
- Click 'Delete Slip'.
- In the notification pop-up window, click ‘Yes’.
- The slip for the data is deleted.
Slips for a closed month can't be deleted.
Slips for fixed assets registered through creation of expenditure resolution reports can't be deleted. Delete the applicable approval document.
If you have processed a clearing and created a clearing slip in ‘Manage Slips > Manage Outstanding Slips’, its slip can't be deleted.
Download Fixed Asset Increase Data List
The following describes how to download the fixed asset increase data list as an Excel file.
- Click the ‘Admin Menu’ at the top right of the PC web screen, and then click ‘Accounting’ in the pop-up window.
- Click at the top left of the screen.
- Click ‘Manage Fixed Asset > Fixed Asset Increase’ from the menu.
- If necessary, enter the fixed asset increase data conditions to be viewed in the search window, and then click ‘Search’.
- You can view the fixed asset increase data that match the entered conditions.
- Click 'Download'.
- The list of fixed asset increase data is downloaded as an Excel file.
Fixed Asset Decrease
In the Fixed Asset Decrease menu, you can register the data for a fixed asset in possession that has been sold or discarded. You can also create fixed asset slips using registered decrease data or delete fixed asset slips created. In case of using the Electronic Tax Invoice service, you can request an issuance of tax invoice for fixed asset decrease data.
Register Data
The Register Fixed Asset Decrease Data page is laid out as follows.
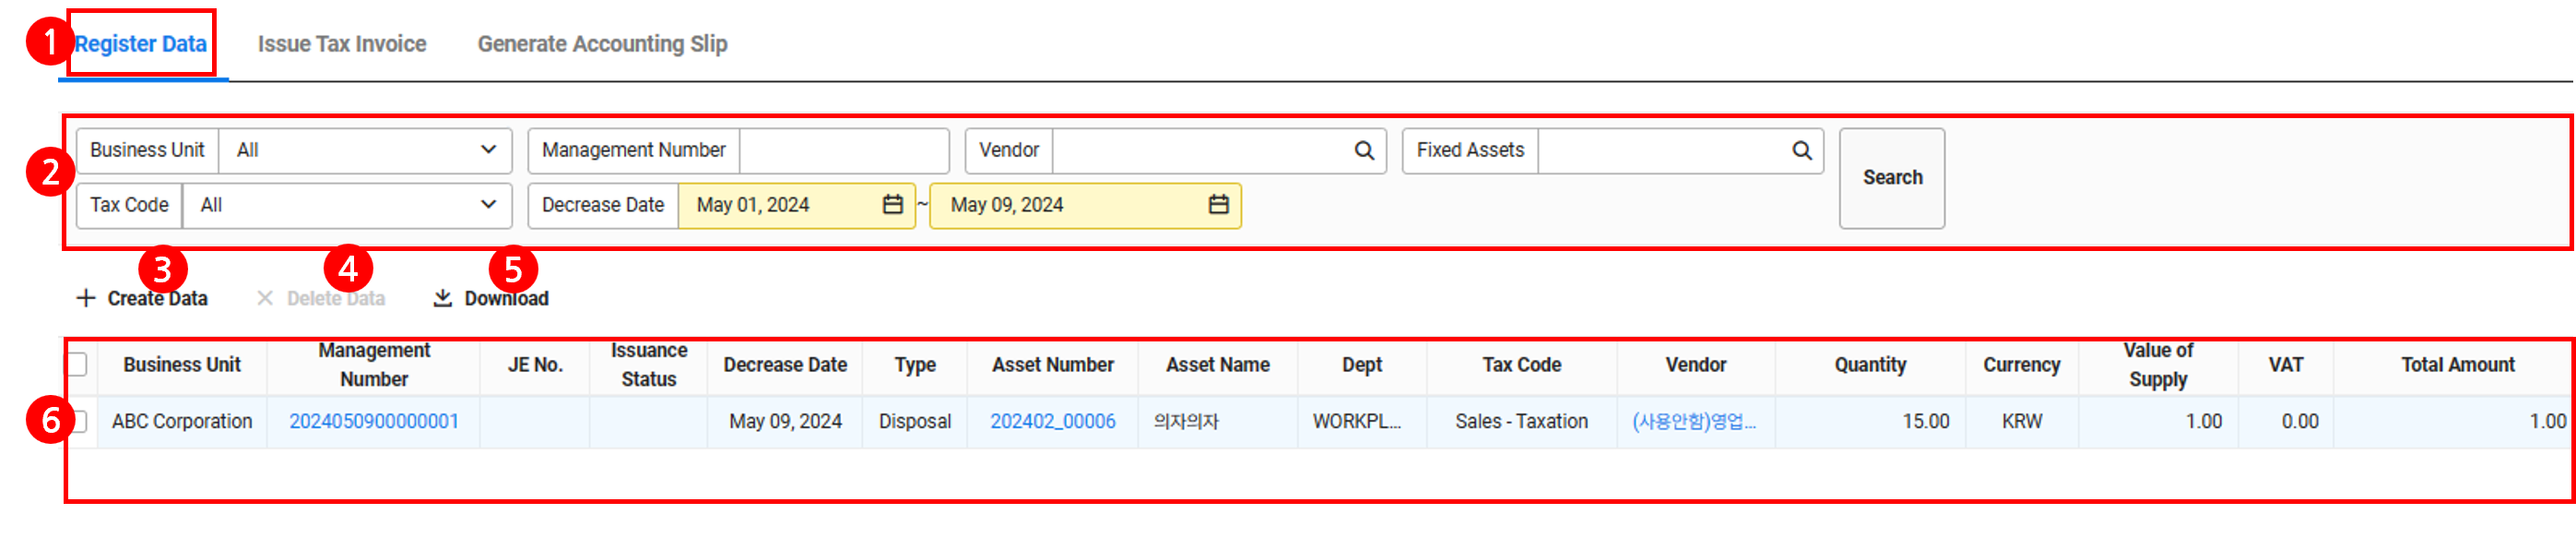
| Area | Description |
|---|---|
| ① Content tab | Register fixed asset decrease data by clicking the tab |
| ② Search window | Search fixed asset data according to business place, management number, vendor, fixed asset, tax code and decrease date conditions |
| ③ Create Data | Create new fixed asset decrease data |
| ④ Delete Data | Click to delete the selected fixed asset decrease data (See Delete Fixed Asset Decrease Data) |
| ⑤ Download | Click to download the list of fixed asset decrease data as an Excel file (See Download Fixed Asset Decrease Data List) |
| ⑥ Fixed asset data list | Check fixed asset decrease data as a list To view the data of issued tax invoices or created slips, go to the ‘Issue Tax Invoice’ tab or ‘Create Slip’ tab.
|
The following describes how to create fixed asset decrease data.
- Click the ‘Admin Menu’ at the top right of the PC web screen, and then click ‘Accounting’ in the pop-up window.
- Click at the top left of the screen.
- Click ‘Register Data’ tab of ‘Manage Fixed Asset > Fixed Asset Decrease’ from the menu.
- Click 'Create Data'.
- Enter the fixed asset increase data history, as shown below.
- Decrease Date: Enter the asset acquisition date
- Fixed Asset: Select the increasing asset.
- Type: Select sold or discarded status.
- Tax Code: Select the tax code to be applied to the increase history.
- Receipt/Claim: Select receipt or claim status.
- Tax Invoice Type (Sales - Taxation, Sales - Tax Exemption): Select the electronic or manual status of tax invoice.
- Vendor of Deposit (Sales - Card Taxation, Sales - Card Tax Exemption): Select the vendor that deposits to the company (vendor to receive the amount).
- Vendor: Select the target vendor for which the asset decrease occurred.
- Quantity, Acquisition Amount, Accumulated Depreciation Amount, Supply Value: Enter the quantity and amount information of the decreasing fixed asset.
- VAT, Fee: Enter the VAT and fee information.
- Note: Enter the note for the decrease history.
- Profit or loss on disposal is calculated automatically according to the acquisition amount, accumulated depreciation amount, and supply value entered.
- Vendor Manager Name, Contacts, Emails are the items required for the issuance of tax invoice. Please enter the information of the vendor manager.
- Click 'Save' and then click 'Yes' in the notification pop-up window.
The additional description of each tax code is as follows.
- Purchase - Taxation: purchase of amount with tax invoice received, where the purchase tax is deducted (VAT rate 10%)
- Purchase - Tax Exemption: sales of amount with invoice received related to tax exemption (VAT rate 0%)
- Purchase - Card Taxation: sales of amount with card slip received, where the sales tax is deductible (VAT rate 10%)
- Purchase - Card Tax Exemption: tax exempt purchase by credit card (VAT rate 0%)
- Purchase - Cash Taxation: sales of amount with cash receipt received, where the sales tax is deductible (VAT rate 10%)
- Purchase - Cash Tax Exemption: tax exempt purchase by cash receipt (VAT rate 0%)
Delete Fixed Asset Decrease Data
The following describes how to delete fixed asset decrease data.
- Click the ‘Admin Menu’ at the top right of the PC web screen, and then click ‘Accounting’ in the pop-up window.
- Click at the top left of the screen.
- Click ‘Register Data’ tab of ‘Manage Fixed Asset > Fixed Asset Decrease’ from the menu.
- Select the data to be deleted among data for which a slip hasn't been created.
- Click 'Delete Data’.
- In the notification pop-up window, click ‘Yes’.
- The fixed asset decrease data are deleted.
Download Fixed Asset Decrease Data List
The following describes how to download the fixed asset decrease data list as an Excel file.
- Click the ‘Admin Menu’ at the top right of the PC web screen, and then click ‘Accounting’ in the pop-up window.
- Click at the top left of the screen.
- Click ‘Register Data’ tab of ‘Manage Fixed Asset > Fixed Asset Decrease’ from the menu.
- If necessary, enter the fixed asset decrease data conditions to be viewed in the search window, and then click ‘Search’.
- You can view the fixed asset decrease data that match the entered conditions.
- Click 'Download'.
- The list of fixed asset decrease data is downloaded as an Excel file.
Issue Tax Invoice
You can request an issuance of tax invoice for the fixed asset decrease data.
The Electronic Tax Invoice Issuance page is laid out as follows.
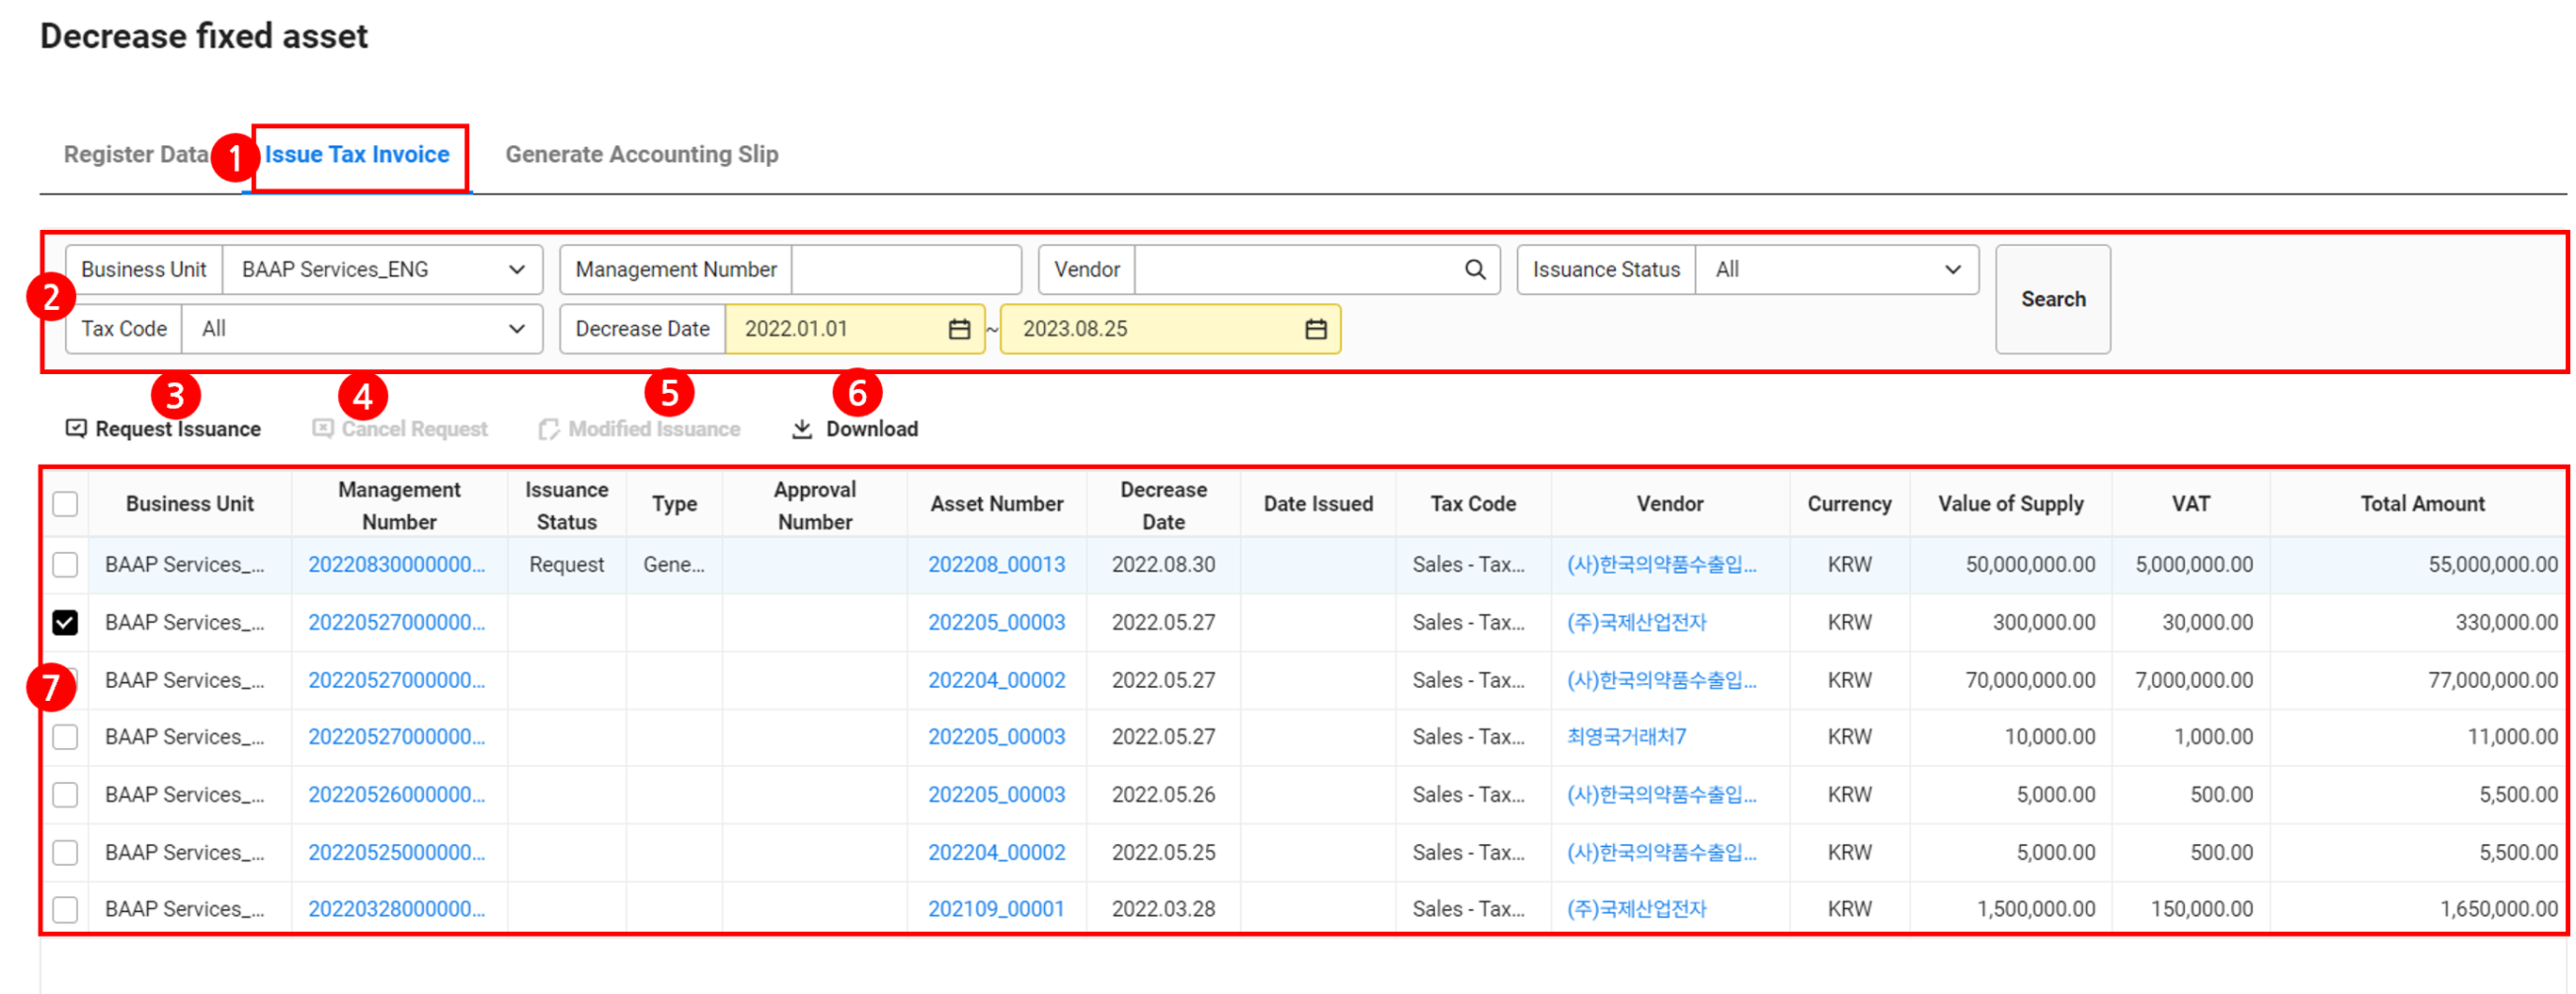
| Area | Description |
|---|---|
| ① Content tab | Click the Issue Tax Invoice tab to request for the issuance of invoice |
| ② Search window | Search fixed asset decrease data according to business place, management number, vendor, issuance status, tax code and decrease date conditions |
| ③ Request Issuance | Request Issuance for the tax invoice of fixed asset decrease data |
| ④ Cancel Request | Cancel the issuance request of tax invoice for the fixed asset decrease data with the issuance status at ‘Request’ |
| ④ Modified Issuance | Click to modify the issued electronic tax invoice and issue again (See Manage Receivables/Payables > Modified Issuance of Sales Data) |
| ⑥ Download | Download the list of fixed asset decrease data as an Excel file |
| ⑦ Fixed asset decrease data list | View the list of fixed asset decrease data with a tax code of ‘Sales - Taxation’ or ‘Sales - Tax Exemption’
|
Request Issuance
The following describes how to request for the issuance of tax invoice of fixed asset decrease data.
- Click the ‘Admin Menu’ at the top right of the PC web screen, and then click ‘Accounting’ in the pop-up window.
- Click at the top left of the screen.
- Click the ‘Manage Fixed Asset > Fixed Asset Decrease > Issue Tax Invoice’ tab from the menu.
- Select the data to request issuance, and then click ‘Request Issuance’.
- You can cancel the issuance request of fixed asset decrease data with the issuance status at ‘Request’ by clicking ‘Cancel Issuance’. (See ‘Cancel Issuance Request’)
- Click 'Yes'.
- You can check the tax invoice requested to be issued in the ‘Forward Issuance’ tab on the ‘Electronic Tax Invoice Service > Manage Issuance > Manage Issuance Request’.
Cancel Issuance Request
The following describes how to cancel the issuance request of tax invoice of fixed asset decrease data that is requested to be issued.
- Click the ‘Admin Menu’ at the top right of the PC web screen, and then click ‘Accounting’ in the pop-up window.
- Click at the top left of the screen.
- Click the ‘Manage Fixed Asset > Fixed Asset Decrease > Issue Tax Invoice’ tab from the menu.
- Select the data with the issuance status at Request, and then click ‘Cancel Issuance’.
- Click 'Yes'.
Create Slip
You can create a slip for the decreased fixed asset history.
The Create Slip page of fixed asset decrease is laid out as follows.
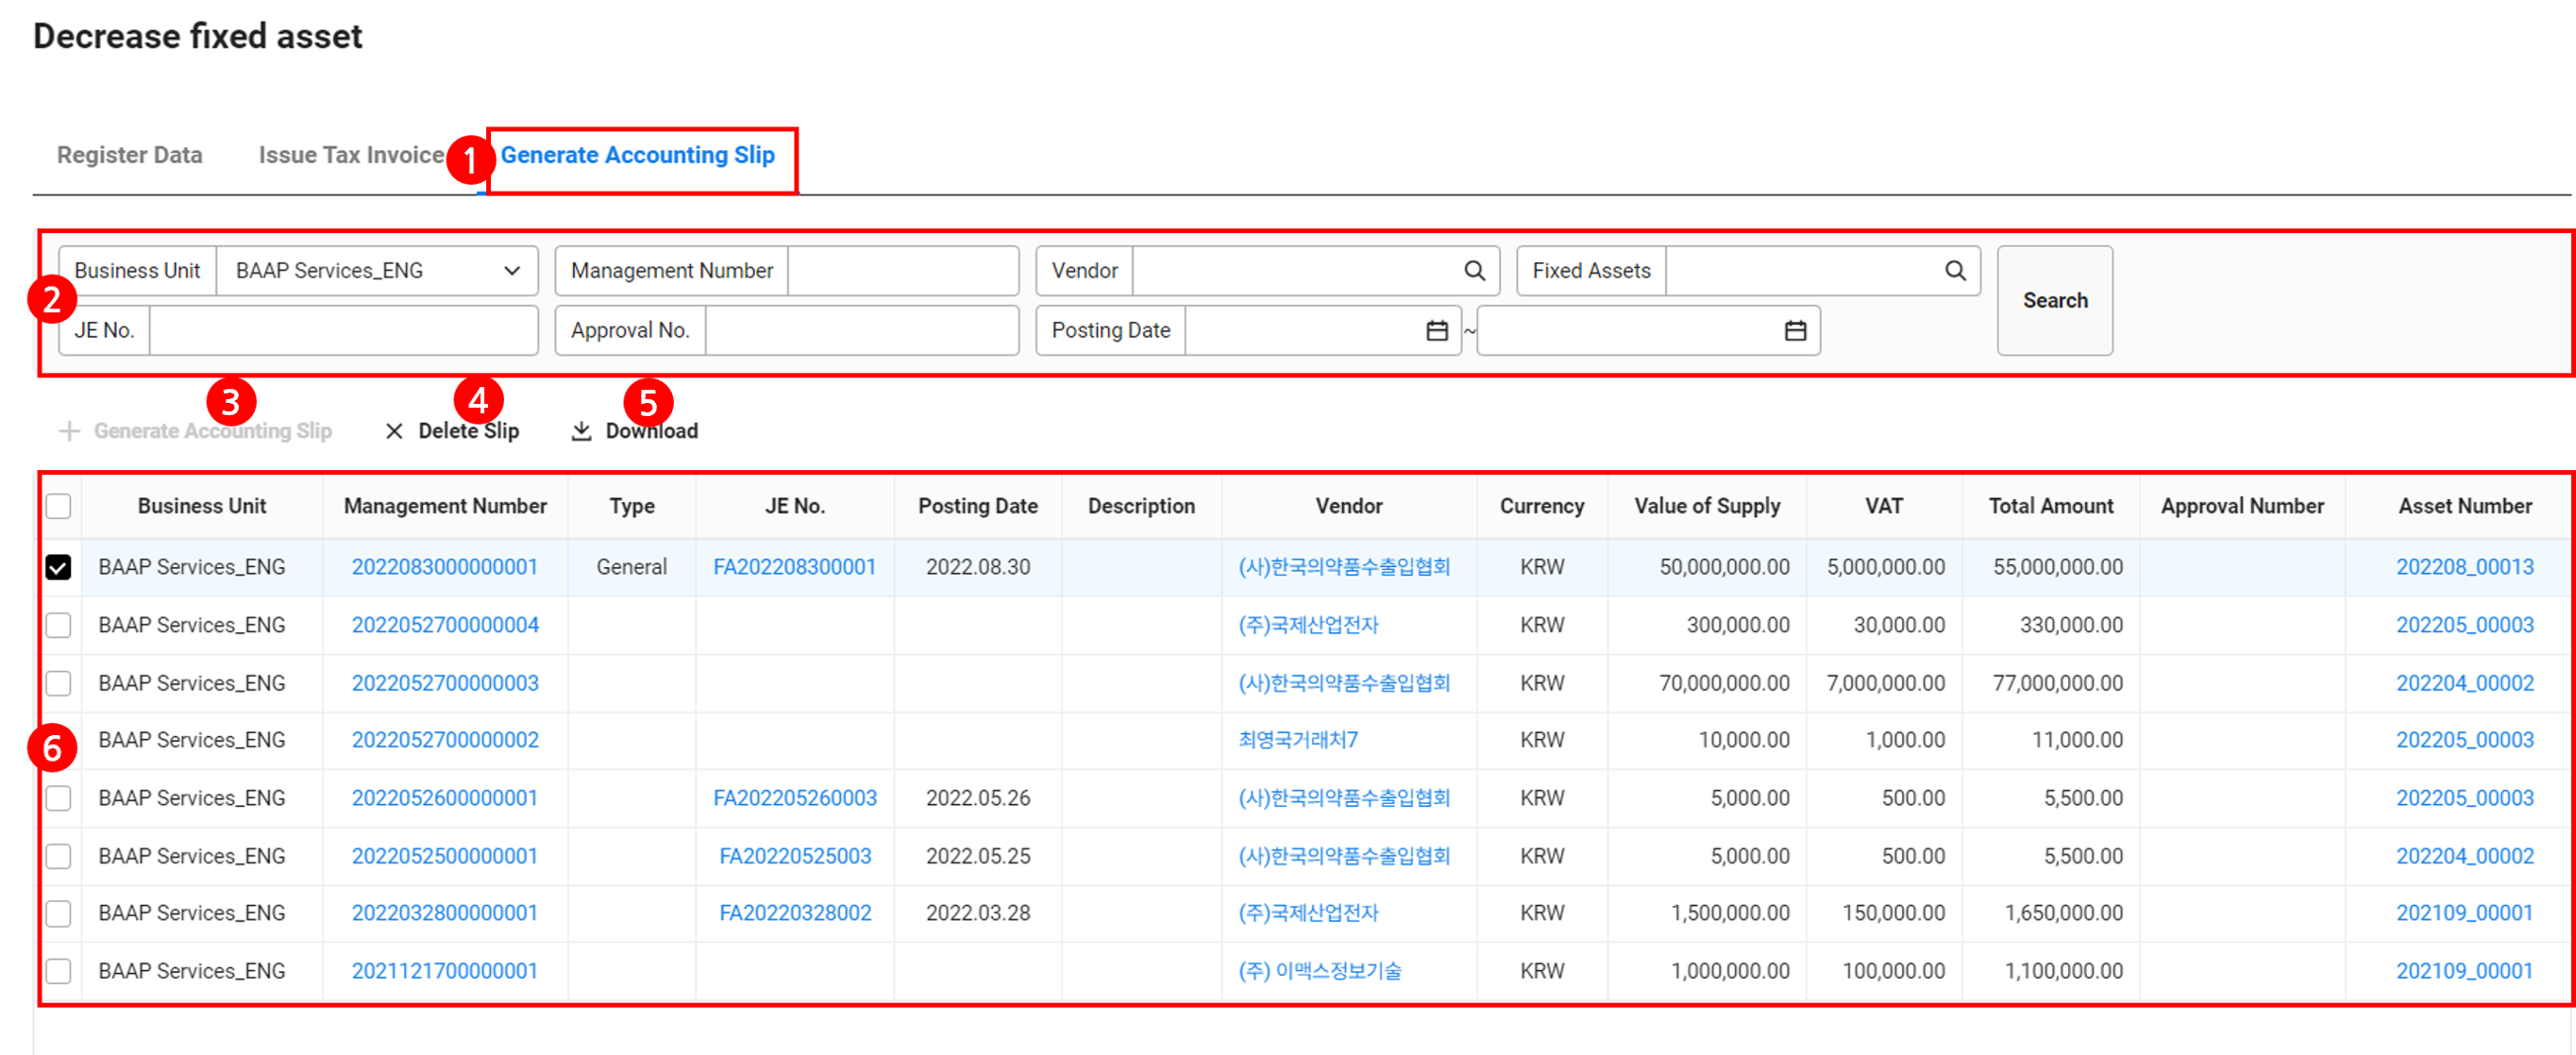
| Area | Description |
|---|---|
| ① Content tab | Click the tab to create a slip for fixed asset decrease |
| ② Search window | Search fixed asset data according to the business place, management number, vendor, fixed asset, slip number, approval number, and slip date conditions |
| ③ Create Slip | Click to create a slip for the selected fixed asset decrease data (See Create Fixed Asset Decrease Slip) |
| ④ Delete Slip | Click to delete a slip for the selected fixed asset decrease data( seeDelete Fixed Asset Decrease Slip) |
| ⑤ Download | Click to download the list of fixed asset decrease data as an Excel file |
| ⑥ Fixed asset data list | Check fixed asset decrease data as a list Click each detail to view information
|
Create Fixed Asset Decrease Slip
The following describes how to create a fixed asset decrease slip.
- Click the ‘Admin Menu’ at the top right of the PC web screen, and then click ‘Accounting’ in the pop-up window.
- Click at the top left of the screen.
- Click ‘Create Slip’ tab of ‘Manage Fixed Asset > Fixed Asset Decrease’ from the menu.
- Click 'Create Slip' according to the following cases.
- If you need to create data, create data by referring to Create Fixed Asset Decrease Data, and then click ‘Create Slip’ in the Create Fixed Asset Decrease Data page.
- If there are data already created, then click ‘Create Slip’ in the Fixed Asset Decrease page.
- In the notification pop-up window, click 'Yes'.
- A slip for the data is created.
Delete Fixed Asset Decrease Slip
The following describes how to delete a fixed asset decrease slip.
- Click the ‘Admin Menu’ at the top right of the PC web screen, and then click ‘Accounting’ in the pop-up window.
- Click at the top left of the screen.
- Click ‘Create Slip’ tab of ‘Manage Fixed Asset > Fixed Asset Decrease’ from the menu.
- Select data for which the slip is to be deleted among data for which a slip has been created.
- Click 'Delete Slip'.
- In the notification pop-up window, click ‘Yes’.
- The slip for the data is deleted.
Download Fixed Asset Decrease List
The following describes how to download the fixed asset list as an Excel file.
- Click the ‘Admin Menu’ at the top right of the PC web screen, and then click ‘Accounting’ in the pop-up window.
- Click at the top left of the screen.
- Click each tab of 'Manage Fixed Asset > Fixed Asset Decrease' from the menu.
- If necessary, enter the fixed asset decrease data conditions to be viewed in the search window, and then click ‘Search’.
- You can view the list of fixed asset decrease data that matches the entered conditions.
- Click 'Download'.
- The list of fixed asset decrease data is downloaded as an Excel file.
Close Fixed Asset
You can check the monthly closing status of fixed assets and change the status. When a month is closed, the features that can be used for the month are changed as shown below.
- Fixed asset increase/decrease data can't be created, edited or deleted.
- Asset history can't be registered.
- Depreciation can be calculated and slips can be created.
The Close Fixed Asset page is laid out as follows.
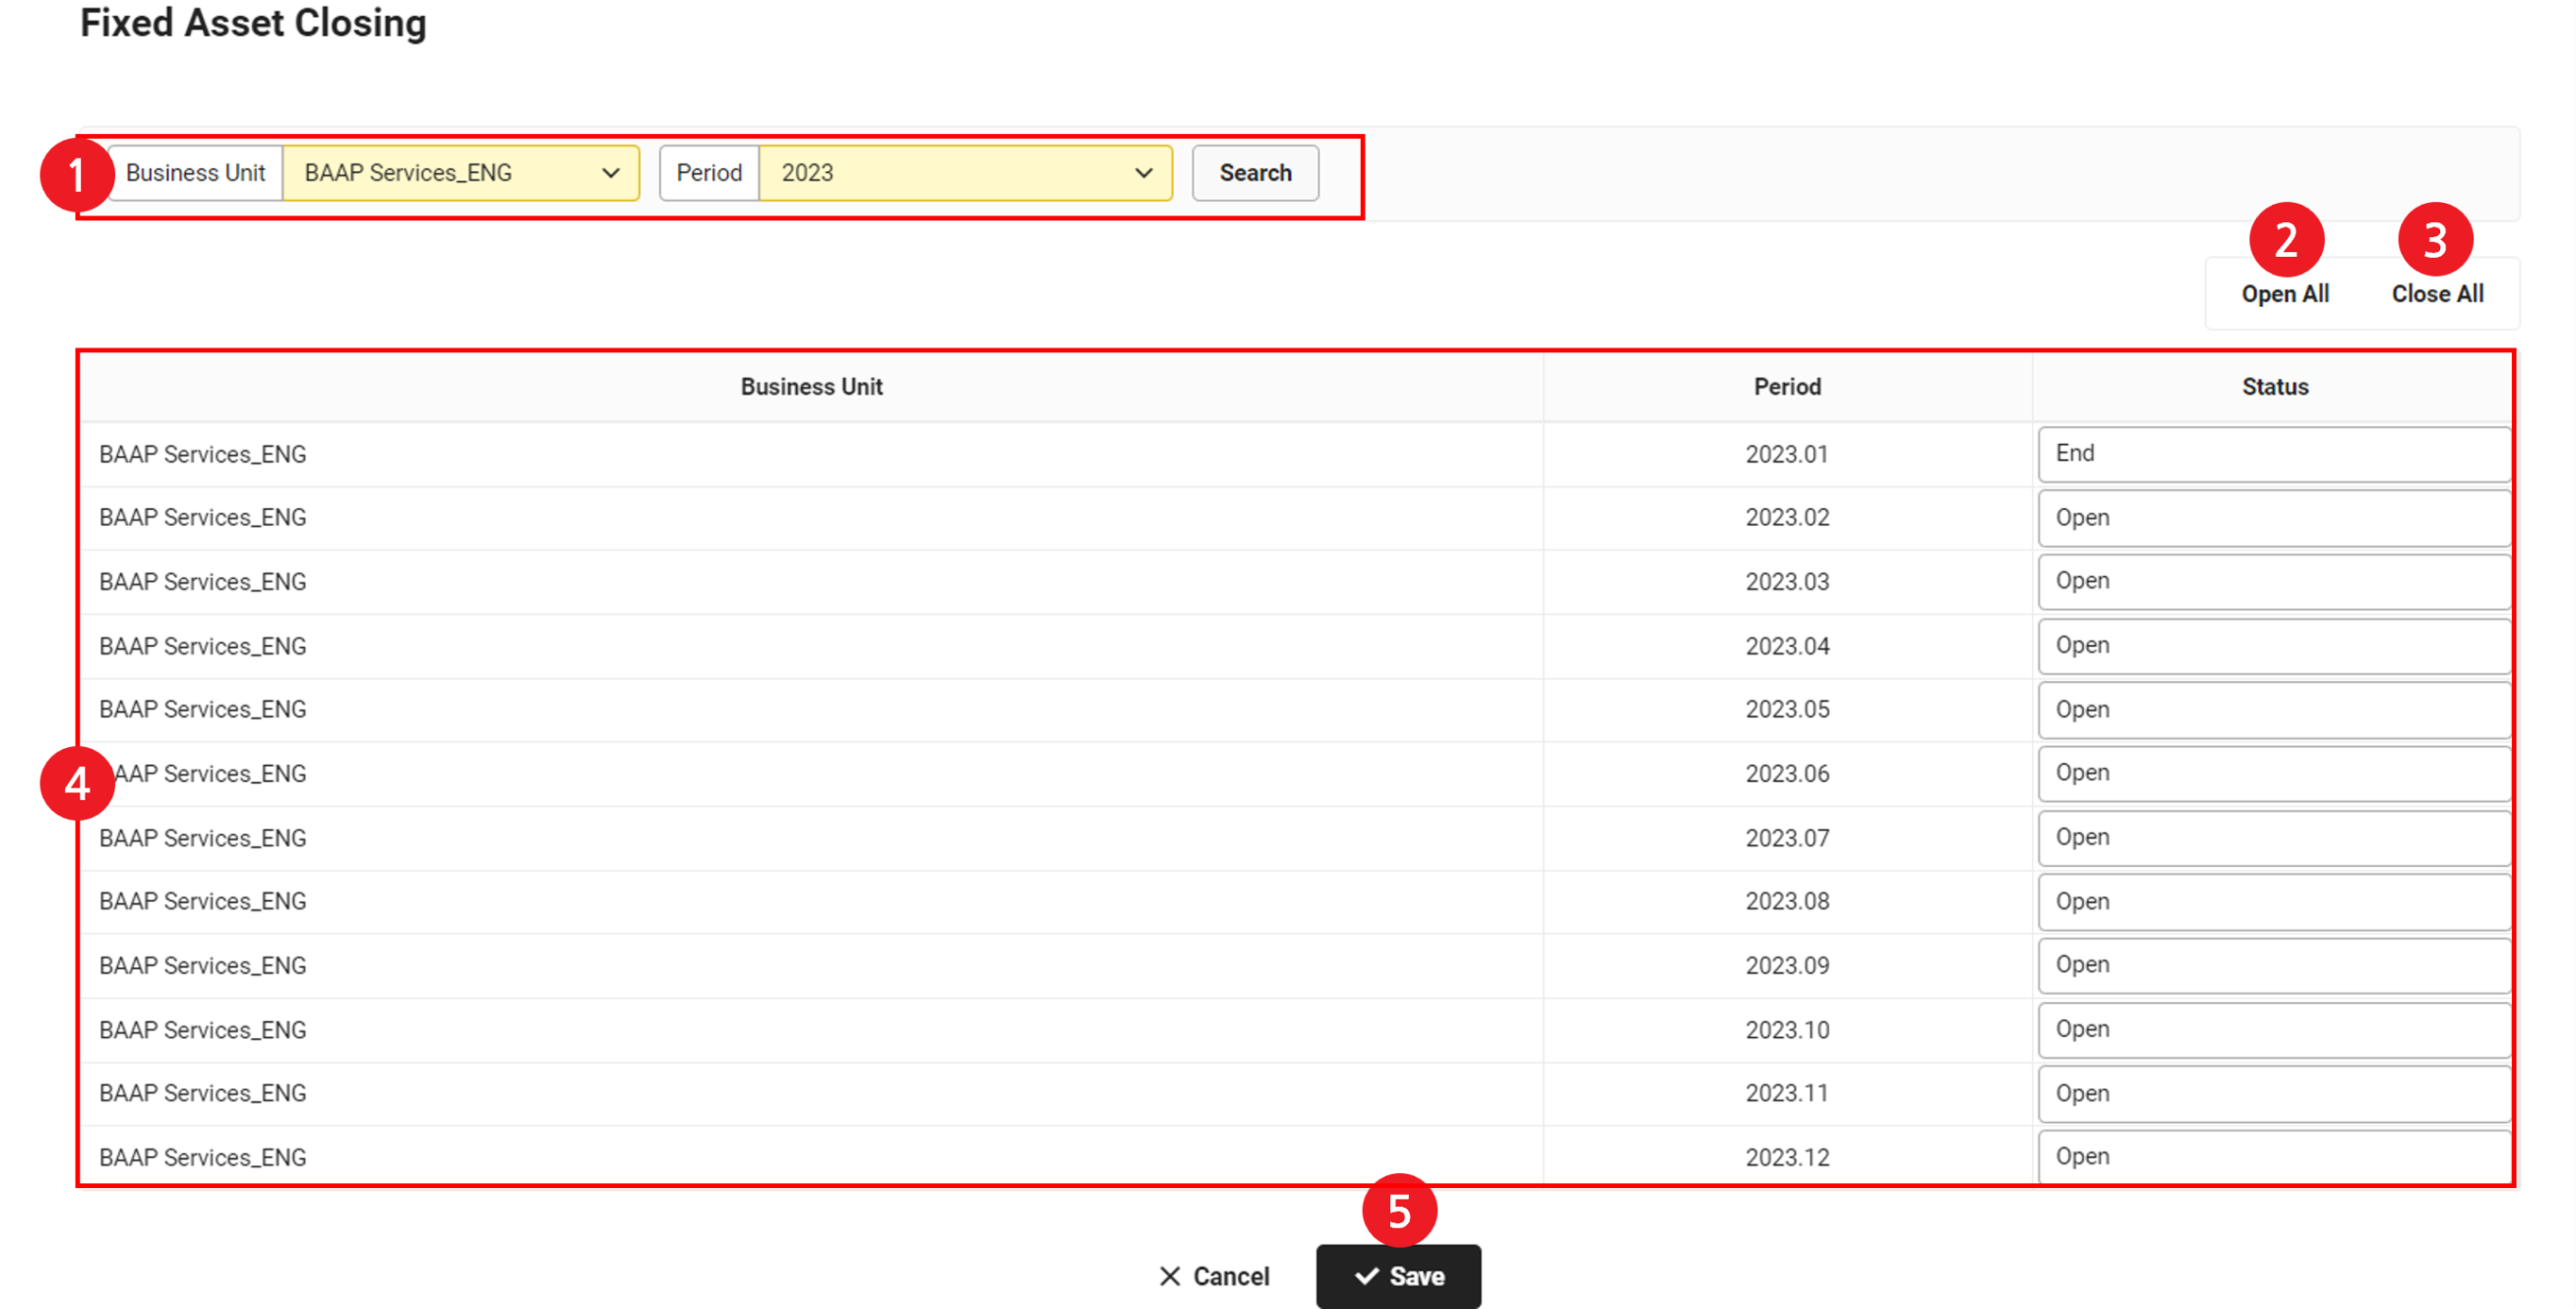
| Area | Description |
|---|---|
| ① Select year | Select the business place and year to close |
| ② Open All | Click to change the closing status for the entire year (January to December) to Open
|
| ③ Close All | Click to change the closing status for the entire year (January to December) to Closed
|
| ④ Monthly closing status | It displays the monthly closing status. Click to close or open each month (See ‘Change Fixed Asset Status’) |
| ⑤ Save | Click to save the edited closing status |
Change Fixed Asset Status
The following describes how to change the fixed asset status.
- Click the ‘Admin Menu’ at the top right of the PC web screen, and then click ‘Accounting’ in the pop-up window.
- Click at the top left of the screen.
- Click ‘Manage Fixed Asset > Close Fixed Asset’ from the menu.
- Change the Status of the month for which you want to change the fixed asset status. If you want to change the closing status of all periods for the year, click ‘Open All’ or ‘Close All’.
- Click ‘Save’.
- In the notification pop-up window, click ‘Yes’.
- The status of the fixed asset is changed.
- If you want to change the status to Closed, then the status of the previous month must be Closed.
- You can't change the status to Closed if there is depreciation history. Delete the depreciation slip first.
- If the settlement slip has already been created for the year, the monthly closing status can't be changed from Closed to Open. Delete the settlement slip first.
Calculate Depreciation
You can calculate depreciation for a closed month. You can only calculate depreciation and create a depreciation slip if the month to be calculated has been closed and the month is Open in the ‘Accounting > Settlement/Financial Statements > Monthly Closing’ menu.
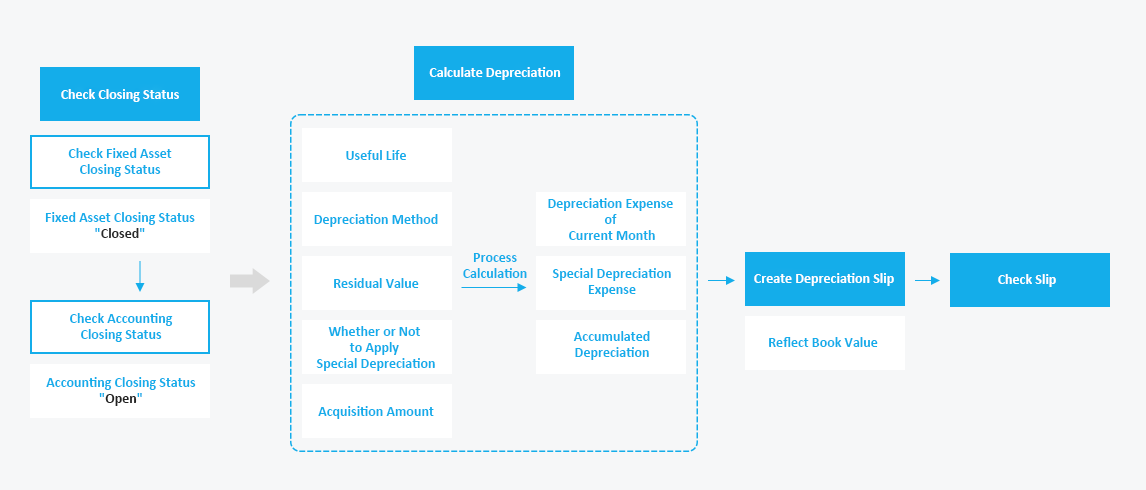
The Calculate Depreciation page is laid out as follows.
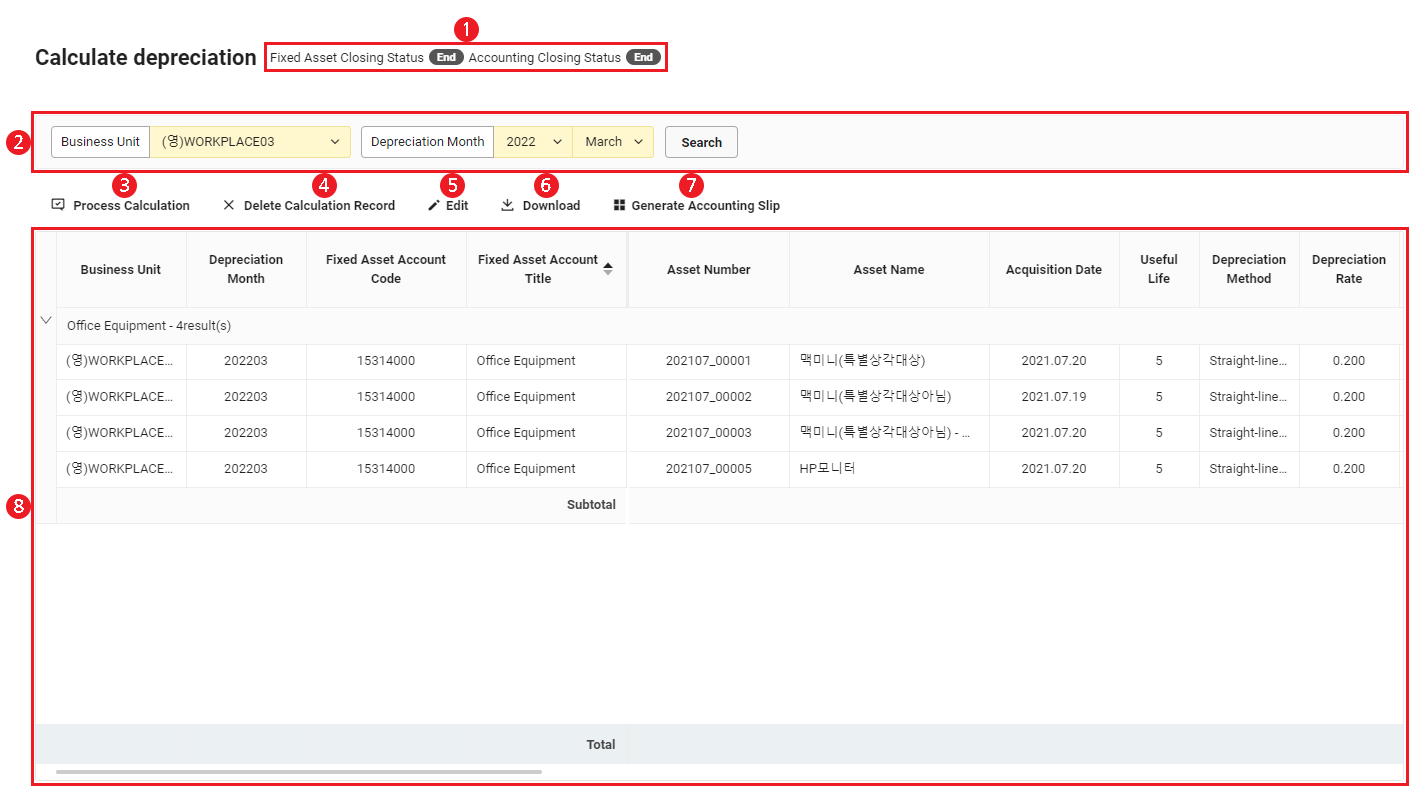
| Area | Description |
|---|---|
| ① Closing Status | It displays the fixed asset closing status and accounting closing status separately |
| ② Search window | Search the depreciation history according to business place and depreciation month conditions |
| ③ Process Calculation | Calculate depreciation for the selected year and month (See Process Depreciation Calculation) |
| ④ Delete Calculation History | Click to delete existing depreciation calculations
|
| ⑤ Modify | Click after processing calculation to modify the depreciation cost of the individual fixed asset (See Modify Individual Depreciation) |
| ⑥ Download | Download the depreciation history as an Excel file (See Download Depreciation History) |
| ⑦ Create Slip/Delete Slip |
|
| ⑧ Depreciation history | Check the depreciation history as a list |
Process Depreciation Calculation
- You can perform depreciation calculation for the applicable year and month only if all of the following conditions are met.
- Fixed asset closing status Closed
- Accounting closing status Open
- Slip created for the previous month
- You can't calculate depreciation after creating a depreciation slip.
The following describes how to calculate depreciation for the selected year and month and create a slip.
- Click the ‘Admin Menu’ at the top right of the PC web screen, and then click ‘Accounting’ in the pop-up window.
- Click at the top left of the screen.
- Click ‘Manage Fixed Asset > Calculate Depreciation’ from the menu.
- Select your business and depreciation month, and then click 'Search'.
- Click 'Process Calculation' and then click 'Yes' in the notification pop-up window.
- Calculation process is completed.
- Click ‘Modify’ to modify individual depreciation, or click ‘Create Slip’ to create a slip.
- To process calculation again, click ‘Delete Slip’ and check that the slip has been deleted. Click ‘Delete Calculation History’, and then click ‘Process Calculation’ to recalculate the depreciation cost of the current month.
- Click ‘Create Slip’ to create a depreciation slip based on the recalculated amount.
Modify Individual Depreciation Cost
You can individually modify a specific depreciation cost item in the calculation processing history. You can only modify it if a slip hasn't been created yet.
The following describes how to individually modify a depreciation cost.
- Click the ‘Admin Menu’ at the top right of the PC web screen, and then click ‘Accounting’ in the pop-up window.
- Click at the top left of the screen.
- Click ‘Manage Fixed Asset > Calculate Depreciation’ from the menu.
- Select your business and depreciation month, and then click 'Search'.
- Click ‘Modify’.
- Modify the Depreciation Cost of Current Month amount of the item to be modified.
- Click 'Disable Modification'.
- The edited content is reflected.
Download Depreciation History
The following describes how to download depreciation history as an Excel file.
- Click the ‘Admin Menu’ at the top right of the PC web screen, and then click ‘Accounting’ in the pop-up window.
- Click at the top left of the screen.
- Click ‘Manage Fixed Asset > Calculate Depreciation’ from the menu.
- If necessary, enter the depreciation history conditions to be viewed in the search window, and then click ‘Search’.
- You can view the depreciation history that matches the entered conditions.
- Click 'Download'.
- The selected depreciation history is downloaded as an Excel file.
View Monthly Depreciation Cost
You can check the monthly status of fixed asset depreciation costs.
The View Monthly Depreciation Cost page is laid out as follows.
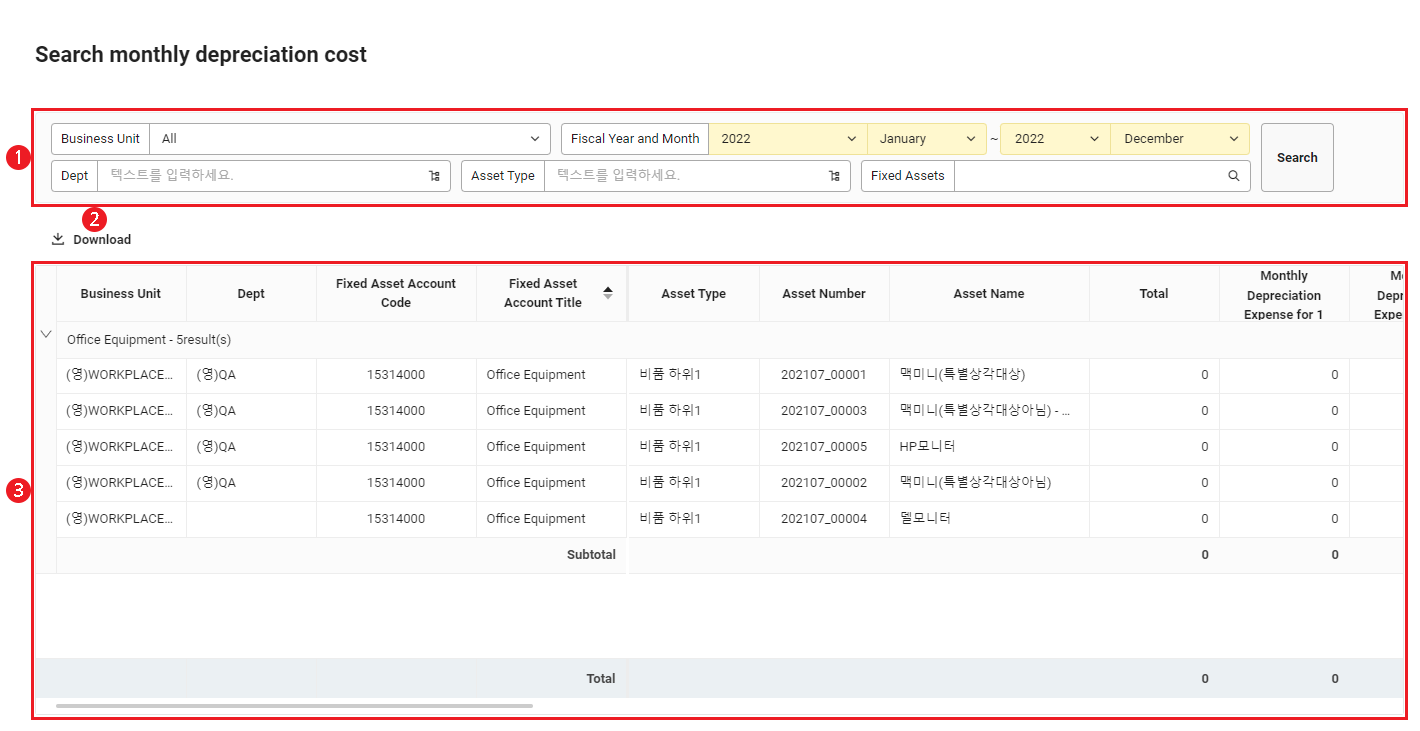
| Area | Description |
|---|---|
| ① Search Window | Search the depreciation cost history according to business place, accounting year and month, department, asset type, and fixed asset conditions
|
| ② Download | Click to download the depreciation cost history as an Excel file |
| ③ Depreciation cost history | Check the depreciation cost history of the selected year and month |
Download Monthly Depreciation Cost History
The following describes how to download monthly depreciation cost history as an Excel file.
- Click the ‘Admin Menu’ at the top right of the PC web screen, and then click ‘Accounting’ in the pop-up window.
- Click at the top left of the screen.
- Click ‘Manage Fixed Asset > View Monthly Depreciation Cost’ from the menu.
- If necessary, enter the depreciation cost history conditions to be viewed in the search window, and then click ‘Search’.
- You can view the depreciation cost history that matches the entered conditions.
- Click 'Download'.
- The monthly depreciation cost history is downloaded as an Excel file.
View Fixed Asset Slip
You can check the monthly status of fixed asset depreciation costs.
The View Fixed Asset Slip page is laid out as follows.
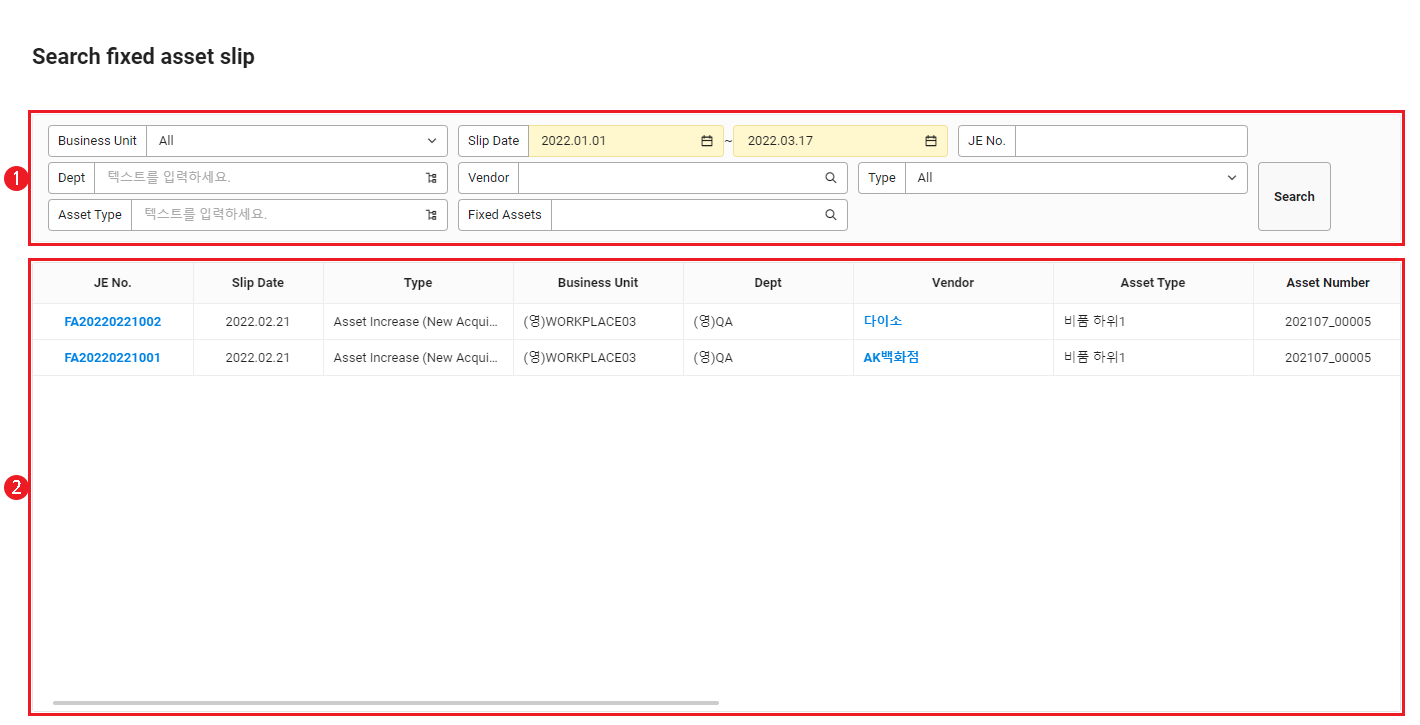
| Area | Description |
|---|---|
| ① Search Window | Search fixed asset slips according to business place, slip date and slip number, department, vendor, type, asset code, fixed asset number, and name conditions |
| ② Fixed asset slip list | Check the fixed asset slips as a list Click each detail to view information
|
Register Asset History
You can register fixed assets possessed by the company that haven't been reflected in the ledger because they are not registered in the Register Fixed Asset menu. You can only register asset history if the month of the asset history to be registered hasn't been closed.
- Registration of asset history is required in the following cases.
- If specific data needs to be migrated among existing fixed assets reflected in accounting slips
- If fixed asset transaction history and depreciation cost recognition occur additionally after registering through the Register Fixed Asset menu, requiring separate registration and reflection in the ledger
- If an asset acquisition slip has been issued through the Expenditure service and its history needs to be reflected in the fixed asset ledger
- When approval is completed for asset acquisition in the Expenditure service, the asset acquisition slip is created automatically in the Accounting service. You can engage in normal asset management, such as depreciation, etc., only by registering the actually acquired asset in the Register Asset History menu instead of the ‘Fixed Asset Increase’ menu. (See Bulk Register Asset History)
The Register Asset History page is laid out as follows.
| Area | Description |
|---|---|
| ① Search Window | Search fixed asset history according to business place, date, type, department, vendor, fixed asset number, and name conditions |
| ② Add | Add fixed asset history (See Add Asset History) |
| ③ Delete | Click to delete the selected fixed asset history |
| ④ Bulk Add | Register fixed asset history in bulk using an Excel template (See Bulk Register Asset History) |
| ⑤ Compare Book Value | After completing the asset history registration, click to compare the fixed asset amount, asset, and accumulated amount on the financial statements |
| ⑥ Download | Click to download the asset history as an Excel file (See Download Asset History) |
| ⑦ Asset History List | Check the registered asset history as a list Click Quantity and Acquisition Cost to edit the values Click Registrant to check the information of the user who created the slip |
| ⑧ Save | Click to save the entered asset history |
Add Asset History
The following describes how to add and register fixed asset history.
- Click the ‘Admin Menu’ at the top right of the PC web screen, and then click ‘Accounting’ in the pop-up window.
- Click at the top left of the screen.
- Click ‘Manage Fixed Asset > Register Asset History’ from the menu.
- Click 'Add'.
- Enter the asset history to be registered, as shown below.
- Date: Enter the transaction date or depreciation date according to Type of asset history.
- Asset Name, Type, Vendor: Enter the name of the asset, type, and vendor.
- Quantity, Acquisition Cost: Enter the quantity and acquisition cost of the asset.
- Note: Enter the note for the asset history.
- Slip Number: Click to view slips that have the same asset account, accumulated amount account, business place, and vendor information as the asset history
If the slip can be matched one-on-one with the asset account, then the selected slip number can be selected.
- Click 'Save' and then click 'Yes' in the notification pop-up window.
Bulk Register Asset History
The following describes how to register asset history in bulk using an Excel template.
- Click the ‘Admin Menu’ at the top right of the PC web screen, and then click ‘Accounting’ in the pop-up window.
- Click at the top left of the screen.
- Click ‘Manage Fixed Asset > Register Asset History’ from the menu.
- Click 'Bulk Add’.
- In the Add Asset History pop-up window, click ‘Download Template File’ to download the template.
- Enter the asset history according to the template, and save the file.
- Asset Name: If it's not a registered fixed asset, see Register Fixed Asset and register the asset.
- Date: Enter a date on or before the creation date.
- Type: Proceed as follows depending on the type.
- Asset increase (new acquisition), Asset increase (capital expense): Select it for an asset increase, and enter the acquisition cost in the Amount field.
- If it's not an asset owned by the company, then select ‘Asset increase (new acquisition)’ from Type, and upload it first by entering the acquisition cost in the Amount field. After the acquisition cost is registered, enter the accumulated amount or sales/discard amount as needed, and then upload the file again.
- Accumulated amount: When selecting Accumulated amount, enter the accumulated depreciation amount in the Amount field. The accumulated depreciation amount can't be 0.
- Sales, discard: When selecting Sales or Discard, enter the disposal amount in the Amount field. The disposal amount can't be 0.
- Map the slip numbers.
- In the Add Asset History pop-up window, click the ‘Attach the file from your PC, or drag the file here.’ area to select the file to attach or drag the file to that area.
- Click ‘Save’.
- Click 'Compare Book Value' to compare and validate the book value.
- See the flow chart of fixed asset management at the top of this guide.
Download Asset History
The following describes how to download Asset History as an Excel file.
- Click the ‘Admin Menu’ at the top right of the PC web screen, and then click ‘Attendance’ in the pop-up window.
- Click at the top left of the screen.
- Click ‘Manage Fixed Asset > Register Asset History’ from the menu.
- If necessary, enter the asset history conditions to be searched in the search window, and then click ‘Search’.
- You can search the asset history records that match the entered conditions.
- Click 'Download'.
- The asset history is downloaded as an Excel file.
Register Asset Under Construction
You can create an asset slip for an asset in construction if an amount was spent to construct a tangible asset. For management, an asset number is granted to each asset under construction. Upon completion of construction, you can select the history of all assets under construction that occur during the construction period and issue transfer slips to replace them as assets.
The Register Asset Under Construction page is laid out as follows.
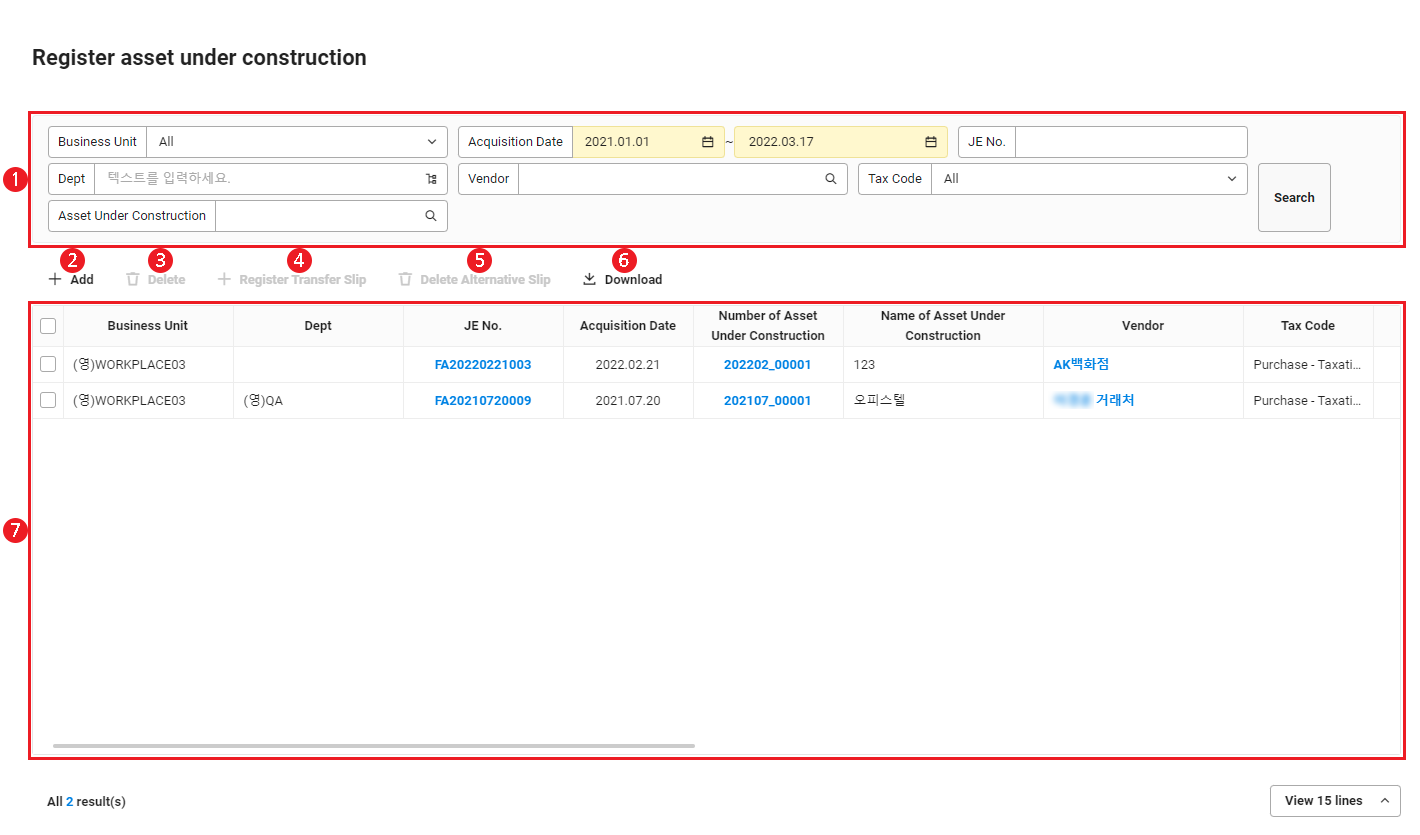
| Area | Description |
|---|---|
| ① Search Window | Search assets under construction according to business place, acquisition date, slip number, department, vendor, tax code, asset under construction number, and name conditions |
| ② Add | Register and a new asset under construction and create a slip |
| ③ Delete | Click to delete the selected asset under construction and asset slip |
| ④ Create Transfer Slip | Create a slip to replace the asset under construction as an asset after completing the construction (acquisition) (See Create Asset Transfer Slip) |
| ⑤ Delete Transfer Slip | Click to delete the created transfer slip |
| ⑥ Download | Click to download the list of assets under construction as an Excel file |
| ⑦ Asset under construction list | Check the registered assets under construction as a list Click each detail to view information
|
Register Asset Under Construction
The following describes how to register assets under construction.
- Click the ‘Admin Menu’ at the top right of the PC web screen, and then click ‘Attendance’ in the pop-up window.
- Click at the top left of the screen.
- Click ‘Manage Fixed Asset > Register Asset Under Construction’ from the menu.
- Click 'Add'.
- Enter the details for the asset under construction to be added, as shown below.
- Name of Asset Under Construction, Business Place, Department: Enter the name of the asset under construction, affiliated business place, and managing department.
- Acquisition Date: Enter the transaction date of eligible supporting documents.
This date is reflected in the date of asset slip creation. - Asset Account Under Construction: Select the asset under construction.
- Tax Code: Select the tax code to be applied to the increase history.
- Tax Invoice Type (Purchase - Taxation, Purchase - Tax Exemption): Select the electronic or handwritten status.
- Card Type, Card Number (Purchase - Card Taxation, Purchase - Card Tax Exemption): Enter the card number after selecting corporate or personal credit card.
- Vendor: Select the vendor that acquired the asset under construction.
- Quantity, Supply Value, VAT, Fee: Enter the quantity and amount information of the asset under construction.
- Project Code: If the company has set to use project code, search and select the project code.
- You can add project code in the Manage Project Code menu.
- Budget Code: display when setting to enable the use of budget in the ‘Accounting > Settings’ menu. To use the budget, click to view the available budget.
- Only budgets that match the entered department (affiliated department) and the project code (optional) are searched.
- Check the available amount and select.
- If the company has set the Budget Control Status to ‘Yes’, the budget can't be used if the sum of the entered supply value, VAT, and commission exceeds the available budget.
- Note: Enter the note for the asset under construction.
- Click ‘Create Slip’, and then click ‘Yes’ in the notification pop-up window.
- To delete all the entered information and enter again, click ‘Reset’.
- When creating a slip, the budget is used.
The additional description of each tax code is as follows.
- Purchase - Taxation: purchase of amount with tax invoice received, where the purchase tax is deducted (VAT rate 10%)
- Purchase - Tax Exemption: sales of amount with invoice received related to tax exemption (VAT rate 0%)
- Purchase - Card Taxation: sales of amount with card slip received, where the sales tax is deductible (VAT rate 10%)
- Purchase - Card Tax Exemption: tax exempt purchase by credit card (VAT rate 0%)
- Purchase - Cash Taxation: sales of amount with cash receipt received, where the sales tax is deductible (VAT rate 10%)
- Purchase - Cash Tax Exemption: tax exempt purchase by cash receipt (VAT rate 0%)
Create Asset Transfer Slip
If the construction (acquisition) of an asset under construction is completed, then you can create a transfer slip to replace as an asset.
The following describes how to create transfer slips.
- Click the ‘Admin Menu’ at the top right of the PC web screen, and then click ‘Attendance’ in the pop-up window.
- Click at the top left of the screen.
- Click ‘Manage Fixed Asset > Register Asset Under Construction’ from the menu.
- Select all assets under construction to be replaced as assets, and then click ‘Create Transfer Slip’.
- Select the fixed asset to be replaced, enter the note, and then click ‘Create Slip’.
- You can only select an asset that has the same business place as the selected asset under construction and with no change history after registering the fixed asset number.
- In the notification pop-up window, click ‘Yes’.
- The transfer slip is created, and the information of the replaced asset is displayed in the replacement date, replaced asset number, and transfer slip number columns.
Delete Asset Transfer Slip
The following describes how to delete an asset transfer slip.
- Click the ‘Admin Menu’ at the top right of the PC web screen, and then click ‘Attendance’ in the pop-up window.
- Click at the top left of the screen.
- Click ‘Manage Fixed Asset > Register Asset Under Construction’ from the menu.
- Select the asset under construction to delete its transfer slip among assets under construction for which a transfer slip has been created.
- Click 'Delete Transfer Slip’.
- In the notification pop-up window, click ‘Yes’.
- The transfer slip of the asset under construction is deleted.
Download Asset Under Construction List
The following describes how to download the assets under construction list as an Excel file.
- Click the ‘Admin Menu’ at the top right of the PC web screen, and then click ‘Attendance’ in the pop-up window.
- Click at the top left of the screen.
- Click ‘Manage Fixed Asset > Register Asset Under Construction’ from the menu.
- If necessary, enter the assets under construction conditions to be viewed in the search window, and then click ‘Search’.
- You can view the assets under construction that match the entered conditions.
- Click 'Download'.
- The list of assets under construction is downloaded as an Excel file.