In Manage Funds, you can integrate with the Accounting service and banks, and register the account information to be managed. You can also view the transaction history and balance by bank account, and register the account information of each employee.
Integrate with Bank/Account
In ‘Manage Standard Information > Manage Vendors’, you can integrate the banks registered as vendors and enter the account information. You can scrape and read the deposit/withdrawal details, transaction history, and account data by integrating banks. The read data is displayed in the Link menu.
For information about vendor registration, see Manage Vendors.
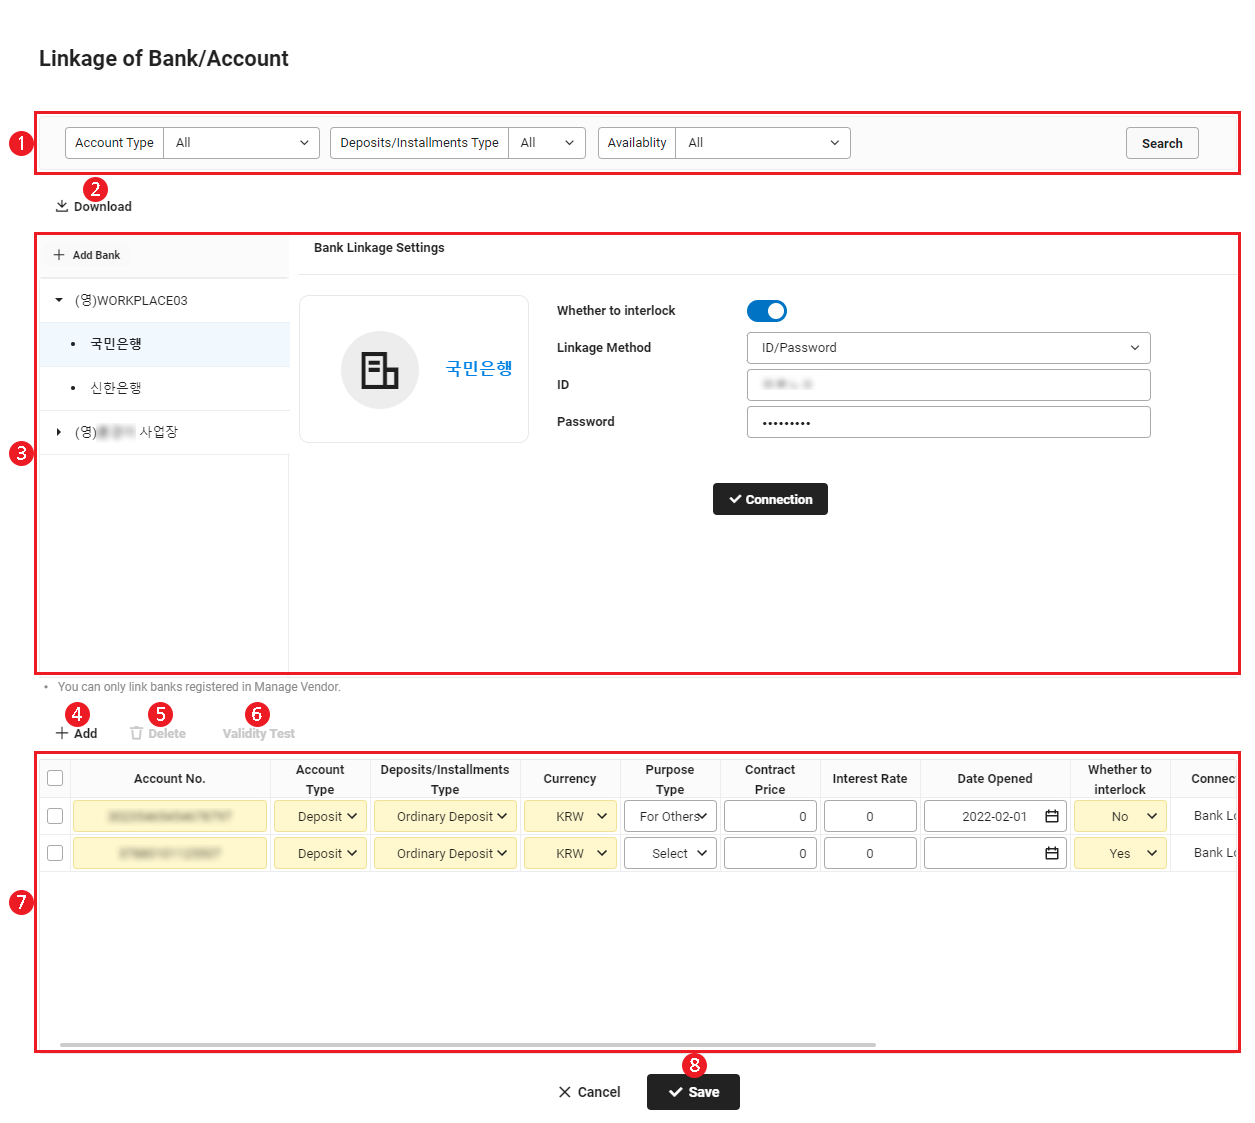
The Link Bank/Account screen is laid out as follows.
| Area | Description |
|---|---|
| ① Search Window | Searches account information by account type, deposit/installment savings type, and use status. |
| ② Download | Downloads the integrated information of banks and accounts as an Excel file |
| ③ List of Integrated Banks |
|
| ④ Add | Registers account information upon clicking it. (See Link Account) |
| ⑤ Deleted | Deletes the linked bank account upon clicking it. |
| ⑥ Validity Test | Tests the validity of a linked bank account upon clicking it. |
| ⑦ List of Bank Accounts | Displays the registered account information in a list. |
| ⑧ Save | Saves the modified account information upon clicking it. (See Modify Linked Account) |
Integrate with Bank
You can set for the data to be scraped in integration with banks. Bank linkage is completed through the method of ID/password login authentication or the certification method. To use the certification method, refer to Manage Certificate and register the certification for finance accounts first.
The following describes how to integrate with banks for the data to be read.
- Click the ‘Admin Menu’ at the top right of the PC web screen, and then click ‘Accounting’ in the pop-up window.
- Click
 at the top left of the screen.
 - Click ‘Manage Funds > Link Bank/Account’ from the menu.
- Click the business place where the bank for integration belongs to, and then click the bank to be integrated.
- Click ‘Add Bank’ to add the bank to be integrated by specifying the vendor type as ‘Bank’ in the Manage Vendors menu. (See Register Vendor)
- Click ‘Linkage Status’ to enable it.
- Choose one of the following methods to proceed with integration.
- ID/Password Method: Select ‘ID/Password’ from Linkage Method, and then enter the ID and password of the bank login account.
- Certification Method: Select ‘Certification’ from Linkage Method, and then select the authentication for finance accounts to be used for integration (automatic selection when there is one authentication).
A integration error may occur if the effective period of a authentication has expired or if it has been reissued. Check if the registered certification is valid, and then register it again in ‘Business Support Settings > Manage Business Place > Manage Certificate’. - Click ‘Link’ and then click ‘Yes’ in the Save pop-up window.
- The integration settings are completed. You can add an account to the integrated bank and integrate the account with import data. (See Link Account)
Remove Bank Integration
The following describes how to remove the set integration.
- Click the ‘Admin Menu’ at the top right of the PC web screen, and then click ‘Accounting’ in the pop-up window.
- Click at the top left of the screen.
- Click ‘Manage Funds > Link Bank/Account’ from the menu.
- Click the business place to which the bank for integration belongs, and then click the bank to be removed from integration.
- Click Linkage Status that is enabled, and then click ‘Yes’ in the Save Linkage Removal pop-up window.
- The integration of the applicable bank is removed.
Integrate with Account
You can add account information to the integrated bank and integrated with the added account. The transaction history is scraped and imported once the account is integrated.
The following describes how to add and integrate with account information.
- Click the ‘Admin Menu’ at the top right of the PC web screen, and then click ‘Accounting’ in the pop-up window.
- Click at the top left of the screen.
- Click ‘Manage Funds > Link Bank/Account’ from the menu.
- Click the business place where the integrated bank belongs to, and then click the bank for adding an account.
- Click 'Add'.
- Enter the account information, purpose, contract amount, interest rate, and opening date.
- Select 'Yes' for the integration status, and then select 'Use' for the use status.
- Click ‘Save’, and then click ‘Yes’ in the Notification pop-up window.
- The account is added and the Linkage Status column is changed to Validity Test Required.
- Select the added account, click ‘Validity Test’, and then click ‘Yes’ in the notification pop-up window.
- Use the entered authentication information of the finance account (ID/password, certification) to check the validity of the finance account to be integrated.
- When the validity test is conducted, deposit/withdrawal details and balance information from 30 days before the current date to the present are scraped and provided.
- Integration is completed after the validity test is performed. Deposit/withdrawal details, transaction history, and balance information are imported twice a day from the integrated bank account. You can view these details in ‘Accounting > Link Finance Account’.
- ‘Bank Login Failed’ is displayed when you can't log in to a bank using the entered ID/password information or certification. In this case, check the ID/password or certification.
Modify Integrated Account
You can modify the information of an added account, change the integration status and use status, or delete the account.
The following describes how to view a integrated account and modify its details.
- Click the ‘Admin Menu’ at the top right of the PC web screen, and then click ‘Accounting’ in the pop-up window.
- Click at the top left of the screen.
- Click ‘Manage Funds > Link Bank/Account’ from the menu.
- Click the business place where the integrated bank belongs to, and then click the bank for modifying an account.
- Perform the necessary tasks below in the list of accounts.
- Modify Contents: Modify the necessary area of the account information.
- Remove Integration: Change the Linkage Status to ‘No’.
- Set as Not Use: Change the use status to ‘Not Use’.
- Delete: Select the account to be deleted, and click 'Delete'.
- Click ‘Save’.
- The modifications are reflected.
View Transactions by Account
You can check transaction history, transaction slips, and total transaction amounts by account based on the approved deposit/withdrawal slip details.
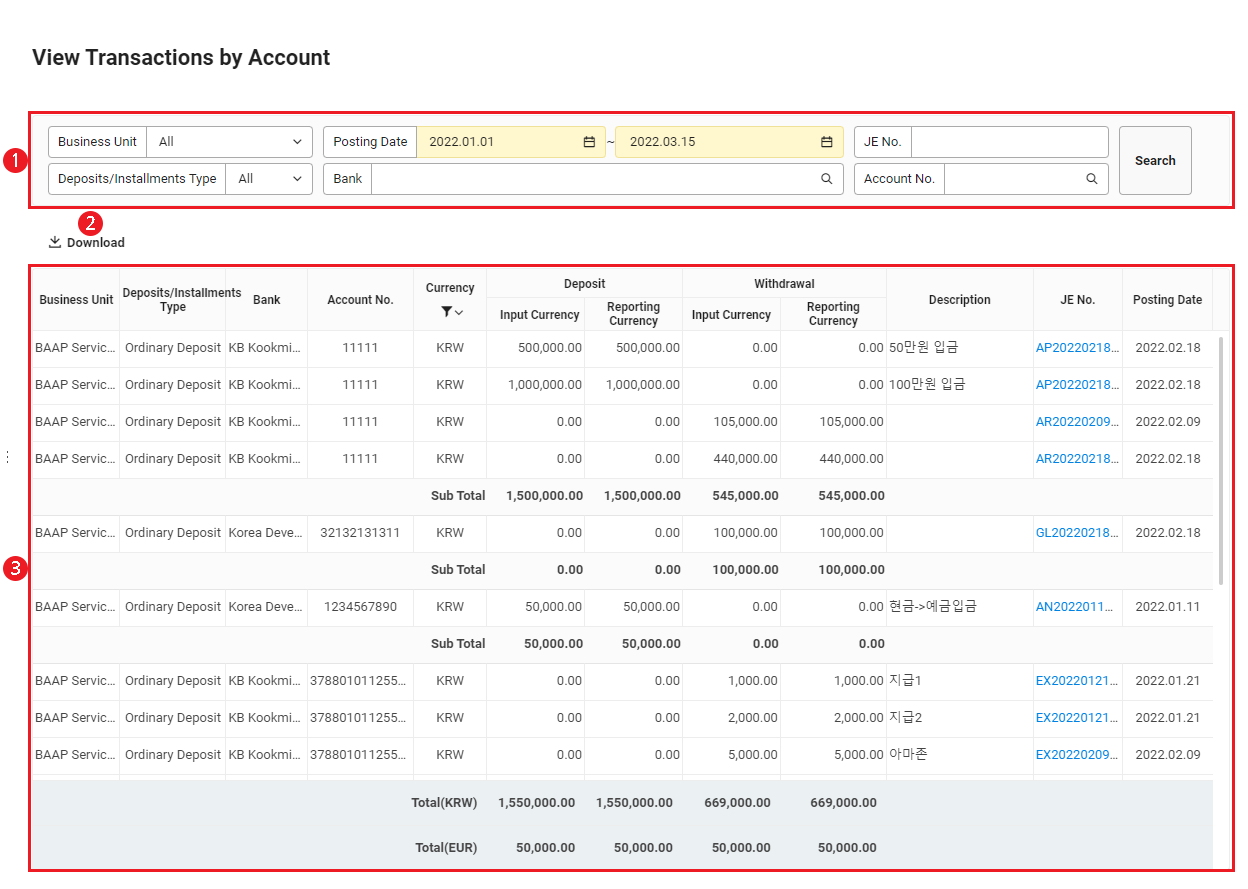
The View Transactions by Account page is laid out as follows.
| Area | Description |
|---|---|
| ① Search Window | Searches the transaction history by account using the conditions of business place, slip date, slip number, deposit/installment savings type, bank, and account number. |
| ② Download | Downloads the transaction history by account as an Excel file upon clicking it. |
| ③ List of Transactions by Account | Displays the transaction history by account in a list. Click ‘Currency’ to filter for the display of only the selected currency, and click the ‘slip number’ to view the slip of each transaction history. |
Download Transactions by Account
The following describes how to download the transaction history by account as an Excel file.
- Click the ‘Admin Menu’ at the top right of the PC web screen, and then click ‘Accounting’ in the pop-up window.
- Click at the top left of the screen.
- Click ‘Manage Funds > View Transactions by Account’ from the menu.
- If necessary, enter the transaction history conditions to be searched in the search window, and then click ‘Search’.
- You can view the transactions that match the entered conditions.
- Click 'Download'.
- The transaction history by account is downloaded as an Excel file.
ViewTransactionsbyAccount_YYYYMMDD_XXXXXX.xlsx in the Download folder.View Balance by Account
You can check the previous day's balance, current day's balance, and deposit/withdrawal details by account based on the approved deposit/withdrawal slip details.
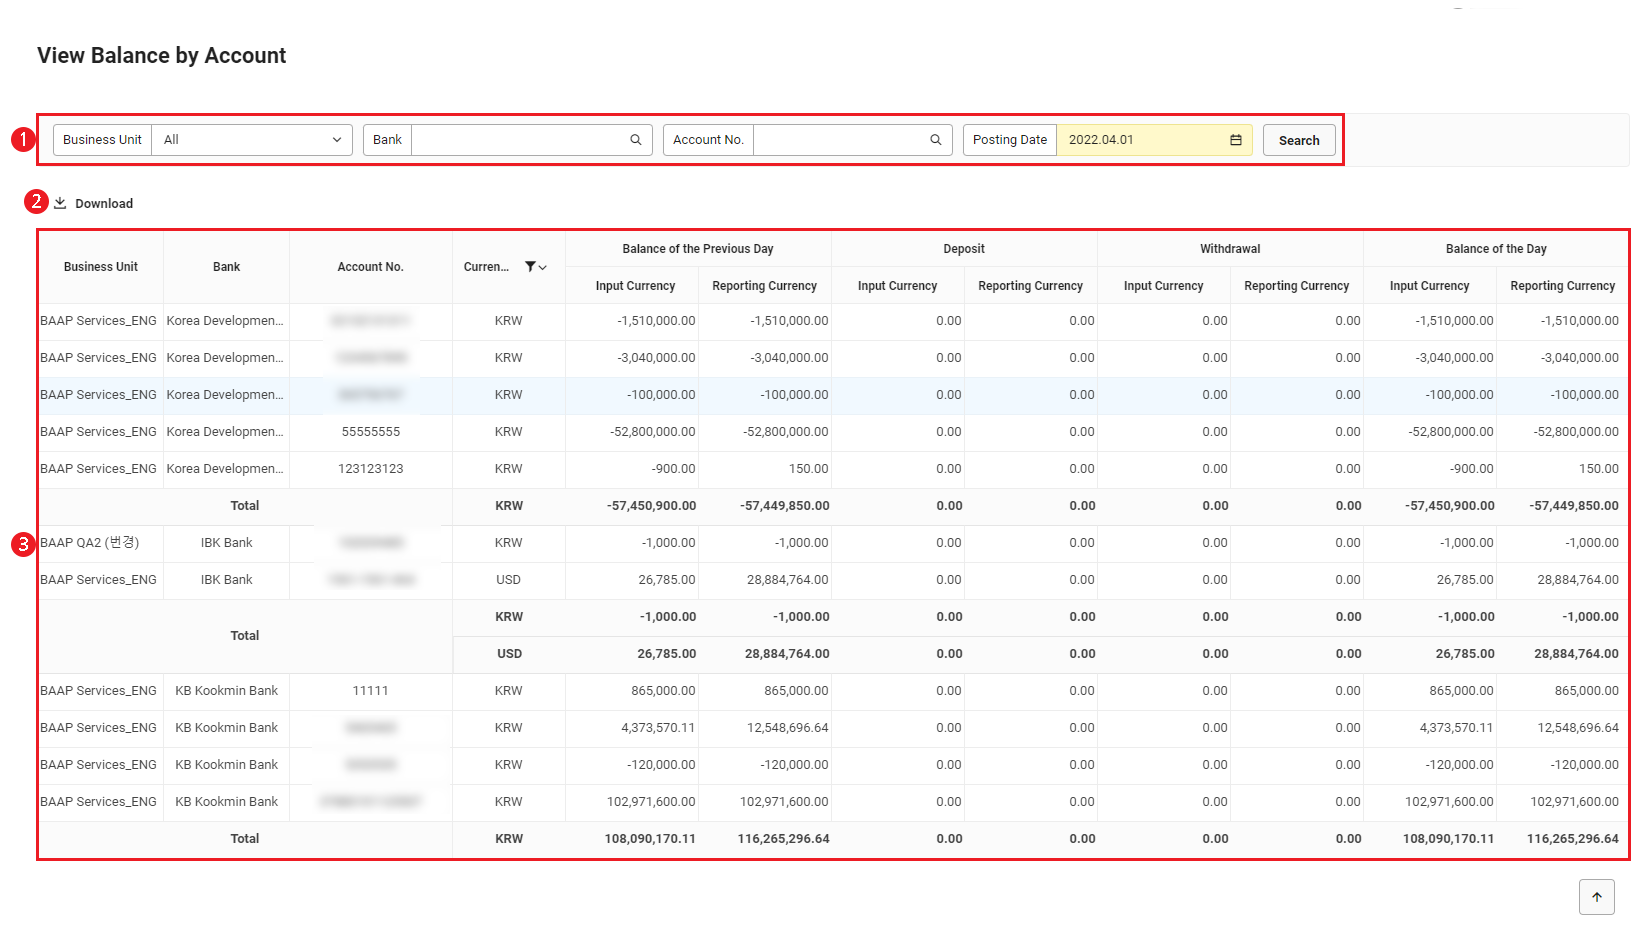
The View Balance by Account page is laid out as follows.
| Area | Description |
|---|---|
| ① Search Window | Searches the balance by account using the conditions of business place, bank, account number, and slip date. Select a bank to only select the account number of the applicable bank. |
| ② Download | Downloads the balance by account as an Excel file upon clicking it. |
| ③ List of Balance History by Account | Displays the balance by account in a list. Click ‘Currency’ to filter for and display only the selected currency. |
Download Balance History by Account
The following describes how to download the balance history by account as an Excel file.
- Click the ‘Admin Menu’ at the top right of the PC web screen, and then click ‘Accounting’ in the pop-up window.
- Click at the top left of the screen.
- Click ‘Manage Funds > View Balance by Account’ from the menu.
- If necessary, enter the bank account conditions to be searched in the search window, and then click ‘Search’.
- You can view the account balance that applies to the entered conditions.
- Click 'Download'.
- The balance history by account is downloaded as an Excel file.
Manage Employee Account
You can register the account information of each employee based on the employee information registered in ‘HR > Member > Manage Employees’.
- When using in the form of a corporate group, you can also manage the bank account of an employee with concurrent positions belonging to another corporate group.
- Employees without registered accounts can compose various documents such as for expenses, business trips, and family events, but they can't create withdrawal slips. You must enter the employee account before creating a withdrawal slip to settle expenses.
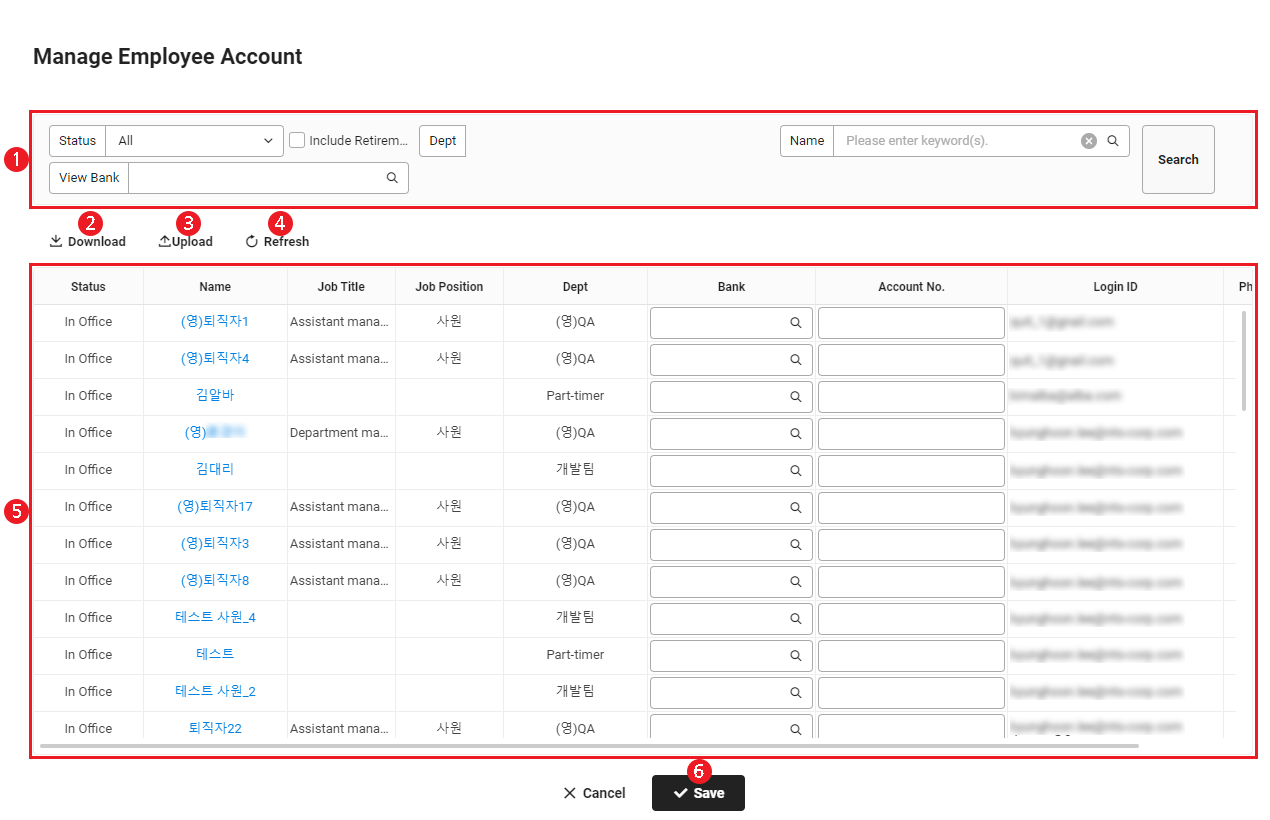
The Manage Employee Account page is laid out as follows.
| Area | Description |
|---|---|
| ① Search Window | Searches employee account information by employment status of employee, department, name, and bank. |
| ② Download | Downloads the list of employee account information as an Excel file upon clicking it (See Download List of Employee Accounts). |
| ③ Upload | Uses an Excel file to add the employee account information in bulk. (See Add Employee Accounts in Bulk) |
| ④ Refresh | Refreshes the list of employee account information upon clicking it. |
| ⑤ List of Employee Account Information | Displays the employee account information in a list and enters the account information. You can enter the account information in the input fields of Bank and Account Number, as well as click the name to view employee details. |
| ⑥ Save | Saves the entered employee account information upon clicking it. |
Add Employee Accounts in Bulk
The following describes how to add the employee account information in bulk.
- Click the ‘Admin Menu’ at the top right of the PC web screen, and then click ‘Accounting’ in the pop-up window.
- Click at the top left of the screen.
- Click ‘Manage Funds > Manage Employee Account’ from the menu.
- Click ‘Upload’.
- See the below and upload the employee list file in the Upload pop-up window.
- Download All Employees: Downloads the information of all employees as a list.
- Download Unregistered Employees: Downloads as a list only the employee information for which the bank or account information was not registered.
- Enter the bank and account number in the Settlement Bank column and the Payment Account No. column, respectively, and then save the file.
Do not edit columns other than the Settlement Bank column and the Payment Account No. column.
- Click ‘Upload’ in the Upload pop-up window, and then upload the composed file.
- Click ‘OK’ and then click ‘OK’ in the notification pop-up window.
- Click ‘Refresh’ on the Manage Employee Account screen.
Download List of Employee Accounts
The following describes how to download the list of employee accounts.
- Click the ‘Admin Menu’ at the top right of the PC web screen, and then click ‘Accounting’ in the pop-up window.
- Click at the top left of the screen.
- Click ‘Manage Funds > Manage Employee Account’ from the menu.
- If necessary, enter the employee account conditions to be searched in the search window, and then click ‘Search’.
- You can view the employee account information that matches the entered conditions.
- Click 'Download'.
- The list of employee accounts is downloaded as an Excel file.
ManabeEmployeeAccounts_YYYYMMDD_XXXXXX.xlsx in the Download folder.Daily/monthly Report on Funds
You can view the company's funds status, such as cash, deposits, and savings balances as well as deposit/withdrawal history, on a daily or monthly basis.
To use ‘Daily/Monthly Report on Funds’, set the usage status of Daily/monthly report on funds to ‘Use’ in ‘Accounting > Settings’.
The Daily/Monthly Report on Funds page is laid out as follows.
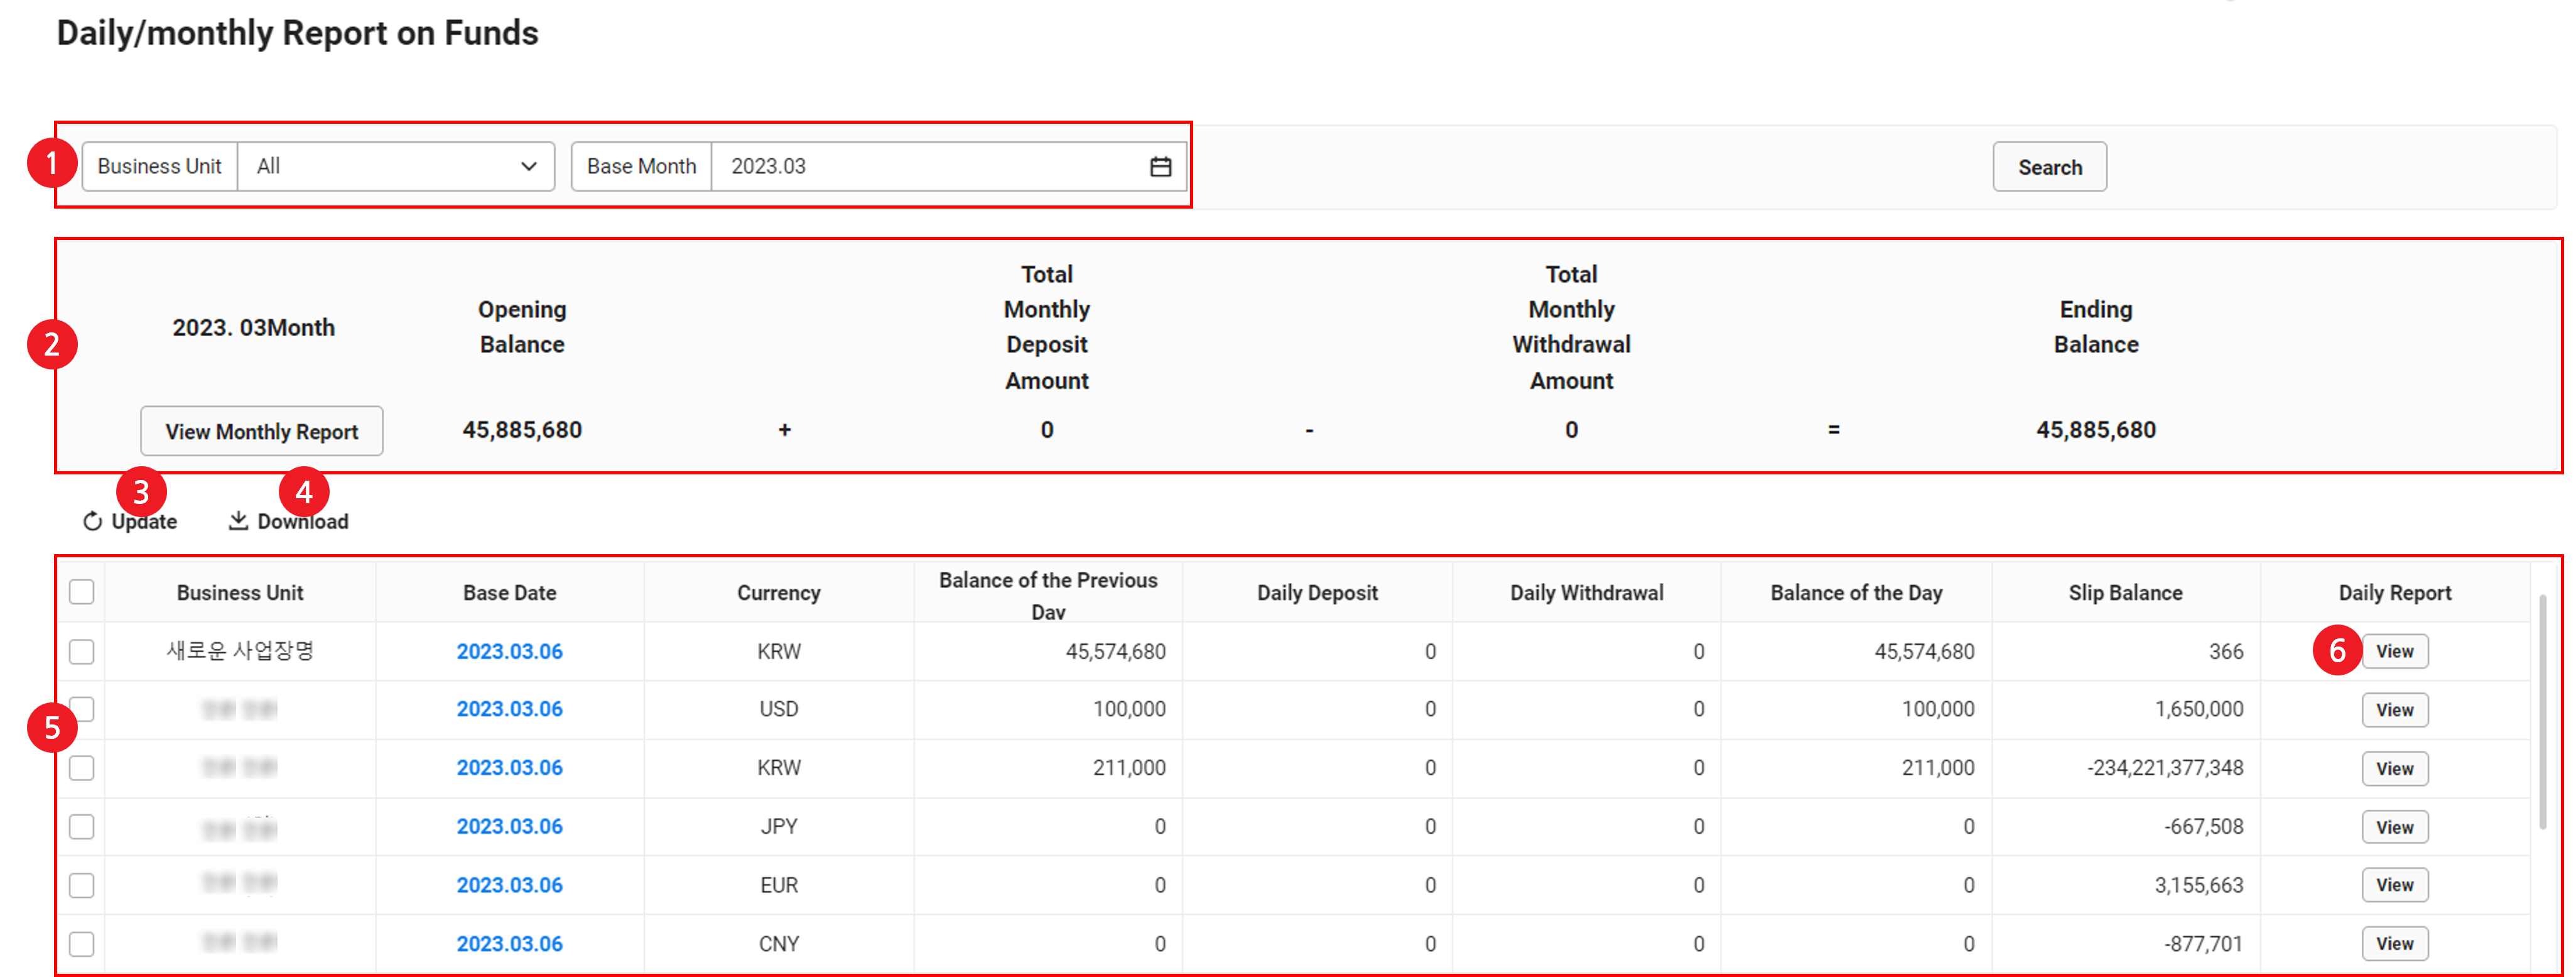
| Area | Description |
|---|---|
| ① Search Window | Search the funds status based on business place and base month conditions. |
| ② Summary of funds status for the base month | Click to view the opening/ending balance for the base month and the deposit/withdrawal amounts for the month.
|
| ③ Update | Click to update the company's funds status to view. |
| ④ Download | Click to download the funds status. (See Download Funds Status) |
| ⑤ List of daily flows for the base month by business place | View the list of daily funds status for the base month by business place. |
| ⑥ Daily Report | Click to view the daily report. (See View Daily Report) |
You can view the status of your funds up to the previous day. To view the funds status for the current time, click ‘Update’.
- However, for customer who use financial account integration, data such as deposit/withdrawal integration history and account balance are scraped and imported through a batch operation, so check whether the integrated transaction history of the day has been scraped before viewing the funds status.
View Monthly Report
The following describes how to view the monthly report of the funds status by business place.
- Click the ‘Admin Menu’ at the top right of the PC web screen, and then click ‘Accounting’ in the pop-up window.
- Click at the top left of the screen.
- Click ‘Manage Funds > Manage Daily/Monthly Report on Funds’ from the menu.
- Select the business place and base month to be searched in the search window, and then click 'Search'.
- You can view the funds status that corresponds to the entered conditions.
- Click ‘View Monthly Report’.
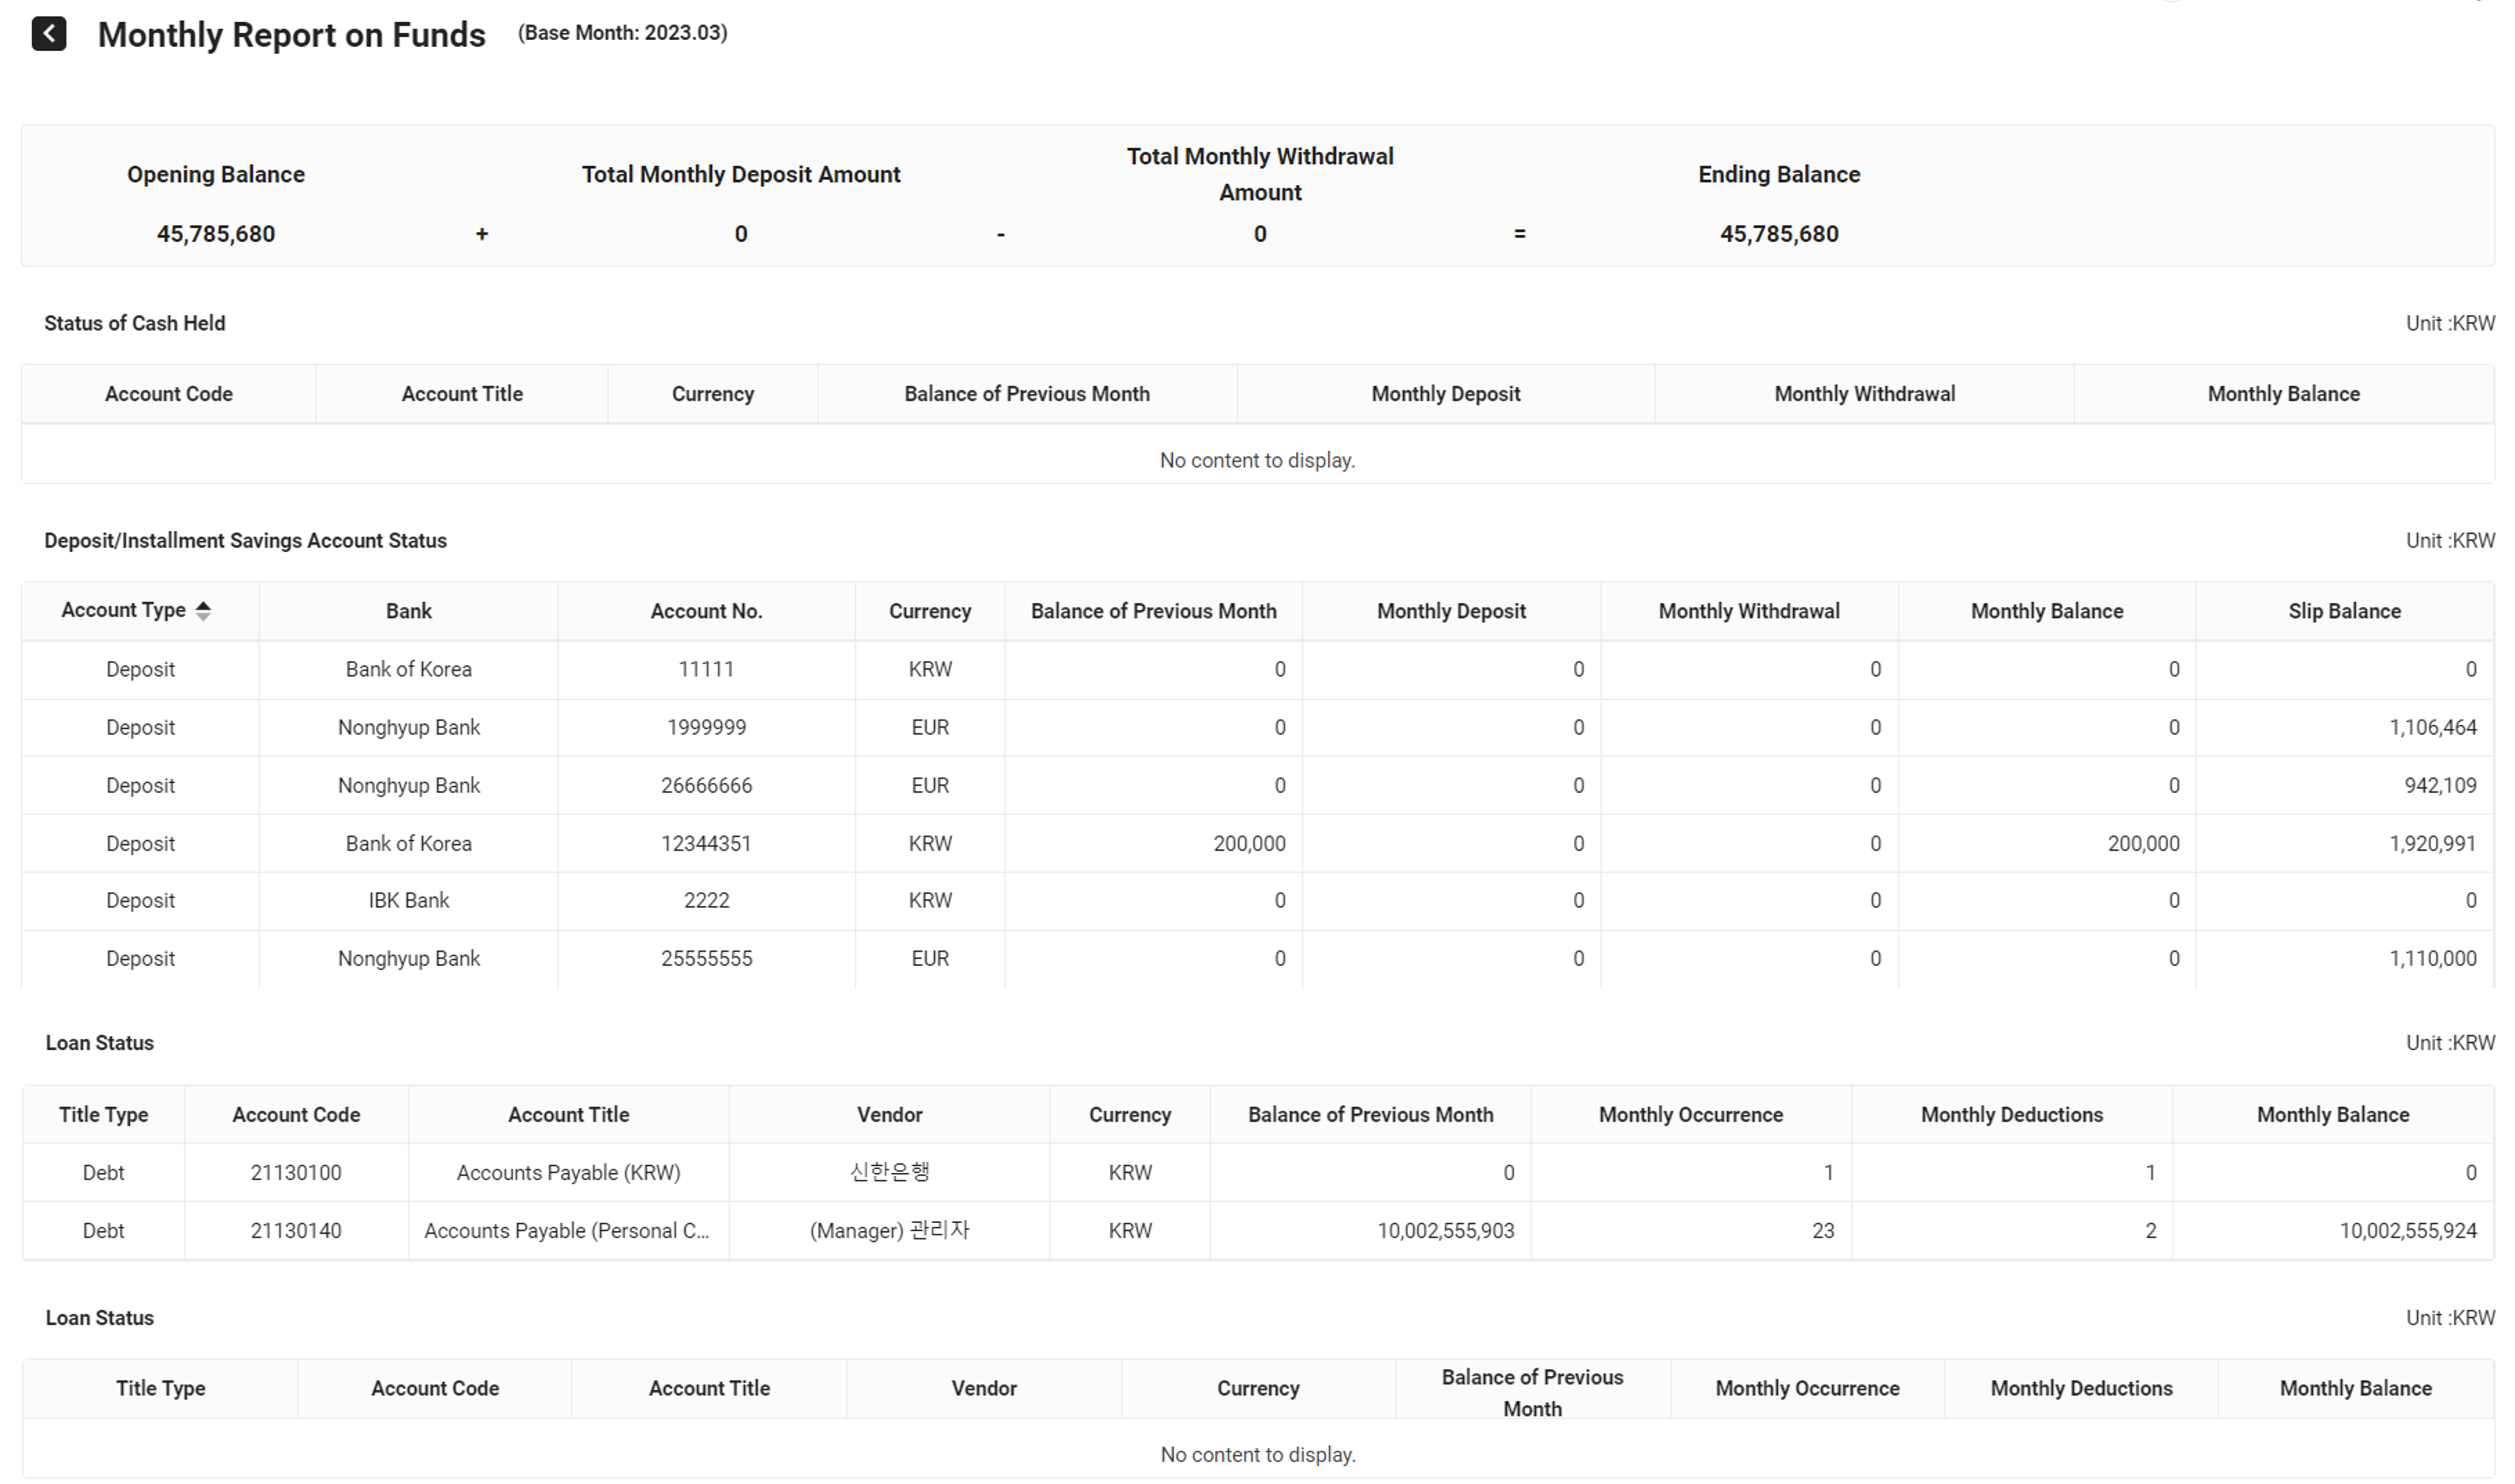
- You can view the detailed cash holdings, deposit and installment savings account status, borrowings, and loans for the selected business place and base month.
View Daily Report
The following describes how to view the daily report of the funds status for the base month by business place.
- Click the ‘Admin Menu’ at the top right of the PC web screen, and then click ‘Accounting’ in the pop-up window.
- Click at the top left of the screen.
- Click ‘Manage Funds > Manage Daily/Monthly Report on Funds’ from the menu.
- Select the business place and base month to be searched in the search window, and then click ‘Search’.
- You can view the funds status that corresponds to the entered conditions.
- From the date you want to view, click ‘View’ of the Daily Report on Funds item.
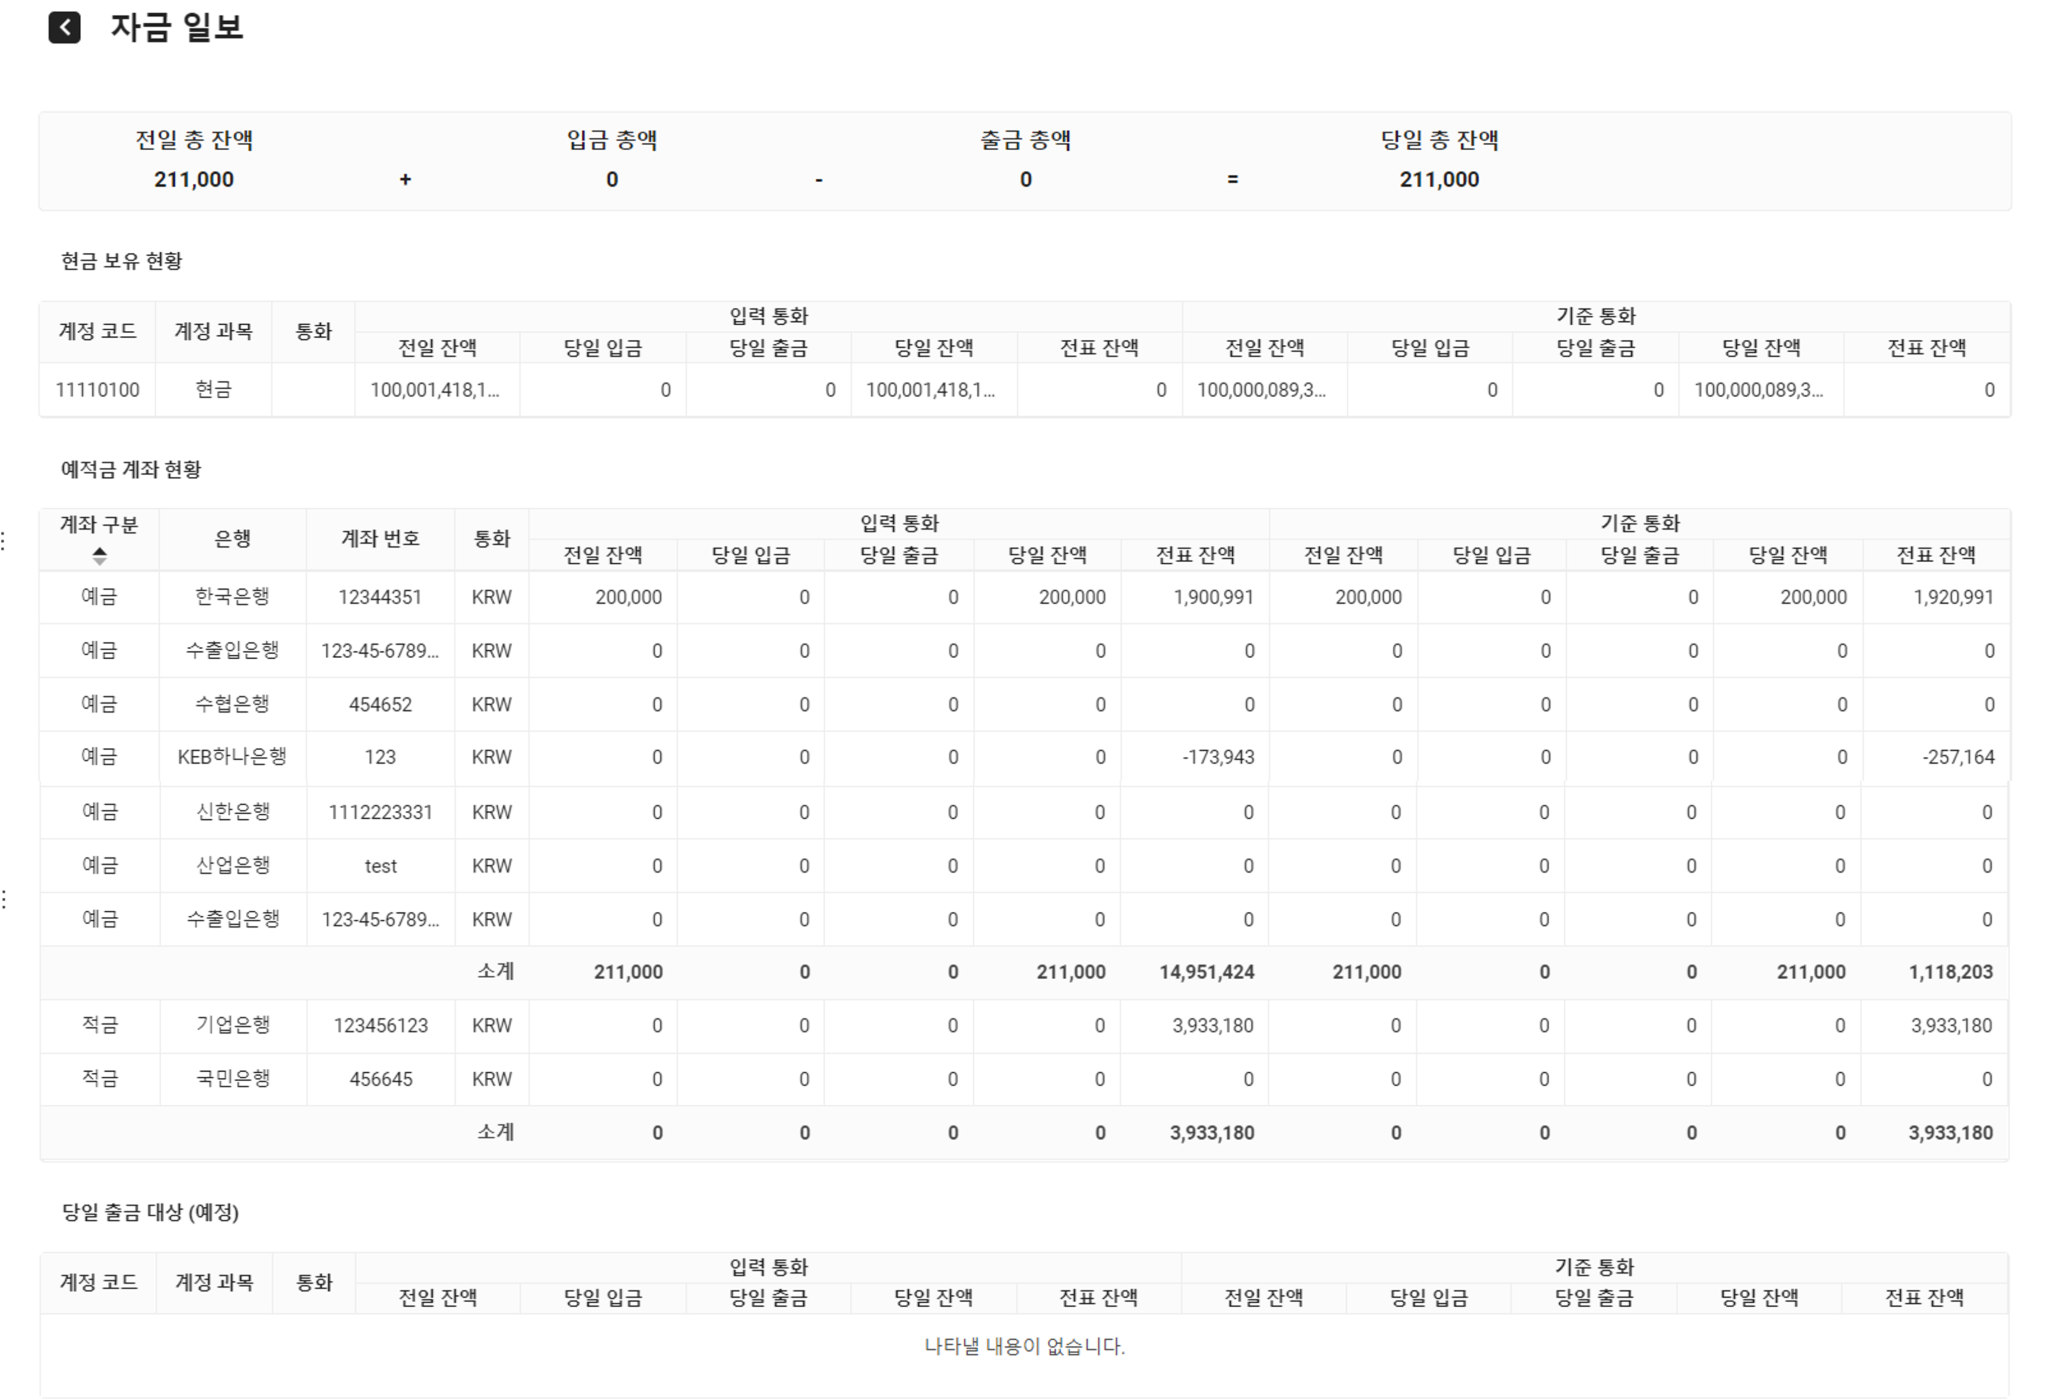
- You can view the detailed cash holdings for the day, deposit and installment savings account status, and the status of any withdrawals (scheduled) to be made that day.
Download Funds Status
The following describes how to download the list of employee accounts.
- Click the ‘Admin Menu’ at the top right of the PC web screen, and then click ‘Accounting’ in the pop-up window.
- Click at the top left of the screen.
- Click ‘Manage Funds > Daily/Monthly Report on Funds’ from the menu.
- Select the business place and base month to be searched in the search window, and then click ‘Search’.
- You can view the funds status information that corresponds to the entered conditions.
- Click 'Download'.
- The searched funds status list is downloaded as an Excel file.
Daily Report on Funds_YYYYMMDD_HHMMSS.xlsx in the Download folder.