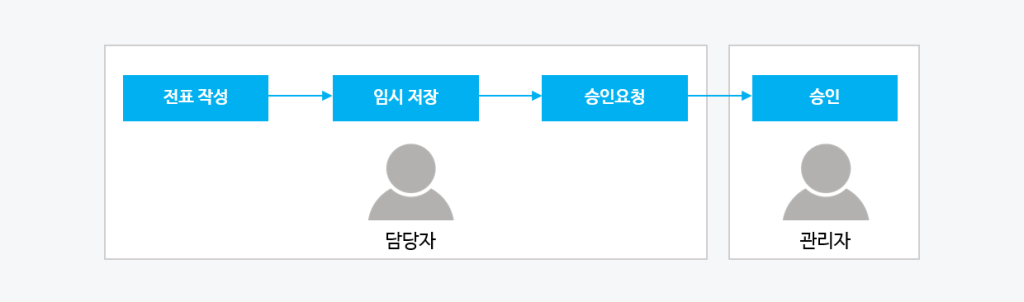
You can register all of the company's transactions with slips and manage them. You can create, view, approve, and delete slips, and the approved slips are reflected in the deposit/withdrawal history according to the receivables/payables classification. When you make settlements after requesting and using various expenses, related slips are automatically created and reflected in the deposit/withdrawal history.
- You need Accounting admin permissions to create slips. Accounting admin permissions can be added in 'Admin > Security > Admin Authority'. You can also add a new permission and grant the permission to create slips.
- Approving, confirming, and rejecting slips can only be done by users with Accounting admin permissions.
Create/View Slips
You can view the created slips, create new slips, delete slips, and perform the tasks of requesting approval of, approving, rejecting, and printing each slip.
The Create/View Slip page is laid out as follows.
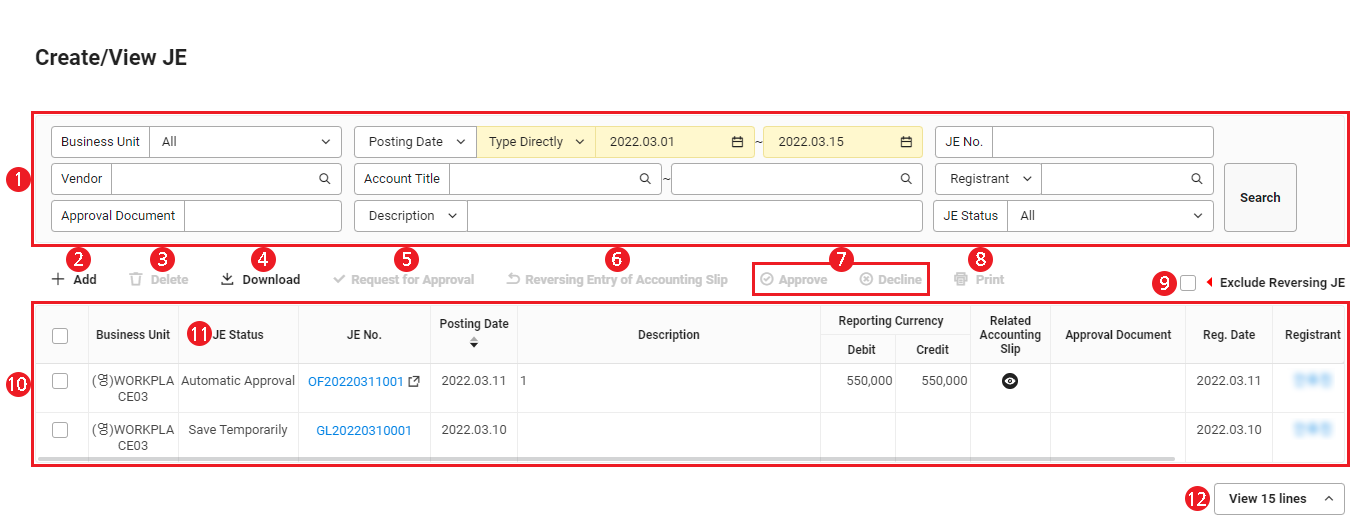
| Area | Description |
|---|---|
| ① Search window | Search slips by business place, slip date, slip number, vendor, account title, registrant, approval document, note, and slip status |
| ② Add | Create a new slip (See Add Slip) |
| ③ Delete | Delete the selected slip (See Delete Slip) |
| ④ Download | Download the list of slips as an Excel file (See Download Slip List) |
| ⑤ Request Approval | Request approval of the selected slip that has been saved temporarily. |
| ⑥ Reverse Slip | Reverse the selected slip (See Reverse Slip) |
| ⑦ Approve, Reject | Approve or reject the selected slip (See Approve and Reject Slip) It is displayed only to the users with Accounting admin permissions |
| ⑧ Print | Print the selected slip (See Print Slip) |
| ⑨ Exclude Reversing JE | Exclude reversals from the list upon clicking it |
| ⑩ Slip list | Check the list of slips Click each detail to view information
|
| ⑪ Slip Status | It displays the slip status
|
| ⑫ Number of displayed items | Set the number of slips to be displayed on a single page of the list |
Create Slip
The following describes how to create a new slip.
- Accounting Basic Settings and Account Titles, Common Codes must be set to create slips.
- You can't create slips if the current month has been closed in the ‘Settlement/Financial Statements > Monthly Closing’ menu.
- Click the ‘Admin Menu’ at the top right of the PC web screen, and then click ‘Accounting’ in the pop-up window.
- Click
 at the top left of the screen.
 - Click ‘Manage Slips > Create/View Slip’ from the menu.
- Click 'Add'.
- Enter the basic information of the slip in the Basic Slip Information area.
- The slip date is automatically displayed as today's date, but you can click
 to change it.
 - Enter the date of when the expense was made in Date of Proof. When attaching a receipt, enter the date of the receipt.
- You can change the Currency by selecting ‘Y’ for Foreign Currency Bookkeeping Status in the ‘Settings > Accounting Settings’ menu.
- When you enter an amount after changing to a foreign currency, a value that has been converted to the reporting currency is displayed separately in the Reporting Currency column of the list after a slip is created. The conversion is made using the standard exchange rate of the Date of Evidence for the selected currency.
- To create reversal slips, select ‘Y’ for Reversal Availability. You can't create reversal slips if ‘N’ is selected.
- Click ‘Attach File’ and attach evidence files such as receipts.
- You can attach multiple files.
- The slip date is automatically displayed as today's date, but you can click
- Enter the details of the slip in the Slip Details area.
- Enter additional settings in Info Page, Schedule, and Management Items according to the selected account title.
- You can change the display status of additional settings in the ‘Accounting > Manage Standard Information > Manage Account Titles’ menu.
- You can enter the collection/payment schedule if the account property is Receivables/Payables. The entered collection/payment schedule is displayed in Scheduled Date.
- To enter the Info Page field, select a vendor and click ‘Promissory Note’, ‘Input VAT’, ‘Output VAT’, or ‘Withholding Tax’.
- To enter the Schedule field, select a vendor and click ‘Manage Schedule’.
- The set schedule is reflected in the deposit/withdrawal history.
- If the slip item is a history related to purchases and the vendor's payment conditions have been registered, then the applicable payment date is entered in the scheduled date.
- If the slip item is a history related to sales and the vendor's collection conditions have been registered, then the applicable payment date is entered in the scheduled date.
- If there are additional notes registered in the account title, then select from the Additional Notes field or enter them manually.
- You can enter an amount in either ‘Debit’ or ‘Credit’ for a single detail.
- Select the vendor and department (affiliated department).
- When using as a corporate group
- Creating a slip for primary company: The department tree of the primary company is displayed.
- Creating a slip for concurrent company by an employee with a concurrent position in the corporate group: The corporate group department tree is displayed.
- When using as a corporate group
- Search and select a project. You can add projects in the Manage Project Code menu.
- Projects are only displayed when the company has set to use projects.
- To use the budget, click
 to view and select the available budget.
- The ‘Budget’ field is displayed if you've set the budget usage status in the ‘Accounting > Settings’ menu to Use.
- Only budgets that match the account title, department (affiliated department), and project (optional) entered will be searched.
- Check the available amount.
- If you've set Budget Control Status to ‘Yes’, then the budget can't be used if the debit/credit amount entered exceeds the available budget.
If a slip deletion or reversal occurs, the used budget is reversed.
- Enter additional settings in Info Page, Schedule, and Management Items according to the selected account title.
- Click 'Save details'.
- To delete saved details, click the detail to be deleted and click ‘Delete Details’.
- The entered details are deleted when you click ‘Cancel’, and you are returned to the page before entering the details.
- Repeat Steps 5 through 6 until the amounts of debit and credit match.
- Complete slip creation by referring to the below.
- ‘Approve’ is only displayed to the Accounting admin, and a slip is created and approved immediately upon clicking it.
- When you click ‘Request Approval’, a slip is created and its status changes to Requested for Approval. The Accounting admin can approve the slip.
- When you click ‘Copy Slip’, a slip with the same account title as the applicable slip is copied.
- When you click ‘Save Temporarily’, a slip with the status of Saved Temporarily is created. You can request approval from the slip list or the Details page.
- When you click ‘Cancel’, the modified details are deleted and you are returned to the page before modifying the details.
Create Slip Automatically
When an approval document is created after spending various expenses, or requesting family event and business trip or expenditure resolutions, the slip for the applicable case is created and approved automatically.
You can cancel automatic slips related to family events and business trips as follows.
- Before creating withdrawal slip: It can be canceled by the Attendance admin, and canceling it automatically creates a reversal slip.
- After creating withdrawal slip: The Attendance admin can cancel it after the Accounting admin Reverses the withdrawal slip manually.
Displays slip details.
You can view the details of a slip. The content of slips with the status of ‘Saved Temporarily’ or ‘Cancel Approval’ can be modified and requested for approval. The Accounting admin can approve the slips for which approval has been requested.
The following describes how to view the slip details.
- Click the ‘Admin Menu’ at the top right of the PC web screen, and then click ‘Accounting’ in the pop-up window.
- Click at the top left of the screen.
- Click ‘Manage Slips > Create/View Slip’ from the menu.
- Click the Slip Number of the slip to view the details for.
- View the details by referring to the below.
- You can view the slip history at the top of the Slip Details page.
Slip History Slip Status Initial slip creation No display of status Save temporarily Saved temporarily 2022.01.01 Request approval Requested for approval 2022.01.01 Approval completed Requested for approval 2022.01.01 > Approval completed 2022.01.01 Cancel Approval Requested for approval 2022.01.01 > Approval completed 2022.01.01 > Approval canceled 2022.01.01 Rejected Requested for approval 2022.01.01 > Rejected 2022.01.01 - ‘Approval’ is only displayed to the accounting admin and it is not displayed when approval has been completed. A slip is created and approved immediately upon clicking it.
- ‘Request Approval’ is only displayed when saved temporarily. A slip is created upon clicking it and its status changes to Requested for Approval. The Accounting admin can approve the slip.
- When you click ‘Copy Slip’, a slip with the same account title as the applicable slip is copied.
- ‘Save Temporarily’ is only displayed when saved temporarily. A slip with the status of Saved Temporarily is created upon clicking it, and you can request approval from the slip list or the Details page.
- ‘Reject’ is only displayed when requested for approval, and you can reject the slip by clicking it.
- ‘Reverse Slip’ is only displayed when approval is completed, and you can reverse the slip by clicking it.
- ‘Edit' is only displayed when approval is completed (including Automatic Approval), allowing you to edit the slip by clicking it. See ‘Edit Slip’ below for instructions on editing slips.
- When you click ‘Cancel’, the modified details are deleted and you are returned to the page before modifying the details.
- You can view the slip history at the top of the Slip Details page.
Edit Slip
Accounting admin can edit slips with the approved or automatic-approved status.
The following describes how to edit slips.
- Click the ‘Admin Menu’ at the top right of the PC web screen, and then click ‘Attendance’ in the pop-up window.
- Click at the top left of the screen.
- Click ‘Manage Slips > Create/View Slip’ from the menu.
- Click the slip number of the slip you want to edit (Approved, Automatic-approved status).
- Click ‘Edit’ at the bottom and enter content to edit.
- The editable fields will be enabled (Notes, Additional Notes, Reference Slip, Attachments, Manage Schedule, Budget (if a department is entered))
- When you edit Budget, only budgets that match the account title, department (affiliated department), and project (optional) entered will be searched.
- The editable fields will be enabled (Notes, Additional Notes, Reference Slip, Attachments, Manage Schedule, Budget (if a department is entered))
- Enter the reason for change.
- Click ‘Save’.
- You can view the change history in the 'Change History' tab.
View Slip Change History
You can view the change history of edited slips at in the Slip Details.
The following describes how to view the slip change history.
- Click the ‘Admin Menu’ at the top right of the PC web screen, and then click ‘Attendance’ in the pop-up window.
- Click at the top left of the screen.
- Click ‘Manage Slips > Create/View Slip’ from the menu.
- Click the Slip Number of the slip to view the change history.
- Click the ‘Change History’ tab.
- You can view the change history of the slip.

- You can view the change history of the slip.
Approve and Reject Slip
The Accounting admin can approve or reject the slips for which approval has been requested.
The following describes how to approve or reject the slips for which approval has been requested.
- Click the ‘Admin Menu’ at the top right of the PC web screen, and then click ‘Attendance’ in the pop-up window.
- Click at the top left of the screen.
- Click ‘Manage Slips > Create/View Slip’ from the menu.
- Select all the slips to be approved or rejected, and click 'Approve' or 'Reject'.
- To view the details of each slip first, click the ‘slip number’, view the details, and click ‘Approve’ or ‘Reject’ on that page.
- Rejected slips can be requested for approval again after being modified by the slip creator.
- Click ‘OK’ in the confirmation pop-up window.
Reverse Slip
You can only reverse approved general (GL) slips. Slips that have been reversed already or slips that were created through reversals can't be reversed again.
Only deletion is possible for slips other then general (GL) slips.
- You can't reverse the slip if the month of the slip date (year and month) has been closed in the ‘Accounting Service > Settlement/Financial Statement > Monthly Closing’ menu.
- Cleared slips can't be reversed.
- You can't cancel the reversal of reversed slips.
- Slips integrated with the Approval service (expenditure slips, expense slips, family event/business trip expense slips, purchase slips) can't be reversed from the Accounting service. However, if you delete the applicable approval document, their accounting slip is automatically deleted.
The following describes how to reverse approved slips.
- Click the ‘Admin Menu’ at the top right of the PC web screen, and then click ‘Attendance’ in the pop-up window.
- Click at the top left of the screen.
- Click ‘Manage Slips > Create/View Slip’ from the menu.
- Select all the approved slips to be reversed, and click ‘Reverse Slip’.
- To view the details of each slip first, click the slip number, view the details, and click ‘Reverse Slip’.
- Click ‘OK’ in the confirmation pop-up window.
- The reversed slip is created, and an arrow signifying the reversal appears on the right of the slip number for the original slip and the reversed slip.
Download Slip List
The following describes how to download the slip list as an Excel file.
- Click the ‘Admin Menu’ at the top right of the PC web screen, and then click ‘Attendance’ in the pop-up window.
- Click at the top left of the screen.
- Click ‘Manage Slips > Create/View Slip’ from the menu.
- If necessary, enter the slip conditions to be searched in the search window, and click ‘Search’.
- You can view the slip list that matches the entered conditions.
- Click 'Download'.
- The slip list is downloaded as an Excel file.
Print Slip
The following describes how to print slips.
- Click the ‘Admin Menu’ at the top right of the PC web screen, and then click ‘Attendance’ in the pop-up window.
- Click at the top left of the screen.
- Click ‘Manage Slips > Create/View Slip’ from the menu.
- Select all the slips to be printed, and click ‘Print’.
- To view the details of each slip first, click the slip number, view the details, and click ‘Print’ on the page.
- Check the details in the Print pop-up window, and click ‘Print’.
Delete Slip
Users with Accounting admin permissions can delete the registered slips.
The following describes how to delete slips.
- Click the ‘Admin Menu’ at the top right of the PC web screen, and then click ‘Attendance’ in the pop-up window.
- Click at the top left of the screen.
- Click ‘Manage Slips > Create/View Slip’ from the menu.
- Select the slip to be deleted, and click 'Delete'.
- See Cancel Approved Slip and delete approved slips after canceling their approval first.
- See Create Slip Automatically and delete the slips that have been approved automatically.
- Click 'Yes' in the confirmation pop-up window.
Delete Slip by Service
If slips were created through services other than Accounting or through the Accounting service menus other than Manage Slips, then you can delete them as shown in the following table.
| Service | Slip Type | Deletion Availability | Slip Deletion Method | Person in Charge |
|---|---|---|---|---|
| Accounting | General slip | Available | Delete from the ‘Accounting > Manage Slips > Create/View Slip’ page. | Accounting Admin |
| Accounting | Transfer slip | Available | Delete from the 'Accounting > Manage Slips > View Transfer Slip' page. | Accounting Admin |
| Accounting | Offset slip | Available | Delete from the ‘Accounting > Manage Receivables/Payables > View Offset Slip’ page. | Accounting Admin |
| Accounting | Deposit slip | Available | Delete the slip from the ‘Accounting > Manage Receivables/Payables > Clear Deposit’ menu. | Accounting Admin |
| Accounting | Integrated deposit slip | Available | Delete the slip from the ‘Accounting > Link Finance Account > Deposit Linkage History’ menu. | Accounting Admin |
| Accounting | Withdrawal slip | Available | Delete the slip from the ‘Accounting > Manage Receivables/Payables > Create Withdrawal Slip’ menu. | Accounting Admin |
| Accounting | Sales slip | Available | Delete the slip in the ‘Accounting > Manage Receivables/Payables > Create/View Sales Data’ menu. | Accounting Admin |
| Accounting | Corporate card refund slip | Available | Delete the slip from the ‘Accounting > Manage Tax > Create Corporate Card Refund Slips’ menu. | Accounting Admin |
| Accounting | Fixed asset increase/decrease slip | Available | Delete the slip from the ‘Accounting > Manage Fixed Asset > Fixed Asset Increase/Decrease’ menu. | Accounting Admin |
| Accounting | Depreciation cost slip | Available | Delete the slip from the ‘Accounting > Manage Fixed Asset > Calculate Depreciation Cost’ menu. | Accounting Admin |
| Accounting | Asset under construction slip | Available | Delete the slip from the ‘Accounting > Manage Fixed Asset > Register Asset Under Construction’ menu. | Accounting Admin |
| Accounting | Purchase slip | Available | 1. If you delete the approval document in the’ Manage Approval > Document Box > Manage Approval Documents’ menu, then the related slips are deleted 2. If there are reversed slips, then they're also deleted. 3. Purchase data is not deleted, and it can be deleted separately if necessary, or can be modified and reused 4. Delete the slip in the ‘Accounting > Manage Receivables/Payables > Create/View Purchase Data’ menu. |
Accounting Admin |
| Expenditures | Expenditure slip | Available | 1. If you delete the approval document in the’ Manage Approval > Document Box > Manage Approval Documents’ menu, then the related slips are deleted 2. If there are reversed slips, then they're also deleted. |
Approval approver |
| Expense | Expense slip | Available | 1. If you delete the approval document in the’ Manage Approval > Document Box > Manage Approval Documents’ menu, then the related slips are deleted 2. If there are reversed slips, then they're also deleted. |
Approval approver |
| Attendance | Family event expense slip Business trip expense slip |
Available | 1. If you delete the approval document in the ‘Manage Approval > Document Box > Manage Approval Documents’ menu, then the related slips are deleted. However, if an absence schedule cancellation document exist for the document, you need to first delete the cancellation document and delete the document. Upon deletion, related slips are deleted 2. If there are reversed slips, then they're also deleted. |
Approval approver |
| Sales | Sales slip from sales | Available | 1. Delete the slip from the ‘Accounting > Manage Slips > Create Linked Data Slip’ menu 2. Only the slip is deleted, and the sales data for sales is not deleted. |
Accounting Admin |
| Payroll | Payroll Slip | Available | 1. Delete the slip from the ‘Accounting > Manage Slips > Create Linked Data Slip’ menu 2. Only the slip is deleted, and not the payroll data. |
Accounting Admin |
Cancel Approved Slips
In the Cancel Approved Slip menu, the Accounting admin can view approved slips in a list and cancel approval if necessary. When the approval is canceled, the status of the slip changes to ‘Approval Canceled’, and the content can be modified or deleted.
The Cancel Approved Slip page is laid out as follows.
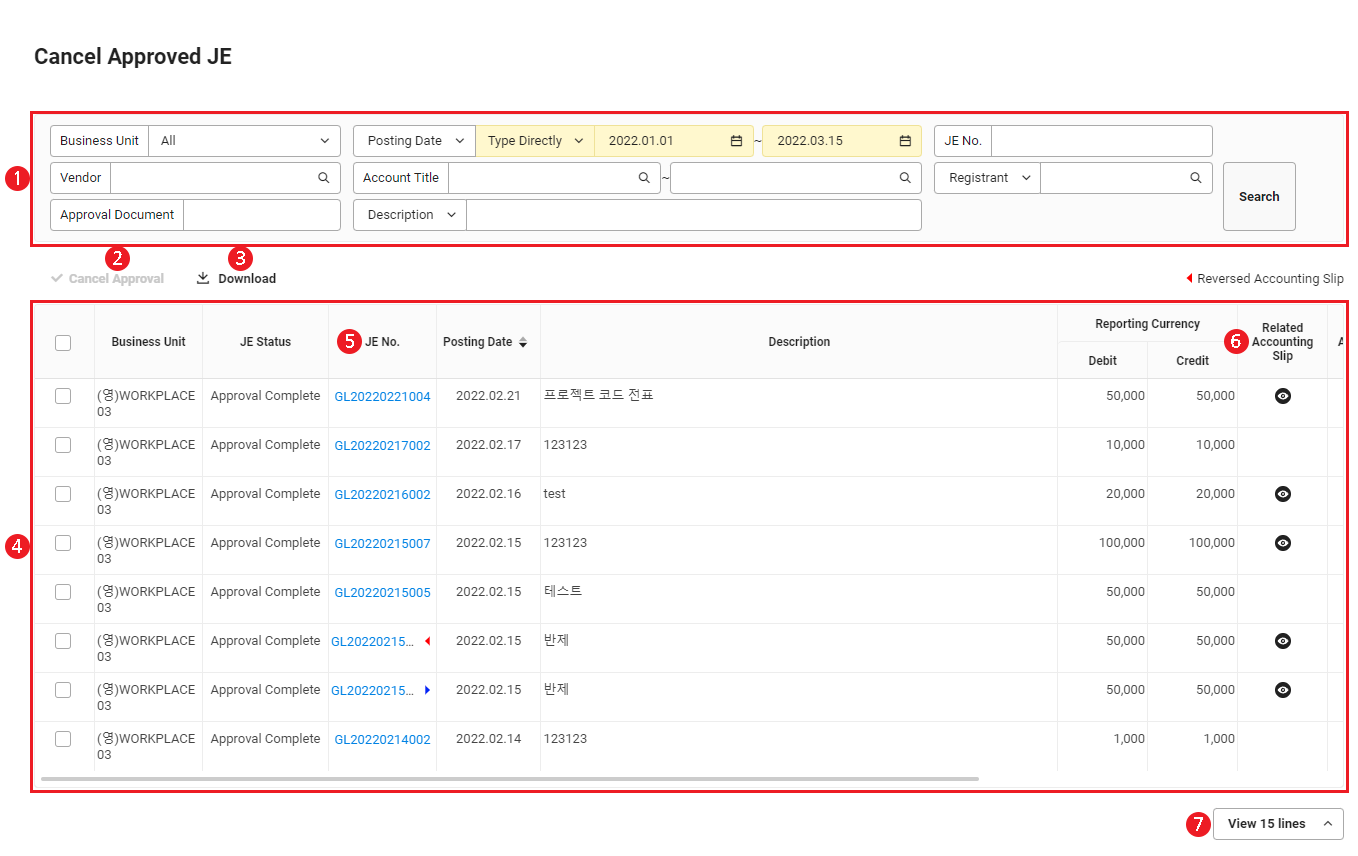
| Area | Description |
|---|---|
| ① Search window | Search approved slips by business place, slip date, slip number, vendor, account title, registrant, approval document, and notes conditions. |
| ② Cancel Approval | Click to cancel the approval of approved slips (See Cancel Approval of Approved Slip) |
| ③ Download | Download the list of approved slips as an Excel file (See Download Approved Slip List) |
| ④ List of Approvals | It displays the approved slips |
| ⑤ Slip Number | It displays the slip details upon clicking it |
| ⑥ Related Accounting Slip | It displays the related accounting slips upon clicking |
| ⑦ Number of displayed items | Set the number of approved slips to be displayed on a single page of the list |
Cancel Approval of Approved Slip
The following describes how to cancel the approval of approved slips.
- Click the ‘Admin Menu’ at the top right of the PC web screen, and then click ‘Attendance’ in the pop-up window.
- Click at the top left of the screen.
- Click ‘Manage Slips > Cancel Approved Slip’ from the menu.
- Select all the approved slips to be canceled, and click ‘Cancel Approval’.
- You can search the approved slips you want by business place, slip date, slip number, vendor, account title, registrant, approval document, and notes.
- Click the Slip Number to view the details of each slip.
- Click
 for Related Slip to view the related slips of each slip.
 - Click the name in the Registrant column to view the details of the slip registrant.
- From the confirmation pop-up window, click ‘Yes’.
- The status of the slip changes to Approval Canceled. You can request the approval again after modifying the details of the slip or delete the slip.
The difference between general slip approval requests and new requests after cancellation of approval is as follows.
- General request for slip approval
- New approval request after cancellation of approval

Download Approved Slip List
The following describes how to download the list of approved slips as an Excel file.
- Click the ‘Admin Menu’ at the top right of the PC web screen, and then click ‘Attendance’ in the pop-up window.
- Click at the top left of the screen.
- Click ‘Manage Slips > Cancel Approved Slip’ from the menu.
- If necessary, enter the approved slip conditions to be viewed in the search window, and click ‘Search’.
- You can view the list of approved slips that match the entered conditions.
- Click 'Download'.
- The approved slip list is downloaded as an Excel file.
Create Transfer Slip
In the Create Transfer Slip menu, you can create transfer slips by changing the account title of a created slip. You can replace the balance management account by vendor with another receivables/payables account, or adjust it with a settlement account. If a slip replacing a different type of account title with a receivables/payables account has been created, then you can use that transfer slip in the ‘Accounting > Manage Receivables/Payables’ menu to confirm the withdrawal history and process their payment.
The following describes how to create transfer slips.
- Click the ‘Admin Menu’ at the top right of the PC web screen, and then click ‘Attendance’ in the pop-up window.
- Click at the top left of the screen.
- Click ‘Manage Slips > Create Transfer Slip’ from the menu.
- Enter the search conditions in the search window, and click ‘Search’.
- Vendor and Account Title are required fields.
- Select all the slips for which to create transfer slips from the displayed list, and click ‘Create Transfer Slip’.
- Click the Slip Number to view the details of each slip.
- Click Vendor to view the vendor information of each slip.
- Click the name in the Person in Charge column to view the details of the slip registrant.
- Enter the slip date, notes, account title to be changed to, and additional notes, and click ‘Create Slip’.
- Enter the creation date of the transfer slip for the Slip Date.
- For Account Title, select the account with the same debit/credit classification as the account for which the slip details were viewed.
- If the account properties of the selected account title are managed as receivables/payables in ‘Manage Account Titles’, then you can read the schedule management (receivables/payables) data created in the transfer slip. This lets you view them in the ‘Manage Receivables/Payables > Create Deposit Slip’ menu or the ‘Manage Receivables/Payables > Create Withdrawal Slip’ menu, as well as process the slip.
- When you select the settlement account, the slip is created for the deduction of balance by vendor.
- If the company has set the use of projects, then search and select the project.
- You can add projects in the Manage Project Code menu.
- The ‘Budget’ field is displayed if you've set the budget usage status in the ‘Accounting > Settings’ menu to Use. To use the budget, click to view and select the available budget.
- Only budgets that match the account title, department (affiliated department), and project (optional) entered will be searched.
- Check the available amount.
- If you've set Budget Control Status to Yes, then the budget can't be used if the debit/credit amount entered exceeds the available budget.
- From the confirmation pop-up window, click ‘Yes’.
- The transfer slip is created and displayed in the ‘Create/View Slip’ menu.
Download Transfer Slip Creation Targets List
The following describes how to download the list of targets for creating transfer slips as an Excel file.
- Click the ‘Admin Menu’ at the top right of the PC web screen, and then click ‘Attendance’ in the pop-up window.
- Click at the top left of the screen.
- Click ‘Manage Slips > Create Transfer Slip’ from the menu.
- If necessary, enter the slip conditions to be searched in the search window, and click ‘Search’.
- You can view the slip list that matches the entered conditions.
- Click 'Download'.
- The list of transfer slip creation targets is downloaded as an Excel file.
View Transfer Slip
You can view the transfer slips created through the Create Transfer Slip menu and delete them if necessary.
The View Transfer Slip page is laid out as follows.
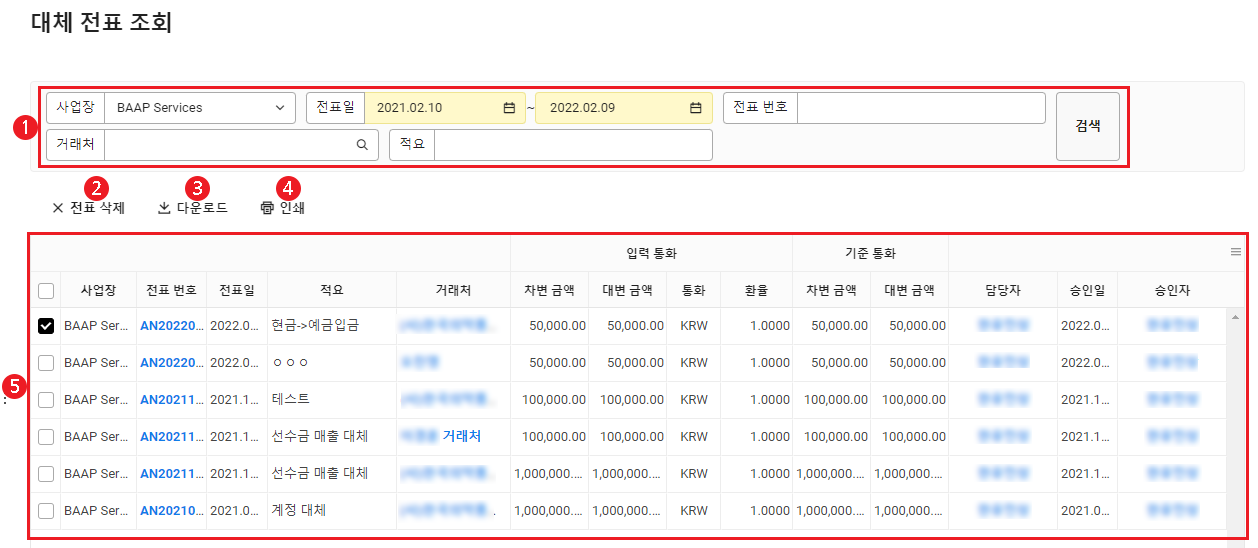
| Area | Description |
|---|---|
| ① Search window | Search transfer slips by business place, slip date, slip number, vendor, and notes conditions |
| ② Delete Slip | Delete the selected transfer slip (See Delete Transfer Slip) |
| ③ Download | Downloads the list of transfer slips as an Excel file (See Download Transfer Slip List) |
| ④ Print | Print the selected transfer slip (See Print Transfer Slip) |
| ⑤ Transfer slip list | Check the list of slips Click each detail to view information
|
Download Transfer Slip List
The following describes how to download the transfer slip list as an Excel file.
- Click the ‘Admin Menu’ at the top right of the PC web screen, and then click ‘Attendance’ in the pop-up window.
- Click at the top left of the screen.
- Click ‘Manage Slips > View Transfer Slip’ from the menu.
- If necessary, enter the transfer slip conditions to be viewed in the search window, and click ‘Search’.
- You can view the transfer slip list that matches the entered conditions.
- Click 'Download'.
- The transfer slip list is downloaded as an Excel file.
Print Transfer Slip
The following describes how to print transfer slips.
- Click the ‘Admin Menu’ at the top right of the PC web screen, and then click ‘Attendance’ in the pop-up window.
- Click at the top left of the screen.
- Click ‘Manage Slips > View Transfer Slip’ from the menu.
- Select all the transfer slips to be printed, and click 'Print'.
- Check the details in the Print pop-up window, and then click
Delete Transfer Slip
Users with Accounting admin permissions can delete the registered transfer slips.
- For precise accounting, it is recommended to perform reversals instead of deleting transfer slips. See Reverse Slip for information about reversing slips.
- Transfer slips cannot be deleted in the following cases.
- If the transfer account is a receivables/payables management account, and the clearing amount is not 0 KRW
- If the ‘year and month’ of the slip date have been closed in the ‘Accounting > Settlement/Financial Statements > Monthly Closing’ menu
The following describes how to delete transfer slips.
- Click the ‘Admin Menu’ at the top right of the PC web screen, and then click ‘Attendance’ in the pop-up window.
- Click at the top left of the screen.
- Click the ‘Manage Slips > View Transfer Slip’ menus, in that order.
- Select the slip to be deleted, and click 'Delete slip'.
- From the confirmation pop-up window, click ‘Yes’.
- The slip is deleted.
Create Linked Data Slip
You can check the sales history submitted to the Accounting service through the ‘Sales > Manage Sales > Manage Sales History’ menu and the ‘Send Payroll Slip’ tab of the ‘Payroll > Payroll > Create Payroll File’ menu, as well as process slips. (See Manage Sales History and Send Payroll Slip)Also, if you're using the Electronic Tax Invoice service, you can check the submitted electronic tax invoice issuance history and create slips from the ‘Electronic Tax Invoice > Manage Accounting Submission > Accounting Submission’.
The Create Linked Data Slip page is laid out as follows.
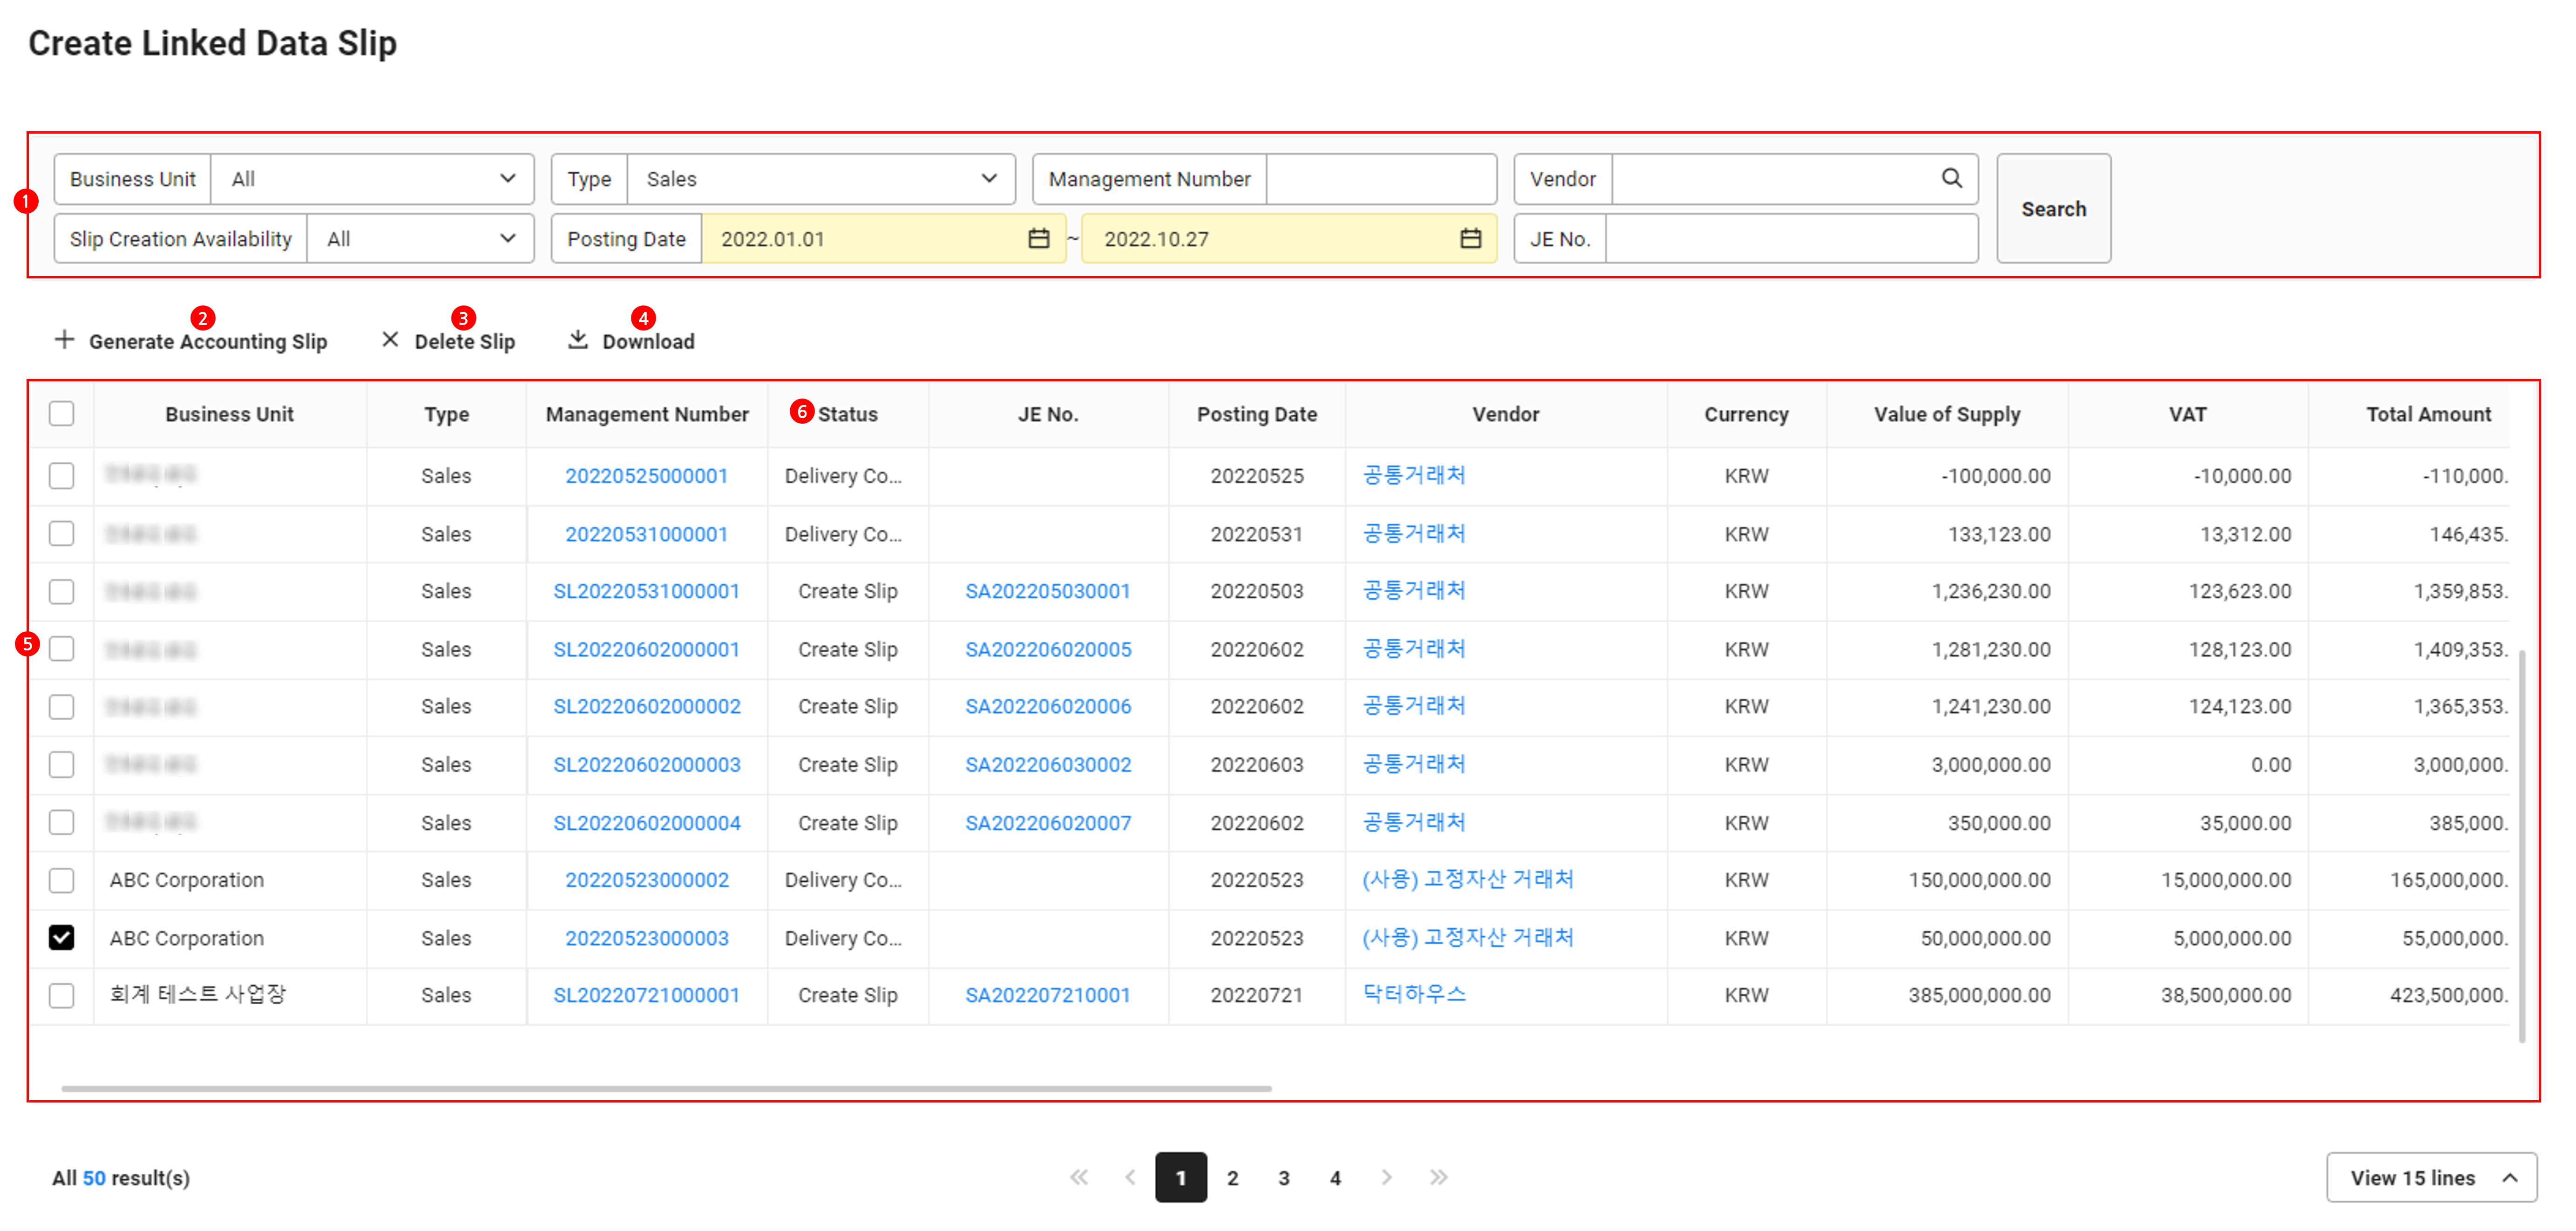
| Area | Description |
|---|---|
| ① Search window | Search the sales history based on business place, type, management number, vendor, slip creation status, slip date, and slip number conditions
|
| ② Create slip | Automatically create a slip with the status of Automatic Approval for the applicable sales history upon clicking it The created sales history slip is displayed in the Create/View Slip menu |
| ③ Delete Slip | Delete the slip created with the sales history upon clicking it The deleted sales history slip is also deleted from the Create/View Slip menu |
| ④ Download | Download the list of sales history records as an Excel file |
| ⑤ Sales history list | Check the list of sales history Click each detail to view information
|
| ⑥ Condition | It displays the status of submitted sales history.
|
| ⑦ Number of displayed items | Set the number of approved slips to be displayed on a single page of the list |
Download Linked Sales History List
The following describes how to download the list of integrated sales history records as an Excel file.
- Click the ‘Admin Menu’ at the top right of the PC web screen, and then click ‘Attendance’ in the pop-up window.
- Click at the top left of the screen.
- Click ‘Manage Slips > Create Linked Data Slip’ from the menu.
- If necessary, enter the integrated sales history conditions to be searched in the search window, and click ‘Search’.
- You can view the list of integrated sales history that match the entered conditions.
- Click 'Download'.
- The list of integrated sales history records is downloaded as an Excel file.
Manage Outstanding Slips
You can check the created slips and clear the balance with the outstanding slips management account.
The Manage Outstanding Slips page is laid out as follows.

| Area | Description |
|---|---|
| ① Search window | Search based on business place, account title, slip date, status, vendor, and slip number conditions |
| ② Account information field | It displays the list of account code/account title registered as an outstanding management item (if there is a slip created with the account). Click
|
| ③ Download | Download the outstanding item for the selected account title as an Excel file |
| ④ List of outstanding slips | It displays the list of outstanding slips (classified by debit/credit), cleared amount and balance of the selected account title
|
Clear Outstanding Slips
The following describes how to cancel the clearing of outstanding slip.
- Click the ‘Admin Menu’ at the top right of the PC web screen, and then click ‘Attendance’ in the pop-up window.
- Click at the top left of the screen.
- Click ‘Manage Slips > Manage Outstanding Slips’ from the menu.
- Enter the business place, slip date and status to be viewed in the search window, and click ‘Search’.
- Select the account title to view in the account title list on the left.
- Click ‘Clearing’ of the item to cancel clearing among the viewed outstanding items
- It is viewed In the clearing process pop-up window, if there is an outstanding item created with the same vendor and the same account as the clearing process target. If no outstanding items are viewed, you can create a clearing slip by clicking ‘Create Clearing Slip’. (See Create Clearing Slip.)
- Outstanding items for the current month are viewed, and you can view the slips for clearing by entering the slip date.
- Select an outstanding item whose debit/credit is opposite of the clearing target.
- Click 'Clearing’.
Cancel Clearing
The following describes how to cancel the clearing of the cleared outstanding slip.
- Click the ‘Admin Menu’ at the top right of the PC web screen, and then click ‘Attendance’ in the pop-up window.
- Click at the top left of the screen.
- Click ‘Manage Slips > Manage Outstanding Slips’ from the menu.
- Enter the business place, slip date and status to be viewed in the search window, and click ‘Search’.
- Select the account title to view in the account title list on the left.
- Click of the item you want to cancel clearing among the searched outstanding items.
- In the Process Clearing pop-up window, click
 of the item you want to cancel clearing.
 - Click 'Yes'.
- Items that have been canceled clearing will be restored to the state prior to clearing and will not be viewed in the clearing processing history.
When you cancel clearing of a cleared history, then the clearing slip is deleted automatically.
Create Clearing Slip
The following describes how to create clearing slips.
- Click 'Create Clearing Slip' in the Process Clearing pop-up window.
- Enter the slip date.
- Enter the cleared amount.
- The amount must be less than or equal to the balance to be cleared.
- Enter the account title in the debit or credit item.
- If the company has set the use of projects, then search and select the project.
- You can add projects in the Manage Project Code menu.
- The Budget item is displayed if you've set the budget usage status in ‘Accounting > Settings’ to Use. To use the budget, click to view and select the available budget.
- You can only view the budget that matches the entered department (affiliated department) and the project (optional).
- Check the available amount.
- If you've set Budget Control Status to ‘Yes’, then the budget can't be used if the cleared amount entered exceeds the available budget.
- Enter the additional notes.
- Click 'Create Slip'.
- Click 'Yes'.
- A clearing slip is created and the cleared amount is applied to the clearing history.
- If the cleared amount is equal to the balance of the outstanding item, the outstanding item open item will change to ‘Completed’ status.