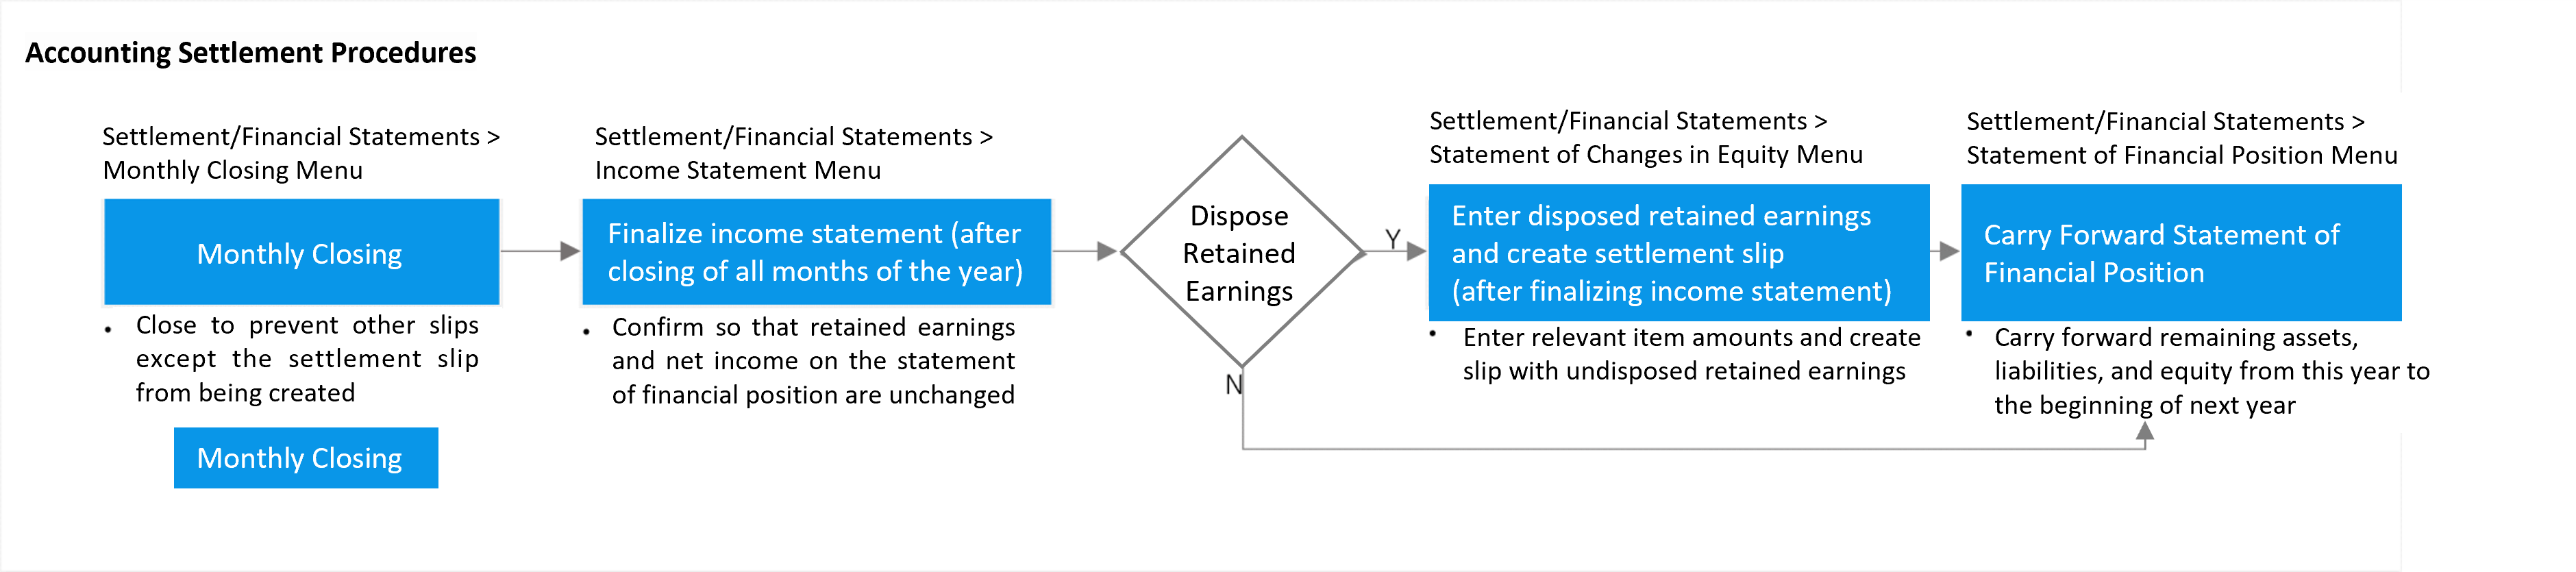
You can process closing of each month, as well as check various financial statements displayed according to the set form.
Monthly Closing
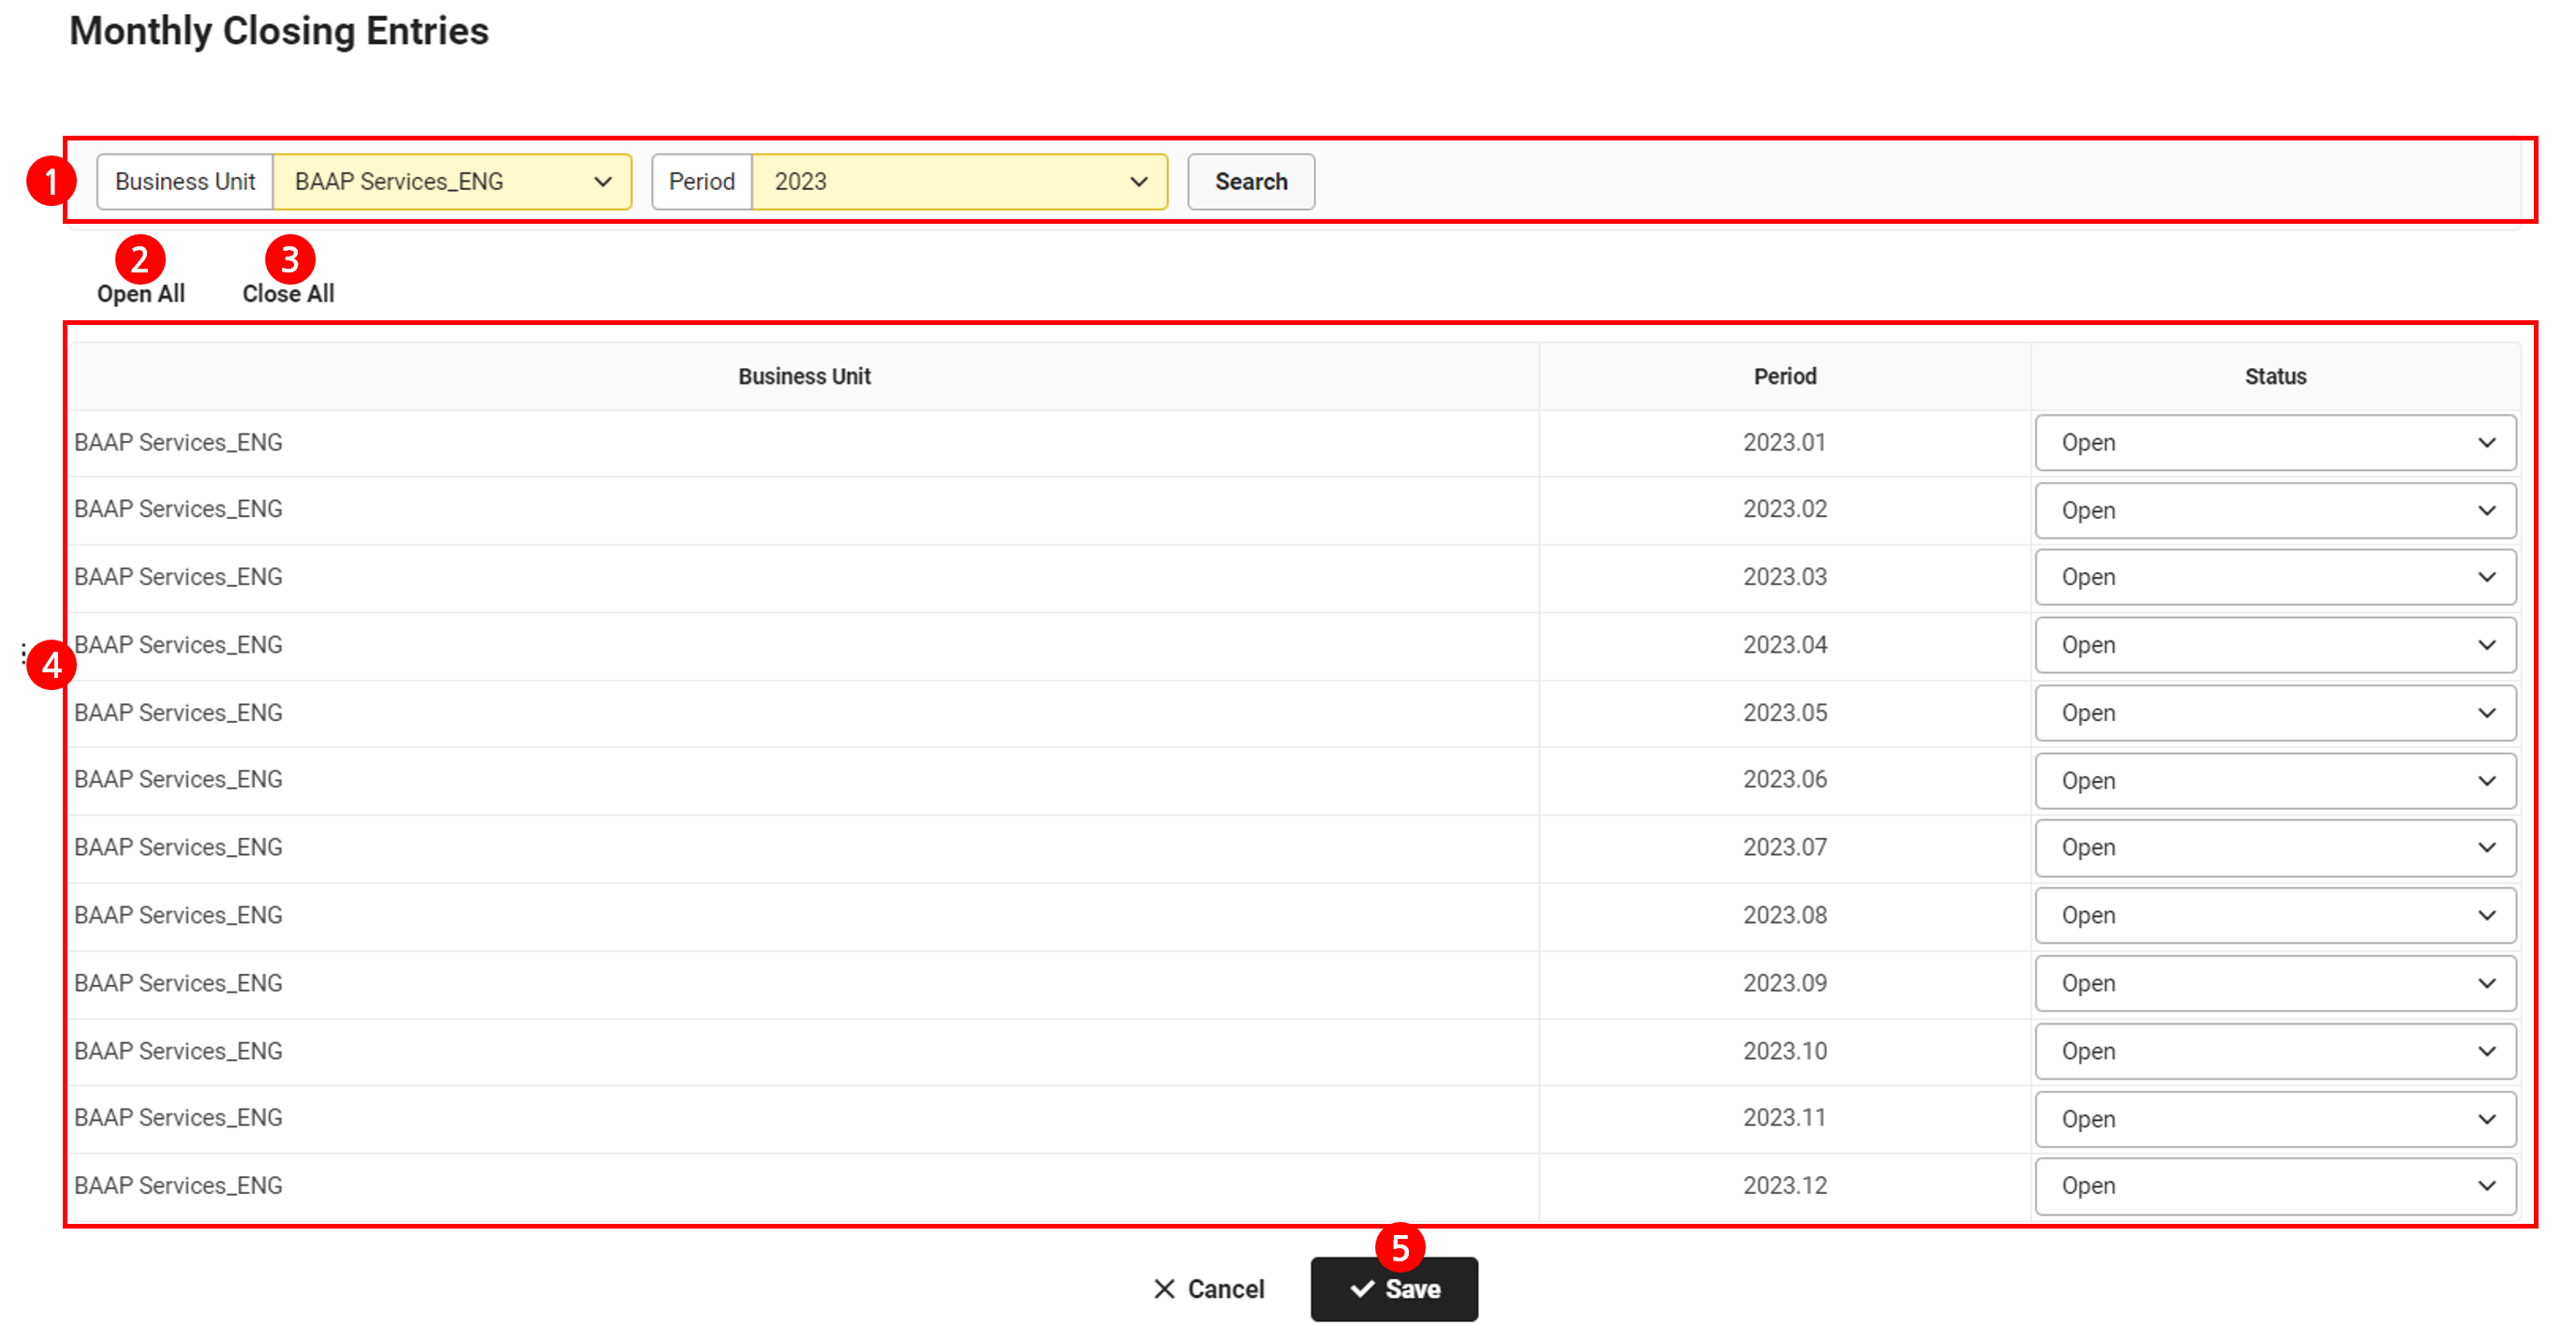
You can close the designated month of the designated year or reopen a closed month. Once closed, you can't register or edit slips, purchase/sales data, and tax data of the month. You can no longer request business trip expense/family event expense/expense settlement.
The Monthly Closing page is laid out as follows.
| Area | Description |
|---|---|
| ① Select year and month | Select the business place and year to close |
| ② Open All | Click to change the entire year to Open
|
| ③ Close All | Available to save after changing some months to Open
|
| ④ Monthly closing status | It displays the monthly closing status. Click to close or open each month (See ‘Change Monthly Closing Status’) |
| ⑤ Save | Click to save the edited closing status |
Change Monthly Closing Status
The following describes how to change the monthly closing status.
- Click the ‘Admin Menu’ at the top right of the PC web screen, and then click ‘Accounting’ in the pop-up window.
- Click
 at the top left of the screen.
 - Click ‘Settlement/Financial Statements > Monthly Closing’ from the menu.
- Change the status of the month for which you want to change the closing status. If you want to change the closing status of all periods for the year, click ‘Open All’ or ‘Close All’.
- Click ‘Save’.
- In the Notification pop-up window, click 'Yes'.
- The monthly closing status is changed.
- If you want to change the status to Closed, then the status of the previous month must be ‘Closed’.
- If the settlement slip has already been created for the year, the monthly closing status can't be changed from ‘Closed’ to ‘Open’. Delete the settlement slip first.
View Settlement Data
You can manage the usage status of the settlement procedure and view the settlement data.
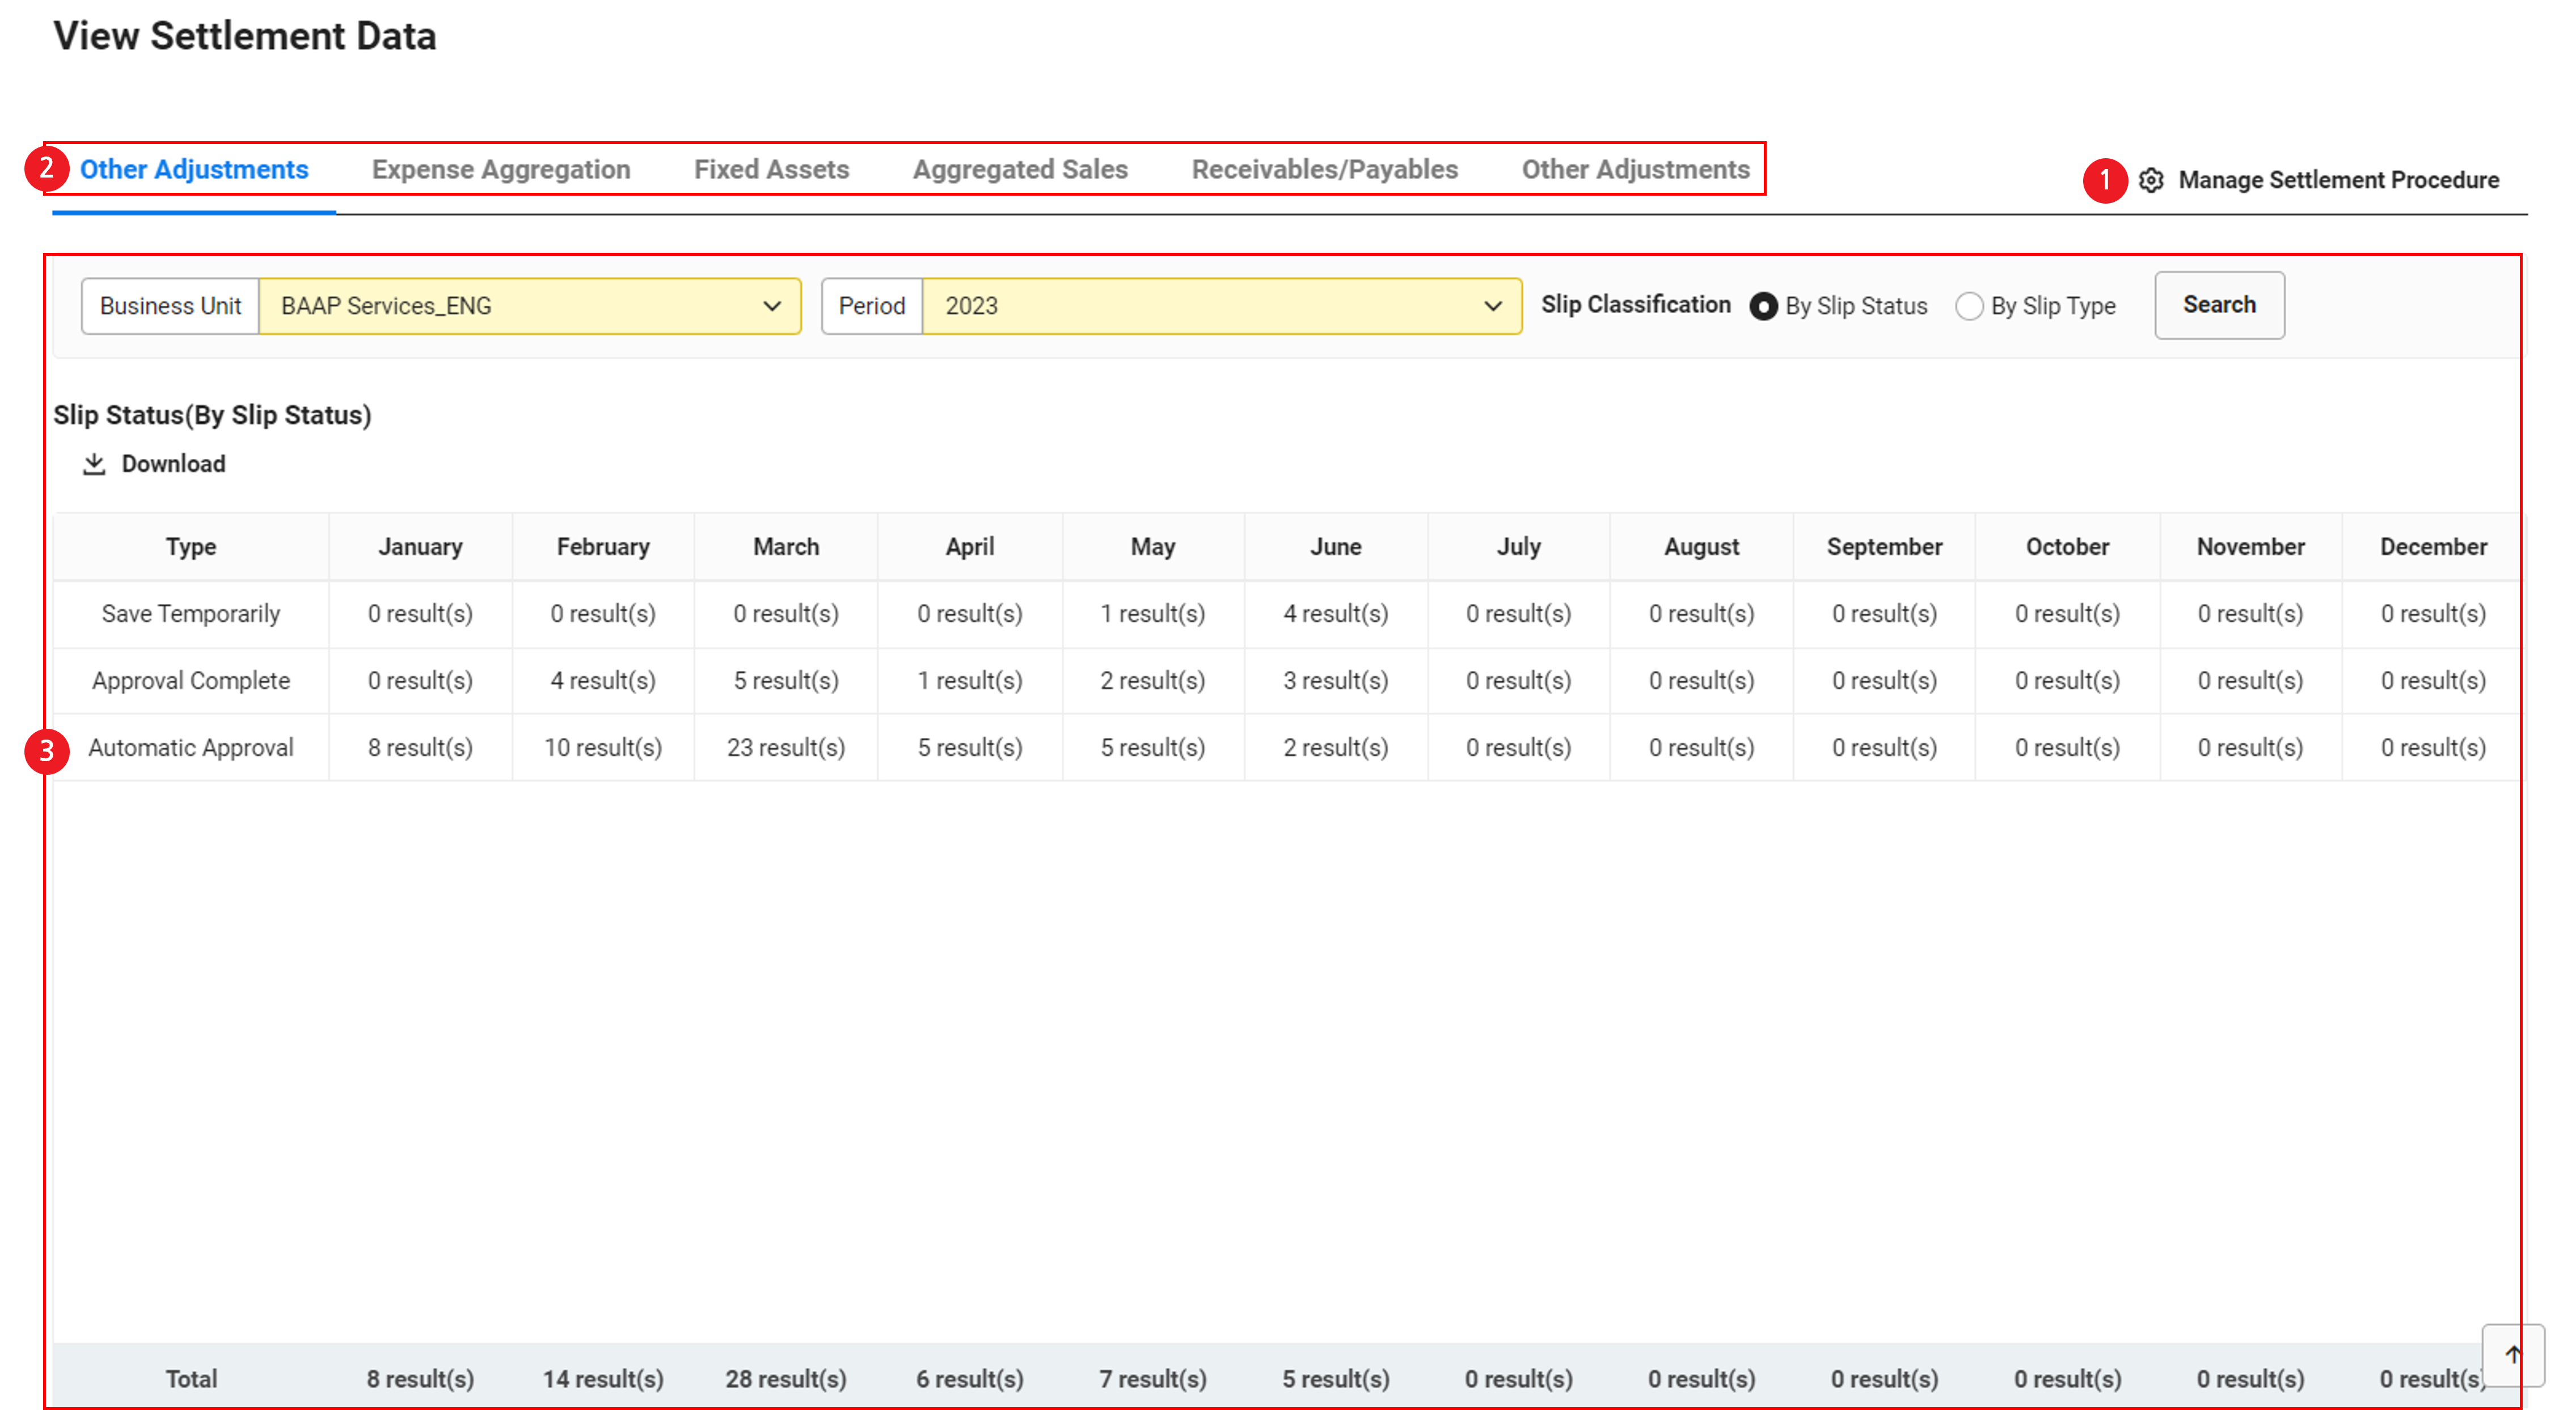
The View Settlement Data page is laid out as follows.
| Area | Description |
|---|---|
| ① Manage Settlement Procedure | Manage the usage status of settlement procedure by business place (See ‘Manage Settlement Procedure’) |
| ② Settlement Procedure tab | Click the view the data for each settlement procedure |
| ③ Content area | It displays the content for each settlement procedure |
Manage Settlement Procedure
The following describes how to manage settlement procedures.
- Click the ‘Admin Menu’ at the top right of the PC web screen, and then click ‘Accounting’ in the pop-up window.
- Click at the top left of the screen.
- Click ‘Settlement/Financial Statements > View Settlement Data’ from the menu.
- Click ‘Manage Settlement Procedure’ at the right of the page.
- Select the business place from the pop-up window, and set the usage status of the settlement procedure you want to use.
- Slip status is a settlement procedure that must be used, and its usage status can't be disabled.
- Click ‘Save’.
- The selected settlement procedures are displayed as tabs on the View Settlement Data page in order. You can click each tab to view the settlement data.
Slip Status
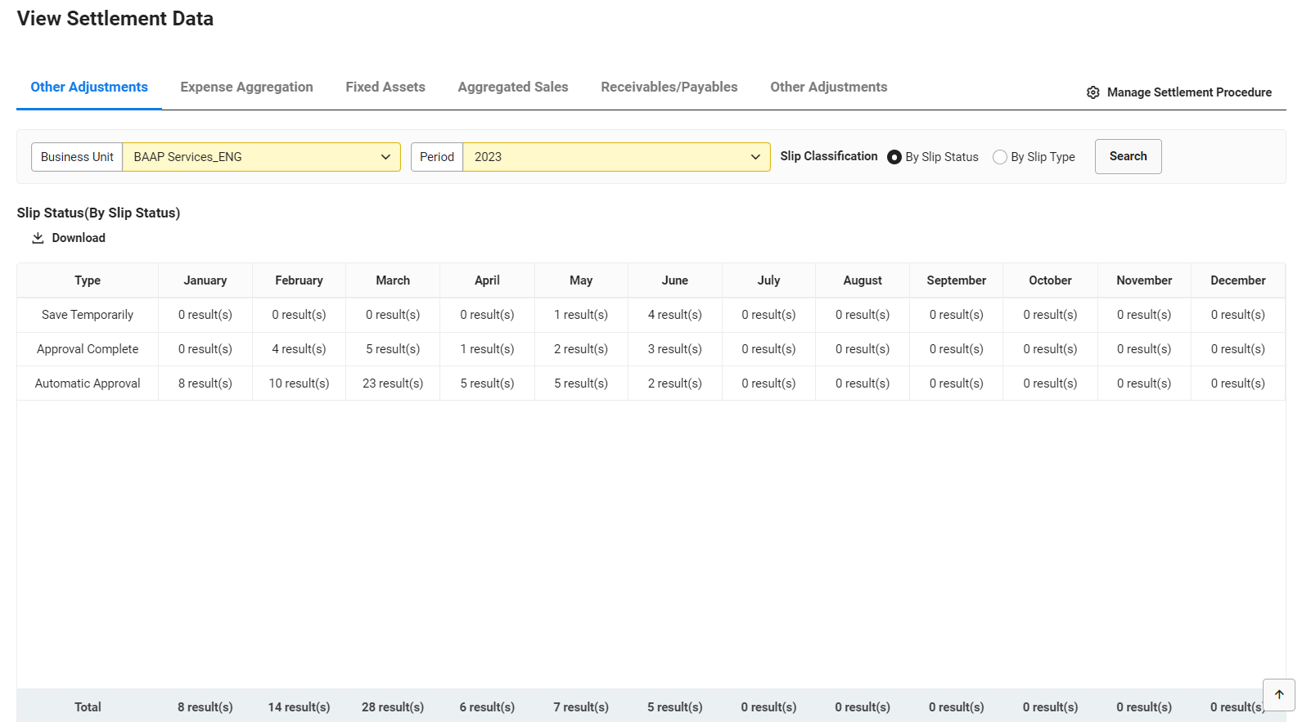
You can view the monthly number of slips and slip closing status for the specified business place and year.
The following describes how to view the slip status.
- Click the ‘Admin Menu’ at the top right of the PC web screen, and then click ‘Accounting’ in the pop-up window.
- Click at the top left of the screen.
- Click ‘Settlement/Financial Statements > View Settlement Data’ from the menu.
- Click the ‘Slip Status’ tab.
- Select the business place, year, and slip classification to search, and then click ‘Search’.
- The monthly slip status of the selected business place and year is searched.
Download Slip Status
The following describes how to download slip status as an Excel file.
- Click the ‘Admin Menu’ at the top right of the PC web screen, and then click ‘Accounting’ in the pop-up window.
- Click at the top left of the screen.
- Click the ‘Slip Status’ tab of the ‘Settlement/Financial Statements > View Settlement Data’ from the menu.
- Select the business place, fiscal year, and slip classification, and then click ‘Search’.
- Click 'Download'.
- The slip status is downloaded as an Excel file.
Aggregate Expense
You can view the monthly processing history of accounts for general sales and management expenses based on slips.
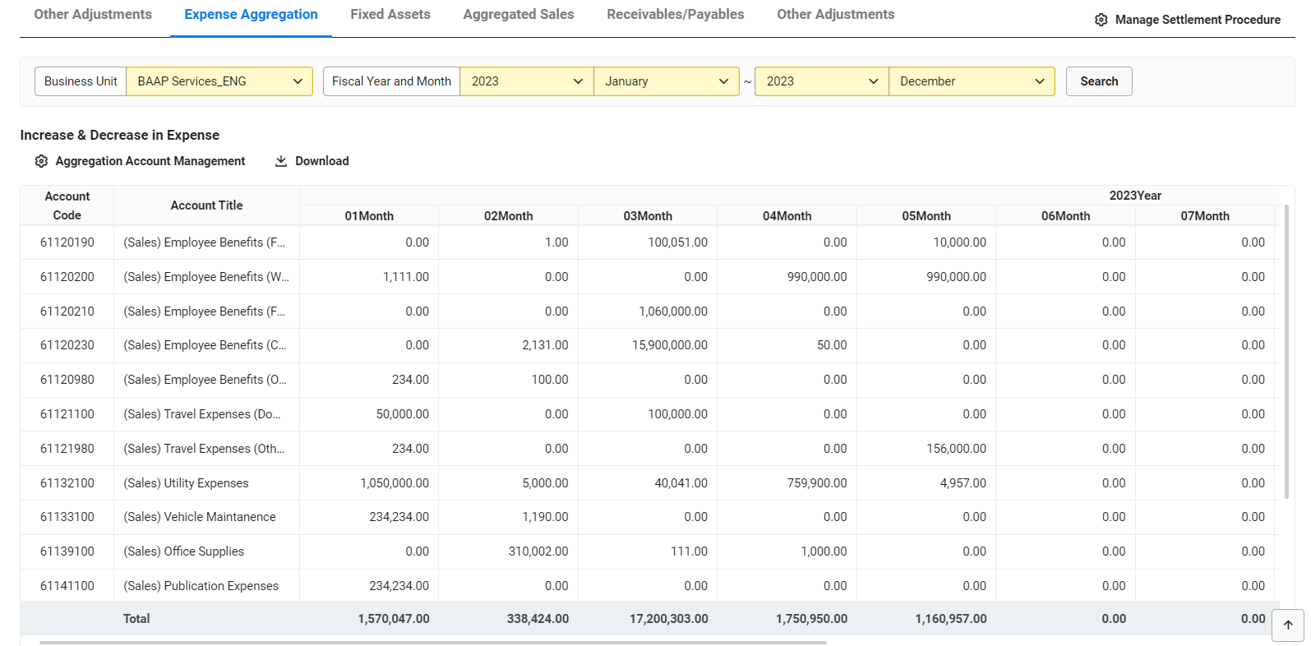
The following describes how to view the expense aggregation status.
- Click the ‘Admin Menu’ at the top right of the PC web screen, and then click ‘Accounting’ in the pop-up window.
- Click at the top left of the screen.
- Click ‘Settlement/Financial Statements > View Settlement Data’ from the menu.
- Click the ‘Expense Aggregation’ tab.
- Click ‘Manage Aggregation Account’ to set account titles to aggregate. (See ‘Manage Aggregation Account’)
- Select the business place and accounting year and month, and then click ‘Search’.
- The monthly expense aggregation status of the selected business place and period is searched.
Manage Expense Aggregation Account
The following describes how to manage expense aggregation accounts.
- Click the ‘Admin Menu’ at the top right of the PC web screen, and then click ‘Accounting’ in the pop-up window.
- Click at the top left of the screen.
- Click ‘Settlement/Financial Statements > View Settlement Data’ from the menu.
- Click ‘Manage Aggregation Account’.
- Click ‘Add Aggregation Account’ from the pop-up window, and select account titles to add.
- Account titles whose classification is ‘Expense’ in the ‘Manage Standard Information > Manage Title’ are displayed.
- Click
 to delete account titles you're not using.
- Click ‘Save’.
Download Expense Aggregation Status
The following describes how to download the expense aggregation status as an Excel file.
- Click the ‘Admin Menu’ at the top right of the PC web screen, and then click ‘Accounting’ in the pop-up window.
- Click at the top left of the screen.
- Click ‘Expense Aggregation’ tab of the ‘Settlement/Financial Statements > View Settlement Data’ from the menu.
- Select the business place and accounting year and month, and then click ‘Search’.
- Click 'Download'.
- The expense aggregation status is downloaded as an Excel file.
Fixed Asset
You can view the closing and book status of fixed assets.
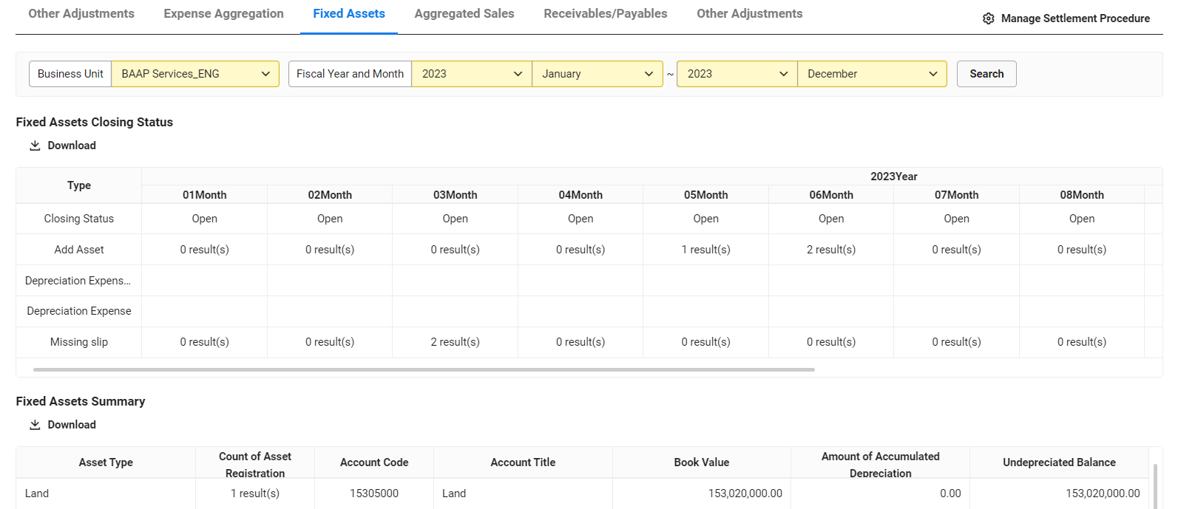
The following describes how to view the fixed asset status.
- Click the ‘Admin Menu’ at the top right of the PC web screen, and then click ‘Accounting’ in the pop-up window.
- Click at the top left of the screen.
- Click ‘Settlement/Financial Statements > View Settlement Data’ from the menu.
- Click the ‘Fixed Assets’ tab.
- Select the business place and accounting year and month, and then click ‘Search’.
- The monthly fixed asset closing and book status are searched for the selected business place and period.
Missing Slip displays the number of slips not reflected as fixed assets among slips related to asset acquisition, disposal, and depreciation, from slips excluding asset slips (FA).
Download Fixed Asset Status
The following describes how to download the fixed asset status as an Excel file.
- Click the ‘Admin Menu’ at the top right of the PC web screen, and then click ‘Accounting’ in the pop-up window.
- Click at the top left of the screen.
- Click ‘Fixed Asset’ tab of the ‘Settlement/Financial Statements > View Settlement Data’ from the menu.
- Select the business place and accounting year and month, and then click ‘Search’.
- Click ‘Download’ of the content you want to download.
- The fixed asset status is downloaded as an Excel file.
Aggregate Sales
You can aggregate and view the sales status.
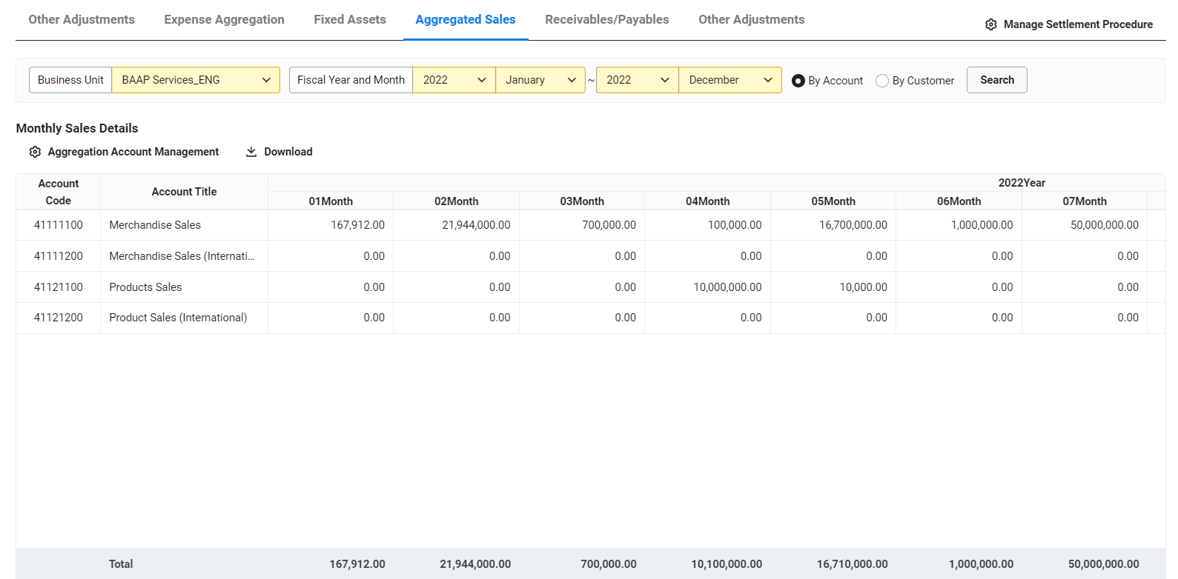
The following describes how to view the sales aggregation status.
- Click the ‘Admin Menu’ at the top right of the PC web screen, and then click ‘Accounting’ in the pop-up window.
- Click at the top left of the screen.
- Click ‘Settlement/Financial Statements > View Settlement Data’ from the menu.
- Click the ‘Sales Aggregation’ tab.
- Click ‘Manage Aggregation Account’ to set account titles to aggregate. (Refer to ‘Manage Sales Aggregation Account’)
- Select the business place, fiscal year and month, and classification, and click ‘Search’.
- The monthly sales aggregation status of the selected business place and period is searched.
Manage Sales Aggregation Account
The following describes how to manage sales aggregation accounts.
- Click the ‘Admin Menu’ at the top right of the PC web screen, and then click ‘Accounting’ in the pop-up window.
- Click at the top left of the screen.
- Click ‘Settlement/Financial Statements > View Settlement Data’ from the menu.
- Click ‘Manage Aggregation Account’.
- Click ‘Add Aggregation Account’ from the pop-up window, and select account titles to add.
- Titles whose classification is ‘Expense’ or ‘Purchase’ in the ‘Manage Standard Information > Manage Account Title’ menu are displayed.
- Click to delete account titles you're not using.
- Click ‘Save’.
Download Sales Aggregation Status
The following describes how to download the sales aggregation status as an Excel file.
- Click the ‘Admin Menu’ at the top right of the PC web screen, and then click ‘Accounting’ in the pop-up window.
- Click at the top left of the screen.
- Click ‘Sales Aggregation’ tab of the ‘Settlement/Financial Statements > View Settlement Data’ from the menu.
- Select the business place, fiscal year and month, and classification, and then click ‘Search’.
- Click ‘Download’ of the content you want to download.
- The sales aggregation status is downloaded as an Excel file.
Receivable/Payable
You can view the receivable/payable aggregation history and create bad debt expense slips in the payable history.
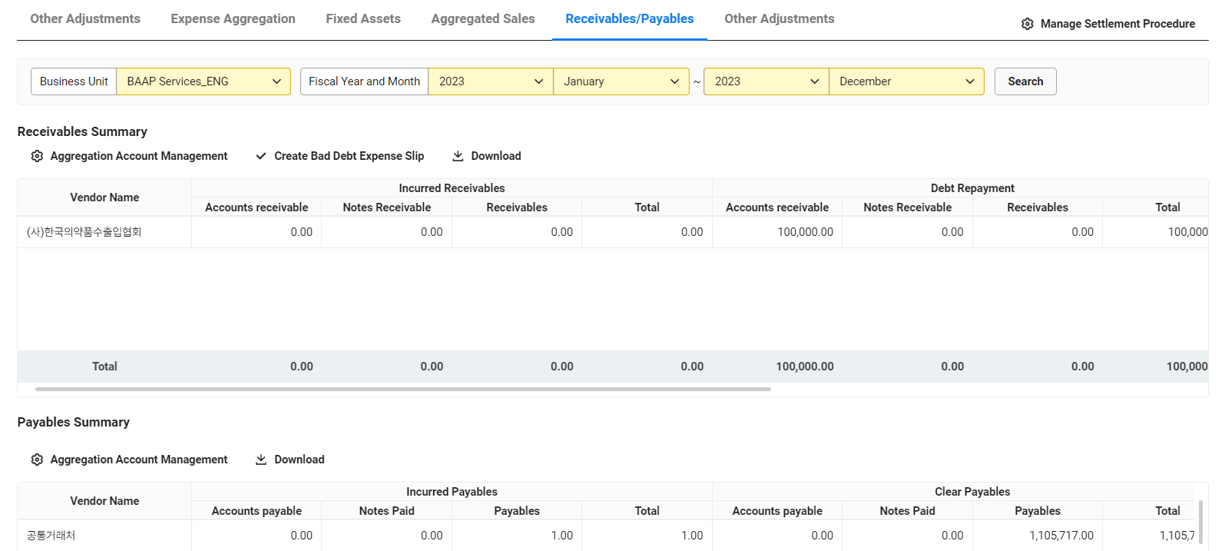
The following describes how to view the receivable or payable aggregation status.
- Click the ‘Admin Menu’ at the top right of the PC web screen, and then click ‘Accounting’ in the pop-up window.
- Click at the top left of the screen.
- Click ‘Settlement/Financial Statements > View Settlement Data’ from the menu.
- Click the ‘Receivable/Payable’ tab.
- Click ‘Manage Aggregation Account’ in the Receivable or Payable area to set account titles to aggregate. (See ‘Manage Receivable/Payable Aggregation Account’)
- Select the business place and accounting year and month, and then click ‘Search’.
- The occurrence history, clearing history, and balance of receivables and payables for the selected business place and period are searched.
- You can create bad debt expense slips for the payable history. Click ‘Create Bad Debt Expense Slip’. (See ‘Create Bad Debt Expense Slip’)
- When searching closed periods, ‘Create Bad Debt Expense Slip’ is deactivated, and only viewing is available.
- You can create bad debt expense slips for the payable history. Click ‘Create Bad Debt Expense Slip’. (See ‘Create Bad Debt Expense Slip’)
Manage Receivable/Payable Aggregation Account
The following describes how to manage receivable/payable aggregation accounts.
- Click the ‘Admin Menu’ at the top right of the PC web screen, and then click ‘Accounting’ in the pop-up window.
- Click at the top left of the screen.
- Click ‘Receivable/Payable’ tab of the ‘Settlement/Financial Statements > View Settlement Data’ from the menu.
- Click ‘Manage Aggregation Account’.
- From the pop-up window, click ‘Add Aggregation Account’ in the receivable/payable aggregation account management area, and select account titles to add.
- Titles whose classification is ‘Receivable’ or ‘Payable’ in the ‘Manage Standard Information > Manage Account Title’ menu are displayed.
- Click to delete account titles you're not using.
- Click ‘Save’.
Download Receivable/Payable Aggregation Status
The following describes how to download the receivable/payable aggregation status as an Excel file.
- Click the ‘Admin Menu’ at the top right of the PC web screen, and then click ‘Accounting’ in the pop-up window.
- Click at the top left of the screen.
- Click ‘Receivable/Payable’ tab of the ‘Settlement/Financial Statements > View Settlement Data’ from the menu.
- Select the business place and accounting year and month, and then click ‘Search’.
- Click ‘Download’ of the content you want to download.
- The receivable/payable aggregation status is downloaded as an Excel file.
Create Bad Debt Expense Slip
The following describes how to create a bad debt expense slip.
- Click the ‘Admin Menu’ at the top right of the PC web screen, and then click ‘Accounting’ in the pop-up window.
- Click at the top left of the screen.
- Click ‘Receivable/Payable’ tab of the ‘Settlement/Financial Statements > View Settlement Data’ from the menu.
- Select the business place and fiscal year and month, and then click ‘Search’.
- Click ‘Create Bad Debt Expense Slip’ in the receivables summary area.
- Enter the content in the Create Bad Debt Expense Slip pop-up window, and then click ‘Save’.
- Business Place: The selected business place is displayed.
- Slip Date: Select the slip date.
- Vendor: Select the vendor.
- Debit (Bad Debt Expense)/Credit (Bad Debt Allowance): Enter the amounts.
- Note: Enter notes.
- Click ‘Create Slip’.
- You can check the bad debt expense slip number from the receivables list. Also, created slips can be viewed from the ‘Manage Slip > Create/View Slip’ page.
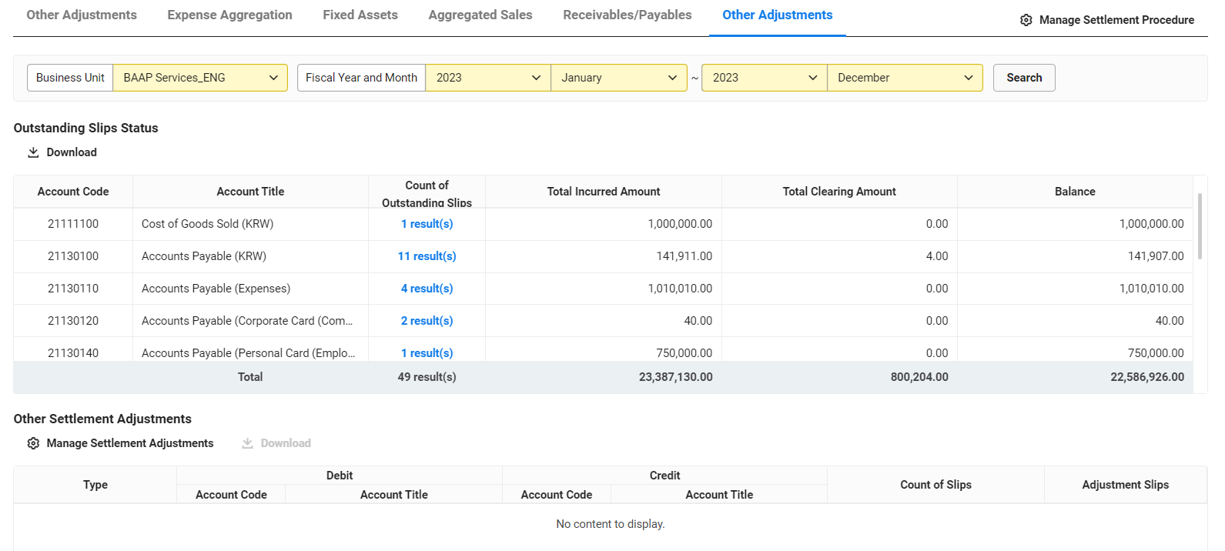
Other Adjustments
You can view the open slip processing status and create adjustment slips for the open history.
View Open Status
The following describes how to view the open slip status.
- Click the ‘Admin Menu’ at the top right of the PC web screen, and then click ‘Accounting’ in the pop-up window.
- Click at the top left of the screen.
- Click ‘Other Adjustments’ tab of the ‘Settlement/Financial Statements > View Settlement Data’ from the menu.
- Select the business place and fiscal year and month, and then click ‘Search’.
- The open slip status is searched.
- You can click the number of open slips by account title to view open slips.
Other Settlement Adjustments
The following describes how to create an adjustment slip for other settlement history.
- Click the ‘Admin Menu’ at the top right of the PC web screen, and then click ‘Accounting’ in the pop-up window.
- Click at the top left of the screen.
- Click ‘Other Adjustments’ tab of the ‘Settlement/Financial Statements > View Settlement Data’ from the menu.
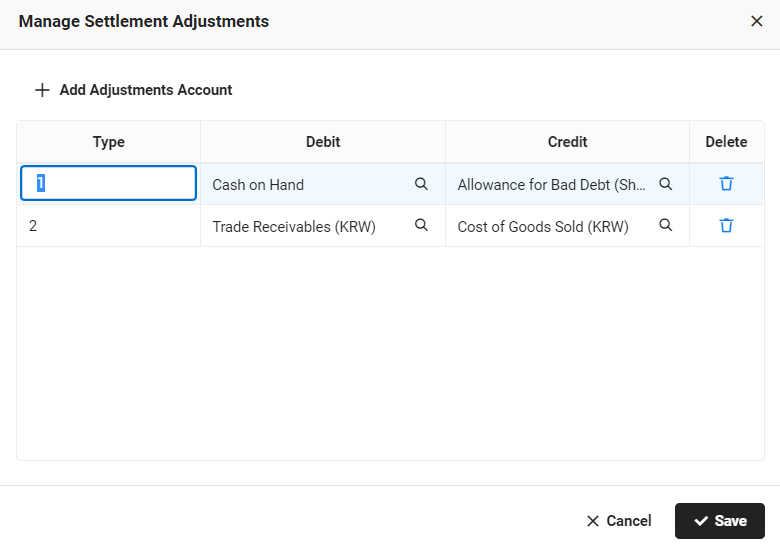
- Click ‘Manage Settlement Adjustment’ to add an adjustment account, and click ‘Save’.
- From the Manage Settlement Adjustment pop-up window, click ‘Add Adjustment Account’
- Specify the account classification, debit, and credit for the adjustment slip you want to create.
- Click to delete account titles you're not using.
- You can view the slips aggregated for the debit/credit of the created adjustment account.
- You can click the number of slips to view slips.
- You can click ‘Create Slip’ of the adjustment slip item to create a slip with the specified debit/credit. Enter the following fields in the pop-up window, and then click ‘Create Slip’.
- Business Place: The selected business place is displayed.
- Slip Date: Select the slip date.
- Debit/Credit: Enter the amounts.
- Enter notes. (E.g., 2022 settlement adjustment slip)
Download Other Adjustment Status
The following describes how to download other adjustment status as an Excel file.
- Click the ‘Admin Menu’ at the top right of the PC web screen, and then click ‘Accounting’ in the pop-up window.
- Click at the top left of the screen.
- Click ‘Other Adjustments’ tab of the ‘Settlement/Financial Statements > View Settlement Data’ from the menu.
- Select the business place and fiscal year and month, and then click ‘Search’.
- Click ‘Download’ above the list you want to download.
- The open slip summary or other settlement adjustment summary is downloaded as an Excel file.
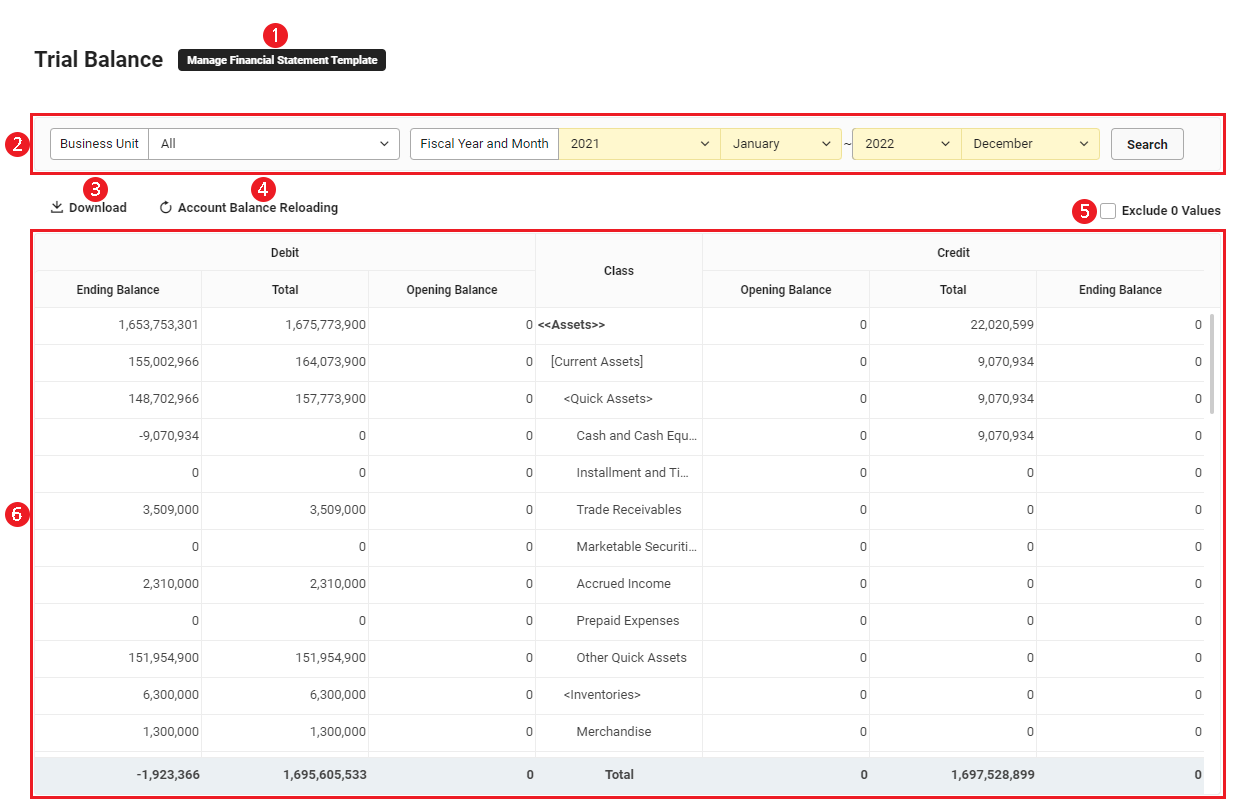
Compound Trial Balance
Through the compound trial balance, you can check the total debit and balance, and total credit and balance by amount classification. You can also check whether the total debit and total credit match up.
The Trial Balance Sheet of Total Balance page is laid out as follows.
| Area | Description |
|---|---|
| ① Manage Financial Statement Form | Open the Manage Financial Statement Form menu where you can edit financial statement forms |
| ② Select year and month | Select the business place and accounting year and month to check the trial balance sheet |
| ③ Download | Download the trial balance sheet of total balance as an Excel file |
| ④ Reaggregate Account Balance | Click to reaggregate the account balance (See ‘Reaggregate Account Balance’)
|
| ⑤ Exclude 0 Values | Click to exclude 0 values from the sheet |
| ⑥ Total Balance Trial History | It displays the total balance trial history Scroll down to check the bottom |
Reaggregate Account Balance
The following describes how to reaggregate the account balance of the compound trial balance.
- Click the ‘Admin Menu’ at the top right of the PC web screen, and then click ‘Accounting’ in the pop-up window.
- Click at the top left of the screen.
- Click ‘Settlement/Financial Statements > Compound Trial Balance’ from the menu.
- Click ‘Reaggregate Account Balance’.
- The account balance from reaggregation of the slips at the current point in time is displayed.
Download Compound Trial Balance
The following describes how to download the trial balance sheet of total balance as an Excel file.
- Click the ‘Admin Menu’ at the top right of the PC web screen, and then click ‘Accounting’ in the pop-up window.
- Click at the top left of the screen.
- Click ‘Settlement/Financial Statements > Compound Trial Balance’ from the menu.
- Select the business place and accounting year and month, and then click ‘Search’.
- Click 'Download'.
- The trial balance sheet of total balance is downloaded as an Excel file.
Statement of Financial Position
You can check the company's balance sheet. An external form to register in an external DART system and an internal form for internal accounting tasks are provided.
Check Statement of Financial Position for External Use
The following describes how to check the statement of financial position using the external form to register in an external DART system.
- Click the ‘Admin Menu’ at the top right of the PC web screen, and then click ‘Accounting’ in the pop-up window.
- Click at the top left of the screen.
- Click ‘Settlement/Financial Statements > Statement of Financial Position’ from the menu.
- Select For External Use for type, select the business place and accounting year and month, and then click 'Search'.
The Statement of Financial Position for External Use page is laid out as follows.
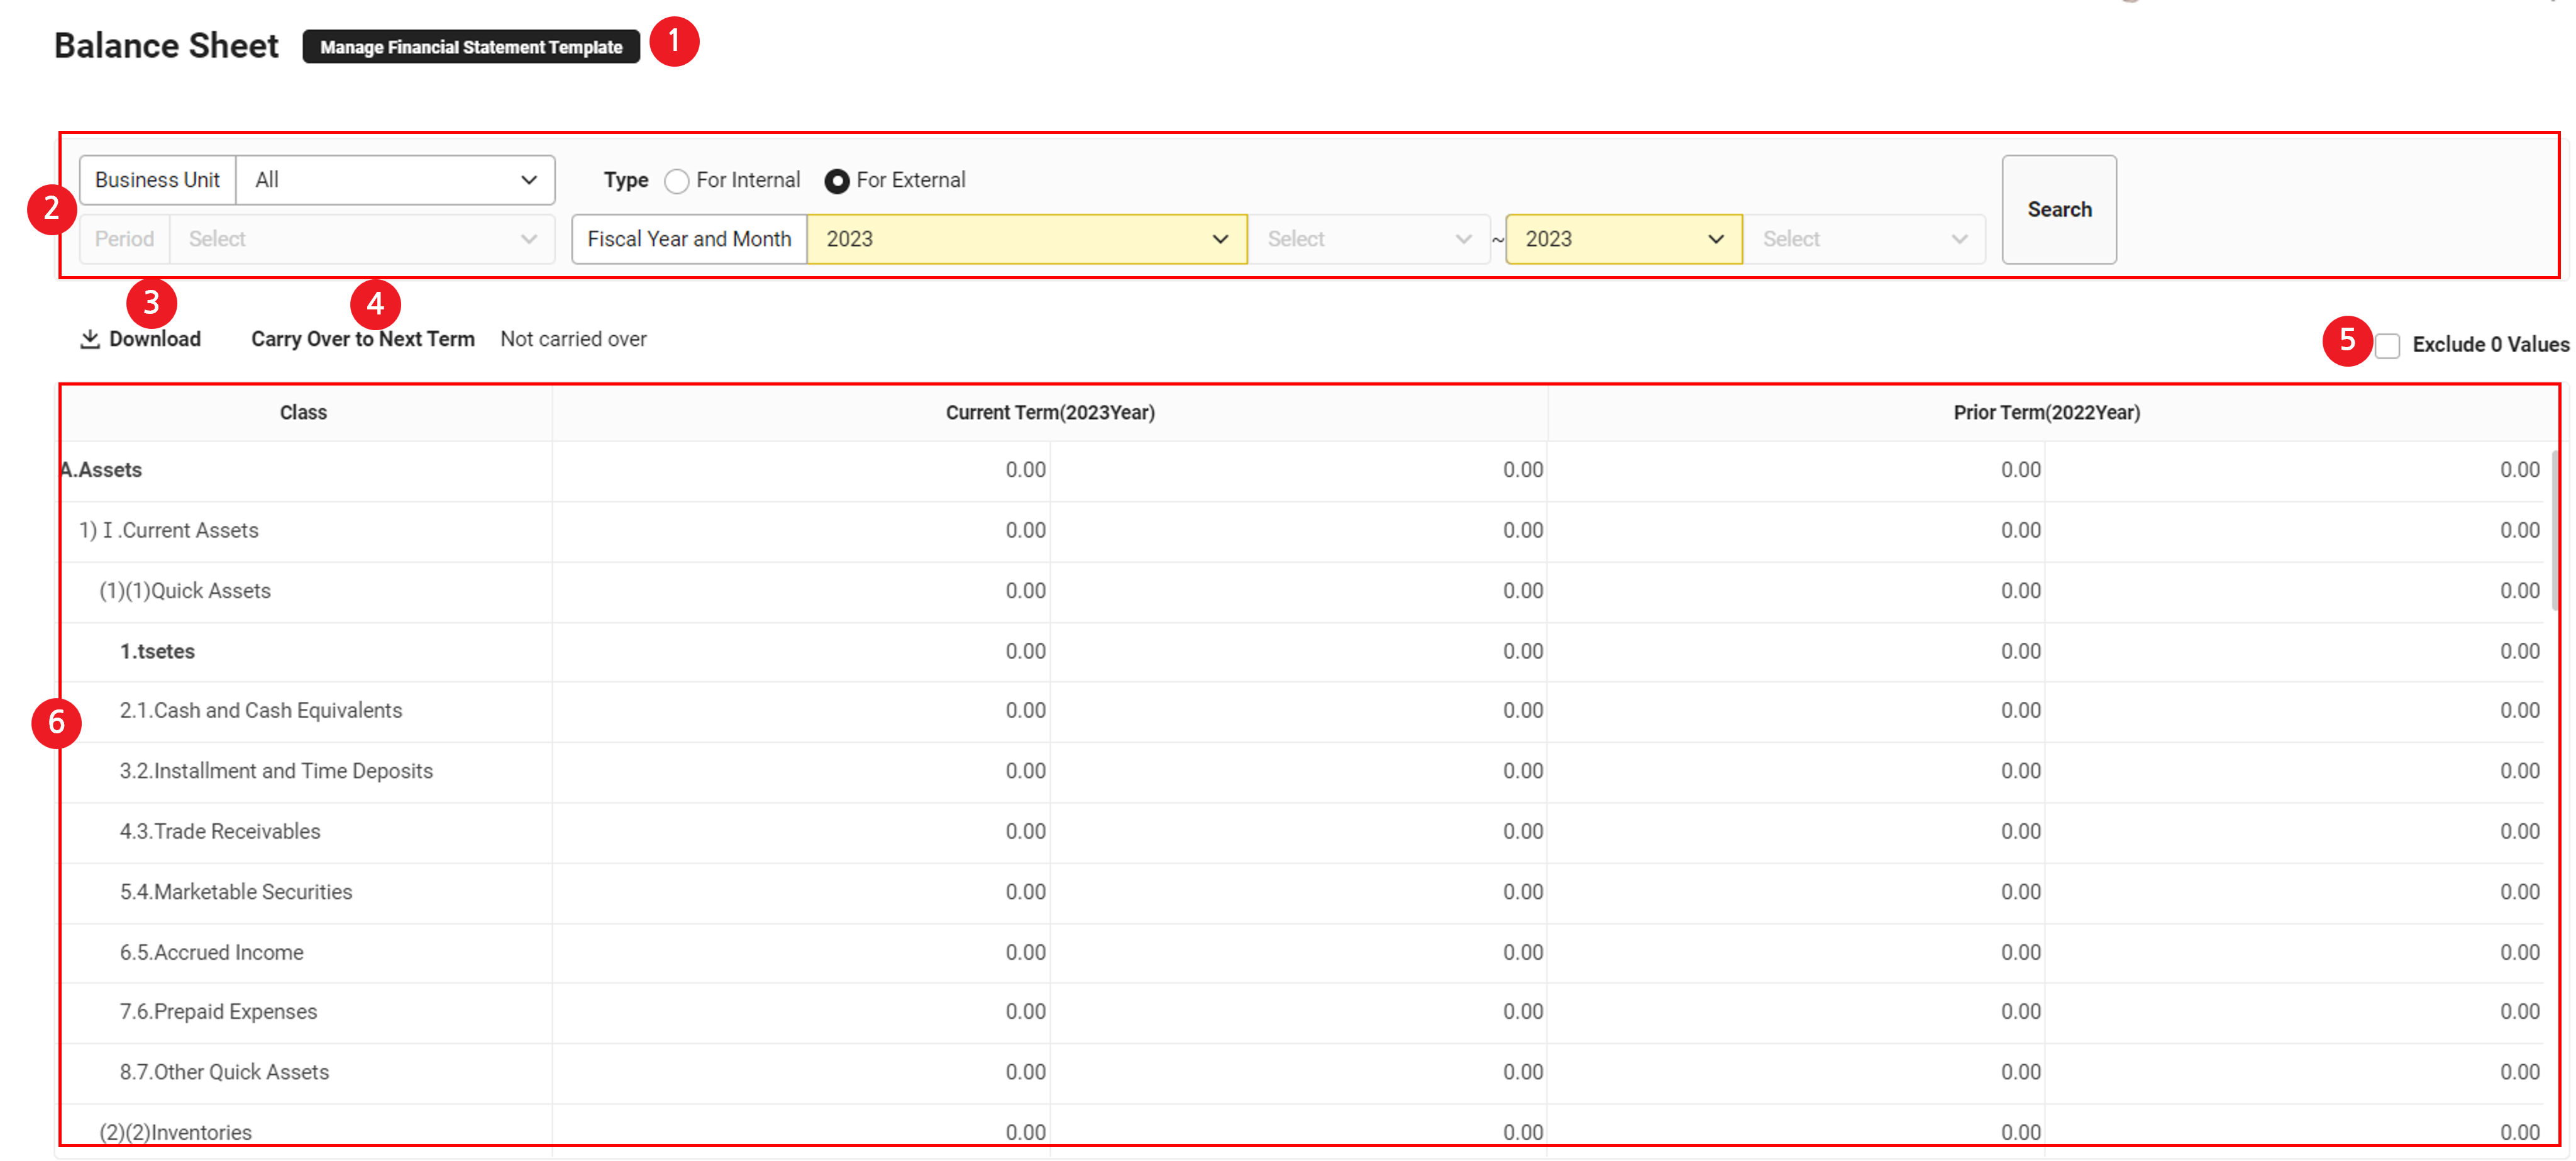
| Area | Description |
|---|---|
| ① Manage Financial Statement Form | Open the Manage Financial Statement Form menu where you can edit financial statement forms |
| ② Select Year and Month and Type | Select the business place and accounting year and month to check the statement of financial position Change the type to For Internal Use and search to change to the statement of financial position for internal use |
| ③ Download | Download the statement of financial position as an Excel file |
| ④ Carry Over to Next Term | Click to carry over the account balance of the financial statement to the next term (See ‘Carry Over Account Balance to Next Term’)
|
| ⑤ Exclude 0 Values | Click to exclude 0 values from the sheet |
| ⑥ Statement of Financial Position | It displays the statement of financial position for external use Scroll down to check the bottom |
Carry Over Account Balance to Next Term
The following describes how to carry over the account balance of the statement of financial position to the next term.
- Click the ‘Admin Menu’ at the top right of the PC web screen, and then click ‘Accounting’ in the pop-up window.
- Click at the top left of the screen.
- Click ‘Settlement/Financial Statements > Statement of Financial Position’ from the menu.
- Select ‘For External Use’ from the type.
- Click ‘Carry Over to Next Term’.
- Select the fiscal year and month and business place in the Financial Statement Carry Over to Next Term pop-up window.
- Click ‘Confirm’.
- The account balance is carried over to the next term.
- Once carryover to the next term is completed, you can view the statement of financial position for the next year, and the carried over account balance is displayed.
Check Statement of Financial Position for Internal Use
The following describes how to check the statement of financial position using the internal form for accounting tasks.
- Click the ‘Admin Menu’ at the top right of the PC web screen, and then click ‘Accounting’ in the pop-up window.
- Click at the top left of the screen.
- Click ‘Settlement/Financial Statements > Statement of Financial Position’ from the menu.
- Select ‘For Internal Use’ for type, select the business place, period, and accounting year and month, and then click ‘Search’.
The Statement of Financial Position for Internal Use page is laid out as follows.
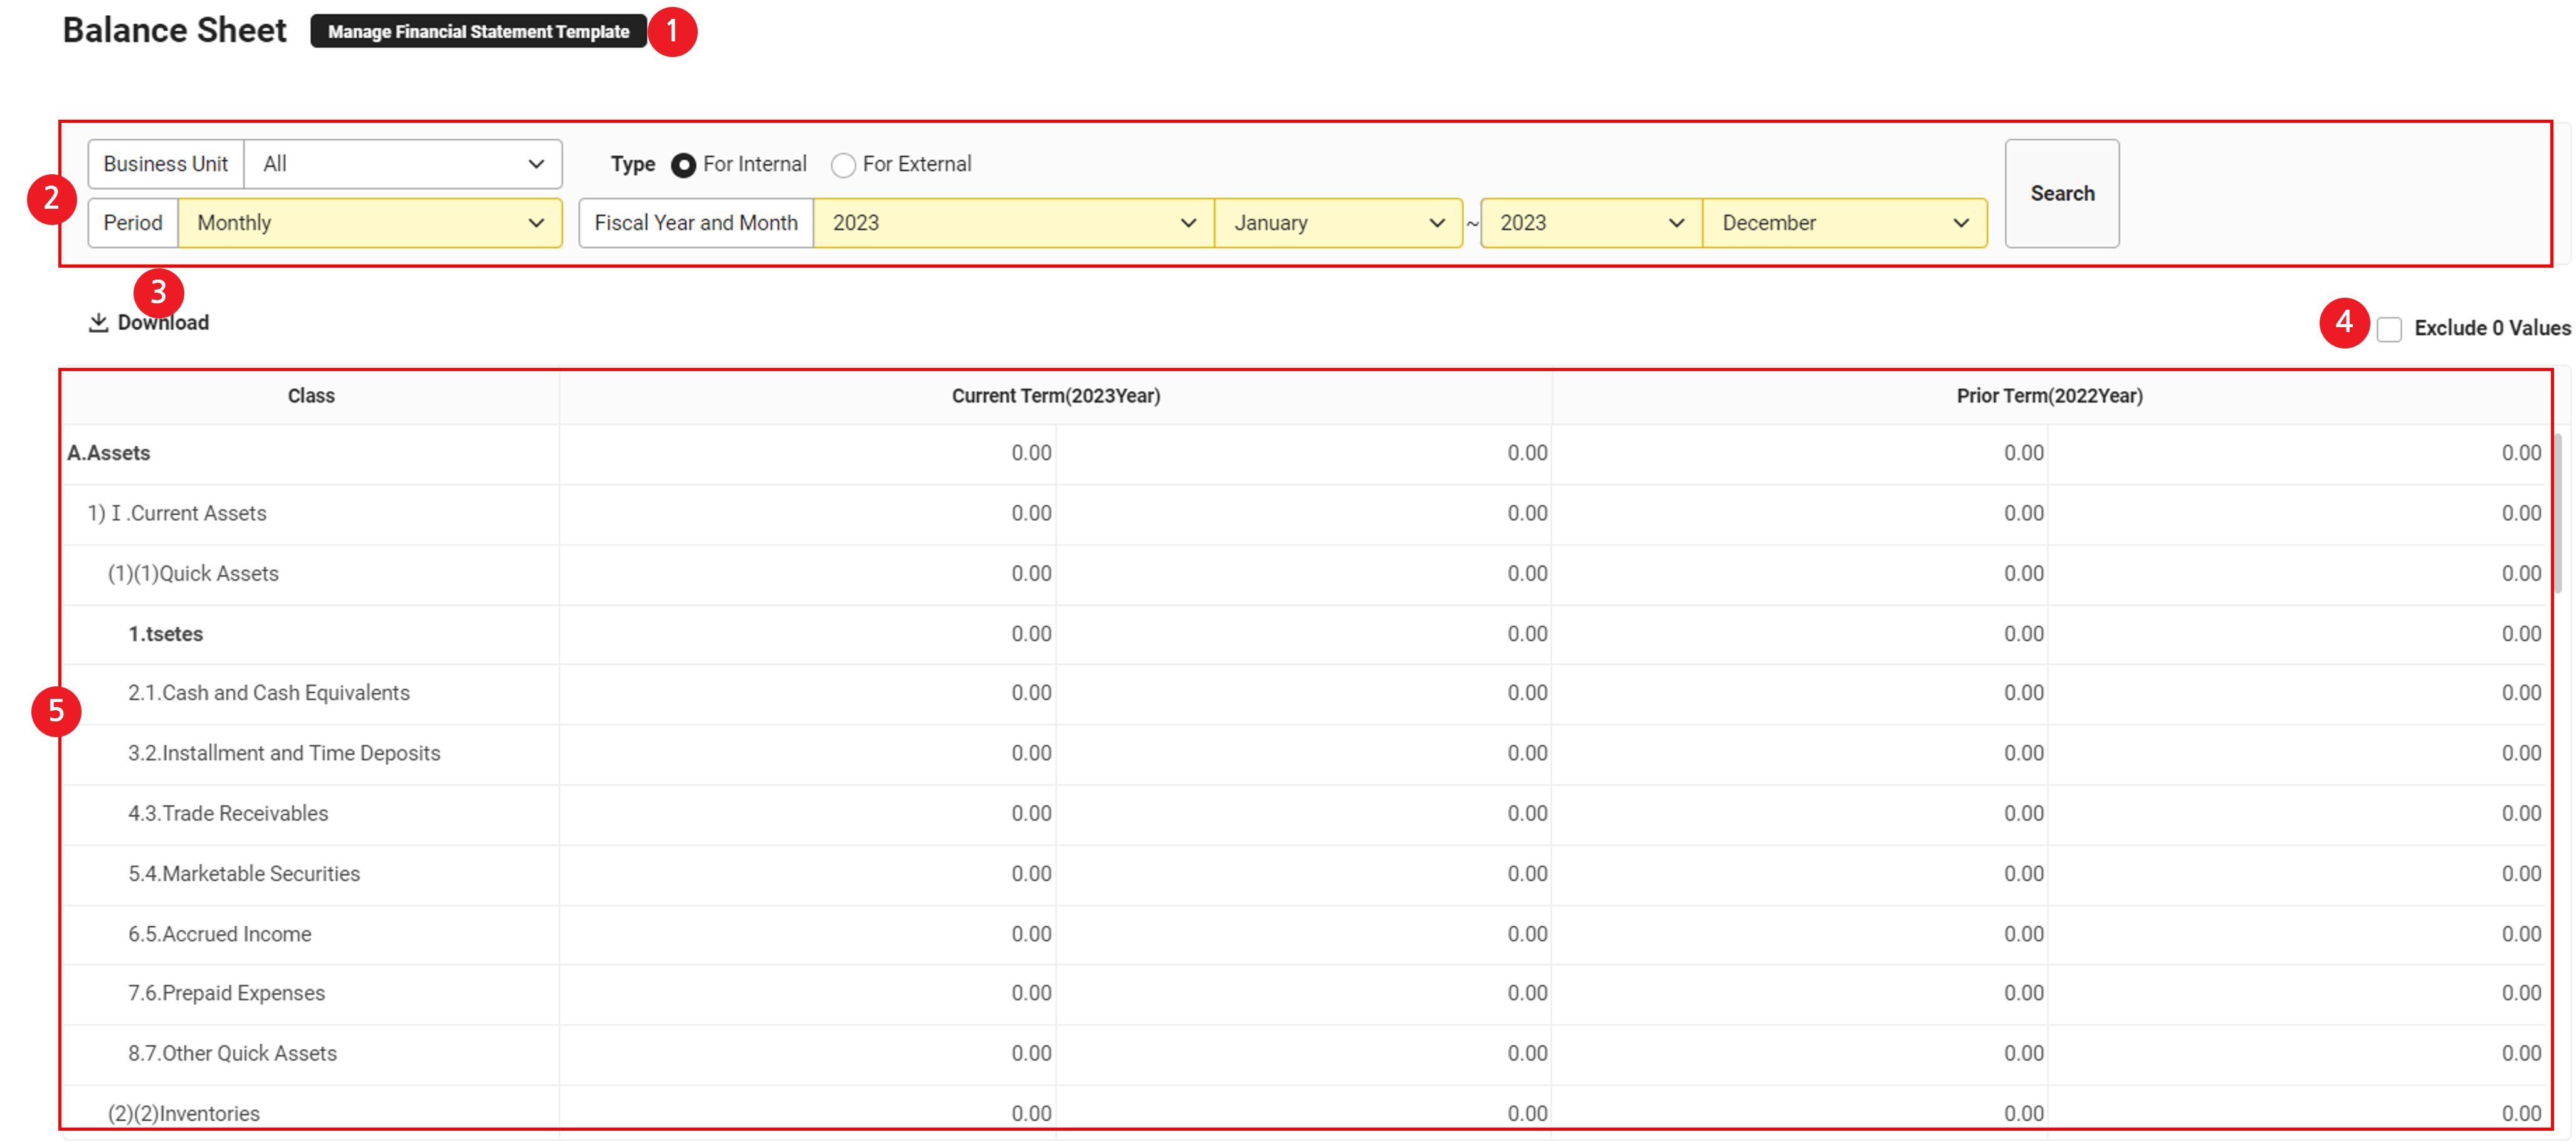
| Area | Description |
|---|---|
| ① Manage Financial Statement Form | Open the Manage Financial Statement Form menu where you can edit financial statement forms |
| ② Select Year and Month and Type | Select the business place, period unit to be displayed, and year and month to check the statement of financial position Change the type to ‘For External Use’ and search to change to the statement of financial position for external use |
| ③ Download | Download the statement of financial position as an Excel file |
| ④ Exclude 0 Values | Click to exclude 0 values from the sheet |
| ⑤ Statement of Financial Position | It displays the statement of financial position for internal use Scroll down to check the bottom |
Download Statement of Financial Position
The following describes how to download the statement of financial position as an Excel file.
- Click the ‘Admin Menu’ at the top right of the PC web screen, and then click ‘Accounting’ in the pop-up window.
- Click at the top left of the screen.
- Click ‘Settlement/Financial Statements > Statement of Financial Position’ from the menu.
- Select For Internal Use or For External Use, enter the conditions of the statement of financial position to be displayed, and then click 'Search'.
- Click 'Download'.
- The statement of financial position is downloaded as an Excel file.
Income Statement
You can check and compare the profit and loss for the fiscal year selected through the income statement and the profit and loss for the same time of the previous year. An external form to register in an external DART system and an internal form for internal accounting tasks are provided.
Check Income Statement for External Use
The following describes how to check the income statement using the external form to register in an external DART system.
- Click the ‘Admin Menu’ at the top right of the PC web screen, and then click ‘Accounting’ in the pop-up window.
- Click at the top left of the screen.
- Click ‘Settlement/Financial Statements > Income Statement’ from the menu.
- Select ‘For External Use’ for type, select the business place and accounting year and month, and then click ‘Search’.
The Income Statement for External Use page is laid out as follows.
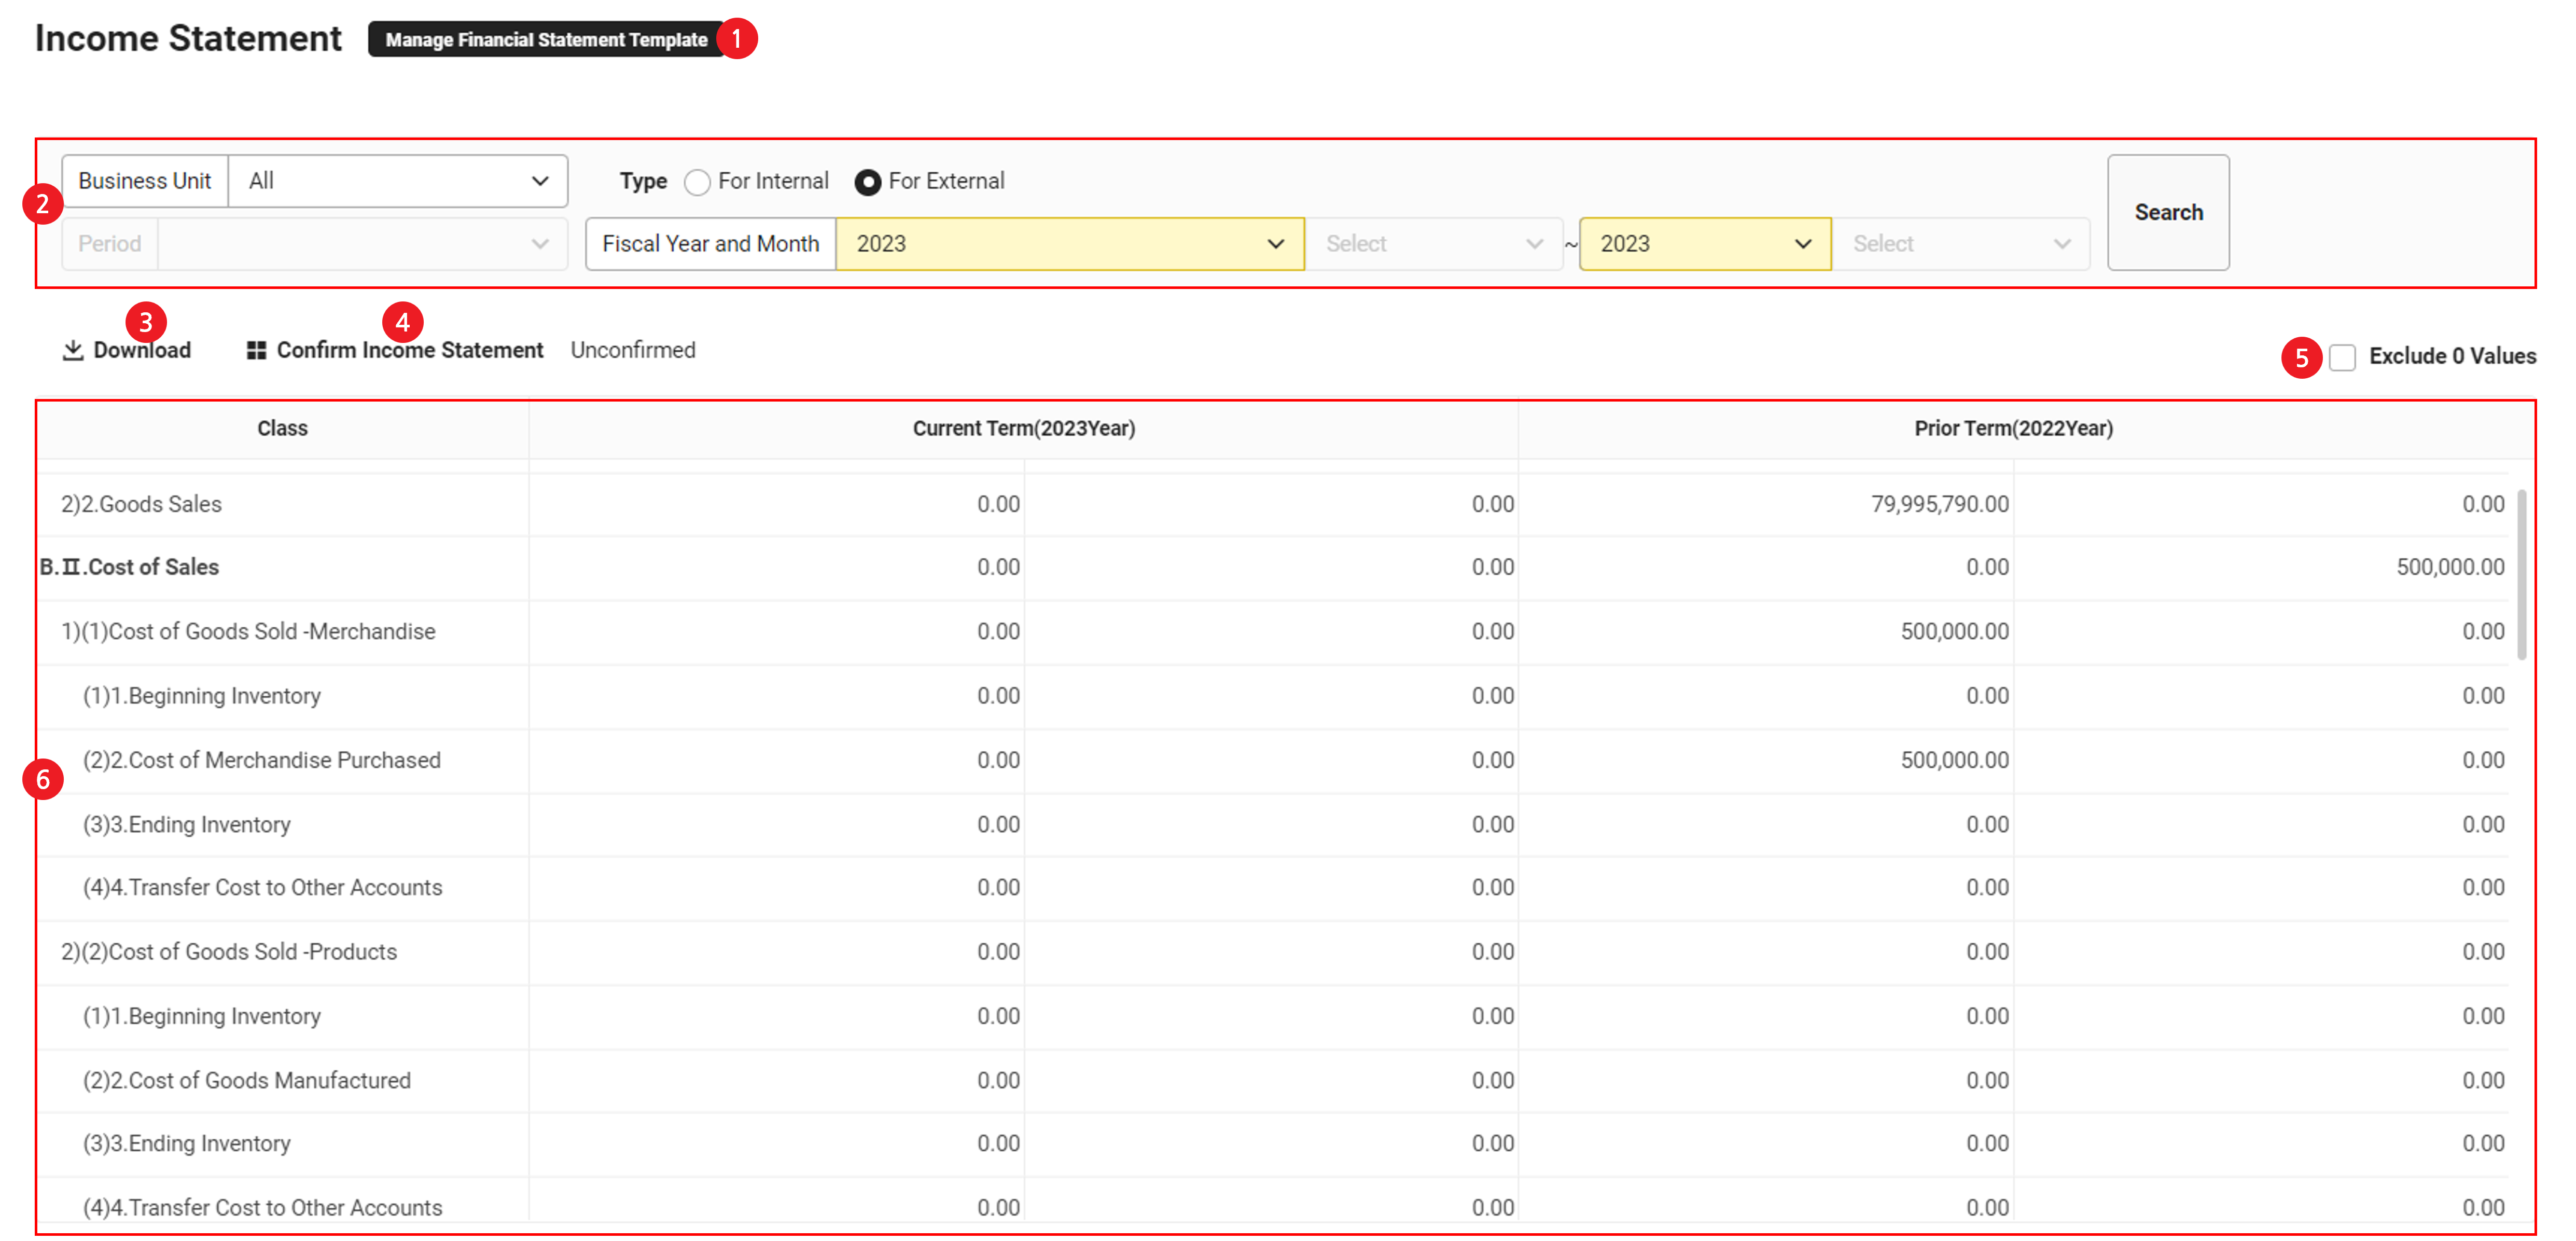
| Area | Description |
|---|---|
| ① Manage Financial Statement Form | Open the Manage Financial Statement Form menu where you can edit financial statement forms |
| ② Select Year and Month and Type | Select the business place and accounting year and month to check the income statement Change the type to ‘For Internal Use’ and search to change to the income statement for internal use |
| ③ Download | Download the income statement as an Excel file |
| ④ Confirm Income Statement | Click to finalize the income statement (See ‘Confirm Income Statement’)
|
| ⑤ Exclude 0 Values | Click to exclude 0 values from the sheet |
| ⑥ Income statement | It displays the profit and loss calculation history of the selected accounting year and the profit and loss calculation history for the same time of the previous year Scroll down to check the bottom |
Confirm Income Statement
The following describes how to finalize the income statement.
- Click the ‘Admin Menu’ at the top right of the PC web screen, and then click ‘Accounting’ in the pop-up window.
- Click at the top left of the screen.
- Click ‘Settlement/Financial Statements > Income Statement’ from the menu.
- Select ‘For External Use’ from the type and select the business place and fiscal year and month, and then click ‘Search’.
- Click ‘Confirm Income Statement’.
- Check details in the confirmation pop-up window, and click ‘OK’.
- Fiscal Year and Month: Select the fiscal year to be finalized in the income statement.
- Business Place: Select the business place to be finalized in the income statement.
After settlement slips of all months (January to December) of the selected year, you can finalize the income statement.
Check Income Statement for Internal Use
The following describes how to check the income statement using the internal form for accounting tasks.
- Click the ‘Admin Menu’ at the top right of the PC web screen, and then click ‘Accounting’ in the pop-up window.
- Click at the top left of the screen.
- Click ‘Settlement/Financial Statements > Income Statement’ from the menu.
- Select ‘For Internal Use’ for type, select the business place, period, and accounting year and month, and then click ‘Search’.
The Income Statement for Internal Use page is laid out as follows.
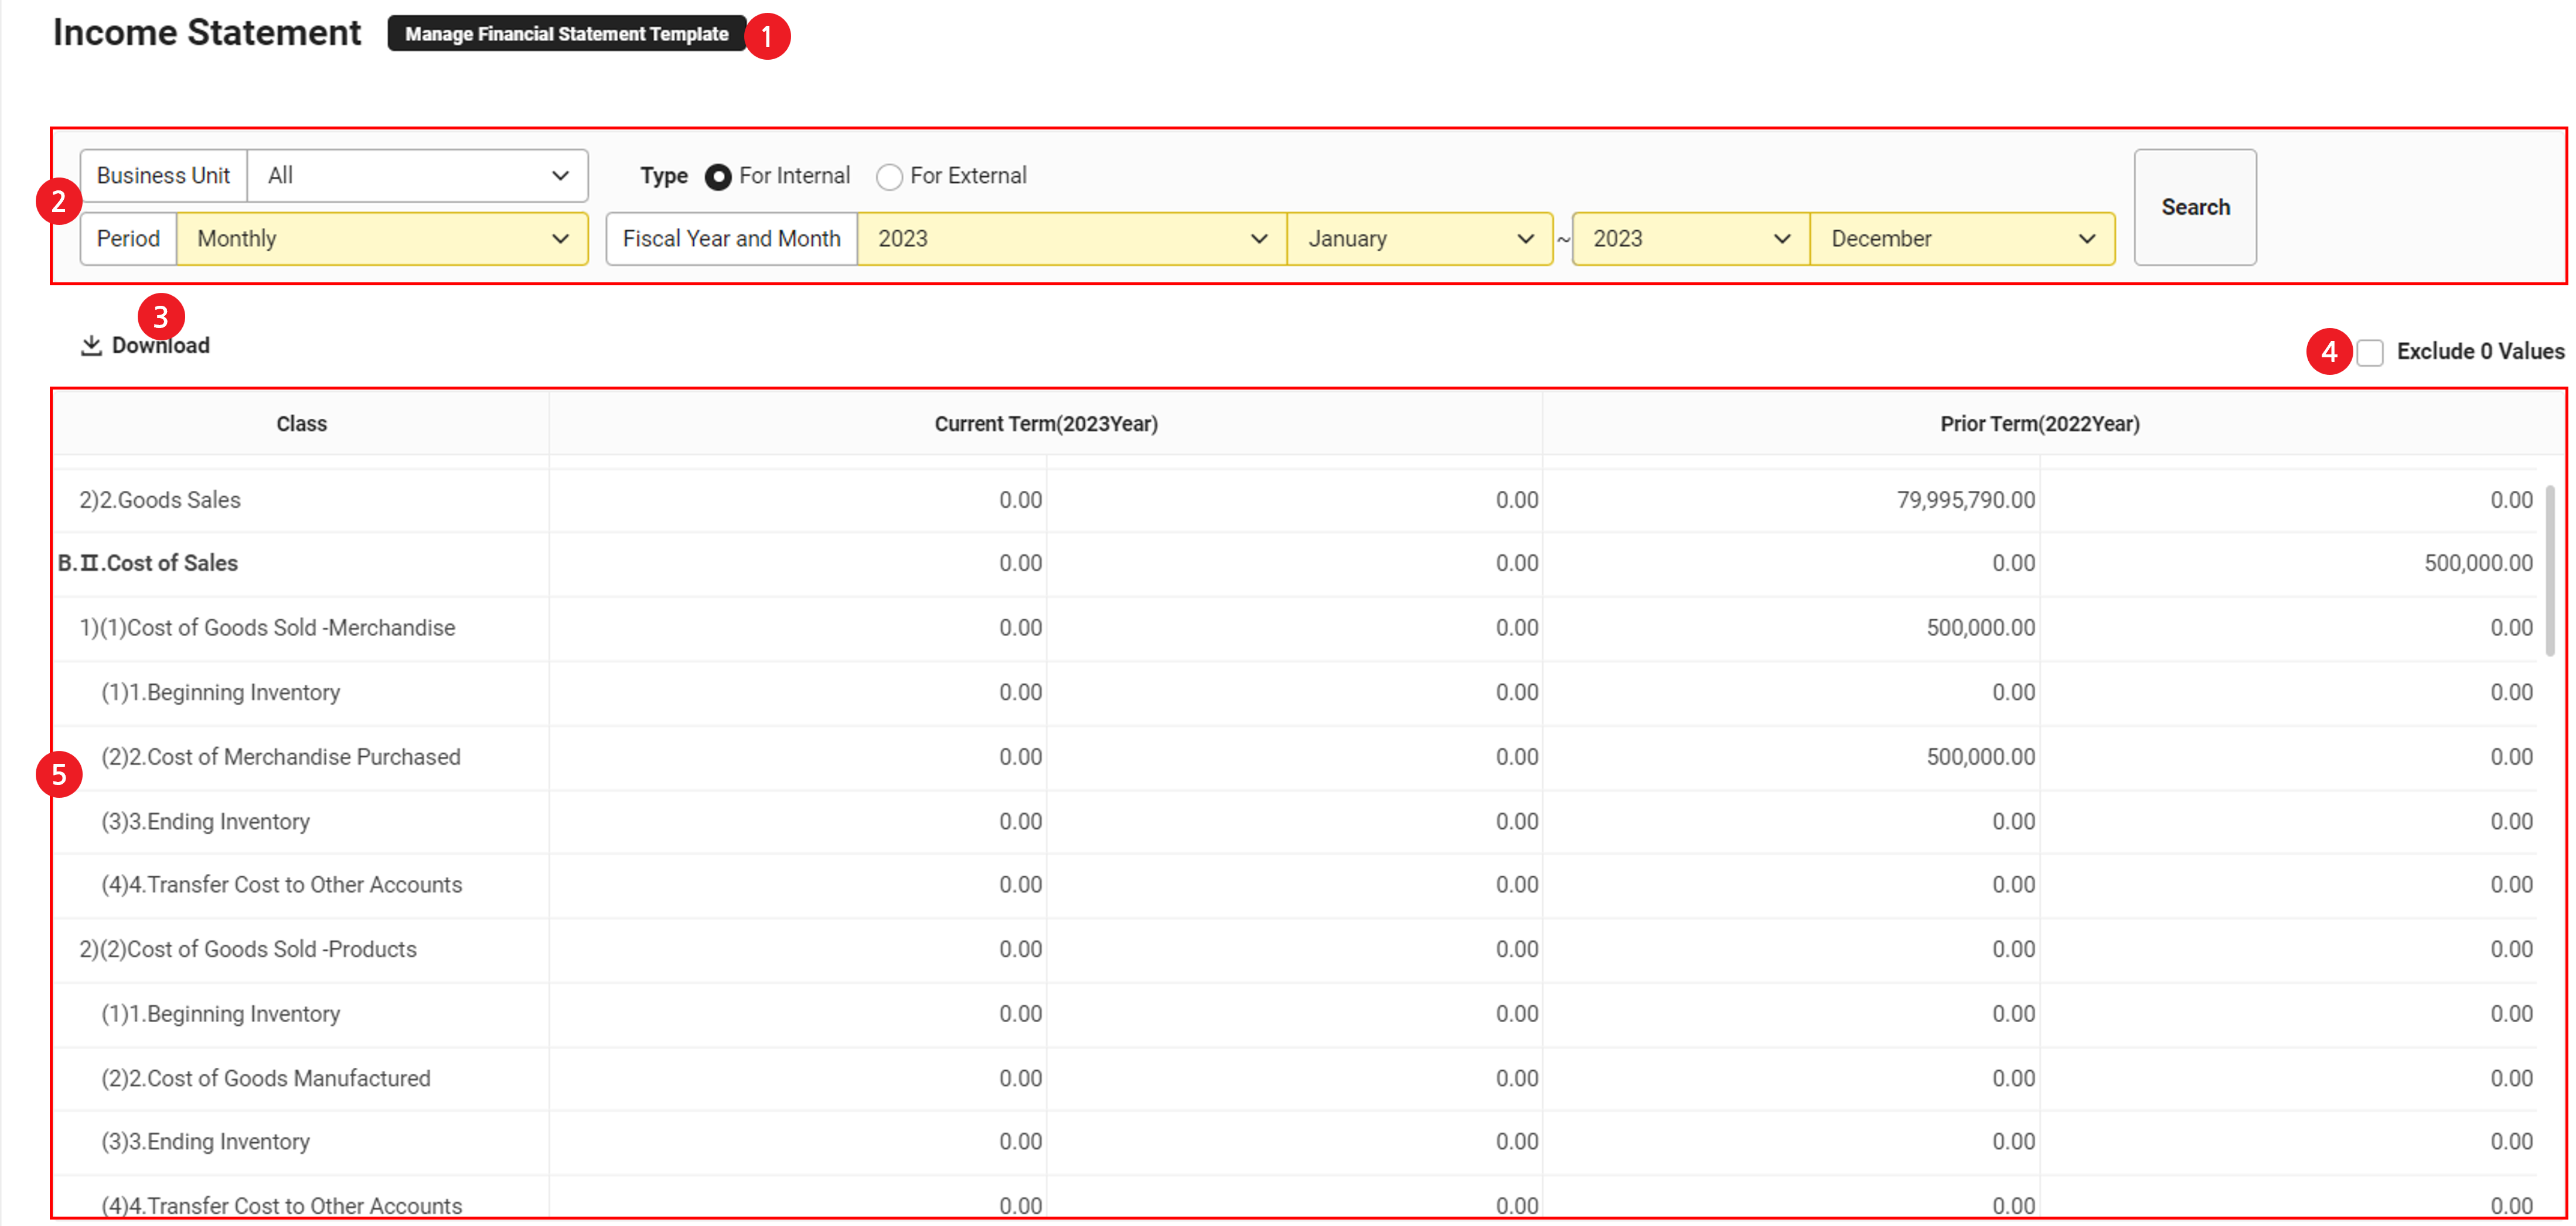
| Area | Description |
|---|---|
| ① Manage Financial Statement Form | Open the Manage Financial Statement Form menu where you can edit financial statement forms |
| ② Select Year and Month and Type | Select the business place, period unit to be displayed, and accounting year and month to check the income statement Change the type to For External Use and search to change to the income statement for external use |
| ③ Download | Download the income statement as an Excel file |
| ④ Exclude 0 Values | Click to exclude 0 values from the sheet |
| ⑤ Income statement | It displays the profit and loss calculation history of the selected accounting year and the profit and loss calculation history for the same time of the previous year Scroll down to check the bottom |
Download Income Statement
The following describes how to download the income statement as an Excel file.
- Click the ‘Admin Menu’ at the top right of the PC web screen, and then click ‘Accounting’ in the pop-up window.
- Click at the top left of the screen.
- Click ‘Settlement/Financial Statements > Income Statement’ from the menu.
- Select ‘For Internal Use’ or ‘For External Use’, enter the conditions of the income statement to be displayed, and then click ‘Search’.
- Click 'Download'.
- The income statement is downloaded as an Excel file.
Statement of Changes in Equity
You can view the statement of changes in equity and create settlement slips.
You can enter, store, and create slips for the retained earnings after finalizing the income statement.
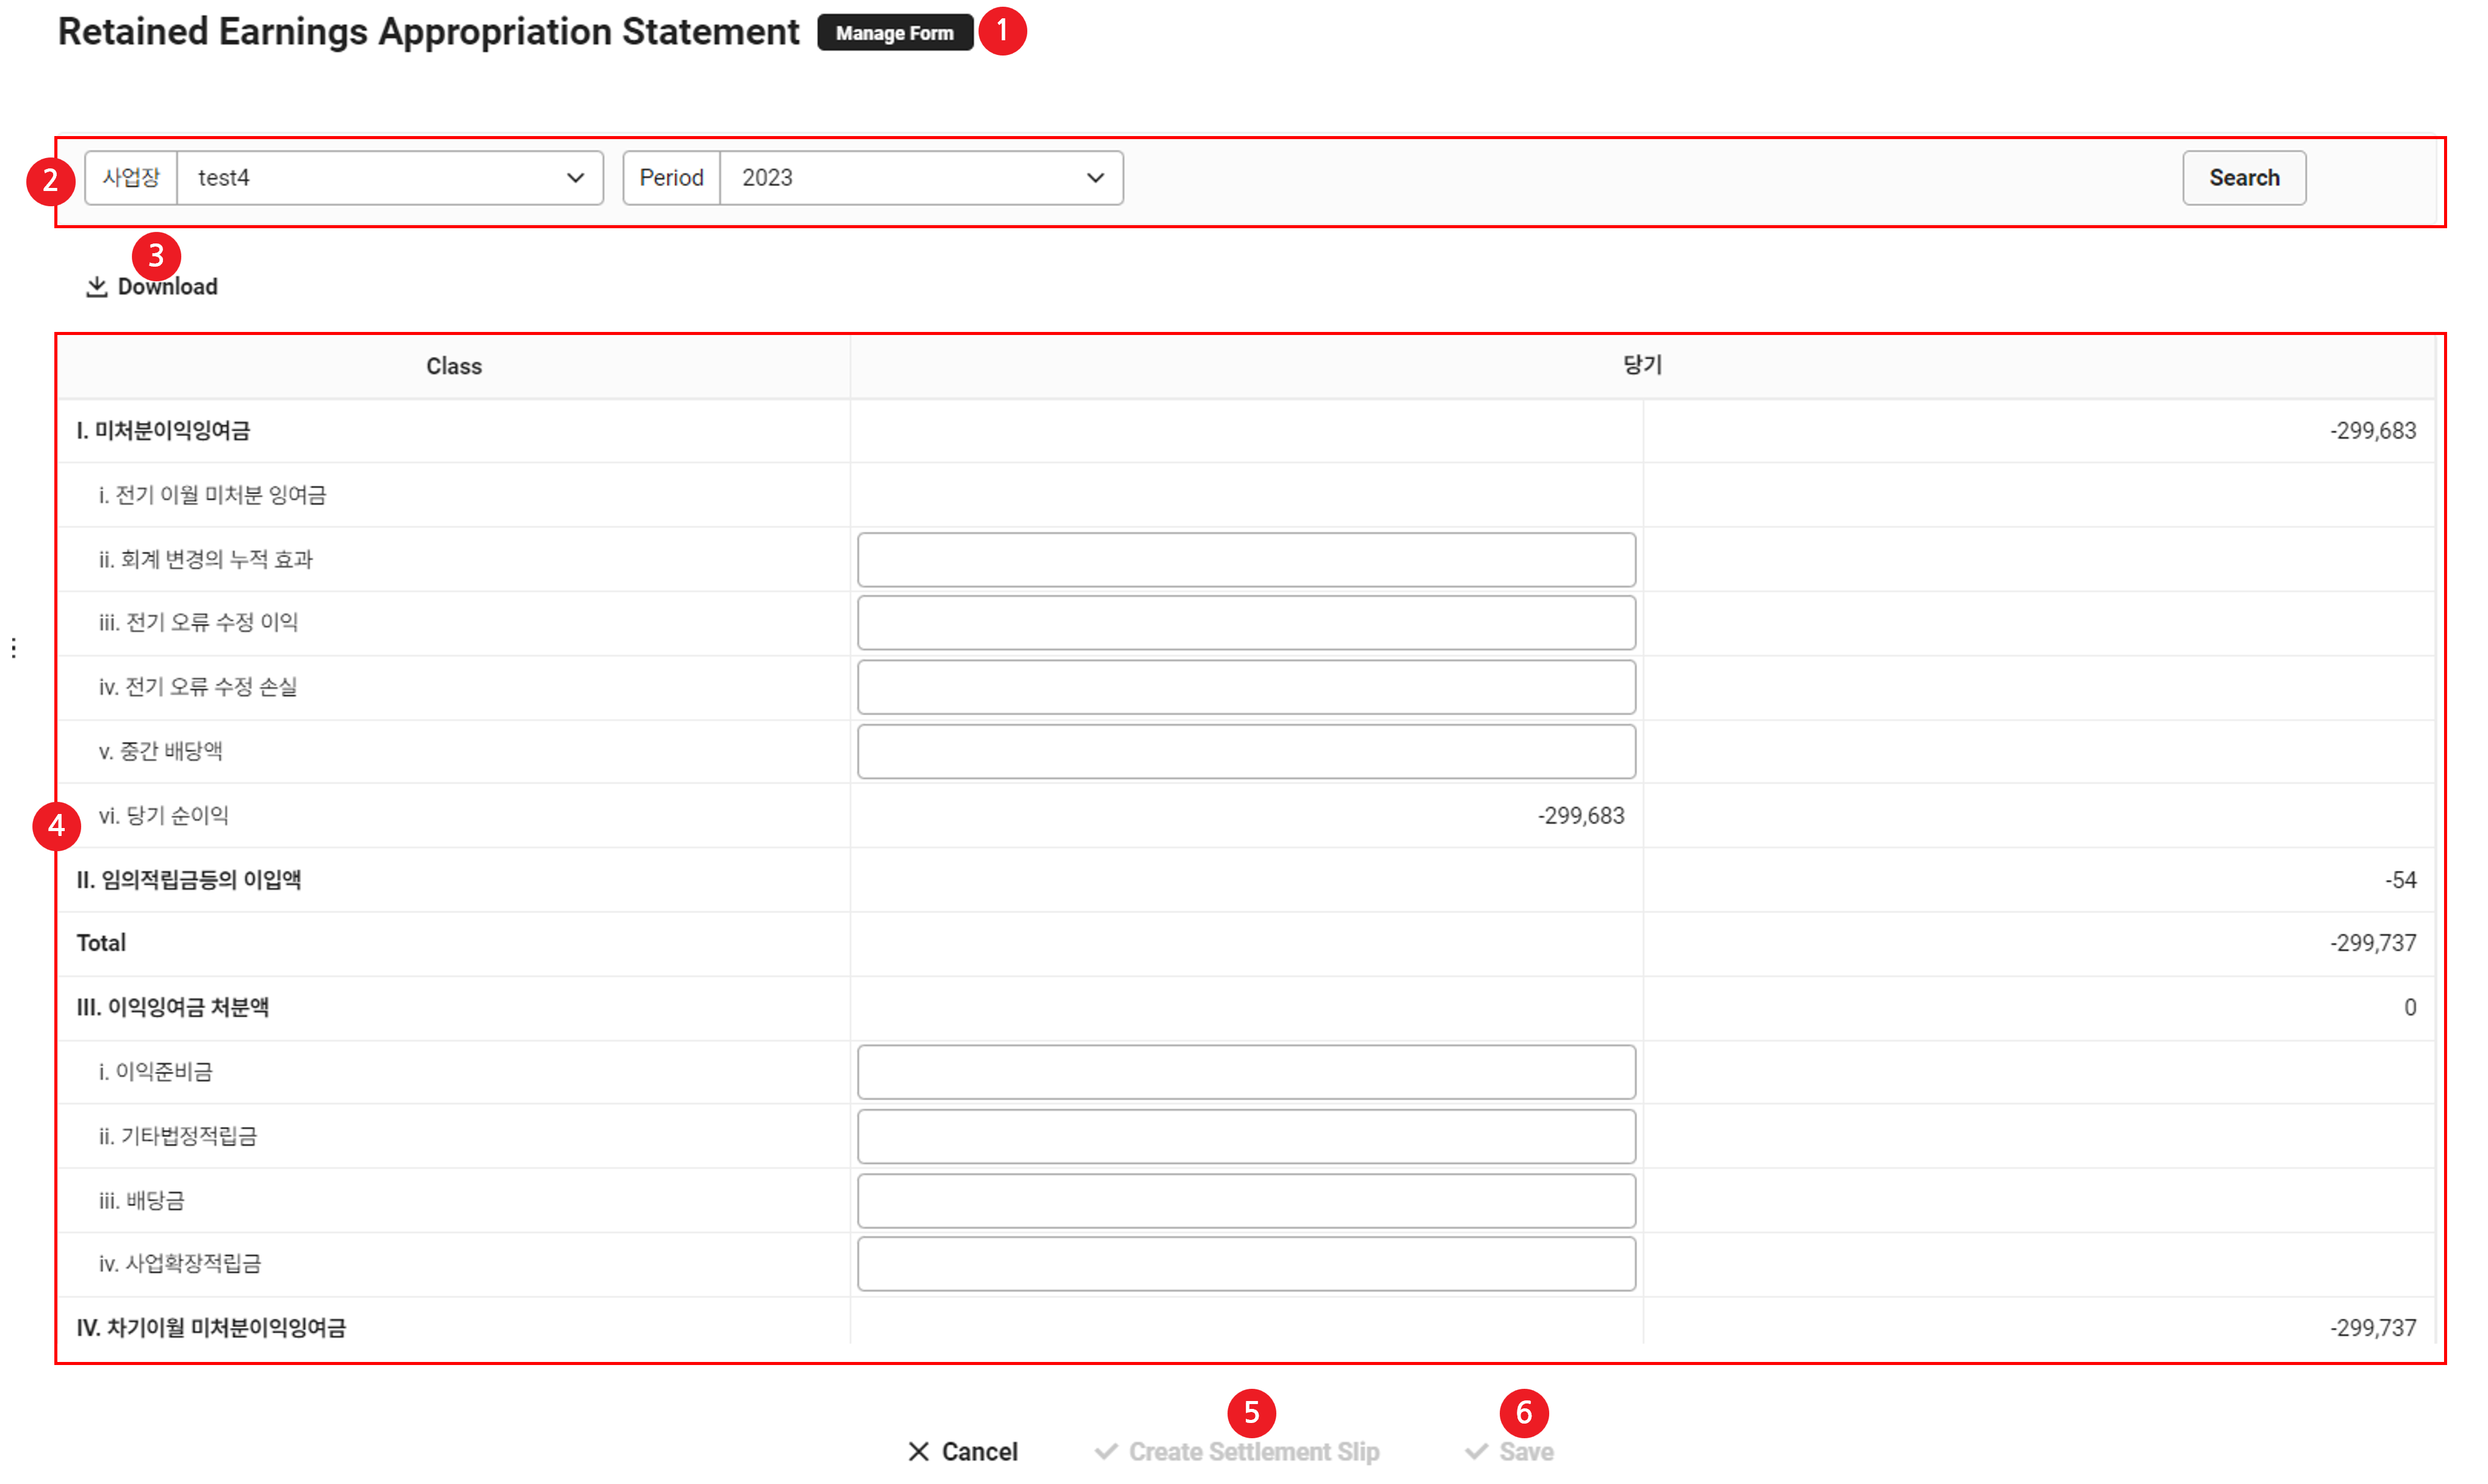
| Area | Description |
|---|---|
| ① Manage Financial Statement Form | Open the Manage Financial Statement Form menu where you can edit financial statement forms |
| ② Select business location and year | Select the business place and fiscal year to check the statement of changes in equity |
| ③ Download | Download the statement of changes in equity as an Excel file |
| ④ Statement of changes in equity | It displays the retained earnings history of the selected fiscal year |
| ⑤ Create Settlement Slip | Click to create settlement slips of the current year (See ‘Create Settlement Slip’)
|
| ⑥ Save | Store the edited statement of changes in equity
|
Create Settlement Slip
The following describes how to create an retained earnings settlement slip for the current year.
- Click the ‘Admin Menu’ at the top right of the PC web screen, and then click ‘Accounting’ in the pop-up window.
- Click at the top left of the screen.
- Click ‘Settlement/Financial Statements > Statement of changes in equity’ from the menu.
- Enter the conditions of retained earnings to be displayed and click ‘Search’.
- Click ‘Create Settlement Slip’.
- You can create the settlement slip after finalizing the income statement of the current year.
- Once the settlement slip creation is completed, the settlement slip number, creation date and time, and the admin who created it are displayed at the top.
- You can check the slip details by clicking the slip number.
Download Statement of Changes in Equity
The following describes how to download the statement of changes in equity as an Excel file.
- Click the ‘Admin Menu’ at the top right of the PC web screen, and then click ‘Accounting’ in the pop-up window.
- Click at the top left of the screen.
- Click ‘Settlement/Financial Statements > Statement of changes in equity’ from the menu.
- Enter the business place and year conditions and click ‘Search’.
- Click 'Download'.
- The statement of changes in equity is downloaded as an Excel file.
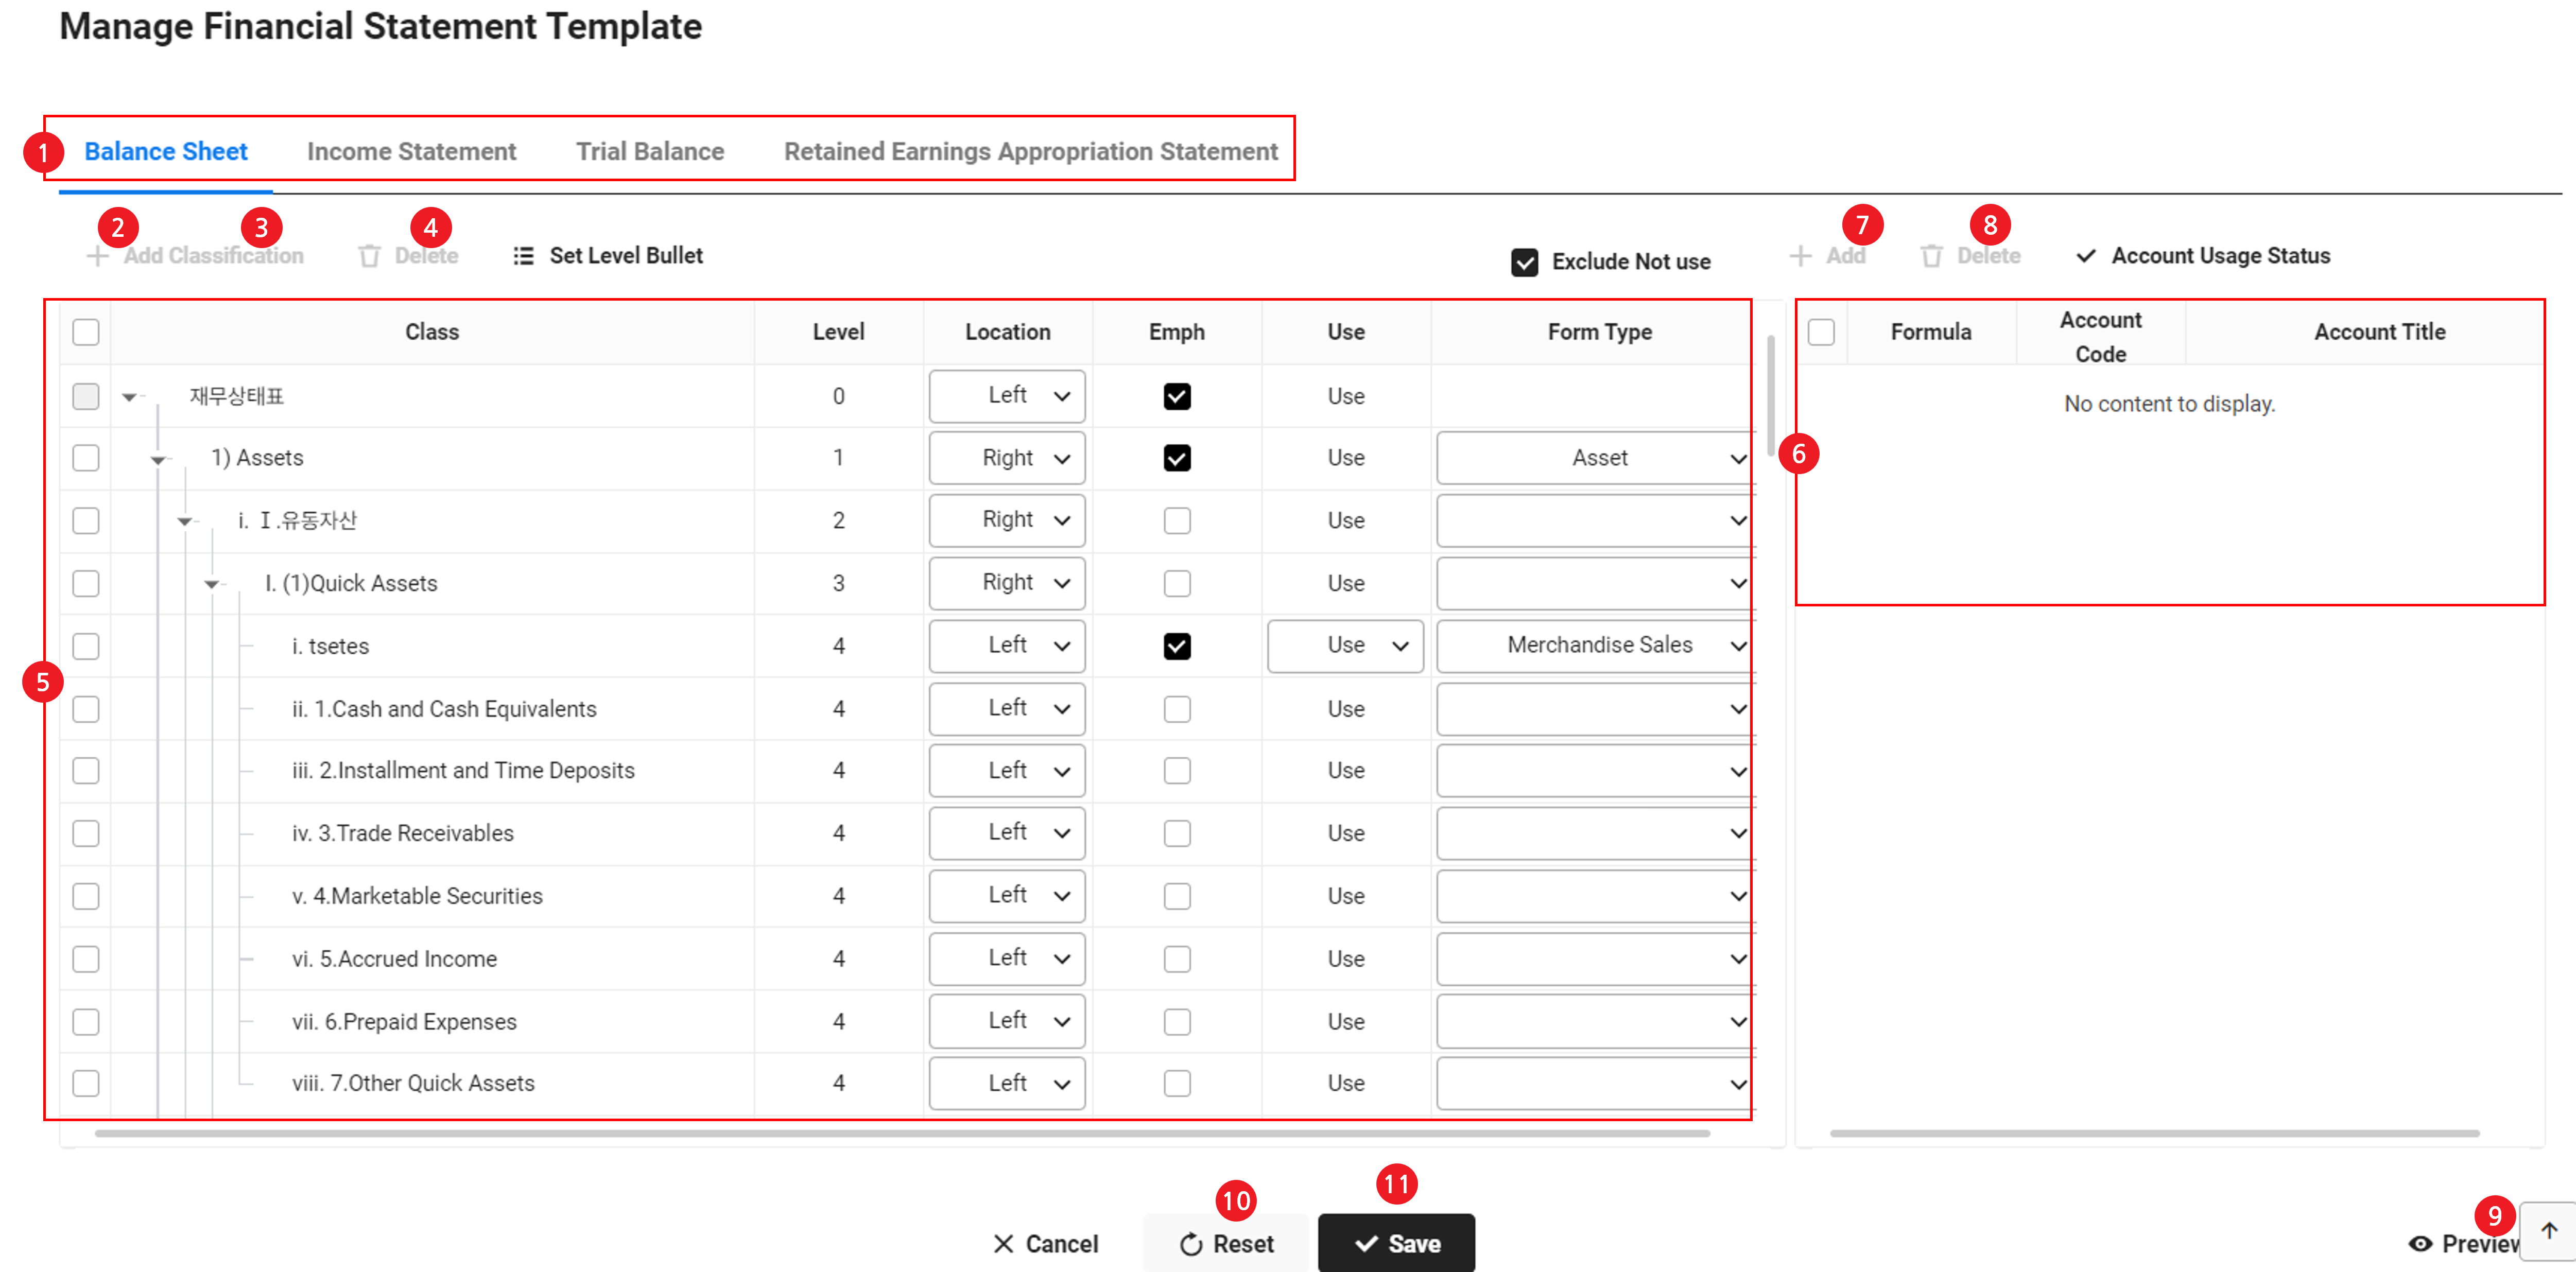
Manage Financial Statement Form
You can edit the form of each financial statement. You can add new amount classifications for financial statements or edit and delete entered amount classifications for financial statements.

| Area | Description |
|---|---|
| ① Financial statement selection tab | Select a financial statement to manage forms |
| ② Add classification | Add classification for the financial statement |
| ③ Delete | Delete classification of financial statement
|
| ④ Set Level Bullet | Click to set the bullet by level |
| ⑤ Classification list | It displays financial statement classifications
|
| ⑥ Detailed classification list | It displays the detailed classification list |
| ⑦ Add | Select the classification, and then add detailed classification accounts |
| ⑧ Delete | Delete detailed classification for the financial statement |
| ⑨ Preview | Preview the financial statement form |
| ⑩ Reset | Immediately resets to the initial service state, and can't be restored |
| ⑪ Save | Save the edited financial statement form |
Add Classification
The following describes how to add new classification to be displayed in financial statements.
- Click the ‘Admin Menu’ at the top right of the PC web screen, and then click ‘Accounting’ in the pop-up window.
- Click at the top left of the screen.
- Click ‘Settlement/Financial Statements > Manage Financial Statement Form’ from the menu.
- Click the financial statement tab menu to add the classification from ‘Statement of Financial Position’, ‘Income Statement’, ‘Compound Trial Balance’, and ‘Statement of Changes in Equity’.
- After selecting the parent classification to be added, click ‘Add Classification’ under the Financial Statements tab.
- A new classification and an input field are created in the selected classification list.
- Enter details for the new classification as shown below, and then click ‘Save’.
- Classification Name: Enter the classification name of the item.
Click ‘A’ to enter English, Japanese, or Chinese (Simplified) name. - Level: The level to display the classification in the financial statement.
- Location: Select whether to enter the classification amount in the left column or right column of the financial statement.
- Emphasize: If selected, the classification name is emphasized in the financial statement.
- Usage: Select the usage status of the classification.
- Form Type: Select the form type of the statement of financial position and income statement. Duplicate selection with other classifications is not available.
- Classification Name: Enter the classification name of the item.
- Click 'OK' in the notification pop-up window, and click the added classification in the refreshed page.
- Click ‘Add’ above the account title list on the right side.
- See ‘Add Account’ and enter details of the account title.
- Click ‘Save’, and then click ‘OK’ in the notification pop-up window.
Edit Classification
The following describes how to edit classification details to be displayed in financial statements.
- Click the ‘Admin Menu’ at the top right of the PC web screen, and then click ‘Accounting’ in the pop-up window.
- Click at the top left of the screen.
- Click ‘Settlement/Financial Statements > Manage Financial Statement Form’ from the menu.
- Click the financial statement tab menu to be edited from ‘Statement of Financial Position’, ‘Income Statement’, ‘Compound Trial Balance’, and ‘Statement of Changes in Equity’.
- Select the classification to be edited from the classification list, and edit details.
The entered content will disappear if you click another classification while editing.
- Select the account title to be edited from the account title list on the right side of the classification list, and edit details. (See ‘Add Account’)
- To delete all detailed classifications of the selected classification, see ‘Delete Detailed Classification’.
- Click ‘Save’, and then click ‘OK’ in the notification pop-up window.
Delete Classification
The following describes how to delete classification details to be displayed in financial statements.
- Click the ‘Admin Menu’ at the top right of the PC web screen, and then click ‘Accounting’ in the pop-up window.
- Click at the top left of the screen.
- Click ‘Settlement/Financial Statements > Manage Financial Statement Form’ from the menu.
- Click the financial statement tab menu to be edited from ‘Statement of Financial Position’, ‘Income Statement’, ‘Compound Trial Balance’, and ‘Statement of Changes in Equity’.
- Select all classifications to be deleted from the classification list, and then click ‘Delete’.
- Click ‘Save’, and then click ‘OK’ in the notification pop-up window.
Classifications with subclassifications or mapped account titles can't be deleted.
Add Account
The following describes how to add new classification to be displayed in financial statements.
- Click the ‘Admin Menu’ at the top right of the PC web screen, and then click ‘Accounting’ in the pop-up window.
- Click at the top left of the screen.
- Click ‘Settlement/Financial Statements > Manage Financial Statement Form’ from the menu.
- Click the financial statement tab menu to add the detailed classification from ‘Statement of Financial Position’, ‘Income Statement’, ‘Compound Trial Balance’, and ‘Statement of Changes in Equity’.
- Click the classification from the classification list on the left.
- Click ‘Add’ from the detailed classification list.
- Select a formula.
- Select the account title by searching.
- Only accounts whose Slip Entry field is selected from the ‘Manage Standard Information > Manage Account Title’ menu are displayed.
- Duplicated account titles can't be added.
- Click ‘Account Title Status’ to view the usage status of the account title.
- Delete: To delete the added account title, select and click ‘Delete’.
- Click ‘Save’.
Delete Detailed Classification
The following describes how to delete detailed classifications to be displayed in financial statements.
- Click the ‘Admin Menu’ at the top right of the PC web screen, and then click ‘Accounting’ in the pop-up window.
- Click at the top left of the screen.
- Click ‘Settlement/Financial Statements > Manage Financial Statement Form’ from the menu.
- Click the financial statement tab menu to be edited from ‘Statement of Financial Position’, ‘Income Statement’, ‘Compound Trial Balance’, and ‘Statement of Changes in Equity’.
- Click the classification from the classification list.
- Select all classifications to be deleted from the detailed classification list on the right, and then click ‘Delete’.
- Click ‘Save’, and then click ‘Confirm’ in the notification pop-up window.