You can check the National Tax Service Hometax data that has been registered manually or imported through scraping. You can also view the withholding tax information entered when registering slips.
The National Tax Service Hometax data is scraped automatically by registering the company certificate in ‘Business Support Settings > Company Information > Manage Business Place > Manage Certificate’, and then selecting the ‘Hometax’ item. See Manage Certificate for more details.
Register Hometax Data
You can manually upload and view your Hometax electronic tax invoice, invoice, and cash receipt data.
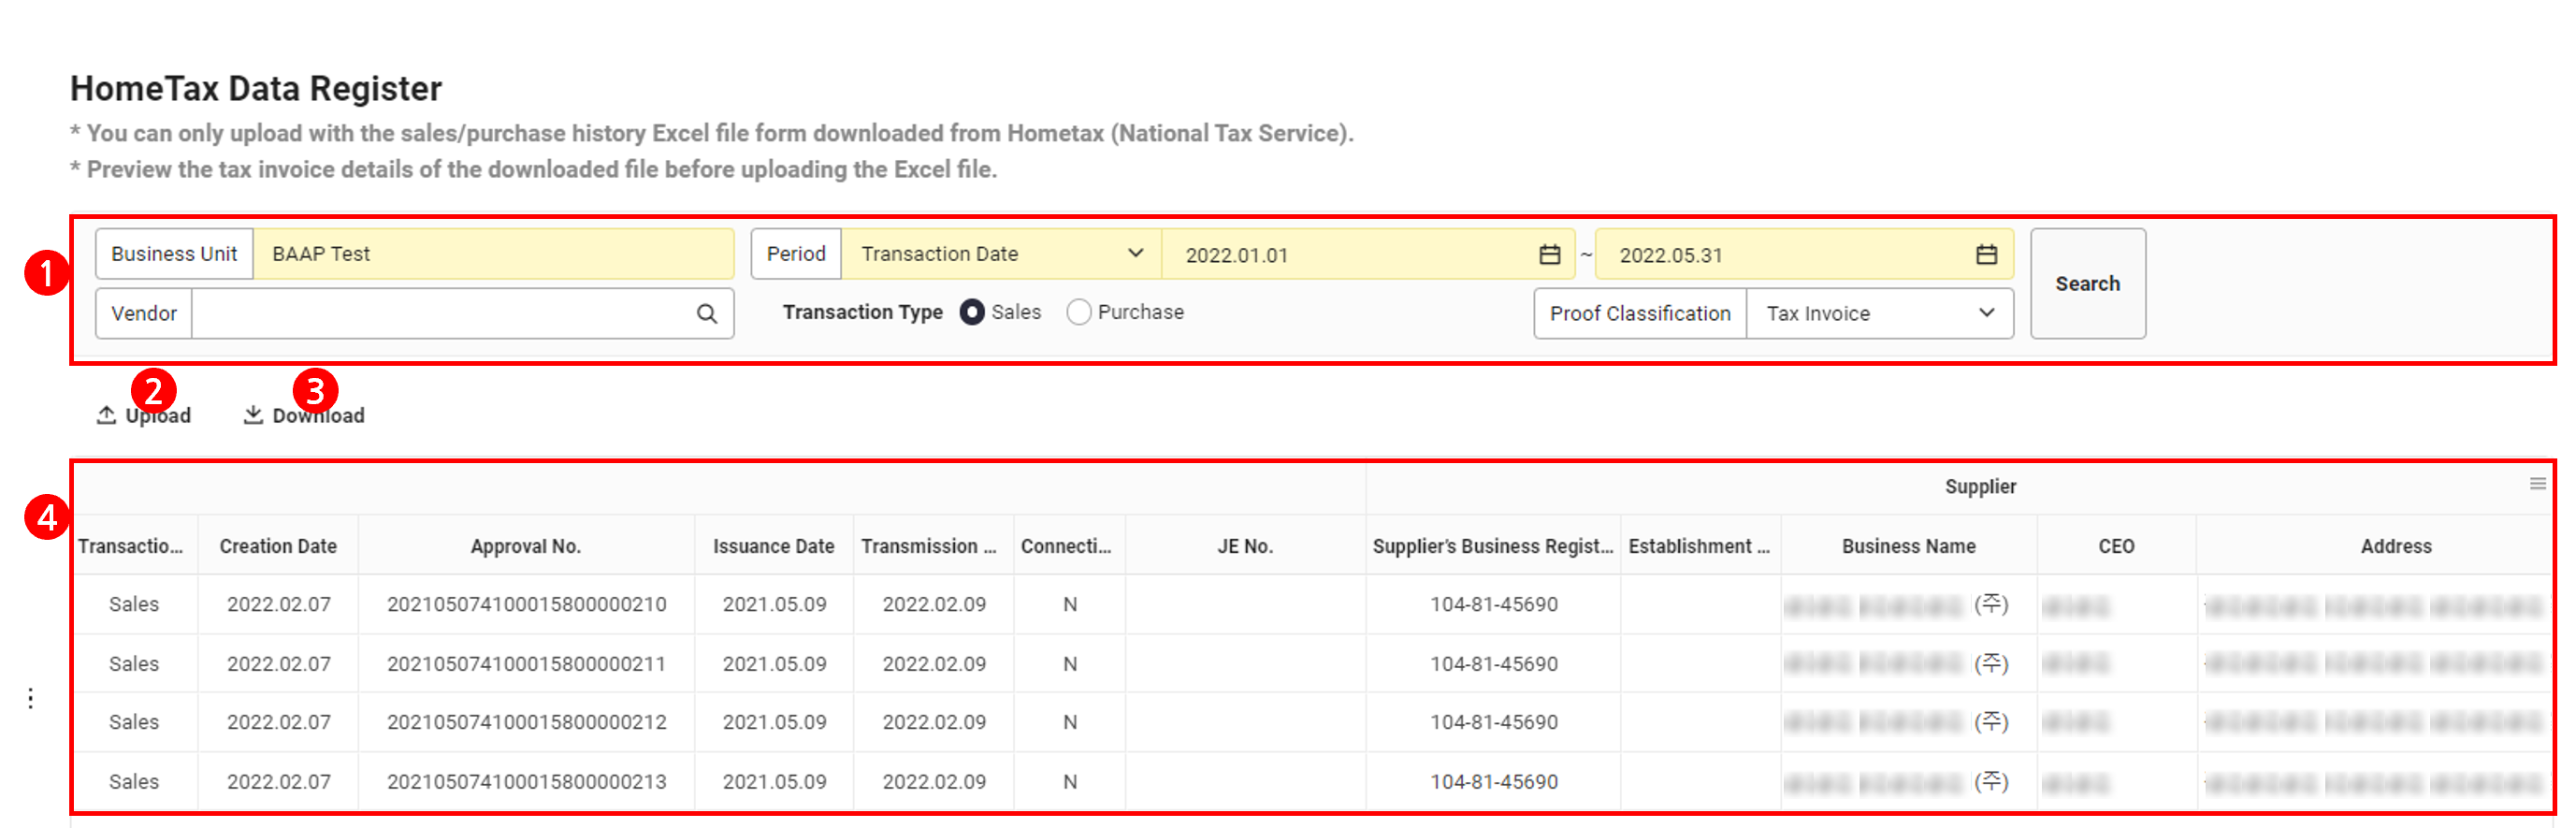
The Register Hometax Data screen is laid out as follows.
| Area | Description |
|---|---|
| ① Search window | Search the registered Hometax data by business place, period, vendor, transaction type, and evidence type
|
| ② Upload | Click to register Hometax data if the evidence type is tax invoice/invoice |
| ③ Download | Click to download the list of registered Hometax data as an Excel file |
| ④ List of Hometax data | It displays the registered Hometax data in a list
|
Upload Hometax Data
The following describes how to upload the Hometax data.
- Click the ‘Admin Menu’ at the top right of the PC web screen, and then click ‘Accounting’ in the pop-up window.
- Click
 at the top left of the screen.
 - Click ‘Manage Tax > Register Hometax Data’ from the menu.
- Click ‘Upload’.
- In the Upload Hometax Data pop-up window, upload the original file downloaded from Hometax, or download a template file by clicking ‘Download Template File’ and fill it out.
- Contents of the files downloaded from Hometax must not be modified.
- You can register purchase/sales data only with the forms provided by Hometax or the Excel file downloaded through Download Sample File.
- The Approval Number must be unique. Otherwise, duplicated data is not registered.
- Check the business registration numbers of the supplier and recipient using the business place registration numbers registered in the ‘Business Support Settings > Company Information > Manage Business Place’ menu.
- Only the first row is registered when there are 2 or more rows for an item, or a row has duplicated approval numbers in the data for other reasons. In such case, manually register the omitted items in ‘Manage Receivables/Payables > Create/View Purchase/Sales Data’.
- Select the tax business place, evidence form type, and upload data type in the Upload Hometax Data pop-up window, and then click the ‘Attach the file from your PC, or drag the file here.’ area to select the file to be attached or drag the file to the area.
- You can't register the data if the month of the issue date (year and month) has been closed in ‘Settlement/Financial Statements > Monthly Closing’.
- Select the Tax Business Place to register the Hometax data.
- Select the ‘Evidence Form Type’.
- Select the Upload Data Type.
- If the vendor's business registration number in the data being uploaded is not registered in ‘Manage Standard Information > Manage Vendor’, then the vendor account will be automatically created.
- Click 'OK', and then click 'Yes' in the notification pop-up window.
- The Hometax data is registered.
Download Hometax Data List
The following describes how to download the list of registered Hometax data as an Excel file.
- Click the ‘Admin Menu’ at the top right of the PC web screen, and then click ‘Accounting’ in the pop-up window.
- Click at the top left of the screen.
- Click ‘Manage Tax > Register Hometax Data’ from the menu.
- If necessary, enter the Hometax data conditions to be searched in the search window, and then click ‘Search’.
- You can view the Hometax data that matches the entered conditions.
- Click 'Download'.
- The list of Hometax data is downloaded as an Excel file.
View Hometax Data
You can view all data that have been registered in the Register Hometax Data menu, imported through XML when registering purchase/sales data, or imported automatically through scraping.
View Tax Invoice/Invoice
You can view the registered tax invoices/invoices registered.
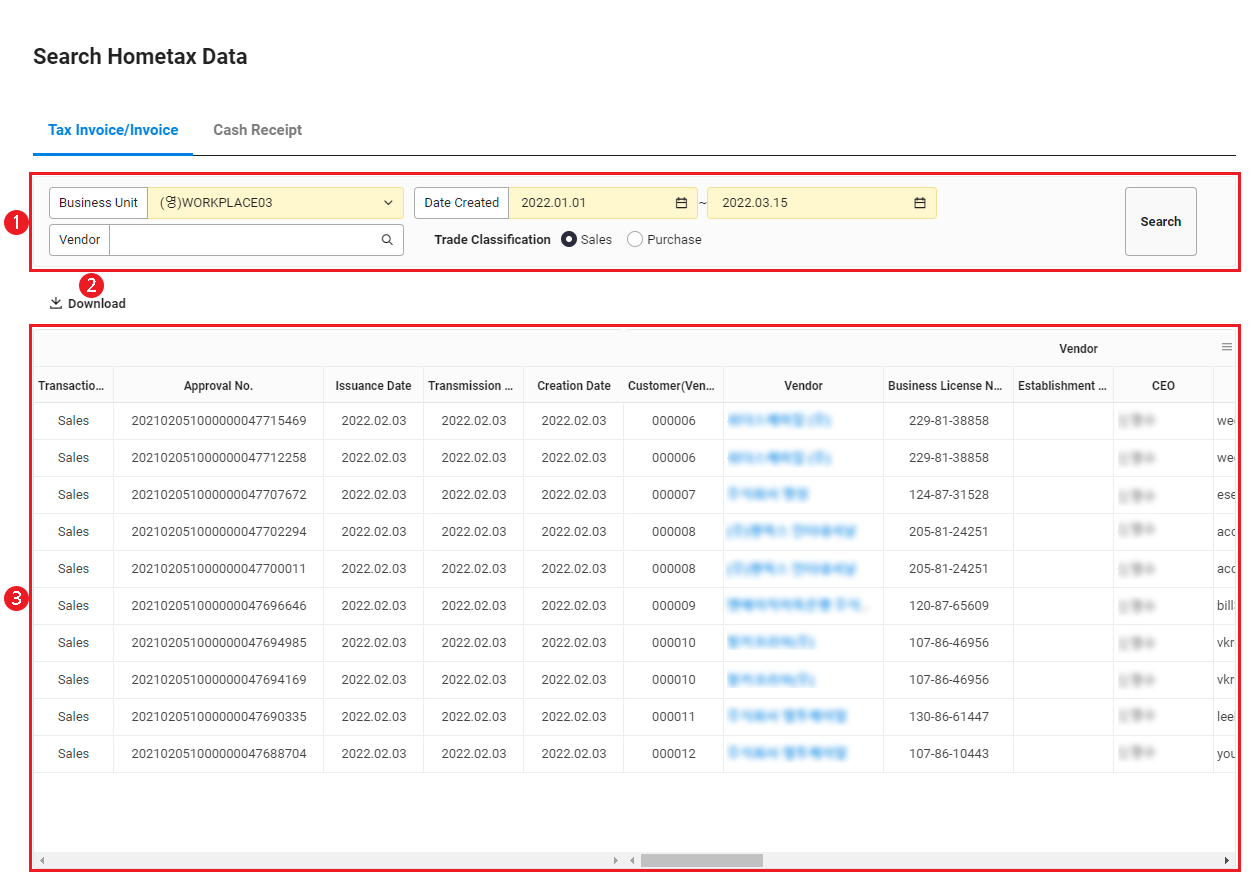
The View Tax Invoice/Invoice page is laid out as follows.
| Area | Description |
|---|---|
| ① Search window | Search tax invoices and invoices by business place, creation date, vendor, and transaction type |
| ② Download | Download the list of tax invoices and invoices as an Excel file |
| ③ List of tax invoices and invoices | It displays the registered tax invoices and invoices in a list |
Download Tax Invoice/Invoice List
The following describes how to download the list of tax invoices and invoices as an Excel file.
- Click the ‘Admin Menu’ at the top right of the PC web screen, and then click ‘Accounting’ in the pop-up window.
- Click at the top left of the screen.
- Click ‘Manage Tax > View Hometax Data’ from the menu.
- If necessary, enter the tax invoice and invoice conditions to be searched in the search window, and then click 'Search'.
- You can view the list of tax invoices and invoices that match the entered conditions.
- Click 'Download'.
- The list of tax invoices and invoices is downloaded as an Excel file.
View Cash Receipt
You can view the registered cash receipts.
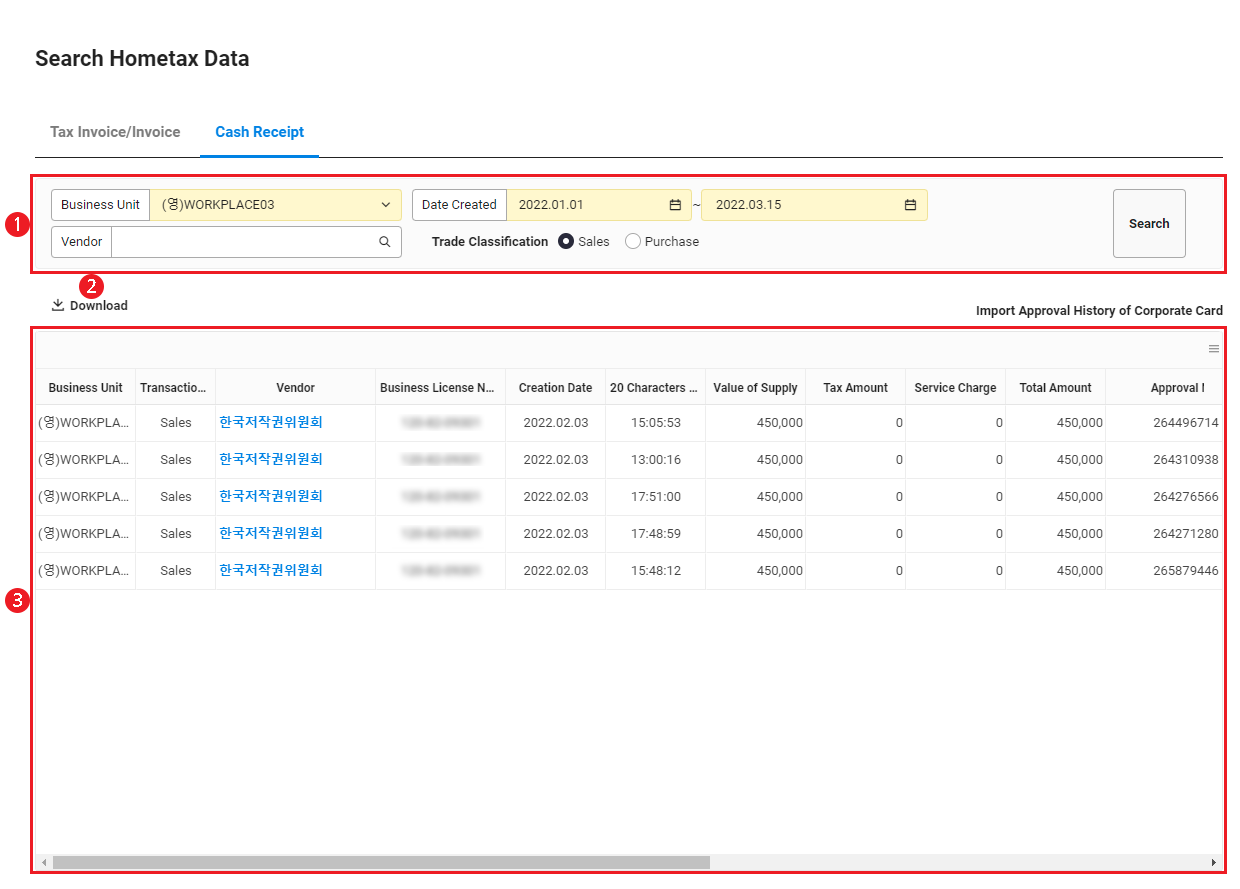
The View Cash Receipt page is laid out as follows.
| Area | Description |
|---|---|
| ① Search window | Search cash receipts by business place, creation date, vendor, and transaction type. |
| ② Download | Download the list of cash receipts as an Excel file |
| ③ List of cash receipts | It displays the registered cash receipts in a list |
Download Cash Receipt List
The following describes how to download the list of cash receipts as an Excel file.
- Click the ‘Admin Menu’ at the top right of the PC web screen, and then click ‘Accounting’ in the pop-up window.
- Click at the top left of the screen.
- Click ‘Manage Tax > View Hometax Data’ from the menu.
- If necessary, enter the cash receipt conditions to be searched in the search window, and then click ‘Search’.
- You can view the list of cash receipts that match the entered conditions.
- Click 'Download'.
- The list of cash receipts is downloaded as an Excel file.
Create Corporate Card Refund Slips
You can create refund slips by selecting the slip without input VAT among the expense slips and card authorization information created by settling corporate credit card usage.
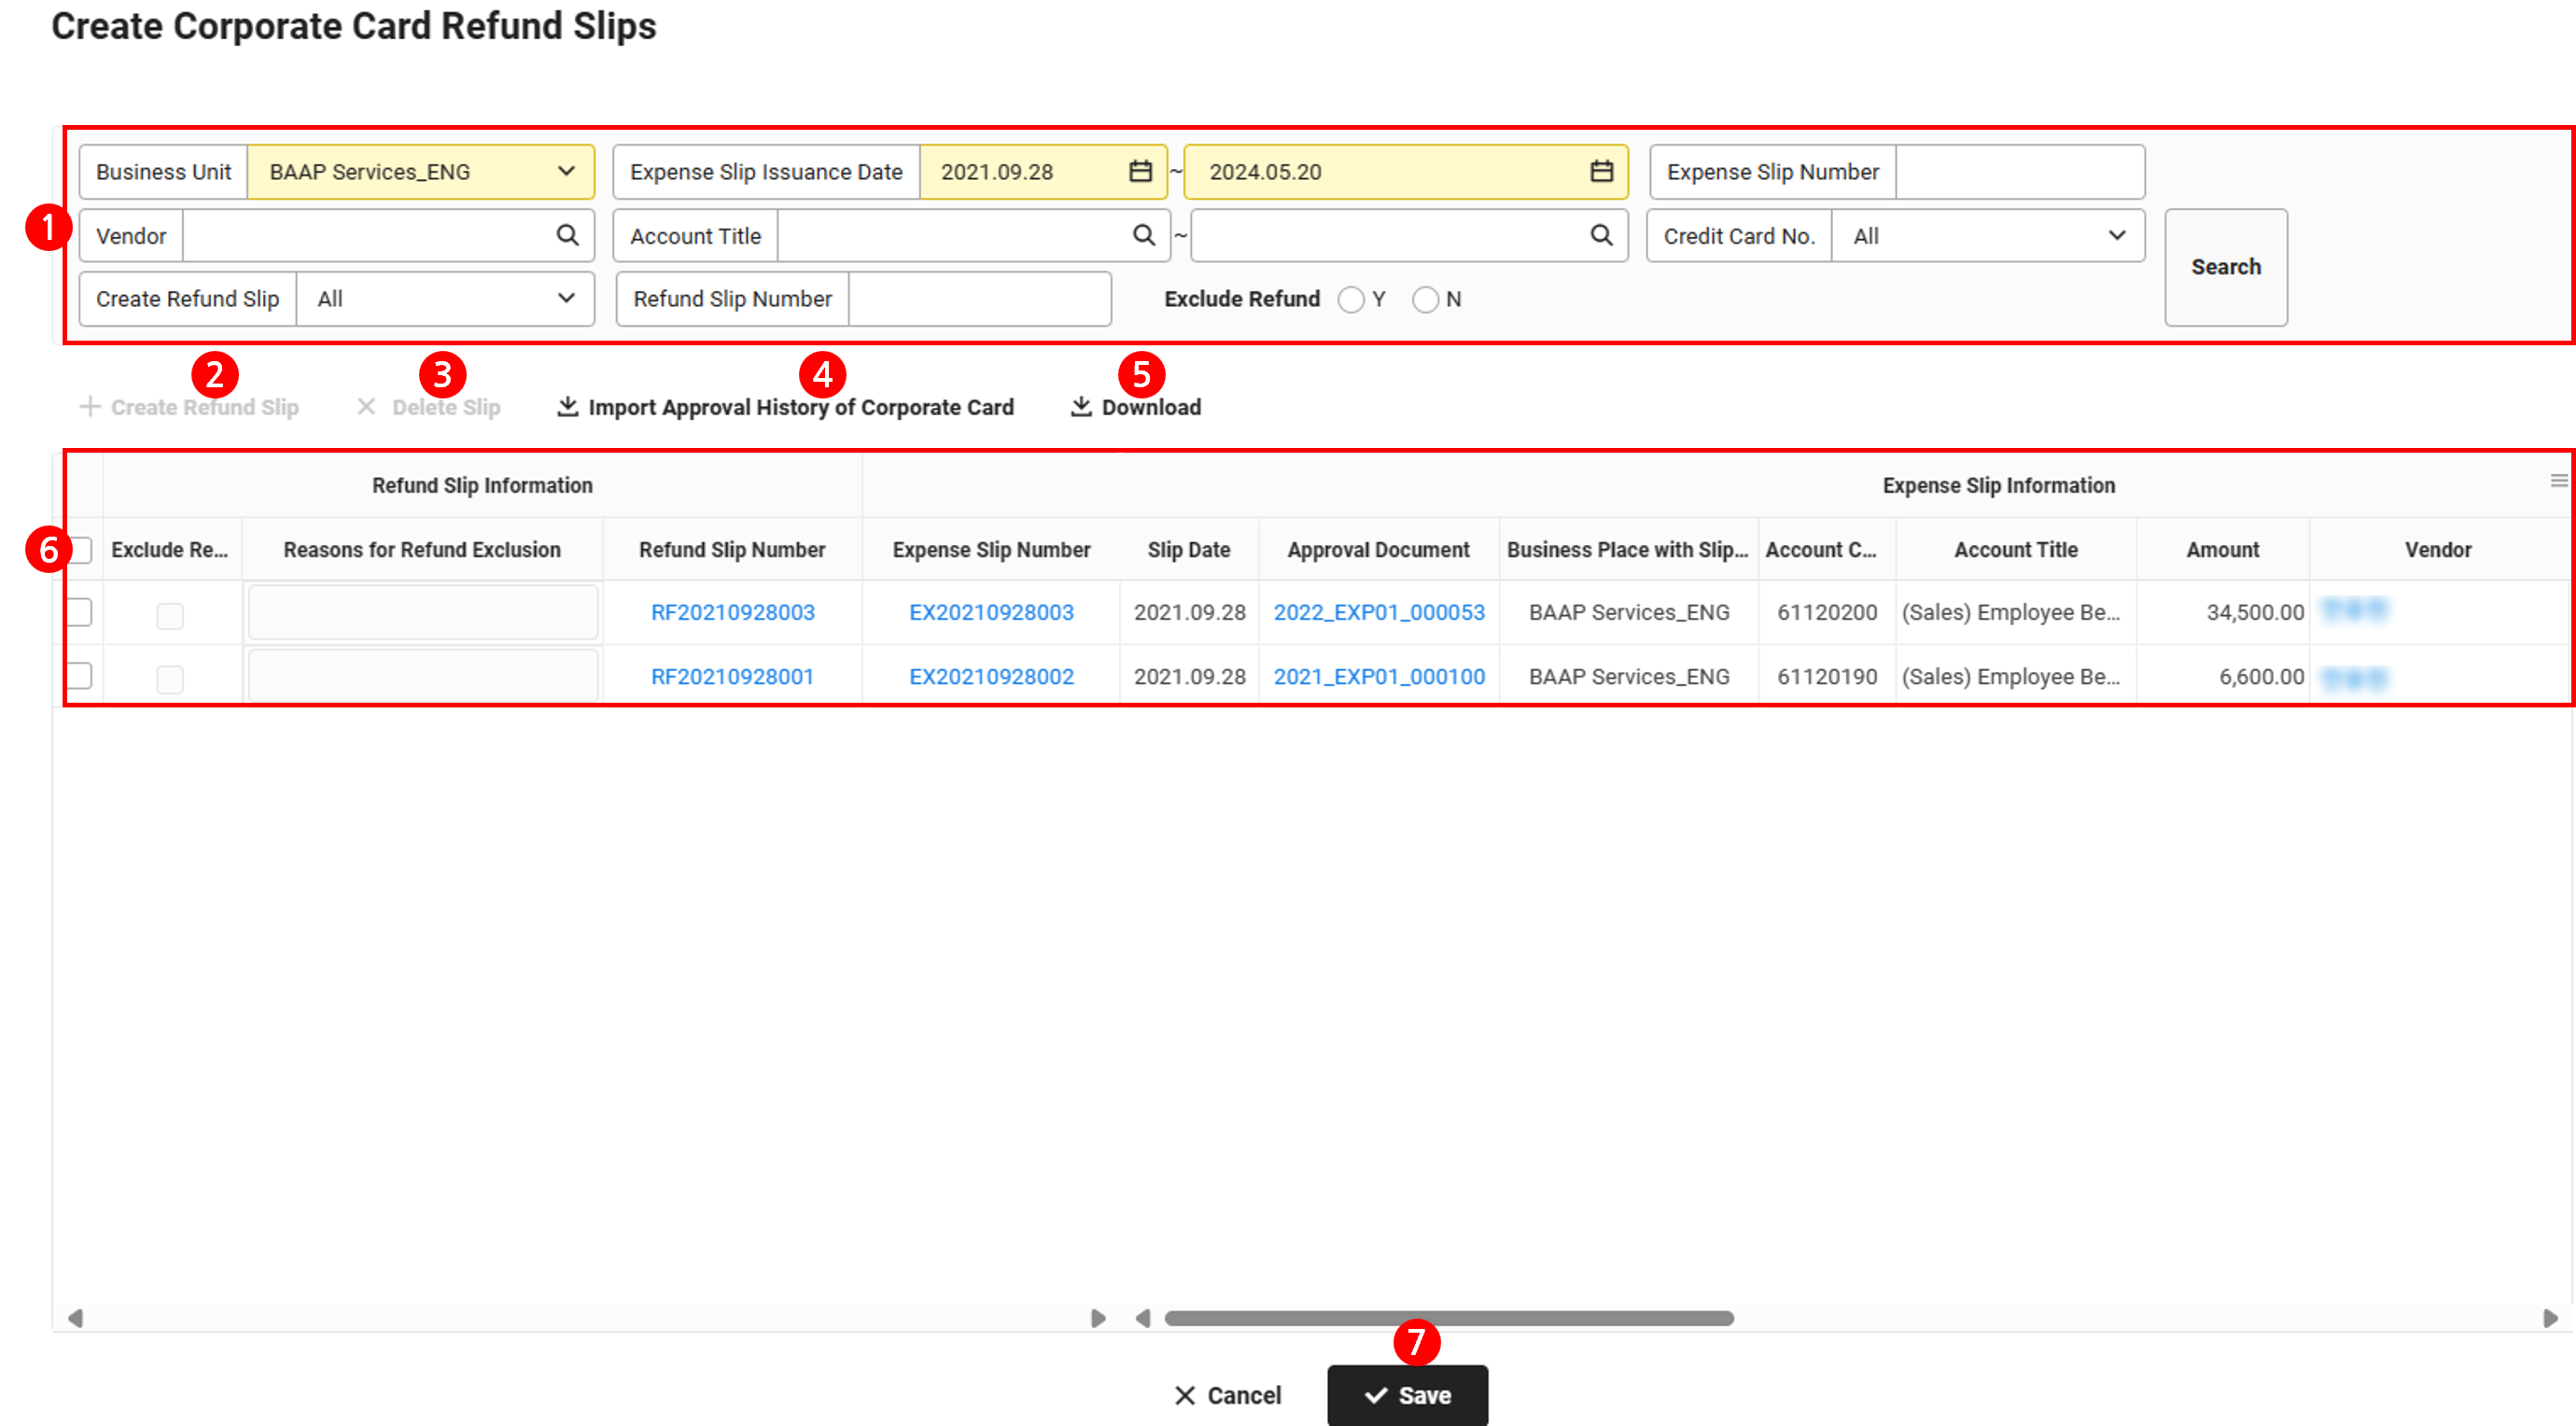
The Create Corporate Card Refund Slip page is laid out as follows.
| Area | Description |
|---|---|
| ① Search window | Search the approval history of corporate credit cards by business place, expense slip issue date and number, vendor, account title, card number, refund slip creation status, refund slip number, and refund exclusion status |
| ② Create refund slip | Click to automatically create a refund slip for the currently selected approval history (See Create Refund Slip)
|
| ③ Delete Slip | Click to delete the refund slip of the selected corporate card usage history (See Delete Refund Slip) |
| ④ Import Corporate Card Approval History | Click to scrape and display the most recent approval history of corporate cards
|
| ⑤ Download | Download the list of corporate card approval history as an Excel file (See Download List of Corporate Card Approval Slips) |
| ⑥ List of corporate card approval history records | It displays the created approval history of corporate cards in a list Click each detail to view more information
|
| ⑦ Save | Save the entered reason for refund exclusion upon clicking it |
- If there is a VAT value of 0 among the scraped approval history of the corporate card, and it is for a general taxpayer:
- When you import the approval history of the corporate card, the affiliate business registration number is automatically searched in the Check Closed Businesses service of Hometax, and the VAT is automatically created by calculating ‘Authorized Card Transaction Amount (Total Amount) - ROUND (Authorized Card Transaction Amount (Total Amount) / 1.1).’
- The transactions authorized abroad are not displayed in ‘Create Corporate Card Refund Slips’.
Create Refund Slip
The following describes how to create corporate card refund slips.
- Click the ‘Admin Menu’ at the top right of the PC web screen, and then click ‘Accounting’ in the pop-up window.
- Click at the top left of the screen.
- Click ‘Manage Tax > Create Corporate Card Refund Slips’ from the menu.
- Select the corporate card approval history (input VAT creation information) to create refund slips from.
- If the corporate card approval history to create refund slips from is not displayed in the list, then click ‘Import Corporate Card Approval History’ and import the corporate card approval history.
- In the notification pop-up window, click 'Yes'.
- Refund slips are created for the selected expense slips (corporate card approval history).
- Refund slips are created in the form of Input VAT XXX/Expense Account XXX, and one refund slip is created per expense slip.
- The credit card approval date is the same as the slip date of the expense slip, slip date of the refund slip, and creation date of the input VAT.
- The vendor of the refund slip is created as common vendor.
Delete Refund Slip
You can delete created refund slips, and create new refund slips after deleting.
- You can't delete the slip if the month of the slip date (year and month) has been closed in the ‘Accounting > Settlement/Financial Statement > Monthly Closing’ menu.
- Deleted refund slips are no longer searched in the Accounting service.
The following describes how to delete refund slips.
- Click the ‘Admin Menu’ at the top right of the PC web screen, and then click ‘Accounting’ in the pop-up window.
- Click at the top left of the screen.
- Click ‘Manage Tax > Create Corporate Card Refund Slips’ from the menu.
- Select the history to delete the slip from, and then click ‘Delete Slip’.
- In the notification pop-up window, click 'Yes'.
- The slip is deleted.
Download Refund Slip Creation Target List
The following describes how to download the list of targets for creating refund slips as an Excel file.
- Click the ‘Admin Menu’ at the top right of the PC web screen, and then click ‘Accounting’ in the pop-up window.
- Click at the top left of the screen.
- Click ‘Manage Tax > Create Corporate Card Refund Slips’ from the menu.
- If necessary, enter the slip conditions to be searched in the search window, and then click ‘Search’.
- You can view the slip list that matches the entered conditions.
- Click 'Download'.
- The list of refund slip creation targets is downloaded as an Excel file.
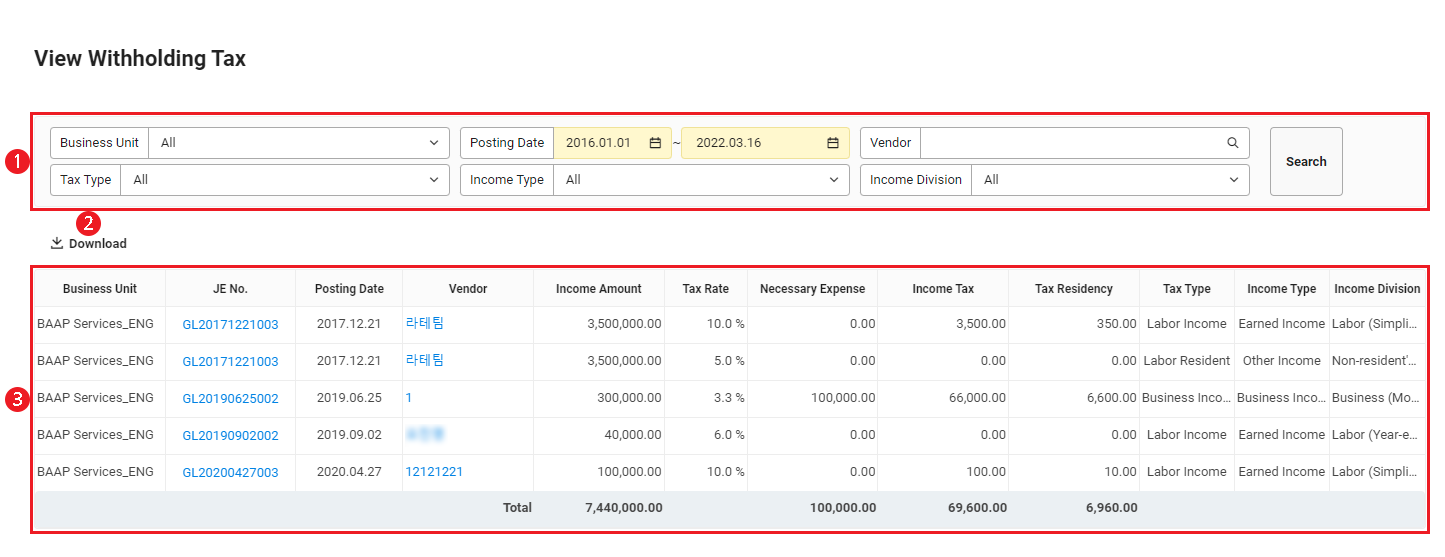
View Withholding Tax
You can check the withholding tax information entered when registering slips in a list, as well as search and view them by conditions when necessary.
The View Withholding Tax page is laid out as follows.
| Area | Description |
|---|---|
| ① Search window | Search withholding tax information by business place, slip date, vendor, taxation type, income type, and income division |
| ② Download | Download the list of withholding tax information as an Excel file |
| ③ List of withholding tax information | It displays the registered withholding tax information in a list |
Download Withholding Tax Information List
The following describes how to download the list of withholding tax information as an Excel file.
- Click the ‘Admin Menu’ at the top right of the PC web screen, and then click ‘Accounting’ in the pop-up window.
- Click at the top left of the screen.
- Click ‘Manage Tax > View Withholding Tax’ from the menu.
- If necessary, enter the withholding tax conditions to be searched in the search window, and then click ‘Search’.
- You can view the withholding tax information that matches the entered conditions.
- Click 'Download'.
- The list of withholding tax information is downloaded as an Excel file.