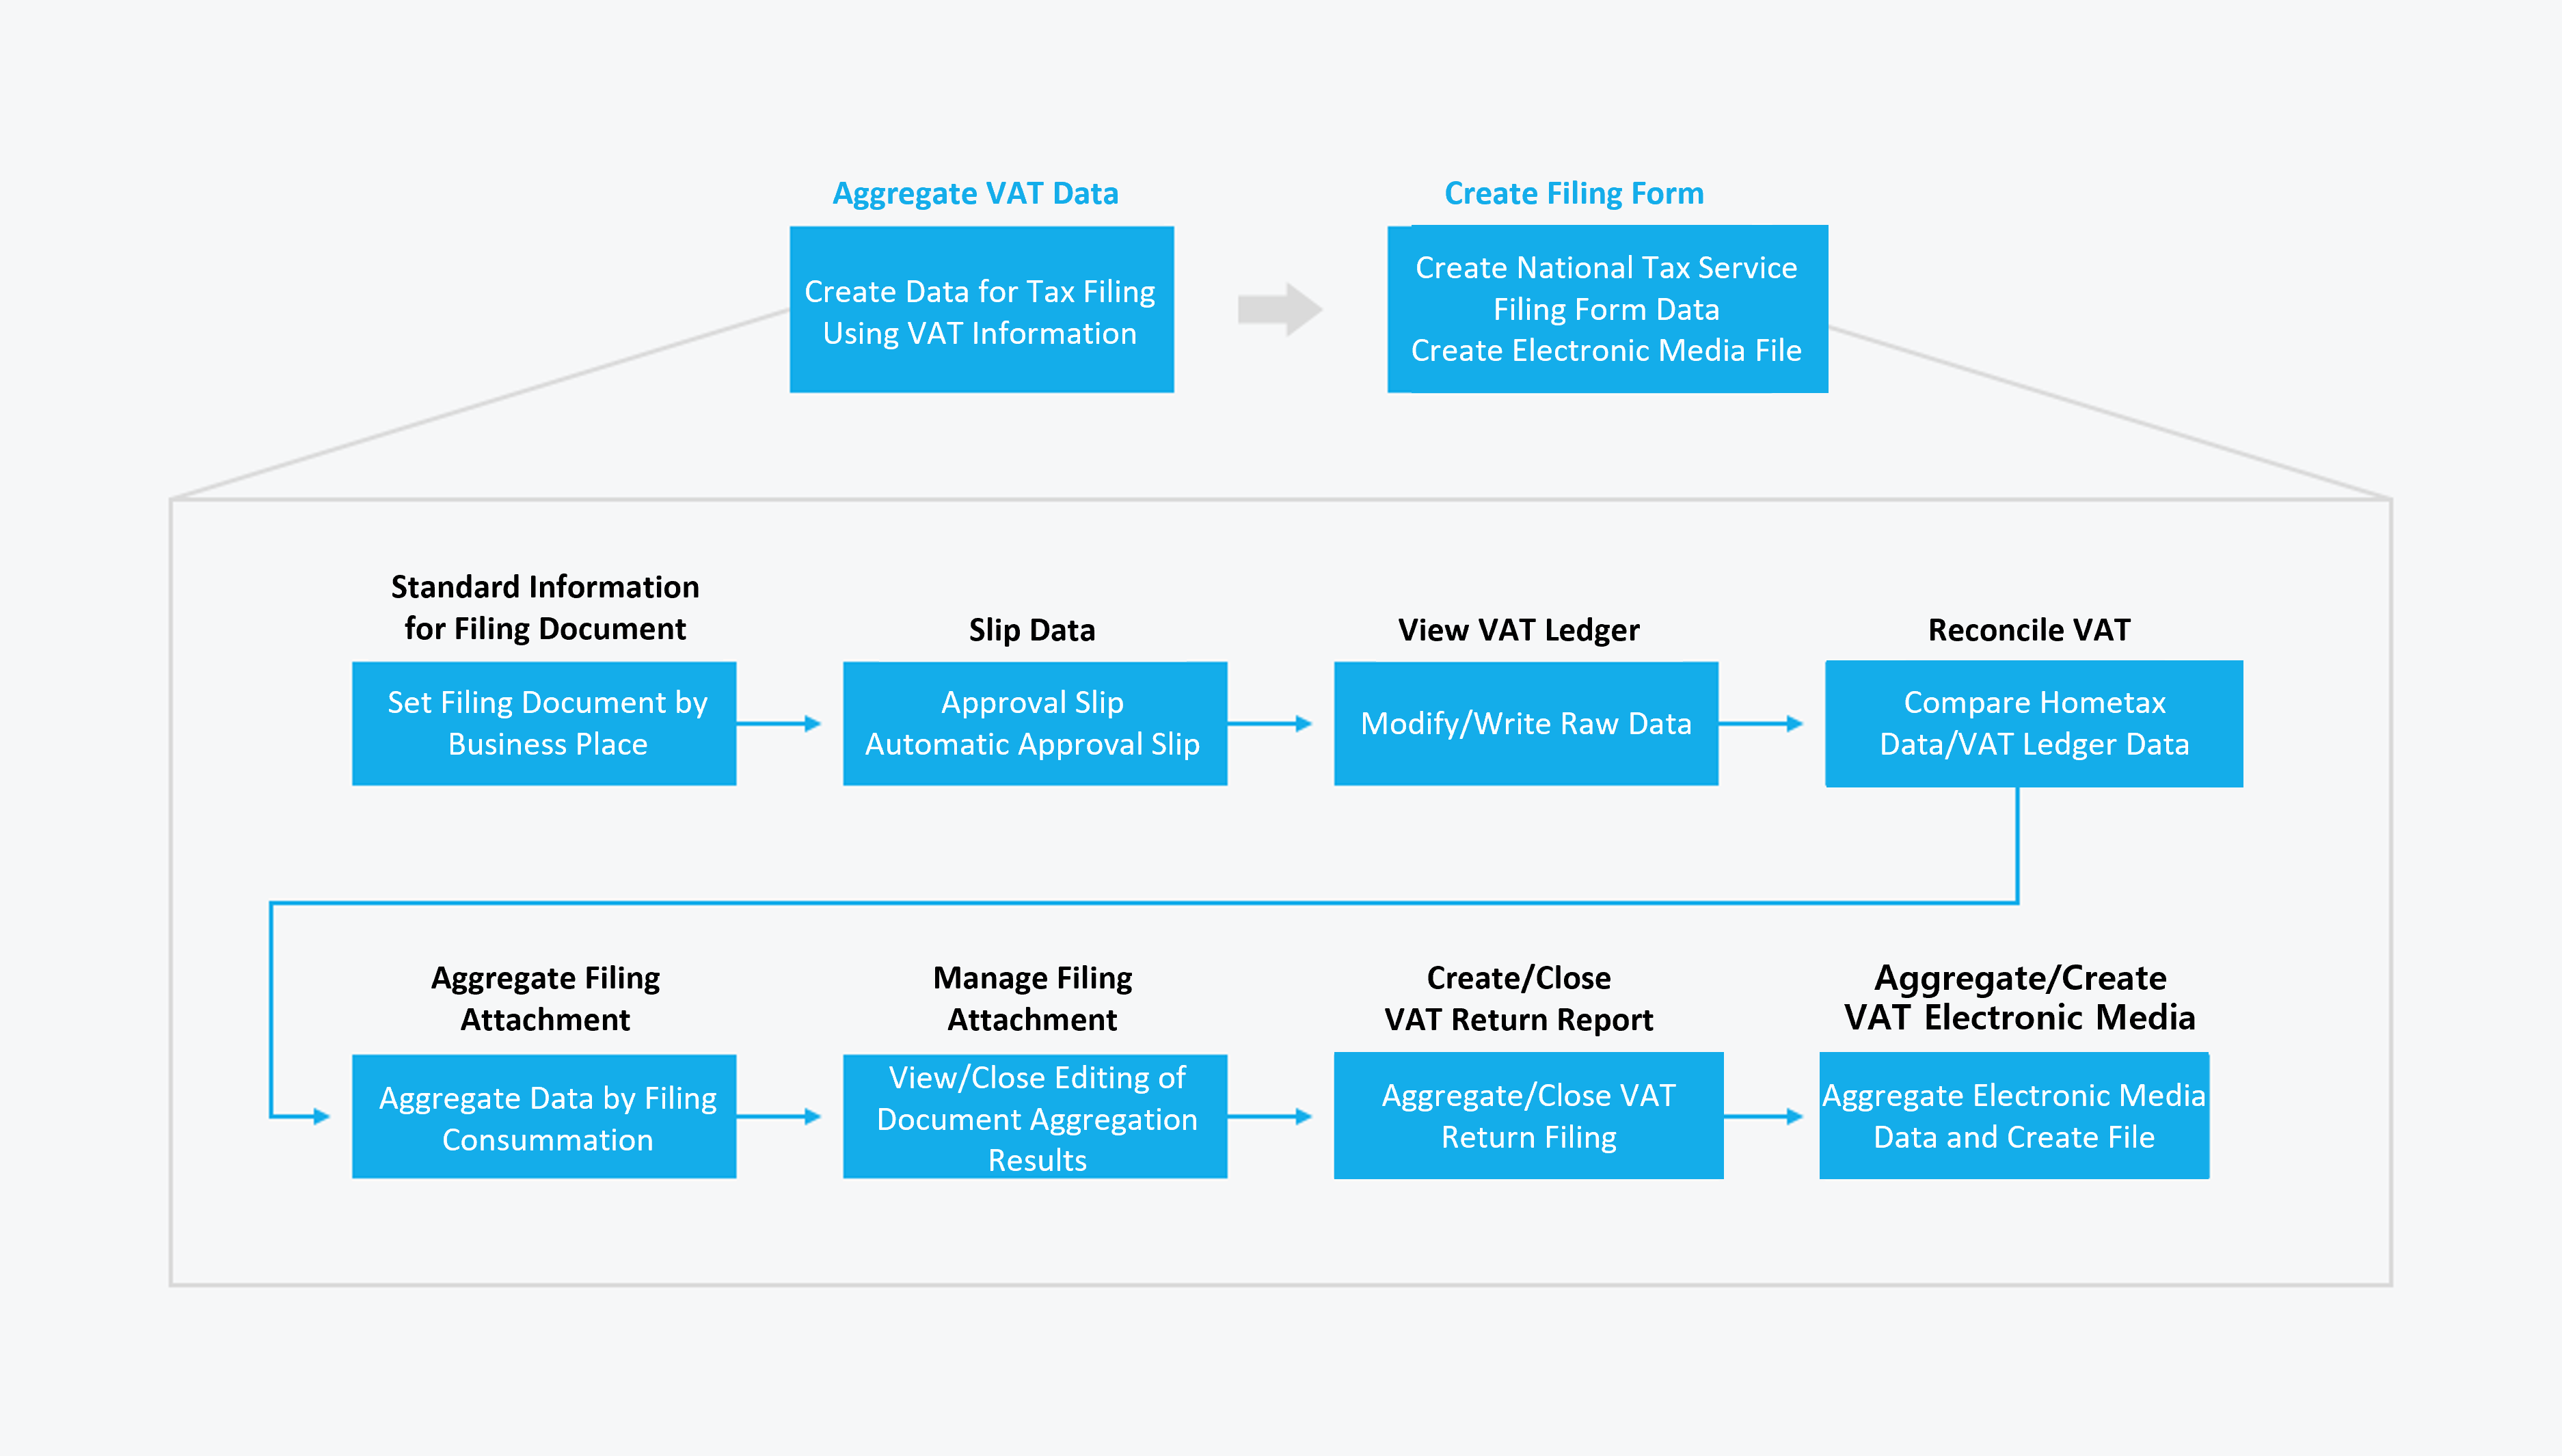
In Report VAT, you can compose VAT returns and attached documents by business place based on the input VAT and output VAT information entered when creating slips, as well as create electronic media for reporting purposes to proceed with reporting VAT.
The general procedure for reporting VAT is as follows.
This guide describes how to proceed with reporting VAT by the order in which the sub menus of Report VAT are displayed on the PC web screen.
Preparations Before Reporting VAT
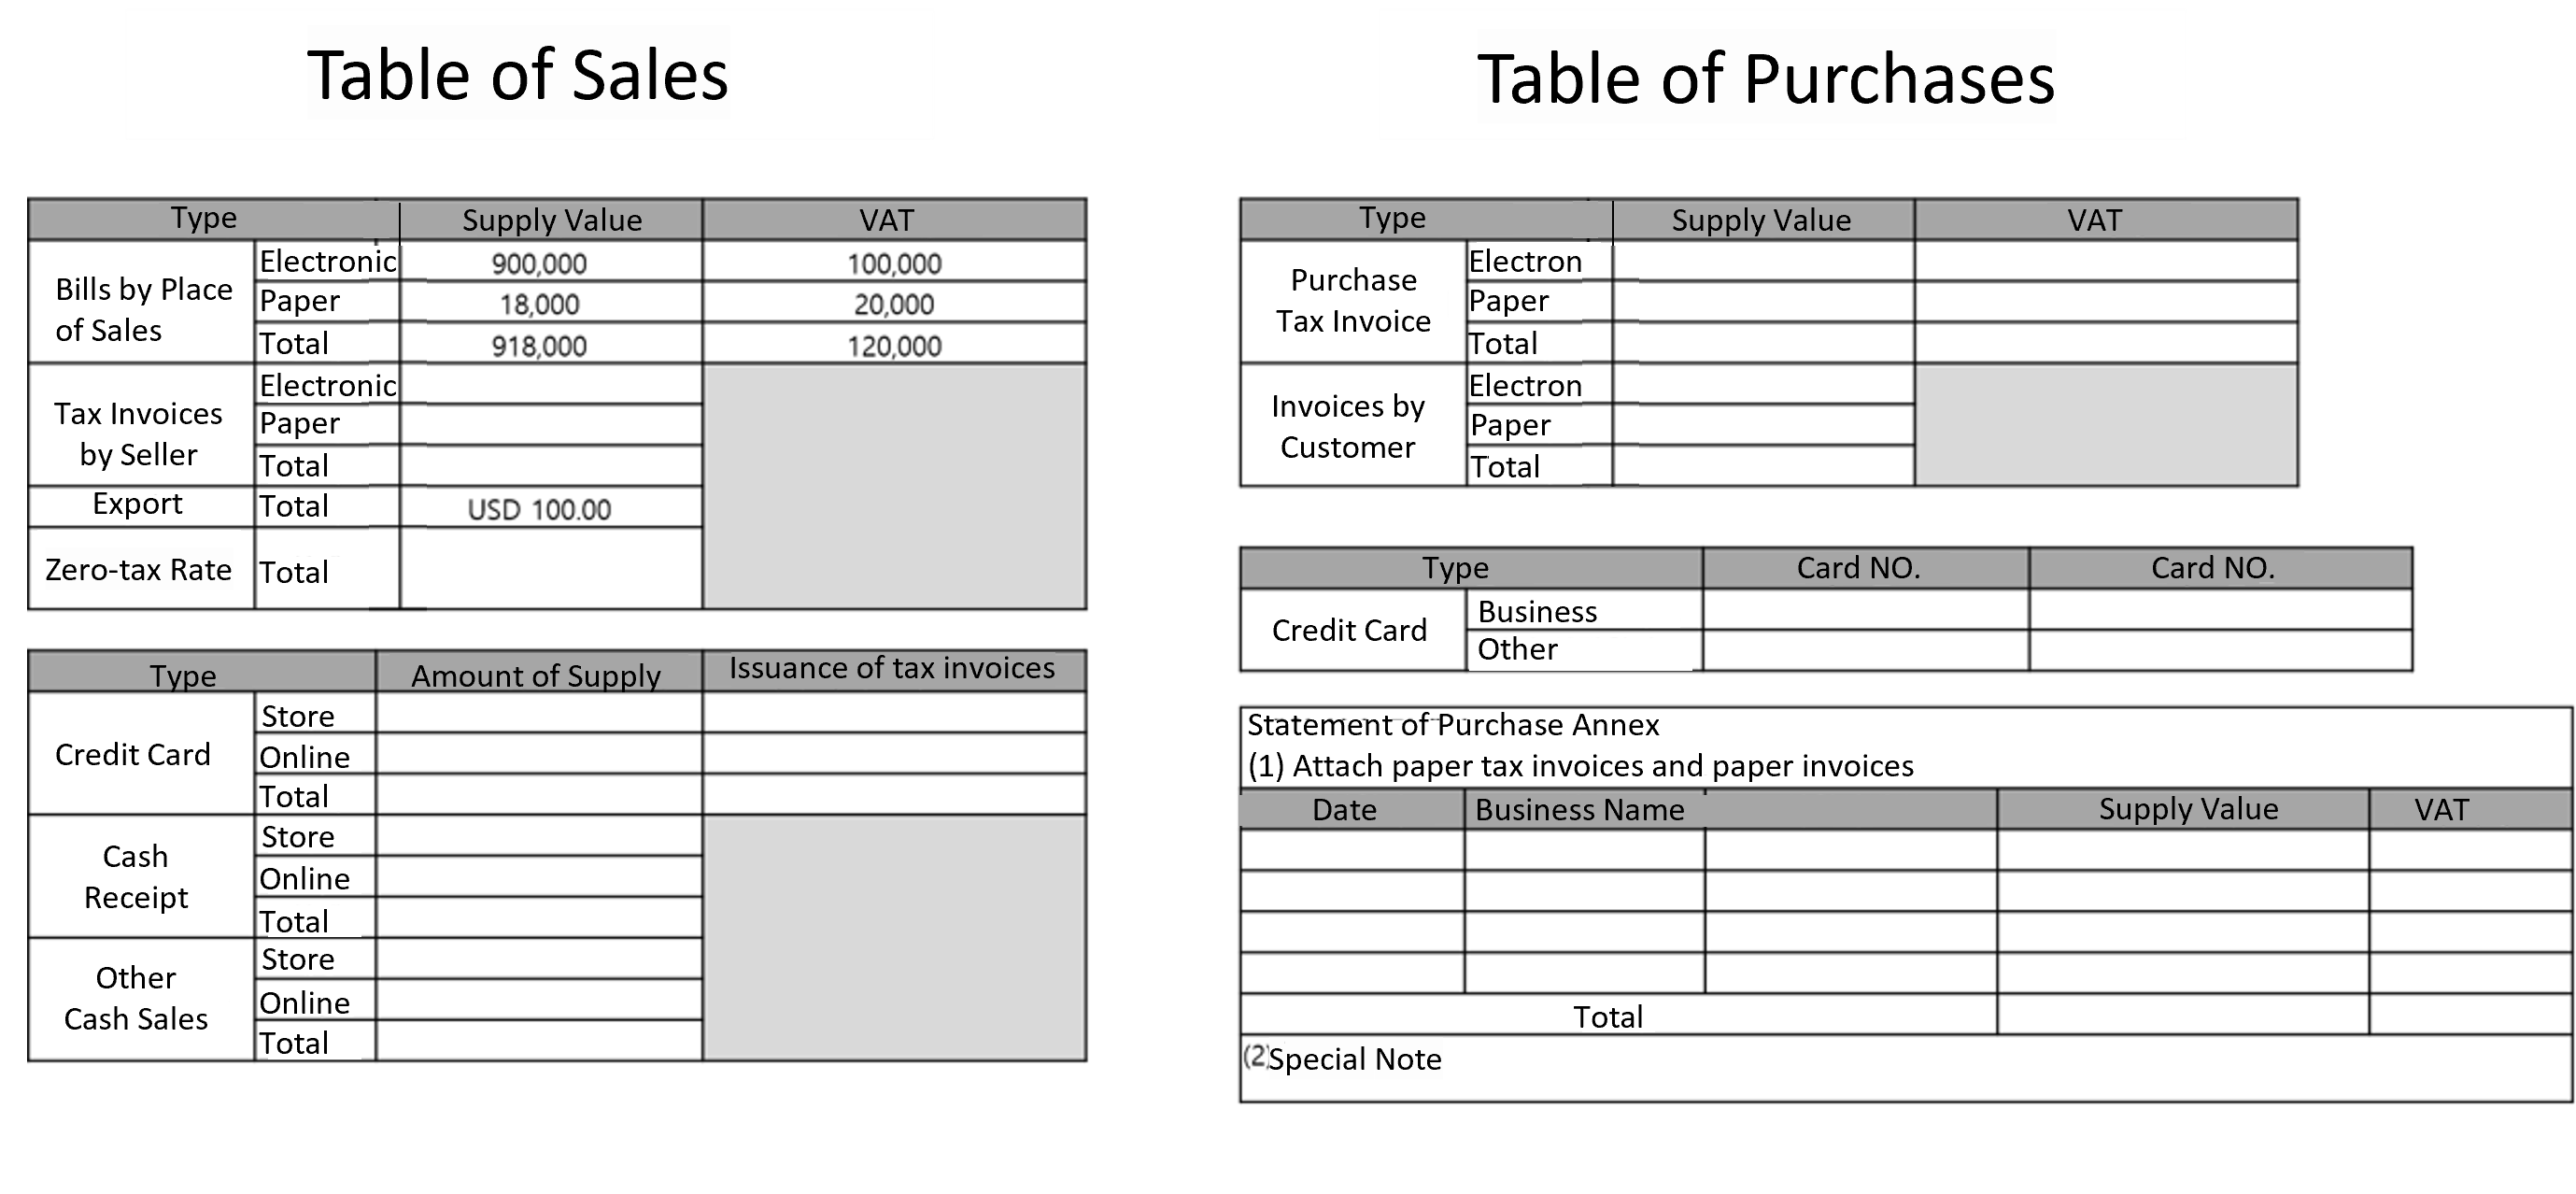
Before reporting VAT, you must check to confirm that the VAT ledger data registered on NAVER WORKS Accounting service and the VAT data registered on National Tax Service Hometax (electronic tax invoice, cash receipts, and business credit card history) match.
You can easily verify that the ledger of NAVER WORKS Accounting service and the data of Hometax match by accessing the National Tax Service Hometax website, checking the electronic tax invoice, cash receipts, and business credit card history, and then organizing them in a sum table of purchase/sales as shown below. Furthermore, you may use the sum table of purchase/sales as validating data when reporting VAT.
Register Reporting Documents by Business Place
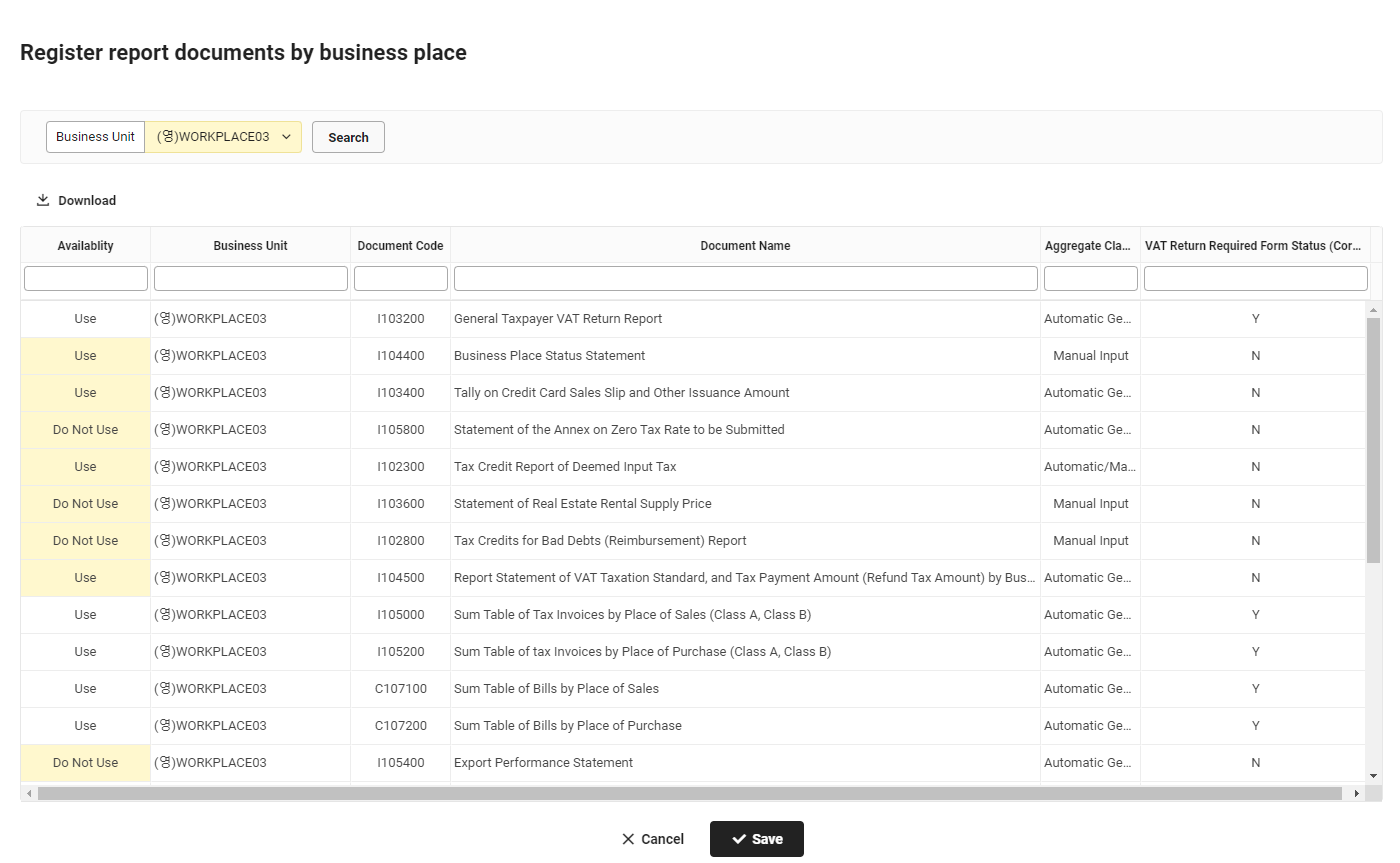
You can register reporting documents by business place and download the list of reporting documents by business place as an Excel file.

Register standard information and documents to be reported by business place subject to VAT report.
The following shows how to register reporting documents by business place.
- Refer to Manage Business Place and register tax offices subject to VAT return submission and taxpayer type for VAT report (businesses subject to business unit taxation, comprehensive tax payment business, and general business operator) by business place.
- Click the ‘Admin Menu’ at the top right of the PC web screen, and then click ‘Accounting’ in the pop-up window.
- Click
 at the top left of the screen.
 - Click ‘Report VAT > Register Reporting Documents by Business Place’ from the menu.
- Select the business place for registering reporting documents, and then click ‘Search’.
- In the list of VAT report documents displayed, set the status of the document for registration as ‘Used’.
- You can filter the documents displayed by entering keywords in the input fields on the second row of the list.
- Click ‘Save’, then click ‘OK’ in the notification pop-up window.
- The reporting documents are registered.
Download List of Reporting Documents by Business Place
The following shows how to download the list of reporting documents by business place as an Excel file.
- Click the ‘Admin Menu’ at the top right of the PC web screen, and then click ‘Accounting’ in the pop-up window.
- Click at the top left of the screen.
- Click ‘Report VAT > Register Reporting Documents by Business Place’ from the menu.
- Select the business place for downloading the list of reporting documents, and then click ‘Search’.
- You can view the list of reporting documents that applies to the entered conditions.
- Click 'Download'.
- The list of reporting documents by business place is downloaded as an Excel file.
Register reporting documents by business place_YYYYMMDD_XXXXXX.xlsx in the Download folder.View/Edit VAT Ledger

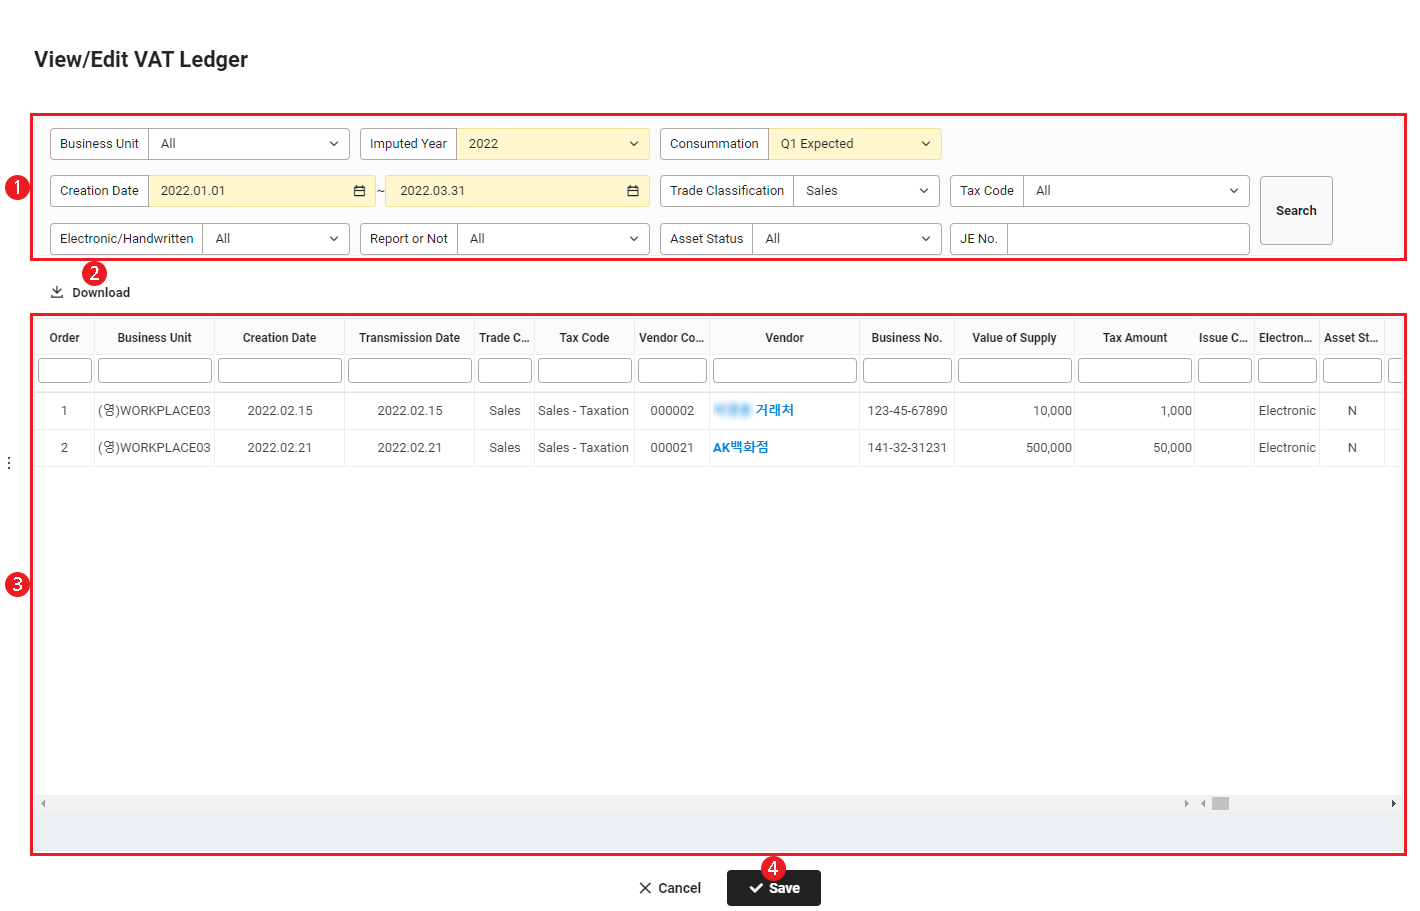
You can check the VAT data of approved slips and edit items requiring modification to proceed with reporting VAT.
The View/Edit VAT Ledger screen is laid out as follows.
| Area | Description |
|---|---|
| ① Search Window | Searches VAT data by conditions of business place, imputed year, quarters, creation date, transaction type, tax code, electronic/handwritten, report status, asset status, and slip number. |
| ② Download | Downloads the list of VAT data as an Excel file (Refer to Download List of VAT Data). |
| ③ List of VAT Data |
|
| ④ Save | Click to save the edited content. |
Edit VAT Data
The following shows how to edit VAT data.
- Click the ‘Admin Menu’ at the top right of the PC web screen, and then click ‘Accounting’ in the pop-up window.
- Click at the top left of the screen.
- Click ‘Report VAT > View/Edit VAT Ledger’ from the menu.
- From the displayed list, edit the items highlighted in yellow.
- You can edit the Asset Classification item if the Asset Status is ‘Y’.
- You can edit the Reason for No Deduction item if the Tax Code is ‘Purchase - Nondeductible’.
- You can edit the following for tax codes related to zero tax sales (Sales - Zero Tax, Sales - Export, Sales - Card Zero Tax, and Sales - Cash Zero Tax): Zero Tax Rate Type, Export Report Number, Shipping Date, Foreign Currency Code, Exchange Rate, and Foreign Currency Supply Amount.
- Click ‘Save’.
- The edited content is reflected.
Download List of VAT Data
The following shows how to download the list of VAT data as an Excel file.
- Click the ‘Admin Menu’ at the top right of the PC web screen, and then click ‘Accounting’ in the pop-up window.
- Click at the top left of the screen.
- Click ‘Report VAT > View/Edit VAT Ledger’ from the menu.
- If necessary, enter the VAT data conditions to be searched in the search window, and then click ‘Search’.
- You can view the VAT data that apply to the entered conditions.
- Click 'Download'.
- The list of VAT data is downloaded as an Excel file.
View/Edit VAT ledger_YYYYMMDD_XXXXXX.xlsx in the Download folder.Reconcile VAT
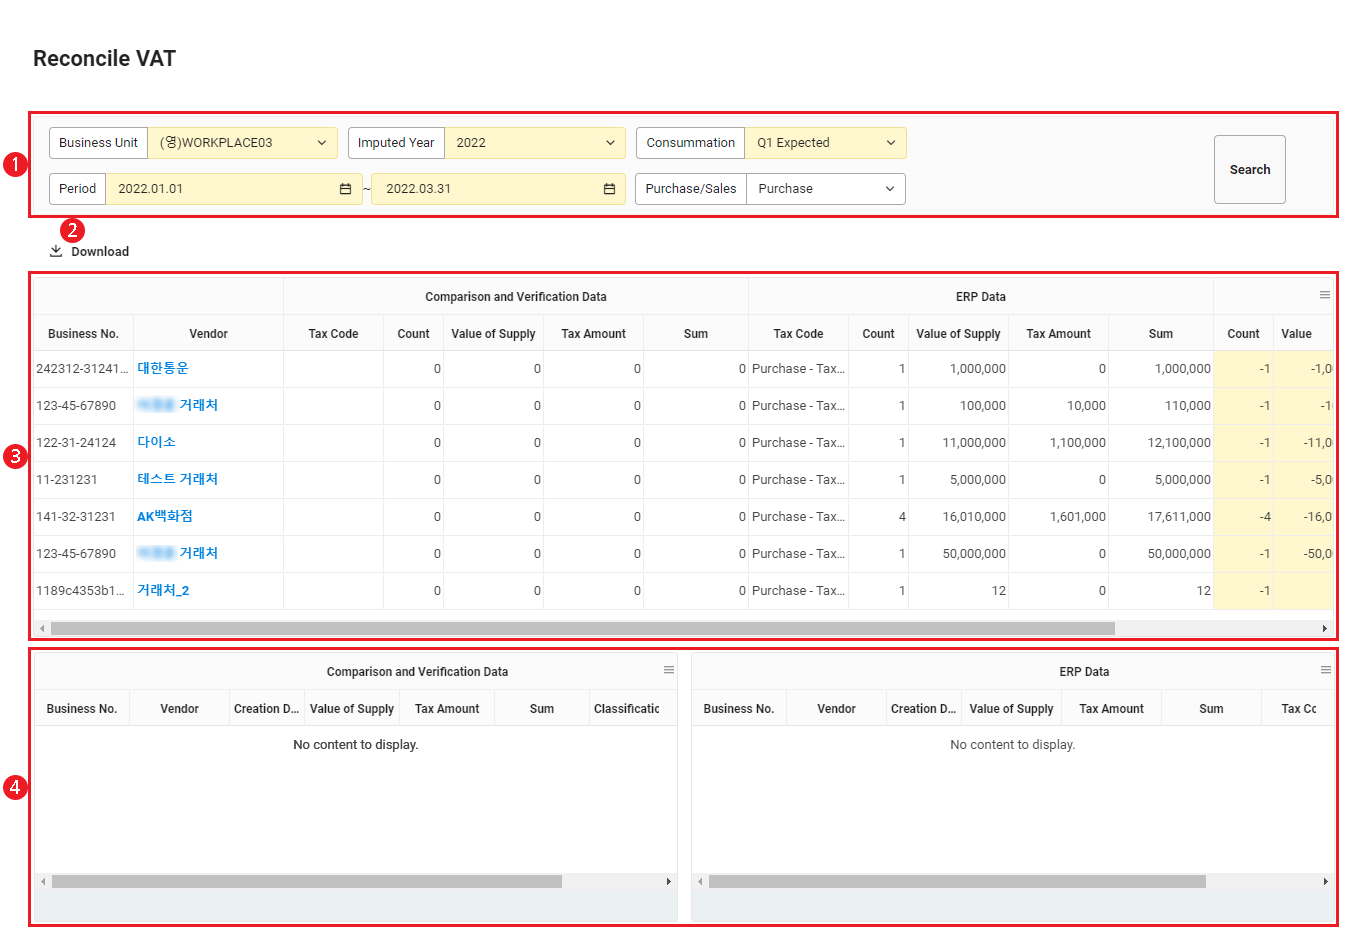
You can compare the Hometax data with the data registered in the VAT ledger to proceed with VAT reconciliation.
The Reconcile VAT screen is laid out as follows.
| Area | Description |
|---|---|
| ① Search Window | Searches VAT reconciliation data by conditions of business place, imputed year, quarters, period, and purchase/sales status. |
| ② Download | Downloads the VAT reconciliation data as an Excel file |
| ③ List of VAT Reconciliation Data | Displays VAT data in a list. Click the data to view each of the Hometax data and NAVER WORKS Accounting slips in Area ④. Click Vendor to view vendor information. |
| ④ Reconcile VAT | Displays each of the Hometax data and NAVER WORKS Accounting slips for the data clicked in Area ③ for VAT reconciliation. |
Download VAT Reconciliation Data
The following shows how to download the list of VAT data as an Excel file.
- Click the ‘Admin Menu’ at the top right of the PC web screen, and then click ‘Accounting’ in the pop-up window.
- Click at the top left of the screen.
- Click ‘Report VAT > Reconcile VAT’ from the menu.
- If necessary, enter the VAT reconciliation data conditions to be searched in the search window, and then click 'Search'.
- You can view the VAT reconciliation data that apply to the entered conditions.
- Click 'Download'.
- The VAT reconciliation data are downloaded as an Excel file.
Reconcile VAT_YYYYMMDD_XXXXXX.xlsx in the Download folder.Aggregate Documents Attached to Report

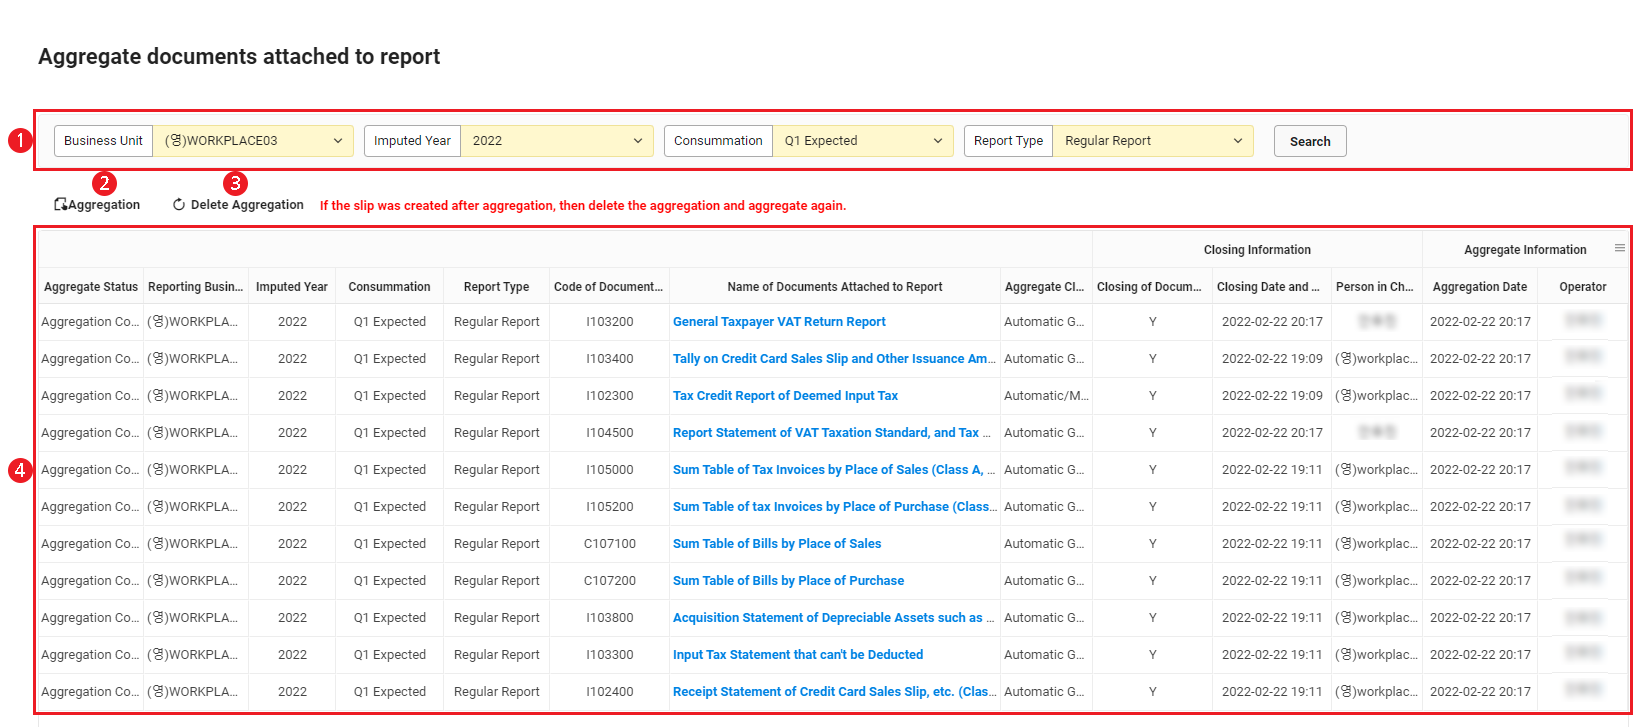
You can aggregate the data of documents attached to a report based on the VAT ledger data. If necessary, you can delete the current aggregation and aggregate the data again.
- If the business place requires cash sales statements, they are always created automatically. The requirement for cash sales statements is automatically determined based on the business type code or sub-biz code.
- The following are created automatically when you file a amendment report: determined (reassessed) claim for tax base and tax amount, tax base amendment report, and additional voluntary tax payment statement.
The Aggregate Documents Attached to Report screen is laid out as follows.
| Area | Description |
|---|---|
| ① Search Window | Searches documents subject to aggregation by conditions of business place, imputed year, quarters, and report type. |
| ② Aggregate |
|
| ③ Delete Aggregation | When a new aggregation is necessary, deletes the current aggregation history upon clicking it (Refer to Delete Aggregation). |
| ④ List of Aggregation Documents | Displays documents subject to aggregation in a list.
|
Aggregate Data
The following shows how to aggregate the data of documents attached to a report.
- Click the ‘Admin Menu’ at the top right of the PC web screen, and then click ‘Accounting’ in the pop-up window.
- Click at the top left of the screen.
- Click ‘Report VAT > Aggregate Documents Attached to Report’ from the menu.
- Click ‘Aggregate’.
- Enter the information of documents to be aggregated.
- On the Aggregate Documents Attached to Report screen, click ‘Aggregate’.
- Data of the documents attached to the report are aggregated, and the aggregate status changes to ‘Aggregation Complete’.
Delete Aggregation
The following shows how to delete aggregated data.
- Click the ‘Admin Menu’ at the top right of the PC web screen, and then click ‘Accounting’ in the pop-up window.
- Click at the top left of the screen.
- Click ‘Report VAT > Aggregate Documents Attached to Report’ from the menu.
- Click ‘Delete Aggregation’.
- Enter the information of documents to be deleted.
- Click ‘Delete Aggregation’.
- Aggregated data are deleted, and the aggregate status changes to ‘Not Aggregated’.
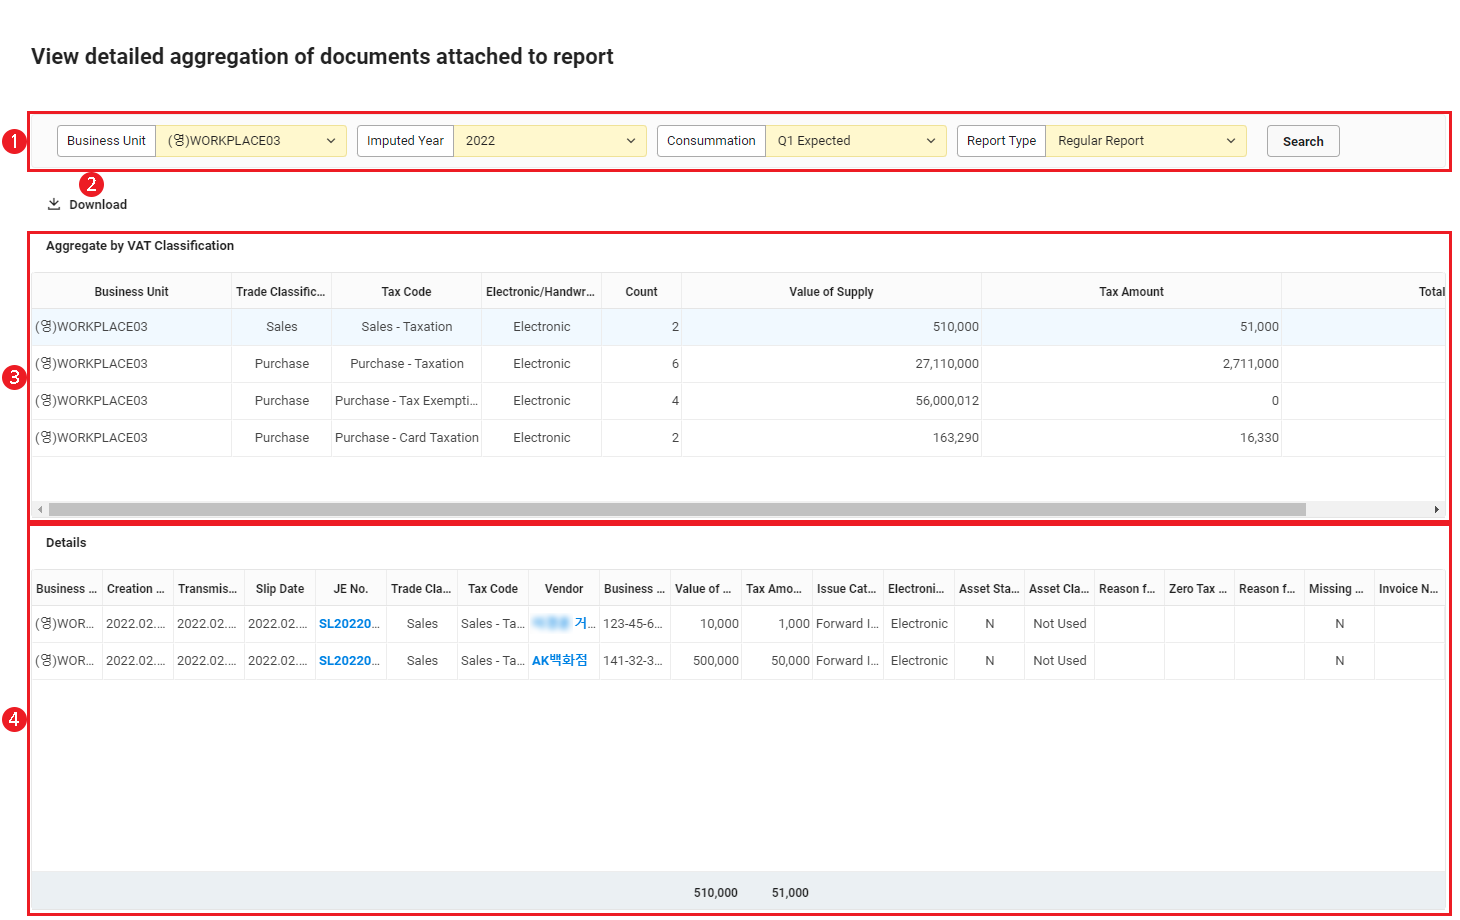
View Detailed Aggregation of Documents Attached to Report
You can aggregate the aggregation data of documents attached to a report in groups of business place, transaction type, tax code, and electronic/handwritten, as well as view the details of each aggregation group.
The View Detailed Aggregation of Documents Attached to Report screen is laid out as follows.
| Area | Description |
|---|---|
| ① Search Window | Searches aggregate information by business place, imputed year, quarters, and report type. |
| ② Download | Downloads the aggregate information by VAT classification as an Excel file upon clicking it |
| ③ Aggregate by VAT Classification | Displays aggregate information by VAT classification.
|
| ④ Details | Displays the details integrating data with identical classifications of business place, transaction type, tax code, and electronic/handwritten. Click each detail to view information.
|
Download Aggregation History of Documents Attached to Report
The following shows how to download the aggregation history of documents attached to a report as an Excel file.
- Click the ‘Admin Menu’ at the top right of the PC web screen, and then click ‘Accounting’ in the pop-up window.
- Click at the top left of the screen.
- Click ‘Report VAT > View Detailed Aggregation of Documents Attached to Report’ from the menu.
- If necessary, enter the conditions for aggregated documents attached to a report to be searched in the search window, and then click ‘Search’.
- You can view the documents attached to a report that apply to the entered conditions.
- Click 'Download'.
- The aggregation history of the documents attached to the report is downloaded as an Excel file.
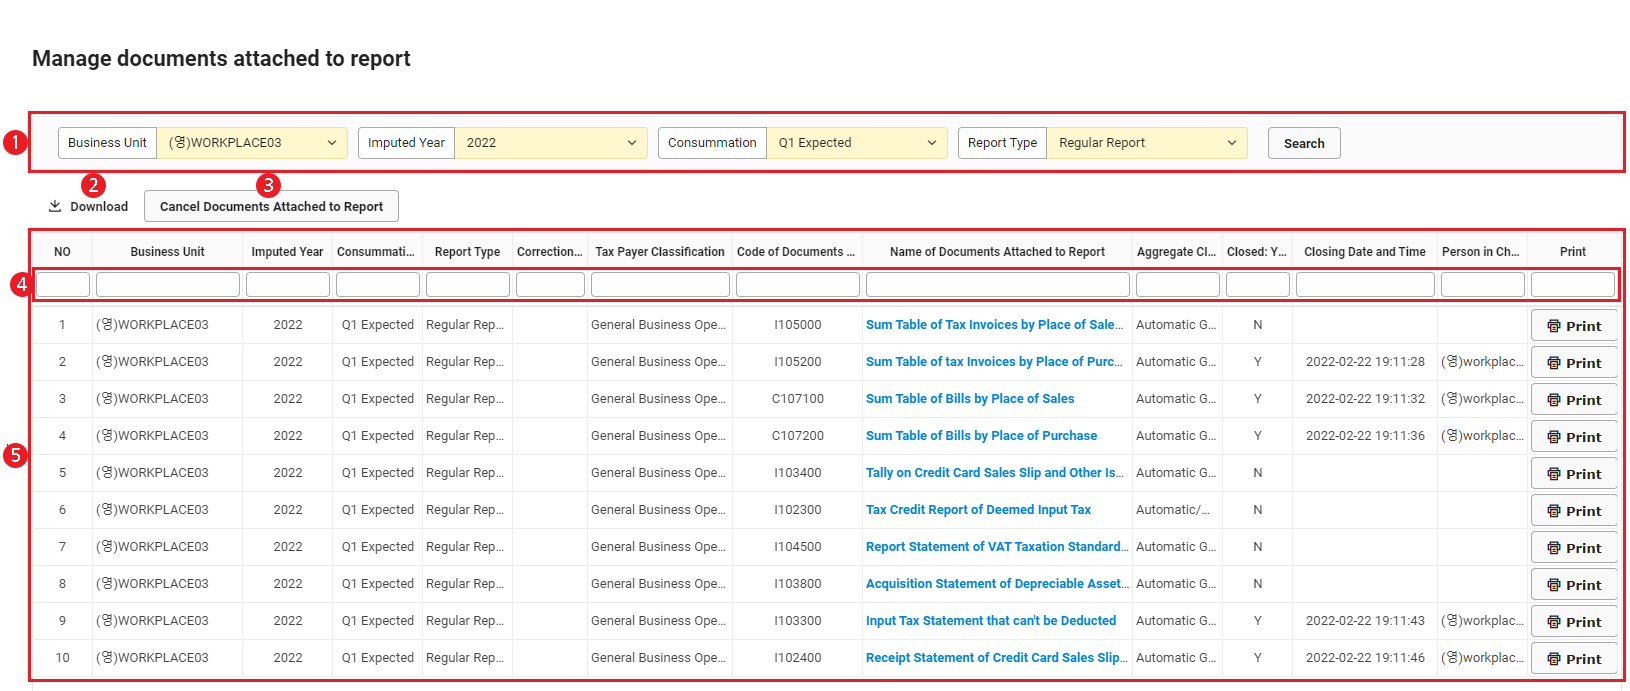
View detailed aggregation of documents attached to report_YYYYMMDD_XXXXXX.xlsx in the Download folder.Manage Documents Attached to Report

You can view the information and progress of aggregated documents attached to a report, as well as go to the page of each document attached to the report to enter and close details.
The Manage Documents Attached to Report screen is laid out as follows.
| Area | Description |
|---|---|
| ① Search Window | Searches documents attached to a report by conditions of business place, imputed year, quarters, and report type. |
| ② Download | Downloads the list of documents attached to a report as an Excel file upon clicking it. |
| ③ Cancel Documents Attached to Report | Cancels the closing of all documents attached to a report upon clicking it. |
| ④ Filter | Filters the contents displayed in the list by entering keywords in the input fields. |
| ⑤ List of Documents Attached to Report |
|
Closing of Documents Attached to Report

The types of attached documents that can be filed in are as follows. Regarding documents without individual links for explaining the page, refer to Sum Table of Tax Invoices by Place of Sales (Class A, Class B).
| Document Name | Description |
|---|---|
| Sum Table of Tax Invoices by Place of Sales (Class A, Class B) | View and close the sum table of tax invoices by place of sales. |
| Sum Table of Tax Invoices by Place of Purchase (Class A, Class B) | View and close the sum table of tax invoices by place of purchase. |
| Sum Table of Invoices by Place of Sales | View and close the sum table of invoices by place of sales. |
| Sum Table of Invoices by Place of Purchases | View and close the sum table of invoices by place of purchase. |
| Tally on Credit Card Sales Slip and Other Issuance Amount | View credit card sales slip and other issuance amount, as well as set tax codes and electronic payment methods. |
| Statement of the Annex on Zero Tax Rate to be Submitted | Compose the document information for the statement of the annex on zero tax rate to be submitted, amount submitted for the current term, reported amount for the current term, and reason for submission. |
| Tax Credit Report of Deemed Input Tax | Enter and close purchase details and report amount in the tax credit report of deemed input tax. |
| Statement of Real Estate Rental Supply Price | Enter details about real estate rental services to create a statement of real estate rental supply price. |
| Tax Credits for Bad Debts (Reimbursement) Report | Compose a report requesting tax credits for bad debts. |
| Statement of Actual Exports | Compose a statement of actual exports. |
| Acquisition Statement of Depreciable Assets such as Buildings | Compose an acquisition statement of depreciable assets such as buildings, as well as view and close acquisition details. |
| Non-deductible Input Tax Statement | Compose a statement on calculation details, settlement history, and recalculation of depreciable assets for non-deductible input tax amount. |
| Receipt Statement of Credit Card Sales Slip, etc. (Class A, Class B) | View and close receipt statement of credit card sales slips, details of card receipts, and details of cash receipts. |
| Report Statement of VAT Taxation Standard, and Tax Payment Amount (Refund Tax Amount) by Business Place with Business Unit Taxation | View and close VAT, tax payment amount, and refund tax amount by business place. |
| Cash Sales Statement | Compose a cash sales statement. |
| Electronically Issued Statement on Local Letter of Credit and Purchase Confirmation | Compose an electronically issued statement on local letter of credit and purchase confirmation. |
| Zero Tax Rate Sales Statement | Compose a zero tax rate sales statement. |
| Sales and Refund Performance Statement of Foreign Tourist Duty-free Goods | Compose a sales and refund performance statement of foreign tourist duty-free goods. |
| Foreign Currency Acquisition Statement | Compose a foreign currency acquisition statement. |
| General Taxpayer VAT Return Report | Compose a general taxpayer VAT return report. |
| Determined (Reassessed) Claim of Tax Base and Tax Amount | Compose a determined (reassessed) claim of tax base and tax amount. |
| Tax Base Amendment Report and Additional Voluntary Tax Payment Statement | Compose a tax base amendment report and additional voluntary tax payment statement. |
The following shows how to close the documents attached to a report.
- Click the ‘Admin Menu’ at the top right of the PC web screen, and then click ‘Accounting’ in the pop-up window.
- Click at the top left of the screen.
- Click ‘Report VAT > Manage Documents Attached to Report’ from the menu.
- Click the name of the attached document to be closed.
- You will be redirected to the page of the applicable attached document.
- Click ‘Process Closing’.
- The report statement of VAT taxation standard, and tax payment amount (refund tax amount) by business place is closed automatically when closing the VAT return.
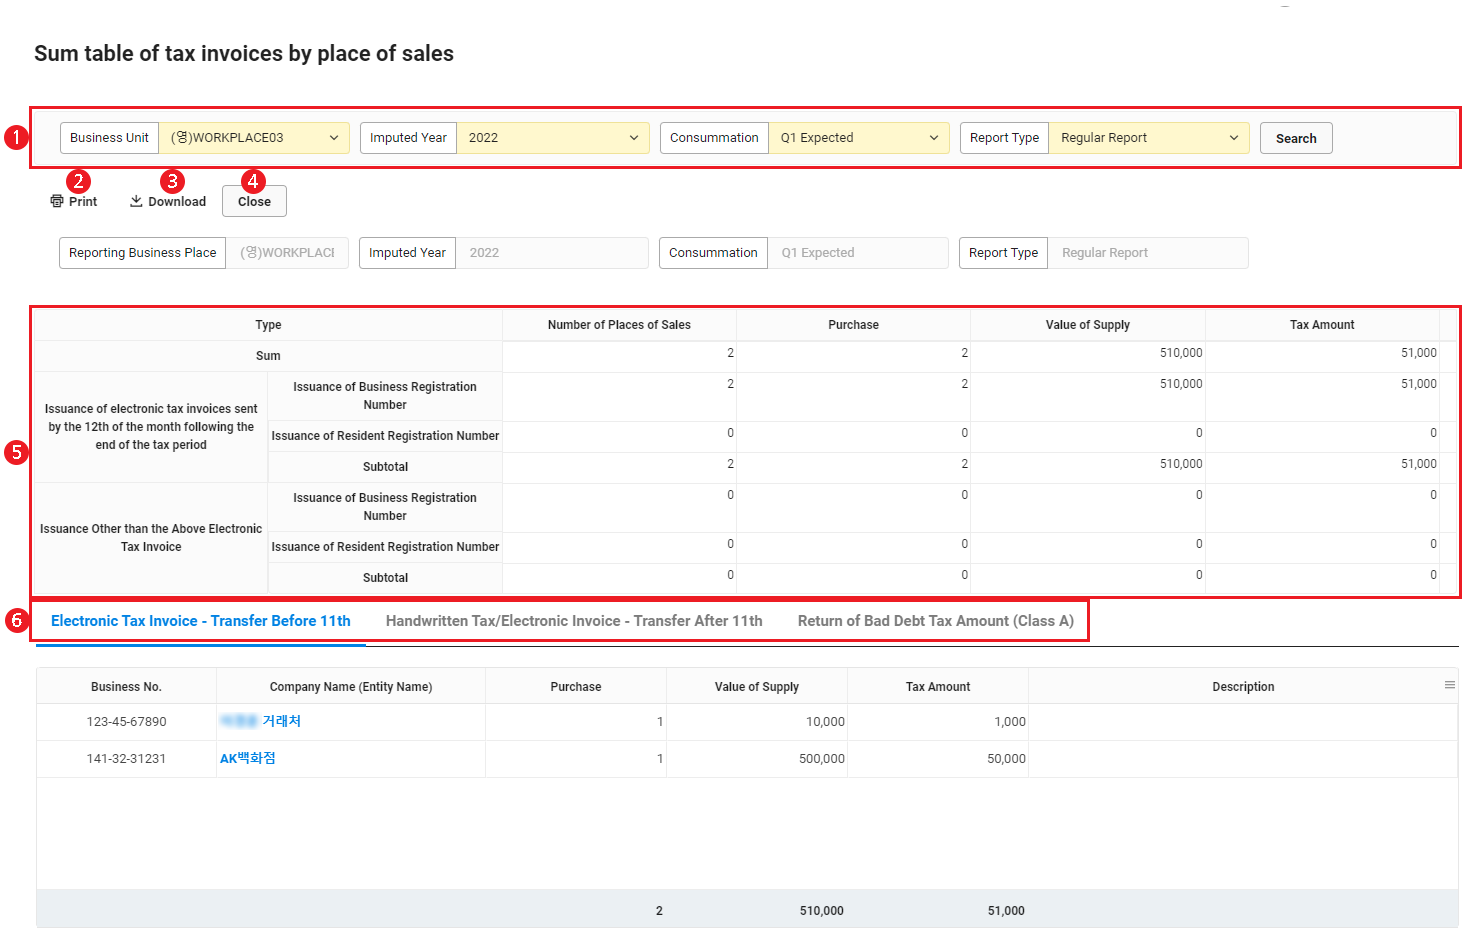
Sum Table of Tax Invoices/Invoices by Place of Purchase/Sales
You can view and process the closing of electronic invoice transfers on and before the 11th, handwritten invoice transfers after the 11th, and overall details.
The Sum Table of Tax Invoices/Invoices by Place of Purchase/Sales screen is laid out as follows.
| Area | Description |
|---|---|
| ① Search Window | Searches the data to be displayed by conditions of business place, imputed year, quarters, and report type. |
| ② Print | Prints the current document upon clicking it. |
| ③ Download | Downloads the current document as an Excel file upon clicking it. |
| ④ Process Closing | Processes the closing of the current document upon clicking it.
|
| ⑤ Contents of Sum Table | Displays the contents of the sum table. |
| ⑥ Details Tab Menu | Displays details upon clicking each tab menu. |
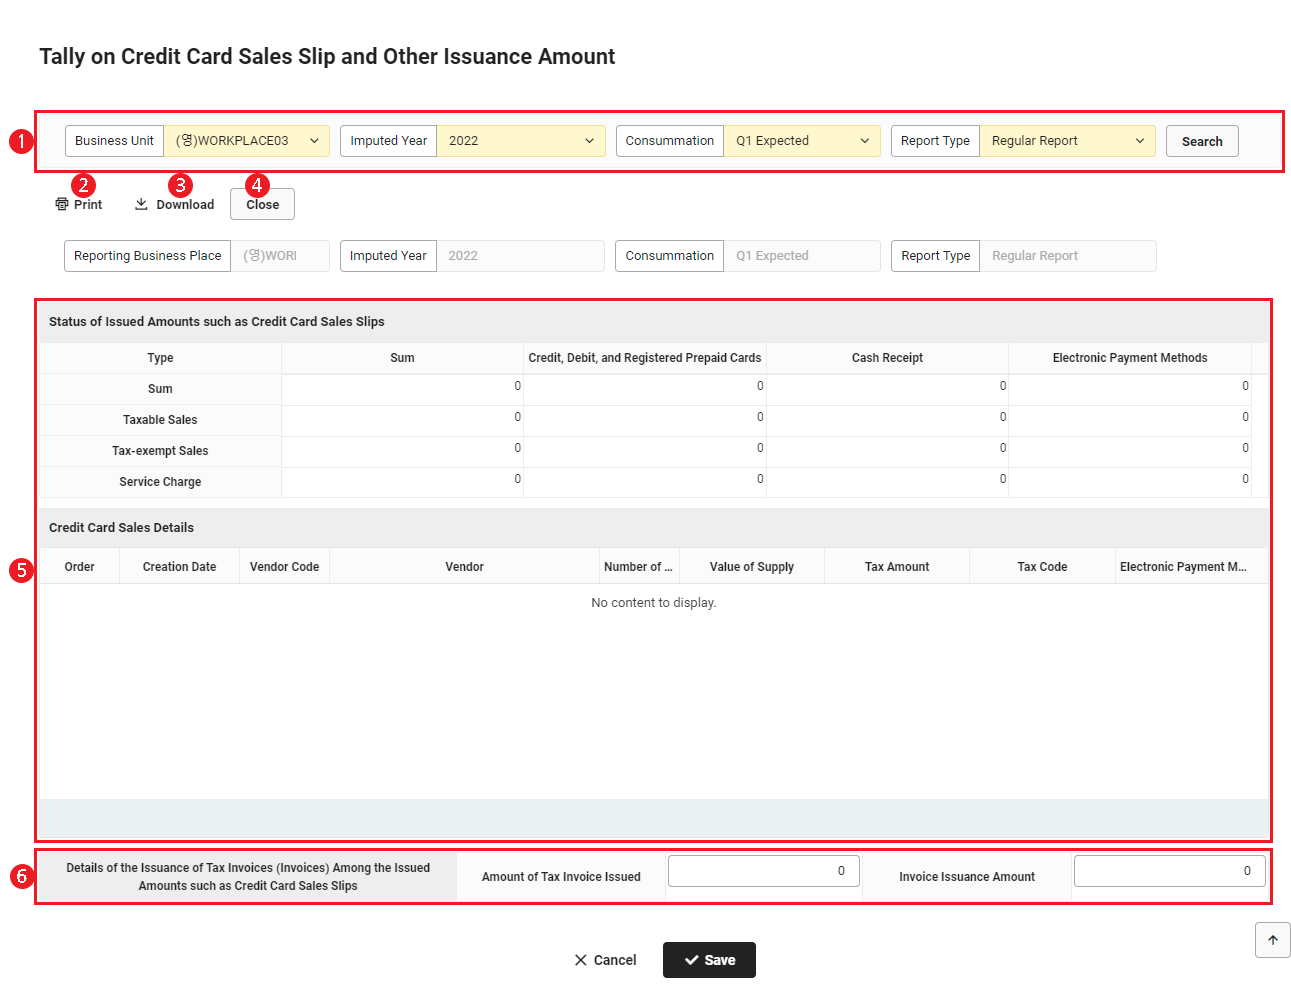
Tally on Credit Card Sales Slip and Other Issuance Amount
You can do the following: View the status of issuance amounts and credit card sales details; Set and edit tax codes, electronic payment methods, and issued amounts; and Process the closing of documents.
The Tally on Credit Card Sales Slip and Other Issuance Amount screen is laid out as follows.
| Area | Description |
|---|---|
| ① Search Window | Searches the data to be displayed by conditions of business place, imputed year, quarters, and report type. |
| ② Print | Prints the current document upon clicking it. |
| ③ Download | Downloads the current document as an Excel file upon clicking it. |
| ④ Process Closing |
|
| ⑤ Contents of Tally | Displays the contents of the tally.
|
| ⑥ Amount of Tax Invoice Issued, Invoice Issuance Amount |
|
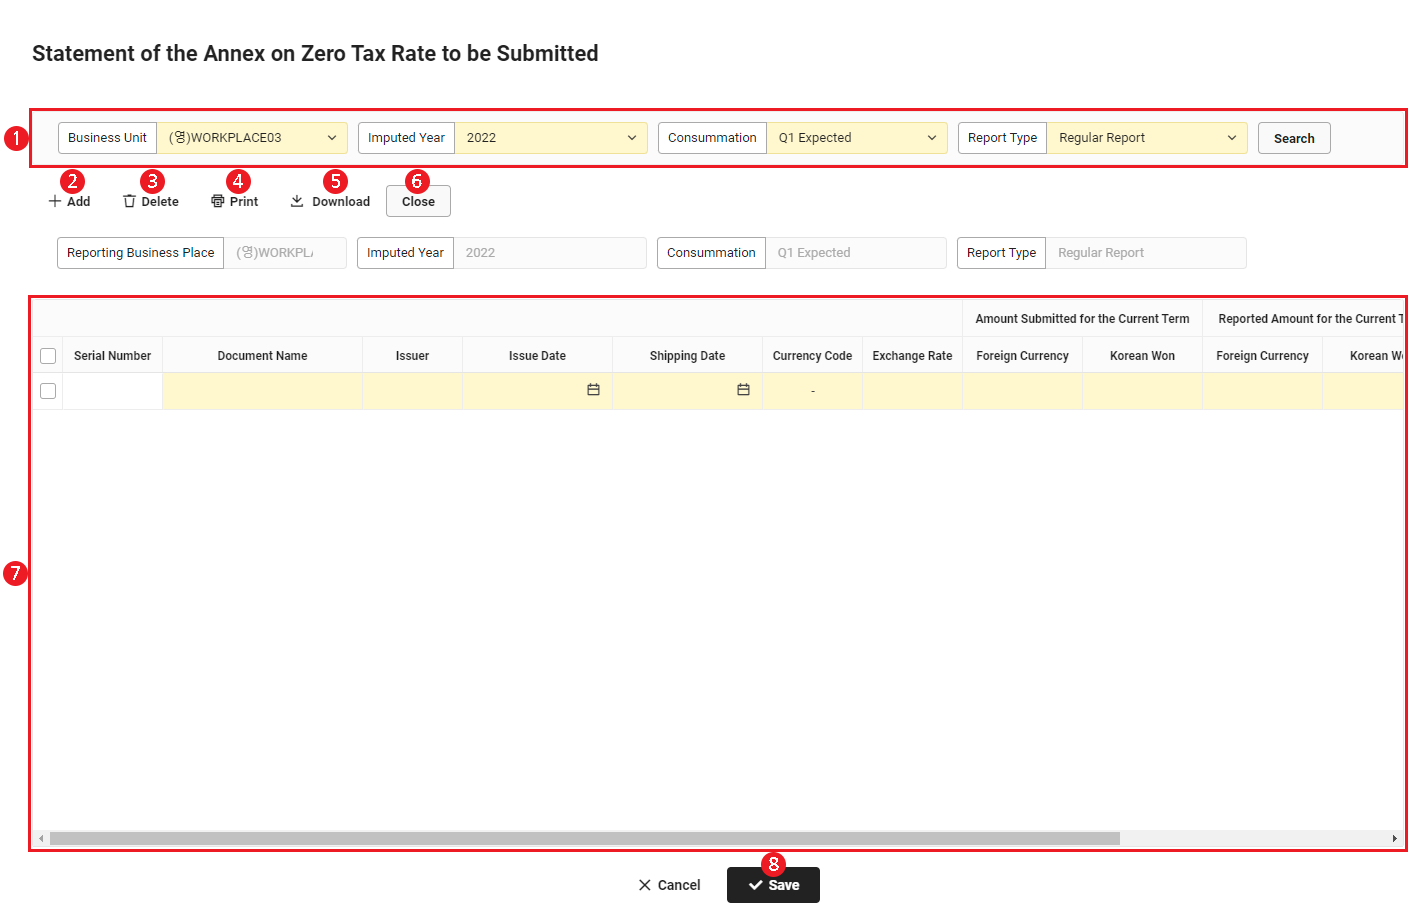
Statement of the Annex on Zero Tax Rate to be Submitted
You can enter and edit the details of a statement of the annex on zero tax rate to be submitted, as well as process its closing.
The Statement of the Annex on Zero Tax Rate to be Submitted screen is laid out as follows.
| Area | Description |
|---|---|
| ① Search Window | Searches the data to be displayed by conditions of business place, imputed year, quarters, and report type. |
| ② Add | Adds statement to the list upon clicking it. |
| ③ Delete | Deletes the selected statement from the list upon clicking it. |
| ④ Print | Prints the current document upon clicking it. |
| ⑤ Download | Downloads the current document as an Excel file upon clicking it. |
| ⑥ Process Closing |
|
| ⑦ Statement Details | Displays the statement details.
|
| ⑧ Save | Saves the entered statement details upon clicking it. |
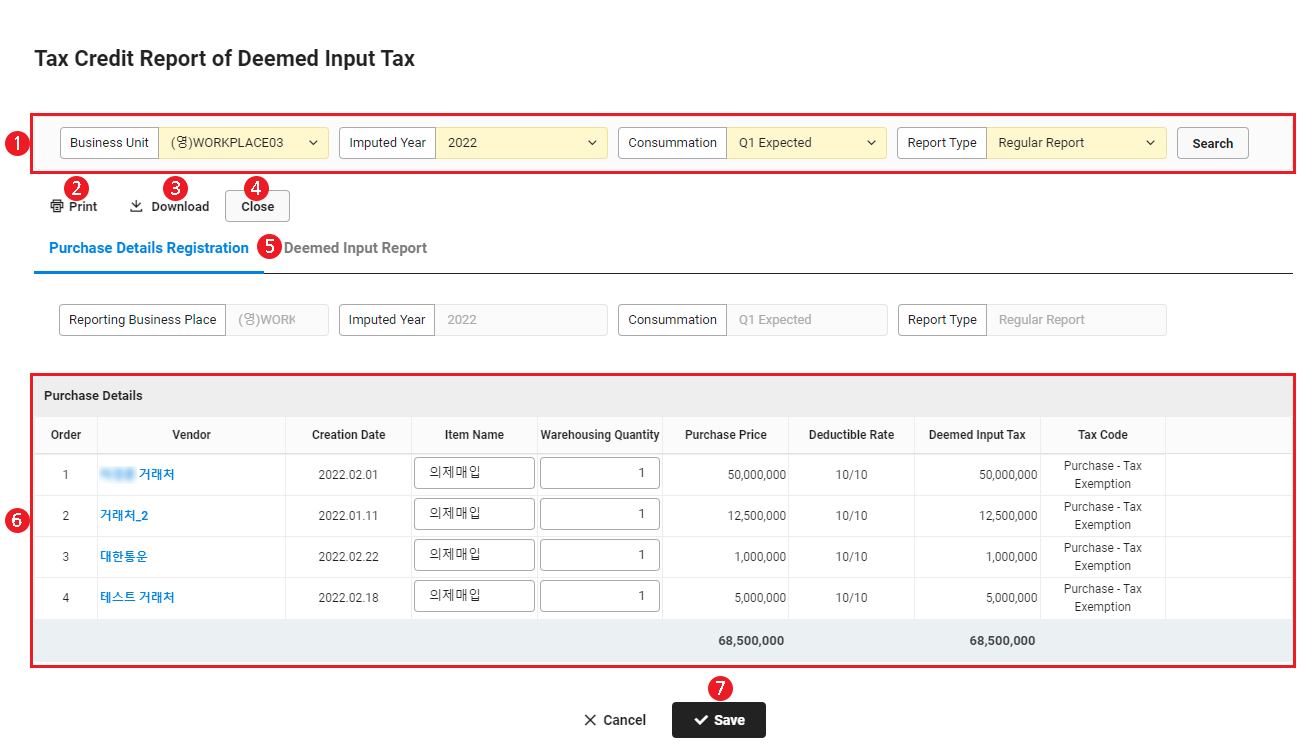
Tax Credit Report of Deemed Input Tax
You can enter the purchase details of the tax credit report of deemed input tax, compose a deemed input report, and process the closing of the document.
The Tax Credit Report of Deemed Input Tax screen is laid out as follows.
| Area | Description |
|---|---|
| ① Search Window | Searches the data to be displayed by conditions of business place, imputed year, quarters, and report type. |
| ② Print | Prints the current document upon clicking it. |
| ③ Download | Downloads the current document as an Excel file upon clicking it. |
| ④ Process Closing |
|
| ⑤ Deemed Input Report | Switches to the Compose Deemed Input Report screen. |
| ⑥ Purchase History | Displays deemed input details.
|
| ⑦ Save | Saves the entered purchase details upon clicking it. |
Compose Deemed Input Report
You can create a report by entering information about the tax base, deductible amount, and tax amount to be deducted during the tax period.
The following shows how to compose a deemed input report.
- Click the ‘Deemed Input Report’ tab on the Tax Credit Report of Deemed Input Tax screen.
- Check the total purchase price of tax-exempt agricultural products, and then enter report details in the Report of Deemed Input Tax on Tax-exempt Agricultural Products, etc. area.
- If reporting as a simplicity taxpayer, enter only when reporting for VAT taxation standard confirmation.
- Click ‘Save’.
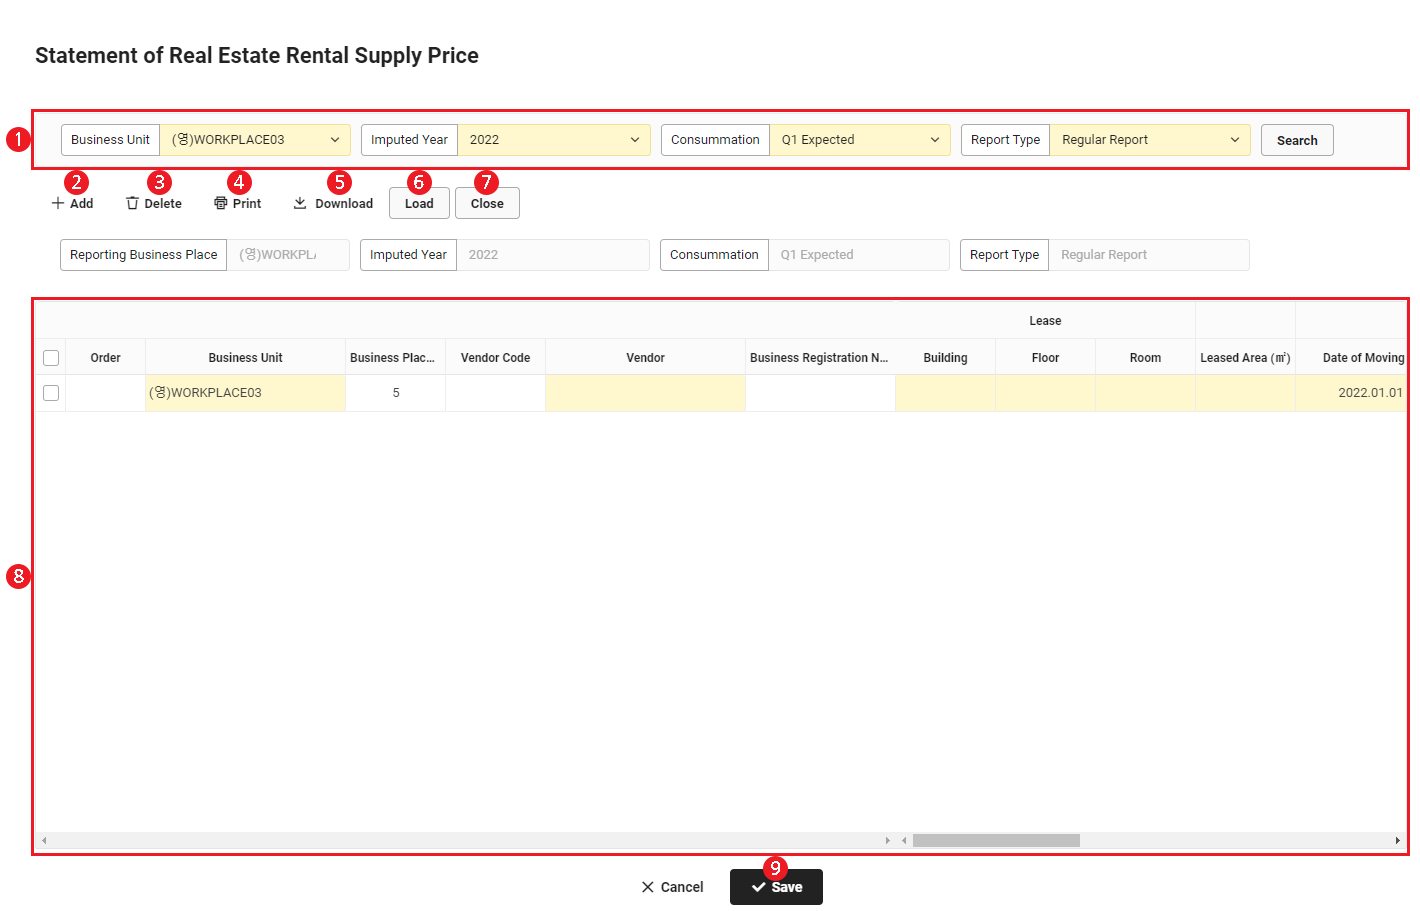
Statement of Real Estate Rental Supply Price
You can enter details about real estate rental services to create a statement of real estate rental supply price and process its closing.
The Statement of Real Estate Rental Supply Price screen is laid out as follows.
| Area | Description |
|---|---|
| ① Search Window | Searches the data to be displayed by conditions of business place, imputed year, quarters, and report type. |
| ② Add | Adds statement to the list upon clicking it. |
| ③ Delete | Deletes the selected statement from the list upon clicking it. |
| ④ Print | Prints the current document upon clicking it. |
| ⑤ Download | Downloads the current document as an Excel file upon clicking it. |
| ⑥ Import |
|
| ⑦ Process Closing |
|
| ⑧ Statement Details | Displays the statement details.
|
| ⑨ Save | Saves the entered statement details upon clicking it. |
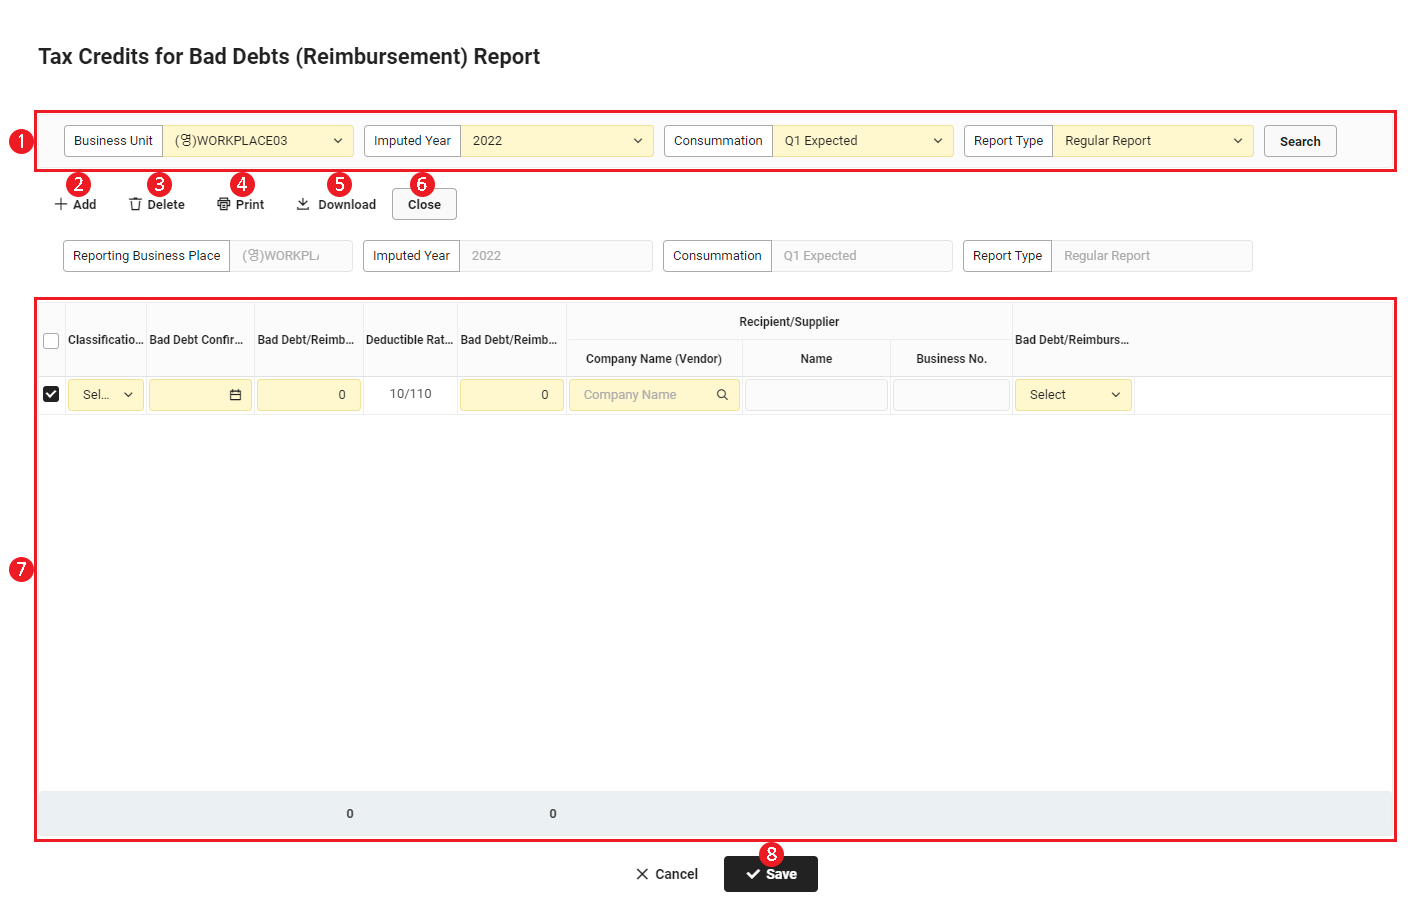
Tax Credits for Bad Debts (Reimbursement) Report
You can compose a report requesting tax credits for bad debts and process its closing.
The Tax Credits for Bad Debts (Reimbursement) Report screen is laid out as follows.
| Area | Description |
|---|---|
| ① Search Window | Searches the data to be displayed by conditions of business place, imputed year, quarters, and report type. |
| ② Add | Adds report to the list upon clicking it. |
| ③ Delete | Deletes the selected report from the list upon clicking it. |
| ④ Print | Prints the current document upon clicking it. |
| ⑤ Download | Downloads the current document as an Excel file upon clicking it. |
| ⑥ Process Closing |
|
| ⑦ Report Details | Displays the report details.
|
| ⑧ Save | Saves the entered report details upon clicking it. |
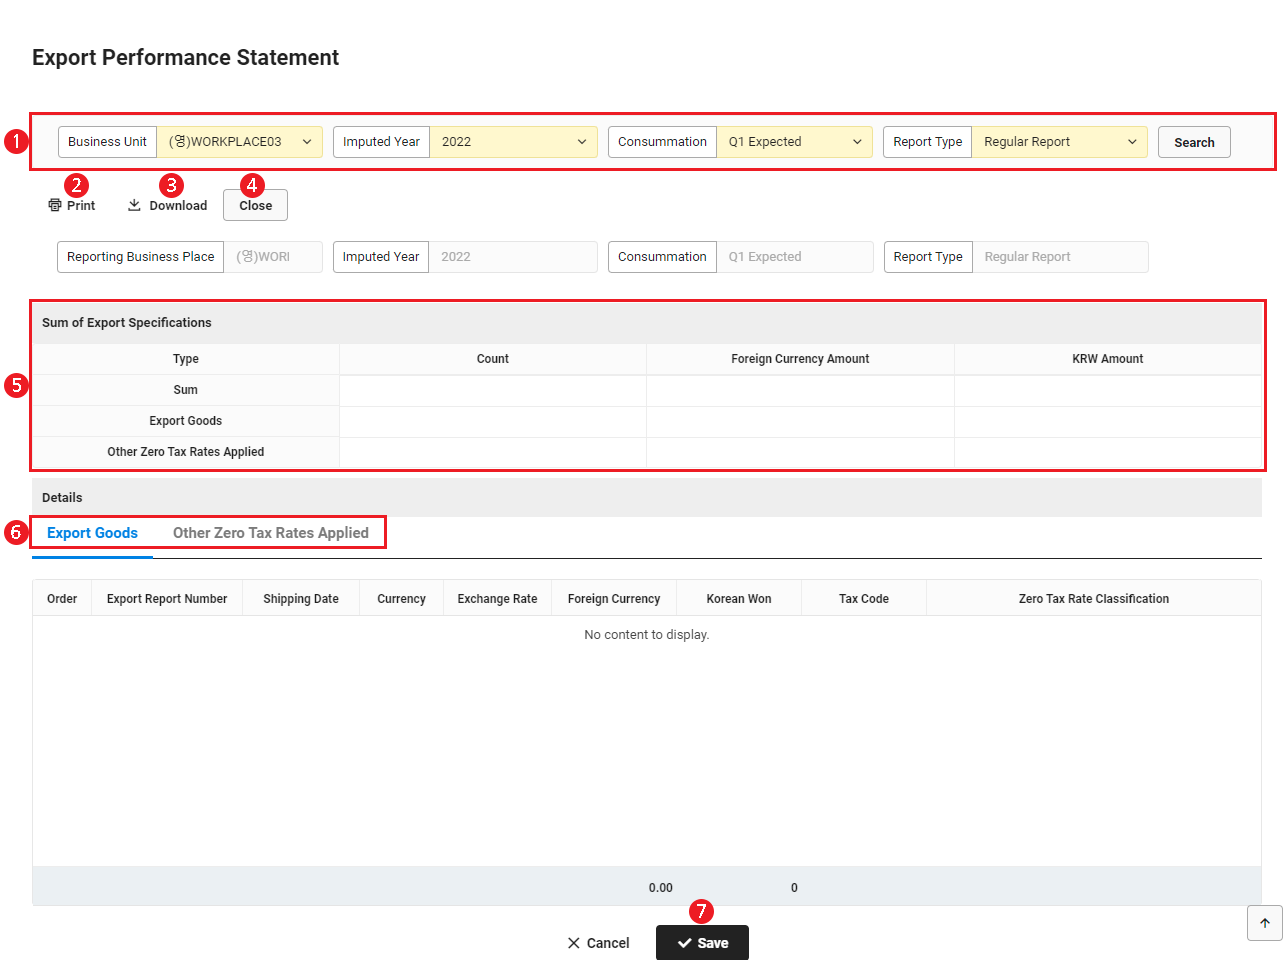
Statement of Actual Exports
You can compose a statement of actual exports and process its closing.
The Statement of Actual Exports screen is laid out as follows.
| Area | Description |
|---|---|
| ① Search Window | Searches the data to be displayed by conditions of business place, imputed year, quarters, and report type. |
| ② Print | Prints the current document upon clicking it. |
| ③ Download | Downloads the current document as an Excel file upon clicking it. |
| ④ Process Closing |
|
| ⑤ Statement Details | Displays the statement details.
|
| ⑥ Details Tab | Displays details upon clicking each tab. |
| ⑦ Save | Saves the entered statement details upon clicking it. |
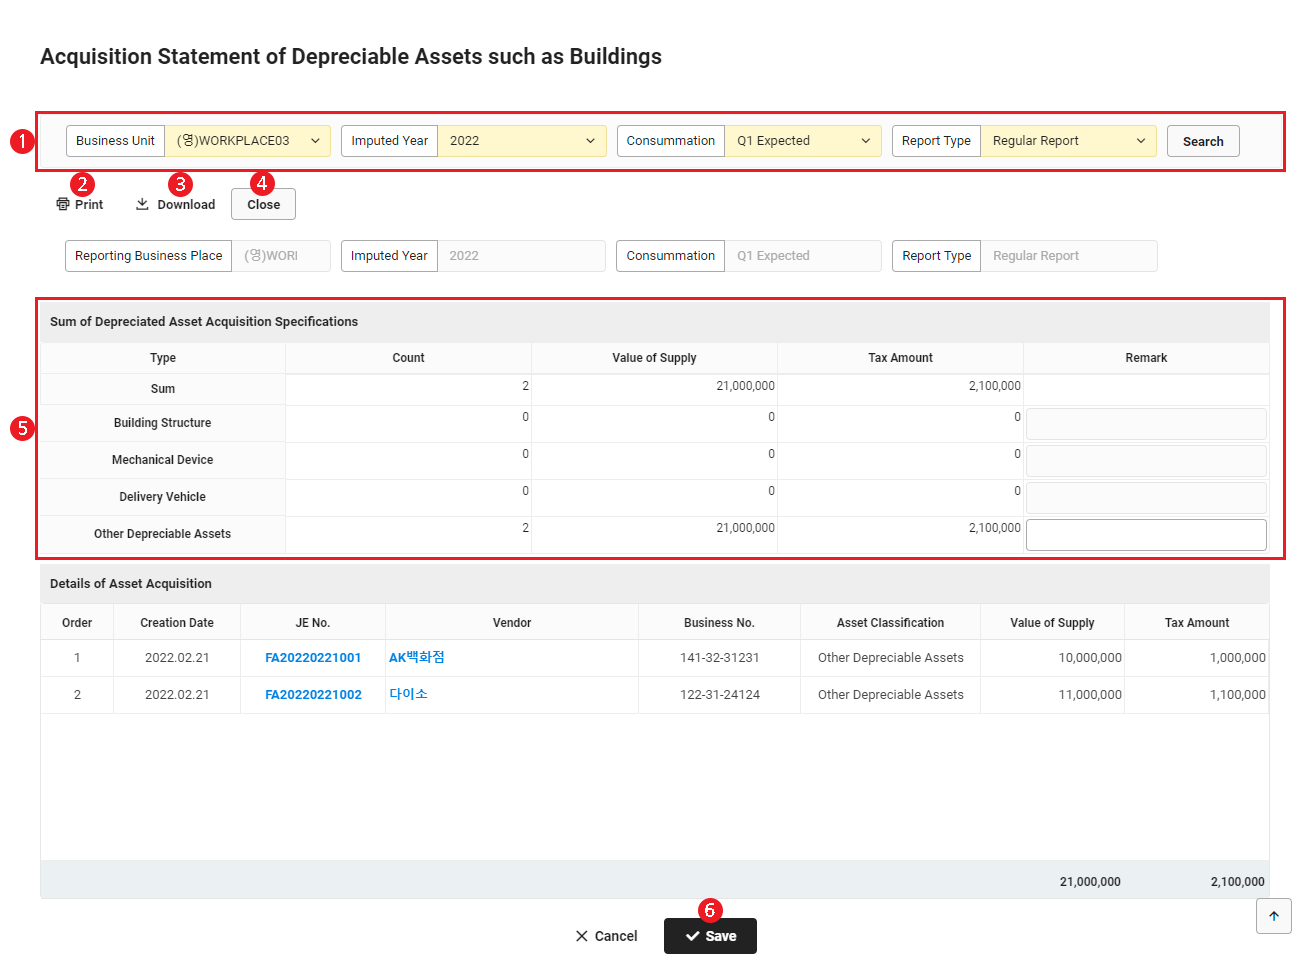
Acquisition Statement of Depreciable Assets such as Buildings
You can view the acquisition statement of depreciable assets such as buildings, enter notes, and process its closing.
The Acquisition Statement of Depreciable Assets such as Buildings screen is laid out as follows.
| Area | Description |
|---|---|
| ① Search Window | Searches the data to be displayed by conditions of business place, imputed year, quarters, and report type. |
| ② Print | Prints the current document upon clicking it. |
| ③ Download | Downloads the current document as an Excel file upon clicking it. |
| ④ Process Closing |
|
| ⑤ Statement Details | Displays the statement details.
|
| ⑥ Save | Saves the entered statement details upon clicking it. |
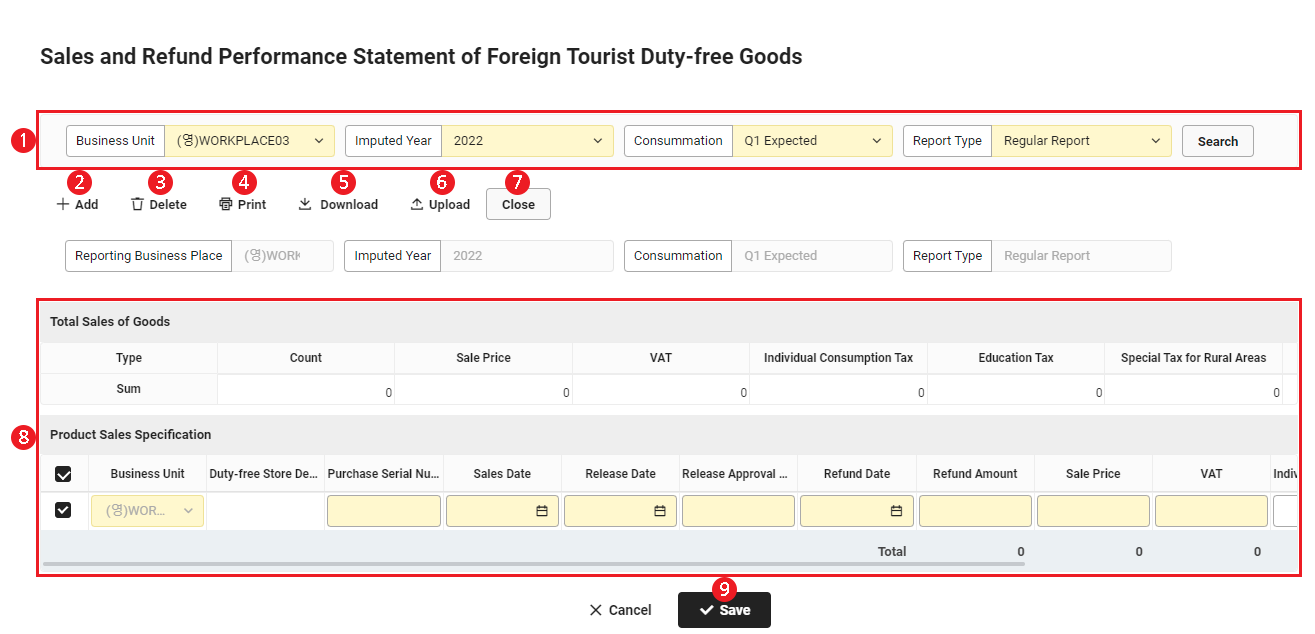
Sales and Refund Performance Statement of Foreign Tourist Duty-free Goods
You can compose a sales and refund performance statement of foreign tourist duty-free goods and process its closing. Use templates to upload multiple sales specifications at once.
The Sales and Refund Performance Statement of Foreign Tourist Duty-free Goods screen is laid out as follows.
| Area | Description |
|---|---|
| ① Search Window | Searches the data to be displayed by conditions of business place, imputed year, quarters, and report type. |
| ② Add | Adds statement to Product Sales Specification upon clicking it. |
| ③ Delete | Deletes the selected statement from Product Sales Specification upon clicking it. |
| ④ Print | Prints the current document upon clicking it. |
| ⑤ Download | Downloads the current document as an Excel file upon clicking it. |
| ⑥ Upload | Uploads multiple sales histories at once. |
| ⑦ Process Closing |
|
| ⑧ Statement Details | Displays the statement details.
|
| ⑨ Save | Saves the entered report details upon clicking it. |
Upload Sales and Refund Performance Statement of Foreign Tourist Duty-free Goods at Once
The following shows how to use Excel templates to upload multiple sales specifications at once.
- Click 'Upload' on the Sales and Refund Performance Statement of Foreign Tourist Duty-free Goods screen.
- Click 'Download template file' in the Upload pop-up window to download the template.
- Enter the sales specifications according to the template and save the file.
- Items marked with '*' are required fields.
- In the Upload pop-up window, select Business Place and click ‘Attach File’ to upload the file.
- Click ‘Save’, then click ‘Yes’ in the notification pop-up window.
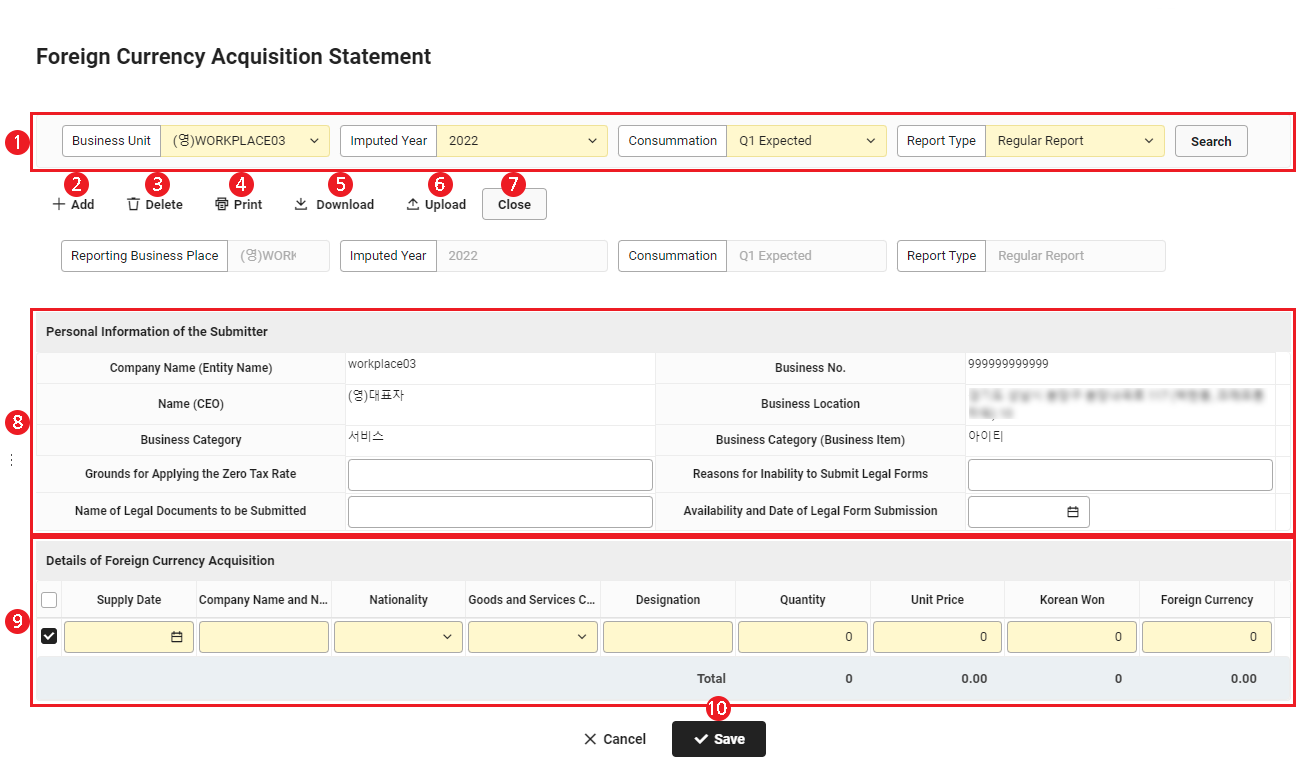
Foreign Currency Acquisition Statement
You can compose a foreign currency acquisition statement and process its closing. Use templates to upload multiple sales specifications at once.
The Foreign Currency Acquisition Statement screen is laid out as follows.
| Area | Description |
|---|---|
| ① Search Window | Searches the data to be displayed by conditions of business place, imputed year, quarters, and report type. |
| ② Add | Adds statement to Details of Foreign Currency Acquisition upon clicking it. |
| ③ Delete | Deletes the selected statement from Details of Foreign Currency Acquisition upon clicking it. |
| ④ Print | Prints the current document upon clicking it. |
| ⑤ Download | Downloads the current document as an Excel file upon clicking it. |
| ⑥ Upload | Uploads multiple foreign currency acquisition details at once. |
| ⑦ Process Closing |
|
| ⑧ Personal Information of the Submitter | Displays the personal information of the person who submitted the statement.
|
| ⑨ Details of Foreign Currency Acquisition | Displays the details of foreign currency acquisition.
|
| ⑩ Save | Saves the entered statement details upon clicking it. |
Upload Foreign Currency Acquisition Statements at Once
The following shows how to use Excel templates to upload multiple foreign currency acquisition details at once.
- Click 'Upload' on the Foreign Currency Acquisition Statement screen.
- Click 'Download Template File' in the Upload pop-up window to download the template.
- Enter the foreign currency acquisition details according to the template and save the file.
- Items marked with '*' are required fields.
- In the Upload pop-up window, select Business Place and click ‘Attach File’ to upload the file.
- Click ‘Save’, then click ‘Yes’ in the notification pop-up window.
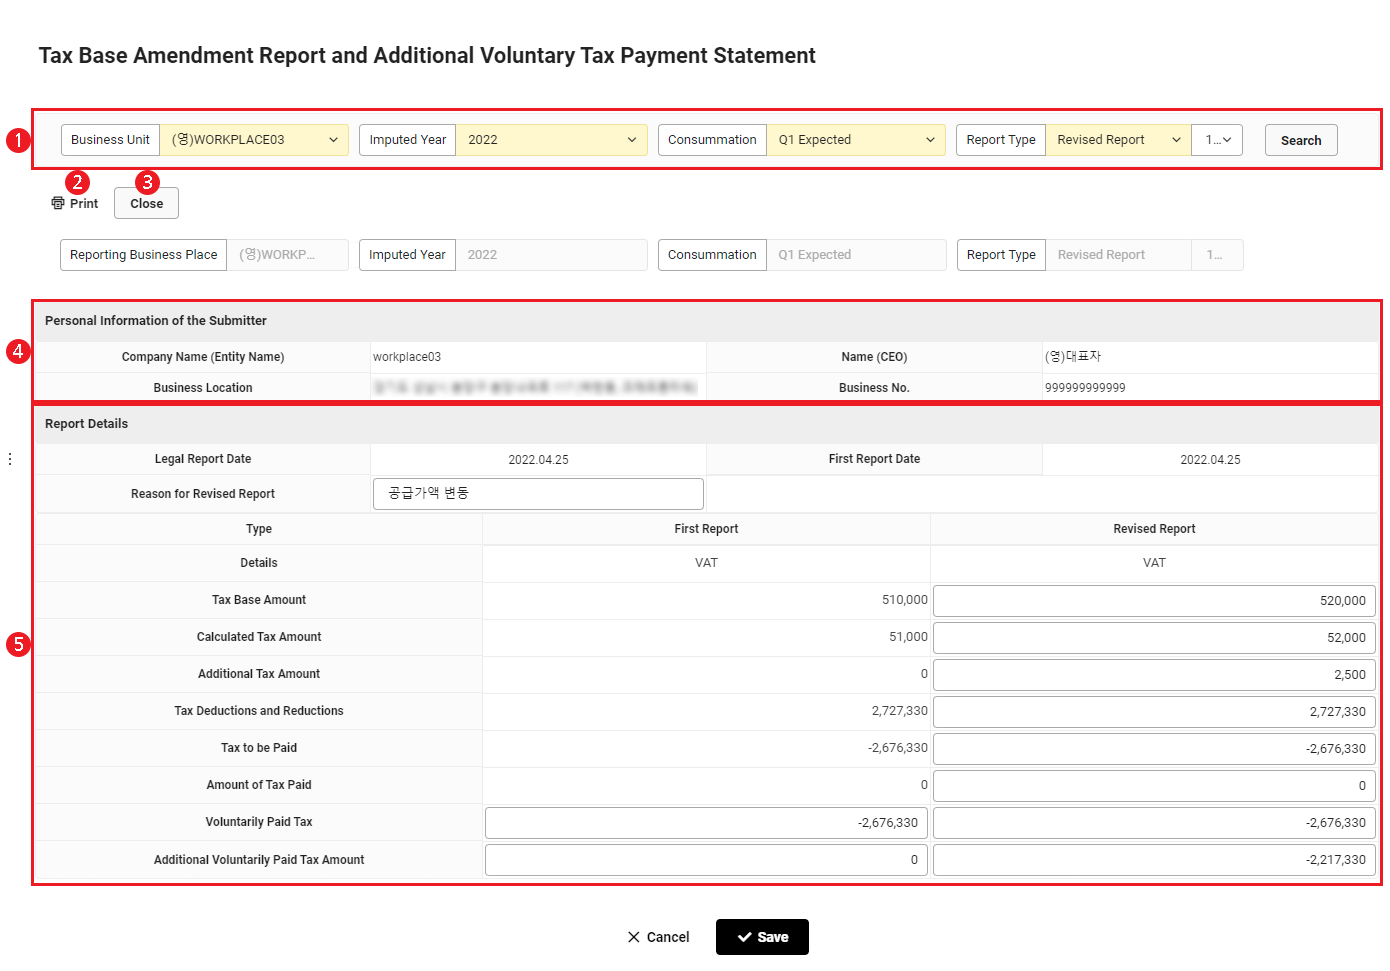
Tax Base Amendment Report and Additional Voluntary Tax Payment Statement
The tax base amendment report and additional voluntary tax payment statement is a document attached to the amendment report. It is displayed only when you make a amendment report. You can enter the details for the amendment report and the reason for modification, and then process its closing.
The Tax Base Amendment Report and Additional Voluntary Tax Payment Statement screen is laid out as follows.
| Area | Description |
|---|---|
| ① Search Window | Searches the data to be displayed by conditions of business place, imputed year, quarters, and report type. |
| ② Print | Prints the current document upon clicking it. |
| ③ Process Closing |
|
| ④ Personal Information of the Submitter | Displays the personal information of the document submitter. |
| ⑤ Report Details | Displays and enters the tax amount of additional voluntary tax payment report details.
|
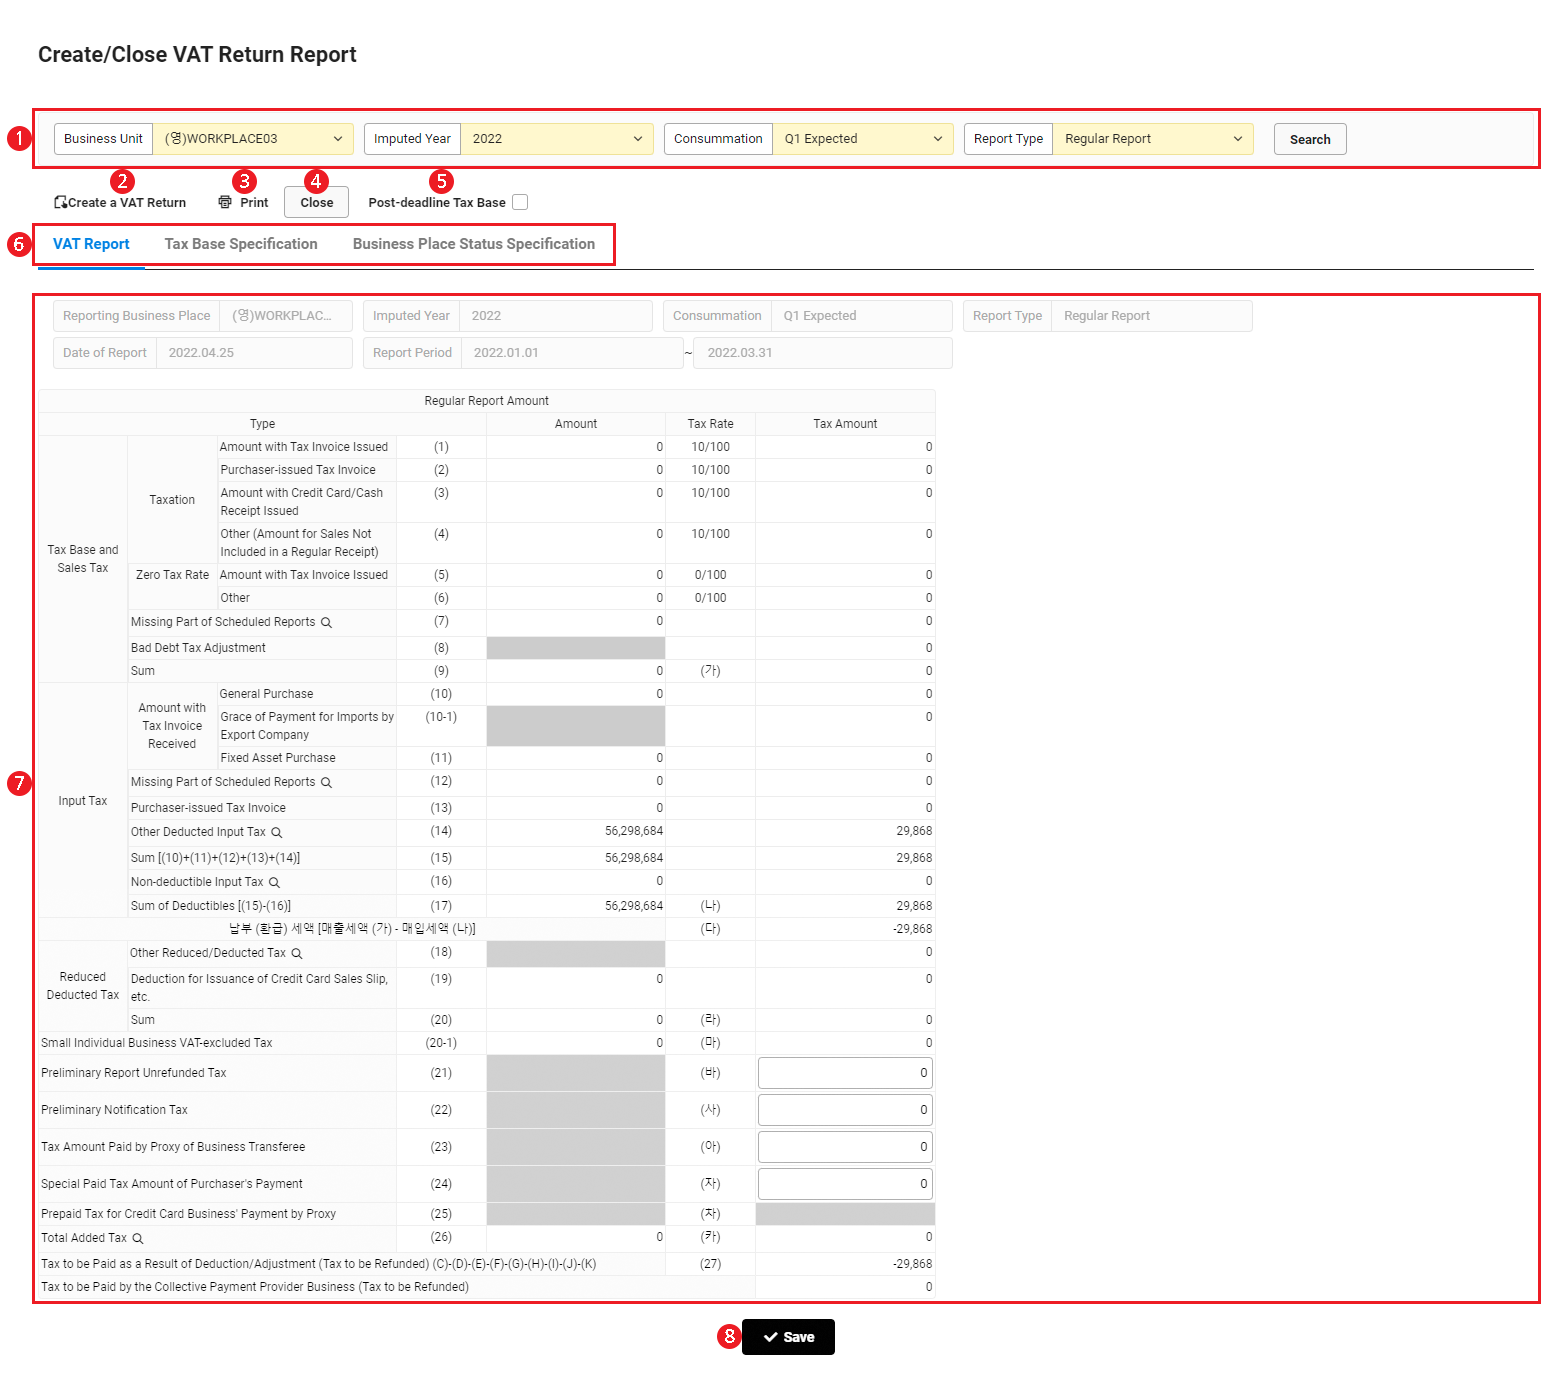
Create/Close VAT Return Report

You can compose a VAT return and process its closing after all attached documents to be reported have been closed.
The Create/Close VAT Return Report screen is laid out as follows.
| Area | Description |
|---|---|
| ① Search Window | Searches the data to be displayed by conditions of business place, imputed year, quarters, and report type. |
| ② Create a VAT Return | Upon clicking it, creates a VAT return based on the closed documents attached to a report.
|
| ③ Print | Prints the current document upon clicking it. |
| ④ Process Closing | Processes the closing of the VAT return upon clicking it.
|
| ⑤ Post-deadline Tax Base | Sets the report status of post-deadline tax base upon clicking it. |
| ⑥ Content Tab | Displays and enters details upon clicking each tab menu. |
| ⑦ Content Area | Displays the details of each tab menu. |
| ⑧ Save | Saves the entered report details upon clicking it. |
Create a VAT Return
The following shows how to create a VAT return.
- Click the ‘Admin Menu’ at the top right of the PC web screen, and then click ‘Accounting’ in the pop-up window.
- Click at the top left of the screen.
- Click ‘Report VAT > Create/Close VAT Return Report’ from the menu.
- Check each tab menu and enter details as shown below.
- VAT Return, Tax Base Specification: Enter details in each tab menu and click ‘Save’.
- Business Place Status Specification: Check details.
- Click 'Create a VAT Return'.
- In the notification pop-up window, click ‘OK’.
- A VAT return is created.
Create Electronic Media for VAT

You can use various conditions to search and view the data aggregated through the documents attached to a report, as well as create the data of quarters with closed VAT reports as electronic media.
The Create Electronic Media for VAT screen is laid out as follows.
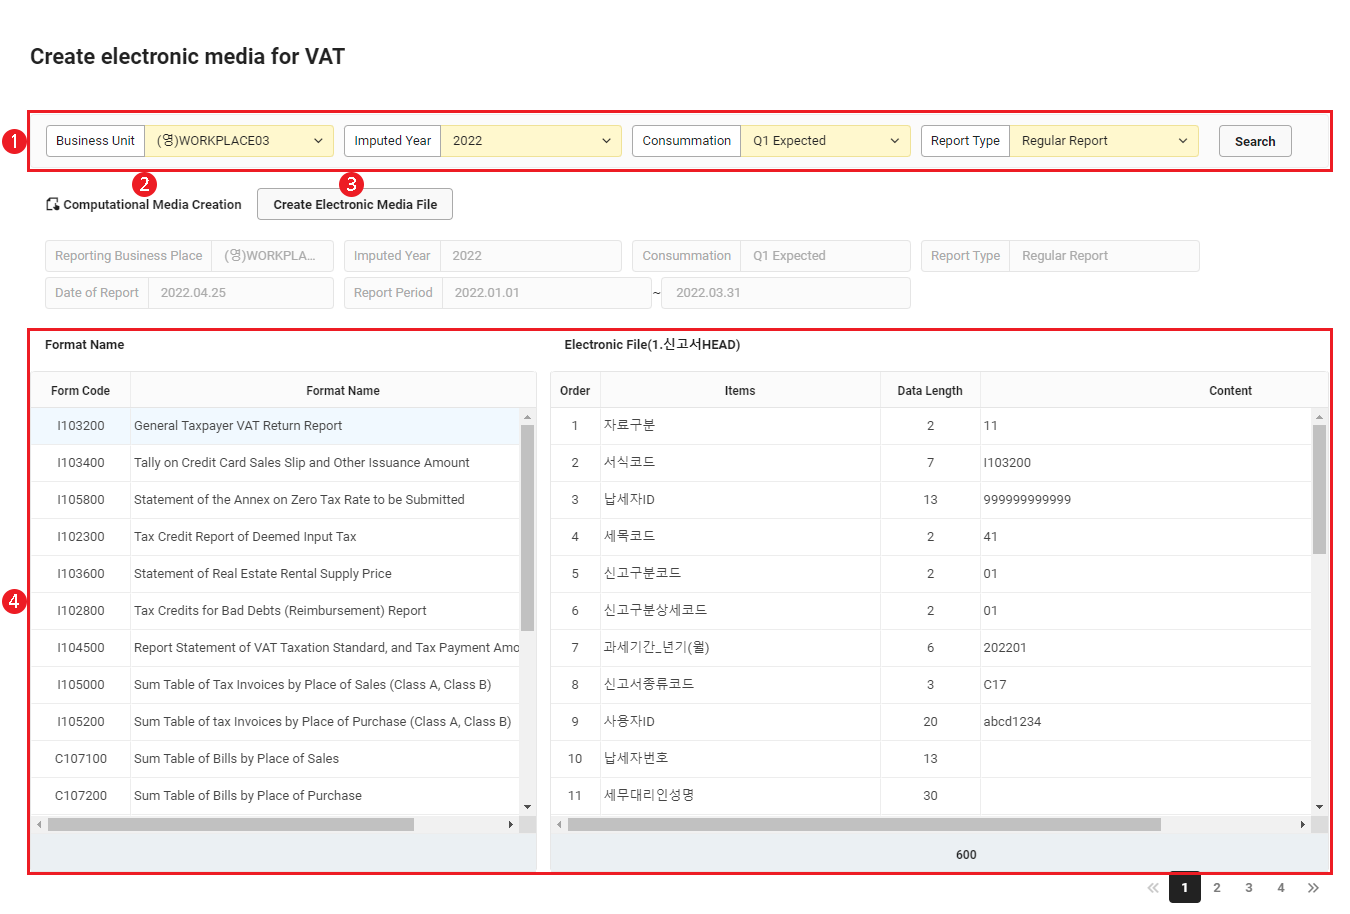
| Area | Description |
|---|---|
| ① Search Window | Searches the data to be displayed by conditions of business place, imputed year, quarters, and report type. |
| ② Create Electronic Media | Creates the data of closed VAT reports as electronic media upon clicking it. |
| ③ Create Electronic Media File | Creates electronic media files upon clicking it. |
| ④ Aggregated Data of Documents Attached to Report | Displays the aggregated data of documents attached to a report. |
Report VAT amendment
If modifications are required after the VAT report has been closed, you can prepare the documents attached to the report that are necessary for making the amendment report and use those documents to proceed with the task of closing the VAT return again. Refer to Create/Close VAT Return Report for information on closing VAT returns.
The following shows how to report a VAT amendment.
- Click the ‘Admin Menu’ at the top right of the PC web screen, and then click ‘Accounting’ in the pop-up window.
- Click at the top left of the screen.
- Click ‘Report VAT > Aggregate Documents Attached to Report’ from the menu.
- Select ‘Amendment Report’ for Report Type, and then click 'Search'.
- Click 'Aggregate' to aggregate the documents.
Aggregation does not occur when there are closed documents. Check the closing status of the documents attached to the report before aggregation, and cancel the closing.
- The determined (reassessed) claim for tax base and tax amount and the tax base amendment report and additional voluntary tax payment statement are added to the list.
- Check and edit all details of the aggregated documents attached to the report, and then click ‘Press Closing’.
- Depending on the case, only one of the determined (reassessed) claim for tax base and tax amount and the tax base amendment report and additional voluntary tax payment statement can be composed.
- If the tax to be paid has further decreased: The determined (reassessed) claim for tax base and tax amount can be composed (for tax refund purposes).
- If the tax to be paid has further increased: The tax base amendment report and additional voluntary tax payment statement can be composed (for additional payment purposes).
You can create VAT returns even if only one of the following is closed: determined (reassessed) claim for tax base and tax amount; and tax base amendment report and additional voluntary tax payment statement.
- Depending on the case, only one of the determined (reassessed) claim for tax base and tax amount and the tax base amendment report and additional voluntary tax payment statement can be composed.
- Click the ‘Report VAT > Create/Close VAT Return Report’ menu.
- Select ‘Amendment Report’ for Report Type, and then click 'Search'.
- Click 'Create a VAT Return'.
- Click ‘Process Closing’.
- Click the ‘Report VAT > Create Electronic Media for VAT’ menu.
- Select ‘Amendment Report’ for Report Type, and then click 'Search'.
- Click ‘Create Electronic Media’.
- The VAT amendment is reported.