You can enable or disable various sub-menus under the Attendance service, manage the clock-in/out button names, and set the search scope and permissions for viewing absence status. You can also import annual leave history from an external solution that the company was using before WORKS Attendance.
Set Attendance
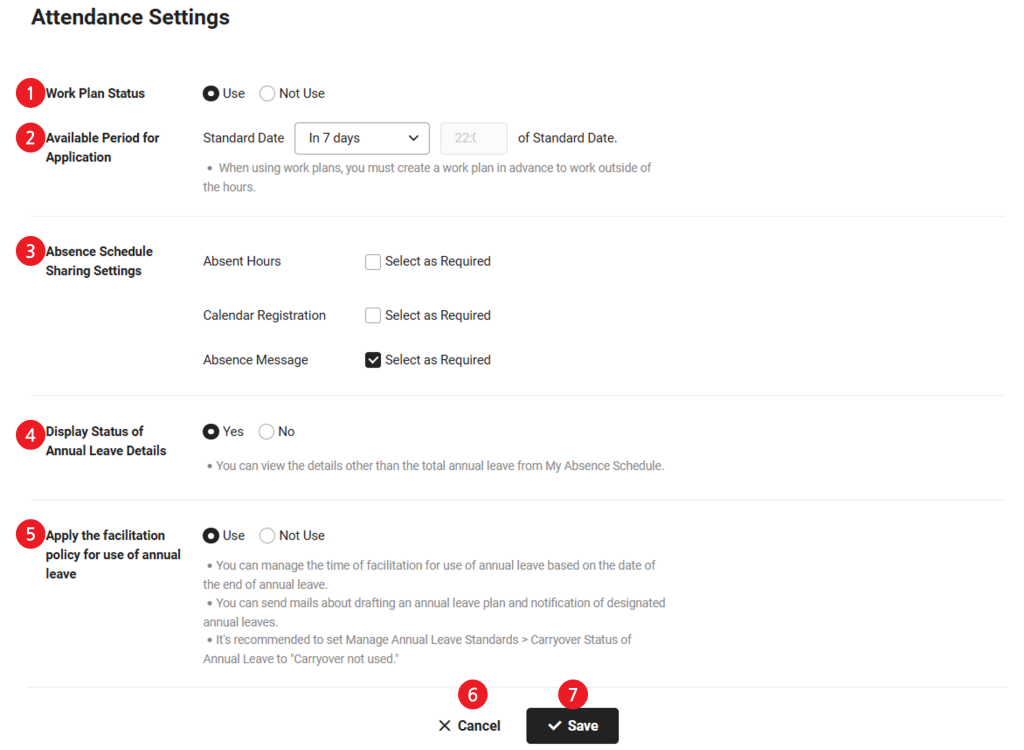
You can set whether to use work plan, require sharing absence status, and promote use of annual leaves.
The Set Attendance page is laid out as follows.
| Area | Description |
|---|---|
| ① Work plan status | Select whether to use work plan
|
| ② Available Request Period | It is displayed when the Work Plan Usage Status is selected as Use
|
| ③ Absence Schedule Sharing Settings | Set the requirement status of each sharing items of the absence schedule form
|
| ④ Provide Annual Leave Details | Set whether to expose the number of annual leave days for each detailed annual leave items in the user
|
| ⑤ Apply Annual Leave Promotion Policy | Set whether to apply the annual leave promotion policy
|
| ⑥ Cancel | Delete the setting, and refresh and open the previous page before making changes |
| ⑦ Save | It saves the settings |
Manage Clock-in/out Button Name
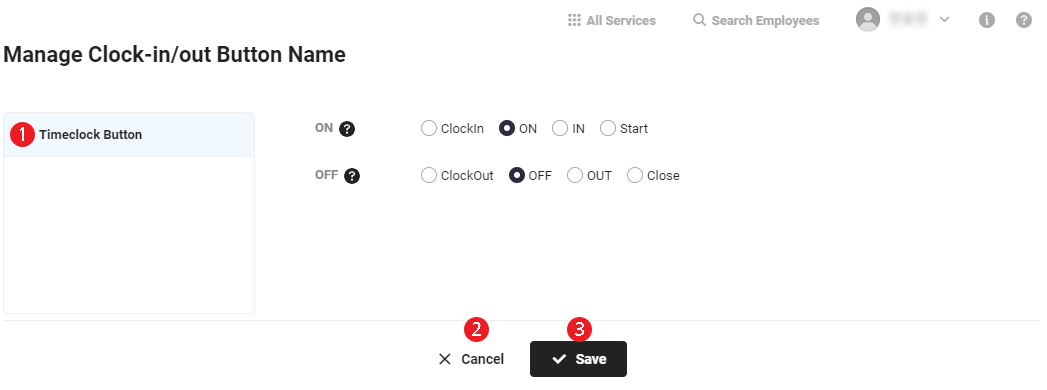
You can set the name of clock-in/out button.
Manage Clock-in/out Button Name page is laid out as follows.
| Area | Description |
|---|---|
| ① Clock-in/out Button | Set up names for buttons that signify the start and the end of work
|
| ② Cancel | Delete the setting, and refresh and open the previous page before making changes |
| ③ Save | It saves the settings |
Absence Status View Settings
The viewing permission and scope can be set to view the absence status of the entire company or user’s organization (including concurrent positions).
The Absence Status View Settings page is laid out as follows.

| Area | Description |
|---|---|
| ① Grant Viewing Permission | Set the target and scope to view the absence status
|
| ② Delete | Delete the set viewing permission details |
| ③ Cancel | Delete the setting, and refresh and open the previous page before making changes |
| ④ Save | It saves the settings |
The following describes how to set the viewing permission of the absence status.
- Click the ‘Admin Menu’ at the top right of the PC web screen, and then click ‘Attendance’ in the pop-up window.
- Click
 at the top left of the screen.
 - Click 'Settings > Absence Status View Settings' from the menu.
- Click ‘Grant Viewing Permission’.
- Target: Select the targets to grant the viewing permissions from the target items. When using as a corporate group, the primary company is the base.
For the target granted the viewing permission, the ‘My Work > Manage Attendance > Absence Status’ menu is displayed.
- All Employees: all employees of our company (members registered in ‘HR > Member > Manage Employee’, not including employees with concurrent positions belonging to the corporate group)
- Department Head: a department head of our company (including concurrent department head, not including employees with concurrent positions belonging to the corporate group)
- Department: members of the selected department of our company (including suborganizations and concurrent departments, not including employees with concurrent positions belonging to the corporate group)
- Employee: selected employees of our company (members registered in ‘HR > Member > Manage Employee’)
- Viewing Scope: Select a viewing scope.
- All Departments: all departments of our company (including employees having concurrent positions belonging to the corporate group)
- My Department: my department of our company (including suborganizations and concurrent departments, including employees with concurrent positions belonging to the corporate group)
- Managing Department: an item displayed when the viewing target is the department head, a department of our company in which I am the department head including concurrent departments (including employees with concurrent positions belonging to the corporate group)
- Delete: You can delete the set viewing permissions by clicking it.
- Target: Select the targets to grant the viewing permissions from the target items. When using as a corporate group, the primary company is the base.
- Click ‘Save’.
- Viewing permission allows the target to see the status of the largest scope granted to the same target.
- When using as a corporate group, the viewing target is designated by the primary company and the viewing scope is applied to each company based on the primary company. The absence status search settings can be applied simultaneously to the primary company and the concurrent company for employees who are appointed to a concurrent position in another company.
Import Data
You can import annual leave information from another service. The uploaded history is reflected to remaining number of leaves for the employee.
If annual leave history is imported in the middle of the year, then the remaining leave days for each employee will be reflected so that remaining leaves days can be managed.
To import data, proceed with the following procedure, in that order.
1. Annual Leave Standard Management Settings
Set the annual leave accrual standard and the number of annual leave days by years of service before registering the annual leave information by employee.
For more information about setting Annual Leave Standard, see Manage Annual Leave Method.
2. Import Data
Upload Number of Annual Leave Days
You can transfer the number of used annual leaves and adjustments for the current year. The uploaded annual leave history is reflected to the remaining number of leaves for the employee.
The following describes how to import the number of annual leave days data.
- Click the ‘Admin Menu’ at the top right of the PC web screen, and then click ‘Attendance’ in the pop-up window.
- Click at the top left of the screen.
- Click ‘Settings > Import Data’ from the menu.
- To upload the history of annual leaves used this year, click ‘Upload’ from Step 2 in the Import Data page to download the template file.
- The sample file is downloaded as an Excel file.
- See ‘Upload Past Absence History’ in Step 3 for information on how to upload absence history used in the past.
- Create the annual leave information by referring to the template file and save it.
- Click ‘Upload’ in Step 2, select the annual leave information file, and then click ‘Open’.
- Check the uploaded annual leave information and the processing status in the Bulk Add Annual Leave Information list.
- When the upload fails, you can check the reason for the failure. Resolve the reason for failure, and then click ‘Retry Uploading’ to upload again.
- Click
 in the upload history list to view the upload history by date.
- Once registered, you can check the employee’s annual leave information for the current year in the ‘Attendance Service > Attendance Status > View/Edit Annual Leave’ menu.
Upload Past Absence History
You can transfer the absence history used before the current year. The uploaded history is applied to the absence schedule status.
- Click the ‘Admin Menu’ at the top right of the PC web screen, and then click ‘Attendance’ in the pop-up window.
- Click at the top left of the screen.
- Click ‘Settings > Import Data’ from the menu.
- In the Import Data page, download the template file by clicking ‘Upload’ of Step 3.
- The sample file is downloaded as an Excel file.
- Create the absence information by referring to the template file and save it.
- Click ‘Upload’ of Step 3, select the absence information file, and then click ‘Open’.
- Check the uploaded absence information and the processing status in the Bulk Add Absence Information list.
- When the upload fails, you can check the reason for the failure. When the upload fails, you can check the reason for the failure. Resolve the reason for failure, and then click ‘Retry Uploading’ to upload again.
- Click the in the upload history list to view the upload history by date.
- Once the registration is complete, the uploaded absence information is reflected in ‘My Work > Manage Attendance > My Absence Schedule’ and ‘Attendance > Attendance Status > Absence Schedule Status’.
- When you upload the current year's annual leave history, it is reflected in used annual leaves.
- When uploading family event or business trip history, it won't be provided to ‘Family Event Request History’ or ‘Business Trip Request History’ (information such as family event type or business trip destination is not received).