You can manage (create, edit, delete) absence items to be used at your company, and set annual leave, special leave, family event, and business trip items.
Manage Absence Item
You can manage absence items to be used in the company.
The set items are reflected to the absence schedule document form. When entering the Leave Type as Annual Leave or Special Leave, you can set the details for each type. When using the Family Event/Business Trip absence items provided by the system, the Accounting handling for the payment of family event expenses and business trip allowances is integrated and can't be deleted.
The Manage Absence Item page is laid out as follows.
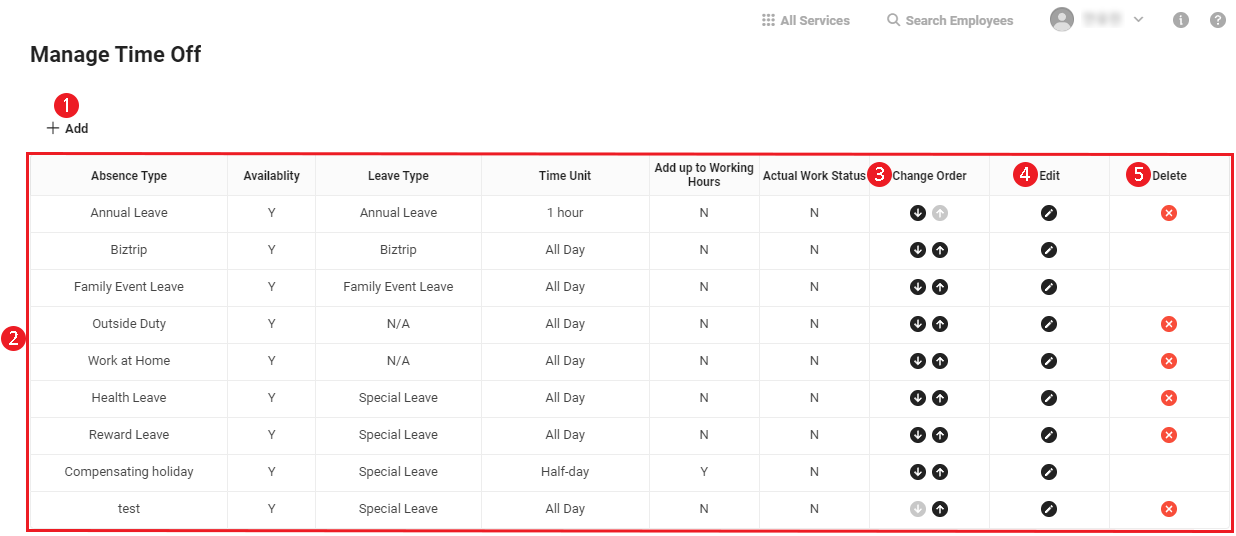
| Area | Description |
|---|---|
| ① Add | Create new absence item (See Create Absence Item) |
| ② Absence list | View and manage details of absence items used at the company |
| ③ Change Order | Change the priority of absence items |
| ④ Edit | Edit absence details (See Edit Absence) |
| ⑤ Delete | Delete absence items. The delete icon is not displayed for family event leaves, business trips, and compensation holidays |
What is a compensation holiday?
It means replacing holidays and workdays in advance according to the agreement between the company and employees. If you work on a day that is specified as a holiday, then you can specify a compensation holiday among the existing workdays. The work hours must be applied within the range of not exceeding the legal work hours (8 hours per day, 40 hours per week) stipulated by the Labor Standards Act. For a compensation holiday to be established, a basis for the holiday must be prepared for collective agreement or employment rules, and the reasons and methods should be specified.
Create Absence Item
New absence items can be created.
The following describes how to create an absence item.
- Click the ‘Admin Menu’ at the top right of the PC web screen, and then click ‘Attendance’ in the pop-up window.
- Click
 at the top left of the screen.
 - Click 'Absences > Manage Absence Item’ in the menu.
- Click 'Add'.
- Set the absence creation information, and click ‘OK’,
- Absence Item: Set the absence item name according to the company's regulations.
- Cause (Description Text): You can provide a guide for filling out the form and provide it to the user. (Example: Enter the purpose of the business trip in detail.)
- Usage Status: Set the usage status of the absence item.
- The usage status of compensation holidays is provided as ‘N’ by default. The agreement between the company and employees are required to change it to Use.
- Vacation Type: Set the vacation type. You can set the details after selecting annual leave or special leave.
- Annual Leave: It is reflected in the annual leave request information.
- Special Leave: Health leave, reward leave and compensation holiday are provided. Special leaves refer to leaves available for use for a specific period by a specific employee according to the company regulations. The employees granted with special leave can use it through the absence schedule request.
- The leaves set as special leave are reflected in ‘Attendance Status > View/Grant Special Leave’. The special leave granted to employees is deleted when you delete configured special leave or change the Leave Type.
- Compensation holiday is a special holiday provided by default and can't be deleted.
- When the compensation holiday is changed to Use, holiday work hours are not recorded. Compensation holiday is automatically provided, depending on the number of holiday work hours based on the special leave settings. The change in the use of compensation holiday must be in agreement between the company and employees. For more information, see Manage Special Leave.
- N/A: Select if it is not annual leave deduction or special leave.
- Time Unit: Choose Full Day/Half Day/1 Hour/2 Hours/30 Minutes.
- The default value is all day, which is 8 hours. It is viewed as the daily fixed work hours for each work arrangement of the Attendance service. For instance, if the fixed work hours are 8 hours, All day is 8 hours and Half day is 4 hours.
- 2 hours: If the general work time of your company is 7 hours, then you can take a 2, 4, or 6-hour leave.
- Leaves for business trips or family events are provided only in the units of All day.
- In the case of special leaves, there may be restrictions on the settings for the special leave use methods, depending on the time unit settings.
- For compensation holidays, the Set Special Leave > Apply Leave Hours in Units of Minutes value is set according to the time unit selection. For more information, see Manage Special Leave.
- Add up to Work Hours: When selecting ‘Y’, the requested absence hours are added to the general work hours for calculation. However, absences on holidays/days off are not added to the work hours.
- Compensation holidays are added to work hours by default and can't be changed.
- Actual Work Status: It is an option displayed for absence items with ‘Y’ selected for Add up to Work Hours. It is applied when using the Selective Work Hour System (Flexible Clock-in/out work arrangement), and provided as ‘N’ by default.
- Y: It is for an absence where the employee actually worked (<e.g.,> business trip). Set this option when including it to the work hours even if the absence is requested.
- N: It is for an absence where the employee does not actually work (<e.g.,> annual leave, family event leave). Set this option when excluding it from the actual work hours.
- However, if the company's work rules require annual leaves to be included in the actual work hours, you can set this option to ‘Y’. In this case, annual leave request eligibility is determined by the settings for the Annual Leave Usage Exceeding Base Work Hours option. Also, if you have another absence hours that has already been requested for that date, the annual leave hours that exceed the daily standard work hours can be recognized only if you fill out the Work Result Request Form.
- Annual Leave Usage Exceeding Base Work Hours: It is an option displayed when Annual Leave is selected as Leave Type. It is provided as ‘N’ by default.
- Y: Set it when you want to enable annual leaves with times exceeding the base work hours.
- Annual leaves that exceed the base work hours can be requested.
- Only the annual leave hours up to the base work hours are recognized as work hours. The exceeded annual leave hours are not added to General work hours under ‘Attendance > Work > Work Hour Status’.
- N: Set it when you want to disable annual leaves with times exceeding the base work hours.
- Annual leaves that exceed the base work hours can't be requested.
- Y: Set it when you want to enable annual leaves with times exceeding the base work hours.
When Annual Leave Usage Exceeding Base Work Hours is set as ‘N’, the use of annual leaves exceeding the base work hours are limited, enabling you to manage annual leaves properly.
Edit Absence
You can edit absence items.
The following describes how to edit absence items.
- Click the ‘Admin Menu’ at the top right of the PC web screen, and then click ‘Attendance’ in the pop-up window.
- Click at the top left of the screen.
- Click 'Absences > Manage Absence Item’ in the menu.
- In the absence list, click
 for the absence you want to edit.
 - Edit the absence information in the Edit pop-up window, and then click ‘Save’.
- For more information on the editing items, see Create Absence Item.
Manage Annual Leave Target
You can manage by specifying the appropriate annual leave group for each person based on their user type or company rules.
Refer to Manage Annual Leave Method and add annual leave groups first, based on the annual leave accrual standards. After adding annual leave groups, specify targets from this menu.
The Manage Annual Leave Target page is laid out as follows.
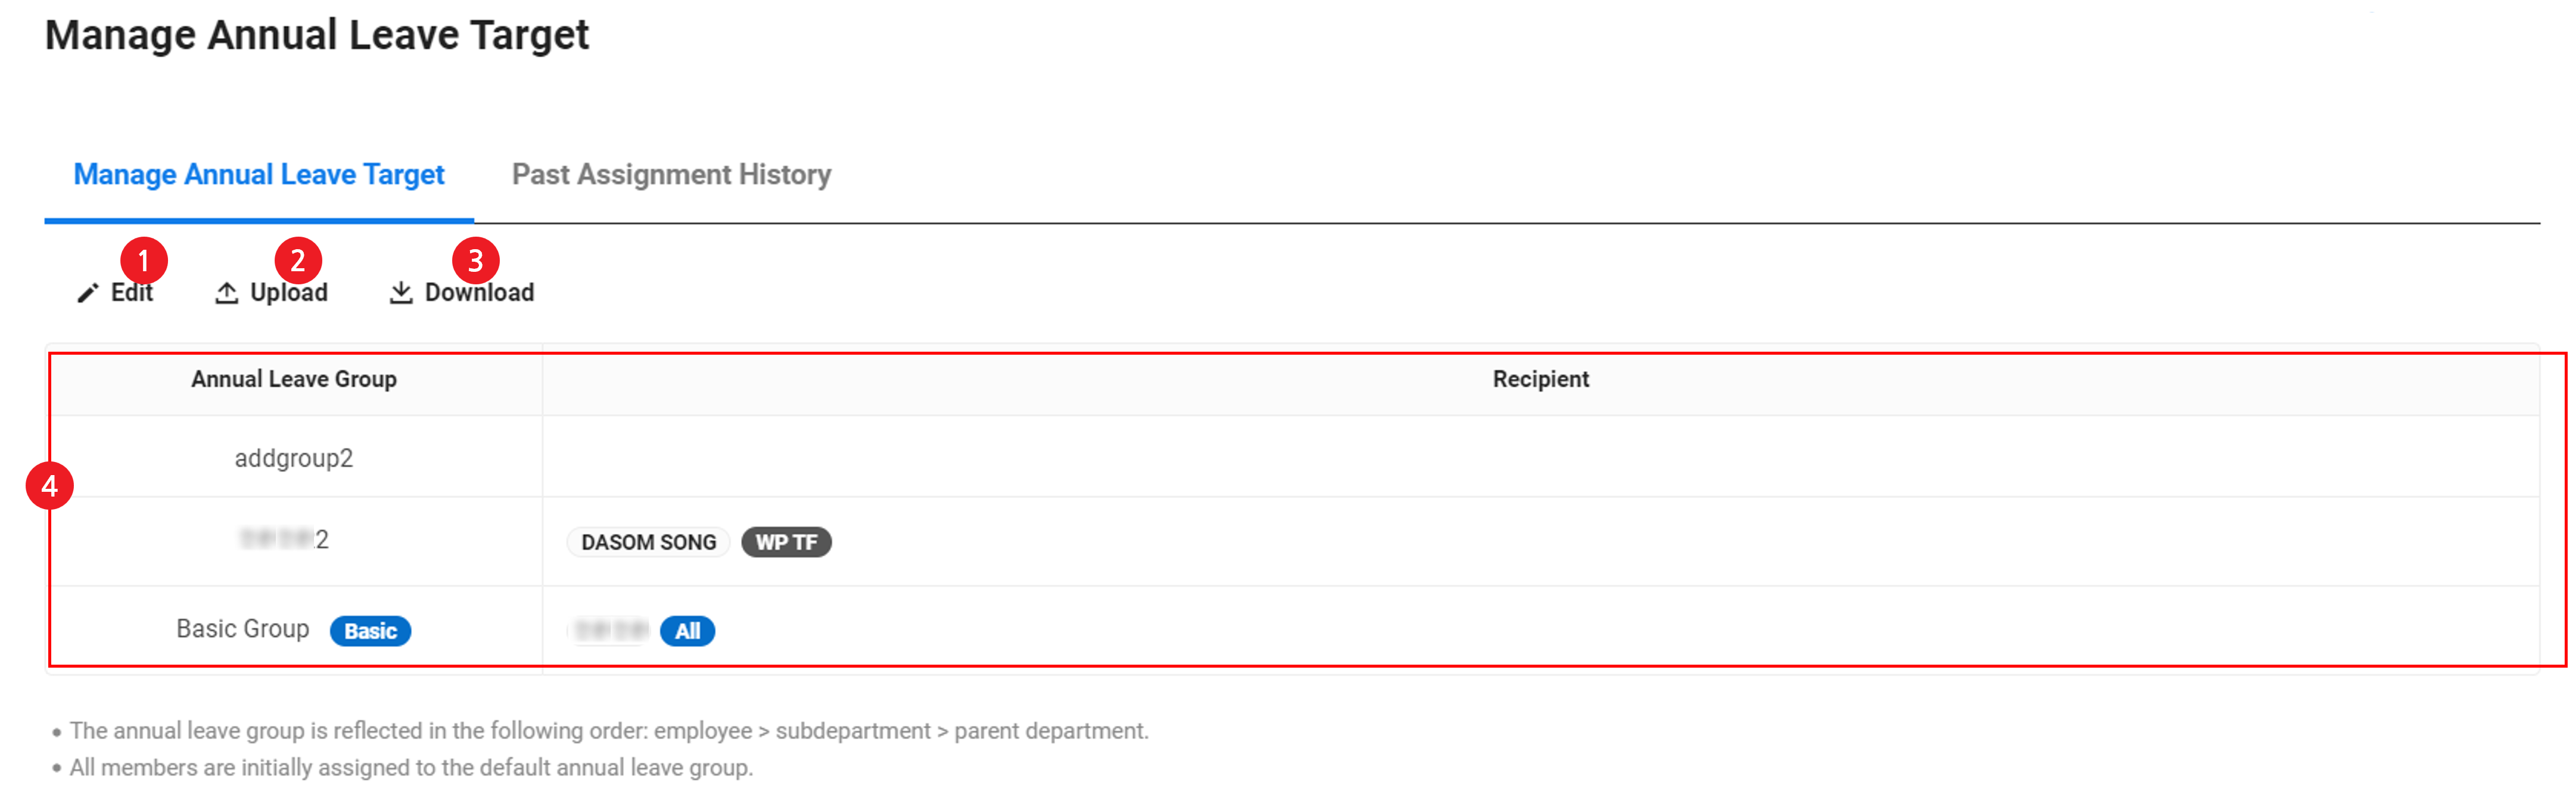
| Area | Description |
|---|---|
| ① Edit | Specify annual leave targets to be added to the annual leave group (See Add Annual Leave Target)
|
| ② Upload | Bulk upload annual leave targets (See Upload Annual Leave Target)
|
| ③ Download | Download annual leave targets as an Excel file (See Download Annual Leave Target)
|
| ④ Annual leave group history | It displays targets by annual leave group
|
Add Annual Leave Target
The following describes how to add targets to an annual leave group.
- Click the ‘Admin Menu’ at the top right of the PC web screen, and then click ‘Attendance’ in the pop-up window.
- Click at the top left of the screen.
- Click ‘Absence > Manage Annual Leave Target’ from the menu.
- Click 'Edit'.
- When bulk uploading annual leave targets, click 'Upload'.
- In the annual leave target assignment pop-up window, specify targets by annual leave group, and click 'OK'.
- Search by the employee or department name to add them.
- When selecting a department, its subdepartments are included. In this case, the same annual leave group is applied immediately to the new employees as well.
- If the company has enabled part-time employees, the part-time employees are included in the Search Employees, and you can assign annual leave groups to part-time employees.
- To delete a department or associate, click 'X' next to their name.
- All members are assigned to the default group, and the target area is marked with ‘All’,
- If each department is assigned to a different annual leave group, you can assign some employees or subdepartments of that department to the default annual leave group.
- Even for an annual leave group targeting all employees, you can apply different annual leave groups to subdepartments and individuals.
- The priority of annual leave groups is in the following order: employee → subdepartment → parent department.
- Search by the employee or department name to add them.
- Make sure that the changes are reflected properly in the Manage Annual Leave Target page.
- When changing annual leave groups, you can view the change history in the Past Assignment History tab.
All members whose annual leave group is changed will accrue new annual leaves.
- New annual leaves are created for the current year, and all past annual leaves are deleted.
- If the company uses the annual leave promotion system, annual leave promotion history is reset.
Upload Annual Leave Target
The following describes how to bulk add annual leave targets with an Excel file.
- Click the ‘Admin Menu’ at the top right of the PC web screen, and then click ‘Attendance’ in the pop-up window.
- Click at the top left of the screen.
- Click ‘Absence > Manage Annual Leave Target’ from the menu.
- Click ‘Upload’.
- Download the template file.
- Enter and save the information by distinguishing sheets by employee or department in the template file.
- Click the ‘ Attach the file from your PC, or drag the file here.’ area to upload the template you created.
- Click ‘Save’.
- You will be directed to the Upload Annual Leave Target page.
- Check the entered information, and then click ‘Save’.
- If a cell has an input error in the template, then it is marked in red, and you can check the error message at the bottom.
- Click ‘Download’ to download the information to be uploaded as an Excel file.
- The downloaded file is saved as
[YYYY-MM-DD]sample members.xlsxfile name in theDownloadfolder.
- The downloaded file is saved as
Download Annual Leave Target
You can download the annual leave assignment status of annual leave targets as a separate file.
The following describes how to download the annual leave group status.
- Click the ‘Admin Menu’ at the top right of the PC web screen, and then click ‘Attendance’ in the pop-up window.
- Click at the top left of the screen.
- Click ‘Absence > Manage Annual Leave Target’ from the menu.
- Click 'Download'.
- The list of annual leave group status is downloaded as an Excel file.
annualTarget.xlsx in the Downloads folder.Past Assignment History
In the Past Assignment History page, you can view the annual leave group by point in time for the annual leave group change target. You can also view the annual leave status at the time of change.
The View Past Assignment History page is laid out as follows.
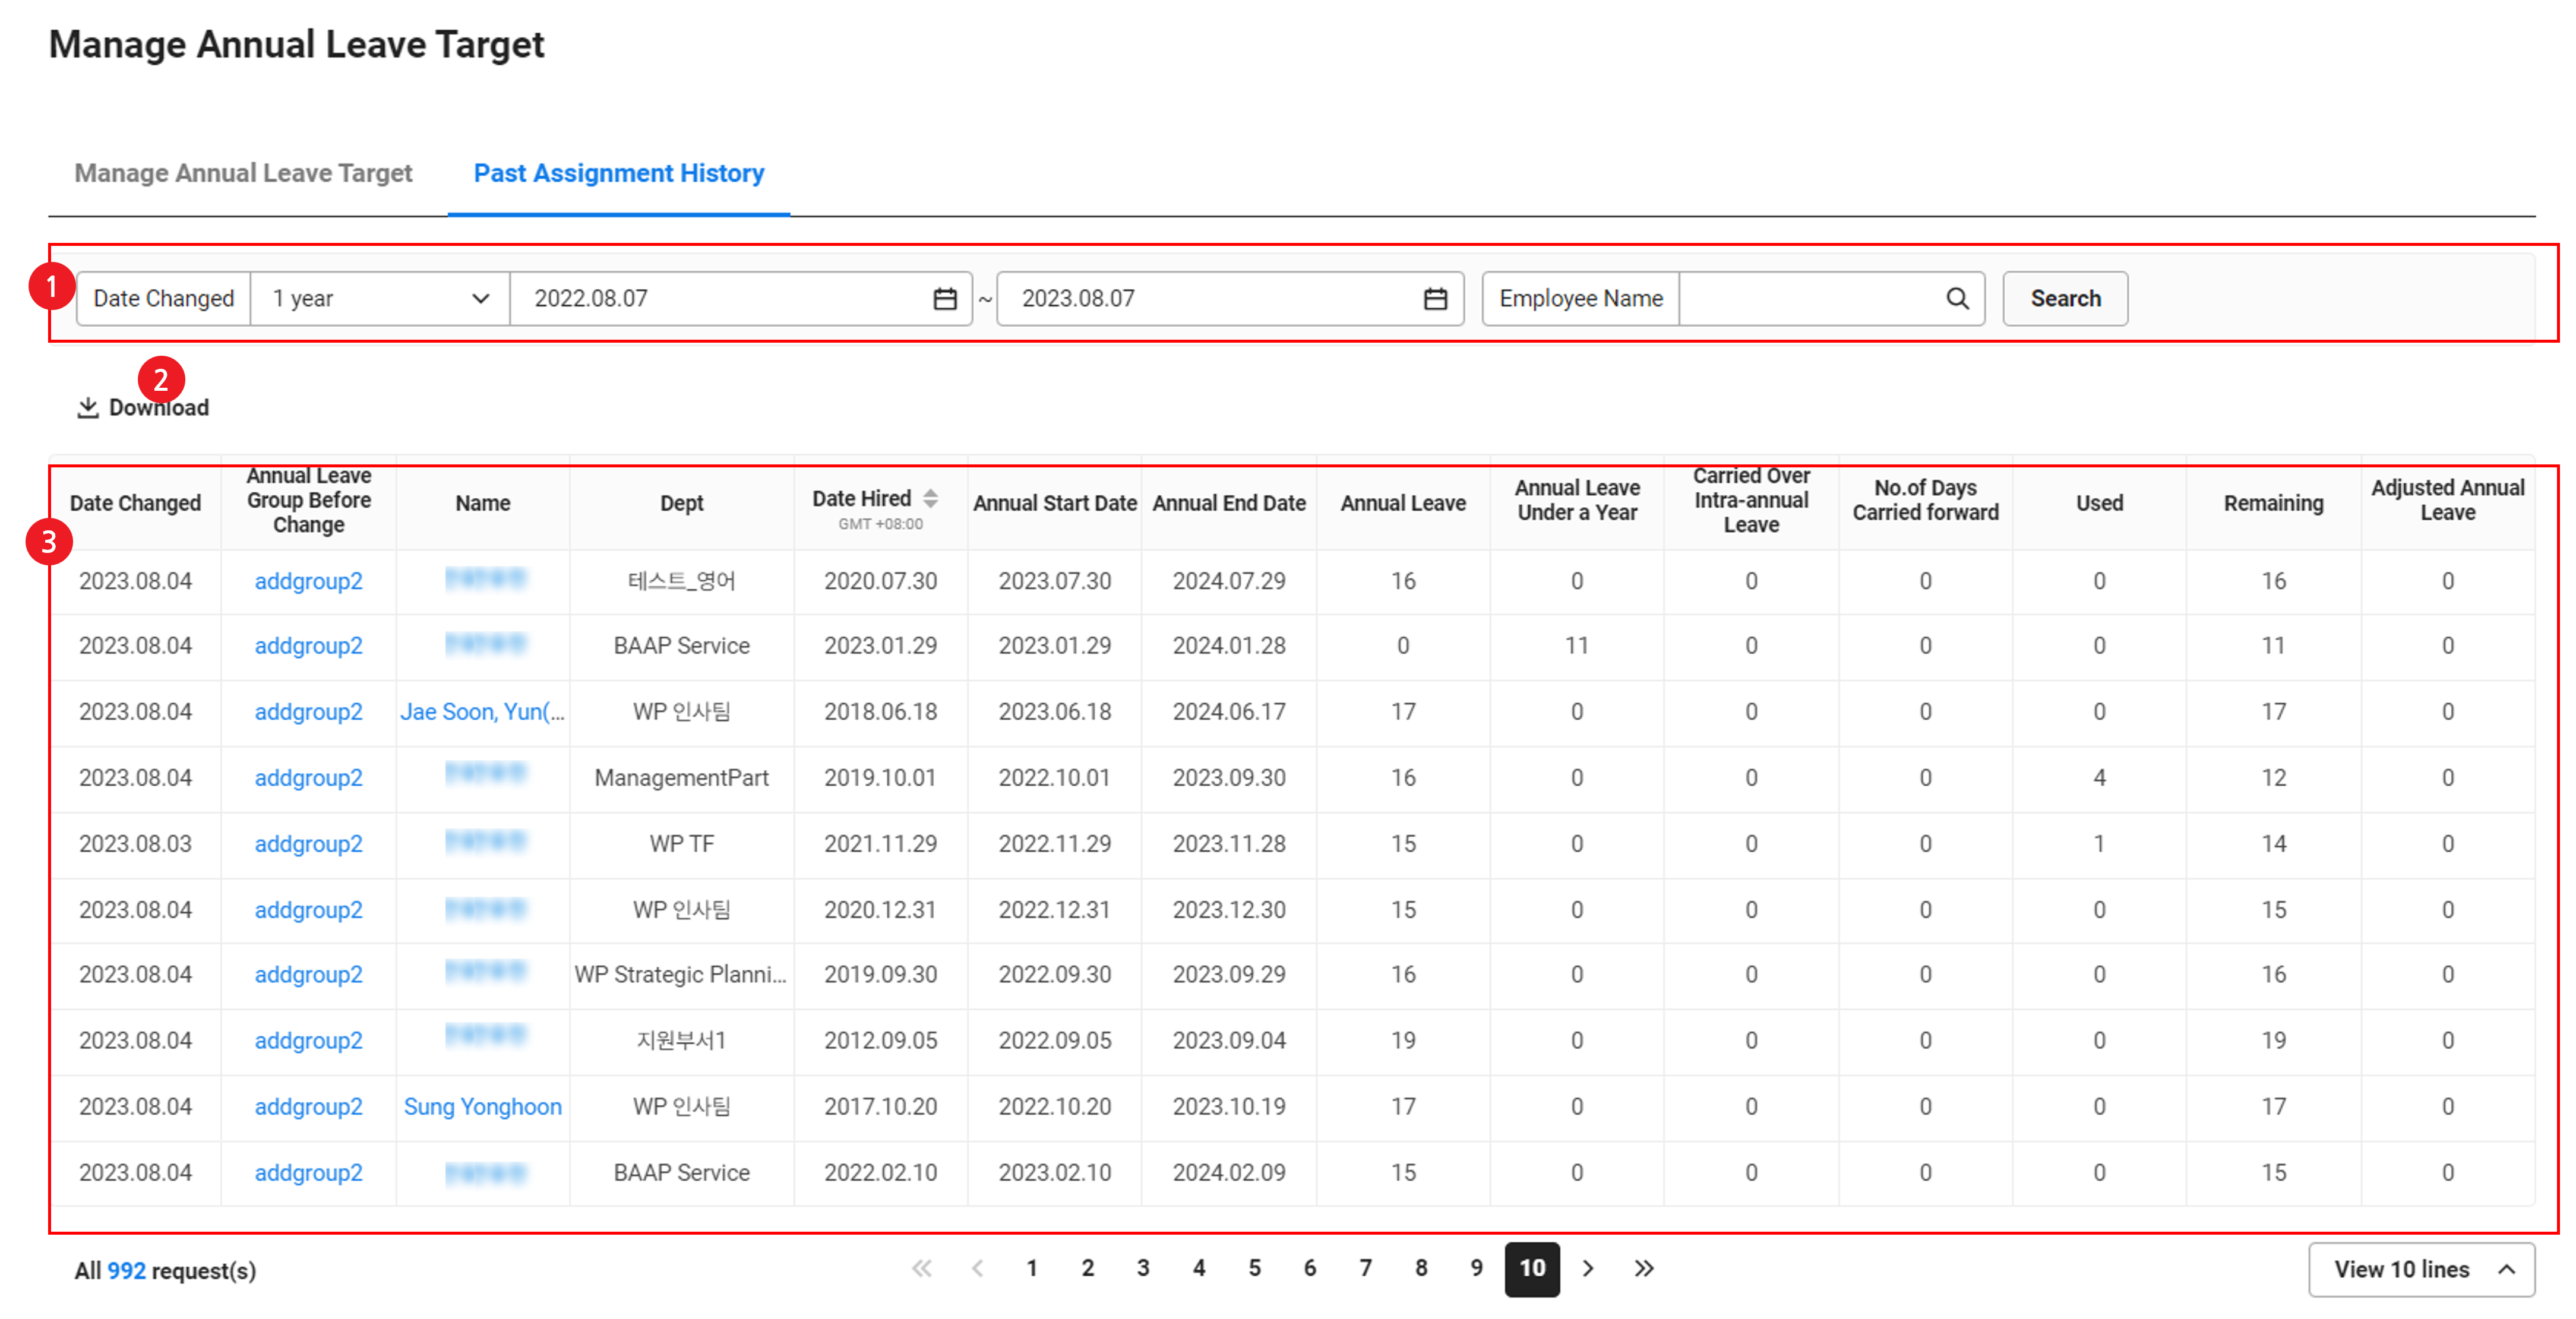
| Area | Description |
|---|---|
| ① Search area | Search past assignment history based on change date and employee name conditions |
| ② Download | Download past assignment history of annual leave groups as an Excel file |
| ③ Annual leave group change history and annual leave status before change |
|
The following are cases of annual leave group changes displayed in the Past Assignment History page.
- Modification of employee's annual leave group from the ‘Manage Annual Leave Target’
- If annual leave groups are specified by department, change of annual leave group due to department movement of an employee
- If annual leave groups are specified by department, change of annual leave group due to department movement cancellation of an employee
- Change of Default Annual Leave Group
- Deletion of annual leave group
- Change of employee's employment date (if the annual leave accrual standard is ‘Employment date’)
Manage Annual Leave Method
You can manage the annual leave standard, and set the number of annual leave days according to the years of service and carryover status of annual leave.
The annual leaves are calculated based on usage dates, and you can specify the use standards to accrue the next year's annual leave in advance, or close the annual leave of the previous year at a specific time.
Annual leave methods can be managed by separating it into general and Part-time Employee standards.
General Standard
In the General Standard page, you can manage the annual leave accrual standard by members' annual leave group.
All members are initially assigned to the ‘Default’ annual leave group. If you have a group that you want to manage annual leaves separately, you can add a annual leave group to manage it. See the Manage Annual Leave Target menu for information on how to specify targets by annual leave group.
The General Standard page is laid out as follows.
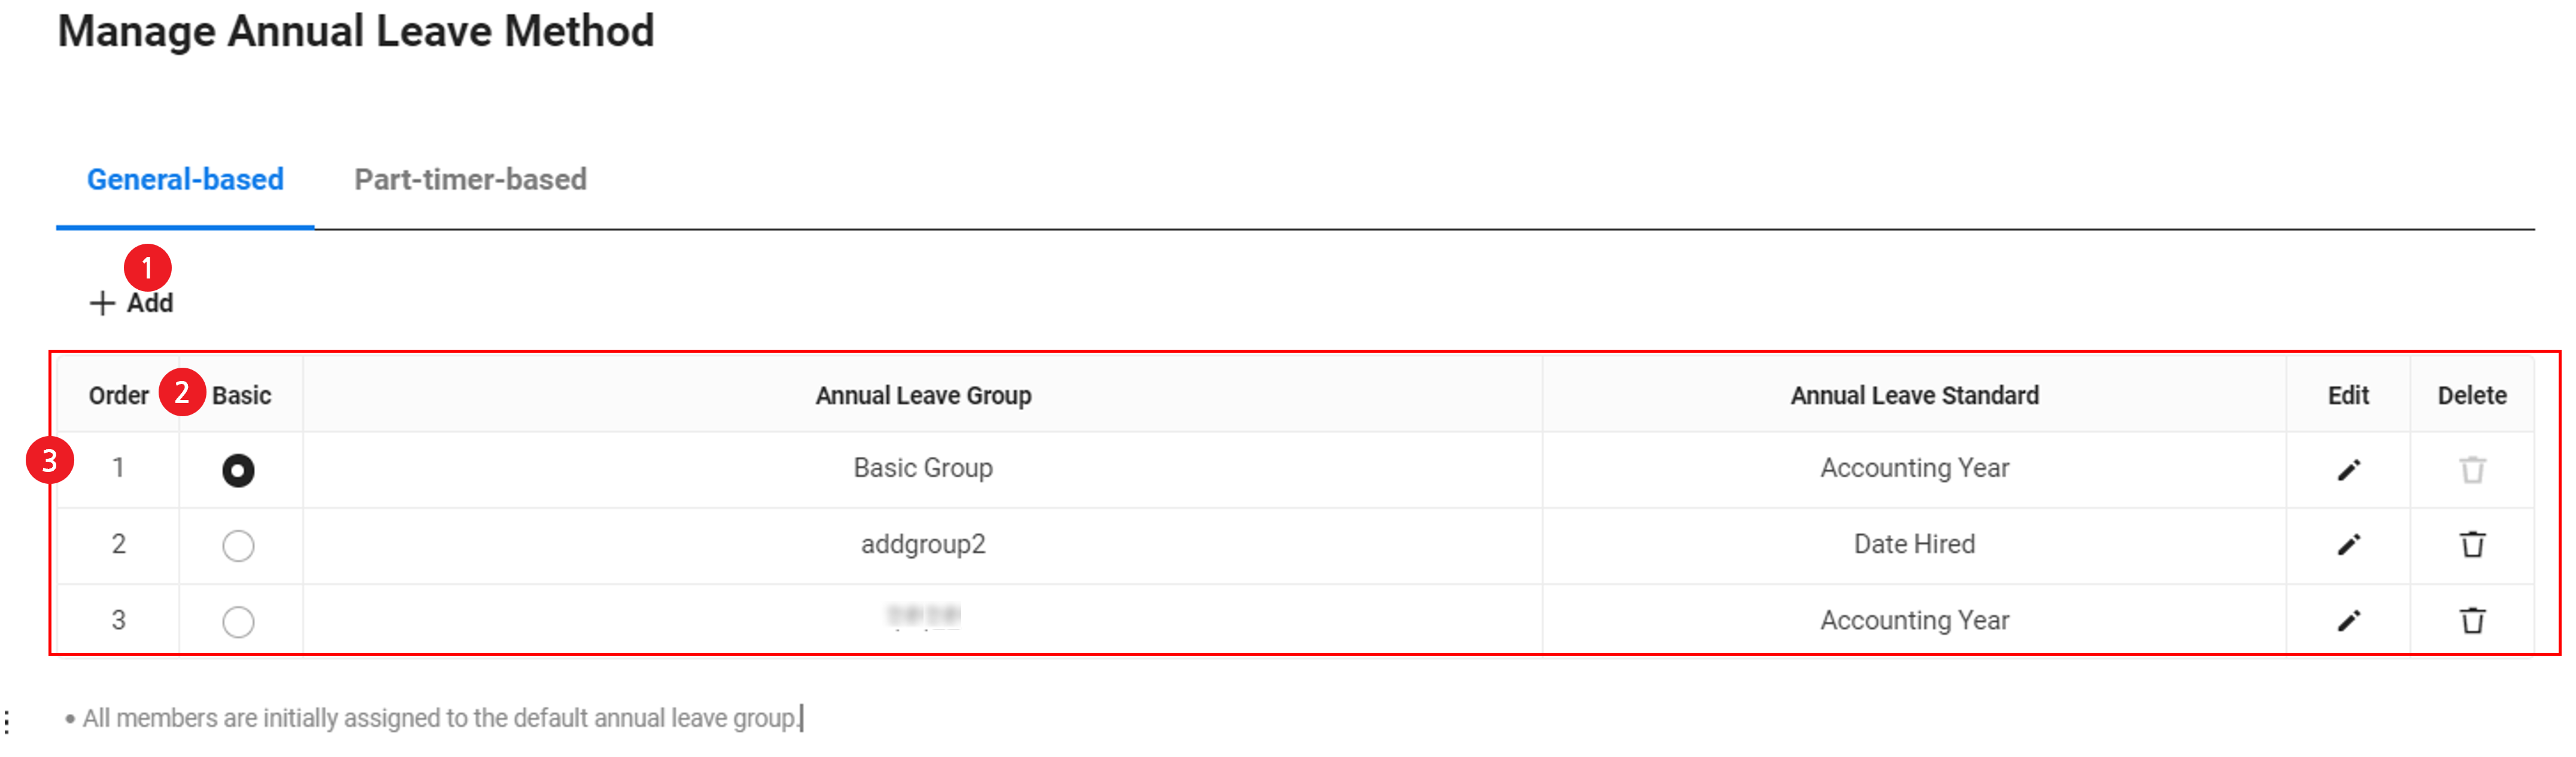
| Area | Description |
|---|---|
| ① Add | Add new annual leave groups (See ‘Add Annual Leave Group and Set Annual Leave Method’) |
| ② Basic | It displays the default annual leave group. All members are initially assigned to the default group
|
| ③ Annual leave group list | It displays the list of annual leave groups
|
Cautions when changing the default annual leave group:
- When changing the default annual leave group, all members assigned to the default annual leave group will be assigned with new annual leaves.
- New annual leaves for employees are accrued for the current year, and all past annual leaves are deleted.
- If the company uses the annual leave promotion system, annual leave promotion history is reset.
Cautions when deleting annual leave groups:
Targets in deleted annual leave groups are assigned to the default annual leave group and accrue new annual leaves.
- New annual leaves for employees are accrued for the current year, and all past annual leaves are deleted.
- If the company uses the annual leave promotion system, annual leave promotion history is reset.
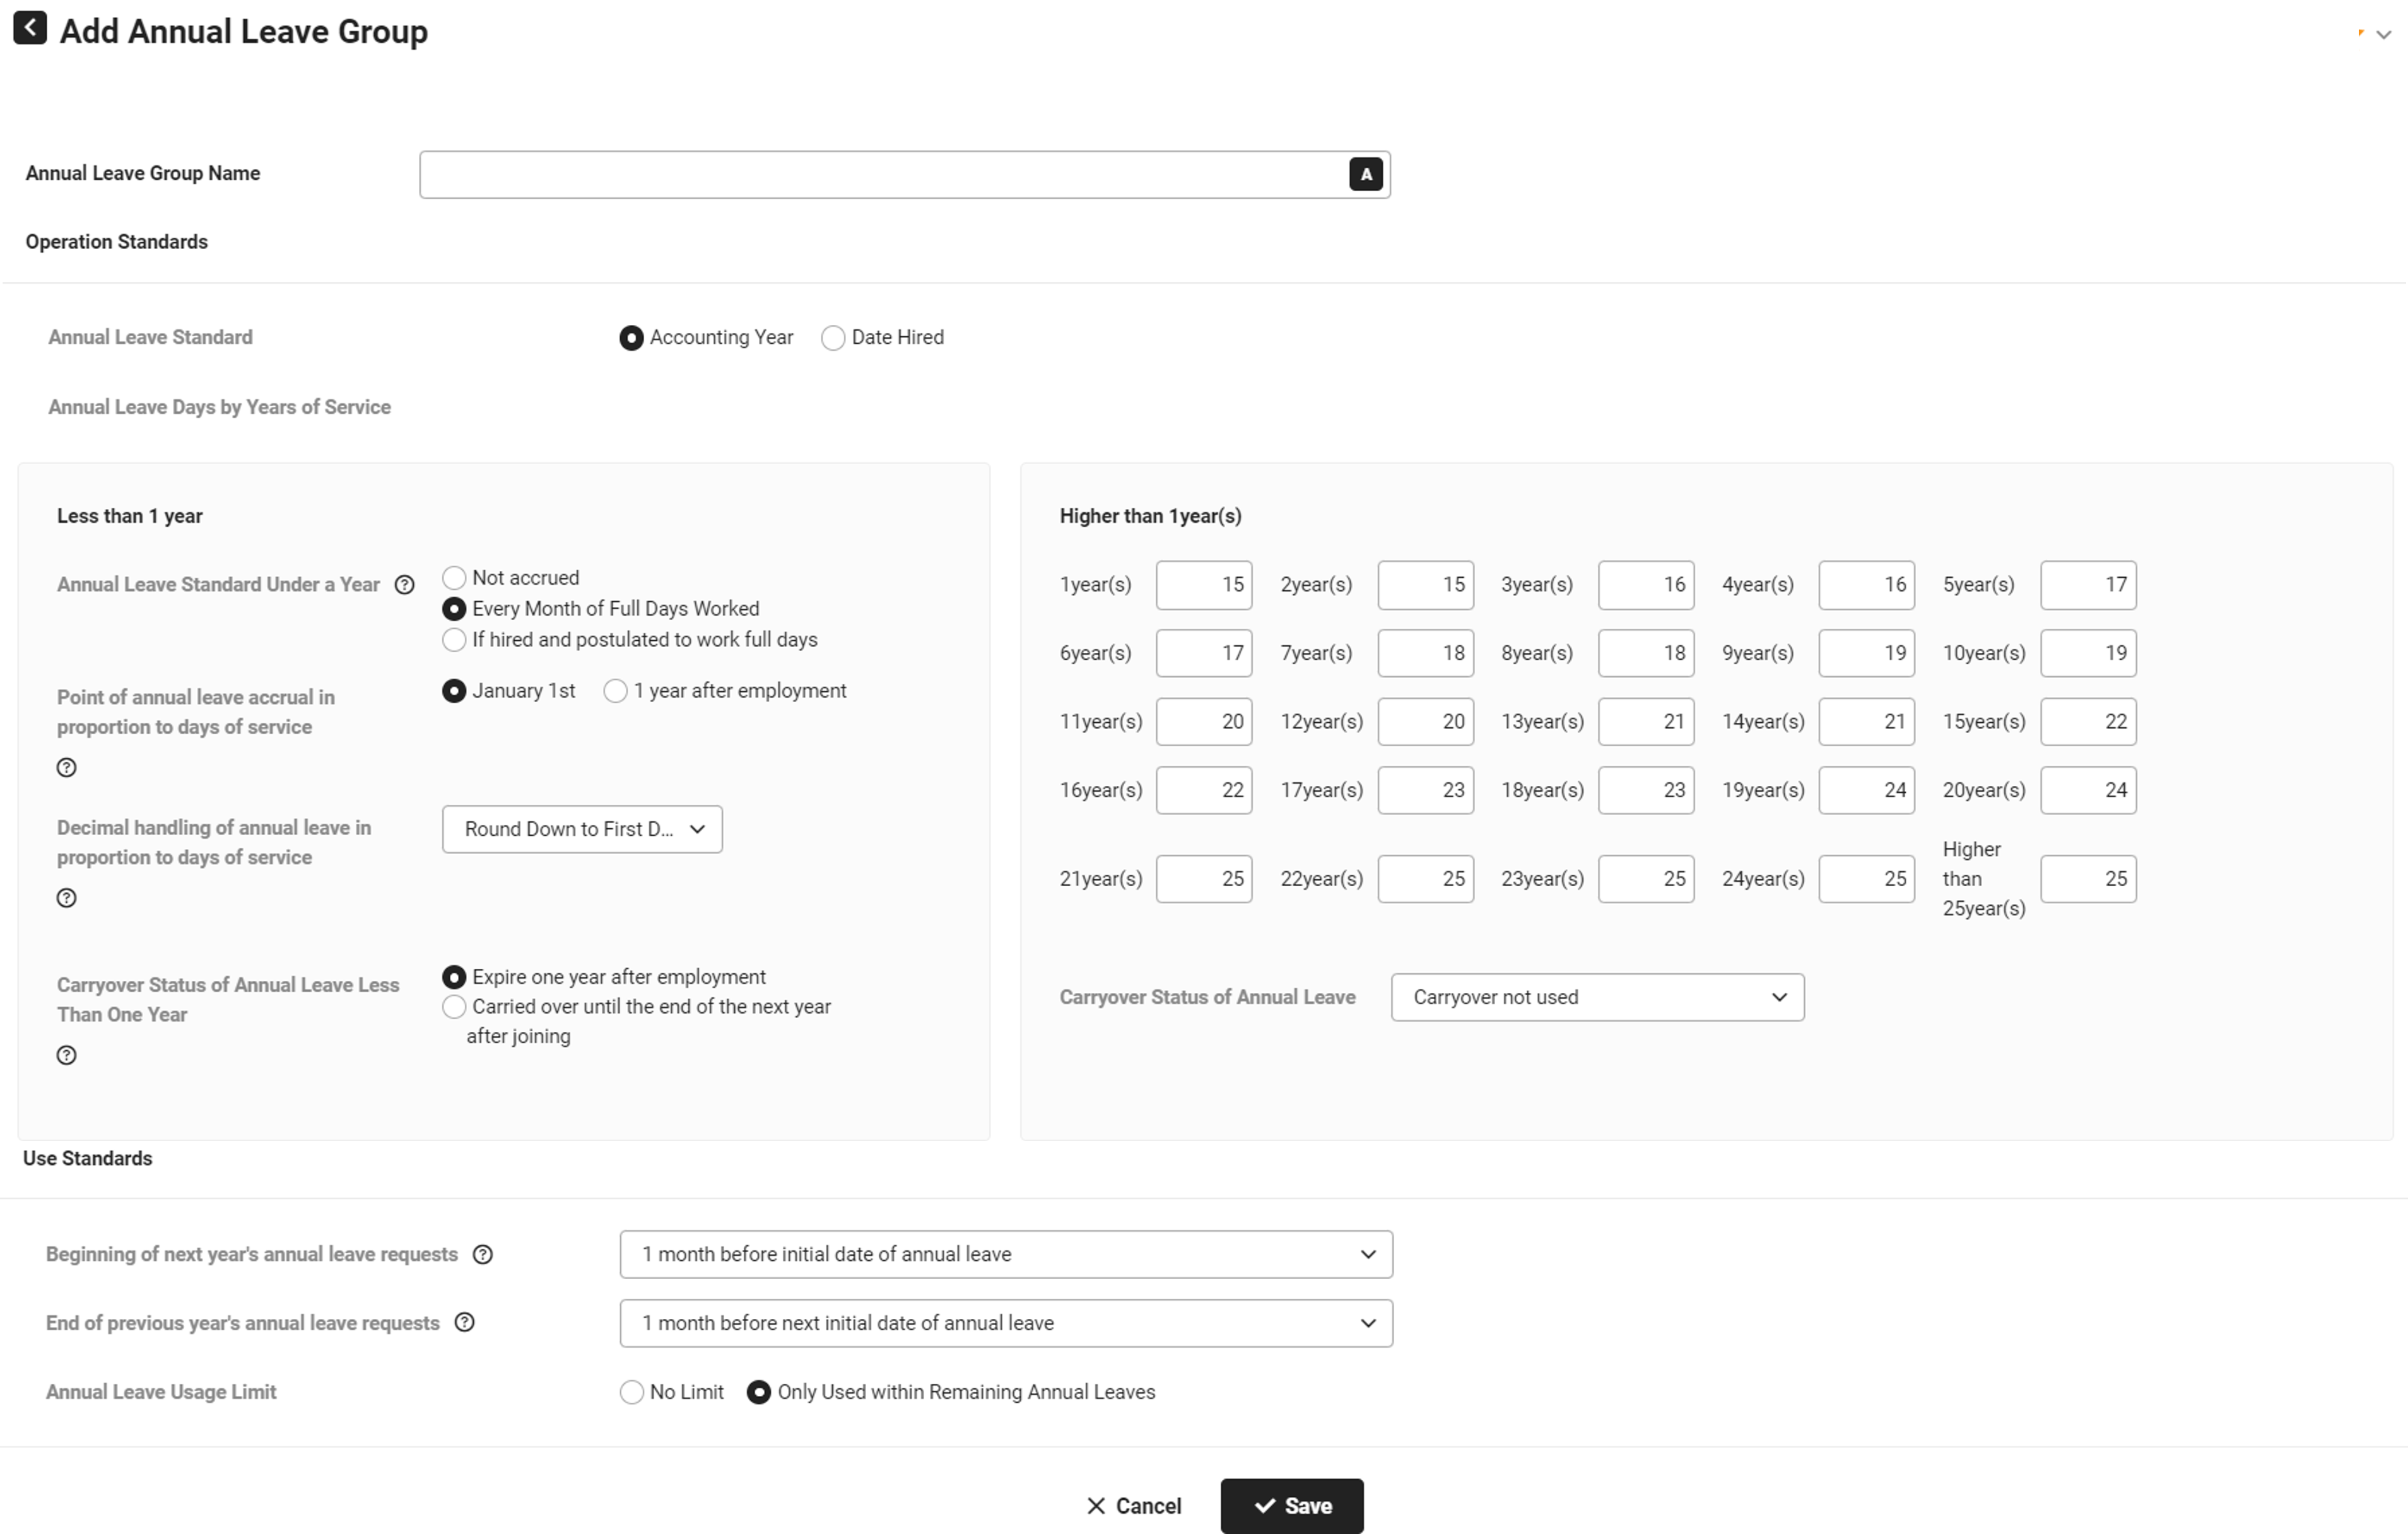
Add Annual Leave Group and Set Annual Leave Method
The following describes how to add an annual leave group and set annual leave methods.
- Click the ‘Admin Menu’ at the top right of the PC web screen, and then click ‘Attendance’ in the pop-up window.
- Click at the top left of the screen.
- Click ‘Absence > Manage Annual Leave Method’ from the menu.
- Click the 'General Standard' tab.
- Set the general annual leave standards, and click ‘Save’.
- Enter the annual leave group name.
- Annual Leave Accrual Standard: Select the standard for annual leave accrual (fiscal year, employment date).
- Fiscal Year: The annual leaves are granted to the employees uniformly based on January 1 of every year, which is the start of the fiscal year.
- Employment Date: The annual leave for the year is granted on the employment date of every year.
- Annual Leave Days by Years of Service: Set the annual leave days by years of service. You can enter up to three decimal places.
- Annual Leave Accrual Standard Less Than a Year: Set the annual leave accrual standard for employees with less than a year of service.
- Not accrue: No annual leaves are provided for employees with less than a year of service.
- Every Full Month of Service: 1 day of annual leave is given for every full month of service for midway recruits.
- If Hired and Postulated to Work Full Days: Assumes the full service for the year, and grants the annual leave for the remaining period for the year collectively at the time of joining.
- Point of Annual Leave Accrual in Proportion to Days of Service (Displayed if Annual Leave Standard is Fiscal Year): It is the accrual time for the annual leave provided in the beginning of the year after employment according to the ratio of service days from the previous year.
- January 1: It is provided on January 1 of the year after employment according to the ratio of service days from the previous year.
- 1 Year After Employment: It is provided one year after employment according to the ratio of service days from the previous year.
- Decimal Handling of Annual Leaves in Proportion to Days of Service (displayed if Annual Leave Accrual Standard is Fiscal Year): It is the method of handling decimals if ratio of service days can't be divided by 365 days.
- Based on the fiscal year, the annual leave of the second year employee is calculated by ‘annual leave accrual in proportion to days of service for the previous year + annual leave for less than a year to be accrued this year’. If decimals are created for the annual leave accrual in proportion to days of service for the previous year, you can select from round off, round up, and round down to handle it. (E.g., If you select round off to one decimal place, it is created as an integer by checking the tenths digit. If you select round off to two decimal places, it is applied to one decimal place by checking the hundredth digit.)
- Annual leave accrual in proportion to days of service for the previous year for second year employees are calculated from ‘number of days of service/365 * 15.’
- The time of accrual for annual leave in proportion to days of service can be delayed under agreement with employees. Attendance service provides an option to accrue this at a point when it has elapsed a full year. The annual leaves accrued at that point can be used until the end of the next year, regardless of the annual leave carryover settings.
Make sure to check if it suits your work conditions before changing the accrual time.
Full Service in Every Full Month of Service:
- The full service in Every Full Month of Service of the Annual Leave Accrual Standard Less Than a Year considers the inclusion status of unpaid leaves It assumes it is a full service and calculates it if there is no unpaid leaves.
- For a company that uses Appointment, if a leave appointment is processed to an item with its Include Clock-in Days in Annual Leave Calculation set to ‘No’ under Leave Classification Settings, it is processed as unpaid leave.
- Under the method of providing annual leaves for less than a year upon each month of full service, the annual leave for the month is not provided if the previous month includes even one day of unpaid leave.
- Based on the fiscal year, the annual leave of the second year employee is calculated by ‘annual leave accrual in proportion to days of service for the previous year + annual leave for less than a year to be accrued this year’. If decimals are created for the annual leave accrual in proportion to days of service for the previous year, you can select from round off, round up, and round down to handle it. (E.g., If you select round off to one decimal place, it is created as an integer by checking the tenths digit. If you select round off to two decimal places, it is applied to one decimal place by checking the hundredth digit.)
- Annual Leave Accrual Standard Less Than a Year: Set the annual leave accrual standard for employees with less than a year of service.
- When it's one year or more:
- The accrued annual leave according to the years of service is displayed.
- The number of annual leave days by years of service can be edited according to the company regulations. In such case, the accrued annual leave according to the years of service is automatically adjusted.
- According to the Labor Standards Act, after 2 full years of service, 1 annual leave for third and fourth year, and 2 annual leaves for fifth and sixth year are additionally accrued.
- When the annual leave accrues based on the fiscal year (January 1 - December 31), it is easier to calculate annual leaves. However, the remaining days can differ when settling the annual leave for retirement.
- Annual Leave Carryover Status: Select whether annual leaves are carried over.
- Carryover not used: Does not carryover remaining annual leaves.
- Carry over overused annual leave only: Carries over only the overused annual leaves to the next year.
- Carry over all annual leaves (excluding overused leaves): Carries over annual leaves of all years that are not overused, excluding annual leaves for less than a year.
- Carry over all annual leaves (including overused leaves): Carryover Status of Annual Leaves for Less Than a Year:
- Set whether to carry over the annual leave provided for months of full service. Set whether to carry over the annual leave provided for months of full service. Annual leaves in proportion to the days of service follow Carryover status of annual leave.
- Expire one year after employment: The annual leaves for less than a year expires one year after employment.
- Carry over until the end of the following year of employment: Carries over the annual leaves for less than a year until the end of the year after employment.
- Beginning of Next Year’s Annual Leave Requests: Set the point of accrual for the next year, to enable request for next year's annual leaves in advance.
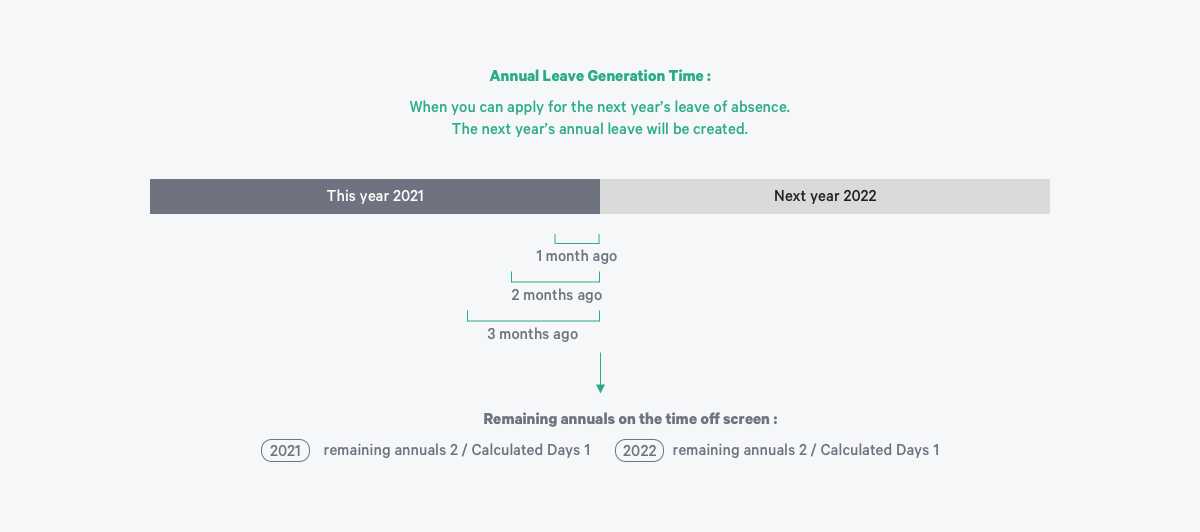
- Initial date of annual leave: This is the date when the next year's annual leave is accrued. You can request the next year's annual leave starting on this date.
- This is 1/2/3 month(s) before the date that the next year's annual leave is accrued. You can request the next year's annual leave starting on this date. For instance, if it's set as 1 month before the initial date for annual leave, you can start requesting the next year's annual leave from 1 month before (e.g.,: December 1 of this year) the start of next year (e.g., January 1).
- For companies with an employment date basis, the batch operation is performed at the beginning of every day based on the employment date of each employee. Annual leaves are automatically accrued according to the point of annual leave accrual settings.
- End of Previous Year’s Annual Leave Requests: Specify the extent to which you can request the previous year's annual leave. This feature sets the closing date for the annual leave request when annual leaves are used first, and requested later. You can request absence schedules within the specified period, and the annual leaves for the previous year can no longer be requested after this period.
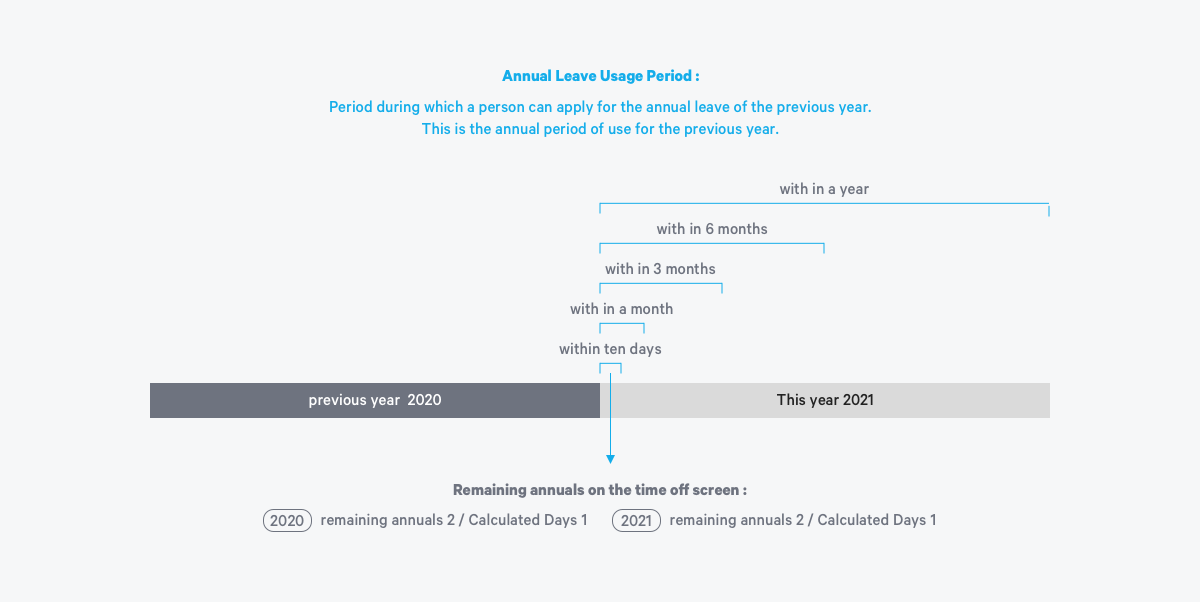
-
- Before initial date of next annual leave: The request for Absence Schedule > Annual Leave is available until the day before the date the next year's annual leave accrues. For instance, if the next year's annual leave accrues on January 1, you need to request the absence schedule by December 31 of this year.
- Within 10 days/1 month/3 months/6 months/1 year of initial date of next annual leave: The request for ‘Absence Schedule > Annual Leave’ is available within 10 days/1 month/3 months/6 months/1 year of the date the next year's annual leave accrues. For instance, when set to Within 10 days of initial date of next annual leave, you can request the absence schedule within 10 days of the date the next year's annual leave accrues.
- No limit: You can request the annual leave of the previous year, regardless of the initial date for next year's annual leave.
- Annual Leave Usage Limit: Set the annual leave usage limit.
- No limit: You can use more annual leaves than the remaining annual leaves for this year.
- Only used within remaining annual leaves: Limit the request for annual leave to the remaining annual leaves for this year, and prevent the overuse of annual leave.
Edit Annual Leave Group
The following describes how to edit an annual leave group.
- Click the ‘Admin Menu’ at the top right of the PC web screen, and then click ‘Attendance’ in the pop-up window.
- Click at the top left of the screen.
- Click ‘Absence > Manage Annual Leave Method’ from the menu.
- Click the 'General Standard' tab.
- Edit the content, and then click 'Save'.
- You can only edit the annual leave group name or usage standards (start of next year's annual leave requests, end of previous year's annual leave requests, annual leave usage limit). Edit items as necessary.
- If you want to change the annual leave accrual standard or number of annual leave days by years of service, create a new annual leave group.
Set Part-time Employee Leave Standard
If the company has enabled part-time employee, then you can set the leave standard for part-time employees.
The following describes how to set leave standard for part-time employees.
- Click the ‘Admin Menu’ at the top right of the PC web screen, and then click ‘Attendance’ in the pop-up window.
- Click at the top left of the screen.
- Click ‘Absence > Manage Annual Leave Method’ from the menu.
- Click the ‘Part-time Employee Standard’ tab.
- If necessary, enter the search conditions in the search window, and then click ‘Search’.
- Holiday Generation Status by Part-time Employee list that meets the search conditions will be displayed.
- Click button for the part-time employee to set the holiday generation standard and click ‘Save’.
- Holiday Generation: Select the standard for holiday generation.
- Not automatically accrued: It is displayed as the default value. The HR Admin manually adjusts and assigns the days of leave. The leave days can be adjusted through ‘Adjust Annual Leave in Attendance Status > View/Edit Annual Leave’ menu. Enter and save the number of leave days to be given and the reasons in the Annual Leave Adjustment items for part-time employees. You can check the adjustment history in the ‘Annual Leave Adjustment History’ tab.
- 1 day for every 1 month service: 1 day is automatically given for every full month of service.
- Leave Usage Method: Select the leave usage method.
- All Day (Default): Select if basic work hours for work arrangement is 8 hours per day.
- Half day: Select if basic work hours for work arrangement is 4 hours per day. User can request it by selecting from All day/Morning/Afternoon.
- 2 hours/1 hour/30 minutes: You can set the leave to be available by the units of hours.
- Holiday Generation: Select the standard for holiday generation.
Manage Annual Leave Promotion Target
The Manage Annual Leave Promotion Targets menu is displayed when the company applies the annual leave promotion policy. When the company uses the annual leave promotion, set Apply Promotion Policy for Usage of Annual Leave to ’Use’ in ‘Attendance Service > Settings’.
The promotion policy for use of annual leave refers to a policy that releases the employer of the financial compensation responsibility for unused annual leaves when the employee has not used annual leaves, even if the employer promoted the use of the employee's annual leaves, according to Article 61 of the Labor Standard Act.
Annual leave promotion can be applied to both employees with less than a year of service and employees with a year or more of service.

Annual Leave Promotion for Employees With Less Than a Year of Service
Promote unused annual leaves of accrued annual leaves within a year of employment from the date of employment to the promotion date for the employees with less than a year of service.
For employees with less than a year of service, one annual leave is accrued when working a month without absence and 11 leaves are accrued until one year after employment. Promote the unused annual leaves for employees with less than a year of service by dividing into two times, pre (9 days) and post (2 days).
Annual leaves subject to promotion for employees with less than a year of service
- For annual leaves subject to promotion for employees with less than a year of service, only the accrued leaves for less than a year are included and annual leaves by year or adjusted annual leaves are not included.
Pre-promotion
The following describes how to promote 9 pre-annual leaves granted to employees with less than a year of service. The pre-promotion is performed through notification urge (primary) and specified notification (secondary).
If unused pre-annual leaves (9 days) remain at the time of 3 months before one year after employment, the employee is the target of primary urge notification. The company shall send a promotion instruction email to the target within a specified period (10 days).
- The promotion is completed if the employee submits the annual leave usage plan within the primary urge notification period (10 days). For remaining annual leaves by the annual leave end date, the company has no obligation for the compensation.
- See View and Promote Annual Leave Promotion Target and ‘Urge Notification For Employees With Less Than a Year of Service’.
The employees who have not submitted the annual leave usage plan within the period are the target of secondary specified notification. The company sends the instruction email on expirations within the annual leave expiration date to target employees.
- If the company sends the specified notification email within the specified period, then the urge is completed.
- See ‘Specified Notification For Employees With Less Than a Year of Service’.
Post-promotion
The following describes how to promote 2 annual leaves granted to employees with less than a year of service after pre-promotion. The post-promotion is performed through notification urge (primary) and specified notification (secondary).
If unused pre-annual leaves (2 days) remain at the time of one month before one year after employment, the employee is the target of primary urge notification. The company shall send a promotion instruction email to the target within a specified period (5 days).
- The promotion is completed if the employee submits the annual leave usage plan within the primary urge notification period (10 days). For remaining annual leaves by the annual leave end date, the company has no obligation for the compensation.
- See View and Promote Annual Leave Promotion Target and ‘Urge Notification For Employees With Less Than a Year of Service’.
The employees who have not submitted the annual leave usage plan within the period are the target of secondary specified notification. The company sends the instruction email on expirations within the annual leave expiration date to target employees.
- If the company sends the specified notification email within the specified period, then the urge is completed.
- See ‘Specified Notification For Employees With Less Than a Year of Service’.
Annual Leave Promotion for Employees With a Year or More of Service
The promotion for use of annual leave for employees with a year or more of service is performed through notification urge (primary) and specified notification (secondary).
The employees with remaining annual leaves 6 months before the annual leave end date are the target of the primary notification urge.
The company searches for the annual leave promotion targets and sends the instruction email for submission of annual leave usage plan. The promotion is completed if the employee submits the annual leave usage plan within the primary urge notification period (10 days). For remaining annual leaves by the annual leave end date, the company has no obligation for the compensation.
- See View and Promote Annual Leave Promotion Target and ‘Urge Notification For Employees With a Year or More of Service’,
The employees who have not submitted the annual leave usage plan within the period are the target of secondary specified notification. The company sends the instruction email on expirations within the annual leave expiration date to target employees. If the company sends the specified notification email within the specified period, then the urge is completed.
- See ‘Specified Notification For Employees With a Year or More of Service’.
View and Promote Annual Leave Promotion Target
The Manage Annual Leave Promotion Targets page is laid out as follows.
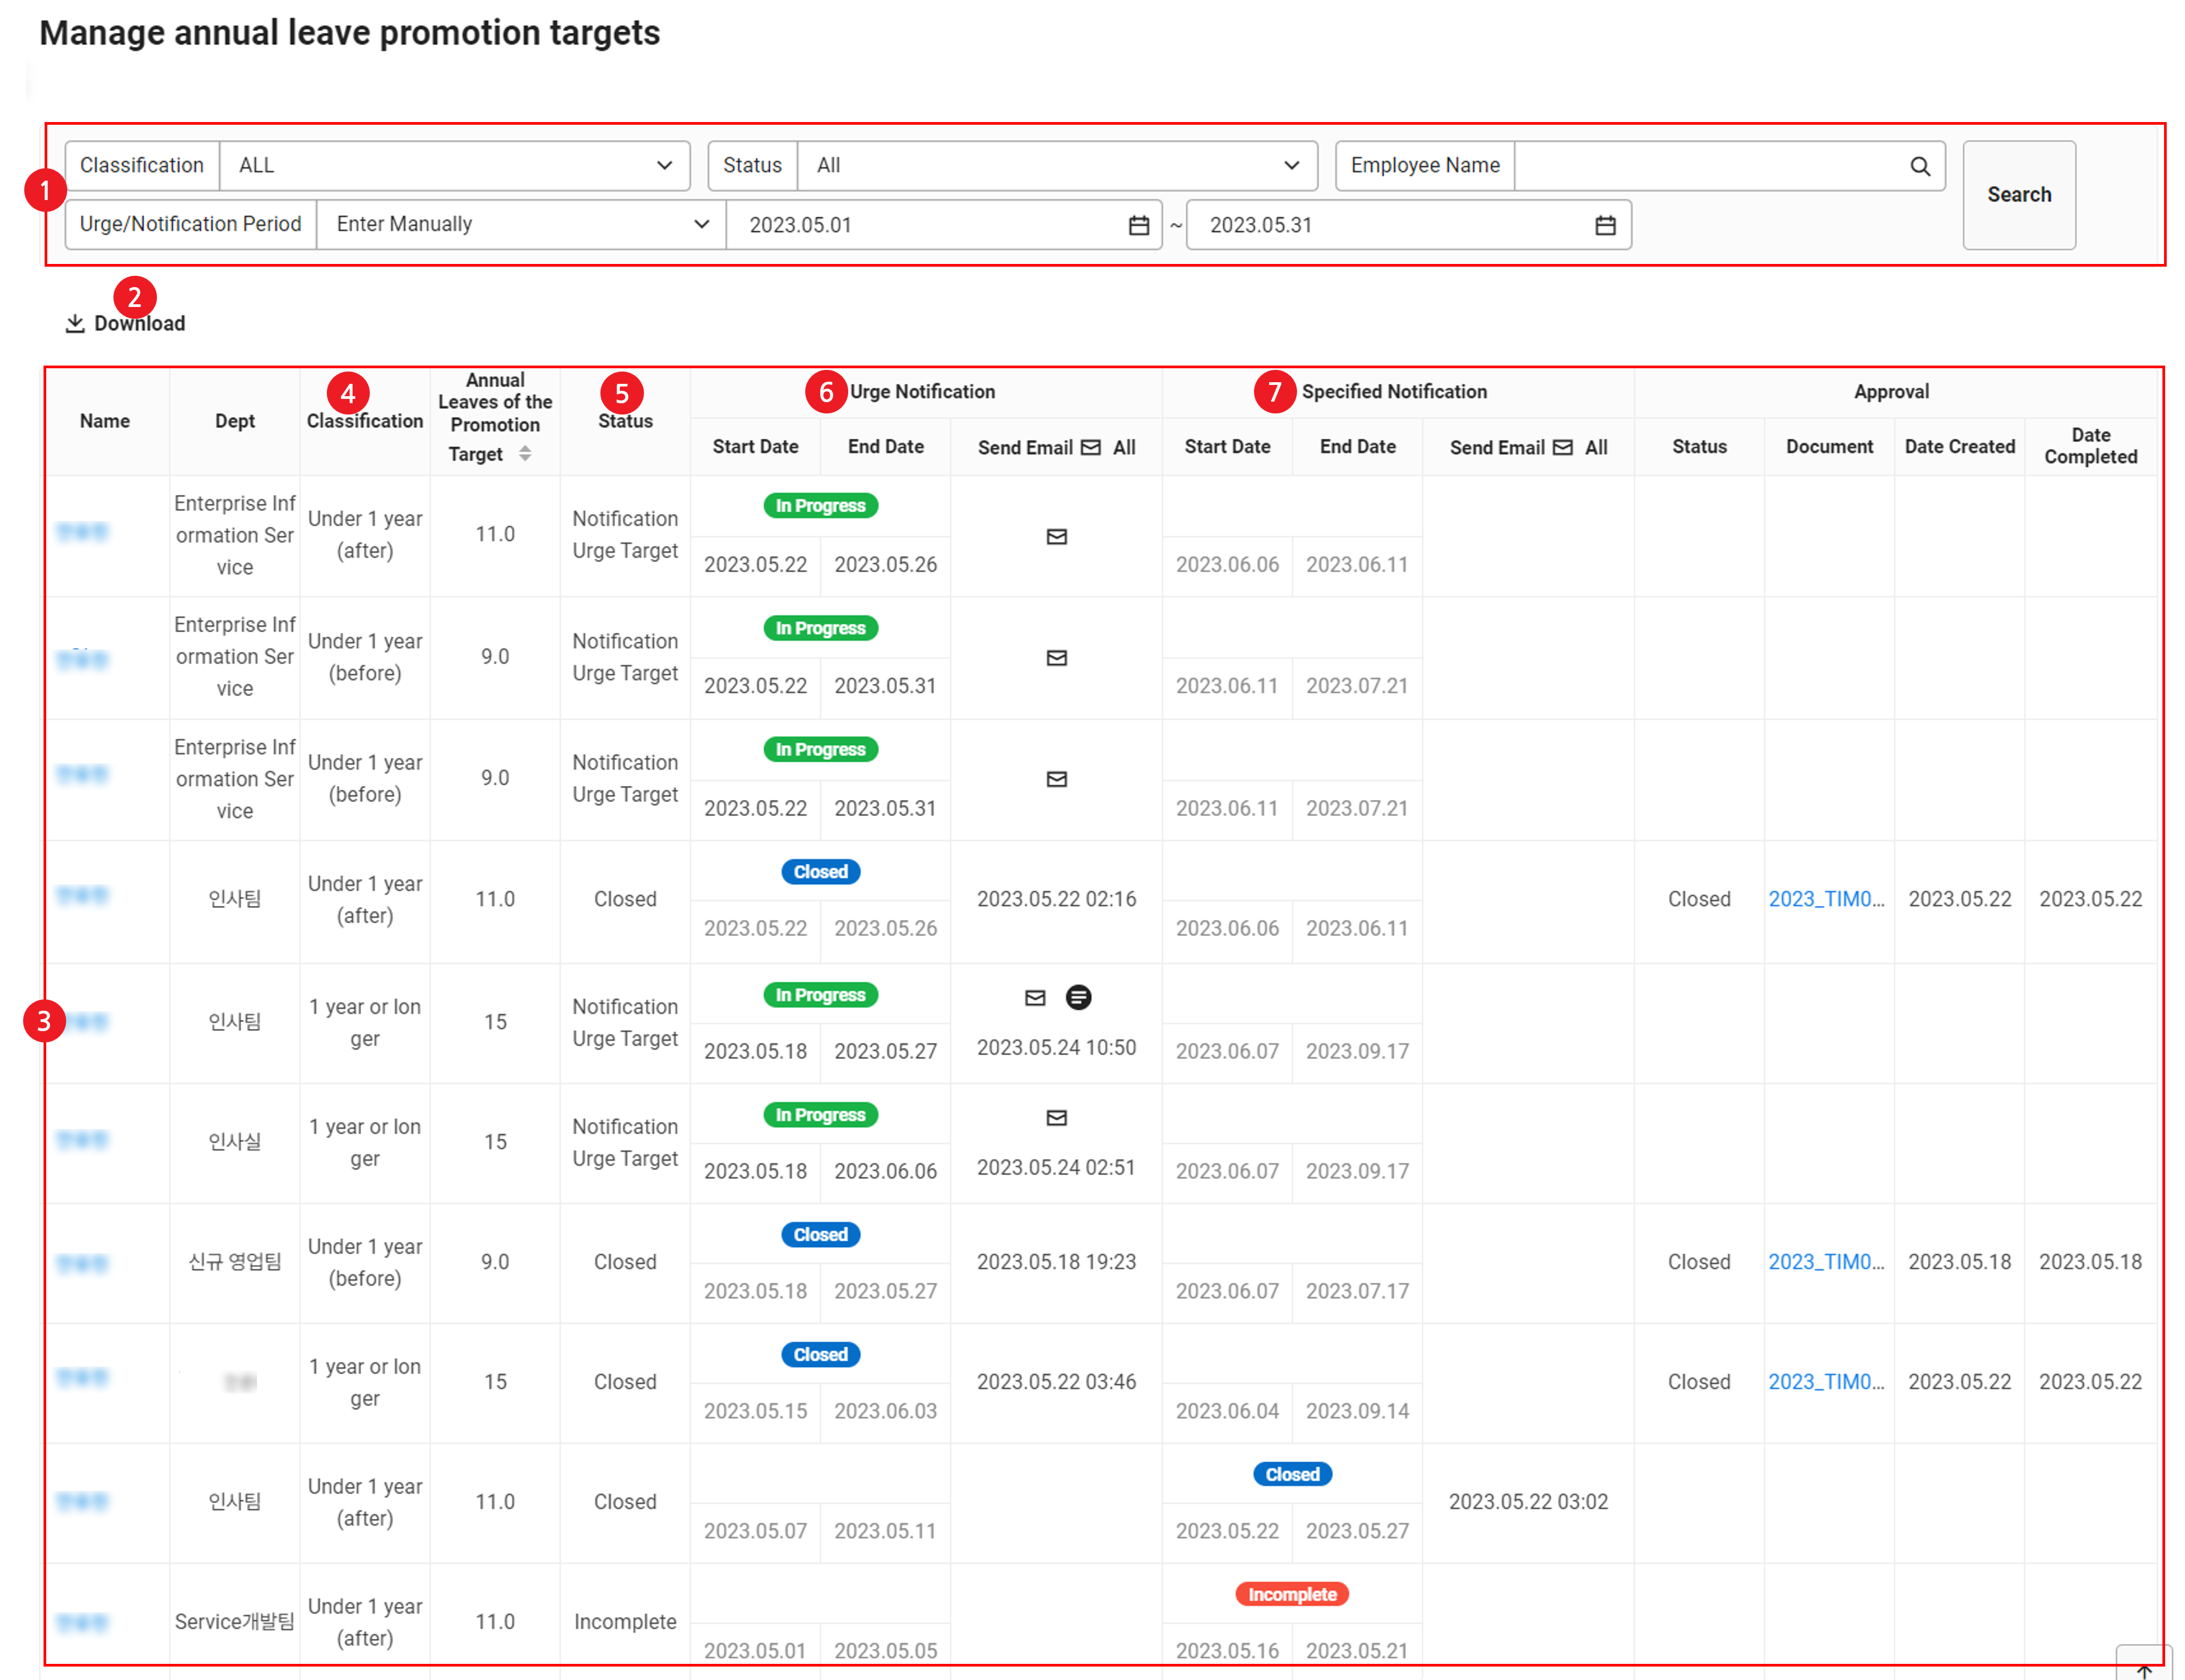
| Area | Description |
|---|---|
| ① Search window | Search annual leave promotion target management status based on search conditions |
| ② Download | Download Annual Leave Promotion Target Management Status |
| ③ Annual leave promotion target list | Check the status of annual leave promotion targets |
| ④ Annual Leave Promotion Type/Target |
|
| ⑤ Status | It displays urge status by employee
|
| ⑥ Urge notification | Send instruction emails to submit the annual leave usage plan to the primary urge notification target employees
|
| ⑦ Specified Notification | Send instruction emails regarding expiration of annual leave to the employees who have not submitted the annual leave usage plan within the primary urge notification period.
|
If you set all annual leaves excluding annual leave less than one year to be carried over in the carryover status of annual leave section in ‘Attendance > Absence > Manage Annual Leave Standards’ menu, then unused annual leaves carried over from the previous year will be excluded from promotion target annual leaves and overused annual leaves carried over will be ignored.
Urge Notification for Employees With Less Than a Year of Service
You can check the urge notification period and status of targets whose promotion type is Less than a year (pre) or Less than a year (post), and you can send Instructions for creating the annual leave usage plan emails.
The following describes how to check employees' urge notification status and send emails.
- Click the ‘Admin Menu’ at the top right of the PC web screen, and then click ‘Attendance’ in the pop-up window.
- Click at the top left of the screen.
- Click ‘Absence > Manage Annual Leave Promotion Targets’ from the menu.
- If necessary, enter the search conditions in the search window, and then click ‘Search’.
- Annual leave promotion target status list that meets the search conditions will be displayed.
- Check the status of each employee in the **Urge Notification** on the list and send an email.
- The urge notification target is an employee who has unused remaining annual leaves at the time of 3 months before one year after employment in the case of ‘Pre-promotion’ and 1 month before one year after employment in the case of ‘Post-promotion’.
- During the urge notification period, targets will be marked as
In Progress. - Start date/End date: The urge notification period of the pre-promotion is 10 days from the time of 3 months before one year after employment and that of the post-promotion is 5 days from the time of one month before one year after employment. During the period, the Send Urge Notification Emails button is displayed.
- Send Emails All: During the urge notification period (start date to end date of urge notification), you can send instruction emails to create the annual leave usage plan. You can send it to all targets, or click
 of individual target to send it individually. The Send Emails button is displayed only during the urge period and if you send multiple times, the promotion period is from the final date of delivery to the urge period. The target, who has been instructed with the promotion for use of annual leave, needs to submit the Annual Leave Usage Plan to the company within the 10 days.
- If they submit it within the due date, then it is displayed as ‘Complete’ and unused annual leaves expire.
- If they don't submit the annual leave usage plan, or don't report it again after being rejected, they are switched as the specified notification target. In this case, the company specifies the annual leave usage dates, and unused annual leaves expire.
Specified Notification for Employees With Less Than a Year of Service
You can check the specified notification period and status of targets whose promotion type is Less than a year (pre) or Less than a year (post), and you can send Instructions for expirations within the annual leave expiration date emails.
The following describes how to check employee’s specified notification status and send emails.
- Click the ‘Admin Menu’ at the top right of the PC web screen, and then click ‘Attendance’ in the pop-up window.
- Click at the top left of the screen.
- Click ‘Absence > Manage Annual Leave Promotion Targets’ from the menu.
- If necessary, enter the search conditions in the search window, and then click ‘Search’.
- Annual leave promotion target status list that meets the search conditions will be displayed.
- Check the status of each employee in the ‘Specified Notification’ on the list and send an email.
- Specified Notification Target: The employees who have not submitted the annual leave usage plan within the primary notification urge period.
- During the specified notification period, targets will be marked as
In Progress. - Start Date: It is the day after the primary urge notification end date.
- End date: The pre-promotion is from the start date of specified notification to the time of 1 month before one year after employment and that of the post-promotion is before 10 days of one year after employment.
- Send Emails All: You can send the Instruction on expirations within the annual leave expiration date email. You can send it to all targets, or click of individual target to send it individually.
- If the email is sent within the specified notification period, then it is displayed as Complete and the company has no obligation to compensate for unused annual leave of the employee. If the email is not sent within the specified period, then the company needs to pay the annual leave allowance for unused annual leaves.
Urge Notification for Employees With a Year or More of Service
You can check the urge notification period and status of targets with a year or more of service based on the promotion type and you can send instruction emails to create the annual leave usage plan.
The following describes how to check employees' urge notification status and send emails.
- Click the ‘Admin Menu’ at the top right of the PC web screen, and then click ‘Attendance’ in the pop-up window.
- Click at the top left of the screen.
- Click ‘Absence > Manage Annual Leave Promotion Targets’ from the menu.
- If necessary, enter the search conditions in the search window, and then click ‘Search’.
- Annual leave promotion target status list that meets the search conditions will be displayed.
- Check the status of each employee in the **Urge Notification** on the list and send an email.
- Urge Notification Target refers to the employees with remaining annual leaves 6 months before the annual leave end date.
- During the urge notification period, targets will be marked as
In Progress. - Start date/End date: The urge notification period is 10 days from the time of 6 months before the annual leave expiration date and during the period, the Send Urge Notification Email is displayed.
- (Example: If the annual leave end date is December 31, then the primary use promotion start date is July 1 to July 10, the promotion end date is July 11 to July 20, and the secondary specified notification start date is July 12 to July 21.)
- Send Emails All: During the urge notification period (start date to end date of urge notification), you can send instruction emails to create the annual leave usage plan. You can send it to all targets, or click of individual target to send it individually. The Send Emails button is displayed only during the urge period and if you send multiple times, the promotion period is from the final date of delivery to the 10 days thereafter. The target, who has been instructed with the promotion for use of annual leave, needs to submit the Annual Leave Usage Plan to the company within the due date.
The target who received the promotion instruction emails needs to submit the annual leave usage plan within 10 days. For example, when the annual leave end date is December 31, it is recommended for the company to send notifications between the urge start date (July 1) and the urge end date (July 10) by considering the submission period for the annual leave usage plan.
- If they submit it within the due date, then it is displayed as ‘Complete’ and unused annual leaves expire.
- If they don't submit the annual leave usage plan, or don't report it again after being rejected, they are switched as the specified notification target. In this case, the company specifies the annual leave usage dates, and unused annual leaves expire.
- The annual leave end date follows the company's Annual Leave Standard settings. For fiscal year basis, it is December 31 of that year, and for employment date basis, it is one year after each employee's employment date.
- If the company changes the Annual Leave Standard (fiscal year/employment date), then the start and end dates of urge/notification as well as the promotion history are all reset.
- If an employee's employment date changes, then it may reset all of the annual leave promotion history.
Specified Notification for Employees With a Year or More of Service
You can check the specified notification period and status of targets with a year or more of service based on the promotion type and you can send Instruction on expirations within the annual leave expiration date emails.
The following describes how to check employee’s specified notification status and send emails.
- Click the ‘Admin Menu’ at the top right of the PC web screen, and then click ‘Attendance’ in the pop-up window.
- Click at the top left of the screen.
- Click ‘Absence > Manage Annual Leave Promotion Targets’ from the menu.
- If necessary, enter the search conditions in the search window, and then click ‘Search’.
- Annual leave promotion target status list that meets the search conditions will be displayed.
- Check the status of each employee in the ‘Specified Notification’ on the list and send an email.
- Specified Notification Target: The employees who have not submitted the annual leave usage plan within the primary notification urge period.
- During the specified notification period, targets will be marked as
In Progress. - Start Date: The specified notification period is 10 days from the next day of the primary usage urge end date. See the following example for the start date of specified notification.
- (Example: If the annual leave end date is December 31, then the primary use promotion start date is July 1 to July 10, the promotion end date is July 11 to July 20, and the secondary specified notification start date is July 12 to July 21.)
- End date: It is from the specified notification start date until 2 months before the expiration of annual leave.
- Send Mail All: You can send the Instruction on expirations within the annual leave expiration date email. You can send it to all targets, or click of individual target to send it individually.
- If the email is sent within the specified notification period, then it is displayed as Complete and the company has no obligation to compensate for unused annual leave of the employee. If the email is not sent within the specified period, then the company needs to pay the annual leave allowance for unused annual leaves.
- Annual leave promotion for employees on leave: The annual leave promotion for all employees may be conducted, but if the annual leave promotion for employees on leave is unnecessary under the company regulations, exclude them from the list of urge/notification target.
- The employees with one or more years of service, whose attendance rate for the year is less than 80%, are also included in the target of the annual leave promotion policy.
Download Annual Leave Promotion Target Management Status
You can download the company's annual leave promotion target management status as a separate file.
The following describes how to download the annual leave promotion target management status.
- Click the ‘Admin Menu’ at the top right of the PC web screen, and then click ‘Attendance’ in the pop-up window.
- Click at the top left of the screen.
- Click ‘Absence > Manage Annual Leave Promotion Targets’ from the menu.
- If necessary, enter the search conditions in the search window, and then click ‘Search’.
- Annual leave promotion target management status list that meets the search conditions will be displayed.
- Click 'Download'.
- Annual leave promotion target management status list will be downloaded as an Excel file.
`annualPlanList.xlsx` in the Downloads folder.
Scheduled Annual Leave Usage History
You can view the annual leave usage plans for employees subject to annual leave promotion.
The Scheduled Annual Leave Usage History page is laid out as follows.
| Area | Description |
|---|---|
| ① Search window | Search the annual leave usage plan history based on employee name and scheduled annual leave usage date conditions |
| ② Download | Download Scheduled Annual Leave Usage History |
| ③ List of upcoming annual leave usage | View Scheduled Annual Leave Usage History
|
Download Scheduled Annual Leave Usage History
You can download the scheduled annual leave usage history for annual leave promotion targets as an Excel file.
The following describes how to download the scheduled annual leave usage history.
- Click the ‘Admin Menu’ at the top right of the PC web screen, and then click ‘Attendance’ in the pop-up window.
- Click at the top left of the screen.
- Click ‘Absence > Manage Annual Leave Promotion Targets’ from the menu.
- Click the ‘Scheduled Annual Leave Usage History’ tab.
- If necessary, enter the search conditions in the search window, and then click ‘Search’.
- You can view the scheduled annual leave usage history for the entered conditions.
- Click 'Download'.
- The list of scheduled annual leave usage is downloaded as an Excel file.
annualPlanHist.xlsx in the Downloads folder.Manage Special Leave
You can view the absence items set as Special Leave under ‘Attendance Service > Absence > Manage Absence Item’, and add targets or change the number of leave days from the property settings of the special leave.
The following describes how to view and edit absence item set as a special leave.
- Click the ‘Admin Menu’ at the top right of the PC web screen, and then click ‘Attendance’ in the pop-up window.
- Click at the top left of the screen.
- Click ‘Absence > Manage Special Leave’ from the menu.
- Click the button for the special leave to edit from the Manage Special Leave list, edit the leave properties in the Edit pop-up window, and then click ‘Edit’.
- Special Leave: Check the special leave type.
- Repetition Status: Select whether to repeat the special leave.
- Not Repeat: It refers to one-time use, and it is not created repeatedly. You can add targets for special leaves set as No limit from the ‘Attendance Status > View/Grant Special Leave’ menu. For more information, see the ‘Attendance > Attendance Status > View/Grant Special Leave’ guide.
- Every month: You can use it between the first and last day of every month. It is not carried over when it's not used, and it is created again on the next month.
- Every year: You can use it between January 1 and December 31 of every year. It is not carried over when it's not used, and created repeatedly on the next year.
- When selecting Every month/Every year, the area to specify target is displayed at the bottom.
- Number of Accrued Days: Enter the number of accrued days for the leave. You can change the number of leave days by individual from the ‘Attendance Status > View/Grant Special Leave’ menu.
- Usage Method: Select the usage method of special leave.
- No limit: You can use the accrued days all at once or split them and use them in units of full days without usage limit.
- 1 day in a month: You can use only one day per month.
- Consecutive dates
- ‘The Consecutive dates’ method may only be selected for special leaves where the time unit is set as ‘All day’ in Absence Item Settings.
- The number of accrued days for the Use in consecutive dates method must be entered as an integer.
- If two or more days are accrued, then they must be used on consecutive dates at once.
- The time unit for Consecutive dates can't be changed from All day to any other time unit in Absence Item Settings.
- If special leave is a Compensation Holiday, then the usage method for the compensation holidays is displayed as ‘Use in place of holiday work’.
- Target (when editing health leave): Select the special leave target.
- Repetition Status is displayed if you choose monthly or yearly.
- For leaves that are not repeated, see the ‘Attendance > Attendance Status > View/Grant Special Leave’ guide.
- You can specify departments and employees. For special leave targets, the applicable special leaves are displayed when selecting Absence Item from the absence schedule form in ‘Approval > Create Document’.
- Grant leave instantly at the time the target is included: Select whether to instantly grant leaves to newly added targets for repeated leaves that are already being applied. If you add a target at the time of selection, then the special leave is immediately granted to the target.
- Validity Period (When editing compensation holiday): Set the validity period.
- The validity period is the available period from the holiday workday. If it's not used within the period, then the compensation holiday will expire.
- Apply Leave Hours in Units of Minutes (when editing compensation holidays): Set the leave conversion standard in units of minutes.
- Holiday work hours can be entered in minutes, but a leave can be requested in increments of at least 30 minutes, so this is a setting that sets rules when converting absences.
- According to the Time unit settings from Absence Item Settings, the rounding up for units of minutes (round up/round off/round down) is set for the number of compensation holidays.
- For instance, if the time unit for compensation holidays is set to All day and Round up, and when the number of hours worked on a holiday is 8 hours and 1 minute (assuming that the daily standard work hours are 8 hours), 2 days of compensation holidays will be accrued.
- You can't edit Repeat Status, Number of Accrued Days, or Grant leave instantly at the time the target is included status for special leaves with specified targets. If you want to edit them, then you need to delete all targets.
- When you delete targets, the special leaves granted to the targets are deleted instantly.
The compensation holiday is automatically granted upon completion of the creation and approval for work result request form for the holiday work hours.
- The employees granted with compensation holidays can request their compensation holidays through the absence schedule form.
- Select Compensation holiday from Absence Item.
- When you select the work results request document, the number of available compensation holidays is displayed.
- When you request a compensation holiday, you can check the compensation holiday usage history from the ‘My Work > Manage Attendance > My Absence Schedule’ page.
Manage Family Event Standard
Set family event items to be used by the company.
When expenses are provided, the automatic slip creation and automatic approval handling are conducted through the integration with the Accounting service.
The way to set family event standard is as follows.
- Click the ‘Admin Menu’ at the top right of the PC web screen, and then click ‘Attendance’ in the pop-up window.
- Click at the top left of the screen.
- Click ‘Absence > Manage Family Event Standards’ from the menu.
- Set the family event item for Family Event Type. In the Manage Family Event Standards page, set the items to be acknowledged as family events by the company, and the family event leave days and family event allowances to be provided according to the relationship between the subject of each family event and the employee, and click ‘Save’.
- Family Event Type: Set the items to be recognized as family events.
- To set existing items, click an existing item.
- To create a new family event item, click ‘Add’ under the Family Event Type field, and click the icon. An input field will be created.
- Enter the family event item and click the check icon.
- Family Event Type: Set the items to be recognized as family events.
- Select a family event item to set the standards for family event benefits, and set the details.
- Relationship: You can set the number of family event leave days or family event expenses, depending on the employee’s relationship. Enter the relationship.
- To add a relationship, click 'Add' and enter the relationship.
- Number of Leave Days: Enter the number of leave days to be provided according to the entered relationship.
- Status of Holiday Inclusion: Select whether to include holidays in the number of leave days.
- Allow usage of days less than the number of granted days: Set the usage allow status of the family event leave less than the number of granted leave days.
- When selecting ‘Allow’ for the number of days to request, the user can select and use the number of days less than the granted leave days. (E.g., Granted days: 5 days, Requested days: 5 days or less)
- Split Usage: Set to enable the split use of family event leave in 2 or 3 divisions, rather than using it on consecutive dates.
- When ‘Not allow’ is selected, you need to use it all at once and use it on consecutive dates.
- For the split use of 2 or 3 divisions, the family event allowance is provided at the last use.
- For split use, the requestor can request it from the absence schedule form, or request them separately on different absence schedule forms.
See the following table for the usage of days less than the number of granted days and selection of the split use option.
Type Allow usage of days less than the number of granted days Not allow usage of days less than the number of granted days Allow split use Allow usage through set number of times
The combined number of days for the set times can be the same as or less than the number of granted daysCan be used through multiple times
The combined number of days for multiple times needs to be the same as the number of granted days (automatically selected)Not allow split use Must be used at once
The sum of days used for one time can be used less than or equal to the number of granted daysMust be used at once
The sum of days used for one time needs to be the same as the number of granted days (automatically selected)
- Family Event Benefit: Enter the amount of family event benefits to pay.
- Preview: Click 'Preview' to check the number of leave days and expenses by family event type.
- Relationship: You can set the number of family event leave days or family event expenses, depending on the employee’s relationship. Enter the relationship.
- Click ‘Save’.
Manage Biztrip Standards
Set a standard for travel expenses by destination or job grade.
When expenses are provided, the automatic slip creation and automatic approval handling are conducted through the integration with the Accounting service.
The following describes how to set the business trip standard.
- Click the ‘Admin Menu’ at the top right of the PC web screen, and then click ‘Attendance’ in the pop-up window.
- Click at the top left of the screen.
- Click 'Absences > Manage Biztrip Standards' from the menu.
- Add a business trip destination from the business trip destination item.
- To create a new business trip, click ‘Add’ and then click
 . An input field will be created.
 - Enter the business trip destination and click the check icon.
- To create a new business trip, click ‘Add’ and then click
- Select a business trip destination to set a standard for travel expenses and set details.
- Domestic / International: Select domestic/international classification of the business trip destination.
- Currency: Select the currency for the business trip expenses.
- Daily Allowance Application Method: Set application method of daily allowance.
- If you select a Daily Allowance Application Method, the daily allowance according to the selected method is displayed upon absence schedule (business trip) request.
- Full-day Payment: The business trip allowance is provided for all dates of the business trip period.
- Full-day Payment for Over 1 Day: The daily allowance is not provided for one-day business trips, and the business trip allowance is provided for all dates if the business trip exceeds one day.
- Exclude Starting Date: The business trip allowance is provided for the business trip period, excluding the business trip start date.
- Job Grade Usage: If you set Job Grade Usage to ‘Y’ you can pay different business trip expenses by employee’s position.
- Enter the travel expense by job grade to be paid.
- Daily Allowance: If you set Job Grade Usage to ‘Not Use’, enter the daily allowance for business trips.
- Preview: Click ‘Preview’ to check the daily allowance for each business trip destination and how the daily allowance is applied.
- Click ‘Save’.