You can plan budgets to be used. You can set the affiliated department and usage period of budgets, and map them to predefined budget standards. You can specify using departments and budget amounts for each budget standard, and set the allocation standard. It provides the budget diversion feature, which changes the budget item within the budget balance range, as well as the budget transfer feature, which changes the affiliated department of the budget. You can also view the change history of budgets.
Manage
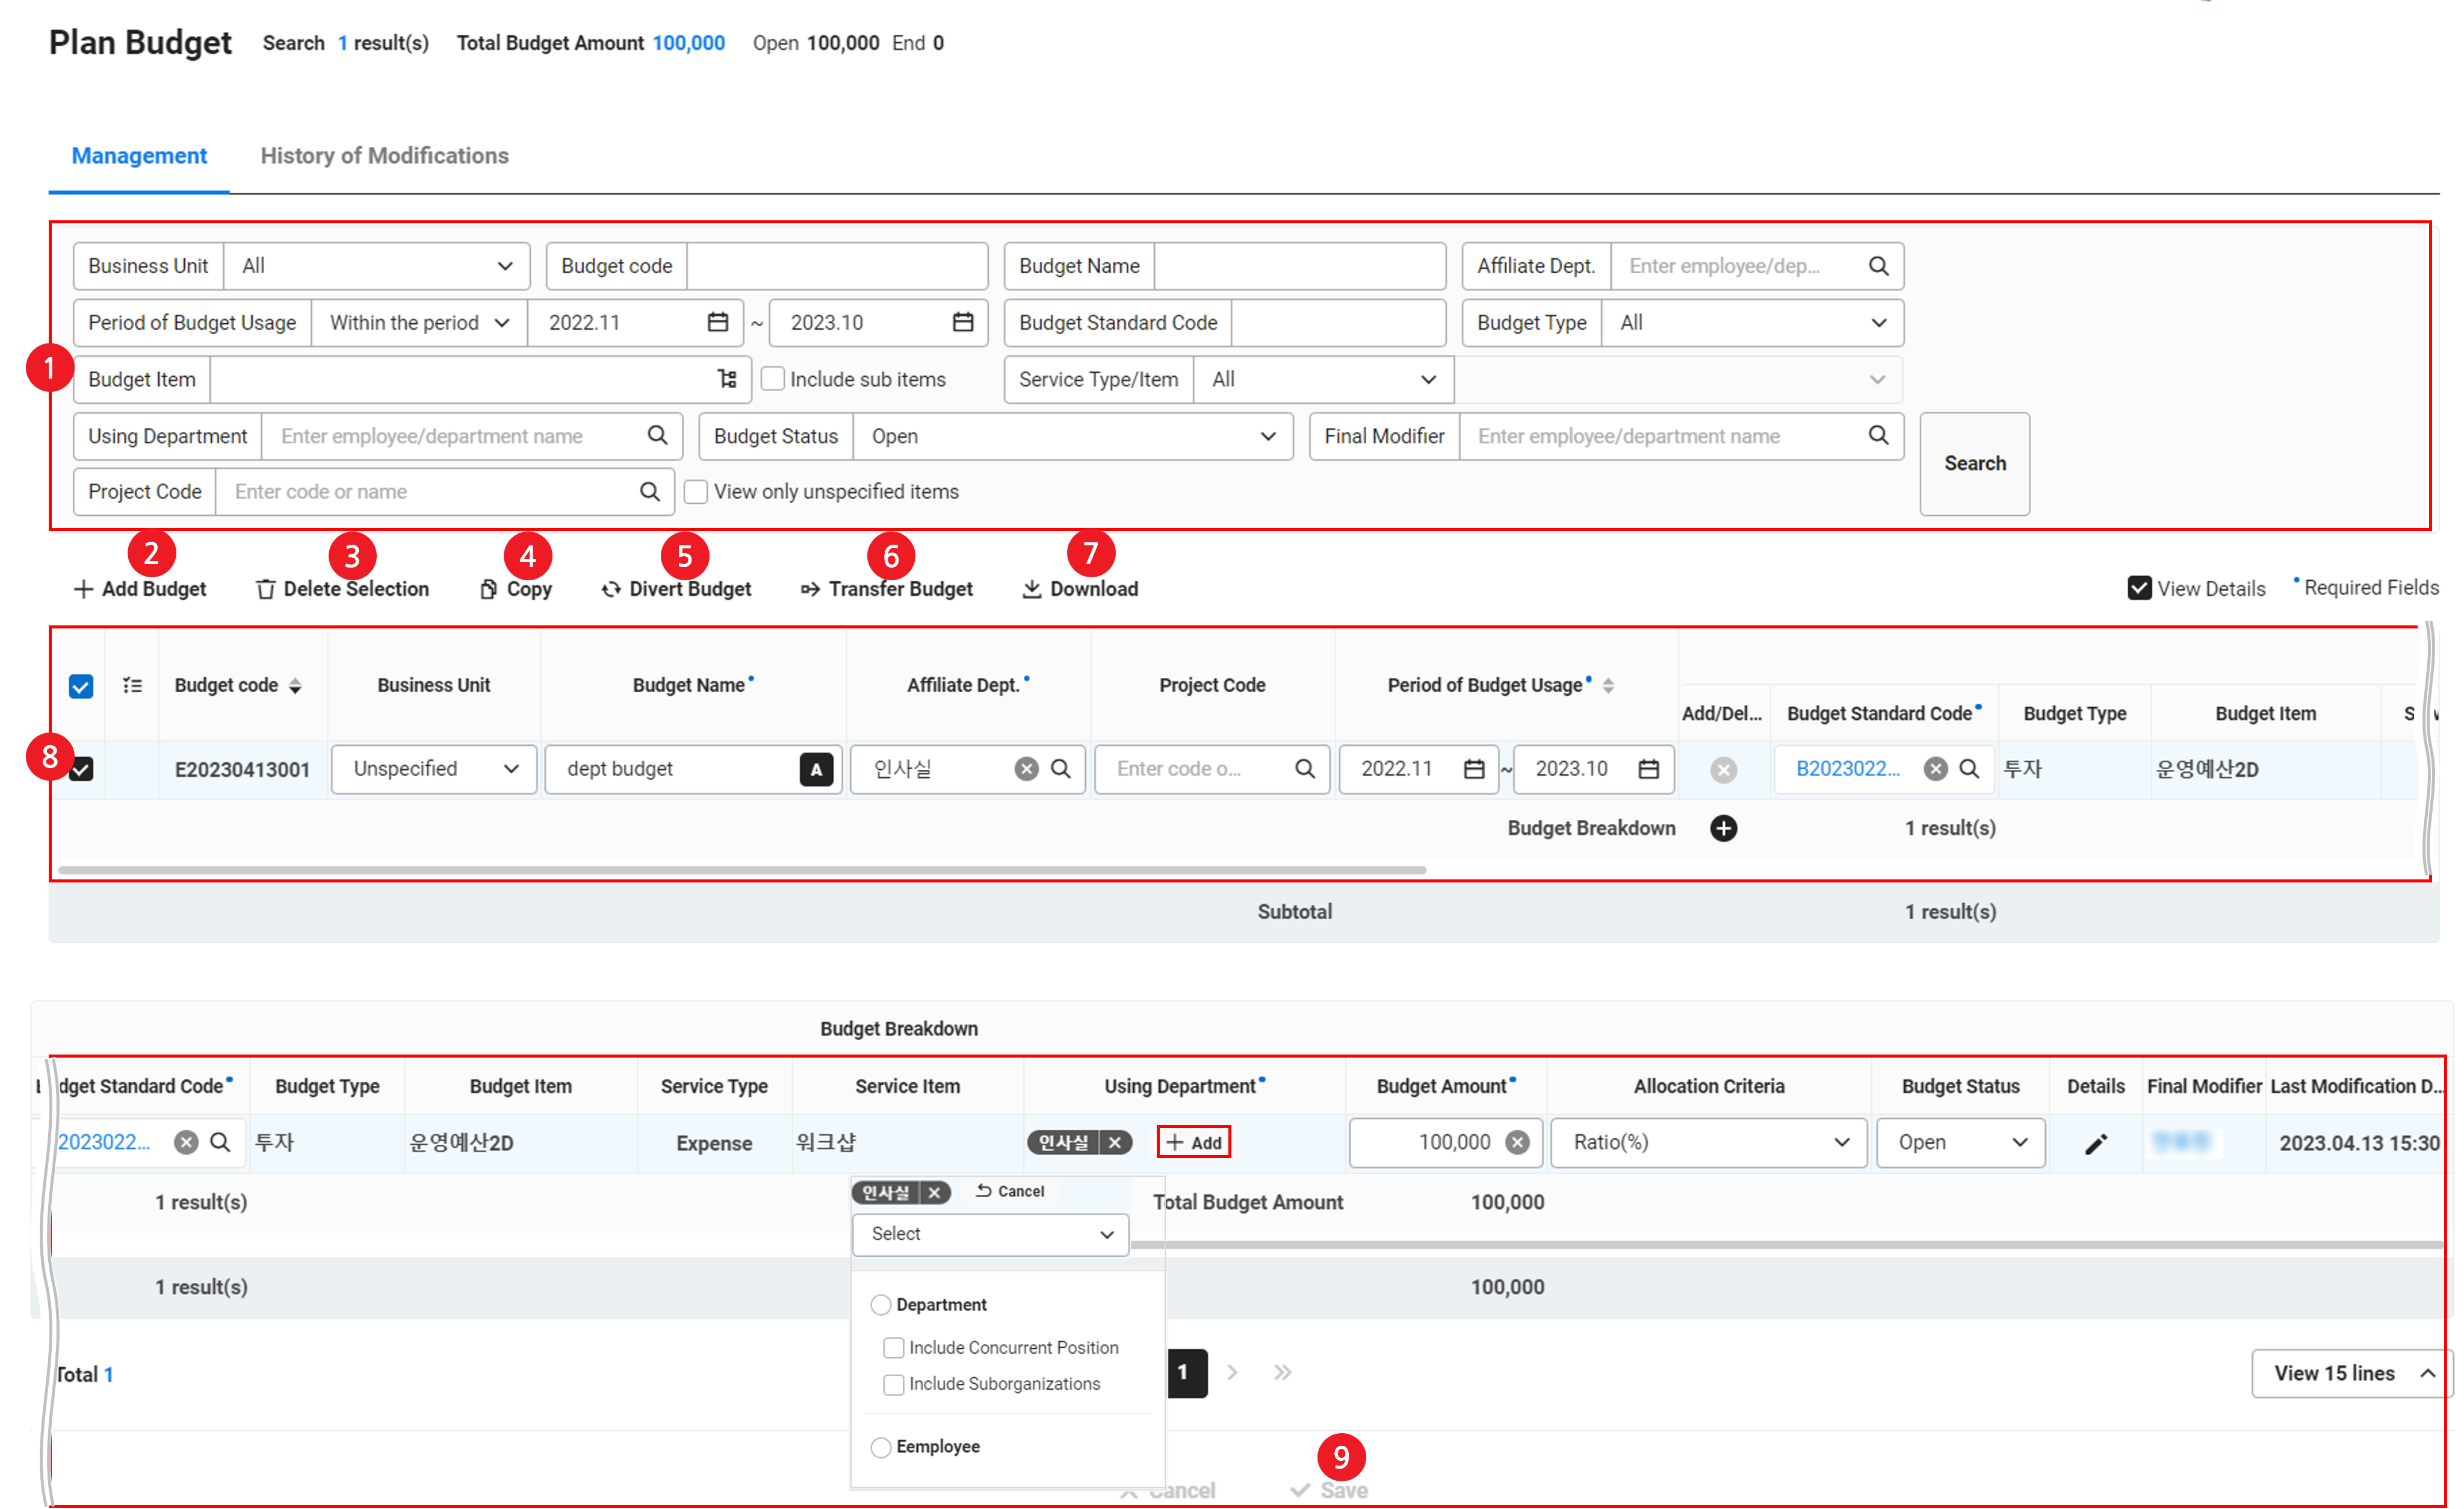
The management page of budget planning is laid out as follows.
| Area | Description |
|---|---|
| ① Search window | You can search the budget planning status based on the business place, budget, budget item, affiliated department, project, usage status, final editor, and budget usage period conditions |
| ② Add Budget | Add a new budget (See Add New Budget) |
| ③ Delete Selected | Delete selected budgets (See Delete Budget)
|
| ④ Copy | Add budgets by copying them (See Copy Budget) |
| ⑤ Divert Budget | Divert the allocation balance of the selected budget to another budget item (See Divert Budget) |
| ⑥ Transfer Budget | Transfer the allocation balance of the selected budget to another affiliated department (See Transfer Budget) |
| ⑦ Download | Download the budget list as an Excel file (See Download Budget List) |
| ⑧ Budget List | It displays the list of planned budgets
|
| ⑨ Save | Saves the modified content |
Add New Budget
The following describes how to add a new budget.
- Click the ‘Admin Menu’ at the top right of the PC web screen, and then click ‘Budget’ in the pop-up window.
- Click
 at the top left of the screen.
 - Click ‘Plan Budget’ from the menu.
- Click the ‘Manage’ tab.
- Click 'Add Budget'.
- Enter each field in the added row.
- You can plan budgets by business place. Select the business place.
- You can only view business places for which you have management permissions. For authorization of business places, see Budget > Managing Business Place Permissions’.
- If you don't want to specify the business place of the budget, select ‘Unspecified’.
- Enter the budget name.
- Select the affiliated department of the budget.
- You can only select one affiliated department for a budget.
- Select the project if necessary.
- If you select a project , you can view the planning, allocation and usage status of budget by project. (See Reports)
- Projects in the ‘In use’ status are displayed.
- For information related to adding projects, see Manage Project Code.
- Set the budget usage period.
- If a project is selected, the start/end dates set for the selected project will be reflected in the budget usage period by default. You can edit the budget usage period if necessary. Editing the budget usage period does not affect existing project start/end dates.
- Any changes to the start/end dates of the project code after budget planning do not affect the budget usage period
- You can select the budget usage period of up to 2 years.
- You can plan budgets by business place. Select the business place.
- Enter each field in the budget breakdown.
- Select the budget standard.
- Click
 , select the budget standard in the pop-up window, and then click ‘Select’. For information on adding budget standards, see Budget Standard.
- Click
- Select the using department.
- The using department refers to a department or an individual who can use the budget.
- You can set this by department or employee. Enter the employee or department name, and search by clicking . You can add one or more departments or one or more employees. Click ‘Add’ to add.
- When using department has been added on a departmental basis
- When ‘Include concurrent position’ is selected, members that are concurrently appointed to the using department can use the budget.
- ‘Include suborganizations’ allows suborganizations to use the budget planned by the parent department.
- When using department has been added on a departmental basis
- You can't use the budget if you are not set as the using department.
- Enter the budget amount.
- If a project code is selected, the amount set for the selected project code will be reflected as the reference amount in the budget amount by default. You can edit the budget amount if necessary. Editing the budget amount does not affect existing project amount.
- Any changes to the project amount after budget planning do not affect the budget usage period.
- If you use the same project in more than one budget, the total amount for that project is subtracted from the budget amount already reflected.
- If a project code is selected, the amount set for the selected project code will be reflected as the reference amount in the budget amount by default. You can edit the budget amount if necessary. Editing the budget amount does not affect existing project amount.
- Select the allocation standard. The budget is allocated in the Allocate Budget page according to the selected allocation standard.
- Equal amount: Allocates the budget amount equally according to the month, quarter, half year, or year.
- Year: Allocates the entire budget allocation amount to the first month.
- Half year: Allocates half of the budget allocation amount to the first month and seventh month
- Quarter: Allocates one-fourth of the budget allocation amount to the first month of each quarter.
- Month: Equally allocates the budget allocation amount to each month.
- Ratio (%): Allocates the specified ratio of the budget allocation amount to the specified month.
- Enter manually: Allocates the budget allocation amount by entering them manually for each month.
- Equal amount: Allocates the budget amount equally according to the month, quarter, half year, or year.
- Select the budget status.
- Only budgets whose budget status is Open can be viewed in the View Budget page of the user.
- Click
 and enter the details of the budget planning. The note icon is displayed once you enter the details. You can click it to check the entered content.
- Select the budget standard.
- The number of budget breakdowns and total budget amount are displayed according to the entered budget breakdowns.
- To additionally map budget standards to the budget, click
 next to the ‘Budget Breakdown’, and then enter each field by repeating Step 7.
 - To delete a budget breakdown, click
 in the Add/Delete column to delete it.
- To additionally map budget standards to the budget, click
- Click ‘Save’.
- A new budget is planned.
Delete Budget
The following describes how to delete a planned budget.
The budget can't be deleted if there is an amount that has already been executed in a related service.
- Click the ‘Admin Menu’ at the top right of the PC web screen, and then click ‘Budget’ in the pop-up window.
- Click at the top left of the screen.
- Click ‘Plan Budget’.
- Click the ‘Manage’ tab.
- Select the budget to delete.
- Click ‘Delete Selected’, and then click ‘OK’ in the confirmation pop-up window.
- Click ‘Save’.
- The selected budget will be deleted.
Copy Budget
You can copy a budget that has been planned and use it to add a new budget.
The following describes how to copy a budget.
- Click the ‘Admin Menu’ at the top right of the PC web screen, and then click ‘Budget’ in the pop-up window.
- Click at the top left of the screen.
- Click ‘Plan Budget’ from the menu.
- Click the ‘Manage’ tab.
- Select the budget to copy from the budget list, and then click ‘Copy’.
- A new row is added with items copied below the selected budget.
- See Add New Budget and edit items.
- Click ‘Save’.
- A new budget is added.
Edit Budget
The following describes how to edit a budget.
- Click the ‘Admin Menu’ at the top right of the PC web screen, and then click ‘Budget’ in the pop-up window.
- Click at the top left of the screen.
- Click ‘Plan Budget’.
- Click the ‘Manage’ tab.
- From the budget list, edit necessary items of the budget you want to edit by clicking it.
- Click ‘Save’.
- The new budget is edited.
Download Budget List
The following describes how to download the budget list as an Excel file.
- Click the ‘Admin Menu’ at the top right of the PC web screen, and then click ‘Budget’ in the pop-up window.
- Click at the top left of the screen.
- Click ‘Plan Budget’.
- Click the ‘Manage’ tab.
- If necessary, enter budget conditions to be searched in the Search window, and click ‘Search’.
- You can view the list of budgets that match the entered conditions.
- Click 'Download'.
- The budget list is downloaded as an Excel file.
- The downloaded file is saved as ‘BudgetDetail.xlsx’ in the Download folder.
Divert Budget
Budget diversion refers to changes in various attributes of multiple budgets in bulk due to an important policy change in the company.
Budget diversion enables you to allocate from a planned budget and change it to another budget item with the same parent budget item within the remaining balance. (See Set Budget Item)
The following describes how to divert a budget.
- Click the ‘Admin Menu’ at the top right of the PC web screen, and then click ‘Budget’ in the pop-up window.
- Click at the top left of the screen.
- Click ‘Plan Budget’.
- Click the ‘Manage’ tab.
- If necessary, enter budget conditions to be searched in the Search window, and click ‘Search’.
- You can view the list of budgets that match the entered conditions.
- Select the budget to divert.
- You can select one or multiple budgets.
- Click 'Divert Budget'.
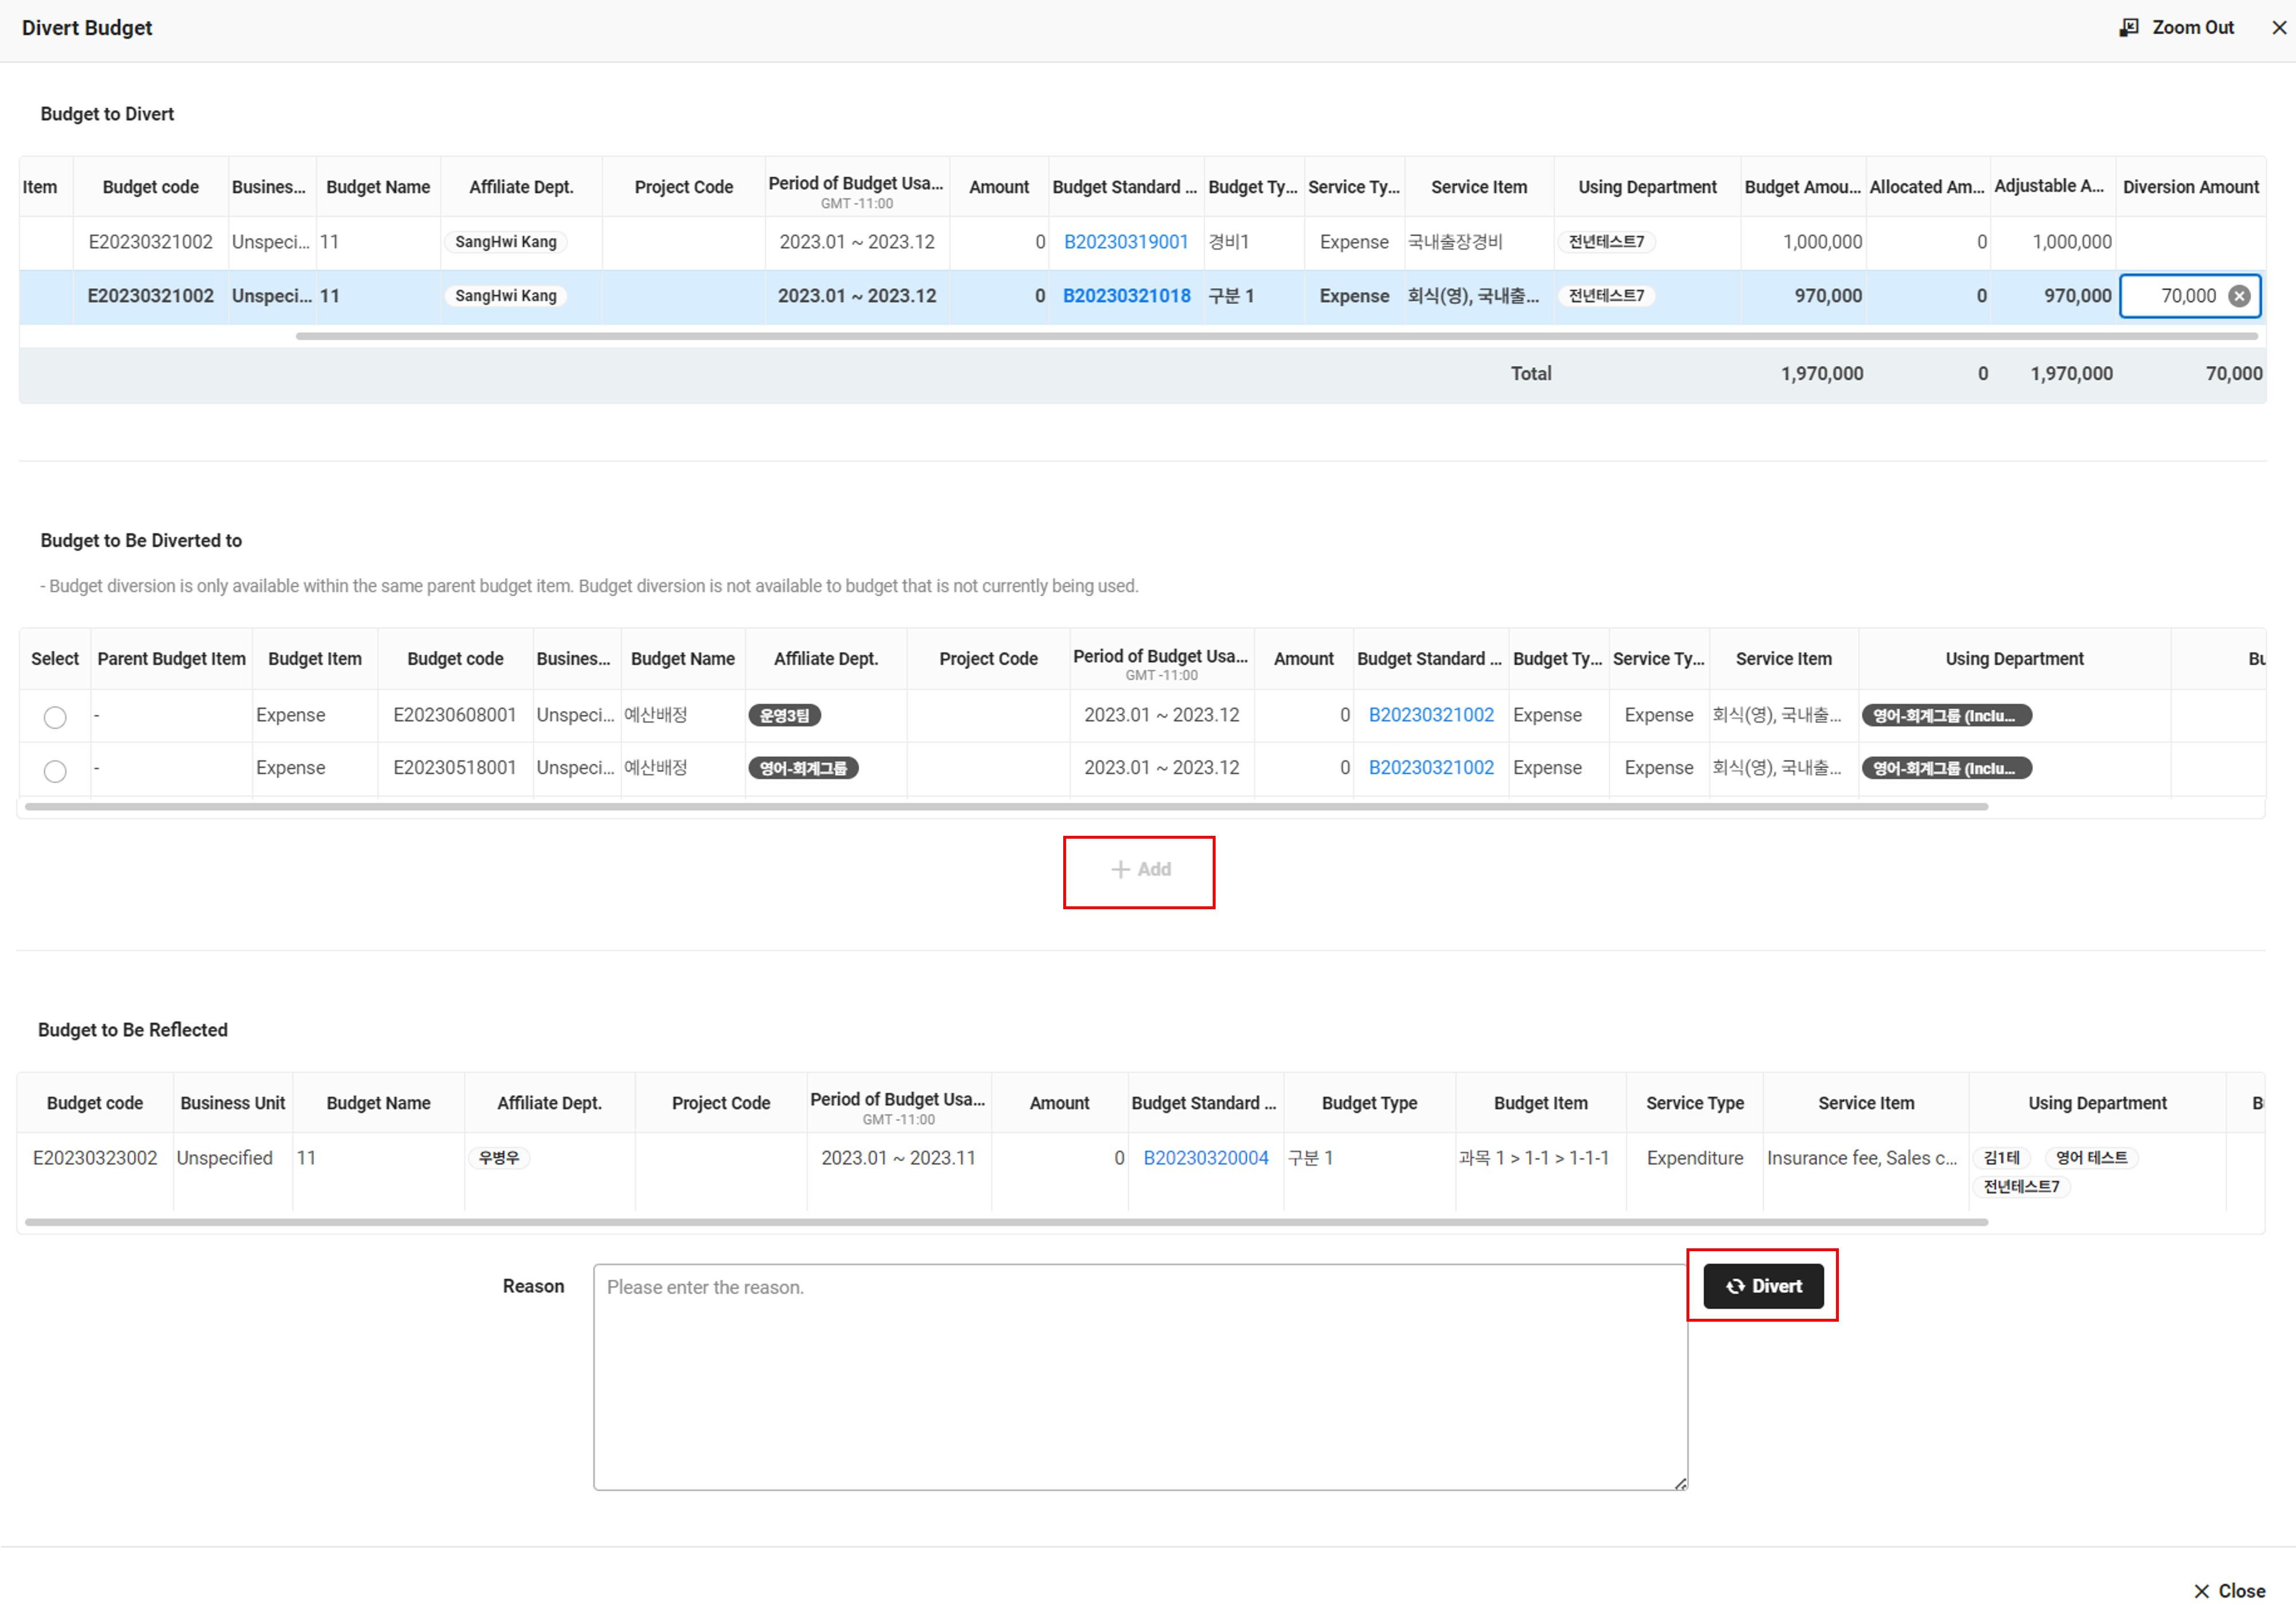
- In the Divert Budget pop-up window, select the budget you want to divert, and then enter the diversion amount within the adjustable amount range.
- You can divert the budget if the adjustable amount is greater than 0.
- The diversion amount must be less than or equal to the adjustable amount.
- When entering the diversion amount, the adjustable amount is subtracted by the diversion amount.
- From the list of budgets to be diverted to, select the receiving budget item.
- You can't divert to a budget whose usage status is ‘Not used’.
- Click 'Add'.
- If you have more budget to divert, repeat Steps 7 through 9.
- The budget to be reflected area is displayed, and check the diversion amount.
- Enter the reason for request.
- Click ‘Divert’. In the notification pop-up window, click ‘OK’ .
- The budget diversion result is displayed.
- Click the Close button of the Divert Budget pop-up window to complete budget diversion.
Transfer Budget
Budget transfer refers to a bulk change to affiliated departments of multiple budgets due to an important policy change in the company.
You can transfer the planned budget to a different affiliated department within the remaining balance after allocation.
The following describes how to transfer a budget.
- Click the ‘Admin Menu’ at the top right of the PC web screen, and then click ‘Budget’ in the pop-up window.
- Click at the top left of the screen.
- Click ‘Plan Budget’.
- Click the ‘Manage’ tab.
- If necessary, enter budget conditions to be searched in the Search window, and click ‘Search’.
- You can view the list of budgets that match the entered conditions.
- Select the budget to transfer.
- You can select one or multiple budgets.
- Click ‘Transfer Budget’.
- Enter the transfer information in the pop-up window.
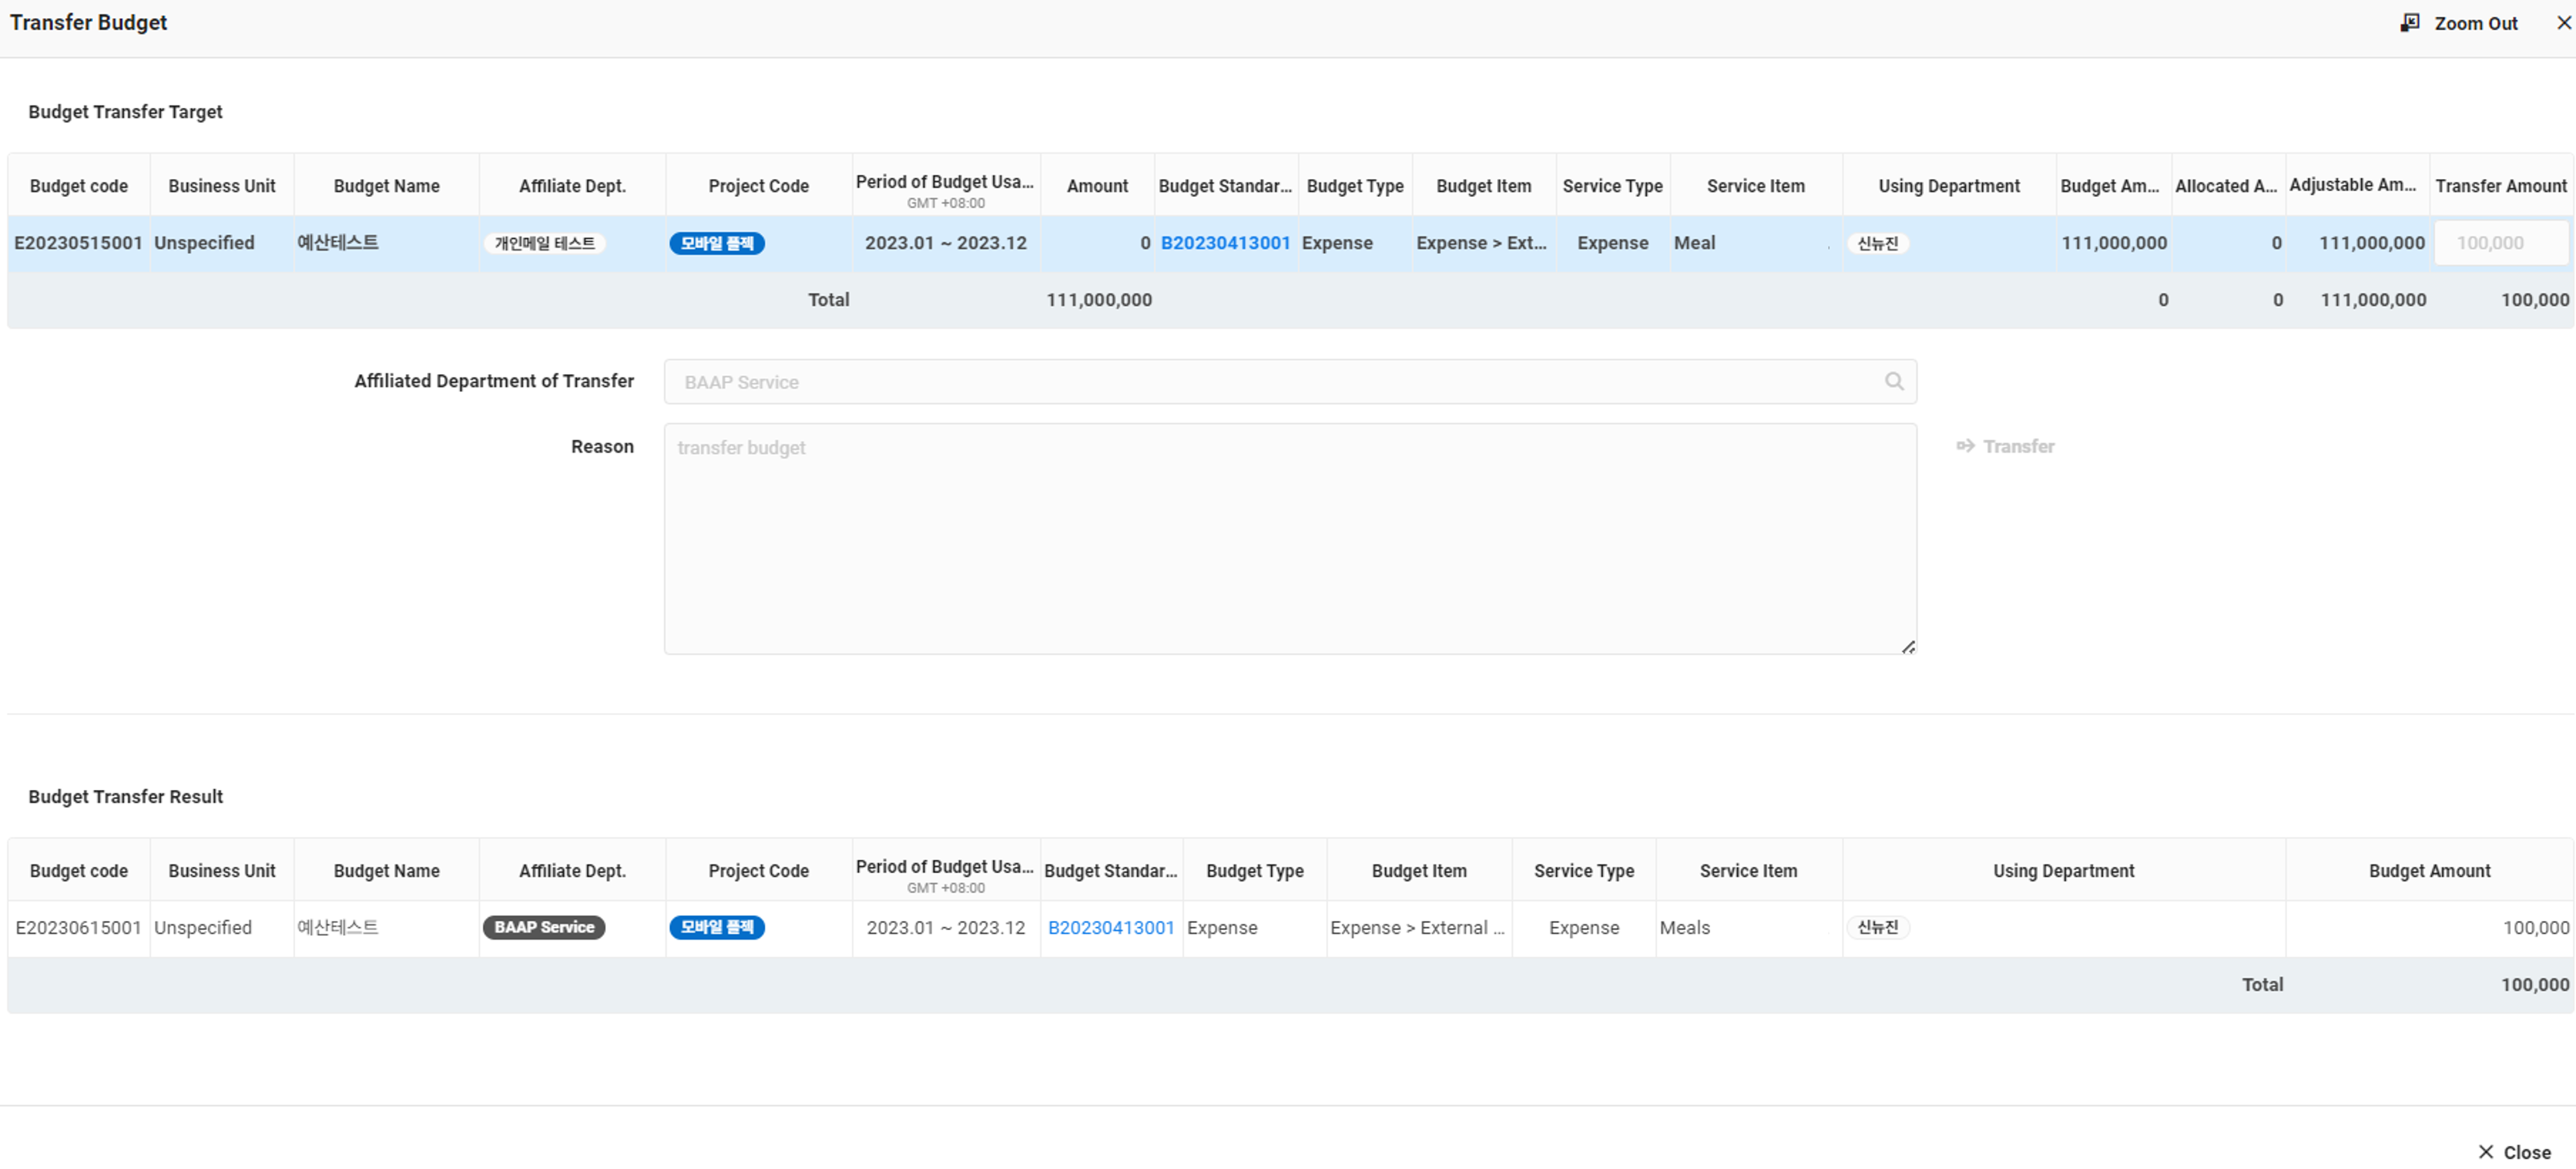
- Enter the transfer amount for the budget you want to transfer. If the budget to be transferred has more than one budget standard mapped to it, enter the transfer amount for each budget standard to be transferred.
- The transfer amount must be less than or equal to the adjustable amount (budget amount- allocated amount). If there is no allocated amount, you can transfer the entire budget amount.
- The transfer amount is subtracted from the budget amount before the transfer. Even if you transfer the entire budget amount, the existing budget is not deleted from the budget list.
- Select the affiliated department you want to transfer to.
- You can transfer to a department or an employee. Search by entering the employee or department name.
- You can't transfer to the same department as the affiliated department before the transfer.
- Enter the reason for request.
- Click 'Transfer'.
- From the pop-up window, click ‘OK’.
- Check the budget transfer result.
- New budgets are created for the number of budget standards you transferred.
- The affiliated department and budget amount are approval document as entries at the time of the transfer.
- The business place, budget name, project code, budget usage period, budget standard, and using department are displayed the same as the budget before transfer.
- Enter the transfer amount for the budget you want to transfer. If the budget to be transferred has more than one budget standard mapped to it, enter the transfer amount for each budget standard to be transferred.
- Click the Close button at the bottom of the pop-up window. Transferred budgets are added in the budget list page.
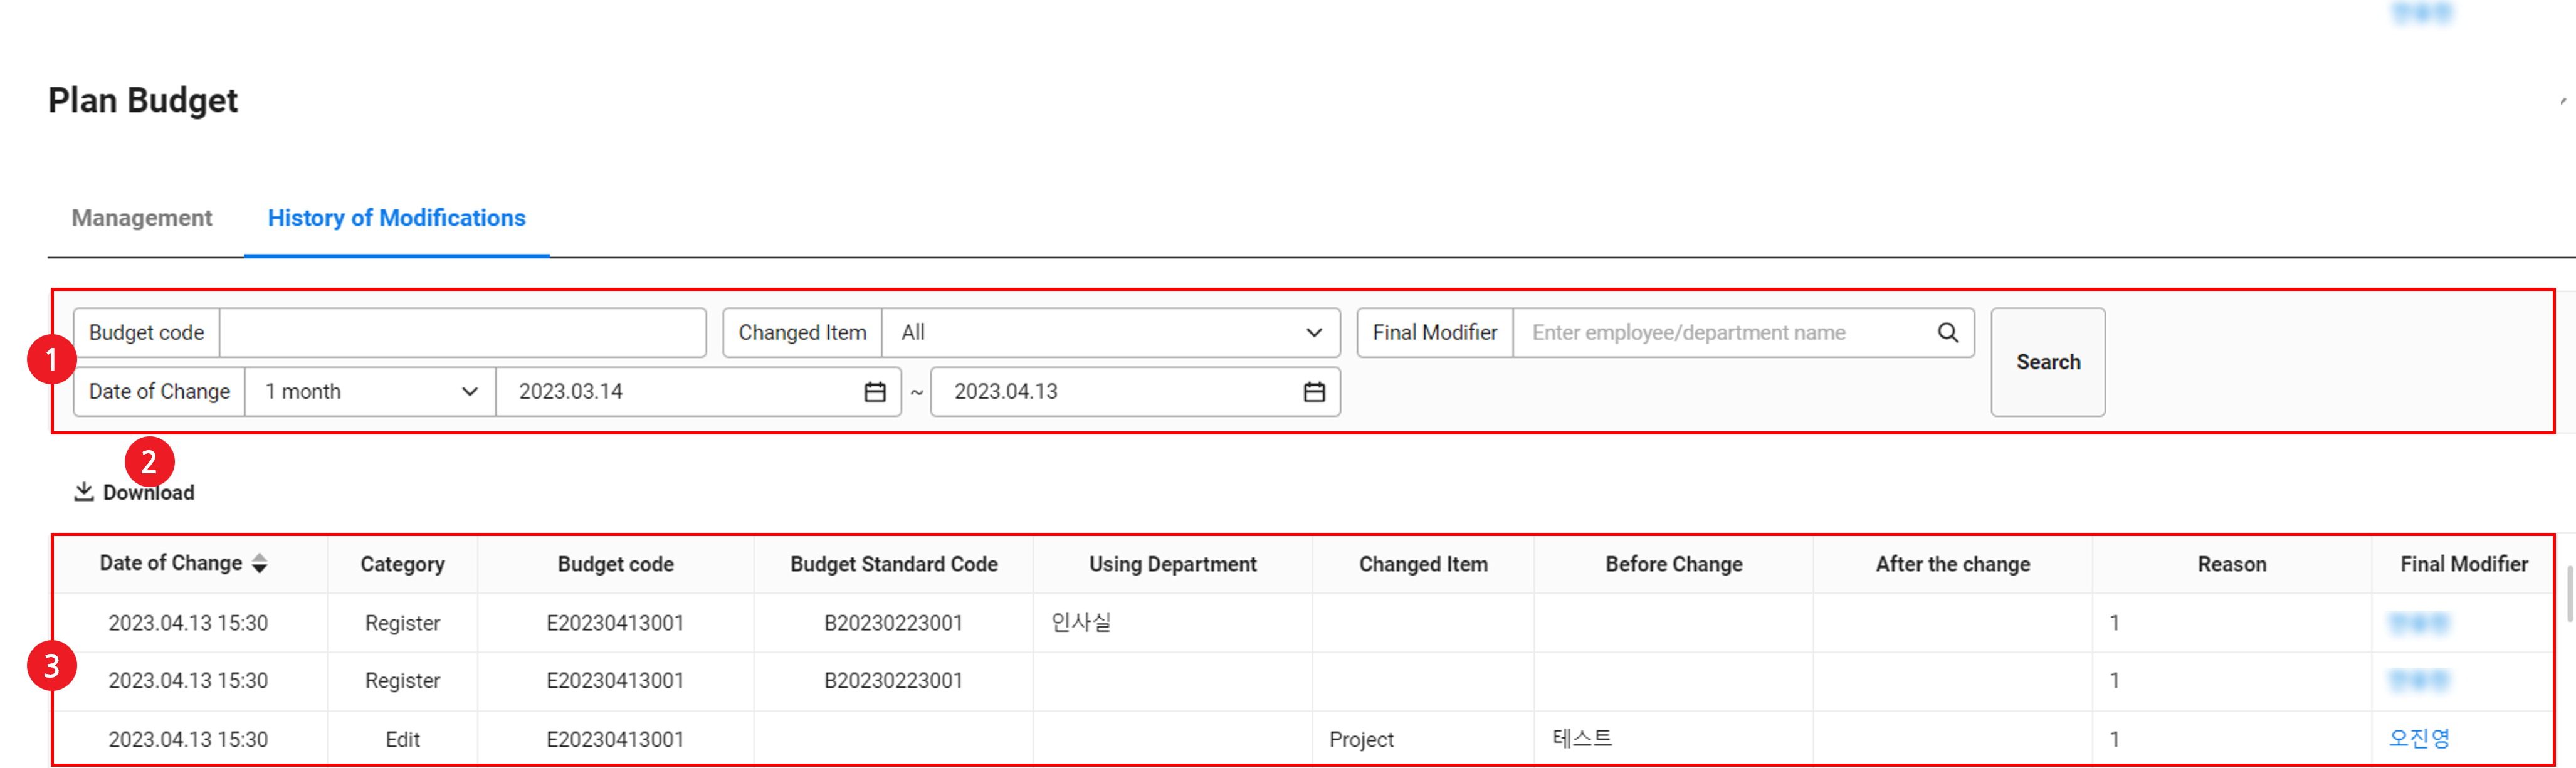
Change History
You can view the change history of budget planning.
The Change History page is laid out as follows.
| Area | Description |
|---|---|
| ① Search window | You can search based on budget code, budget name, changed item, final editor, affiliated department, and change date and time conditions |
| ② Download | Download the list of budget change history records as an Excel file (See Download Budget Change History) |
| ③ Budget change list | It displays the budget change list
|
View Budget Change History
The following describes how to view the budget change history.
- Click the ‘Admin Menu’ at the top right of the PC web screen, and then click ‘Budget’ in the pop-up window.
- Click at the top left of the screen.
- Click ‘Plan Budget’.
- Click the ‘Change History’ tab.
- If necessary, enter budget conditions to be searched in the Search window, and click ‘Search’.
- You can view the budget change history that matches the entered condition.
Download Budget Change History
The following describes how to download the list of budget change history as an Excel file.
- Click the ‘Admin Menu’ at the top right of the PC web screen, and then click ‘Budget’ in the pop-up window.
- Click at the top left of the screen.
- Click ‘Plan Budget’.
- Click the ‘Change History’ tab.
- If necessary, enter the budget change history conditions to be searched in the Search window, and then click ‘Search’.
- You can view the budget change history list that matches the entered condition.
- Click 'Download'.
- The list of budget change history is downloaded as an Excel file.
- The downloaded file is saved as ‘BaseRevision.xlsx’ in the Download folder.