You can define the budget standards according to the budget policy of the company. You can view and select budget standards (usage) that have already been defined upon budget planning. You can also view the change history of budget standards.
Manage Budget Standard
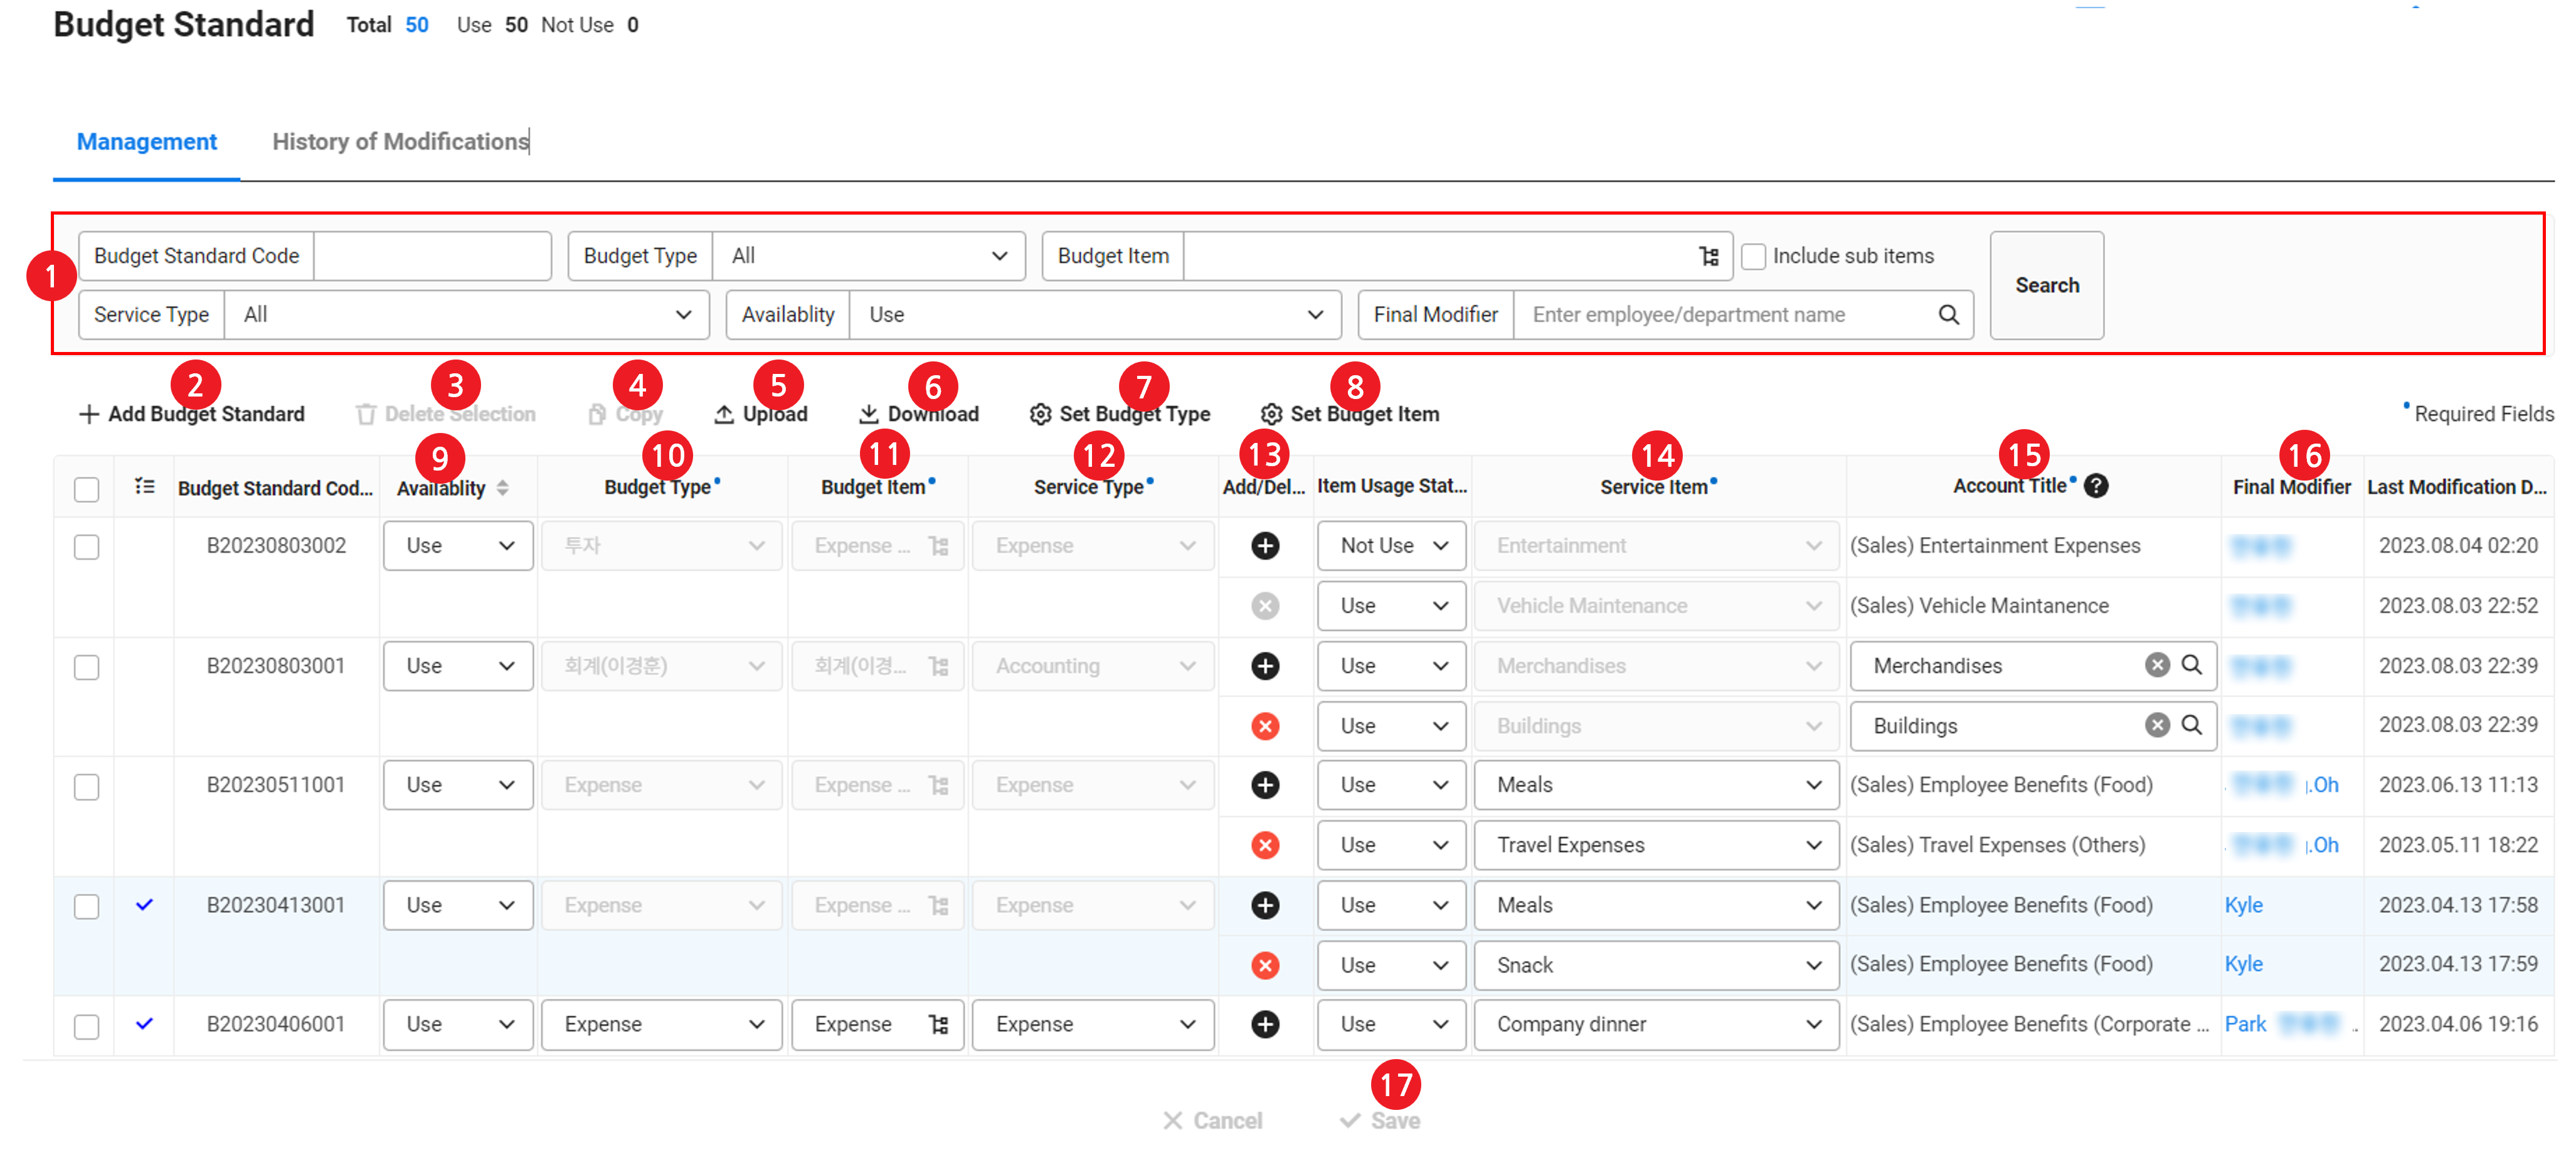
The management page of budget standards is laid out as follows.
| Area | Description |
|---|---|
| ① Search window | Search budget standards based on budget standard code, budget type, budget item, service item, usage status, and final editor conditions |
| ② Add Budget Standard | Add a new budget standard (See Add Budget Standard) |
| ③ Delete Selected | Delete budget standards by selecting them
|
| ④ Copy | Add budget standards by copying them (See Copy Budget Standard) |
| ⑤ Upload | Bulk upload the list of budget standards with an Excel file (See Upload Budget Standard) |
| ⑥ Download | Download the list of budget standards as an Excel file (See Download Budget Standard) |
| ⑦ Set Budget Type | Set budget types (See Set Budget Type) |
| ⑧ Set Budget Item | Set budget items (See Set Budget Item) |
| ⑨ Usage Status | It displays the usage status of each budget standard If not used, the budget standard is not displayed when viewing budget standard codes in the Plan Budget page |
| ⑩ Budget Type | Select budget types |
| ⑪ Budget Item | Select budget items |
| ⑫ Service Type | Select services to map
|
| ⑬ Add/Delete | Add or delete service items to map, depending on the service type selected in ⑫ |
| ⑭ Service Item |
|
| ⑮ Account Title |
|
| ⑯ Final Editor/Final Modification Date | It displays the final editor and the modification date and time of the budget standard |
| ⑰ Save | Save the edited content |
Add Budget Standard
The following describes how to add a new budget standard.
- Click the ‘Admin Menu’ at the top right of the PC web screen, and then click ‘Budget’ in the pop-up window.
- Click
 at the top left of the screen.
 - Click ‘Budget Standard’ from the menu.
- Click the ‘Management’ tab.
- Click ‘Add Budget Standard’.
- Select the usage status.
- Select the budget type.
- You can add budget types after setting them by clicking ‘Set Budget Type’. See Set Budget Type.
- Budget types can also be set in ‘Settings > Set Budget Type’, and set budget types are synced.
- Select the budget item.
- You can add budget items after setting them by clicking ‘Set Budget Item’. See Set Budget Item.
- Budget items can also be set in ‘Settings > Set Budget Item’, and set budget items are synced.
- Select the service type to map.
- ‘Expense’ is displayed if you're using the Expense service, ‘Expenditure’ is displayed if you're using the Expenditure service, and ‘Accounting’ is displayed if you're using the Accounting service. If you're not using any of the Expense, Spending, and Accounting services, the Service Type field is not displayed.
- Select the service item to map.
- Depending on the service type selected in Step 8, expense items set from the Expense service are displayed if you've selected Expense, and expenditure items set from the Expenditure service are displayed if you've selected Expenditure.
- If you select the Accounting service, the service item selection is deactivated and the selected account title is displayed automatically.
- Select the account title.
- If is displayed only if you're using the Accounting service.
- If you've selected Accounting from Service Type, select the account title you want to map.
- If you've selected the Expense or Expenditure service from Service Type, the accounting account title mapped to the selected expense item or expenditure item is displayed automatically. Check the account title. For information related to mapping account titles to expense items or expenditure items, see Manage Expense Item and Manage Expenditure Item.
- If you want to map additional service items of the same service type to the that budget standard, click the
 in the Add column and repeat Steps 9 and 10. Skip this process if you're not adding any.
- To delete mapped service items, click the
 in the Delete column.
- To delete mapped service items, click the
- Click ‘Save’, and then click ‘OK’ in the confirmation pop-up window.
Copy Budget Standard
You can copy a budget standard that has been created and use it to add a new budget standard.
The following describes how to copy a budget standard.
- Click the ‘Admin Menu’ at the top right of the PC web screen, and then click ‘Budget’ in the pop-up window.
- Click at the top left of the screen.
- Click ‘Budget Standard’ from the menu.
- Click the ‘Management’ tab.
- Select the budget standard you want to copy from the budget standard list.
- Click 'Copy'.
- A new row is added with items copied.
- See Add Budget Standard and edit necessary items.
- Click ‘Save’.
- A new budget standard is created.
Edit Budget Standard
You can edit budget standards.
The following describes how to edit a budget standard.
- Click the ‘Admin Menu’ at the top right of the PC web screen, and then click ‘Budget’ in the pop-up window.
- Click at the top left of the screen.
- Click ‘Budget Standard’ from the menu.
- Click the ‘Management’ tab.
- See Add Budget Standard and edit required items of the budget standard you want to edit.
- Click ‘Save’.
- The budget standard is edited.
Upload Budget Standard
The following describes how to bulk upload the list of budget standards with an Excel file.
- Click the ‘Admin Menu’ at the top right of the PC web screen, and then click ‘Budget’ in the pop-up window.
- Click at the top left of the screen.
- Click ‘Budget Standard’ from the menu.
- Click ‘Upload’.
- Click ‘Download Sample File’ to download the sample file and fill it out.
- Click ‘Attach File’ to upload the filled-in file.
- Click ‘Save’.
Download Budget Standard List
The following describes how to download the list of budget standards as an Excel file.
- Click the ‘Admin Menu’ at the top right of the PC web screen, and then click ‘Budget’ in the pop-up window.
- Click at the top left of the screen.
- Click ‘Budget Standard’ from the menu.
- If necessary, enter the budget standard conditions to be searched in the Search window, and then click ‘Search’.
- You can view the list of budget standards that match the entered condition.
- Click 'Download'.
- The list of budget standards is downloaded as an Excel file.
- The downloaded file is saved as 'base.xlsx' in the Download folder.
Set Budget Type
You can set the budget by classifying the budget into large units based on the budget policy of the company.
The following describes how to set a budget type.
- Click the ‘Admin Menu’ at the top right of the PC web screen, and then click ‘Budget’ in the pop-up window.
- Click at the top left of the screen.
- Click ‘Budget Standard’ from the menu.
- Click the ‘Management’ tab.
- Click ‘Add Budget Type’.
- Configure the content in the Set Budget Type pop-up window, and then click ‘Save’.
- Click ‘Add Type’.
- Enter the type name in the added row.
- The budget type is added.
- Click the delete icon of the budget type to delete an unused budget type.
- The delete icon of a budget type used in budget standards is deactivated and can't be deleted.
- To edit the budget type name, enter the budget type name you want to edit to.
The changed budget type is reflected in the budget type list in the ‘Settings > Set Budget Type’ menu.
Set Budget Item
The following describes how to set a budget item.
- Click the ‘Admin Menu’ at the top right of the PC web screen, and then click ‘Budget’ in the pop-up window.
- Click at the top left of the screen.
- Click ‘Budget Standard’ from the menu.
- Click the ‘Management’ tab.
- Click ‘’Add Budget Item’.
- Configure the content in the Set Budget Item pop-up window, and then click ‘Save’.
- Click 'Add'.
- Enter the budget item name in the added row, and then click
 .
. - To add a budget sub-item to the created budget item, place the cursor over the budget item name, and then click ‘Add Subfield’.
- Enter the budget sub-item name, and then click .
- You can set up to 4 levels, including the top level.
- Enter the budget sub-item name, and then click
- To edit a budget item or a budget sub-item, place the cursor over the budget item name, and then click the edit icon.
- Enter the budget item name you want to edit to.
- To delete an unused budget item or budget sub-item, place the cursor over the budget item name, and then click the delete icon.
- When you delete a budget item with sub-items, all sub-items are also deleted.
- Budget items mapped to budget standards can't be deleted.
Changes in budget items are reflected in the budget item list in the ‘Settings > Set Budget Item’ menu.
Change History
You can view the change history of budget standards.
The Change History page is laid out as follows.

| Area | Description |
|---|---|
| ① Search window | Search by budget standard code, changed item, final editor, and change date and time conditions |
| ② Download | Download the budget standard change history as an Excel file |
| ③ Budget standard change list | It displays the budget standard change list
|
View Budget Standard Change History
The following describes how to view the budget standard change history.
- Click the ‘Admin Menu’ at the top right of the PC web screen, and then click ‘Budget’ in the pop-up window.
- Click at the top left of the screen.
- Click ‘Budget Standard’ from the menu.
- Click the ‘Change History’ tab.
- If necessary, enter the budget standard conditions to be searched in the Search window, and then click ‘Search’.
- You can view the budget standard change history that matches the entered condition.
Download Budget Standard Change History
The following describes how to download the list of budget standard change history as an Excel file.
- Click the ‘Admin Menu’ at the top right of the PC web screen, and then click ‘Budget’ in the pop-up window.
- Click at the top left of the screen.
- Click ‘Budget Standard’ from the menu.
- Click the ‘Change History’ tab.
- If necessary, enter the budget criteria change history conditions you want to search in the search box and click 'Search'.
- You can view the budget standard change history list that matches the entered condition.
- Click 'Download'.
- The list of budget standard change history is downloaded as an Excel file.
- The downloaded file is saved as "BaseRevision.xlsx" in the Download folder.