This feature is available after applying for WORKS Finance.
You can add and manage the expenditure item by code, item name, and account title.
Information of Manage Expenditure Items is used to set budget standards when using the Budget service.
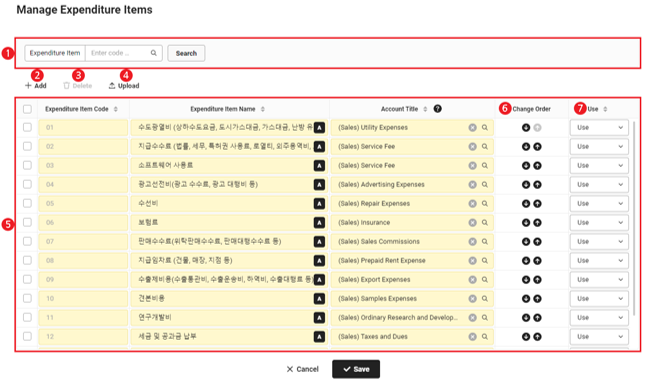
The Manage Expenditure Item screen is laid out as follows.
| Area | Description |
|---|---|
| ① Search Window | Search expenditure items by entering a code or name |
| ② Add | Adds a new expenditure item (Refer to Add Expenditure Item) |
| ③ Delete | Delete a expenditure item (Refer to Delete Expenditure Item) |
| ④ Upload | Upload the expenditure items in bulk as an Excel file (Refer to Bulk Upload Expenditure Items) |
| ⑤ List of Expenditure Items |
|
| ⑥ Change Order | Change the order of expenditure items (Refer to Change Expenditure Item Order) |
| ⑦ Use | Display and change the use status of expenditure items (Refer to Change Expenditure Item Use Status) |
Add expenditure item
The following describes how to add an expenditure item.
- Click ‘Admin Menu’ at the top right of the PC web screen, and then click ‘Expenditure’ in the pop-up window.
- Click
 at the top left of the screen.
 - Click 'Add'.
- Enter the expenditure item code and name.
- Enter to search the account title code or name to be linked to Accounting service to select.
- A slip is automatically created with the corresponding account title when the user creates an expenditure resolution report.
- Click ‘Save’.
Delete expenditure item
You can't delete expenditure items for which the budget has been allocated or settlement has been processed.
The following describes how to delete an expenditure item.
- Click ‘Admin Menu’ at the top right of the PC web screen, and then click ‘Expenditure’ in the pop-up window.
- Click at the top left of the screen.
- Click 'Manage Expenditure Items' from the menu.
- Select the item to delete, and then click ‘Delete’.
- Click ‘Save’.
Bulk upload expenditure items
When using the Expenditure service for the first time, it is used to upload the existing expenditure items with the accounting account or to add expenditure items in bulk.
The following describes how to bulk upload the expenditure items.
- Click ‘Admin Menu’ at the top right of the PC web screen, and then click ‘Expenditure’ in the pop-up window.
- Click at the top left of the screen.
- Click 'Manage Expenditure Items' from the menu.
- Click ‘Upload’.
- Click ‘Download Sample File’ in the Upload pop-up window to download and fill in the sample file.
- The downloaded sample file is saved as
costItem-sample.xlsxin theDownloadfolder.
- The downloaded sample file is saved as
- Click ‘Attach File’ in the Upload pop-up window to upload the created sample file.
- Click 'OK'.
- The added expenditure item is added to the list of expenditure items.
- Click ‘Save’.
Change expenditure item order
The following describes how to change the order of expenditure items.
- Click ‘Admin Menu’ at the top right of the PC web screen, and then click ‘Expenditure’ in the pop-up window.
- Click at the top left of the screen.
- Click 'Manage Expenditure Items'.
- Click an arrow in ‘Change Order’ to change the desired order.
- Click ‘Save’.
- The changed order is saved.
Change the use status of expenditure items
The following describes how to change the use status of expenditure items.
- Click ‘Admin Menu’ at the top right of the PC web screen, and then click ‘Expenditure’ in the pop-up window.
- Click at the top left of the screen.
- Click 'Manage Expenditure Items'.
- Click the drop-down list in the ‘Use’ line, and then click ‘Use’ or ‘Not Use’.
- Click ‘Save’.
- The changed use status is saved.