You can set audit items to limit the use of each expense, request explanation of expenses that violated audit items, and manage the history of responses received. You can check and manage the set audit items as a list and preview expense plan or expense settlement documents before creating them.
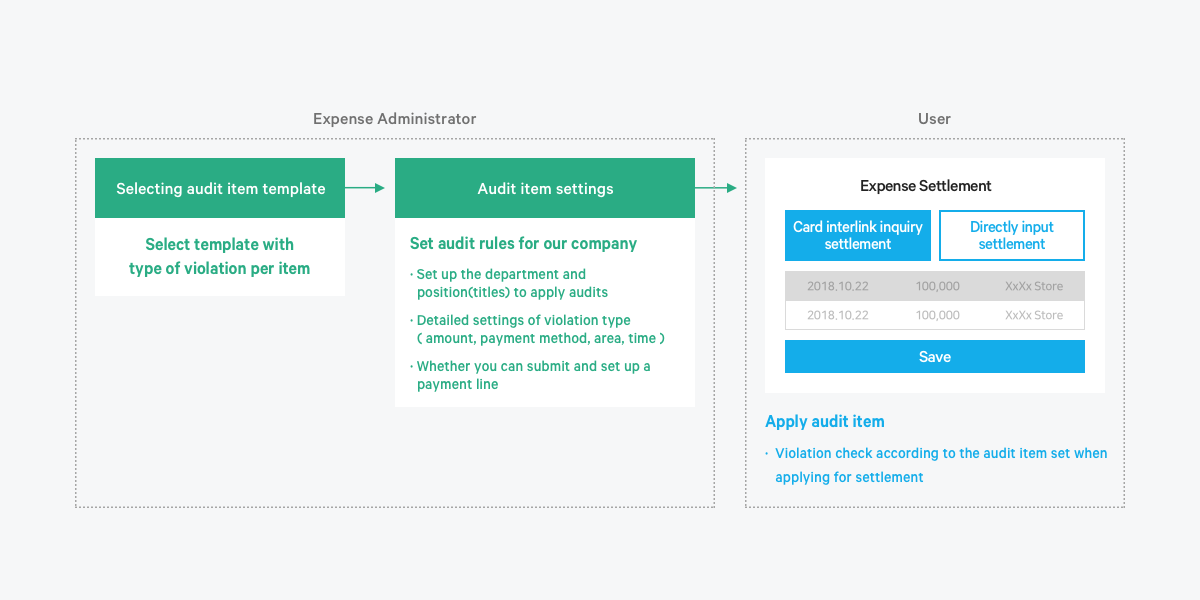
Manage Audit Items
You can add, edit, or delete expense audit items and check the set audit items.
The Manage Audit Item screen is laid out as follows.
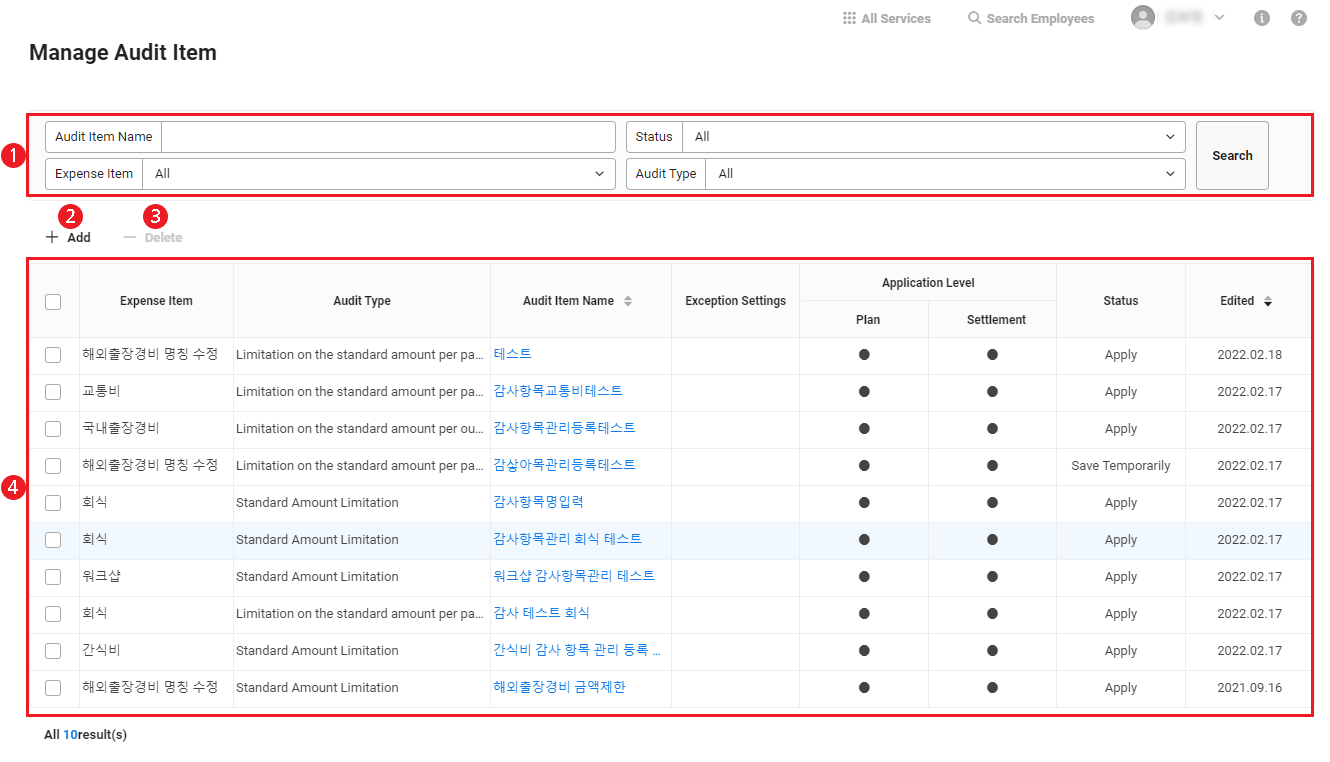
| Area | Description |
|---|---|
| ① Search Window | Searches audit items by item name, status, expense item, and audit type. |
| ② Add | Sets a new audit item. (Refer to Adding Audit Item) |
| ③ Delete | Deletes the selected audit item. (Refer to Deleting Audit Item) |
| ④ Audit Item List | Confirms the added audit items as a list.
|
Adding Audit Item
The following shows how to set a new audit item.
- Click ‘Admin Menu’ at the top right of the PC web screen, and then click ‘Expense’ in the pop-up window.
- Click
 at the top left of the screen.
 - Click ‘Manage Self Check > Manage Audit Items’ from the menu.
- Click 'Add'.
- Select the expense item to be audited and application stage, and then enter the audit item name.
- Select the audit type, and enter the settings by referring to below.
- Refer to Entering Audit Type Settings
- Click 'Apply'.
- The added content will be applied and displayed in the audit item list.
- Click ‘Save Temporarily’ to display the added content in Temporarily Saved status in the audit item list.
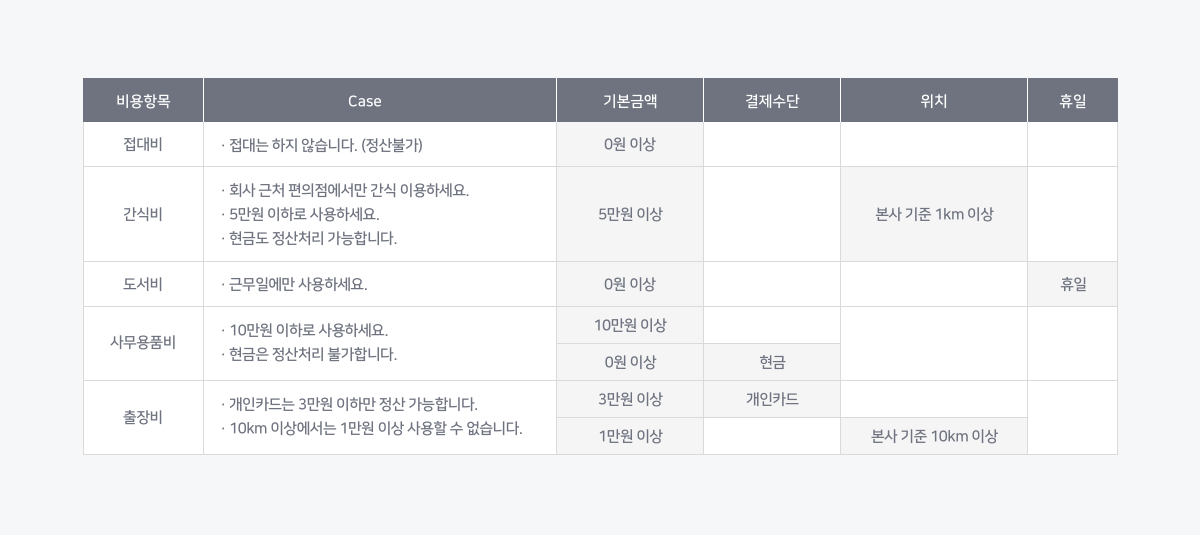
The following shows an example of how to apply an audit item to practice.
Entering Audit Type Settings
The following audit types can be selected according to the Application Stage selected in the Add Audit Item screen.
| Application Stage | Audit Type |
|---|---|
| Expense Plan Request (Or if both plan and settlement are selected) |
|
| Expense Settlement Request |
|
- The Limitation on the standard amount per outsider participating type is only displayed if the ‘Check Subjects of Improper Solicitation and Graft Act item’ is set to ‘Yes’ in the ‘Expense > Settings > Manage Expense Item Code’ menu.
- If the company does not use the expense plan, the Expense Plan Request stage does not appear.
Limitation on the standard amount per participant, Limitation on the standard amount per outsider participating
- Standard Amount: Enter the maximum amount that can be used per person. The amount per person is calculated by dividing the number of participants into the total expense requested.
- Audit Subjects: The limitation on the standard amount per person automatically applies to all departments and job titles.
- Save Item
- Save Temporarily: The audit item creation work is saved temporarily and is not applied.
- Apply: Details of the audit item will be saved and applied.
- Suspend: The application of the audit item is suspended. The corresponding item does not apply during expense plan and settlement until the suspension is canceled.
- Cancel: Returns to the previous Audit Item List screen. If entering or editing an item, cancellation is checked again before returning.
Limitation on the standard amount
- Basic Settings: Select the affiliated department, job title, and job position to be audited, and then enter the standard amount to be judged as an audit violation.
- Affiliated Department: Click
 to select the department to apply, or check ‘All’ to apply to all departments. Individuals granted with a budge can also be selected as an expense-affiliated department. In this case, enter the employee name and violation amount in Exception Settings.
 - Job Title: Click the input field to select the wanted job title, or select ‘All’ to apply to all job titles. This item is not displayed if ‘Display’ of job title is set to ‘Hide’ in ‘Admin > Member > Manage Items’.
- Job Position: Click the input field to select the wanted job position, or select ‘All’ to apply to all job positions. This item is not displayed if ‘Display’ of position is set to ‘Hide’ in ‘Admin > Member > Manage Items’.
- Affiliated Department: Click
- Exception Settings: Set the target and amount of exception to not apply the audit standards.
- Audit Violation Processing: Set to enable or disable approval report when the expense plan or expense settlement request violates the audit items. If ‘Can Report’ is selected, you can select the approval line to be reported between Default Approval Line and Violation Approval Line. For more details about violation approval line settings, refer to Manage Approval Line. If the violation approval line is set to Not Use, change it to 'Use’.
- Save Item
- Save Temporarily: The audit item creation work is saved temporarily and is not applied.
- Apply: Details of the audit item will be saved and applied.
- Suspend: The application of the audit item is suspended. The corresponding item does not apply during expense plan and settlement until the suspension is canceled.
- Cancel: Returns to the previous Audit Item List screen. If entering or editing an item, cancellation is checked again before returning.
Limitation on the location and standard amount for using corporate cards, Limitation on the time and standard amount for using corporate cards, Limitation on the payment method and standard amount
- Basic Settings: Select the affiliated department, job title, and job position to be audited, and then enter the audit standards.
- Affiliated Department: Click to select the department to apply, or check ‘All’ to apply to all departments. Individuals granted with a budge can also be selected as an expense-affiliated department. In this case, enter the employee name and violation amount in Exception Settings.
- Job Title: Click the input field to select the wanted job title, or select ‘All’ to apply to all job titles. This item is not displayed if ‘Display’ of job title is set to ‘Hide’ in ‘Admin > Member > Manage Items’.
- Job Position: Click the input field to select the wanted job position, or select ‘All’ to apply to all job positions. This item is not displayed if ‘Display’ of position is set to ‘Hide’ in ‘Admin > Member > Manage Items’.
- Amount: The standard amount to be judged as an audit violation
- Location: The standard distance from the company to be judged as an audit violation.This item is used if the head office address is registered in ‘Business Support Settings > Company Information > Manage Company Information’ and the address of the place of use is included by corporate card linkage.
- Time: The standard transaction time to be judged as an audit violation. This item is utilized if the card approval time is included by corporate card linkage.
- Payment Method: The standard payment method to be judged as an audit violation
- Affiliated Department: Click
- Exception Settings: Set the target and amount of exception to not apply the audit standards.
- Audit Violation Processing: Set to enable or disable approval report when the expense plan or expense settlement request violates the audit items. If ‘Can Report’ is selected, you can select the approval line to be reported between Default Approval Line and Violation Approval Line. For more details about violation approval line settings, refer to Manage Approval Line. If the violation approval line is set to Not Use, change it to 'Use’.
- Save Item
- Save Temporarily: The audit item creation work is saved temporarily and is not applied.
- Apply: Details of the audit item will be saved and applied.
- Suspend: The application of the audit item is suspended. The corresponding item does not apply during expense plan and settlement until the suspension is canceled.
- Cancel: Returns to the previous Audit Item List screen. If entering or editing an item, cancellation is checked again before returning.
Confirming and Editing Details of Audit Item
The following shows how to confirm and edit the detailed information of the audit item set.
- Click ‘Admin Menu’ at the top right of the PC web screen, and then click ‘Expense’ in the pop-up window.
- Click at the top left of the screen.
- Click ‘Manage Self Check > Manage Audit Items’ from the menu.
- Click Audit Item Name of the audit item to check the detailed information.
- Check the detailed information of the audit item and edit it if necessary.
- Click ‘Apply’ or ‘Save Temporarily’ to save the content.
Copying Audit Item
The following shows how to quickly create a new audit item by copying an audit item set.
- Click ‘Admin Menu’ at the top right of the PC web screen, and then click ‘Expense’ in the pop-up window.
- Click at the top left of the screen.
- Click ‘Manage Self Check > Manage Audit Items’ from the menu.
- Click Audit Item Name of the audit item to be copied.
- Click ‘Copy’ at the bottom of the Detailed Information screen of the audit item.
- A new item filled with details of the copied audit item will be created.
- Check the detailed information of the new audit item and edit it if necessary.
- The application stage and audit type can't be changed.
- Click ‘Apply’ or ‘Save Temporarily’ to save the content.
Deleting Audit Item
The following shows how to delete an audit item set.
- Click ‘Admin Menu’ at the top right of the PC web screen, and then click ‘Expense’ in the pop-up window.
- Click at the top left of the screen.
- Click ‘Manage Self Check > Manage Audit Items’ from the menu.
- Select the audit item to be deleted, and then click ‘Delete’.
- Click ‘OK’ in the confirmation pop-up window.
Manage Violations/Explanations
In the Manage Violations/Explanations menu, you check the results of explanations requested regarding violations of expense audit items. Explanation requests can be sent in the View Self Check menu. When the expense requester who receives the explanation request enters the response, the expense history is displayed in the Manage Violations/Explanations menu.
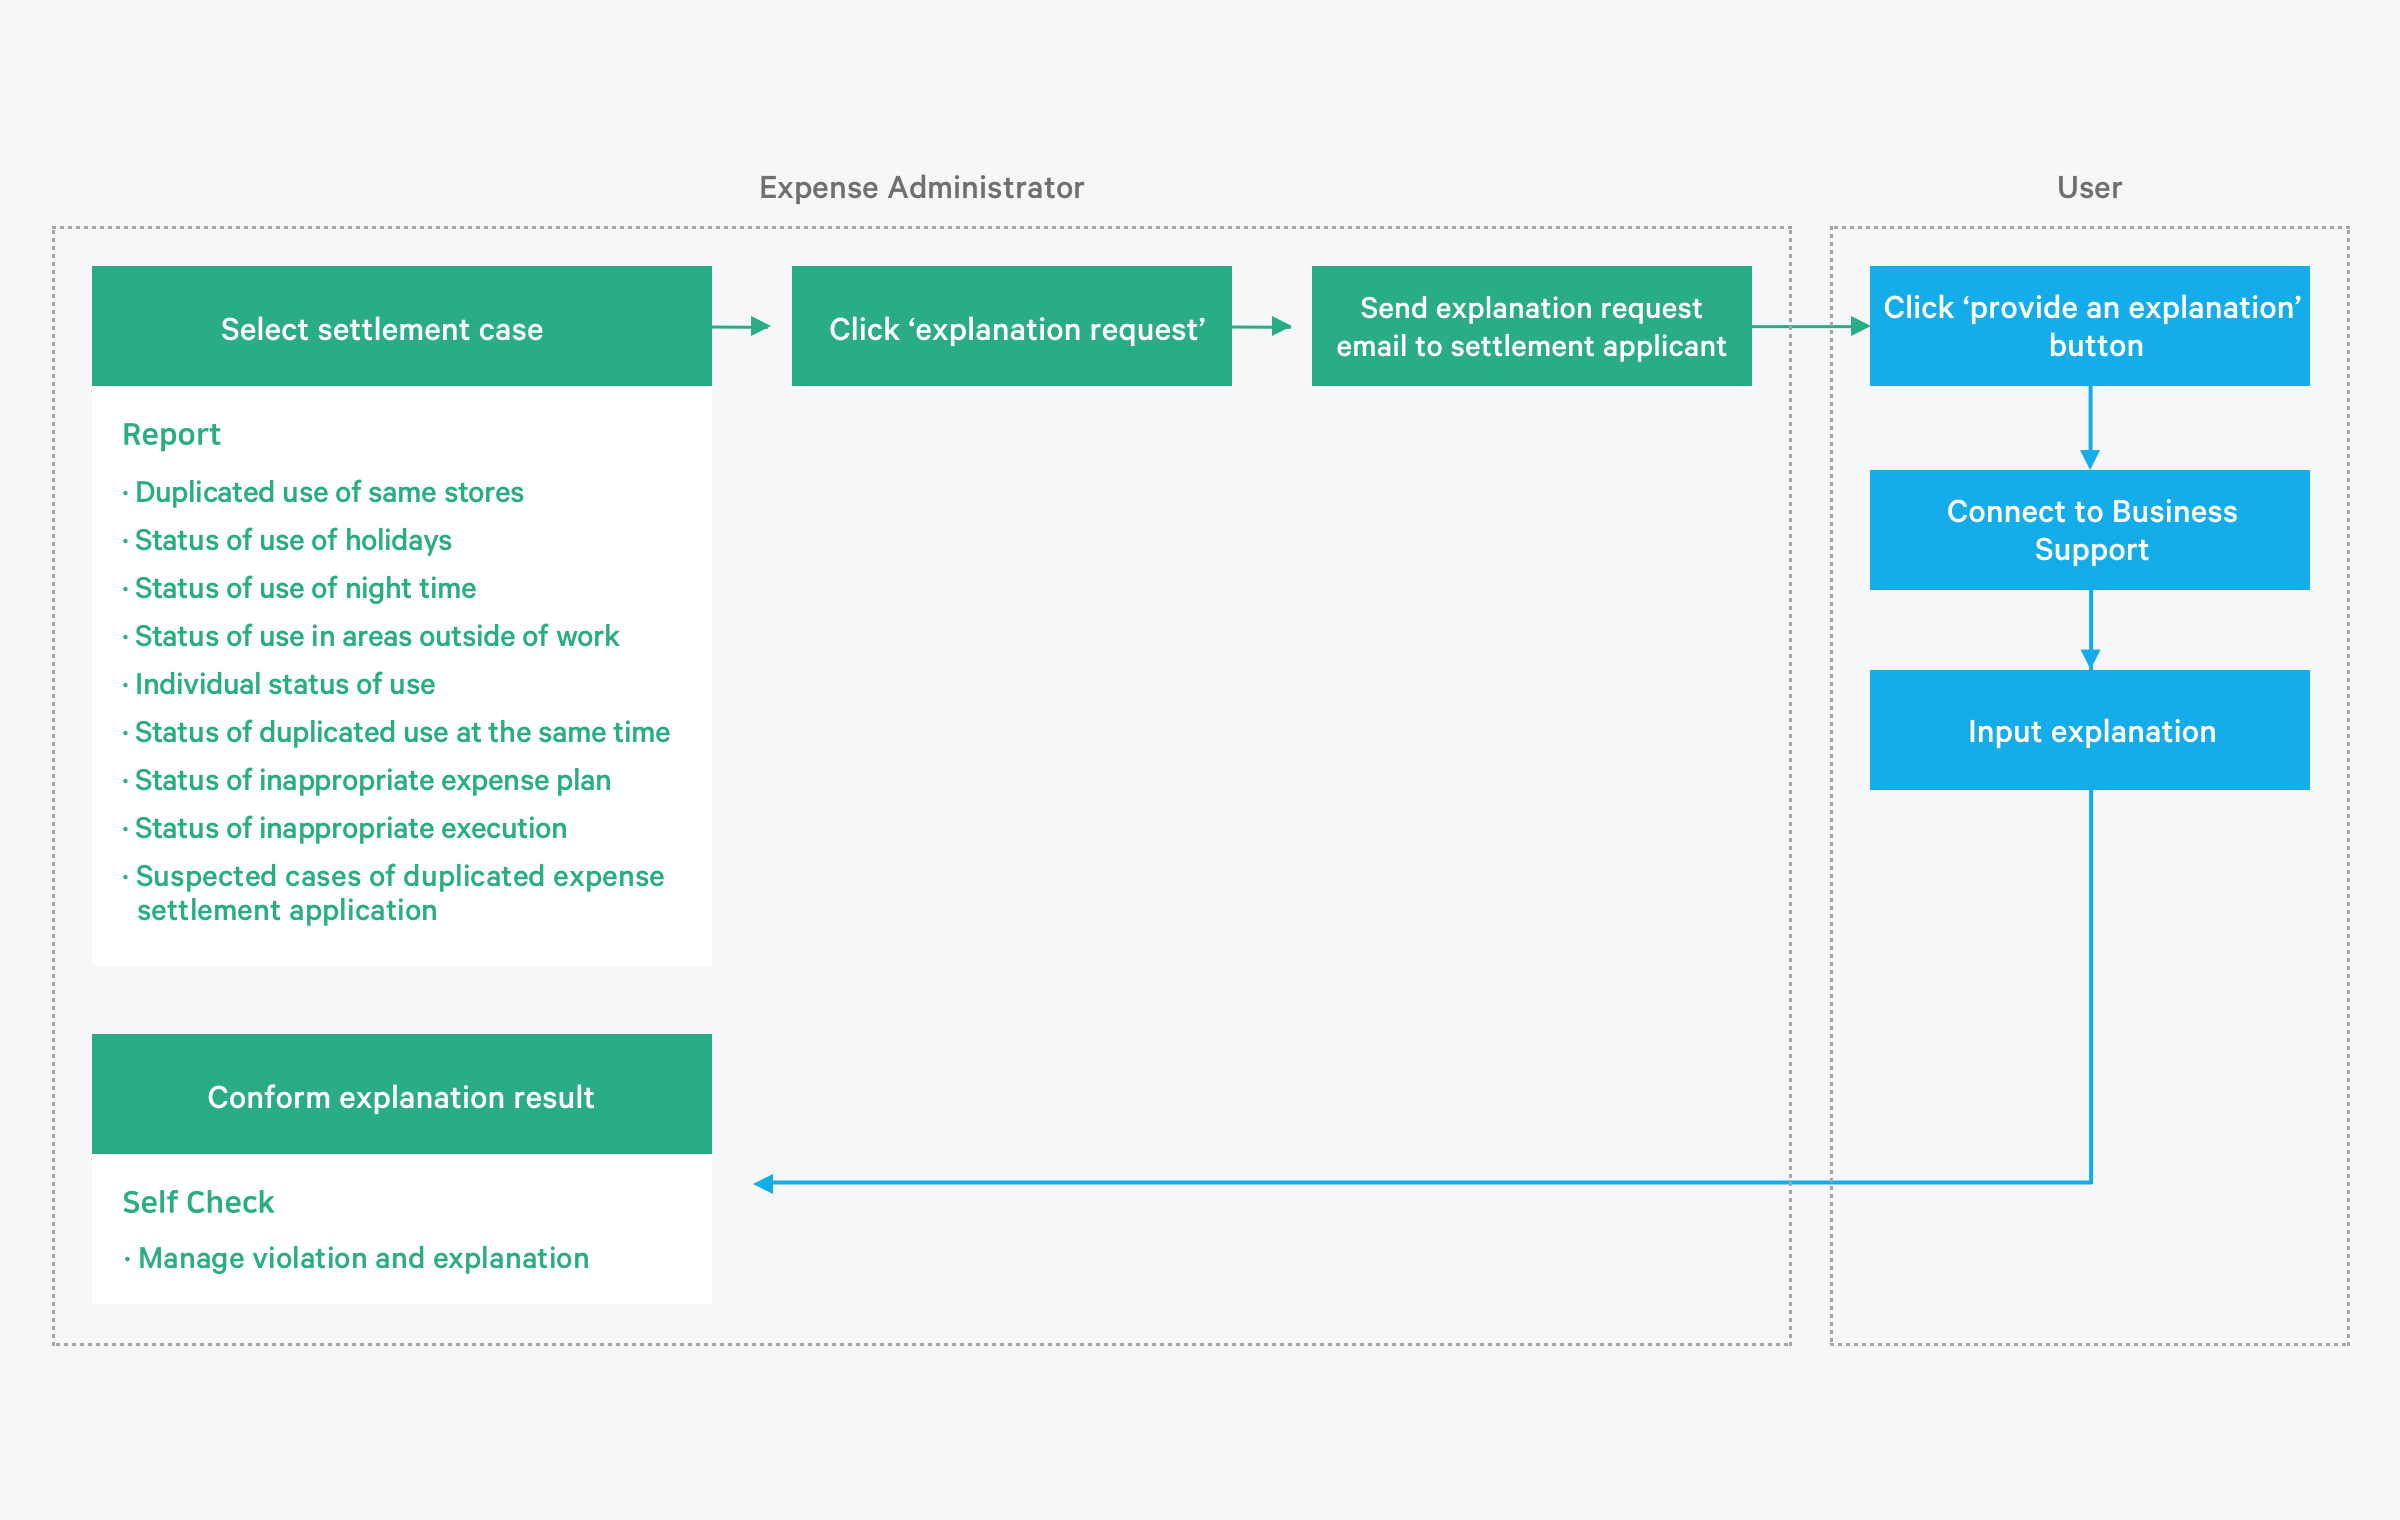
The Manage Violations/Explanations screen is laid out as follows.
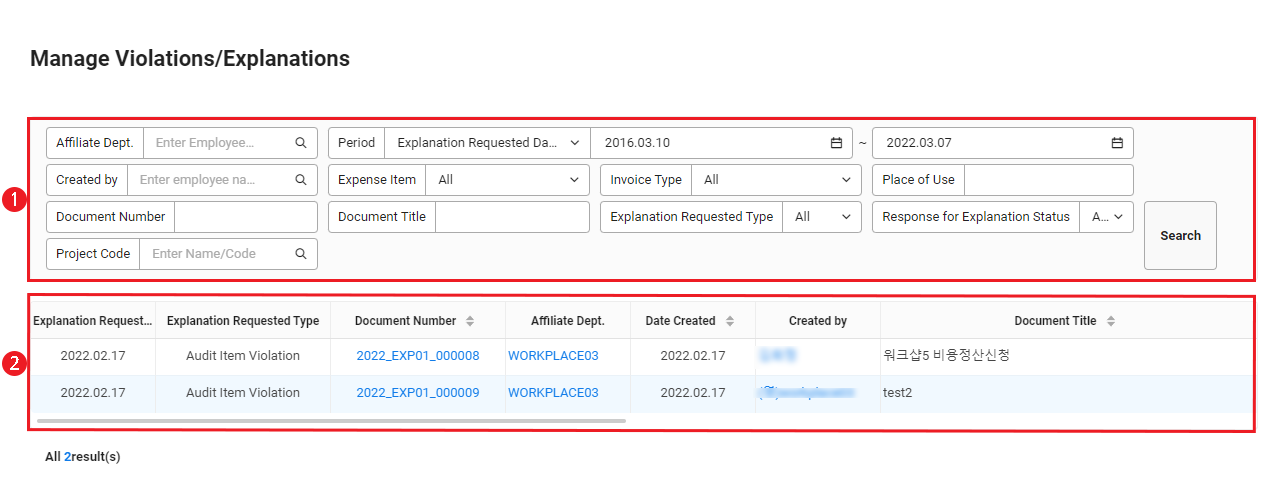
| Area | Description |
|---|---|
| ① Search Window | Searches the explanation results by affiliated department, period, creator, expense item, evidence type, place of use, settlement document number and title, explanation request type, explanation response, and project code. |
| ② Explanation Result List | Views explanation results as a list.
|