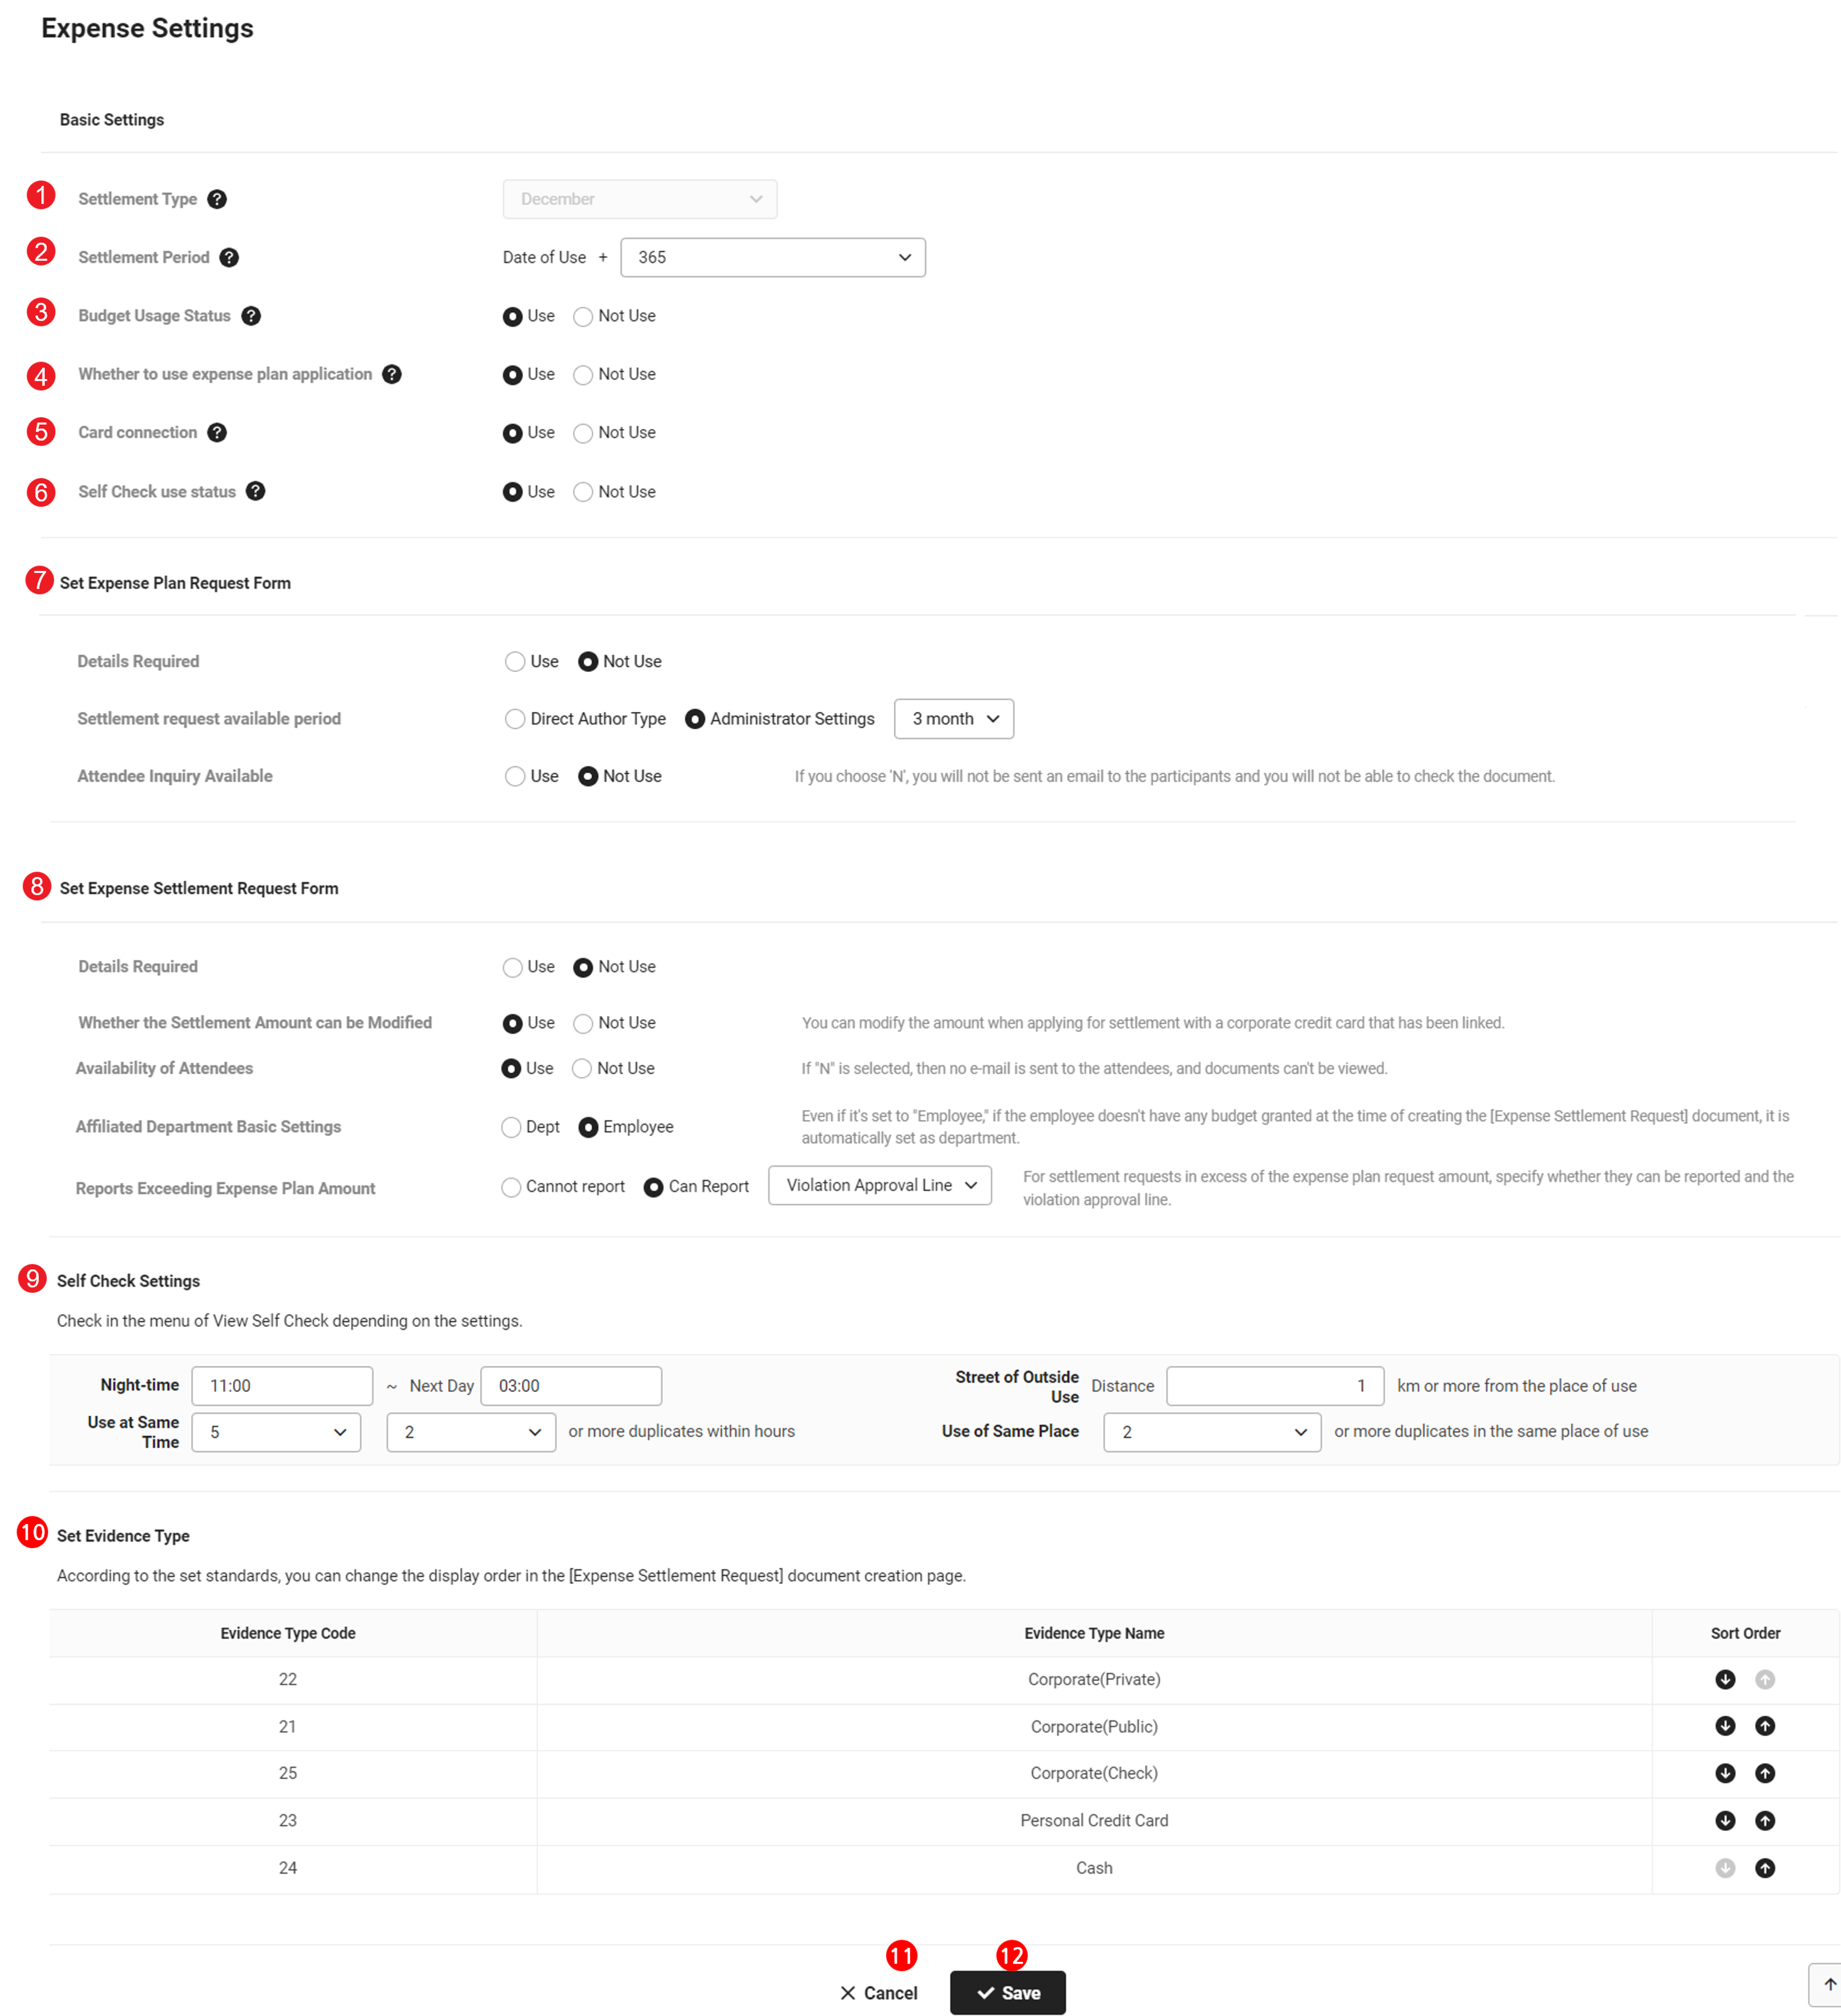
You can set to use or not use various sub menus of the Expense service and manage budget items and expense items. You can also set the Self Check audit criteria and manage corporate credit cards. You can organize and allocate budgets in other menus of the Expense service based on the budget items and expense items set in the Settings menu. You can compose expense plan and expense settlement request documents.
Set Expense
You can select the menus to be used in the Expense service and change settings for the expense plan request and expense settlement request forms. You can also set the Self Check criteria to display details of expenses that violate audit items in the View Self Check menu.
The Expense Settings page is laid out as follows.
| Area | Description |
|---|---|
| ① Settlement Type | The type is automatically set to the settlement month set in the Accounting service and can't be changed The accounting year of the Expense service is displayed according to this setting value (See Set Accounting) |
| ② Settlement Period | Set the period for requesting settlements in the corporate credit card approval history
|
| ③ Budget Usage Status | Budget usage status is displayed when using the Budget service When Use is selected, you can view and use budgets when filling out the expense settlement request forms |
| ④ Expense Plan Usage Status | If ‘Use’ is selected, the following expense-related menus are displayed
|
| ⑤ Credit Card Company Integration Status | If ‘Use’ is selected, you can set data integration with credit card companies in the ‘Manage Card’ menu. Fees are charged for each corporate credit card, and the following corporate credit card-related menus are displayed
|
| ⑥ Self Check Usage Status | If ‘Use’ is selected, the menus related to Self Check below are displayed
|
| ⑦ Set Expense Plan Request Form |
|
| ⑧ Set Expense Settlement Request Form |
|
| ⑨ Set Self Check | These settings are used to judge whether a specific expense history has violated audit items (See View Self Check)
|
| ⑩ Set Evidence Type | Set the display order of the detailed selection items displayed on the ‘Evidence Type’ field of the expense settlement request form |
| ⑪ Cancel | Delete the setting, and refresh and open the previous page before making changes |
| ⑫ Save | It saves the settings |
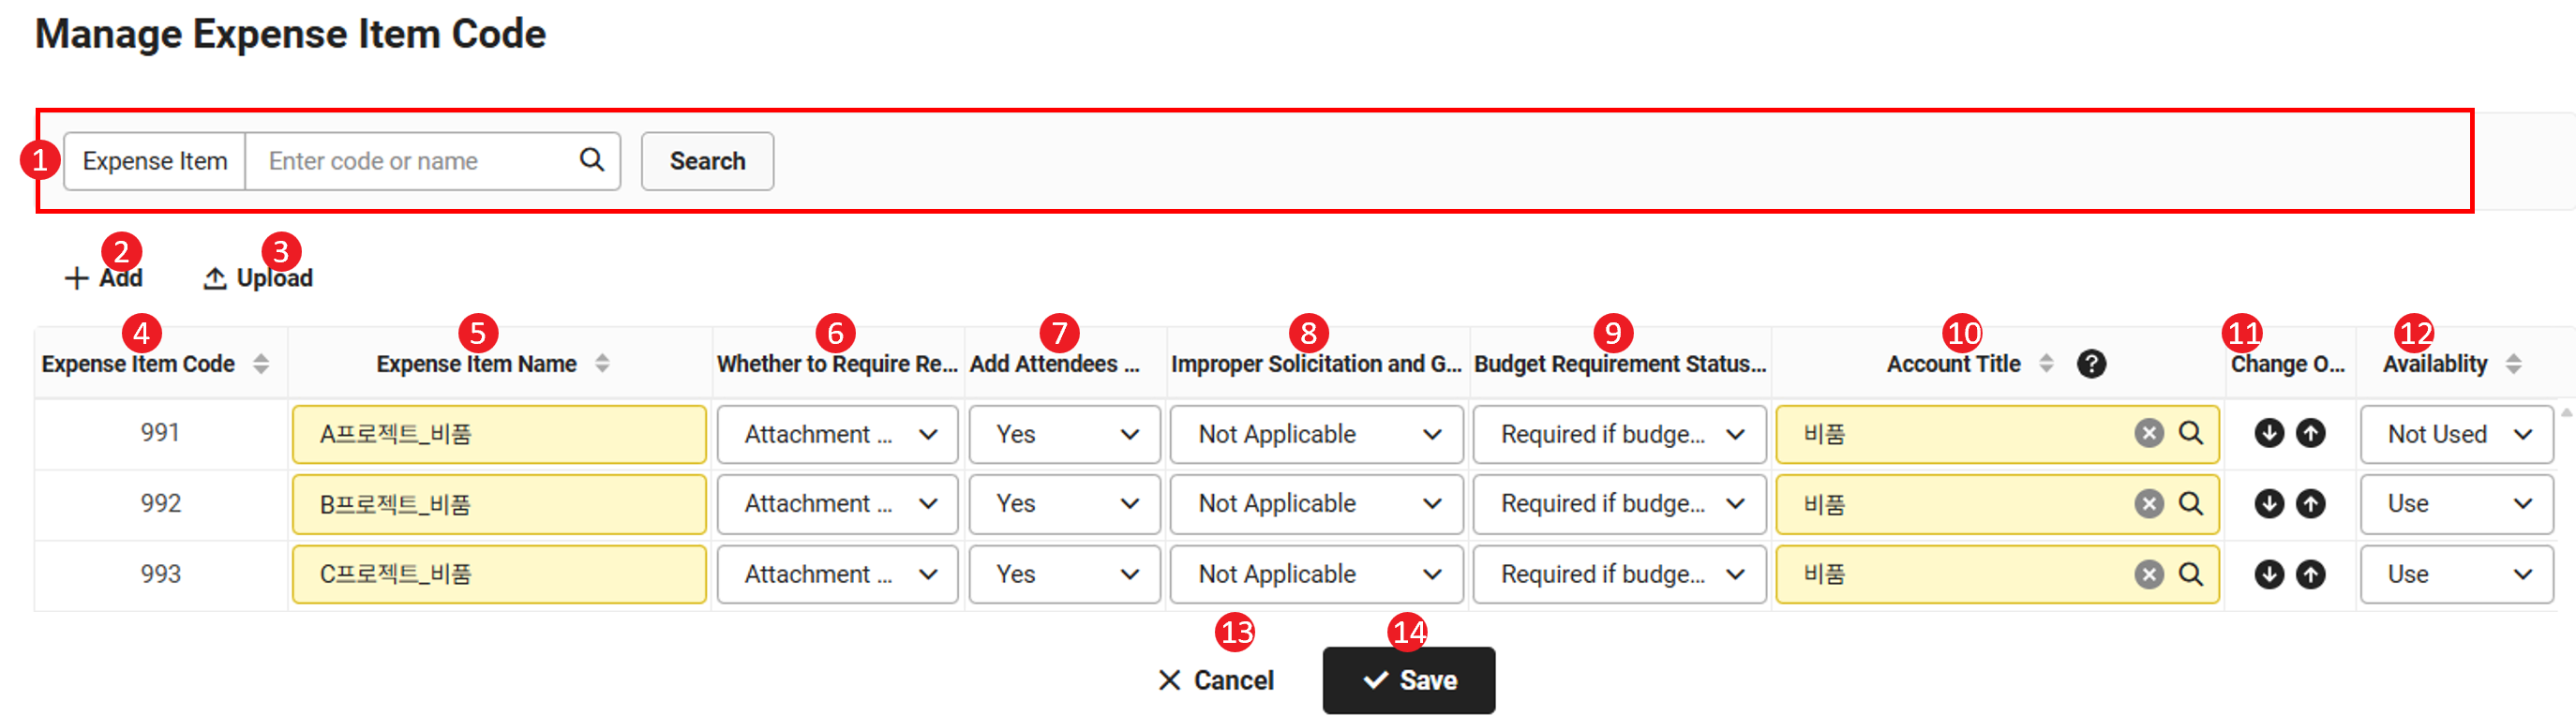
Manage Expense Item Code
You can request expense plans and settlements and manage the expense items displayed when using various expense-related sub menus. You can change the expense item name, adding attendees, Improper Solicitation and Graft Act subject confirmation, budget item affiliated with expense item, account title, order, and usage status. You can add new expense items when necessary.
The Manage Expense Item Code page is laid out as follows.
| Area | Description |
|---|---|
| ① Search window | Search expense items by item name or code |
| ② Add | Add a new expense item (See Add Expense Item) |
| ③ Upload | Attach and batch upload files composed after downloading the sample file |
| ④ Expense Item Code | It displays the code of each expense item |
| ⑤ Expense Item Name | It displays the name of each expense item Click to change the name |
| ⑥ Receipt Requirement Status | If you select 'Attachment required', a receipt must be attached when requesting expenses for this item
|
| ⑦ Add Attendee | When set to ‘Yes’, insider and outsider attendees can be added when requesting an expense using the expense item |
| ⑧ Improper Solicitation and Graft Act | When ‘Yes’ is selected, you need to check if any of the outsider attendees are subject to the Improper Solicitation and Graft Act when requesting an expense using the expense item |
| ⑨ Budget Requirement Status | If 'Required' is selected, you must select Budget when requesting expenses for this expense item. If ‘Required if budget is allocated' selected, you must select Budget in case that the budget is allocated to the applicant when requesting expenses for this expense item. If ‘Not required’ is selected, it is not required to select Budget when requesting expenses for this expense item. |
| ⑩ Account Title | Account title to be used in the Accounting service For the selected account title, related slip forms are automatically created in the ‘Accounting > Settings > View Slip Templates’ menu When the expense item added by the user is approved, the slip is created automatically |
| ⑪ Change Order | Change the order of displaying the list of expense items |
| ⑫ Usage Status | It displays the usage status of each expense item If not used, the expense item is not displayed when viewing expense items |
|
⑬ Cancel |
Delete the edited details and refreshes to the page before modification |
|
⑭ Save |
Save the edited content |
Add Expense Item
The following describes how to add a new expense item.
- Click ‘Admin Menu’ at the top right of the PC web screen, and then click ‘Expense’ in the pop-up window.
- Click
 at the top left of the screen.
 - Click ‘Settings > Manage Expense Item Code’ from the menu.
- Click 'Add'.
- Enter the settings for the expense item by referring to below.
- Expense Item Code: Code number of the expense item
- Expense Item Name: Name of the expense item
- Receipt Requirement Status: Set whether receipt attachment is required when requesting expense reimbursement for this item.
- Even if 'Attachment required' is selected, it will not apply when settling expenses through corporate credit card integrated settlement.
- Add Attendee: Set whether to add attendees when requesting an expense using the expense item.
- Improper Solicitation and Graft Act: Set whether to check if there is an outsider subject to the Improper Solicitation and Graft Act when requesting an expense using the expense item.
- Budget Requirement Status:It is displayed when 'Budget Usage Status' is set to 'Use' in 'Expense > Settings > Budget Settings.' You can set whether the budget is required when requesting expense settlement for this item.
- Required: Budget must be selected when requesting an expense using the expense item.
- Required if budget is allocated: When requesting an expense using this item, budget selection is required if the budget-using department matches the affiliated department or the requestor or the affiliated department (See Create Expense Settlement Request Form)
- Not required: Budget can be selected when requesting an expense using the expense item.
- However, if the requestor is in the budget-using department, but the affiliated department is different, the budget must be selected even if it is set to 'Not required'
- Account Title: Account title to be used in the Accounting service
- Change Order: Display position of the item in the expense item list
- Usage Status: Usage status of the expense item
- Click ‘Save’, and then click ‘OK’ in the confirmation pop-up window.
Upload Expense Item Code List
The following describes how to upload the list of expense item codes as an Excel file.
- Click ‘Admin Menu’ at the top right of the PC web screen, and then click ‘Expense’ in the pop-up window.
- Click at the top left of the screen.
- Click ‘Settings > Manage Expense Item Code’ from the menu.
- Click ‘Upload’.
- Click ‘Download Sample File’ to download the sample file.
- The sample file is saved as ‘expItem-sample.xlsx’ in the Download folder.
- Create the list of expense item codes according to the sample file form, and save it.
- Click ‘Attach File’ to attach the file, and then click ‘OK’.
- Click ‘Save’, and then click ‘OK’ in the pop-up window.
Manage Card
You can register and manage credit card companies and corporate credit card information to import data by integrating with credit card companies. When registering credit card companies and corporate credit cards, the data from the credit card companies is automatically scraped and presented in various sub-menus within the Expense service. The credit card company login information is securely saved and in accordance with the Privacy Policy of the NAVER Cloud Platform. The scraped history is properly viewed only if the corporate card has not expired and the Card Validity Check result is Normal.
- As credit card companies handle card approval and cancellation data differently, variations may occur in the imported data due to scraping methods. To check the history more accurately, compare with the approval history provided on the corporate card website.
- If the corporate credit card has been lost or expired, register the information of the reissued corporate credit card to scrape the approval history following the existing corporate credit card.
The Manage Card page is laid out as follows.
| Area | Description |
|---|---|
| ① Search window | Search credit card companies and corporate credit cards by credit card company, card alias, cardholder, payment date, integration status, status, and usage status |
| ② Download | Download the list of credit card companies and corporate credit cards as an Excel file (See Download List of Credit Card Companies and Cards) |
| ③ Set Credit Card Company | Add new credit card companies (See Add Credit Card Company and Set Integration) and view and edit registered credit card company information
|
| ④ Set Corporate Credit Card | Add new corporate credit cards (See Add and Set Card), and view and edit the information of registered corporate credit cards
|
Download List of Credit Card Companies and Cards
The following describes how to download the list of registered credit card companies and corporate credit cards as an Excel file.
- Click ‘Admin Menu’ at the top right of the PC web screen, and then click ‘Expense’ in the pop-up window.
- Click at the top left of the screen.
- Click ‘Settings > Manage Card’ from the menu.
- If necessary, enter the credit card company and corporate credit card conditions to be searched in the search window, and then click ‘Search’.
- You can view the list of credit card companies and corporate credit cards that applies to the entered conditions.
- Click 'Download'.
- The list of credit card companies and corporate credit cards is downloaded as an Excel file.
Add Credit Card Company and Set Integration
You can add credit card companies, enter data integration settings with each credit card company, and change settings of the added credit card companies.
The following describes how to add credit card companies and enter data integration settings.
- If you set credit card company integration to ‘N’ in the ‘Settings > Expense Settings’ menu, items related to integration are not displayed. Set credit card company integration to ‘Y’ if you want to enter credit card company integration settings.
- You can still register credit card companies and corporate credit cards after setting credit card company integration to ‘N’. In this case, you can't scrape data from the credit card company, but you can use the information of the registered corporate credit card when requesting expense settlement.
- Click ‘Admin Menu’ at the top right of the PC web screen, and then click ‘Expense’ in the pop-up window.
- Click at the top left of the screen.
- Click ‘Settings > Manage Card’ from the menu.
- Click 'Add Credit Card Company'.
- Select a credit card company in the Select pop-up window, enter the alias of the credit card company, and then click ‘Save’.
- Integrated Tab: Credit card companies available for data integration
- Select and save the credit card company being used by the company to add the credit card company to the list of credit card companies on the left side of the Manage Card page.
- Specify the alias of the credit card company to manage integrated cards of each account if there are several accounts on the credit card company.
- Not Integrated Tab: Credit card companies not available for data integration
- If there is a credit card company used by the company, select it and save. The integration service is not provided, but individual corporate credit cards can be registered only after registering the credit card company.
- Integrated Tab: Credit card companies available for data integration
- Select the added credit card company and enter the integration settings as shown below.
- Credit Card Company Integration Status: Click to activate
- To remove credit card company integration later, click Credit Card Company Integration Status and deactivate.
- Integration Method: Select the credit card company integration method.
- ID/Password Method: Select ‘ID/Password’ from Integration Method, and then enter the ID and password of the credit card company login account to authenticate.
- Certificate Method: Select ‘Certificate’ from Integration Method, and then select the certificate (automatic selection when there is only one certificate). If you want to use the certificate method, the certificate for corporate credit card integration must be registered in ‘Business Support Settings > Manage Business Place > Manage Certificate’. For more information, see Manage Certificate.
Refer to the following for proper corporate credit card scraping integration.
- The certificate, ID, and password for setting up the credit card company integration must be the same as the information registered on the actual corporate credit card website.
- Corporate credit card scraping scrapes the data from the website of the corporate credit card company where the corporate credit card is actually registered. Don't confuse this with the bank website or personal credit card website.
- If there are changes to the credit card company's website, data may not be fetched for a period of time, even if it's not a failure of card scraping.
A integration error may occur if the effective period of a authentication has expired or if it has been reissued. Check if the registered certification is valid, and then register it again in ‘Business Support Settings > Manage Business Place > Manage Certificate’.
- Credit Card Company Integration Status: Click to activate
- Click ‘Save’, and then click ‘OK’ in the confirmation pop-up window.
- If a login account input error occurs, the 'Login Error' status is displayed when checking validity after registering an individual card. The validity check result of each card can be checked in ‘Expense Service > Card Usage Status > Integration Error Status’.
- If the credit card company is integrated successfully, the list of cards of the credit card company in possession is displayed in the Card Settings area at the bottom of the page.
- To change credit card company settings later, edit the settings in the page and click ‘Save’.
To change integration settings of individual corporate credit cards registered with the credit card company, see Add and Set Card.
The registered credit card company is automatically added to the list of vendors in the ‘Business Support Settings > Common Code > Manage Vendor menu’.
Delete Credit Card Company
The following describes how to delete a registered credit card company.
- To delete a credit card company, delete all corporate credit cards registered with the credit card company first.
- When deleting a credit card company, the integration of registered credit cards is suspended, and it is excluded from billing starting from the following month.
- The login account (ID, password) information of the deleted credit card company is deleted.
- Click ‘Admin Menu’ at the top right of the PC web screen, and then click ‘Expense’ in the pop-up window.
- Click at the top left of the screen.
- Click ‘Settings > Manage Card’ from the menu.
- After selecting the credit card company to delete, click
 and then click ‘OK’ in the confirmation pop-up window.
Even if you delete a credit card company, it is not deleted from the vendor list in the ‘Business Support Settings > Manage Common Code > Manage Vendor’ menu.
Add and Set Card
You can add corporate credit cards to registered credit card companies, change settings of the added corporate credit cards. If credit card company integration status is ‘Y’, a fee is imposed per card when adding corporate cards.
The following describes how to add corporate credit cards to the credit card company and manage them.
- Click ‘Admin Menu’ at the top right of the PC web screen, and then click ‘Expense’ in the pop-up window.
- Click at the top left of the screen.
- Click ‘Settings > Manage Card’ from the menu.
- Select the credit card company to add corporate credit cards, and then click ‘Add’ in the Card Settings area.
- Enter the corporate credit card settings by referring to the following.
- Card Number: Number of the corporate credit card to be registered
- Expiration Date: Expiration date of the corporate credit card to be registered
- Card Alias: Alias to discern corporate credit cards
- Cardholder: Cardholder and manager of the corporate credit card
- User: Users that can request settlement through the corporate credit card
You can select in units of employees or departments by clicking ‘Settings’. The unit of department can include suborganizations, reflecting the latest organization chart.The following features are available to registered users.
- The unsettled count related to the corporate credit card is reflected in the ‘Corporate Credit Card Settlement’ widget.
- You can select the corporate credit card as the evidence type to settle it in ‘Approval Home > Compose Document > Request Expense Settlement > Add Manual Settlement History’. In the case of corporate card integration settlement, the approval history of the corporate card is integrated and can be settled.
- The approval history of the corporate credit card is displayed in ‘My Work > Manage Expense > Corporate Credit Card Usage History’ and can be selected for settlement.
- If the company uses the Expenditure service, the user can select the corporate credit card as the evidence type when creating ‘Approval Home > Compose Document > Expenditure Resolution Report’.
- Card Type: Whether the card is shared, personal, or debit card.
- If it is a corporate card (debit), enter the payment account number.
- Payment Date: Corporate credit card payment date.
Click ‘Settings’ to enter additional approval period.- Set the payment date according to the card approval period.
- When using with the Accounting service, the payment due date is automatically calculated upon setting the approval period and payment date. It is reflected when processing the accounting slip.
- You can check the payment due date in ‘Manage Schedule’ of the expense slip payable account or the ‘Accounting Service > Manage Receivables/Payables > Confirm Withdrawal History’ menu. The Accounting admin can edit the payment due date on this page when necessary.
- Example of payment date calculation: If the payment date for the period from the first day to the last day of the previous month is set to the 14th, the expense slip payment due date of a case approved (expense used) on December 21 is automatically calculated and designated as January 14.
When selecting the payment date directly, the automatic calculation of the scheduled payment date for the expense slip is not applied. It is applied automatically only if the approval period and the payment date have been set by clicking ‘Settings’.
- Payment Account: Account connected to the corporate credit card
- Integration Status: Whether the corporate credit card is integrated
The integration by card can be changed after registering the corporate credit card. When changing the No status to Yes and saving, the card validity check is performed. (See Validity Check) - Integration Status: It displays the integration status of the corporate credit card. (See Check Card Integration Status)
- Usage Status: Usage status of the corporate credit card.
If changed to Not use, the card does not appear when selecting a corporate credit card when requesting expense settlement.- When using in the form of a corporate group, you can also set an employee with concurrent positions belonging to another company of the corporate group as a cardholder.
- By entering an additional corporate credit card approval period, the payment due date is automatically calculated and reflected when processing slips in the Accounting service.
- Click ‘Save’, and then click ‘OK’ in the confirmation pop-up window.
- To change corporate credit card settings later, edit the settings from the page and click ‘Save’.
Check Card Integration Status
The Integration Status of corporate credit cards is classified as follows.
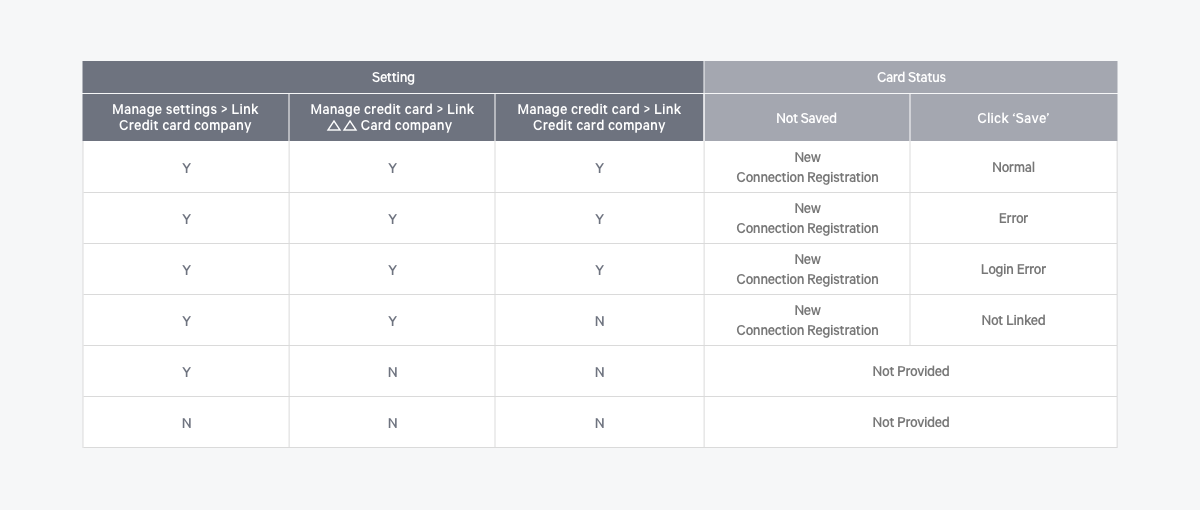
- New Registration: The corporate credit card has been newly added and not been saved.
- Integration Registration: The information of the card issued through credit card company integration settings has been automatically imported and entered but not saved.
- Normal: There is no problem in the corporate card validity check performed after saving, and scraping is being executed normally.
- Error: The card has been saved, but there is an error in the card information.
- Login Error: Login fails because of inaccurate credit card company integration login information, and scraping can't be done.
- Not Integrated: The status is indicated as not integrated if the credit card company has not been integrated or the corporate credit card information integration status is selected as ‘No’.
The integration status of Error and Login Error is recorded in ‘Expense > Card Usage Status > Integration Error Status’. When an integration error occurs, a notification email is sent to the Expense admin.
Delete Card
- Click ‘Admin Menu’ at the top right of the PC web screen, and then click ‘Expense’ in the pop-up window.
- Click at the top left of the screen.
- Click ‘Settings > Manage Card’ from the menu.
- Select the credit card company, select the corporate credit card to delete, and click ‘Delete’.
- Click ‘Save’, and then click ‘OK’ in the confirmation pop-up window.
Precautions when deleting cards:
- The integration data of the deleted card is available in ‘Expense > Card Usage Status > Approval/Purchase/Billing History’, but the card no longer appears in the search conditions. For users, the integration data of the deleted card no longer appears in the ‘My Work > Manage Expense > Corporate Credit Card Usage History’ menu.
- Approval documents that have been settled with the deleted card won't be deleted, but it does delete the card's integration history in temporarily saved documents.
- If you have lost or replaced your card, you'll need to see Lost/Replacement and register the reissued card to ensure that your card usage history is provided continuously.
- For unused cards, if you set the card's integration status to Not integrated or its usage status to ‘Not use’, you won't be charged from the following month, so please note this before deleting the card.
Check Card Validity
Validity of corporate credit cards can be checked upon completion of integration after registration.
- Selectively click for a regular check when the corporate credit card status needs to be changed.
- If the integration status is displayed as ‘Error’, check validity after confirming the credit card company integration and corporate credit card information.
- If the integration status is displayed as ‘Login Error’, check validity after accurately entering the credit card company login information.
The following describes how to check validity of registered cards.
- Click ‘Admin Menu’ at the top right of the PC web screen, and then click ‘Expense’ in the pop-up window.
- Click at the top left of the screen.
- Click ‘Settings > Manage Card’ from the menu.
- Select the credit card company, select the corporate credit card to check validity, and click ‘Check Card Validity’.
Lost and Replaced Cards
If a corporate credit card has been expired or lost and reissued, you can register the corporate credit card. Register the reissued corporate credit card to scrape the approval history following the existing corporate credit card.
The following describes how to register a corporate credit card reissued after being lost or replaced.
- Click ‘Admin Menu’ at the top right of the PC web screen, and then click ‘Expense’ in the pop-up window.
- Click at the top left of the screen.
- Click ‘Settings > Manage Card’ from the menu.
- Select the credit card company, select the corporate credit card lost or replaced, and click ‘Loss/Replacement’.
- Enter the number and expiration date of the reissued corporate credit card, and then click ‘Save’.
- The existing corporate credit card information is changed to the reissued corporate credit card information and display
 in front of the corporate credit card number, verifying the reissuance history.
- The existing corporate credit card information is changed to the reissued corporate credit card information and display
Set Payment Date in Bulk
The following describes how to change the payment date of various corporate credit cards in bulk.
- Click ‘Admin Menu’ at the top right of the PC web screen, and then click ‘Expense’ in the pop-up window.
- Click at the top left of the screen.
- Click ‘Settings > Manage Card’ from the menu.
- Select the credit card company, select all corporate credit cards to change the payment date, and click ‘Set Payment Date in Bulk’.
- Enter the approval period and expiration date of the corporate credit cards, and then click ‘Save’.
Bulk Upload Card
The following describes how to add corporate credit cards in bulk.
- Click ‘Admin Menu’ at the top right of the PC web screen, and then click ‘Expense’ in the pop-up window.
- Click at the top left of the screen.
- Click ‘Settings > Manage Card’ from the menu.
- Select the credit card company to add corporate credit cards, and then click ‘Upload’ in the Card Settings area.
Bulk upload of corporate credit cards can be done for one credit card company at a time.
Select the credit card company to upload from the list of credit card companies, and then upload the list of corporate credit cards for the selected credit card company. - Click ‘Download Sample File’ to download the template file.
- The downloaded template is saved as ‘sample_card.xlsx’ in the Download folder.
- Enter the information such as corporate credit card information, cardholders, integration, and usage status in the template, and then save it.
- The card number, cardholder login ID, and card type are required fields.
- See the Add and Set Card guide for the entry method of each field.
- Duplicated credit card numbers can't be uploaded.
- Click ‘Attach File’ to upload the filled-in template.
- If the content entered in the template has errors, you can check the error message at the bottom of the page. Edit it and upload it again.
- Click ‘Save’.
Manage Notifications
You can set notifications related to the Expense service to be delivered to the Expense admin or users. Notifications can be received either in service notification or email format. Integration with external solutions like KAKAO, LINE, Slack, Google Chat, etc., enables receiving notification messages.
The Manage Notifications page is laid out as follows.
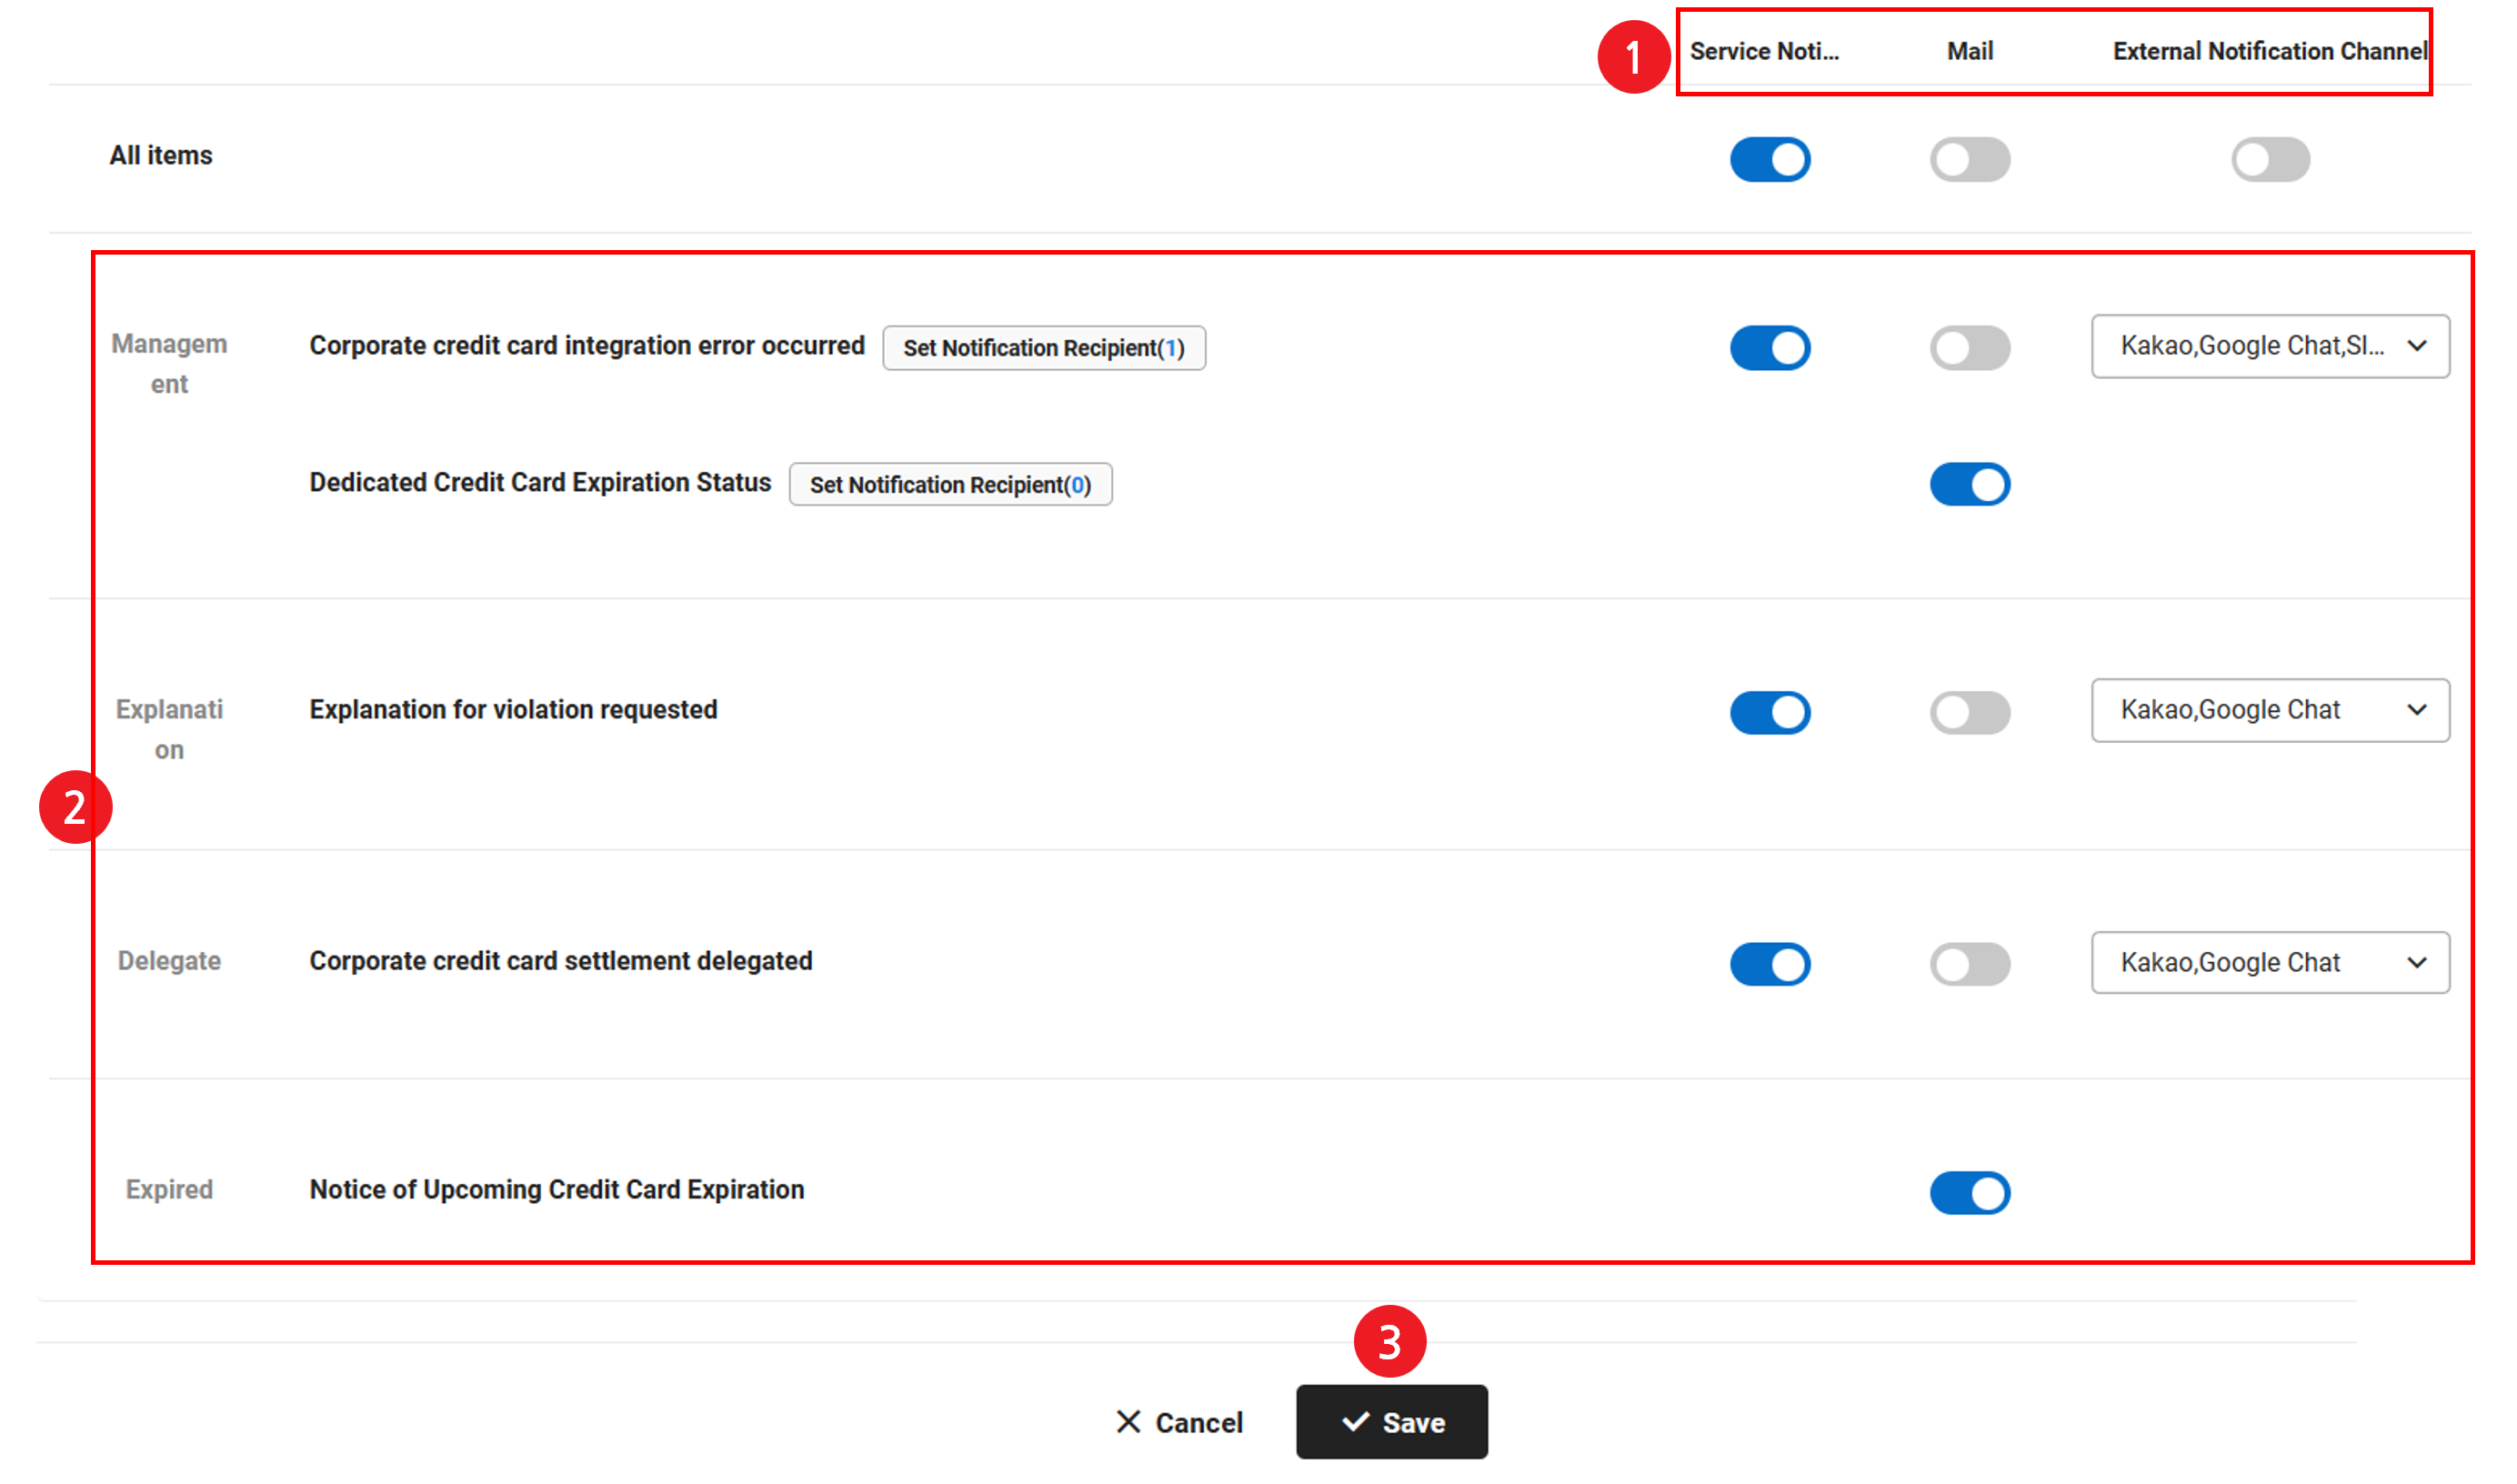
| Area | Description |
|---|---|
| ① Notification channels | Set up service notifications, email type notifications
|
| ② Set Notifications | Set notifications to be sent or not sent by channel and item
|
| ③ Save | It saves the settings |