You can request certificate issuance and issue certificates, as well as add and manage certificate forms that can be issued.
The system basically provides a certificate of employment and a certificate of career in Korean/English.
Certificate Issuance/History
In the Certificate Issuance/History menu, you can request certificate issuance and issue certificates you've applied for issuance. You can also search and view the issuance request history by condition and download the list of certificate issuance requests as an Excel file.
The Certificate Issuance/History page is laid out as follows.
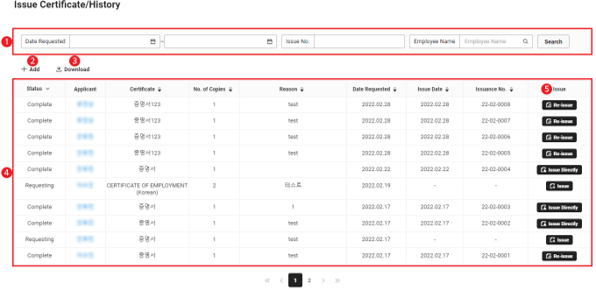
| Area | Description |
|---|---|
| ① Search window | Search certificate issuing application by application date, issue number, and employee name |
| ② Add | Request issuance of a new certificate (See Request Certificate Issuance) |
| ③ Download | Download the list of certificate issuance requests as an Excel file (See Download List of Certificate Issuance Requests) |
| ④ Issuance list | Certificate issuance request list
|
| ⑤ Issue | It displays a button depending on the status of certificate issuance
|
Request Certificate Issuance
The following describes how to request certificate issuance.
- Click 'Admin Menu' at the top right of the PC web, and then click 'HR' in the pop-up window.
- Click
 at the top left of the screen.
 - Click the 'Certificate > Certificate Issuance/History’ from the menu.
- Click 'Add'.
- Search and select the requestor.
- Select a certificate to be applied.
- See Add Certificate to add certificates that can be issued.
- Enter the number of copies to be issued.
- If there are fields set by the admin to be entered by the requestor, then enter the applicable fields.
- Enter the purpose of issuance.
- Click ‘Save’.
- Certificate issuance is requested. (See Issue Certificate)
- The career certificate is for retired employees and can only be applied by the admin.
- For a user without the permission as a certificate admin to request certificate issuance, see Create Certificate Request Form.
- If you request issuance of a certificate that is set to Direct issuance in the Certificate Issuance/History menu, then you can't check it in ‘Approval Home > Approval Document > All’ page or issue it directly.
Issue Certificate
To issue a certificate, click the ‘issue’ button of the certificate to be issued.
- The issued certificate is opened as a PDF file. Print the PDF file, stamp the seal on it, and send it to the requestor.
- In the Issue item of the issued certificate, ‘Re-issue’ is displayed.
Download List of Certificate Issuance Requests
The following describes how to download the list of certificate issuance requests.
- Click 'Admin Menu' at the top right of the PC web, and then click 'HR' in the pop-up window.
- Click at the top left of the screen.
- Click the 'Certificate > Certificate Issuance/History’ from the menu.
- If necessary, enter the certificate issuance request condition to be searched in the search window, and then click 'Search'.
- You can view the details for the certificate issuance request that match the entered conditions.
- Click 'Download'.
- The list of certificate issuance requests is downloaded as an Excel file.
[YYYYY-MM-DD]certificate_history.xlsx in the Downloads folder.Manage Certificates
You can add and manage certificate forms that can be issued.
The Manage Certificate menu is laid out as follows.
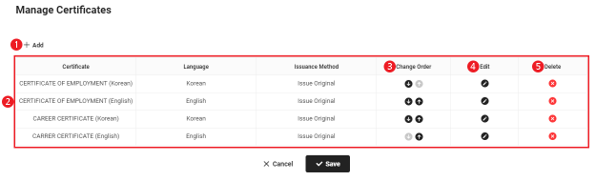
| Area | Description |
|---|---|
| ① Add | Add a new certificate (See Add Certificate) |
| ② Certificate list | It displays basically provided certificates and added certificates details |
| ③ Change Order | Click to change the order of certificates (See Change Certificate Order) |
| ④ Edit | Click to edit certificates (See Edit Certificate) |
| ⑤ Delete | Click to delete certificates (See Delete Certificate) |
Add Certificate
The following describes how to add a certificate.
- Click 'Admin Menu' at the top right of the PC web, and then click 'HR' in the pop-up window.
- Click at the top left of the screen.
- Click the 'Certificate > Certificate Issuance/History’ from the menu.
- Click 'Add'.
- Set the basic information of the certificate.
- If you select the issuance method to Direct issuance (sealed), then the user can directly issue a certificate including a company seal image registered in ‘Business Support Settings > Company Information > Manage Company Information’.
- If you select the issuance method to Request original (no seal), the admin must print the certificate, stamp the company seal on it, and then send it to the requestor.
- When selecting ‘Issued only by the admin without exposing to the certificate request form’, the certificate will not be searched in the Certificate field in ‘Approval Home > Compose Document > Request Certificate’, and only the admin can issue the certificate in the ‘HR > Certificate > Certificate Issuance/History’ menu.
- Please set up the certificate form.
- Enter a certificate title.
- Select items to be displayed in the certificate by clicking them in Content.
- Personal Information: The requestor name is a required field.
- Employment Information: Items set to ‘Use’ by the company admin in ‘Admin > Member’ are displayed.
- Company Information: Select the company information to display.
- The business registration number and address are displayed if they're registered in ‘Business Support Settings > Company Information > Manage Company Information’.
- Other Information: To display user input content in the certificate, click ‘Add’ of Other Information, and then enter the content.
- When selecting Entered by Requestor, contents entered by the requestor when requesting certificate issuance will be displayed in the Certificate. If it's not selected, then the item name and contents set by the admin will be displayed in the Certificate.
- Purpose of Issuance: To display the purpose of issuance on the certificate, select Display on certificate.
- Attestation Statement: To use attestation statement, select the checkbox and then enter the statement (<e.g.,> I do hereby certify that the above is true).
- Place of Issuance: Select the place of issuance.
- ‘Company’ is selected by default.
- When selecting the ‘Business Place’, information of the business unit where the requestor belongs to, is displayed in the place of issue field.
- Representative Job Title: If you enter the job title of the company representative, it is displayed at the bottom of the certificate.
- Company Logo: Select whether to display the company logo.
- The ‘Company Logo’ item is only displayed when the logo image is registered in Admin.
- Select the certificate format style.Click ‘Preview’ to view the form of the certificate to be added.
- Click 'OK'.
- Click ‘Save’.
- The added certificate is saved.
Change Certificate Order
The following describes how to change the certificate order.
- Click 'Admin Menu' at the top right of the PC web, and then click 'HR' in the pop-up window.
- Click at the top left of the screen.
- Click the 'Certificate > Certificate Issuance/History’ from the menu.
- Change the order by clicking
 or
or  of the order-changing item.
 - Click ‘Save’.
- The changed certificate order is saved.
Edit Certificate
The following describes how to edit certificates.
- Click 'Admin Menu' at the top right of the PC web, and then click 'HR' in the pop-up window.
- Click at the top left of the screen.
- Click the 'Certificate > Certificate Issuance/History’ from the menu.
- Click
 of the certificate to be edited.
 - Apply the edited content, and then click ‘OK’.
- Click ‘Preview’ to view the edited certificate.
- Click ‘Save’.
- The edited information is saved.
Delete Certificate
The following describes how to delete a certificate.
- Click 'Admin Menu' at the top right of the PC web, and then click 'HR' in the pop-up window.
- Click at the top left of the screen.
- Click the 'Certificate > Manage Certificates’ from the menu.
- Click
 of the certificate to be deleted.
 - Click ‘Save’.
- The certificate is deleted.