You can add information for employees belonging to the company, as well as manage employees through actions such as through personnel appointments. Also, you can appoint and manage Reports To.
Manage Employee
you can manage employee information and arrange personnel appointments. You can also edit employees’ personnel information in bulk as an Excel file, as well as download the employee list as an Excel file.
The Manage Employees page is laid out as follows.
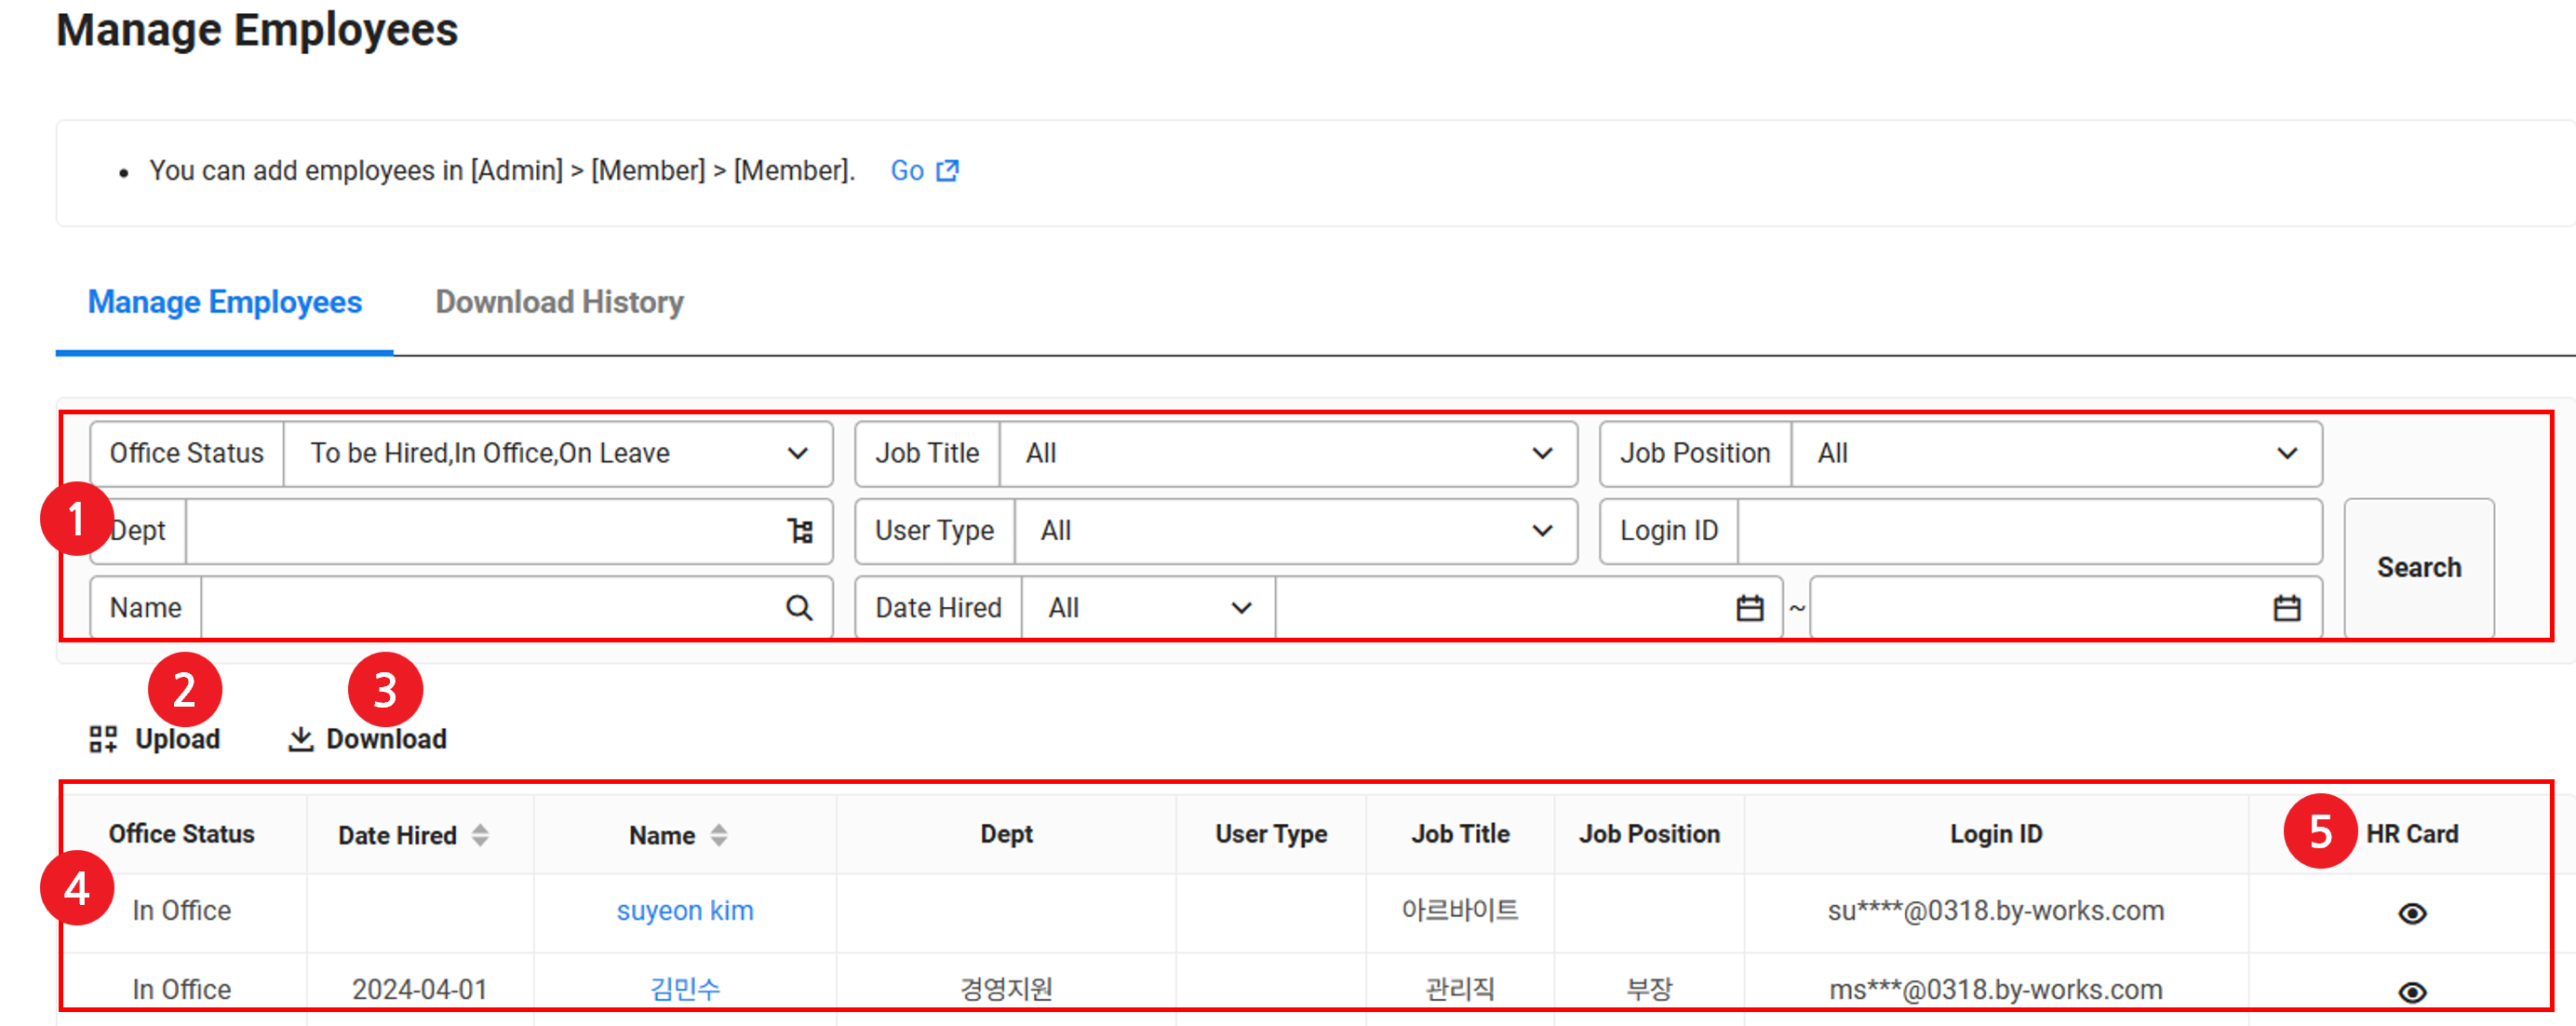
| Area | Description |
|---|---|
| ① Search window | Search for an employee based on the employment status, job grade, job position, department, user type, login ID, name, and employment date
|
| ② Upload | Edit employee personnel information in bulk (See Edit Employee Information in Bulk) |
| ③ Download | Download the list of employees as an Excel file (See Download Employee List) |
| ④ Employee list | The employee's information, including their employment date, name, department, user type, job title, job position, and login ID, is displayed.
|
| ⑤ HR Card | Click the employee's name or click |
| ⑥ Number of displayed items | Set the number of employees to be displayed on a single page of the list |
View/Edit HR Card
Click the employee's ![]() in the employee list to view the employee's HR card. On the HR card page, you can edit or print the written employee information, and can arrange personnel appointment for the employee.
in the employee list to view the employee's HR card. On the HR card page, you can edit or print the written employee information, and can arrange personnel appointment for the employee.
The HR card consists of the following.
| Content tab | Description |
|---|---|
| Personnel Information | View Basic Information, and Additional Information
|
| Appointment | It displays the personnel appointment history and apply personnel appointment by individual
|
Edit Personnel Information
Retired employees can only edit the retirement date.
The following describes how to edit employee information entered in the HR card.
- Click 'Admin Menu' at the top right of the PC web, and then click 'HR' in the pop-up window.
- Click
 at the top left of the screen.
 - Click ‘Member > Manage Employees’ from the menu.
- Click
 of the employee who information will be edited in the employee list.
 - Make the necessary changes in the ‘Basic Information’ tab.
- ‘Basic information’ area
- You can edit ‘Business Place’ and ‘Reports to’ information.
- You can edit 'Reports to' in the HR card only if you are not using Appointment. If you are using Appointment, you can edit it in Personnel Appointment. You can view the employee-centric tree by clicking Reports to.
- You can edit the 'Group Company Transfer Date' for employees who transfer to another group company.
- You can edit other basic information in ‘Admin > Members’.
- You can edit ‘Business Place’ and ‘Reports to’ information.
- 'Additional information' area
- Displayed items may differ according to the personnel information settings. (See Additional Information Settings)
- If you are using the Payroll service, the 'Personal' field is required.
- To add family information, career information, language information, certificates, and educational background information, click ‘Add’.
- Click
 to delete the added information.
- Click
- See the table for the location to edit each item.
Type Edit location Remarks Using Appointment Not Using Appointment Basic information Add Account Admin Admin Delete Account HR Admin Recover Account Admin Admin Picture Admin Admin Name Admin Admin Name by Language Admin Admin Nickname Admin Admin Corporate Group Email Admin Admin Personal Email Admin Admin Phone Admin Admin Company Phone Number Admin Admin Date of Birth Admin Admin Department HR Admin Job Position HR Admin Concurrent Department HR Admin Employment Date Admin Admin Group Company Transfer Date HR HR Display when moving or transferring to a group company User type (formerly employment type) HR Admin Job Title HR Admin Employee No. Admin Admin Workplace Admin Admin Task in Charge Admin Admin Messenger/SNS Admin Admin Connected Contacts Admin Admin Office Status HR Admin Business Place HR HR Reports To HR HR When Reports To is set to ‘Use’ in ‘Set Personnel Information’ Direct Reports HR HR When Reports To is set to ‘Use’ in ‘Set Personnel Information’ Nationality HR HR Displayed when selecting 'Korea' or 'Japan' as the country Resident registration number HR HR Enter when selecting 'Korea' as the country and nationality as 'Korea' Alien Registration Number HR HR Enter when selecting 'Korea' as the country and nationality other than 'Korea' Gender HR HR Displayed when selecting 'Korea' or 'Japan' as the country Home Address HR HR Displayed when selecting 'Korea' or 'Japan' as the country Additional information Family Information HR HR Displayed when 'Korea' is selected as the country Work Experience HR HR Displayed when selecting 'Korea' or 'Japan' as the country Language Tests HR HR Displayed when 'Korea' is selected as the country Certificates HR HR Displayed when 'Korea' is selected as the country Military Service HR HR Displayed when 'Korea' is selected as the country Academic Background HR HR Displayed when 'Korea' is selected as the country Additional information (company setting information) HR HR
- ‘Basic information’ area
- Click ‘Appointment’ tab to apply appointment details by individuals.
- If you are using Appointment, the 'Appointment' tab will be displayed.
- When you appoint or cancel appointment for a specific employee, you can use individual appointment For the appointment method, see Personnel Appointment.
- You can execute Reset Appointment that resets all appointment history and registers only the basic appointment history based on the employment date. For more information, see ‘Reset Appointment’.
- Click ‘Save’.
- Changes will be simultaneously reflected on the user's 'Personnel Information' screen.
- To cancel editing, click ‘Cancel’.
- Go to the employee list.
Retirement
If you are using Appointment, click 'Retirement' at the bottom of the HR Card to open Personnel Appointment and proceed with appointing retirement. (See Appoint Retirement)
- You can cancel retirement appointment from the personnel appointment list. (See Cancel Personnel Appointment)You cannot cancel a retirement appointment after 7 days have passed since the retirement date.
In case of a retired employee, click ‘Delete’ at the bottom of the HR Card to permanently delete the retired employee. If you permanently delete the employee, the employee information can't be restored
Print Employee Information
The following describes how to print the employee information.
- Click of the employee whose information will be printed in the employee list.
- Click 'OK’.
- It is displayed at the bottom of each content tab.
- Select the item to be printed, and then click 'OK'.
- When the Print pop-up window appears, check the item to be printed and click ‘Print’.
Reset Appointment
If basic appointment is not properly registered to the appointment history of the member or if you want to delete all appointment history, you can reset appointment.
When resetting appointment, download appointment history in the Personnel Appointment page before resetting because all existing appointment history is deleted.
The 'Reset Appointment' button will not be activated for employees without an employment date.
The following describes how to reset appointment history.
- Click of the employee whose appointment history will be reset in the employee list.
- Click the ‘Appointment’ tab from HR Card.
- Click ‘Reset Appointment’.
- If the employment date is not registered, you can't reset. Register the employment date in ‘Admin > Members’.
- Click ‘OK’ in the notification window.
- Click ‘Save’.
- Appointment history of the member is reset and basic appointment history is registered again.
- Appointment history on recruitment, department transfer, change of user type, and changes of job title and job position with the employment date as the appointment date is created.
- User types are created when set to 'Use’ in 'Admin > Members'.
- Appointments for changes in job title/job position create default appointment records when 'Display' is enabled in ‘Admin > Members > Manage Item’, and when job title/job position items are defined by the company, for employees with existing appointment records.
- Basic appointment is registered with information on the affiliated department, user type, job title, and job position of the member at the time of resetting the appointment.
- You can't cancel appointment history after resetting the appointment.
- Appointment history of the member is reset and basic appointment history is registered again.
Bulk Edit Employee Information
Among the basic information of already registered employees, you can bulk edit business location information, additional details, and supplementary information.
You can add new employees or edit existing employees' basic information in bulk within 'Admin > Members'.
The following describes how to edit employee information in bulk.
- Click 'Admin Menu' at the top right of the PC web, and then click 'HR' in the pop-up window.
- Click at the top left of the screen.
- Click ‘Member > Manage Employees’ from the menu.
- Click ‘Upload’.
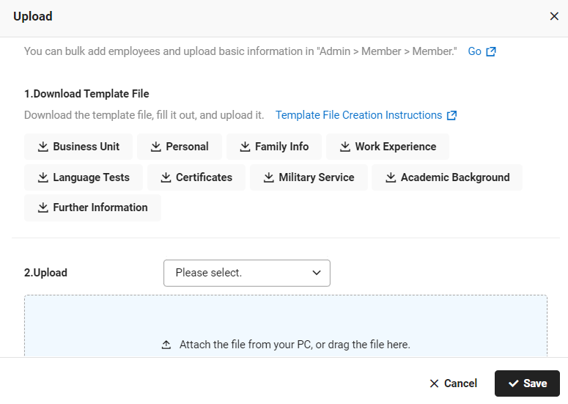
- Click the template for information that requires editing to download it.
- The downloaded template is saved as ‘[YYYY-MM-DD]sample update [edited field name]’ in the Download folder.
- You can bulk edit the 'business place' item among basic information. You can edit other basic information in ‘ Admin > Members’.
- Among the templates for additional information, only items set by admin in the ‘Set Personnel Information’ menu to Use, are displayed. If they are not in the template list, then change the Usage Status in ‘HR > Settings > Set Personnel Information’ to ‘Use’.
- When using the Payroll service, Nationality, Resident Registration No./Alien Registration Number are managed as required items. Additionally, when entering family information, it is necessary to provide the names of family members and their resident registration numbers.
- The ‘family relationship’ item is reflected by being mapped with the ‘relationship’ code of the Payroll service. (E.g., father -> income earner direct ascendant)
- The ‘status of a basic deductible target’ is used as information to determine the status of family dependents eligible for deductions from the Payroll.
- When using the Payroll service, Nationality, Resident Registration No./Alien Registration Number are managed as required items. Additionally, when entering family information, it is necessary to provide the names of family members and their resident registration numbers.
- Supplementary Information templates will only appear if admin has added supplementary information in ‘Settings > Set Personnel Information’ . If you have supplementary information to upload in bulk, please add the supplementary information first in the ‘Set Personnel Information’ menu.
- Enter the details to be edited, and then save it.
- Maintain all template forms as they are, and enter only information of employees to be edited.
The method reflected when uploading depending on the information is as follows.
- Business place/ personal information
- Existing information is maintained, and only the changed information is reflected.
- An empty item will not be updated. Leave blank items that require no change.
- Family information/Career information/Language information/Certificates/Military service information/Academic information/Supplementary information
- Download the template file with all existing information displayed.
- When you upload the edited content, it will replace all existing information with the changes you've made.
- Select Upload Item, and then click ‘Click to Upload the File.’ to upload the written template.Click ‘Save’.Check the entered information, and then click ‘Save’.
-
- If a cell has an input error in the template, then it is marked in red, and you can check the error message at the bottom.
- Click ‘Download’ to download the edited information to be uploaded.
- The downloaded file is saved as ‘[YYYY-MM-DD]sample members.xlsx’ file name in the Download folder.
Download Employee List
The following describes how to download the employee list as an Excel file.
- Click 'Admin Menu' at the top right of the PC web, and then click 'HR' in the pop-up window.
- Click at the top left of the screen.
- Click ‘Member > Manage Employees’ from the menu.
- If necessary, enter the employee conditions to be searched in the search window, and then click ‘Search’.
- You can view the employee list that applies to the entered conditions.
- Click 'Download'.
- Document Open Password (Verify): Enter a password required to view a downloaded document.
- Reason for Download: Enter the reason for the download. You can view the entered reason in the download history.
- Click 'Download'.
- The employee list is downloaded as an Excel file.
- You can check the download history in the ‘Download History’ tab.
- The downloaded file is saved as ‘[YYYY-MM-DD]members.xlsx’ in the Download folder.
- If the downloaded file contains a retiree, the last work day is also displayed.
Download History
The following describes how to view the download history of the employee list as an Excel file.
- Click 'Admin Menu' at the top right of the PC web, and then click 'HR' in the pop-up window.
- Click at the top left of the screen.
- Click the ‘Download History’ tab in ‘Member > Manage Employee’ from the menu.
- If necessary, enter the period to be searched and the name of the employee who downloaded the document in the search box, and then click 'Search'.
- You can view the download history that matches the entered conditions.
Manage Reports To
You can check and manage Report To for each employee. To set Reports To, see Manage Approval Line or Appoint Reports To.
The Manage Reports To menu is only displayed if the usage status of appointment is set to ‘Not Use’ in ‘Set > Manage Appointment Usage’. (See Manage Appointment Usage)
- You can only view Reports To when setting to ‘Use’ Reports To in ‘Set > Basic Information Settings’. (See Set Basic Information)
- If you set an approval line at ‘each level as Reports To’ in ‘Approval > Manage Form’, then Reports To for each requester is automatically designated.
Personnel Appointment
You can handle personnel appointment and view the personnel appointment history. You can also search and view the personnel appointment history by condition and download the personnel appointment list as an Excel file.
- The Personnel Appointment menu is only displayed if the usage status of appointment is set to ‘Use’ in the ‘Set > Manage Appointment Usage’ menu. (See Manage Appointment Usage)
- You can edit the date of personnel appointment in the ‘Appointment’ tab. (See Edit Appointment Date)
- Reports To, title/position changes, user type changes, leave, reinstatement, and retirement appointments can be retroactively appointed to past dates.
The Personnel Appointment page is laid out as follows.
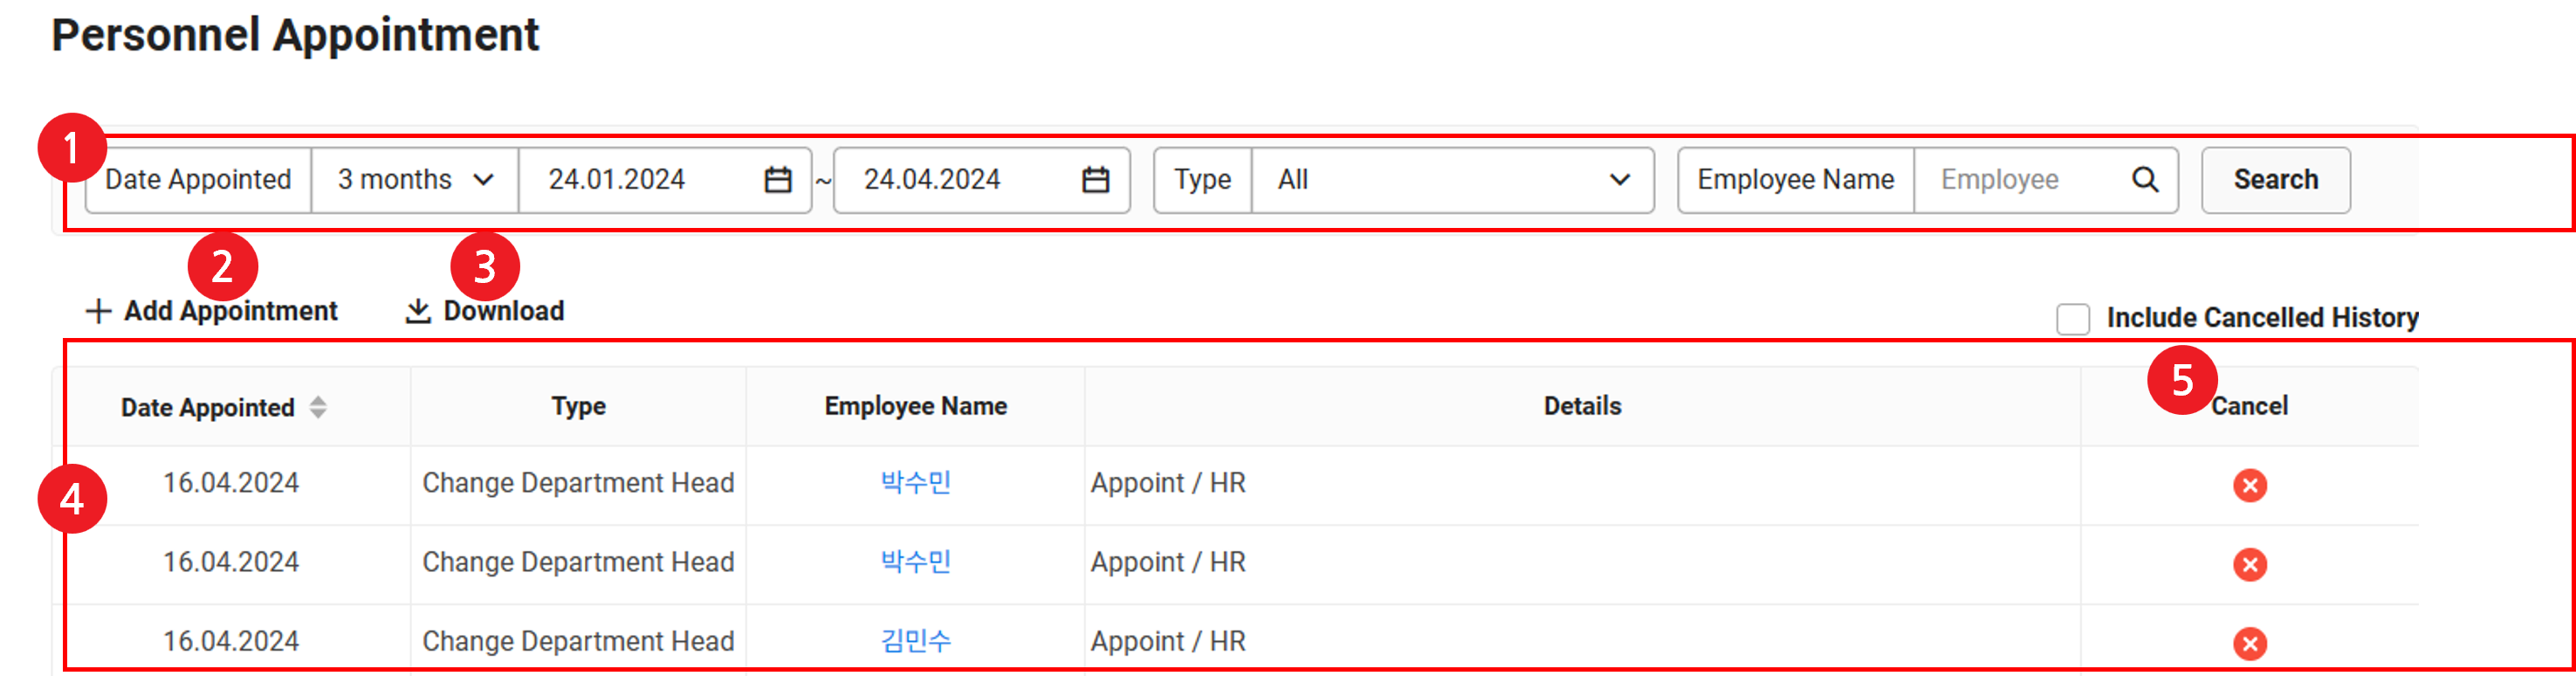
| Area | Description |
|---|---|
| ① Search window | Search the personnel appointment history by the appointed date, appointment type, and employee name. |
| ② Add appointment | Add new personnel appointment (See Add Personnel Appointment) |
| ③ Download | Download the list of personnel appointments as an Excel file (See Download Personnel Appointment List) |
| ④ List of personnel appointments | View the personnel appointment history |
| ⑤ Include cancellation details | When selected, include and display canceled personnel appointment history in the list |
Add Personnel Appointment
For more details about the personnel appointment, see Appoint Reports To , Appoint Title/Position Change , Appoint Department Head Change , Appoint User Type Change , Appoint Department Movement , Appoint Concurrent Position , Appoint Leave , Appoint Reinstatement/Retirement , Appoint Concurrent Position in Corporate Group , Appoint Corporate Group Transfer.
- To appoint new employees, register them as new members in ‘ Admin > Members’.
- The added appointment can't be edited. Please cancel it and appoint again. (See Cancel Personnel Appointment)
- Only the employees with a specified employment date can be appointed. If you register the date of employment, the initial appointment details (recruitment, department transfer, rank/position/user type) are provided.
Standards for displaying and activating appointment categories.
- You can view Appointment Type only when setting the usage status of Reports To, title and position to ‘Use’ in ‘HR > Settings > Set Basic Information’.
- Only when the 'Service Display Status' of the rank, position, and user type in 'Admin > Member' is set to 'Display', it will be displayed in the appointment category and the appointment can be processed.
- If your company has departments, the 'Move Department' category is activated.
- If the company has departments and the person to be appointed is affiliated with a department, the categories 'Appoint/Release Concurrent Position,' 'Appoint/Release Concurrent Position in the Group Company,' 'Change Department Head,' and 'Change Job Position' are activated.
- If the individual does not belong to a department, they cannot be appointed to a concurrent position or group company.
Appoint Reports To
The following describes how to appoint Reports To.
- Click 'Admin Menu' at the top right of the PC web, and then click 'HR' in the pop-up window.
- Click at the top left of the screen.
- Click ‘Member > Personnel Appointment’ from the menu.
- Click ‘Add Appointment’.
- Select the ‘Reports To’ for the Appointment Type, and then click ‘OK’.
- Reports To pop-up window is displayed.
- Select the date of appointment.
- Click ‘Search’ to the target you want to appoint as Reports To.
- Detailed Search pop-up window is displayed.
- Click to select the employee you want to appoint as Report To, then click 'OK'.
- You can search and view an employee in the search window.
- Can be selected only when the employment status is In Office.
- When clicking Only View Employees with No Reports To Status to select, only employees without Reports To are displayed in the list.
- To remove Reports To, click of Reports To to remove in the Reports To item of the target.
- Click ‘Appointment’.
- They will be added to the list of personnel appointments.
- You can set 2 or more Reports To according to work roles by employees.
- You can't designate the employee, who is designated as Direct Report, as Reports To.
Appoint Title/Position Change
The following describes how to change job title or position.
- Click 'Admin Menu' at the top right of the PC web, and then click 'HR' in the pop-up window.
- Click at the top left of the screen.
- Click ‘Member > Personnel Appointment’ from the menu.
- Click ‘Add Appointment’.
- Select ‘Change Job Title’ or ‘Change Job Position’ for the appointment type, and then click ‘OK’.
- Selecting Change Job Title will display the Change Job Title pop-up window, and selecting Change Job Position will display the Change Job Position pop-up window.
- A change in position can only be made if the person being appointed belongs to a department.
- Select the appointment type (appointment/cancellation.)
- Select the date of appointment.
- If there are multiple targets to change the job title or job position and the date of appointment is the same, you can appoint them in bulk.
- If there are multiple targets to change the job title or job position but the date of appointment is different, you need to handle appointments on each date of appointment.
- Select the job title or job position to appoint, and then select the target through searching.
- For appointment cancellation, the Job Title or Job Position item is not displayed.
- Clicking ‘Advanced Search by Condition’ will display Search Details pop-up window. You can search and select an employee by department, job title, job position, user type, employment status and employee name.
- Repeat the procedure to add more targets.
- Once selected, they are added to the target list.
- To delete the target, click of the target to be deleted.
- Click ‘Appointment’.
- They will be added to the list of personnel appointments.
The company's job title and position can be set in ' Admin > Members > Position/Level/User Type'.
Appoint Department Head
If the appointment usage is set to 'Not Use' in ‘Set > Manage Appointment Usage’, appoint or dismiss department heads in 'Admin > Members'.
The following describes how to handle or remove appointment of the department head in the Personnel Appointment menu.
- Click 'Admin Menu' at the top right of the PC web, and then click 'HR' in the pop-up window.
- Click at the top left of the screen.
- Click ‘Member > Personnel Appointment’ from the menu.
- Click ‘Add Appointment’.
- Select the Change Department Head for the Appointment Type, and then click ‘OK’.
- Change Department Head pop-up window is displayed.
- Select the appointment type, and then select the date of appointment.
- If the appointment type and the date of appointment is the same, then you can appoint them in bulk.
- Select the target department for appointment.
- If you select Appointment for the appointment type, then select the department head.
- You can select a department head only for a department without a department head. To change the existing department head, first cancel the department head appointment, and then appoint again.
- You can select and appoint a department head from employees who belong to the department.
- If you select the appointment type to Cancel, you can select a department that already has a department head and cancel.
- If you select Appointment for the appointment type, then select the department head.
- Click ‘Appointment’.
- They will be added to the list of personnel appointments.
User Type Change Appointment
The following describes how to change the User Type.
- Click 'Admin Menu' at the top right of the PC web, and then click 'HR' in the pop-up window.
- Click at the top left of the screen.
- Click ‘Member > Personnel Appointment’ from the menu.
- Click ‘Add Appointment’.
- Select ‘User Type’ for the Appointment Type, and then click ‘OK’.
- Change User Type pop-up window is displayed.
- Select the date of appointment.
- If there are multiple targets for changing user types and the appointment date is the same, you can appoint them in bulk.
- If there are multiple user type-changing targets but the date of appointment is different, then you should handle appointments on each date of appointment.
- Select the user type, and then search and select the target.
- Clicking Advanced Search by Condition will display the Search Details pop-up window. You can search and select an employee by department, job title, job position, user type, employment status and employee name.
- The search will find targets valid for the user type you want to change.
- Repeat the procedure to add more targets.
- Once selected, they are added to the target list.
- To delete the target, click of the target to be deleted.
- Clicking Advanced Search by Condition will display the Search Details pop-up window. You can search and select an employee by department, job title, job position, user type, employment status and employee name.
- Click ‘Appointment’.
- They will be added to the list of personnel appointments.
The company's user type can be set in 'Admin > Members > Position/Level/User Type'.
Appoint Department Movement
The following describes how to appoint the department movement.
- Click 'Admin Menu' at the top right of the PC web, and then click 'HR' in the pop-up window.
- Click at the top left of the screen.
- Click ‘Member > Personnel Appointment’ from the menu.
- Click ‘Add Appointment’.
- Select the Department Movement for the Appointment Type, and then click ‘OK’.
- Department Movement pop-up window is displayed.
- Select the date of appointment.
- If there are multiple targets for department movement and the appointment date is the same, you can appoint them in bulk.
- If there are multiple department movement targets but the date of appointment is different, then you should handle appointments on each date of appointment.
- You can't select the date of department transfer appointment before today.
- Select a department.
- If reorganization is scheduled on the date of department transfer appointment, you can view based on the organization chart of the day.
- You can't appoint to the concurrent department.
- Search and select the target.
- Clicking ‘Advanced Search by Condition’ will display the Search Details pop-up window. You can search and select an employee by department, job title, job position, user type, employment status and employee name.
- Repeat the procedure to add more targets.
- To appoint as a department head of the department to be transferred, click ‘Department Head Status’ to select. Department transfer and department head appointment are simultaneously processed.
- If there is already a department head in the selected department, the option for 'Department Head Status' will not be displayed.
- If an employee who is a department head of the department before transfer is appointed to be transferred and be a department head of the department at the same time, the department head of the former department is canceled.
- Once selected, they are added to the target list.
- To delete the target, click of the target to be deleted.
- Click ‘Appointment’.
- They will be added to the list of personnel appointments.
- If the appointment target for department transfer is a department head, department transfer and department head cancellation appointment are simultaneously processed and added to the appointment history.
- If reorganization (department deletion) is scheduled before the date of department transfer appointment, the department transfer appointment is canceled when the date of reorganization arrives.
Appoint Concurrent Position
The following describes how to appoint the concurrent position.
- Click 'Admin Menu' at the top right of the PC web, and then click 'HR' in the pop-up window.
- Click at the top left of the screen.
- Click ‘Member > Personnel Appointment’ from the menu.
- Click ‘Add Appointment’.
- Select the ‘Concurrent position’ for the Appointment Type, and then click ‘OK’.
- Concurrent position pop-up window is displayed.
- Select the date of appointment.
- If there are multiply concurrent position-appointing targets and the date of appointment is the same, then you can appoint them in bulk.
- If there are multiple concurrent position-appointing targets but the date of appointment is different, then you should handle appointments on each date of appointment.
- You can't select the date of concurrent appointment before today.
- Select the appointment type, department, and target, and then search and select the target.
- Selecting ‘Remove’ for the appointment type will not display the department selection item, target item, and ‘Search Details by Condition’. Click ‘Search Employee with Concurrent Position’ to search and select an employee to disable the concurrent position appointment.
- Clicking ‘Advanced Search by Condition’ will display Search Details pop-up window. You can search and select an employee by department, job title, job position, user type, employment status and employee name.
- Repeat the procedure to add more targets.
- Once selected, they are added to the target list.
- To delete the target, click of the target to be deleted.
- Click ‘Appointment’.
- They will be added to the list of personnel appointments.
- Up to 30 corporate group concurrent positions, including the original position of the employee can be appointed.
- When revoking a concurrent position, if the target is the department head of the concurrent department, the department head revocation will be issued and added to the appointment records.
- To appoint corporate group concurrent position, see Appoint Concurrent Position in Corporate Group.
Appoint Leave
The following describes how to appoint the leave.
- Click 'Admin Menu' at the top right of the PC web, and then click 'HR' in the pop-up window.
- Click at the top left of the screen.
- Click ‘Member > Personnel Appointment’ from the menu.
- Click ‘Add Appointment’.
- Select ‘Leave’ for the Appointment Type, and then click ‘OK’.
- Leave pop-up window is displayed.
- Select the leave classification.
- Select the leave date.
- If there are multiply leave-appointing targets and the leave days are the same, then you can appoint them in bulk.
- If there are multiple leave-appointing targets but the leave days are different, then you should handle appointments on each leave day.
- Select the date of reinstatement, and then search and select the target.
- Clicking ‘Advanced Search by Condition’ will display Search Details pop-up window. You can search and select an employee by department, job title, job position, user type, employment status and employee name.
- You can select employees for the targets on leave.
- Repeat the procedure to add more targets.
- Once selected, they are added to the target list.
- To delete the target, click of the target to be deleted.
- A reinstatement notification mail is sent to the member admin 7 days before the scheduled date of reinstatement.
- The scheduled date of instatement is displayed in the absence information of the employee on leave until the scheduled date of instatement.
- Click ‘Appointment’.
- They will be added to the list of personnel appointments.
- When you are using Appointment, you can set the leave classification in ‘HR > Settings > Leave Classification Settings’.
- The leave appointment history is used as information to pay less than the existing monthly payroll for paid leave. (See Manage Target, Close Basic Data)
- If you've appointed the leave, then make sure to appoint reinstatement on the scheduled reinstatement date. Not appointing the reinstatement, the employment status will be maintained as leave even after the scheduled reinstatement date. (See Appoint Reinstatement/Retirement)
- The annual leave requested by the date during the actual leave period (the date of leave to the date of reinstatement) needs to cancel the absence schedule and is not automatically canceled.
Appoint Reinstatement/Retirement
- If the employee to retire holds the Super Admin role, please delegate administrative authority before issuing the retirement appointment.
- If the usage status of Appointment is set to ‘Not Use’, you can process retirement of an employee by deleting the account of the employee in the ‘Manage Member’ menu.
The following describes how to appoint the reinstatement or retirement.
- Click 'Admin Menu' at the top right of the PC web, and then click 'HR' in the pop-up window.
- Click at the top left of the screen.
- Click ‘Member > Personnel Appointment’ from the menu.
- Click ‘Add Appointment’.
- Select ‘Reinstatement’ or ‘Retirement’ for the appointment type, and then click ‘OK’.
- Selecting ‘Reinstatement’ will display the Reinstatement pop-up window, and selecting ‘Retirement’ will display the Retirement pop-up window.
- Select the date of reinstatement or retirement appointment.
- If there are multiply reinstatement/retirement-appointing targets and the date of reinstatement/retirement is the same, then you can appoint them in bulk.
- If there are multiple reinstatement/retirement-appointing targets but the date of reinstatement/retirement is different, then you should handle appointments on each reinstatement/retirement day.
- A reinstatement notification mail is sent to the member admin 7 days before the date of reinstatement.
- Search and select the target.
- Clicking ‘Advanced Search by Condition’ will display Search Details pop-up window. You can search and select an employee by department, job title, job position, user type, employment status and employee name.
- Reinstatement targets can only be selected from employees on leave.
- Retirement targets can be only be selected from employees.
- Repeat the procedure to add more targets.
- Once selected, they are added to the target list.
- To delete the target, click of the target to be deleted.
- Click ‘Appointment’.
- They will be added to the list of personnel appointments.
- Employees who have been issued a retirement appointment can access NAVER WORKS until midnight on the day of their retirement.
- For the retired employee, the date of retirement is displayed in the ‘Employment Status’ item of the HR card.
- The retirement date is the appointment date entered when appointing retirement and the employment status is recorded as having worked until the date. (E.g. Retirement date of Personnel Appointment: September 30, Employment date reflected in HR card: until September 30)
- Record as having worked until the retirement date in the employment period item of the career certificate of the retired employee.
- The retired employee's information is used as information to pay retirement benefits in the Payroll service. (See Manage Target and Close Basic Data)
- After a retirement appointment, mailbox and other information are retained for 7 days. If the appointment is canceled within 7 days, then NAVER WORKS information can be restored. (See Cancel Personnel Appointment)
- You can edit the date of retirement appointment, but if there is a personnel appointment before the existing date of retirement, the date of retirement can't be changed before that. (See Edit Appointment Date)
- The login ID is also used as an email account in NAVER WORKS, which can't be reused for 7 days from the date of retirement.
- If you want to assign the retired employee's login ID to another employee, change the retiree's ID, and then assign the login ID to another employee. (See Edit Employee Basic Information)
Retirement Process
Retired employees will not be searched in Search Employees. However, even after retirement, any settings set before the retirement may still exist and will be displayed as follows.
- From the date of retirement, Consent, Decline, and Delegate buttons are disabled on the document approval notification email page of the retired employee.
- For an employee designated as an approver of a document in workflow and a recipient before retirement, ‘Retirement’ is displayed before the name in ‘Manage Approval > Manage Document Permissions > Manage Invalid Approval’, and the admin can change the approval line and recipient by clicking ‘Change’.
Appoint Concurrent Position in Corporate Group
- Appoint Concurrent Position in Corporate Group is displayed in the appointment type when using NAVER WORKS as a corporate group type.
- If you set the status of appointment to ‘Not Use’, handle appointment in Personnel Information of the employee who will be appointed to a concurrent position within a corporate group in 'Admin > Members'.
- For employees appointed to a concurrent position within a corporate group, the 'Name of Group Company With Concurrent Position' field will be displayed in the HR card, and the email domain of the concurrent company will be automatically indicated.
- If an email address of the concurrently appointed company is registered, then the employee can view the email address of that company in Personnel Information menu. In this case, the company's email address is indicated in the concurrent company information area of the organization chart.
- In case of concurrent position appointment of the corporate group, information of the primary company and concurrent company is displayed together on the user page, and HR and work-related information is operated based on the primary company, and accounting and expense-related information is operated by each company.
The following describes how to appoint the concurrent position in the corporate group.
- Click 'Admin Menu' at the top right of the PC web, and then click 'HR' in the pop-up window.
- Click at the top left of the screen.
- Click ‘Member > Personnel Appointment’ from the menu.
- Click ‘Add Appointment’.
- Select the ‘Corporate Group Concurrent Position’ for the Appointment Type, and then click ‘OK’.
- Corporate Group Concurrent Position pop-up window is displayed.
- In the appointment category, select ‘Appoint/Release Concurrent Position in the Group Company’ and enter the appointment items below.
- Select the date of appointment, and then select the target company.
- You can't select the date of concurrent position appointment of the corporate group before today.
- All companies in use in your corporate group are displayed in the target company. However, companies that do not use departments will be marked as disabled.
- Select target person.Clicking ‘Advanced Search by Condition’ will display Search Details pop-up window. You can search and select an employee by department, job title, job position, user type, employment status and employee name.
- If 'Group Company Concurrent' is selected, choose the location of the company where the concurrent position is to be appointed.
- If you select 'Group Company Concurrent', select the department, position, and title to which you will be assigned to the concurrent position.
- To appoint as a department head of the selected department, click ‘Department Head Status’ to select.
- If there is a department head in the selected department, then ‘Department Head Status’ checkbox is disabled on the page.
- The presence of job title and position fields may vary depending on the settings for their use in the target company.
- Once selected, they are added to the target list.
- To appoint as a department head of the selected department, click ‘Department Head Status’ to select.
- Click ‘Appointment’.
- They will be added to the list of personnel appointments.
- If the employee already has a concurrent position in a corporate group, when selecting a target, the business place, job title and position items are disabled on the page and only the department item can be selected.
- When the corporate group where the target is concurrently appointed to, has changed its HR system such as not using a job title and deletion of department, the primary company should remove the concurrent position in the corporate group and then handle appointment again. For concurrent position in the corporate group, HR admins of the two companies should communicate with each other before appointment.
- When the corporate group changed job title or position, remove appointment of concurrent position to the corporate group, and then register it again.
- In case of concurrent position appointment of the corporate group with department head appointment, appointments are processed as one appointment and you can't appoint cancellation of the department head in the concurrent company.
Appoint Corporate Group Transfer
- When using as a corporate group, the appointment of transfer to corporation group is displayed in the appointment type, which is used to retire an employee of a primary company and then to appoint joining to another company within the corporate group.
- You can use the transfer appointment only for employees of the primary company.
- If you set the status of appointment to ‘Not Use’, handle appointment in Personnel Information of the employee who will be appointed to a corporate group transfer in 'Admin > Member'.
- When an employee is transferred to a corporate group, the employee is retired from the existing (before transfer) company and is hired to the company after transfer.
The following describes how to appoint the transfer to a corporate group.
- Click 'Admin Menu' at the top right of the PC web, and then click 'HR' in the pop-up window.
- Click at the top left of the screen.
- Click ‘Member > Personnel Appointment’ from the menu.
- Click ‘Add Appointment’.
- Select the ‘Transfer to Corporate Group’ for the Appointment Type, and then click ‘OK’.
- Corporate Group Transfer pop-up window is displayed.
- Select the date of appointment.
- The date of appointment is the date of employment at the transfer company.
- You can't select the date of transfer appointment of the corporate group before today.
- If you select the appointment date to today, then the employee is immediately appointed and retired from the primary company.
- When issuing an immediate appointment, the resignation date for the current company is the day before, and the start date for the new company is the same day.
- You can reserve the date of appointment to a future date.
- Select the target company, and then search and select the target.
- All companies in use in your corporate group are displayed.
- Only primary company employees can be selected for the transfer target.
- Login ID of the target is displayed in Login ID item.
- The employee can still use their login ID after being transferred.
- The login ID retains only the ID part of the email address, while the domain is automatically set to the domain of the new company. (E.g. aaa@A.com ->aaa@B.com)
- If the ID is already in use, then a notification will appear and the ID must be changed.
- Click ‘Appointment’.
- The employee is retired from the existing company and all personnel appointments are removed on the date of appointment, and if there are documents in workflow where the employee is included in the approval line or the employee is set to be a recipient, they are displayed in the ‘Manage Approval > Manage Document Permissions > Manage Invalid Approval’ menu. (See Manage Invalid Approval)
- Upon appointment, the employee's personnel information is sent to the transfer company, and an email is sent to the HR Admin. The HR Admin can edit the transfer employee's personnel information by clicking ‘Personnel Information’ in the received email.
- Employment Date: When an employee is transferred to another company within the corporate group, the initial employment date of the corporate group item is displayed in the HR Card and can be edited. Based on this date, the number of annual leave days can be calculated.
- Corporate Group Transfer Date: The day after the corporate group transfer appointment date is considered as the corporate group transfer date for the previous company. Grant annual leave by reflecting leave use/balance information of the existing company as of the date of appointment. For how to adjust annual leave, see Adjust Annual Leave.
- Joining the transfer company (recruitment) is completed on the date of appointment, an invitation email is sent, and the employment status is changed to ‘Employed’.
Both the existing company and the transfer company can cancel the transfer appointment. To cancel the transfer appointment, cancel the appointment before the date of appointment by referring to Cancel Personnel Appointment. Can't be canceled after the date of appointment.
After reserving a corporation group transfer appointment, the current company can edit the personnel information of the employee or handle personnel appointment. However, changes to personnel information sent to the company won't be accepted if the company already received that information. If there is anything that needs to be changed, then change it before the transfer appointment.
Edit Appointment Date
The following describes how to edit the personnel appointment date.
- Click 'Admin Menu' at the top right of the PC web, and then click 'HR' in the pop-up window.
- Click at the top left of the screen.
- Click ‘Member > Personnel Appointment’ from the menu.
- If necessary, enter the employee conditions to be searched in the search window, and then click ‘Search’.
- You can view the employee list that applies to the entered conditions.
- Click of the employee whose appointment date needs to be edited.
- Click the ‘Appointment’ tab.
- In the personnel appointment list, click
 of the personnel appointment date item to be changed.
 - Edit the appointment date.
- Click ‘Save’ displayed next to the date of appointment.
- The edited appointment date will be reflected.
- If the retirement date is changed to a date before the existing retirement date, then charges will apply based on the retirement appointment date.
- If the retirement date is changed, then the existing retirement appointment date on the personnel appointment page is also changed.
Cancel Personnel Appointment
The following describes how to cancel the personnel appointment.
- Click 'Admin Menu' at the top right of the PC web, and then click 'HR' in the pop-up window.
- Click at the top left of the screen.
- Click ‘Member > Personnel Appointment’ from the menu.
- Click of the item to be canceled.
- Personnel appointment is canceled.
- Only of appointments that can be canceled, are enabled, and appointments can't be canceled in the following.
- After an appointment is added, new appointment is added before the date of appointment
- The department to move to is invalid
Click
Download Personnel Appointment List
The following describes how to download the list of personnel appointment as an Excel file.
- Click 'Admin Menu' at the top right of the PC web, and then click 'HR' in the pop-up window.
- Click at the top left of the screen.
- Click ‘Member > Personnel Appointment’ from the menu.
- If necessary, enter the personnel appointment conditions to be searched in the search window, and then click ‘Search’.
- You can view the details of personnel appointment that apply to the entered conditions.
- Click ‘Download’.
- The list of personnel appointment is downloaded as an Excel file.