You can set and manage items required for using HR service.
Manage Appointment Usage
You can set the usage status of appointment to manage the employment status of employees and handle personnel appointment.
The lower menu displayed in HR menu differs depending on the setting of appointment status.
- Use:
- You can make appointments, such as the member's job title/position, department head, Reports To, User type, leave, reinstatement, retirement, concurrent department, and concurrent corporate group/transfer in the ‘Personnel Appointment’ menu.
- You can set the time when the changes are reflected in the organization chart, such as the creation and deletion of department and the change of department name, in the ‘Organization > Manage Organization Chart’ menu.
- ‘Appointment’ tab is added on employee's HR card page of ‘Member > Manage Employee’ menu.
- Not Use:
- It displays ‘Manage Employee’, and ‘Manage Reports To’
- The organization chart cannot be modified in the ‘Organization > Manage Organization Chart' menu, and departments can be created, modified, or deleted in ' Admin > Organization'.
When changing the appointment feature from ‘Not use’ to ‘Use’:
- The employment status of the employee on leave is changed to ‘Employed’.
- For existing employees, the recruitment appointment history is created in the ‘Personnel Appointment’ menu.
When changing the appointment feature from ‘Use’ to ‘Not use’:
- All existing appointment history is reset. You can't recover the existing appointment information, even though you can enable the appointment again. So, please be careful when changing settings.
- Scheduled reorganization and personnel appointments of the ‘Organization > Manage Organization Chart’ menu are not reflected.
- The employment status of the employee on leave is changed to ‘Employed’.
- Retired employees are immediately deleted and cannot be recovered. If you need appointment details or retiree information, download member data in advance from ‘Business Support Settings > Security > Data Export’ before changing status.
- The information of prospective employees is deleted.
Basic Information Settings
You can manage employee’s information provided by default, additional information, and supplementary information managed by Business Support. You can set the usage, editing, and display status of information by clicking ![]() of items.
of items.
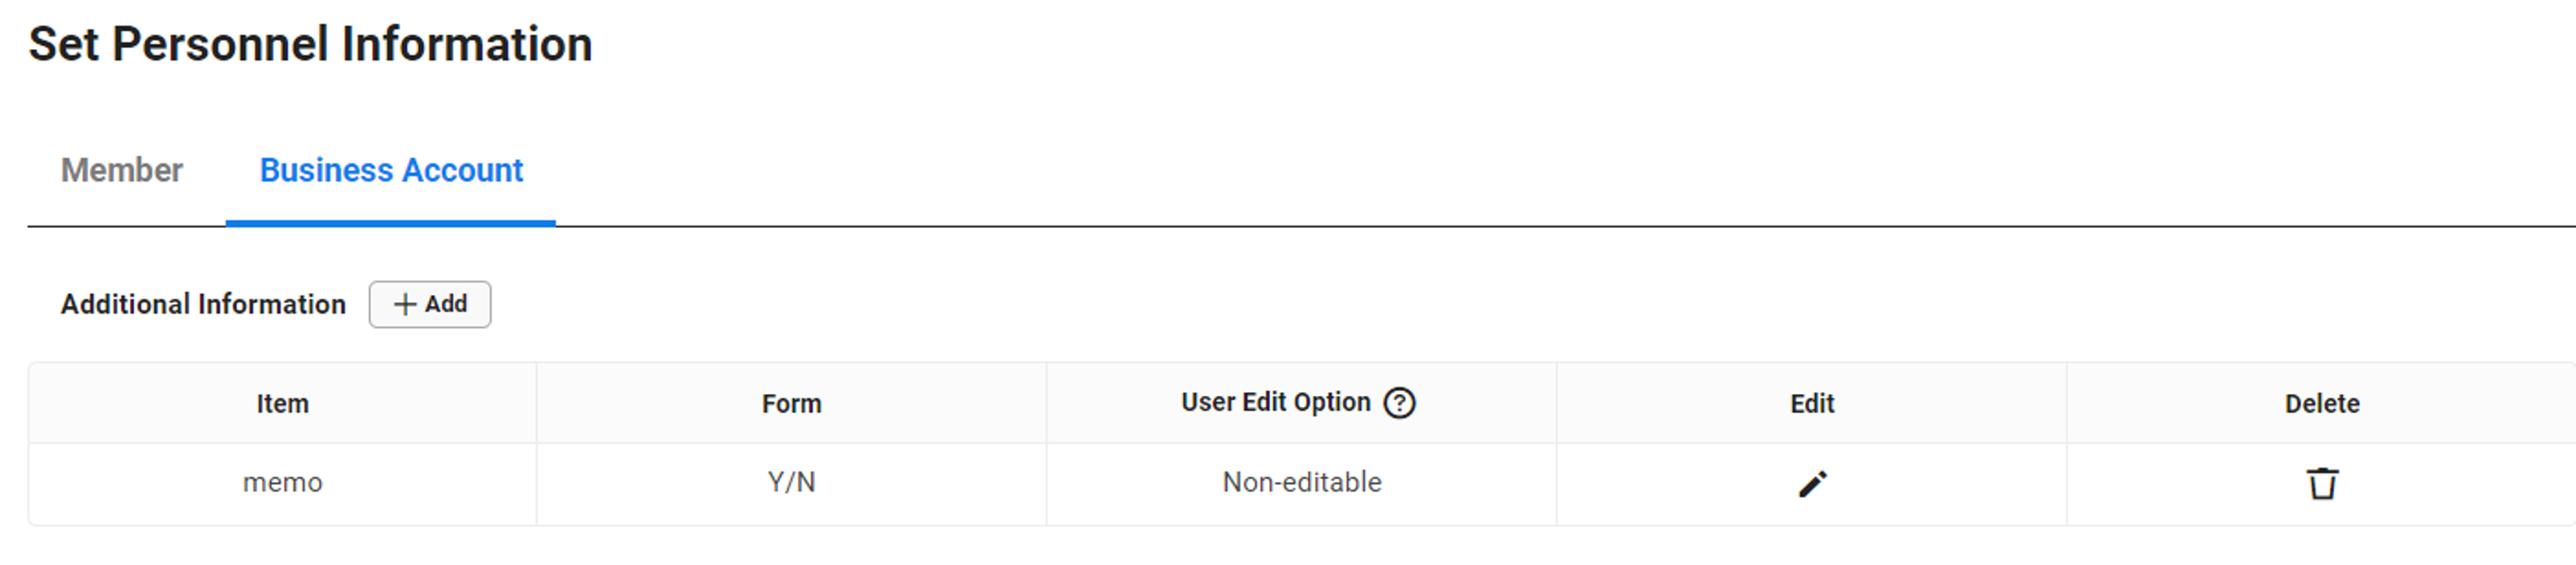
When using a business account, the 'Business Account' tab will be displayed.You can set up the personnel information of the business account by clicking the 'Business Account' tab.
The Set Personnel Information screen is laid out as follows.
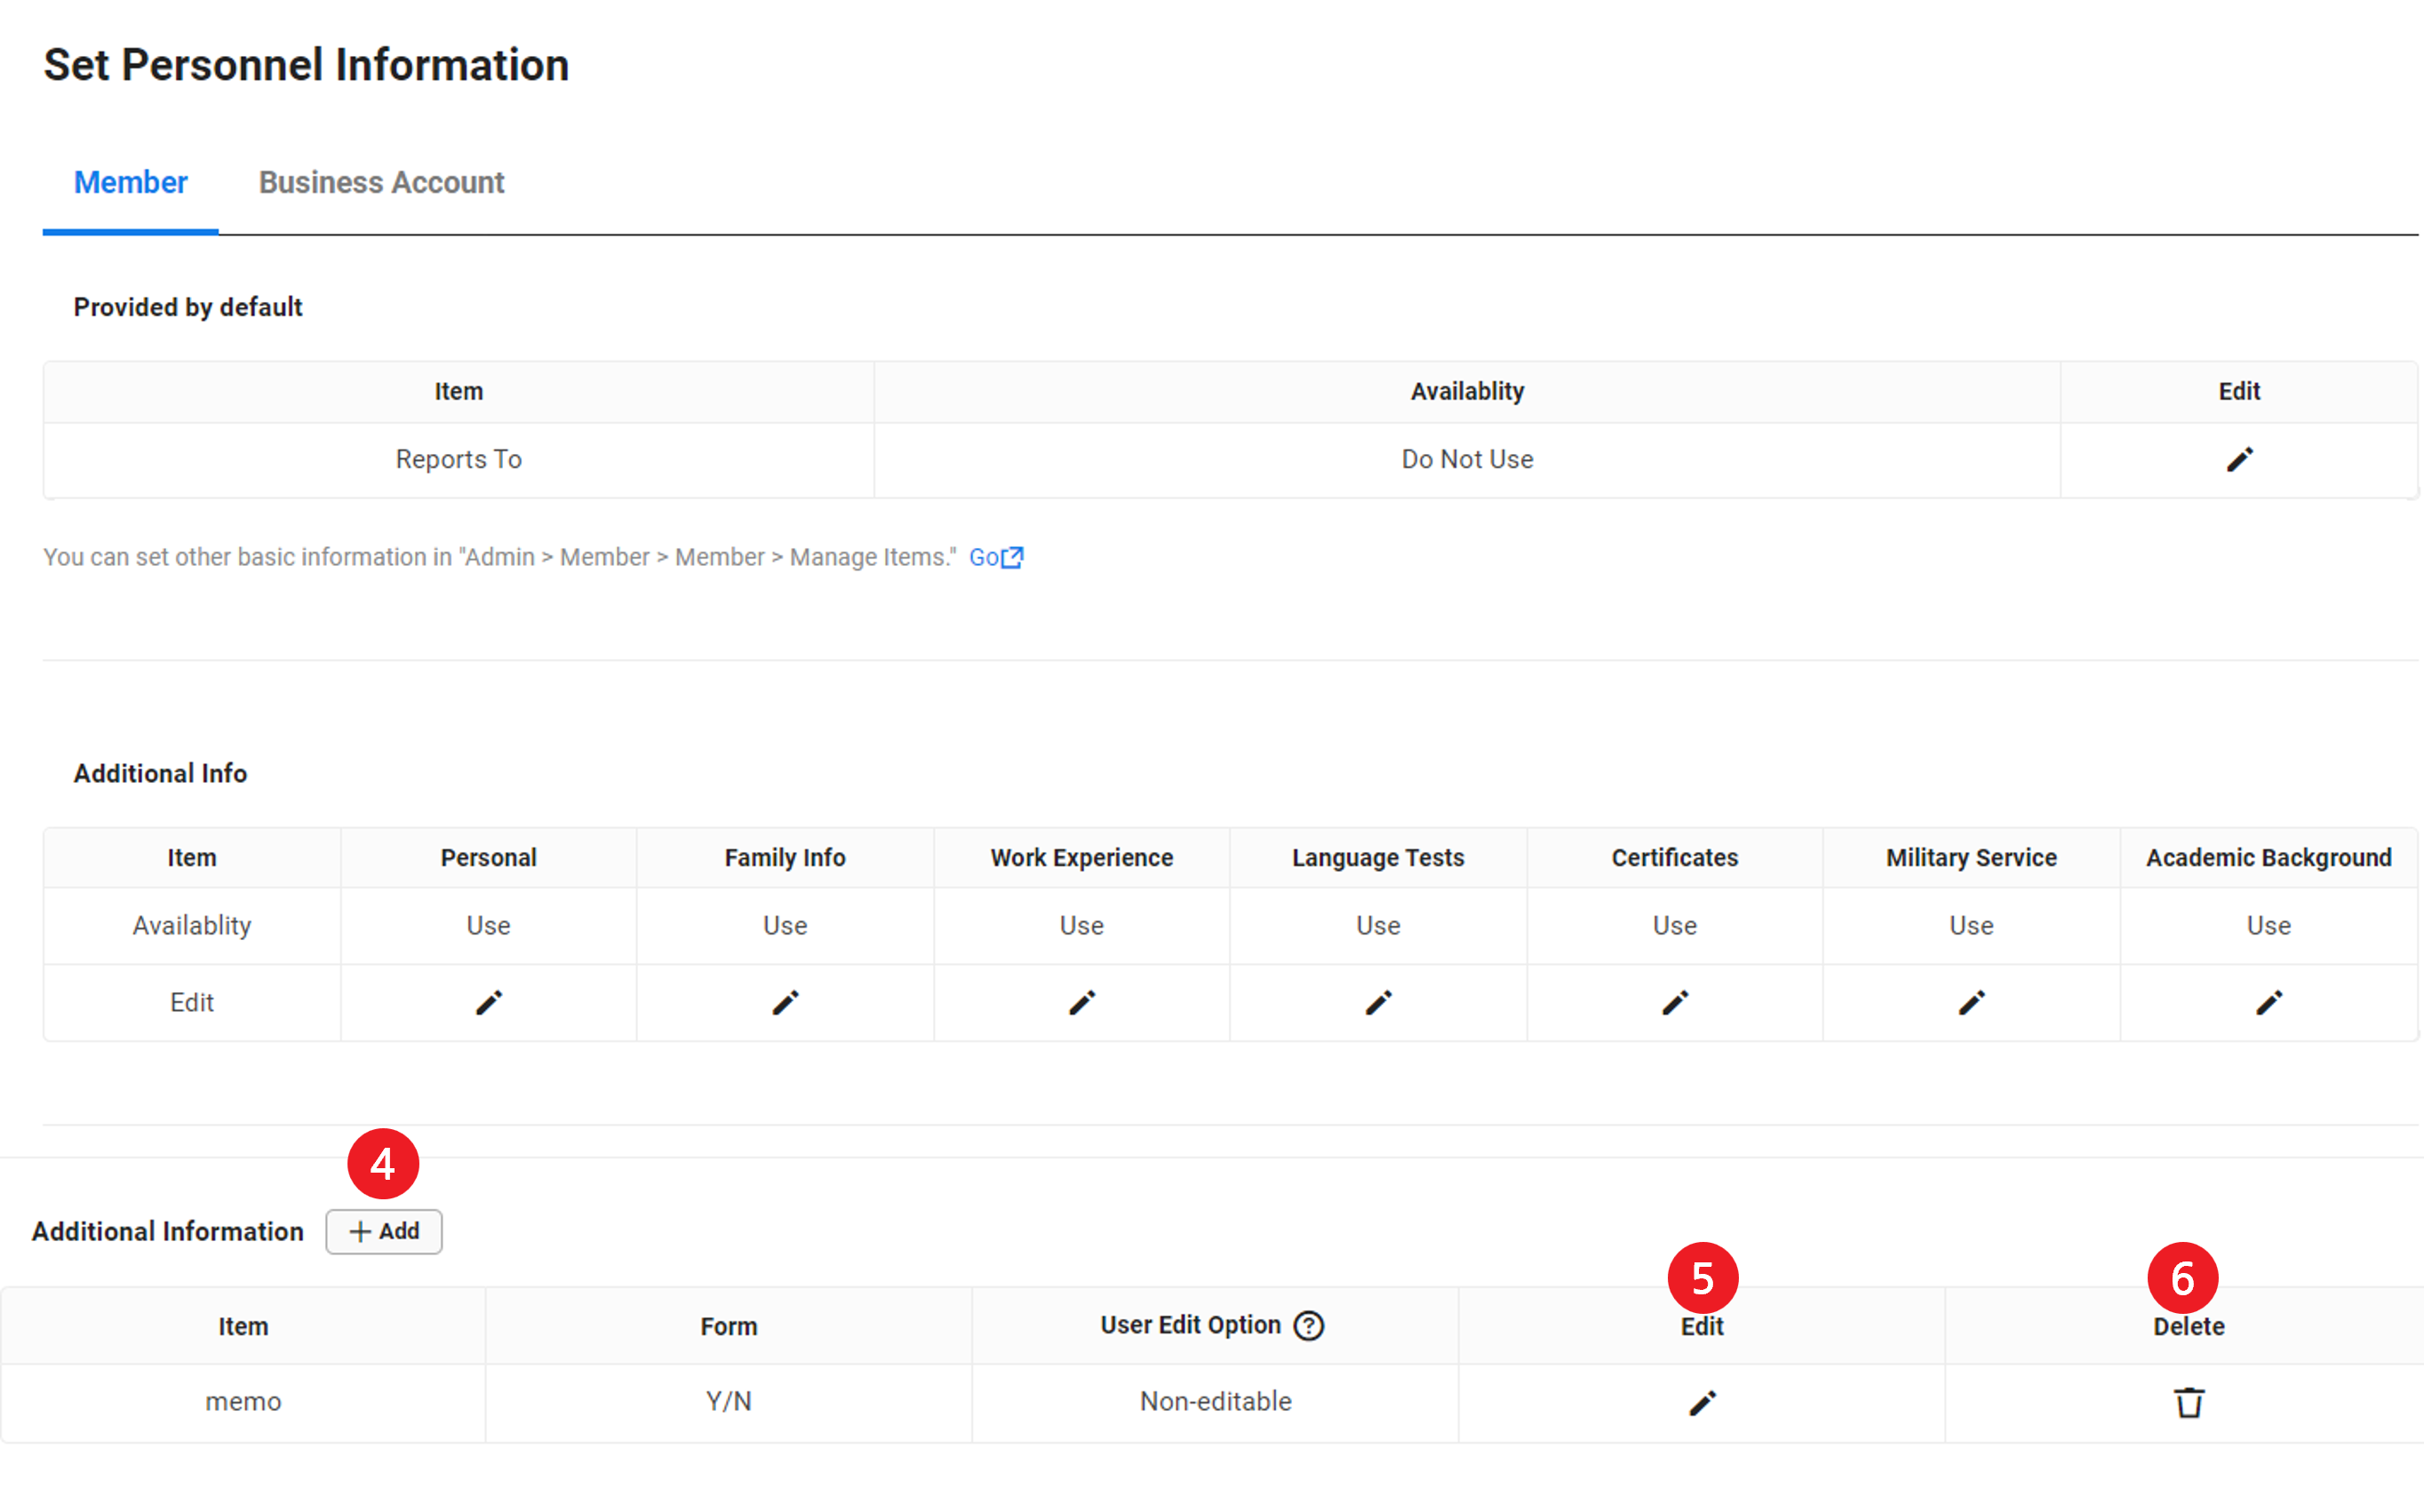
| Area | Description |
|---|---|
| ① Provided by default | Set Reports To usage status
|
| ② Additional information | Set User Edit Option of Personal Information
Set usage and user modification permissions for Additional Information |
| ③ List of Supplementary Information | It displays supplementary information items |
| ④ Add | Add new supplementary information (See Add supplementary information) |
| ⑤ Edit | Click |
| ⑥ Delete | Click |
Edit Personnel Information
The following describes how to edit personnel information.
- Click 'Admin Menu' at the top right of the PC web, and then click 'HR' in the pop-up window.
- Click
 at the top left of the screen.
 - Click 'Settings > Set Personnel Information' from the menu.
- Click
 of the item to edit in the Provided by default, Additional Information, Supplementary Information area.
- Edit personnel information for business account in the ‘Business Account’ tab.
- Edit personnel information for business account in the ‘Business Account’ tab.
- Make the necessary changes, and then click ‘Save’.
- The edited content will be reflected.
- If you edit the usage status of additional information, and supplementary information to ‘Not Use’, then you can't manage it as personnel information.
- If you set to ‘Not Use’, content entered previously will not be deleted. If you edit the usage status to ‘Use’, the existing contents will be displayed.
- When using Payroll service, ‘personal information’ and ‘family information’ are required use items and clicking edit icon, Usage Status is not displayed.
- As for personnel information, you can set User Edit Option by each detail item.
- Editable: Individual employees can edit in Personnel Information
- Unmodifiable: Individual employee can't edit in Personnel Information
- Not Display: It is not displayed in Personnel Information, and can't be checked by individual employee (Admin can check or edit the item)
Add Additional Information
The following describes how to add supplementary information to use.
- Click 'Admin Menu' at the top right of the PC web, and then click 'HR' in the pop-up window.
- Click at the top left of the screen.
- Click 'Settings > Set Personnel Information' from the menu.
- Click ‘Add’ in the Supplementary Information area.
- Add supplementary information for business account in the ‘Business Account’ tab.
- Enter an attribute name.
- Select the entry type.
- Y/N: Select Y or N to enter additional information.
- Selective Input Type-Combo: Select among optional items to enter additional information.
- When selecting, ‘Add selected item’ and the list of Add selected item is displayed.
- Enter additional information you want to display as an optional item in additional information input Area.
- Click 'Add selected item' to add selected items.
- Date Input Type: Select a date to enter additional information.
- Text Input Type (Short): Briefly describe additional information to enter.
- You can enter the link in the text input type (short) additional information and you can go to the new window by clicking the link in the View Employee Information page.
- Text Input Type (Long): Describe additional information in detail to enter.
- File Attachment Type: Attach a file to enter additional information.
- Select the Display Status in Search Employees.
- If you select ‘Yes’, then it will be used as search information.
- Select the User Modification Option.
- Click ‘Save’.
- Additional information will be added.
Delete Supplementary Information
The following describes how to delete added supplementary information.
- Click 'Admin Menu' at the top right of the PC web, and then click 'HR' in the pop-up window.
- Click at the top left of the screen.
- Click 'Settings > Set Personnel Information' from the menu.
- Click
 of the supplementary information item to be deleted.
- Delete supplementary information for business account in the ‘Business Account’ tab. This will be displayed if the Business Account is set to ‘Use’.
- Click ‘OK’ in the pop-up window.
- The supplementary information will be deleted.
Set Leave Type
You can add the reason for leave as an item to classify and manage.
The Set Leave Classification page is laid out as follows.
| Area | Description |
|---|---|
| ① Add | Add Leave Classification item (See Add Leave Classification) |
| ② Leave classification list | It displays the leave classification |
| ③ Include in Number of Clocked-in Days for Annual Leave Calculation | Set the status of Include Annual Leave Calculated Clock-in Days |
| ④ Change Order | Click to change the order of reason for leave (See Change Leave Classification Order) |
| ⑤ Delete | Click to delete the Leave Classification (See Delete Leave Classification) |
Add Leave Classification
The following describes how to add a Leave Classification.
- Click 'Admin Menu' at the top right of the PC web, and then click 'HR' in the pop-up window.
- Click at the top left of the screen.
- Click 'Settings > Set Leave Classification' from the menu.
- Click 'Add'.
- Enter the Leave Classification in the added line, and select the status of Include in Number of Clocked-in Days for Annual Leave Calculation.
- If it is set as ‘No’ and the actual days of work do not reach 80%, then annual leaves may not be 100% accrued.
- Click ‘Save’.
- A Leave Classification item will be added.
Change Leave Classification Order
The following describes how to change the order of leave classification.
- Click 'Admin Menu' at the top right of the PC web, and then click 'HR' in the pop-up window.
- Click at the top left of the screen.
- Click 'Settings > Set Leave Classification' from the menu.
- Change the order by clicking
 or
or .
. - Click ‘Save’.
- The changed order is reflected.
Delete Leave Classification
The following describes how to delete leave classification.
- Click 'Admin Menu' at the top right of the PC web, and then click 'HR' in the pop-up window.
- Click at the top left of the screen.
- Click 'Settings > Set Leave Classification' from the menu.
- Click of the Leave Classification to be deleted.
- Click ‘Save’.
- The applicable Leave Classification will be deleted.
Manage Notifications
You can set notifications from HR services to send to users. Notifications can be received by email.
The Manage Notifications page is laid out as follows.
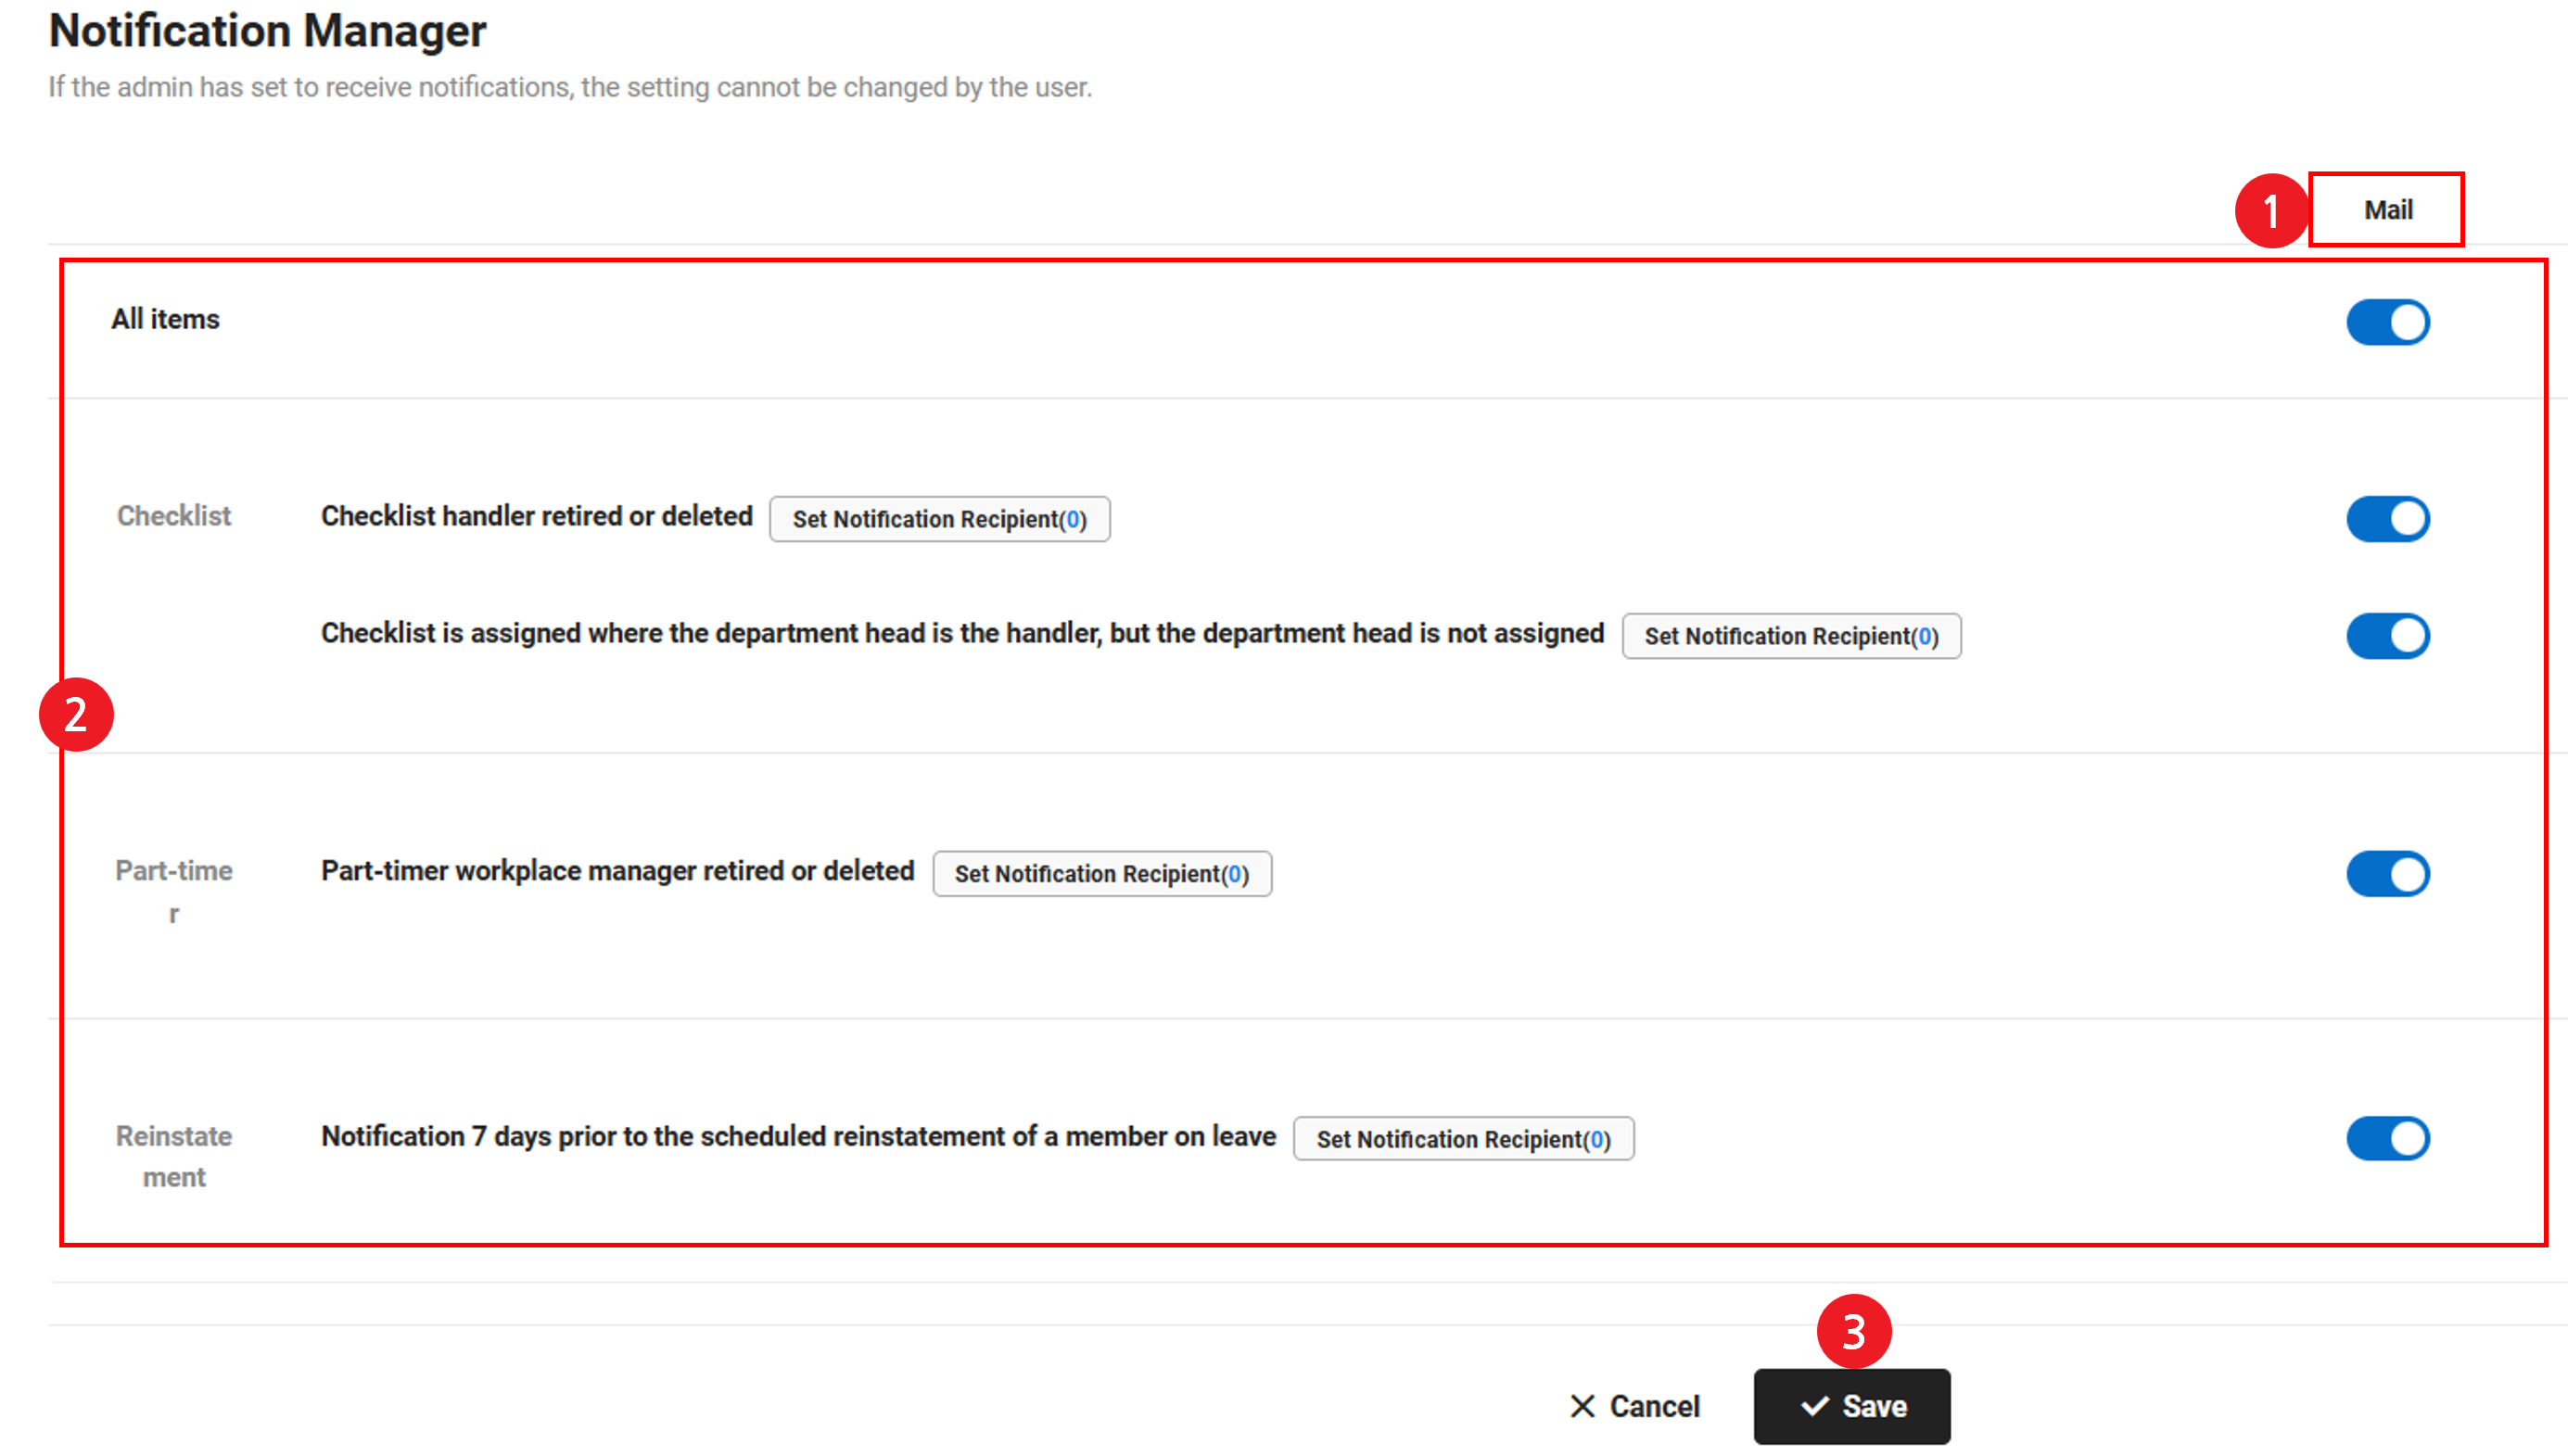
| Area | Description |
| ① Notification channels | Send to email |
| ② Set Notifications | Sets to send or not send notifications by item
|
| ③ Save | It saves the settings |
Manage Business Account Usage
You can set the usage status of business account and manage its usage status.
The Business Account feature enables regular employees to convert their standard member accounts into business accounts, allowing them to use external accounts required for work purposes.
The Manage Business Account Usage page is laid out as follows.
| Area | Description |
|---|---|
| ① Business Account description area | Description for Business Accounts |
| ② Usage settings area | Request or Cancel Business Account Use
|
Request Business Account Usage
The following describes how to request the business account usage.
- Click 'Admin Menu' at the top right of the PC web, and then click 'HR' in the pop-up window.
- Click at the top left of the screen.
- Click ‘Settings > Manage Business Account Use’ from the menu.
- Click ‘ Use’. When setting the usage status of business account to Use, the ‘HR > Business Account’ menu is added. When searching for members by name, their business accounts will also be included in the search.
Change Business Account Usage to Not Use
If you are not using the business account, you can change the usage status to Not Use. The following describes how to change.
- Click 'Admin Menu' at the top right of the PC web, and then click 'HR' in the pop-up window.
- Click at the top left of the screen.
- Click ‘Settings > Manage Business Account Use’ from the menu.
- Click ‘Not Use’.
The business account usage status can't be changed to ‘Not Use’ if there are business accounts in use. Please check the account in use. (See Business Account)
Manage Use of Part-timers
You can set the usage status of part-timer, payroll, and payroll items.
The Manage Part-timer Usage page is laid out as follows.
Set Part-timer Usage
The following describes how to set the part-timer usage.
- Click 'Admin Menu' at the top right of the PC web, and then click 'HR' in the pop-up window.
- Click at the top left of the screen.
- Click ‘Settings > Manage Use of Part-timers’ from the menu.
- Click 'Use' in the settings to enable the use of part-timers.
When using Part-timer feature
- The Part-timer menu is added, including its lower menus, Manage Workplace, Manage Part-time Employee, Manage Payroll Statement, and Payroll Settlement.
- When searching employees, part-time employees are also searched.
- When using the Attendance service, the employee with permission or workplace manager can search the part-time employee status, work status, and leave status in ‘My Work > Management’. Also, the ‘Part-timer Standard’ tab is displayed in the ‘Attendance > Absence > Manage Annual Leave Method’, allowing you to set the standard for creating part-time employee's leave.
- Leave Request (Part-timer), Work Result Request (Part-timer), and Work Plan Request (Part-timer) are provided as a document composition form prepared for part-time employees.
Set Part-timer Payroll
- Click 'Admin Menu' at the top right of the PC web, and then click 'HR' in the pop-up window.
- Click at the top left of the screen.
- Click ‘Settings > Manage Use of Part-timers’ from the menu.
- Click 'Use' in Set Part-timer Payroll to enable the payroll.
- Enter the items.
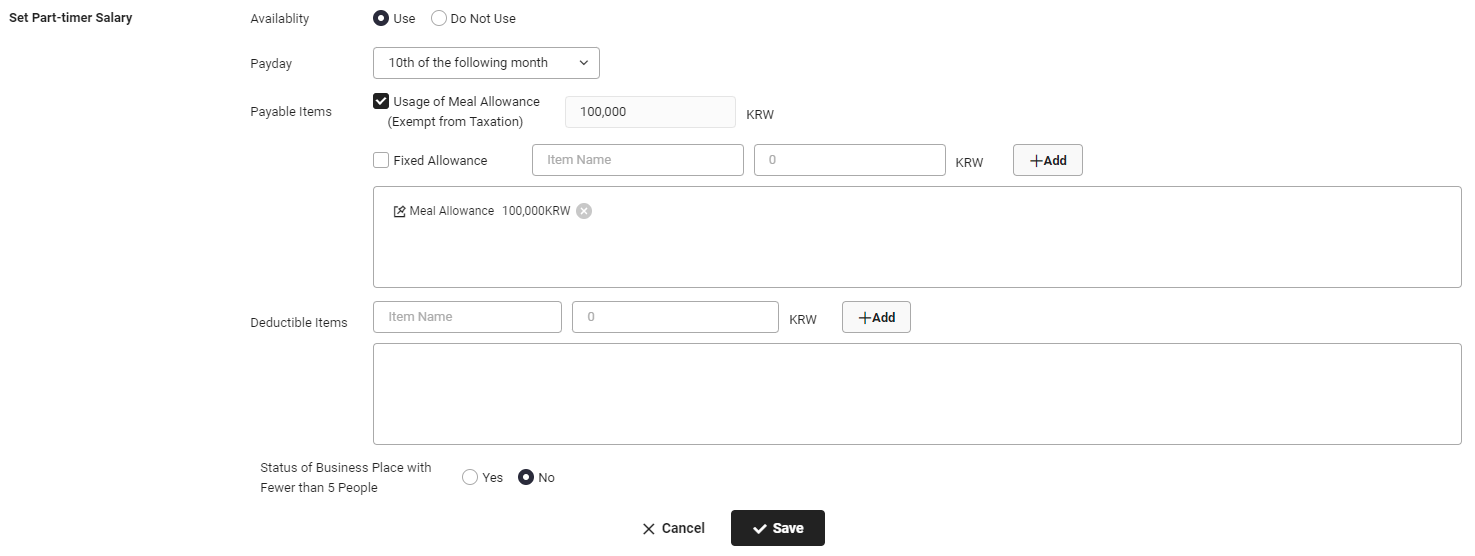
- Select the Payday.
- If you change the payday, then it will be applied from the next payroll settlement (including resettlement). It is not applied to resettlement of individual payroll.
- Create Payable Items.
- To use meal allowance (exempt from taxation), enter the amount and then select ‘Use Meal Allowance (Exempt from Taxation)’.
- Meal allowance is paid in the ratio of the number of contracted days per month to the total days in the month.
- The meal items can't be manually deleted from the list. It is deleted from the list when unchecked.
- If you want to add payment items, click 'Add' and then enter the item name, amount, and calculation method.
- If you don't enter the amount, then it will be applied as 0 KRW.
- The entered calculation method will be shown on the part-timer's payroll statement and the settle payroll screen.
- When you add a payment item, you can select whether it is a fixed allowance included in the regular hourly wage.
- If it is selected as a fixed allowance, then it is paid in the ratio of the number of contracted days per month to the total days in the month.
- The fixed allowance added will be marked with a separate icon upon salary settlement.
- To use meal allowance (exempt from taxation), enter the amount and then select ‘Use Meal Allowance (Exempt from Taxation)’.
- Fill in Deductible Items.
- To add deductible items, click 'Add' and enter the item name, amount, and calculation method.
- If you don't enter the amount, then it will be applied as 0 KRW.
- The entered calculation method will be shown on the part-timer's payroll statement and the settle payroll screen.
- To add deductible items, click 'Add' and enter the item name, amount, and calculation method.
- Select Status of Business Place with Fewer than 5 People.
- Select the Payday.
- Click ‘Save’.
- The fixed allowance is included in the total payroll and is used to calculate the four major insurance policies.
- The business place with fewer than 5 people does not pay overtime, night, and holiday allowances.
Set Part-timer Payroll to Not Use
The following describes how to change usage status to Not Use when not using the Part-timer Payroll.
- Click 'Admin Menu' at the top right of the PC web, and then click 'HR' in the pop-up window.
- Click at the top left of the screen.
- Select 'Settings' from the menu to expand the menu and click 'Manage Use of Part-timers' to access the Manage Use of Part-timers page.
- Click ‘Not Use’ in the Set Payroll.
Management View Settings
You can set the target and scope for department heads to view the status of department or employee for Member, Expense, and Part-timer.
The Management View Settings page is laid out as follows.
| Area | Description |
|---|---|
| ① Status list | It displays the status list to which management search is set |
| ② Settings area | Set management search scope and permissions |
The following describes how to set the viewing scope and permission.
- Click 'Admin Menu' at the top right of the PC web, and then click 'HR' in the pop-up window.
- Click at the top left of the screen.
- Select 'Settings' from the menu to expand the menu and click 'Management View Settings' to access the Management View Settings page.
- Click the item to the which search scope and permission are set.
- Click the ‘Grant Viewing Permission’ from the settings area.
- Target: Select the targets to grant the viewing permission.
- Department Head: a department head of our company (including concurrent department head)
- Department: selected employees of the department of our company (including employees of our company having a concurrent position in the department)
- Employee: selected employee of our company
- Manager: an item displayed in the part-time status item, an employee set to a manger of a part-time workplace of our company (available to designate a manager in the entire range of the corporate group)
When granted with viewing permissions, applicable menus are provided under the ‘My Work > Management’ menu.Department Attendance Status, Department Expense Status, and Part-timer Status widgets are provided in Home.
You can view the department absence status, department expense status, and individual expense status in ManagerBot.
- Target: Select the targets to grant the viewing permission.
-
- Viewing Scope: a range in which a selected target can view.
- All Departments: all departments of our company (including affiliated employee of the corporate group having a concurrent position in our company)
- Managing Department: an item displayed when the viewing target is the department head, a department of our company in which I am the department head including concurrent departments (including affiliated employee of the corporate group having a concurrent position in our company)
- My Department: a department where I belong to in our company (including affiliated employee of the corporate group having a concurrent position in my department)
- Department where I am a manager: an item displayed in the part-time status item, a part-time workplace of our company designated as a manager
- All Workplaces: an item displayed in the part-time status item, all part-time workplaces of our company
- Viewing Scope: a range in which a selected target can view.
- Click ‘Save’.
- The set information is saved.
Viewing permission allows the target to see the status of the largest scope they are granted
When using as a corporate group, the viewing target is designated by the primary company and the viewing scope is applied to each company based on the primary company.
Import Data
You can import the information of retired employees in the past to HR service.
- You can only view Register Retiree Information and can manage retiree information when the usage status of appointment in the ‘Settings > Manage Appointment Usage’ menu is set to ‘Use’.
- You can view the registered retiree information in ‘HR > Member > Manage Employee’ by searching for retirees.
- You can view only registered retirees when setting the employment status to ‘Retirement’ to search.
Guide for Creating Retiree Information Upload Template
When creating a template for retiree information upload, see the following.
| Input Item | Description | Example |
| Name* | Enter the employee's real name. | 이지아 |
| Name (Kor) | You may optionally enter a name per language. | 이지아 |
| Name (Eng) | Toda Ayumi | |
| Name (Simplified Chinese) | 户田 | |
| Name (Chinese) | 戶田 | |
| Name (Japanese) | 十田あゆみ | |
| Date Hired * | After changing the display format to text, enter date hired in the form yyyy-MM-dd.This is a required field. |
2012-05-01 |
| Last work day* | After changing the display format to text, enter date hired in the form yyyy-MM-dd. This is a required field. |
2022-01-31 |
| Business Unit | Select a business unit. | Seoul Unit |
| Date of Birth(Solar Calendar/Lunar Calendar) | Enter if it is based on solar or lunar calendar. | Solar Calendar |
| Date of Birth | After changing the display format to text, enter date of birth in the form yyyy-MM-dd. |
1990-10-05 |
| Postal Code | Enter postal code. | 12780 |
| Address | Enter address. | Bundang-gu, Seongnam-si, Gyeonggi-do |
| Detailed Address | Enter detailed address. | Street A, Building B 201 |
| Phone Number | Enter the cellphone number.
Only [numbers, () - * # + P T] can be entered. |
010-1234-5678 |
| Company Phone No. | Enter Company Phone No. Only [numbers, () - * # + P T] can be entered. |
031-1234-1234 |
| Login ID * | Enter in the form id@company.com or id@group.
This is a required field. |
abc@navercorp.com/ abc@navercorp |
| Enter in the form test@test.com. | abc@navercorp.com |