Integrate the approval information with the customer's corporate information system using developer tools. When the approval data is linked, the approval status of each form is automatically sent to the company's corporate information system. You can utilize it in different ways on the company's corporate information system.
Flow of Approval linkage settings and processing:
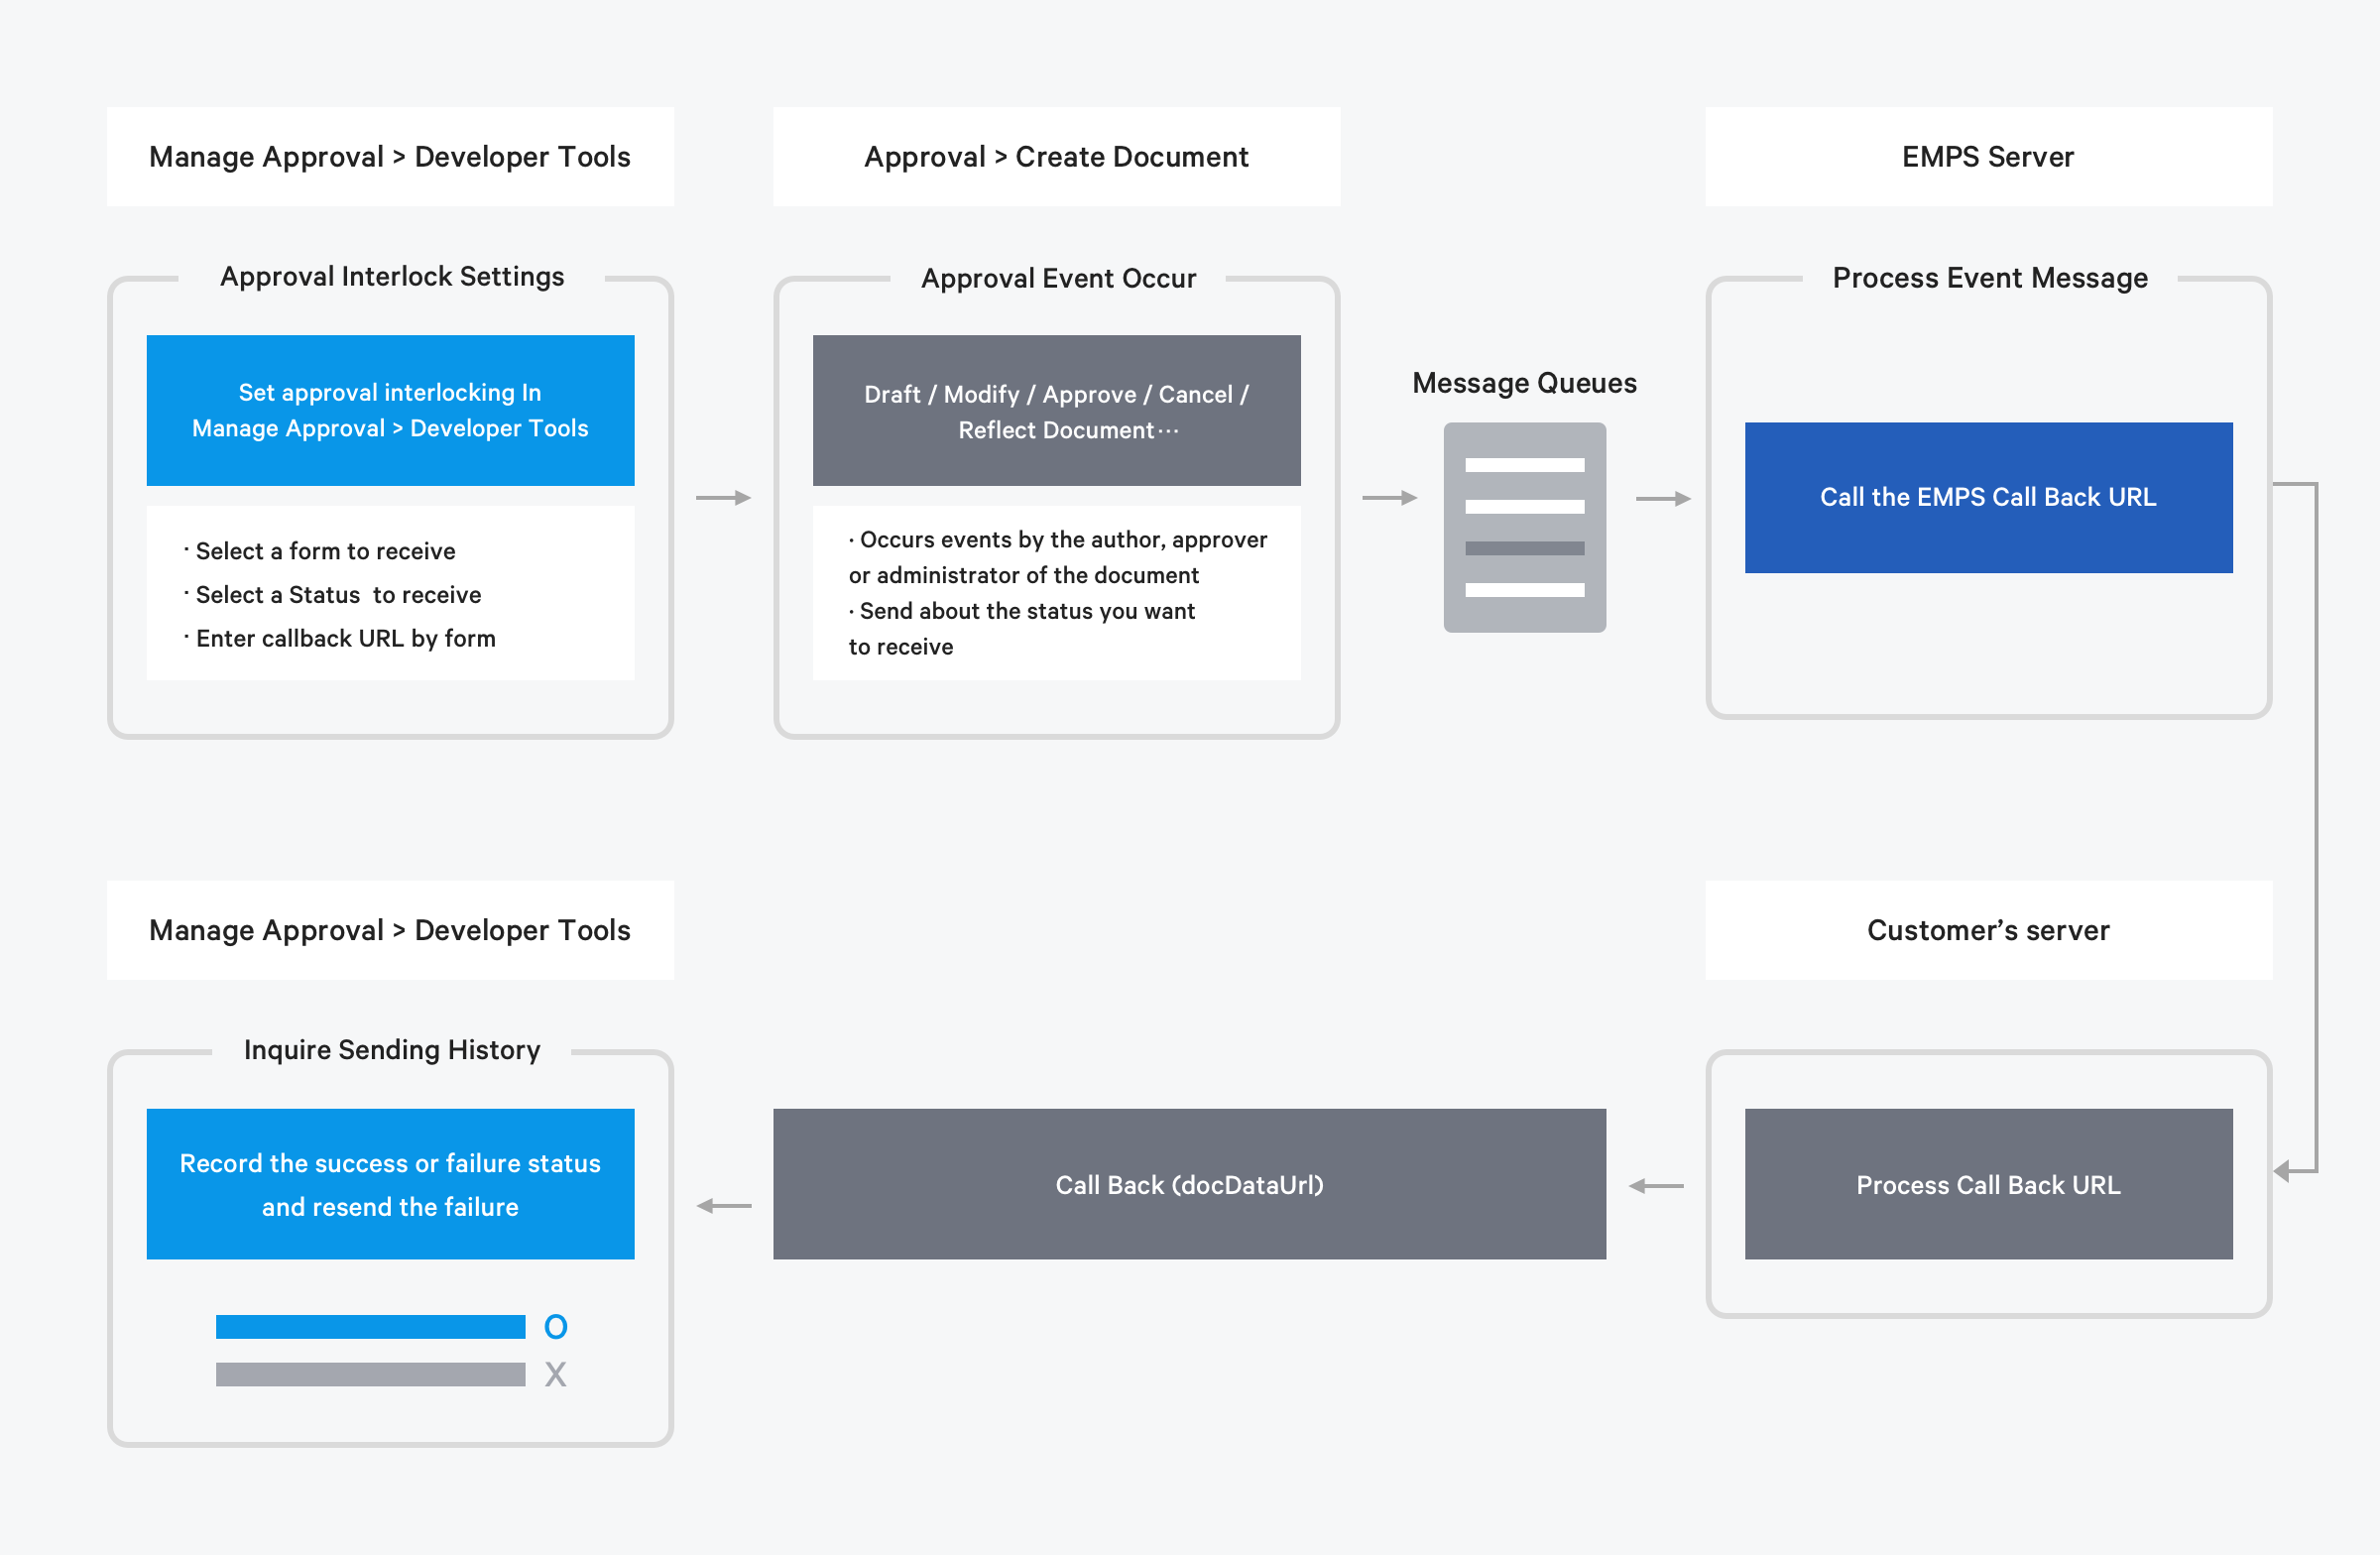
Dispatch Settings
-
- Click the ‘Admin Menu’ at the top right of the PC web screen, and then click ‘Manage Approval’ in the pop-up window.
- Click
 at the top left of the screen.
 - Click ‘Developer Tool > Set Sending’ from the menu.
- Click 'Add Sending Form'.
- Select the form to be linked.
- Set the information to be received for each form.
- Enter Callback URL: Enter the callback URL of the form. For the entry method, see ‘Enter Callback URL’. Refer to Event Processing for the processing of registered callback URL.
- Select Approval Status: Select the status for which the delivery is made. The name can be displayed differently, depending on the Approval admin’s approval type and processing type settings. (Example > Approval/Consent)
- Click 'Save' to complete the setup.
Enter Callback URL
Enter the callback URL to receive events that occur for each form.
- To receive events for each form, set each URL to receive callback. To use the same URL, you can set
dfmIdas the get parameter, as shown in the example below.
The object structure delivered during event callback is as follows.

| Field | Description |
|---|---|
| docDataUrl | API link to view detailed document information (viewing v1 API link to view detailed document information, to be changed to v2 API later) |
| aprvDocId | Internal PK of document |
| processYmdt | Date and time when event occurred |
| docNo | Document number |
| sendTpCd | Event status |
| dfmId | Form ID |
- Please refer to the following table for events available for delivery (sendTpCd).
| sendTpCd | Description | Details |
|---|---|---|
| DRAFT | Draft | Event where the creator saves the document |
| REVISE | Modify | Event where the creator modifies the document |
| APPROVE | Consent, Agreement, Automatic Consent | Event where the creator approves the document with methods such as Consent, Agreement, or Automatic Consent |
| DELEGATE | Delegate | Event where the approver delegates the approval to another person |
| REJECT | Decline | Event where the approver rejects the document |
| APPROVED | Completed (Approved) | Event that occurs when the document has been completed |
| CANCELED | Canceled (Approval Canceled) | Event that occurs when the admin cancels the approval of the approved document |
| DELETED | Deleted | Event that occurs when the admin deletes the document |
| AUTO_APPROVE | Automatic Consent | Event where the document is approved with the Automatic Consent method |
| COOPERATION | Agreement | Event where the document is approved with the Agreement method |
| RETRIEVE | Retrieved | Event where the creator retrieves the document |
Event Processing
It processes events that occur from Approval documents in real time by calling registered callback URL using the PUT method. The processing method is as follows.
- Method: PUT
- Media Type: application/json
It is processed as follows according to the response code of the PUT method call result.
- When the response code is returned in the 200 range: Recorded as successful delivery
- When the response code is returned in the 400 or 500 range: Recorded as failed delivery
The processing results are recorded in Developers of the Admin. Refer to ‘View Delivery History’ for delivery details.
View Delivery History
You can view the success and failure history of the approval information delivered to the company’s corporate information system, as well as resend failed history. You can also view the details of received documents by using API.
The View Delivery History page is laid out as follows.
| Area | Description |
|---|---|
| ① Search | Search by entering form, delivery date, document number, title |
| ② Resend | Resend failed delivery history |
| ③ Download | Download delivery history |
| ④ Delivery history list | Check delivery history |
Resend Failed History
The following describes how to resend failed delivery history.
- Click the ‘Admin Menu’ at the top right of the PC web screen, and then click ‘Manage Approval’ in the pop-up window.
- Click at the top left of the screen.
- Click ‘Developer Tool > View Delivery History’ from the menu.
- Select Succeeded and Failed Delivery History.
- Click 'Resend’.
View Document Details Using API
You can view the details of received documents by calling provided API.
2 types of APIs are provided, and you can search using aprvId.
- V1 API: This API can be used to view document details of basic forms of the Approval service. For more details, see ‘Searching document details V1’ API.
- Example of API call: https://workplace.apigw.ntruss.com/workflow/apigw/v1/company/52e6e775-6993-424d-bc58-62e17268ed29/doc/25025
- V2 API: You can view documents of forms created by Create Form. For more details, see ‘View details of document form generator V2’ API.
- Example of API call: https://workplace.apigw.ntruss.com/workflow/apigw/v2/company/52e6e775-6993-424d-bc58-62e17268ed29/doc/25025
Set Component Linkage
It can be linked to set company-specific component keys for specific components of forms. The configured component keys can be utilized as parameters when searching document details using an open API.
Flow of component key settings and utilization:
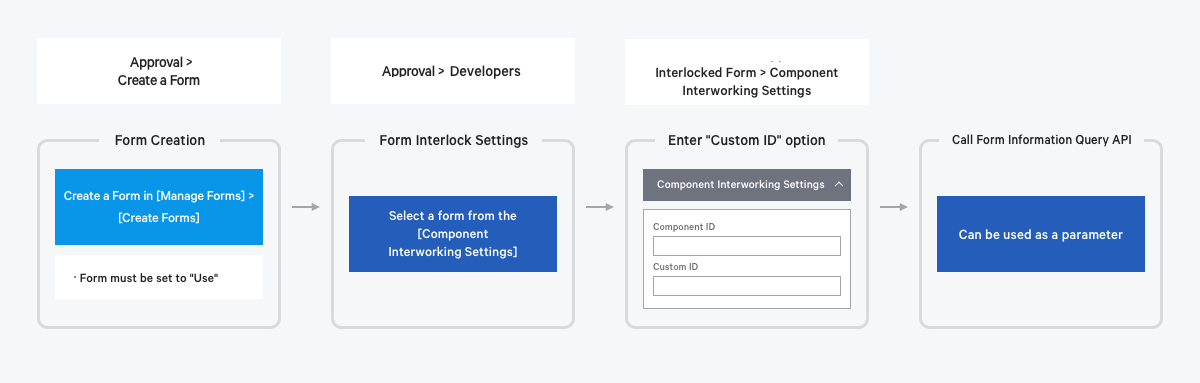
The following describes how to add a form to set the component key for.
- Click the ‘Admin Menu’ at the top right of the PC web screen, and then click ‘Manage Approval’ in the pop-up window.
- Click at the top left of the screen.
- Click ‘Developer Tool > Component Linkage Setting’ from the menu.
- Click 'Add Integrated Form'.
- Select a category.
- Select a form. You can only select forms set to ‘Use’, among forms created with Create Form.
- Click ‘Save’.
- Integrated forms can be utilized by setting the company's unique ID in the component. Refer to ‘Set User-defined ID’ below.
Set User-defined ID
For integrated forms, the ‘Component Linkage Settings’ option is displayed in the options area of the form details.
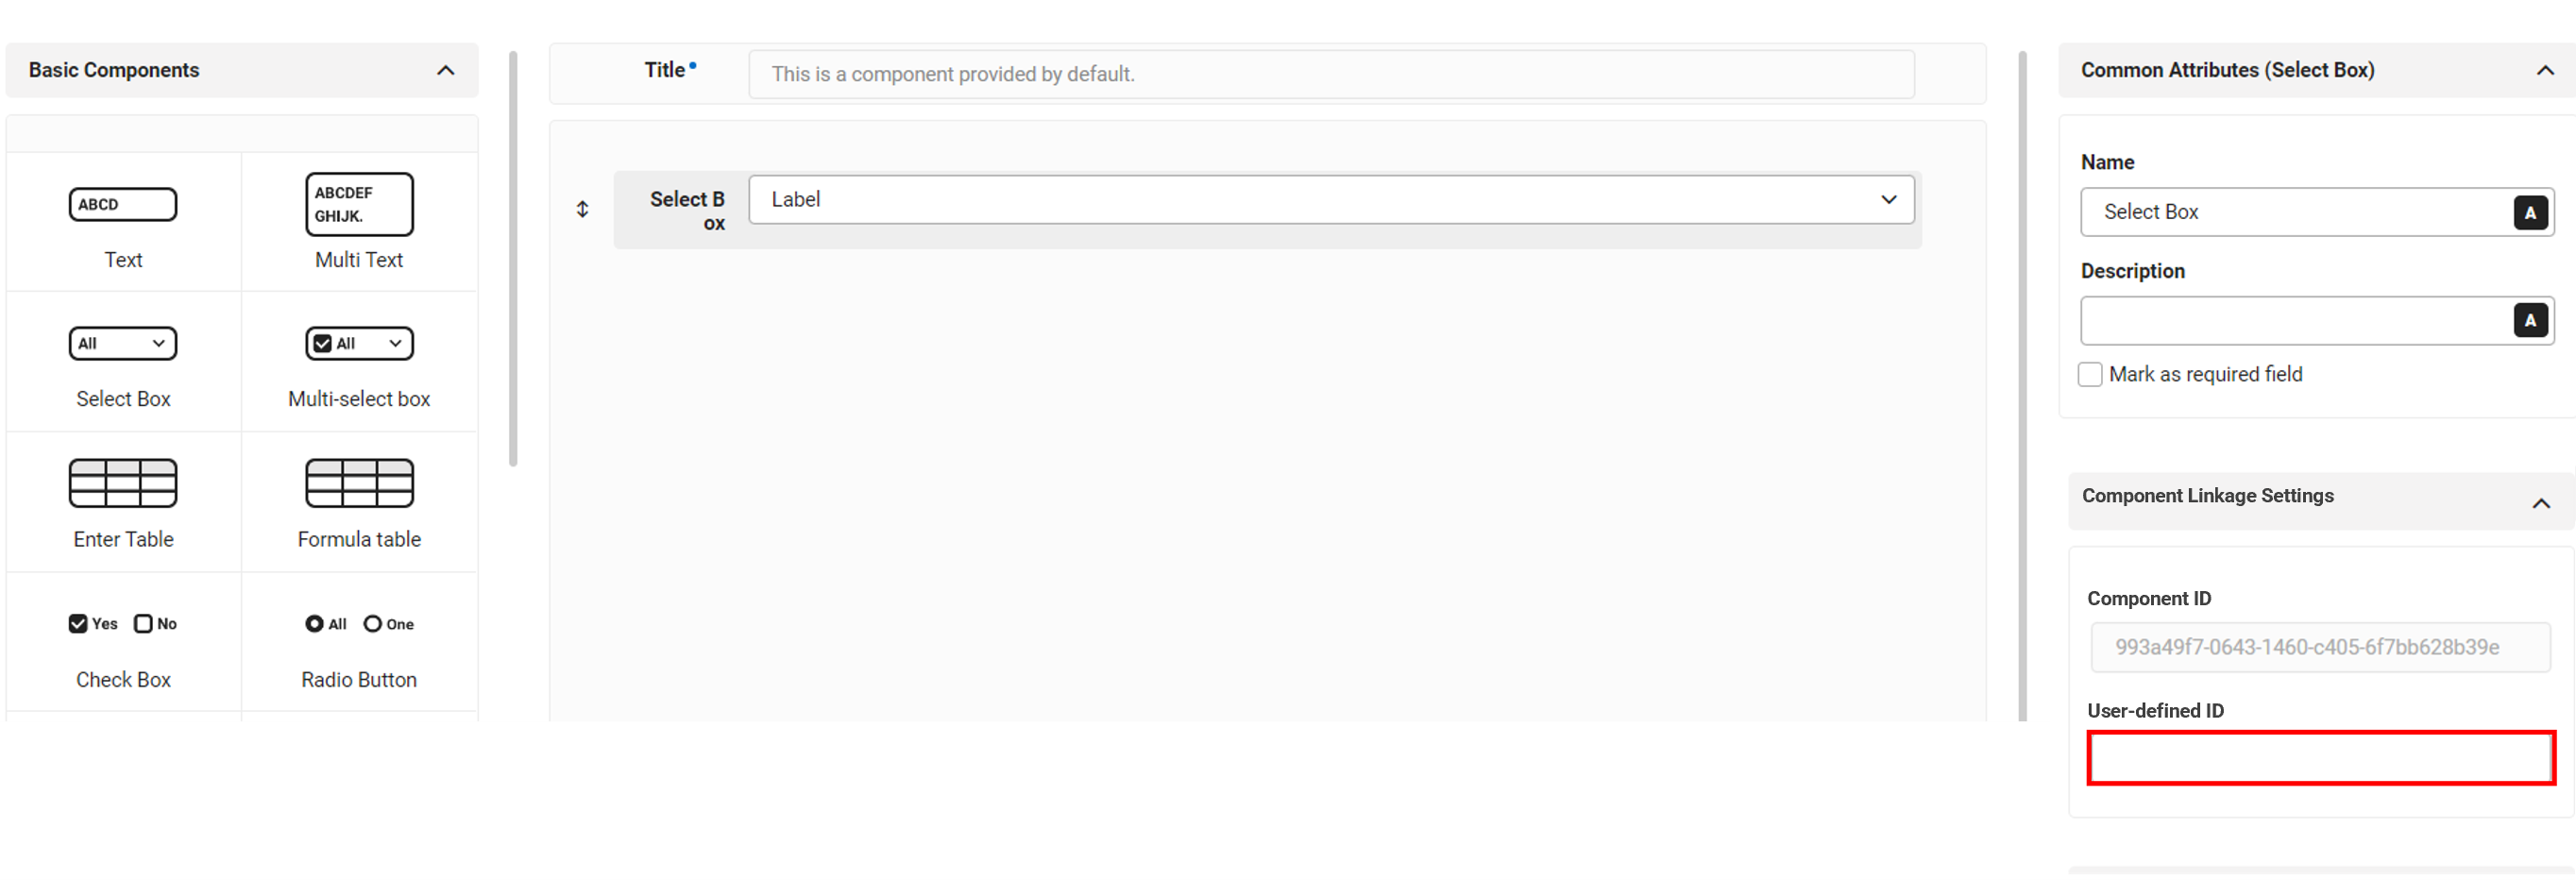
The following describes how to set the user-defined component ID for the integrated form.
- Click the ‘Admin Menu’ at the top right of the PC web screen, and then click ‘Manage Approval’ in the pop-up window.
- Click at the top left of the screen.
- Click ‘Form > Manage Form’ from the menu.
- Click
 of the integrated form.
 - Enter the User-defined ID in the component linkage settings area.
- Click ‘Save Form’ to save.
- The entered user-defined ID can be utilized as a parameter (componentCustomId) when calling search form information API. For more details, see ‘View Form Details API Guide’.