You can check all approval documents, and manage imported, received, and sent documents.
Manage Approval Document
You can check all approval-related documents. You can check details and approval progress of each document and change the approval line or sharing target.
The Manage Approval Document page is laid out as follows.

| Area | Description |
|---|---|
| ① Search window | Search for an approval document based on the approval progress status, form, document number, creation date, creator/approval/shared recipient/drafting department, and content conditions
|
| ② Hide/Show | Hide or unhide selected approval documents from the list
|
| ③ Download | Download the approval document list as an Excel file |
| ④ Include hidden documents | It displays hidden approval documents in the list |
| ⑤ Approval document list | View approval documents as a list and details of each document (See View Approval Document Details) Click Created by to check the information of the document creator |
View Approval Document Details
You can confirm details of each approval document and change the approval line or sharing target. You can delete documents when necessary.
The following describes how to check details of approval documents.
- Click the ‘Admin Menu’ at the top right of the PC web screen, and then click ‘Manage Approval’ in the pop-up window.
- Click ‘Document Box > Manage Approval Document’ from the menu.
- Click the title of the document to confirm.
- It displays the approval document pop-up window.
The approval document pop-up window is laid out as follows.

| Area | Description |
|---|---|
| ① Document details | It displays the details of the approval document
|
| ② Turn off notifications/Turn on notifications | Turn notifications related to the document on or off |
| ③ Information Change History | History is displayed for documents whose approval is in progress. Click to check the change history of the document |
| ④ Hide/show approval line | Hide the approval line and sharing information or cancels hiding. |
| ⑤ Approval line summary | It displays a summary of approval lines and approval results in a table if there are approvers (For more information, see Print Document)
|
| ⑥ Approval line | It displays the approval line information of the document
|
| ⑦ Recipient | (For documents with a recipient) It displays recipient information
|
| ⑧ Sharing status | Change the sharing status of the document. Changes are immediately reflected upon clicking and a sharing notification is sent
|
| ⑨ Document comment | After entering and editing comments on the document, save by clicking OK |
| ⑩ Delete | This item is only displayed if document approval is complete (See Delete Approval Document) |
| ⑪ Print | See Print Document |
Delete Approval Document
The following describes how you can print documents.
- Click the ‘Admin Menu’ at the top right of the PC web screen, and then click ‘Manage Approval’ in the pop-up window.
- Click ‘Document Box > Manage Approval Document’ from the menu.
- Click the title of the document to print.
- It displays the approval document pop-up window.
- Select the print options in the approval document pop-up window, and then click ‘Print’.
- Approval line summary: Summarizes and prints the approval result as a table at the top of the document.
- Agreement approval line: This item is only displayed if the agreement approval line is included in the approval line. Includes agreement approval in the approval line summary area if selected.
- Include signature: This item is displayed if the admin sets to use signature. Includes the approver's signature in the approval line summary area if selected.
- Prints the signature image of each individual at the time of document creation. Signature images changed after saving the document do not apply when printing the document. They apply to the next document.
- Signatures can be displayed as a stamp or signature image format. For registration of signature images, see Manage Signature.
- If the signature image is not displayed
- Default image displayed: Approver who did not register the signature, approver who rejected/approval rejected and sent back by another approver/approver who delegated
- Diagonal line (/) displayed: Approval who showed consent to arbitrary decision
- Approval line: Prints the approval time and approval comment of each approver at the bottom of the print page. If cleared, the approval comment and shared comment are also excluded from printing.
- Approval Comment: Prints the approval comment of the document.
- Shared Comment: Prints the shared comment at the bottom of the print page.
- Receipt: Receipts can be printed for expense settlement request documents.
- Received Original Document: This is a print option displayed for a document created with the General Document (Receipt) form. Select to print with the original document included.
- Recipient: This is a print option displayed for a form with a recipient. Select to print with the recipient information included.
- When printing a document, the company logo image can be printed at the bottom of the document.
- The company logo image will be displayed if you have registered the logo image in the 'Manage Company Logo and Color' in Admin.
Delete Approval Document
You can delete completed approval documents and data included in documents.
Check the history and reason for deleting documents in the ‘Business Support Settings > Security > Approval Document Deletion Status’ menu.
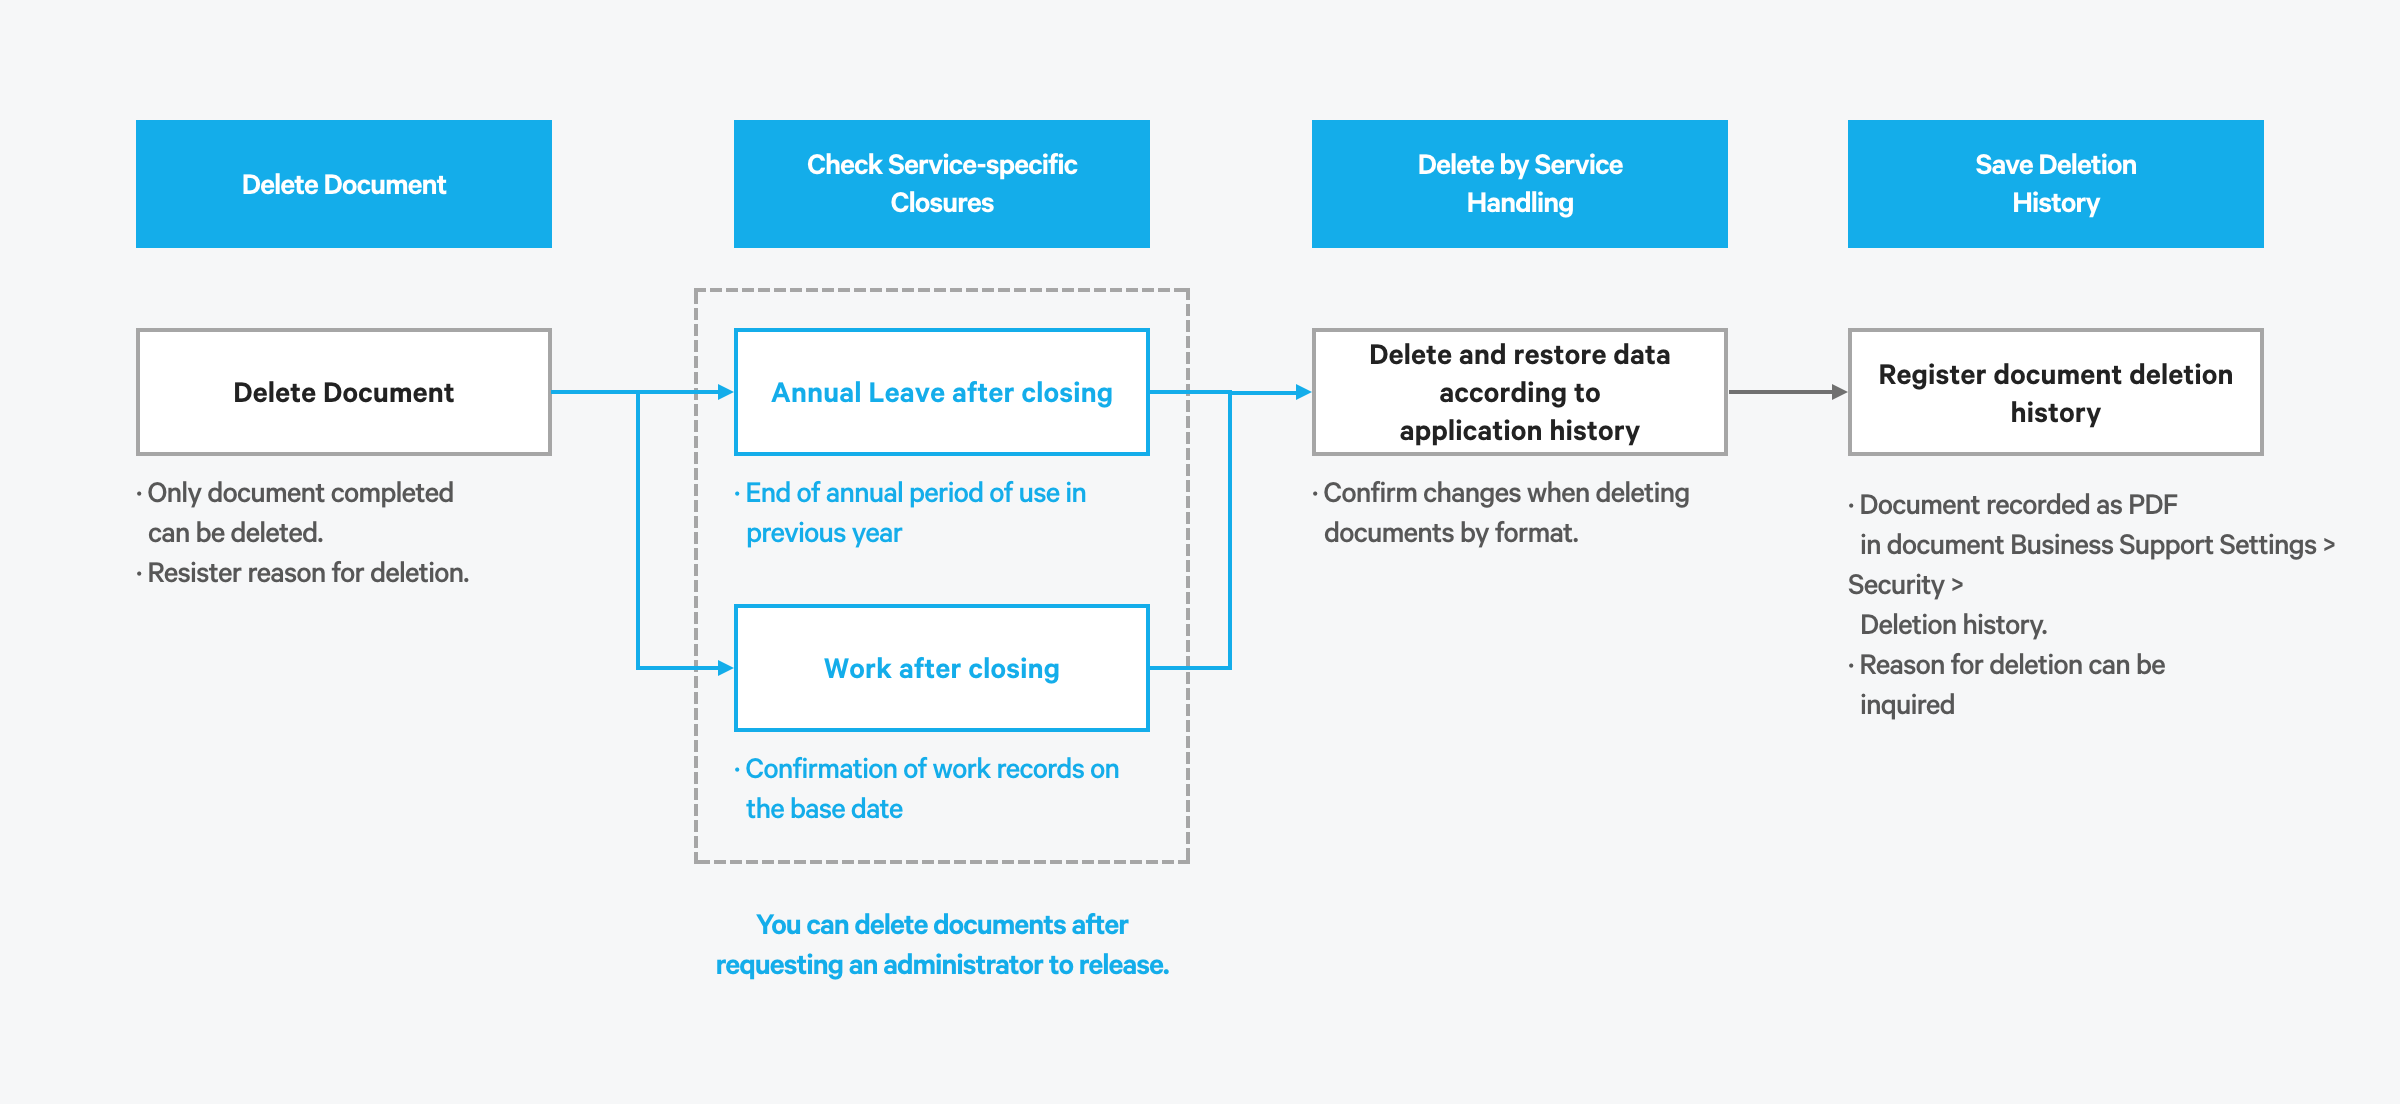
General documents before closing, certificates, expenditure resolution report, work plan requests, expense plan requests, and other documents created with the user setting form can be immediately deleted. You can only delete closed documents by canceling closing or confirmation as follows.
- Close annual leaves: The period to request the annual leaves used in the previous year is defined based on the settings in ‘Attendance > Absence > Manage Annual Leave Method’. Expired annual leave request documents can be deleted after asking the attendance admin to change the annual leave usage period.
- Close work hours: The work result request documents with fixed work records on the base date can be deleted after asking the attendance admin to cancel the confirmation.
- Close accounting slips: Expense settlement documents and expense resolution application documents whose business slips have been closed on the date of use can be deleted by requesting the accounting manager to change the closing status to 'Open'.
- Close fixed assets: Expenditure resolution documents for which the fixed assets of the business have been closed on the date of use can be deleted by requesting the accounting manager to change the closing status to 'Open'.
The following describes how to delete approval documents.
- Click the ‘Admin Menu’ at the top right of the PC web screen, and then click ‘Manage Approval’ in the pop-up window.
- Click ‘Document Box > Manage Approval Document’ from the menu.
- If necessary, enter the search conditions in the search window, and then click ‘Search’.
- Select ‘include hidden documents’ to also view hidden documents.
- In the list of approval documents, click the title of the document to be deleted among documents that completed approval.
- Click ‘Delete’ from the approval document pop-up window.
- Enter the reason for deleting, and then click ‘OK’.
- The approval document is deleted. You can check the history and reason for deletion in ‘Business Support Settings > Security > Approval Document Deletion Status’.
Click ‘Hide’ to hide the document from the list without deleting it.
Delete documents in workflow that include a retired approver:
- You can only delete documents whose approval is complete. If approval can't be proceeded because of a retired person in the approval line, you can delegate the unprocessed approver to the approval admin on the document detail page. The document can be deleted after the admin processes the delegated document and completes approval.
For a document created through approval of work schedule reporting by an employee who selects a fixed time to clock in/out (Report Approval of Work Schedule), you can't delete the document when there are clock-in/out records in the work schedule. (For more information, see Clock-in/out by Selecting a Fixed Time.)
- When a document is deleted, data included in the document are also deleted. Deleted documents and data can't be recovered. Make sure to review carefully before deleting.
The following will be automatically reflected based on the type of document that has been deleted.
| Deleted Document | What is reflected |
|---|---|
| Annual/Special Leave | Restore annual leaves or days of leave used |
| Family Event Leave/Business Trip | Restore days of leave used and reverse family event expense/business trip expense accounting slips paid |
| Certificate | Delete certificate issuance history |
| Work Plan Request | Delete the plan request history |
| Work Result Request | Delete hours entered for clock-in/clock-out/break/outside work other than the attendance check and recalculate cumulative work hours |
| Expense Plan | Delete the plan request history and restore the budget |
| Expense Settlement | Delete the settlement request history, recover the budget, and reverse accounting slips |
| Expenditure Resolution Report | The expenditure resolution application details are deleted and the budget is restored. (When using Accounting) If the expenditure resolution request type is "Asset Acquisition," the slip is deleted and the registered fixed asset is deleted |
| Forms created by company | Delete the work document history |
Manage Imported Document
You can use the Import Data to check and manage documents imported from external solutions.
This menu is only displayed if there is an imported document.
For the method of importing documents from external solutions, see Import Data.
The Manage Imported Document page is laid out as follows.

| Area | Description |
|---|---|
| ① Search window | Search imported documents based on form, creator/approver/shared recipient, title, document number, and period conditions |
| ② Delete | Delete the imported document selected When a document is deleted, it is also deleted on the page of the user who shared the document |
| ③ Download | Download the imported document list as an Excel file |
| ④ Imported document list | View imported documents as a list
|
Manage Received Document
You can manage all received documents. You can check the receipt status per document status. For a recipient with no manager specified, the admin can specify a manager on behalf of users.
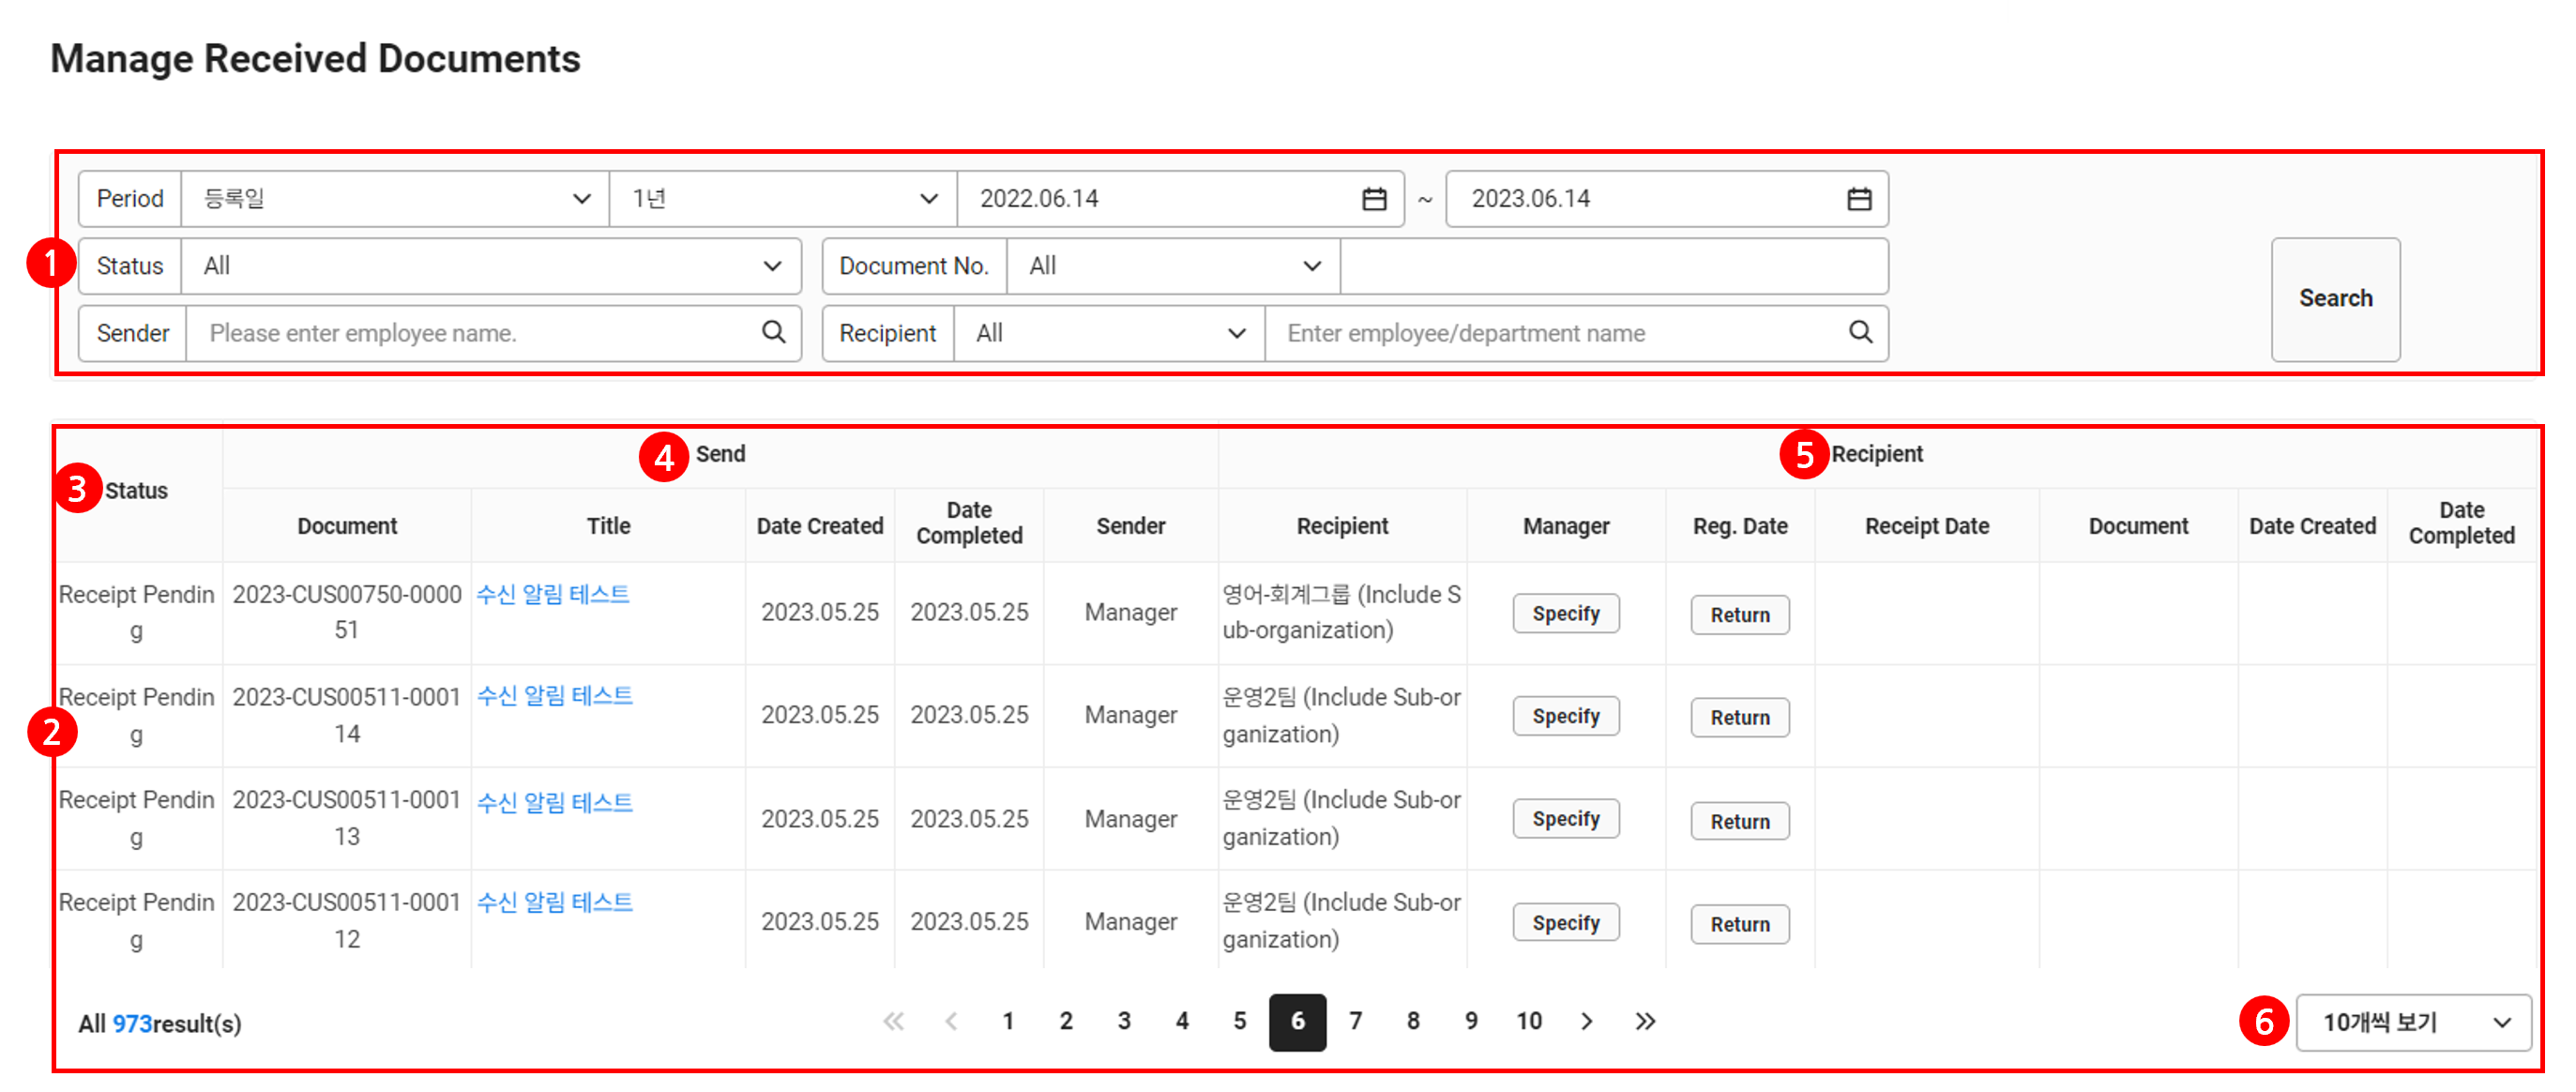
The Manage Received Document page is laid out as follows.
| Area | Description |
|---|---|
| ① Search window | Search the document based on the status, document number, period, and receipt (recipient, manager) conditions
|
| ② Document list | It displays the list of received documents |
| ③ Document status | It displays the status of received documents
|
| ④ Sent documents | It displays information of sending (original document)
|
| ⑤ Received documents | It displays the receipt information
|
| ⑥ Number of displayed items | Set the number of documents to be displayed on a single page of the list |
Specify Manager
For a recipient with no manager specified, the admin can specified a manager on behalf of users.
The following describes how to specify a manager.
- Click the ‘Admin Menu’ at the top right of the PC web screen, and then click ‘Manage Approval’ in the pop-up window.
- Click ‘Document Box > Manage Approval Document’ from the menu.
- If necessary, enter the search conditions in the search window, and then click ‘Search’.
- The list of received documents that meet the entered conditions is displayed.
- Click ‘Specify’ for the document to specify a manager.
- In the pop-up window, enter the name of the employee to be specified as the manager and click
 .
. - Select an employee from the search result.
- If necessary, fill in the note for manager specification.
- Click 'OK'.
- The employee specified as a manager will receive an email.
Return
A received document that has not been accepted can be returned by the admin on behalf of users.
The following describes how to return a document.
- Click the ‘Admin Menu’ at the top right of the PC web screen, and then click ‘Manage Approval’ in the pop-up window.
- Click ‘Document Box > Manage Approval Document’ from the menu.
- If necessary, enter the search conditions in the search window, and then click ‘Search’.
- The list of received documents that meet the entered conditions is displayed.
- Click ‘Return’ for the document to return.
- Click 'Yes'.
- The document returned by the admin is deleted from the inbox of the corresponding recipient and from the admin's Manage Received Document list.
Manage Sent Document
You can check the receipt status of all sent documents. A document not yet accepted by a recipient can be retrieved by the manager
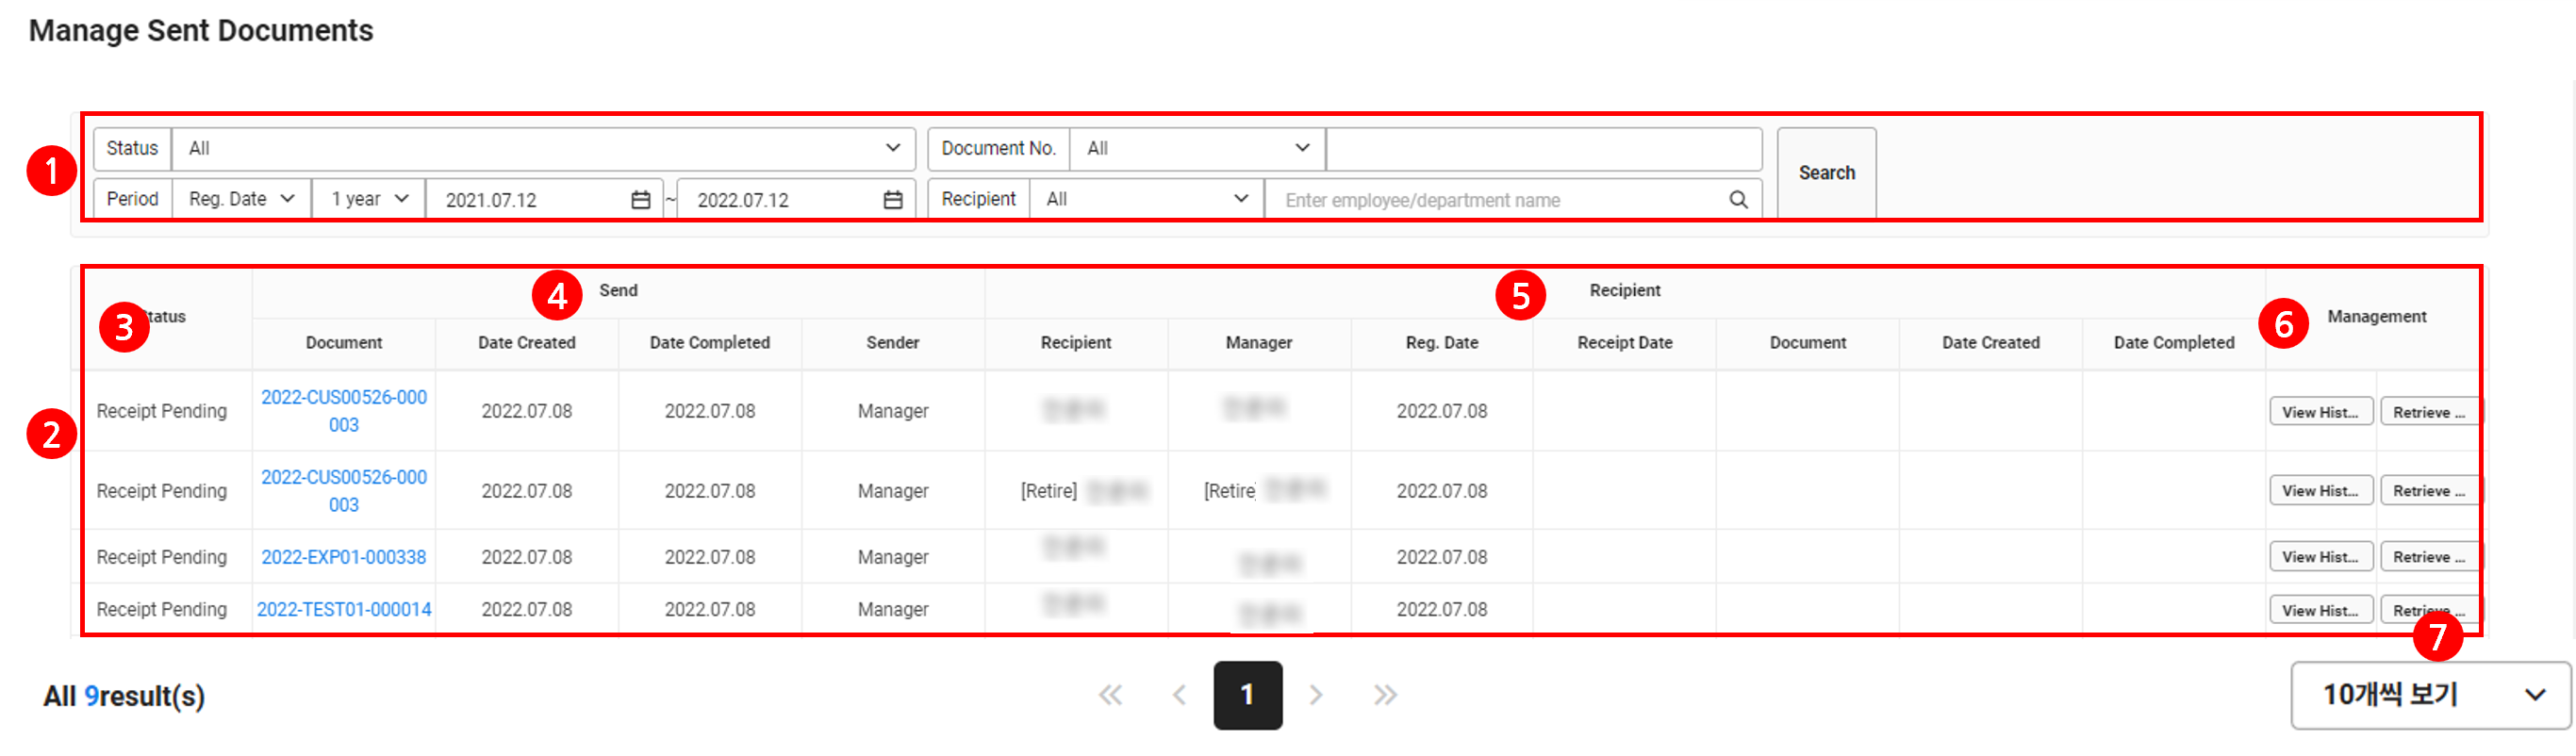
The Manage Sent Document page is laid out as follows.
| Area | Description |
|---|---|
| ① Search window | Search the document based on the status, document number, period, and receipt (recipient, manager) conditions
|
| ② Document list | It displays the list of sent documents |
| ③ Document status | It displays the status of sent documents
|
| ④ Sent documents | It displays the information of sending
|
| ⑤ Received documents | It displays the receipt information
|
| ⑥ Manage |
|
| ⑦ Number of displayed items | Set the number of documents to be displayed on a single page of the list |
Retrieve Sent Document
A sent document not yet accepted by a recipient can be retrieved by the admin on behalf of users.
The following describes how to retrieve a sent document.
- Click the ‘Admin Menu’ at the top right of the PC web screen, and then click ‘Manage Approval’ in the pop-up window.
- Click ‘Document Box > Manage Approval Document’ from the menu.
- If necessary, enter the search conditions in the search window, and then click ‘Search’.
- The list of received documents that meet the entered conditions is displayed.
- Click ‘Retrieve Sent Document’ for the document you want to retrieve.
- Select the scope of recipient for the retrieval in the pop-up window.
- Only retrieve from the applicable recipient: Document is only retrieve from the selected recipient and deleted from the inbox of the recipient.
- Retrieve from all recipients (for only the recipient that has not accepted the document): Document is retrieved from all recipients that have not accepted the document and is deleted from the inbox of all such recipients.
- Click 'OK'.