You can change the settings applied to each page of the Approval service according to the company environment. You can also easily import external documents using the template provided.
Set Approval
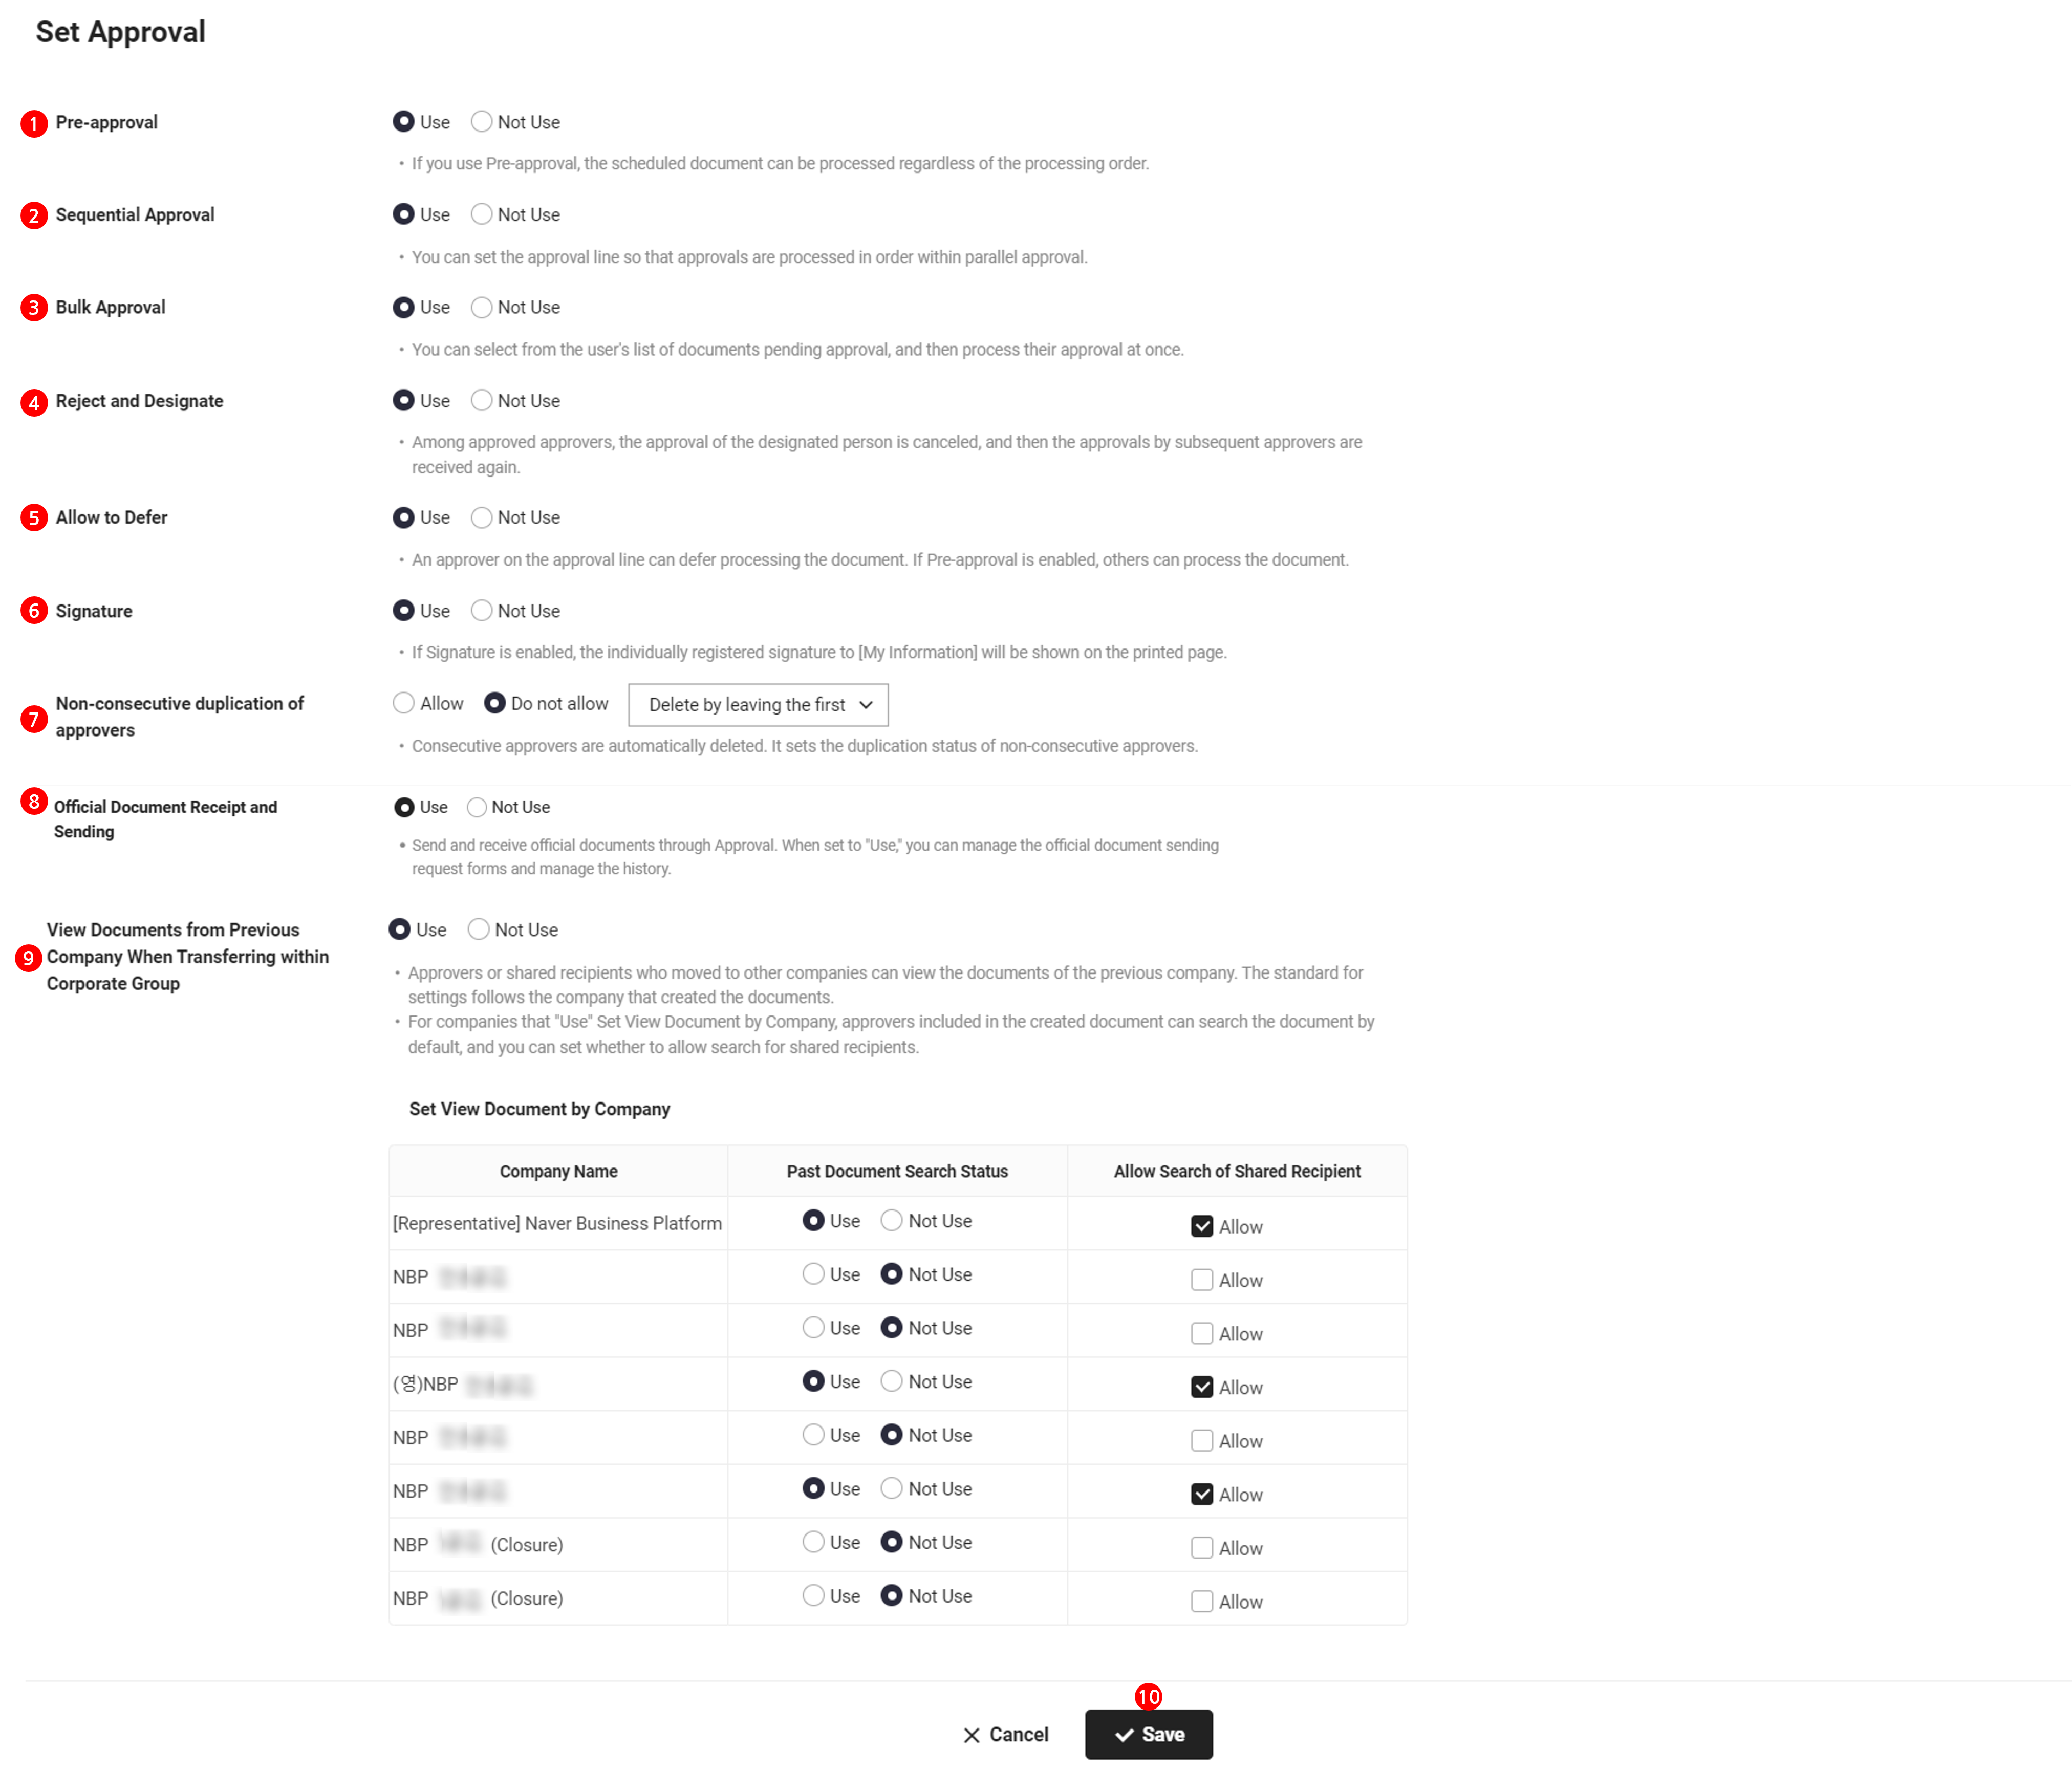
You can set to use or not use pre-approval, sequential approval, reject and specify, defer, and signature features for the approval work.
The Set Approval page is laid out as follows.
| Area | Description |
|---|---|
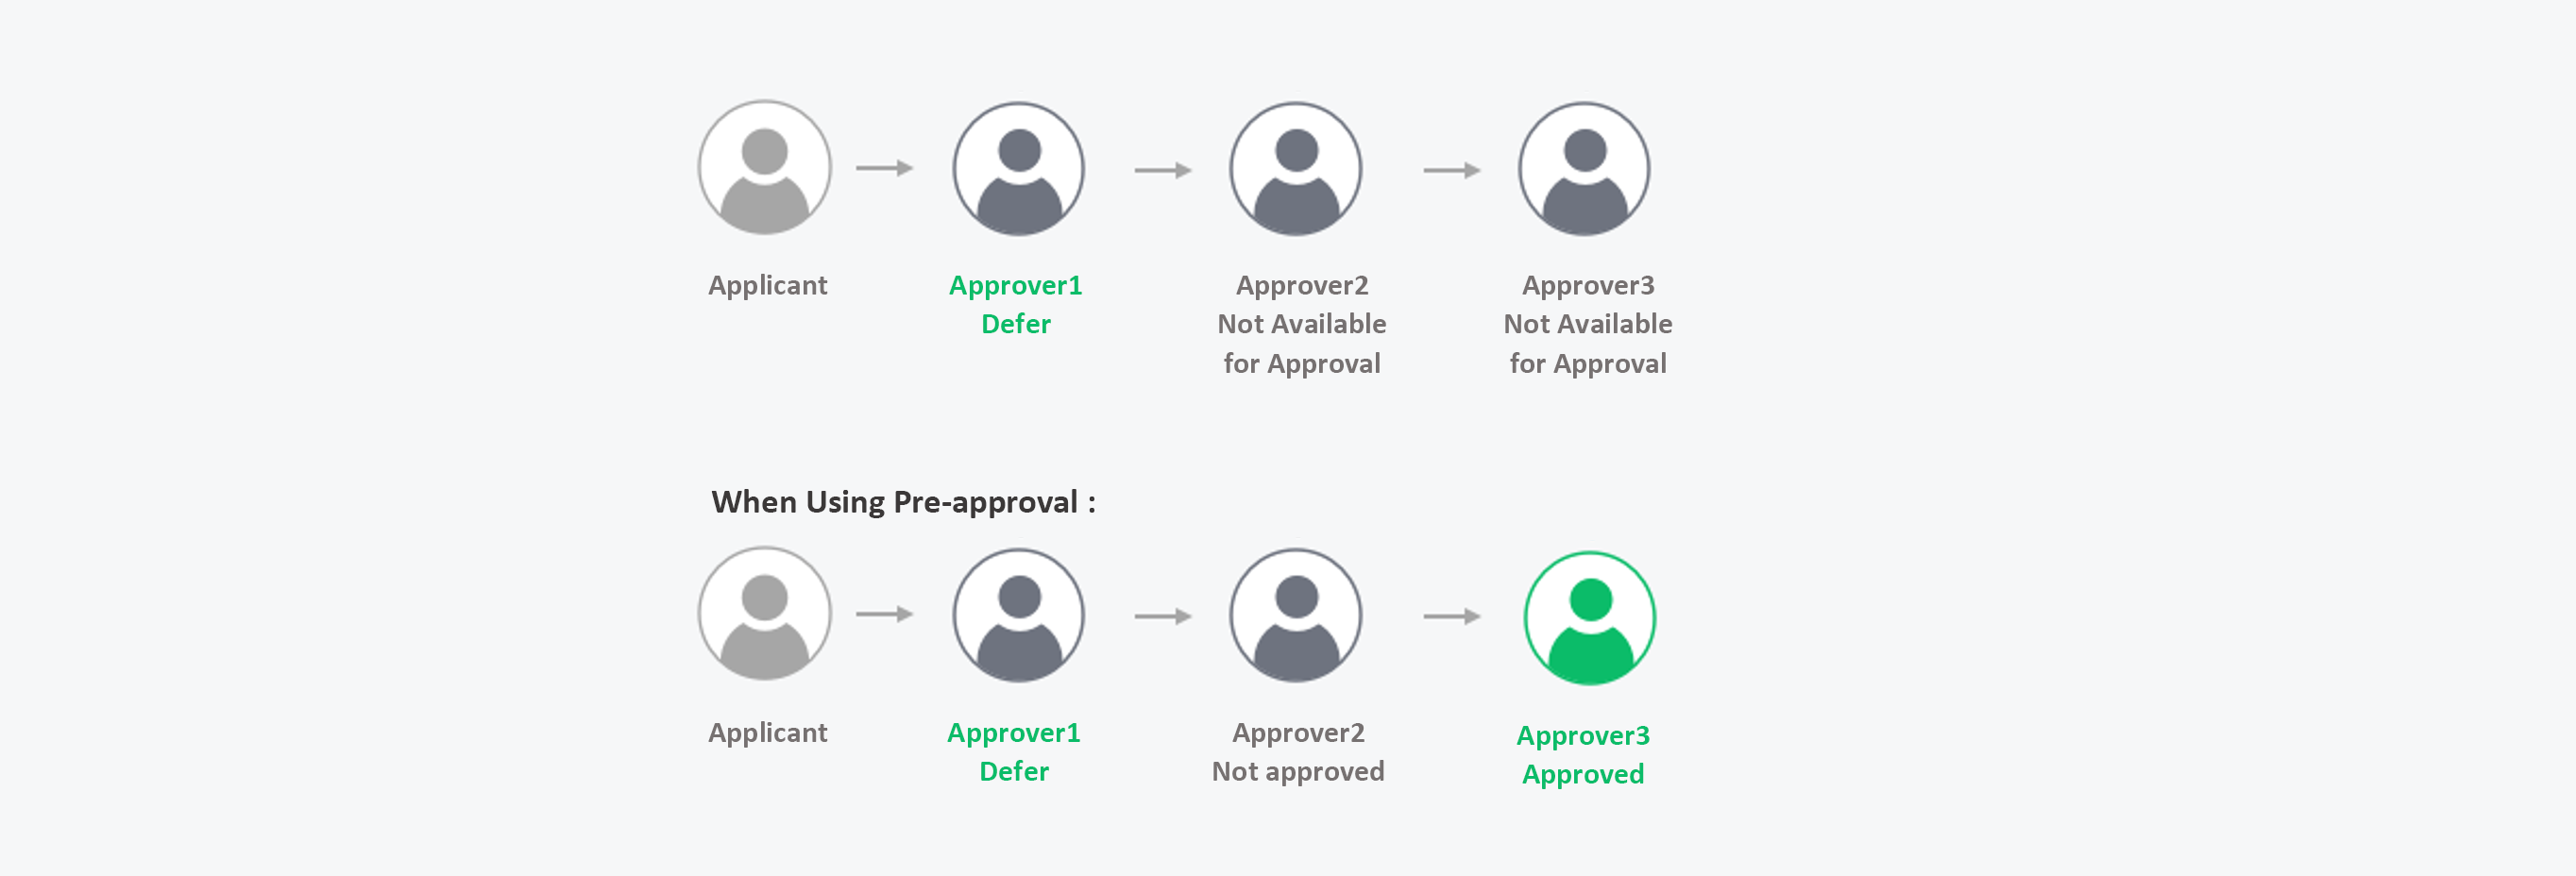
| ① Pre-approval | Enables pre-approval of a document to be approved, regardless of the approval order specified in the approval line |
| ② Sequential Approval | Allow to add sequential approvers who approve documents in order within the unit of Parallel Approval (Agreement)
|
| ③ Bulk Approval | Set to approve documents in the approval pending status in bulk
|
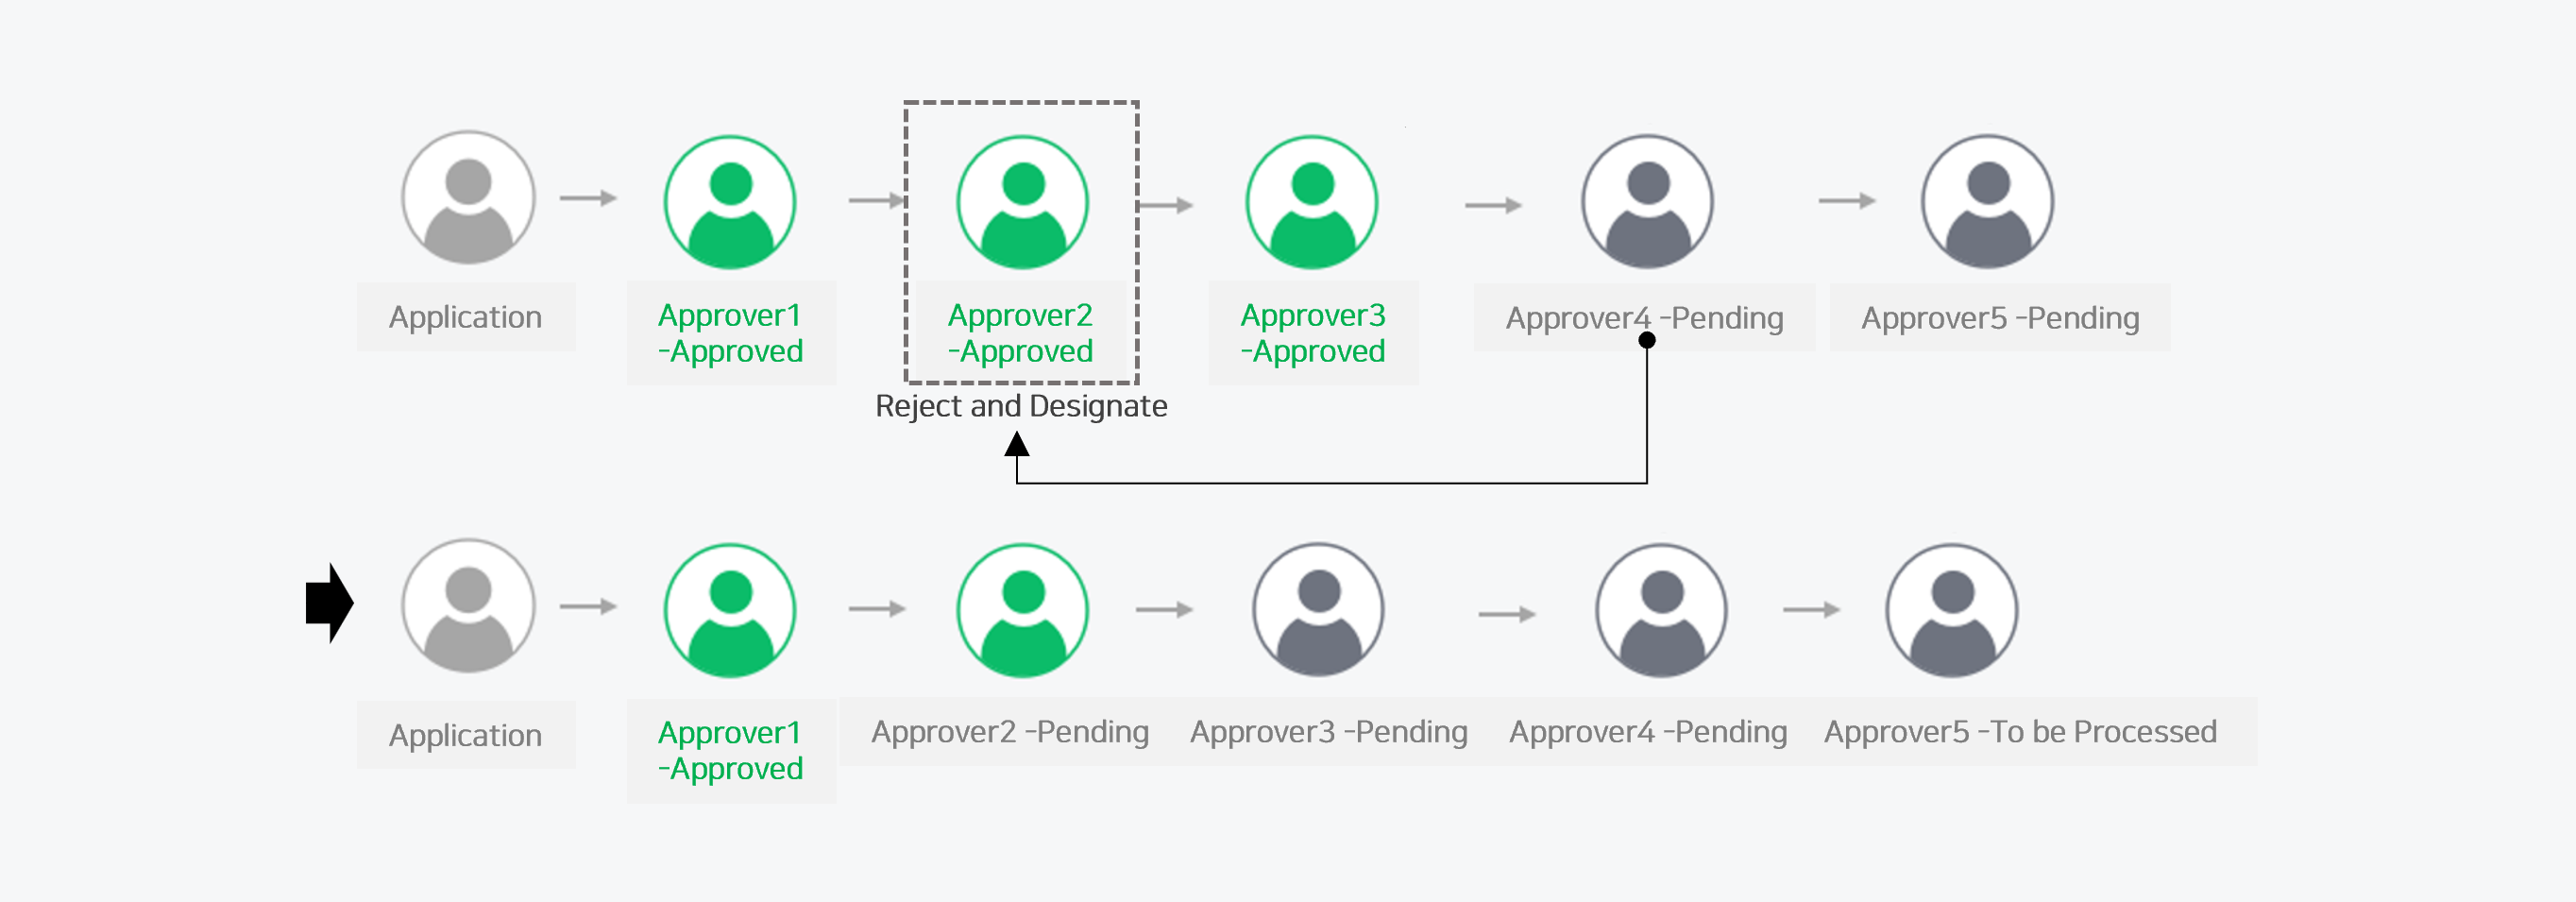
| ④ Reject and Specify | Specify one of the approvers who have already approved and cancel the approval for the specified approver so that the specified approver and other following approvers in the approval line need to approve again
|
| ⑤ Pending | Allow to defer document approval and temporarily stop the approval process
|
| ⑥ Signature | Set the personal signature of the approver to be displayed in the printed page of the approval document
|
| ⑦ Non-consecutive Duplication of Approvers | Set the duplication status of non-consecutive approvers (only applies to Set Approval Lines of the admin)
|
| ⑨ View Documents From Previous Company When Transferring Within Corporate Group | This item is displayed when using as a corporate group, and only the primary company can set
|
| ⑧ Official Document Receipt and Sending | Use’, official documents can be requested for sending and receipt via approval. Official document sending request forms can be managed and their request history can be checked
|
| ⑩ Save | Click to save the settings |
- Pre-approval

- Sequential Approval

- Reject and Specify
- Pending
Manage Name
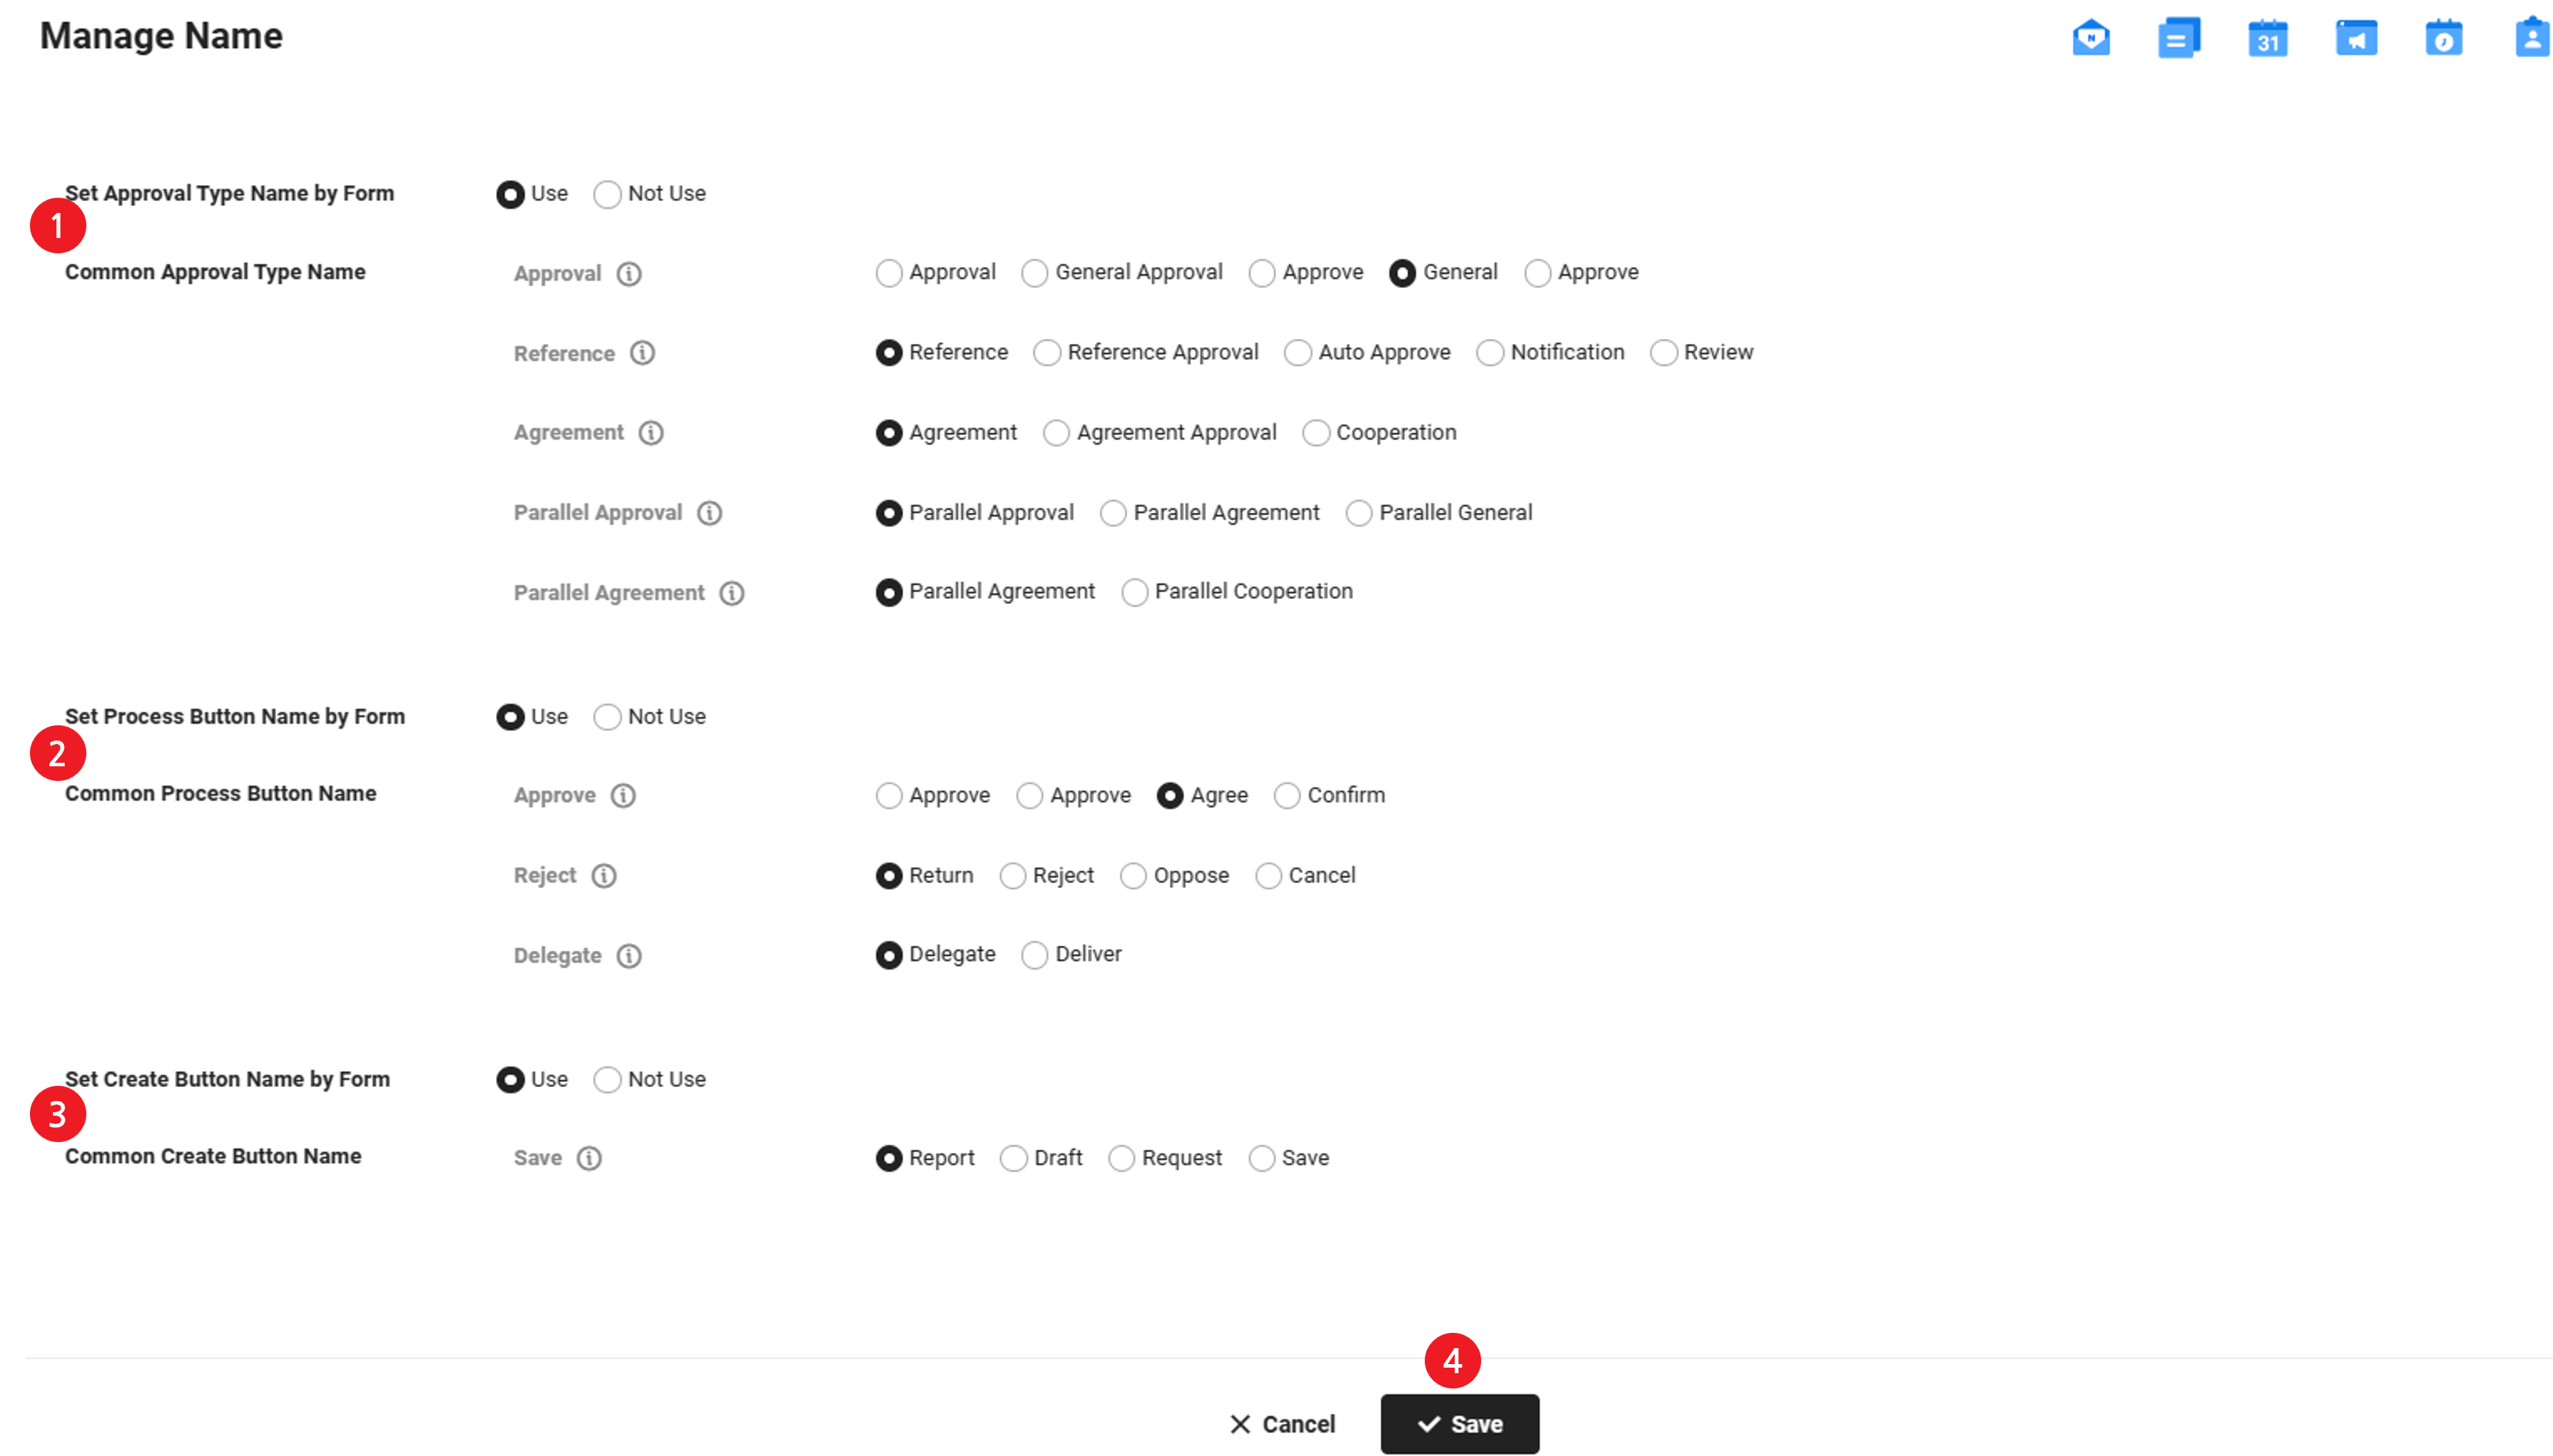
You can change each name displayed on various pages related to approval. For example, if the name of Consent is changed to General Approval, approval cases processed as consent in the document list of the Approval Home > Approval Document menu or other related menus are displayed as General Approval.
The Manage Name page is laid out as follows.
| Area | Description |
|---|---|
| ① Set Approval Type Name | If you select ‘Use’ for Set Approval Type Name by form, you can set an approval type name by form. If you select ‘Not Use’, the settings are universally applied to all forms
|
| ② Set Process Button Name | If you select ‘Use’ for Set Process Type Name by form, you can set a process type name by form. If you select ‘Not Use’, the settings are universally applied to all forms
|
| ③ Set Create Button Name | If you select ‘Use’ for Set Create Button Name by form, you can set a create button name by form. If you select ‘Not Use’, the settings are universally applied to all forms
|
| ④ Save | Click to save the settings |
Manage Notifications
You can set approval-related notifications to be delivered to users. Users can receive service notifications and emails. Also, they can integrate with external solutions such as KakaoTalk, LINE, Slack, and Google Chat to receive notification messages.
The Manage Notifications page is laid out as follows.
| Area | Description |
|---|---|
| ① Notification channels | Set notifications for each channel
|
| ② Set Notifications | Sets to send or not send notifications in each situation
|
| ③ OK | It saves the settings |
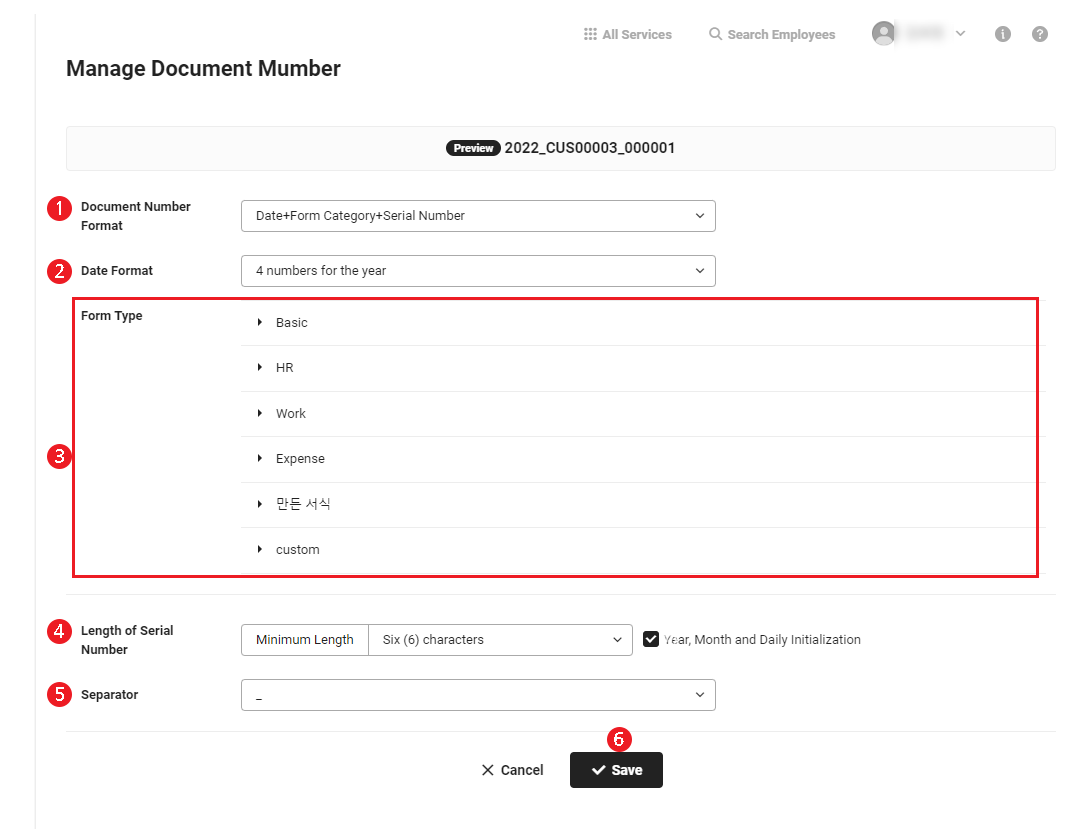
Managing Document Number
You can set document numbering rules of each form. If you change the rule, the changed rule will apply to documents created after the change takes place.
The Manage Document Number page is laid out as follows.
| Area | Description |
|---|---|
| ① Document Number Format | Select the format of assigned document numbers. |
| ② Composition of Year, Month, and Date | Select the display format of year, month, and date. |
| ③ Form Type Name | Enters the form type name of each form. |
| ④ Serial Number Length | Select the minimum length of the document number. If Initialize by Date is selected, it is displayed after initializing by date. reset by year, month, and day. |
| ⑤ Separator | Select the separator to be used. |
| ⑥ Save | Save the edited content |
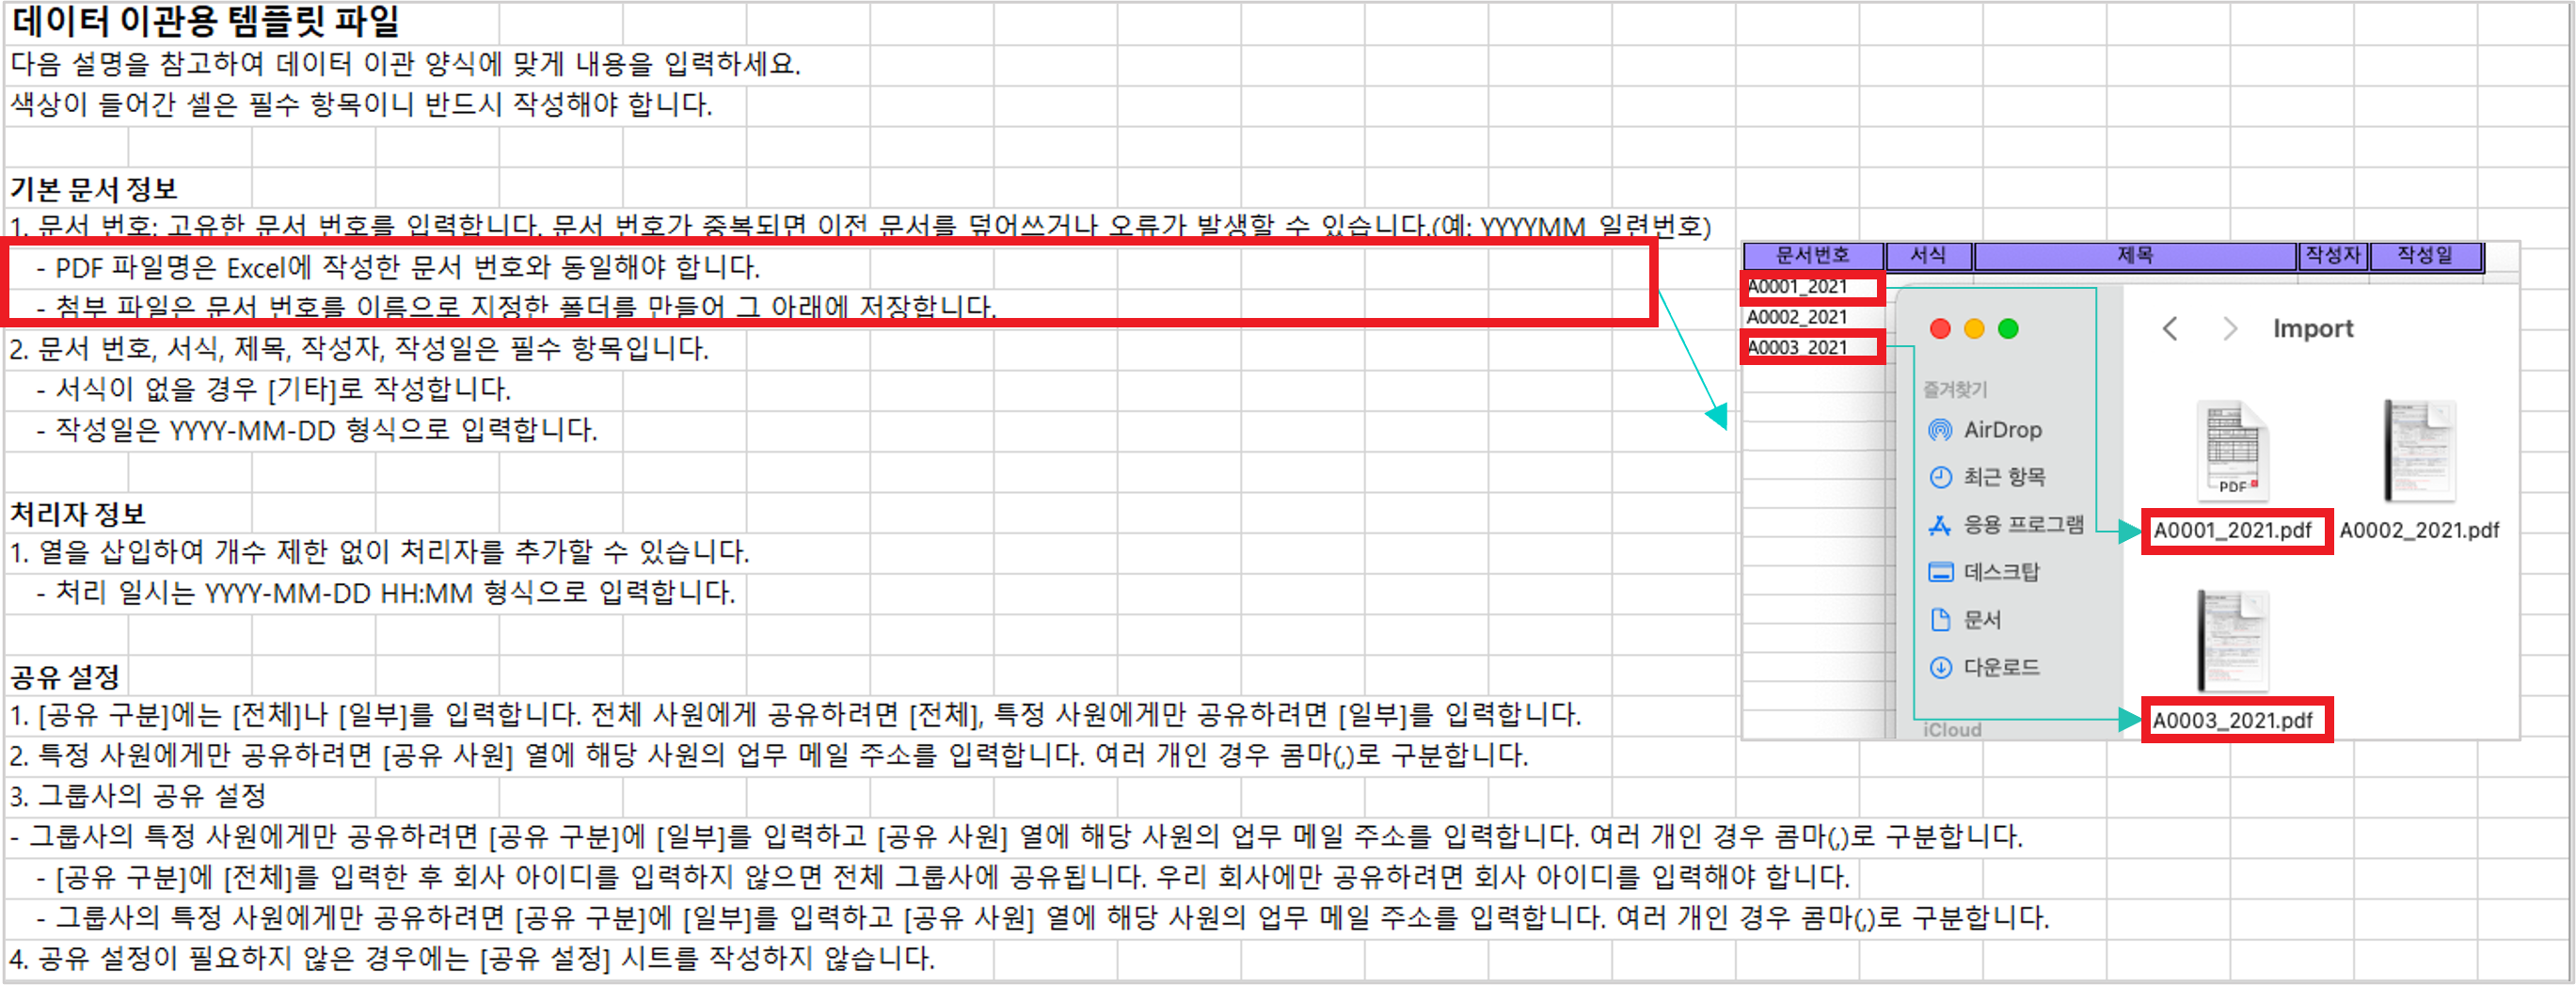
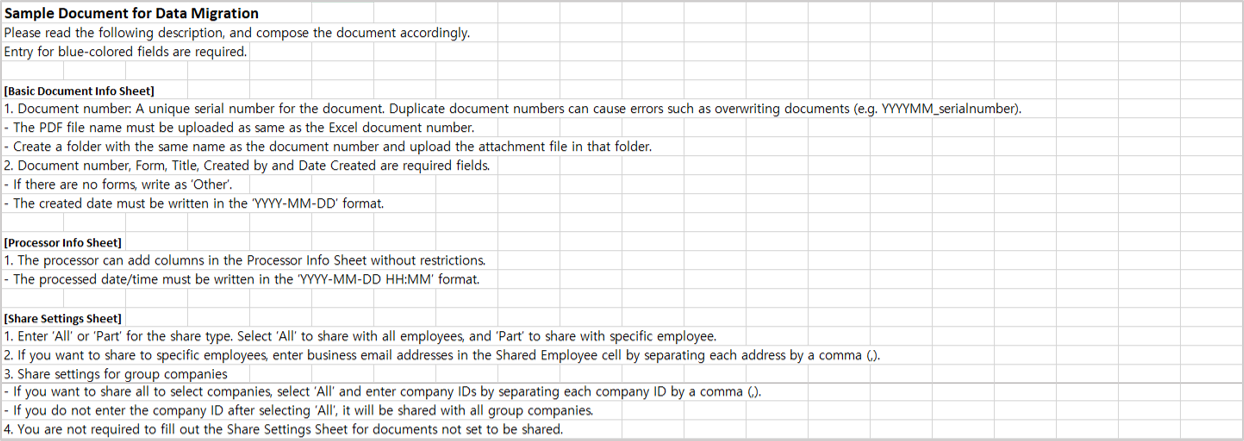
Import Data
You can import external documents using the template. Admins can check and manage imported documents in ‘Manage Approval > Document Box > Manage Imported Documents’ and users can check imported documents in ‘Approval Home > Imported Documents’. You can set sharing targets and exchange shared comments in the same manner with other documents created in Approval service.
The following describes how to import external data.
-
- Prepare the external document to be imported in PDF format.
- Click the ‘Service Menu’ at the top right of the PC web screen, and then click ‘Manage Approval’ in the pop-up window.
- Click
 at the top left of the screen.
 - Click ‘Settings > Import Data’ from the menu.
- Click ‘Download Template File’.
- Enter details into the Basic Document Information, Approver Information, and Sharing Range sheets according to the guide in the downloaded template, and save the file.
- Click ‘Upload File’ in the Import Data page and upload the saved file.
- The upload result will be shown.
- If there is an input error, it is marked in red, and an error message is displayed at the bottom. In this case, upload the Excel file again after correcting the error.
- Create a folder on the local PC for each Document Number displayed as the upload result, and put the external document into the folder.
- For a document with attachments, create a subfolder named Document Number again inside the folder containing the document, and then put the PDF file and attachments into the subfolder.
- Compress the folder of each document number into a ZIP file.
- Click ‘Upload PDF/Attachment’ in the Import Data page and upload the ZIP file.
- Click ‘Save’, and then click ‘OK’ in the confirmation pop-up window.
- Registration is completed, and the uploaded document is displayed in the list.
- Click ‘View’ to check the uploaded PDF document. Click ‘Download’ to download the list of uploaded documents as an Excel file.
Manage Integration Code
You can register and edit integration code that can be integrated and used in a component. The registered integration code can be used as an optional item in a checkbox in the form or can be used by integrating with the corporate information system (Lagecy) currently used by the client.
The Manage Integration Code page is laid out as follows.
| Area | Description |
|---|---|
| ① Add Code | Add a component code (item) to be integrated (See Add Integration Code) |
| ② Integration Items | Registered integration component code (item); Click |
| ③ Code Name | Enter the item name of the component |
| ④ Code Key | Enter the key to identify the code. |
| ⑤ Add | Register detailed items in the code (See Add Integration Code) |
| ⑥ Upload | Upload detailed code items and item ID at once (See Upload Integration Code) |
| ⑦ Download | Download detailed code items and item ID of the code (See Download Integration Code) |
| ⑧ Detailed list | Detailed item of the integration component code You can change the detailed code exposure order or change the detailed code usage status (See Change Detailed Code Usage Status) |
| ⑨ Save | Save the registered and modified information. |
Add Integration Code
The following describes how to add a component code (item) to be integrated.
- Click the ‘Service Menu’ at the top right of the PC web screen, and then click ‘Manage Approval’ in the pop-up window.
- Click at the top left of the screen.
- Click ‘Settings > Manage Integration Code’ from the menu.
- Click ‘Add Code’.
- Enter Code Name and Code Key.
- Click ‘Add’, enter information into the input field added to the list, and then click ‘Save’.
Modify Integration Code
The following describes how to modify the registered integration codes.
- Click the ‘Service Menu’ at the top right of the PC web screen, and then click ‘Manage Approval’ in the pop-up window.
- Click at the top left of the screen.
- Click ‘Settings > Manage Integration Code’ from the menu.
- Click
 of integration code to change in the integration code list
 - Change the code name and usage status.
- You can change the detailed code usage status for each integration code. (See Change Detailed Code Usage Status)
- Click ‘Save’.
- You can't modify the code key.
- If you change the usage status to ‘Not Use’, when you apply integration code to a component of a form, the integration code is not displayed. (See Apply Integration Code) If you change the usage status of detailed code to Not Use, when a user creates a form, the detailed code is not displayed.
- If you change an integration code detailed item included in the document to ‘Not Use’, the approver cannot edit the document in progress. (See Approve Documents > Consent After Document Modification)
Change Detailed Code Usage Status
The following describes how to change the usage status of the detailed code of an integration code.
- Click the ‘Service Menu’ at the top right of the PC web screen, and then click ‘Manage Approval’ in the pop-up window.
- Click at the top left of the screen.
- Click ‘Settings > Manage Integration Code’ from the menu.
- Select an integration code from the integration code list.
- Place the cursor over the detailed code to change and click
 to select the usage status.
 - Click ‘Save’.
Upload Integration Code
The following describes how to upload an integration code.
- Click the ‘Service Menu’ at the top right of the PC web screen, and then click ‘Manage Approval’ in the pop-up window.
- Click at the top left of the screen.
- Click ‘Settings > Manage Integration Code’ from the menu.
- Select the integration code to be uploaded in the integration code item.
- Click ‘Upload’.
- Click ‘Download Sample File’ in the Upload pop-up window to download the sample file.
- The sample file is downloaded as an Excel file.
- See the sample file to create and save the integration code.
- Click ‘Attach File’ in the Upload pop-up window, select the integration code file, and then click ‘Save’.
- Check the details in the notification pop-up window, and then click ‘OK’.
- Check the details in the confirmation pop-up window, and then click ‘OK’.
- If the upload fails, resolve the cause of the error and upload again.
- Once the upload is completed successfully, you can check the detailed code item and item ID information from the integration code item.
Import Integration Code Using API
You can import codes using the provided open API. Proceed by using the API guide.
- Add Code API
- Add Detailed Code Item API
Download Integration Code
The following describes how to download integration codes.
- Click the ‘Service Menu’ at the top right of the PC web screen, and then click ‘Manage Approval’ in the pop-up window.
- Click at the top left of the screen.
- Click ‘Settings > Manage Integration Code’ from the menu.
- Select the integration code to be downloaded in the integration code item.
- Click ‘Download’.
- The list of integration codes is downloaded as an Excel file.
interlockcode.xlsx in the Downloads folder.