This feature is available after applying for the Reservation option.
You can register shared resources of the company, and manage the information. You can also search and view resources by condition and download the list of resources as an Excel file.
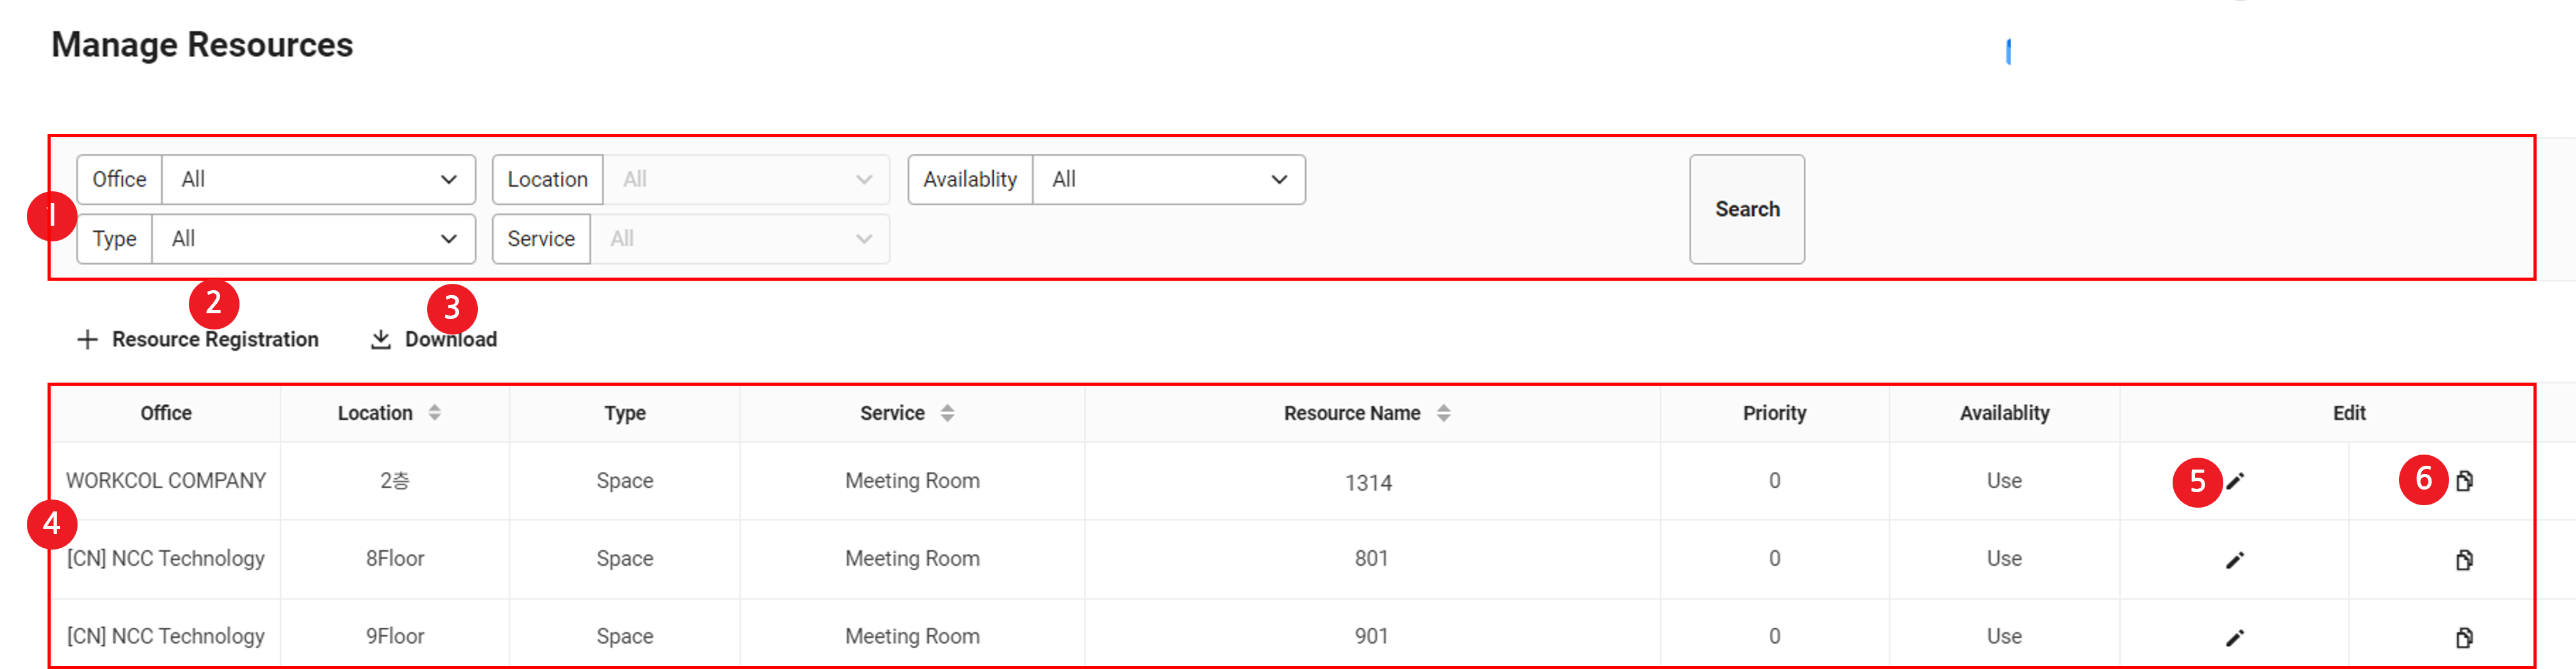
Manage Resource
The Manage Resource menu is laid out as follows.
| Area | Description |
|---|---|
| ① Search Window | Search based on office, location, usage status, resource type, and service |
| ② Register Resource | Add a new resource |
| ③ Download | Download the list of resources as an Excel file |
| ④ Resource list | It displays the information of registered resources |
| ⑤ Edit | Click to view and edit the resource information |
| ⑥ Copy | Add resource information by copying |
Add Resource
The following describes how to add a resource.

- Click ‘Admin Menu’ at the top right of the PC web screen, and then click ‘Manage Reservation’ in the pop-up window.
- Click
 at the top left of the screen.
 - Click ‘Manage Resource’ from the menu.
- Click 'Register Resource'.
- Enter basic information of the resource.
- Select an office. For registration of offices, see Manage Office.
- If necessary, select the resource location in the office. For registration of locations, see Manage Location.
- Select the resource type.
- Space, Work device, and Vehicle are provided as resource types.
- Select the detailed service for the selected resource type.
- Enter the resource name.
- Enter the priority for the resource list to be displayed.
- Enter the description for the resource. It is a description text displayed when the user places the cursor over the resource name.
- Enter the reservation notes. This is the text that appears in the Notes area when a user reserves a resource. You can provide a form or example of a note to be entered by the user.
- Select the usage status of the resource.
- Even if you set a resource to Use, only users authorized to use the resource can reserve it.
- Enter the reservation information of the resource.
- If multi-reservation is set to ‘Use’, you can apply long-term reservations across multiple dates or recurring reservations by day of the week.
- If the resource type is Vehicle, the usage of multi-reservation is displayed as disabled.
- In Maximum Reservation Days, enter the available reservation period for the resource. (E.g., If you enter 7 days, you can reserve from today up to a date 7 days later.)
- Enter the opening hour for the resource. Users can reserve it from that time every day.
- Select whether to use reservation limits.
- It refers to the number of times a user can reserve a single resource, which can be set in days, weeks, or months when Use Reservation Limits is selected as Use.
- If you're using multi-reservations, you can't enable reservation limits.
- Enter the reservation base time.
- It is the unit of time for reserving resources. If the reservation base time is set to 20 minutes, you can reserve in increments of 20 minutes, such as 20, 40, or 60 minutes. However, you can't reserve for less than the minimum reservation time.
- Set the minimum and maximum resource reservation times.
- The minimum and maximum reservation times for the resource refers to the minimum or maximum reservation time that can be used in a single request for the resource.
- If you want to restrict reservations for a specific period during available hours for reasons such as meeting room or device repairs, you can set Resource Usage Limits to Use.
- If you're restricting resource usage, click ‘Add’ and select the restriction start and end dates.
- Enter the instruction text if needed.
- If multi-reservation is set to ‘Use’, you can apply long-term reservations across multiple dates or recurring reservations by day of the week.
- Enter the information according to the selected resource type.
- Enter the capacity when registering a meeting room.
- Register the main image when registering a work device.
- This area is not displayed for vehicles.
- Grant usage, management, reservation operation, reservation email notification permissions.
- Resource usage permissions: permissions that can use resources
- Resource management permissions: permissions that can manage resources, locations, and offices
- Reservation operation permissions: permissions to view the reservation status of resources, and to reserve/edit on behalf of an employee in the admin mode
- Reservation email notifications: person in charge of receiving email notifications when resources are reserved
- Permissions can be granted by employees, departments, and permission groups.
- When granting permissions to a group, click ‘Manage Group’ to grant permissions by selecting a displayed group or by creating a new group. Added permission groups can also be used in other services.
If the employee you want to grant resource or reservation operation permissions is not a Reservation admin, assign Resource Reservation Manager authority in 'Admin > Security > Admin Authority'. When using as a corporate group, usage permissions for registered resources can be granted within the corporate group.
- If necessary, enter other information.
- You can create notes for the purpose of resource management.
- Admin notes are not displayed to users.
- Click ‘Save’.
- If you want to cancel adding a resource, click ‘Cancel’.
View/Edit Resource Information
If you click ‘Edit’ of the resource you want to view in the resource list, the resource details are displayed on the details page. From this page, you can view, edit, or reset the resource information.
- Apply the content to be edited in the searched page. See ‘Add Resource’.
- When searching, the number of reservations per resource service are displayed.
- Office, location, type, and service can't be edited.
- Click ‘Save’.
- The edited information is saved.
- Click ‘Reset’ to reset the edited content.
- The ‘Delete’ is displayed for resources whose usage status is set to Not use or resources with no reservation history. You can click the button to delete unnecessary resources.
Add Resource by Copying
You can quickly register a resource by copying the registered resource information.
- From the resource list, click ‘Copy’ of the resource you want to copy.
- You're directed to the Add Resource page, which reflects the same information as the copied resource.
- Edit the information or enter the rest of the information by referring to Add Resource.
- Click ‘Save’.
- The resource is registered.
Download Resource List
The following describes how to download the resource list as an Excel file.
- Click ‘Admin Menu’ at the top right of the PC web screen, and then click ‘Manage Reservation’ in the pop-up window.
- Click at the top left of the screen.
- Click ‘Manage Resource’ from the menu.
- If necessary, enter the resource conditions to be searched in the search window, and then click ‘Search’.
- You can view the resources corresponding to the entered conditions.
- Click 'Download'.
- The resource list is downloaded as an Excel file.
The downloaded file is saved as
resource_YYYYMMDD_HHMMSS.xlsx in the Downloads folder.