You can calculate the payment amount for income earners of income other than wage income and retirement income, download the electronic media file from National Tax Service Hometax, and report it.
You can manage withholding taxes for individuals and corporates, and apply the withholding tax rate.
However, since the tax rate differs for income and dividends paid overseas, depending on the conditions, you must check the information and select the tax rate.
The flow of non-wage income management work is as follows.
For management of business, other, dividend, and non-resident incomes, common (entry, search, print) features are provided respectively.
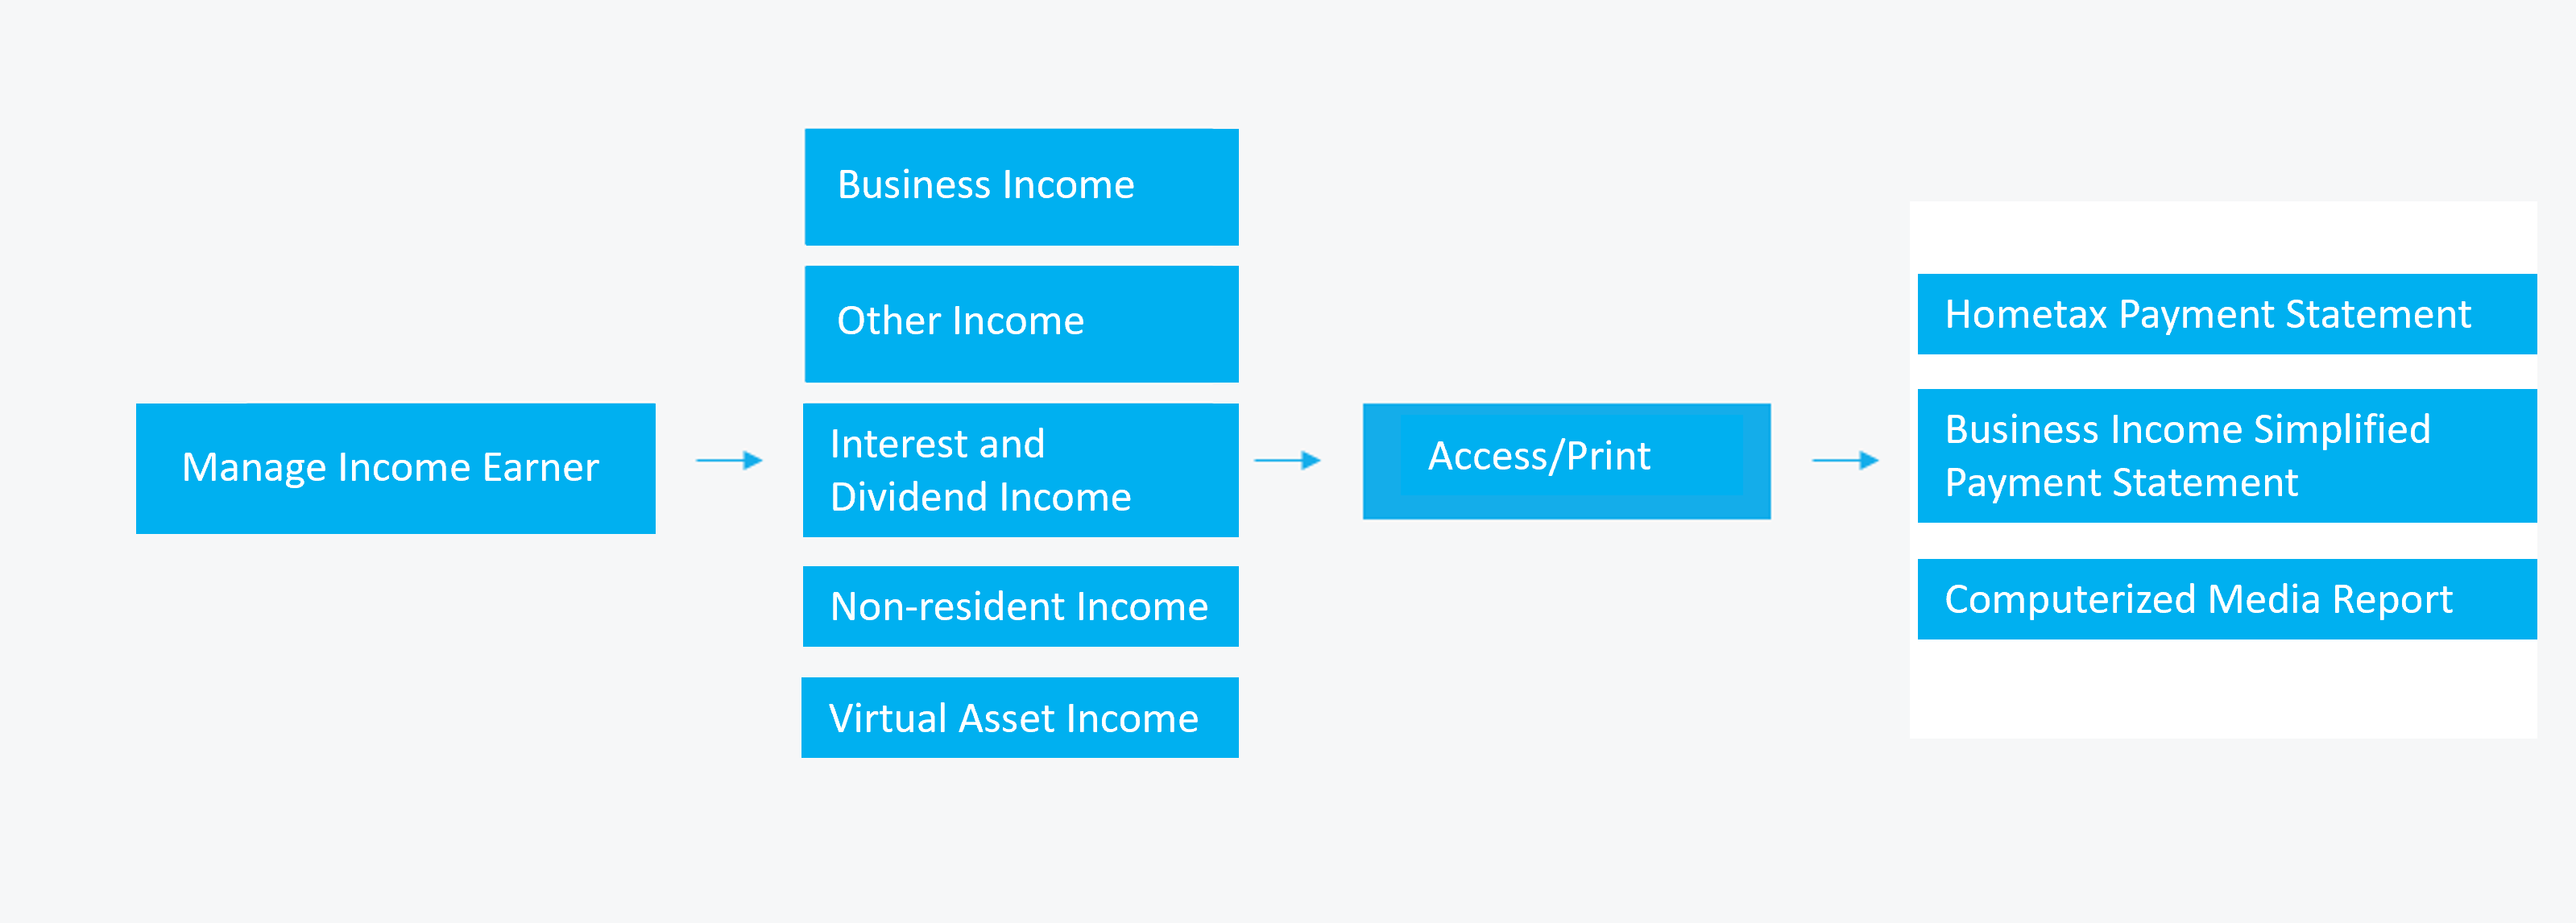
Manage Income Earner
You can register and manage the income earner information for non-wage income.
Freelancers who are not members but provide labor related to the company can be registered in ‘Manage Income Earner’ to be reflected in business income, resulting in a 3.3% business income tax.
The following describes how to register and manage income earners of non-wage income.
- Click the ‘Admin Menu’ on the PC web screen, and then click ‘Payroll’ in the pop-up window.
- Click
 at the top left of the screen
 - Click ‘Non-wage Income > Manage Income Earner’ from the menu.
- If necessary, enter the search conditions in the search window, and then click ‘Search’.
- You can search income earners according to the search conditions, such as the management number, name, income earner type, residency type, Korean/foreigner status, and status.
- Click 'Add'.
- Enter the information in the Add Income Earner pop-up window, and then click ‘Save’.
- Income Earner Management Number: Enter the number to manage the income earner with. You can only enter uppercase English letters and numbers.
- Name-Korean: Enter the Korean name of the income earner.
- Resident Registration Number: Enter the resident registration number of the income earner.
- Manage Business Place: Select the business place that the income earner belongs to.
- Passport Number: Enter the passport number of the income earner.
- Korean/Foreigner: Select between Korean and Foreigner. The displayed list of Income Earner Type changes according to the Korean/Foreigner status selection.
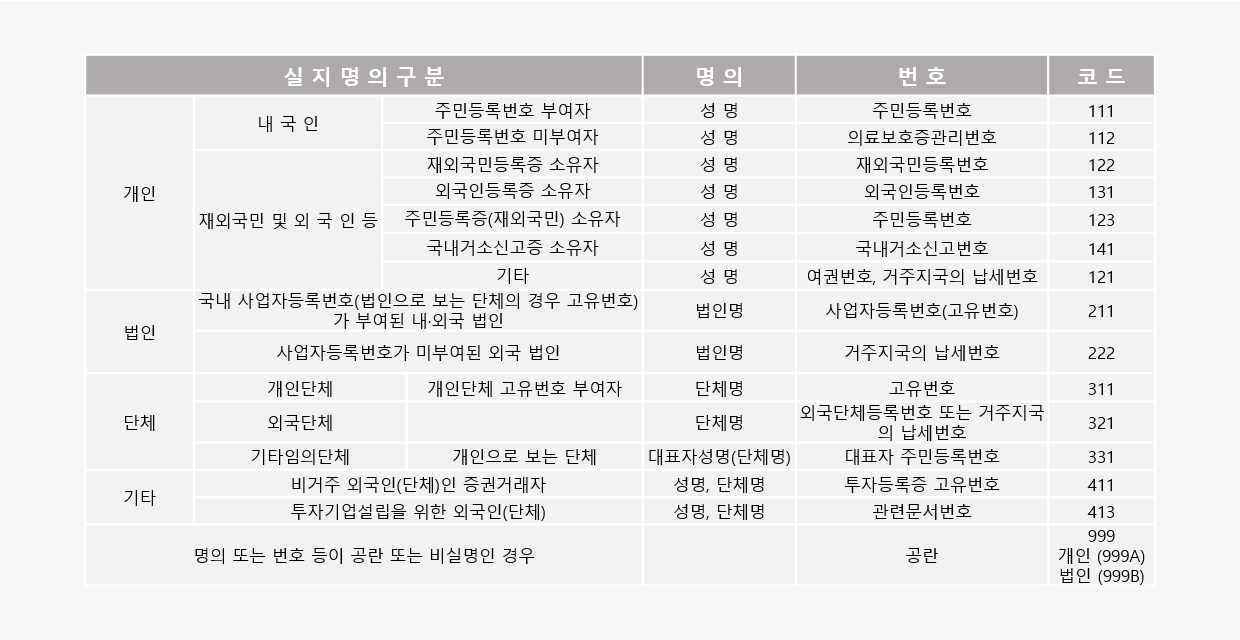
- Income Earner Type: Select this item by referring to the type code table for income earners below.
- According to the selected income earner type, it is displayed in the list of Income Earner upon adding the income amount.
- The required fields can be changed or added according to the income earner type code.
- Income Earner Type Code Table
- Residency Type: Select whether the income earner is a resident or non-resident. If you select Non-resident, then you can select the Country of Residence.
- Country of Residence: Enter this item if you selected Non-resident for the Residency Type. The country is automatically entered as South Korea and can't be edited in the case of Resident.
- Address: Enter the address of the country of residence.
- Email: Enter the email address of the income earner.
- Bank Code, Account Number, Account Holder Name: Select the bank code of the income earner, and enter the account number and account holder name.
- Status: Select between Active and Inactive. If the withholding duties have been terminated, then select Inactive.
- If you select Inactive, then the income earner is not searched when entering the income amount. However, the data already entered is searched and shown in the list, and you can report the payment statement.
When changing the residency type or Korean/foreigner status, you must add the income earner management number, and then newly register the information for the income earner. - Check that the income earner of non-wage income has been added to the list.
- To edit, click
 of the item.
 - Click ‘Download’ to download. The downloaded file is saved as
ManageIncomeEarner_IncomeEarner_yyyymmdd_hhmmss.xlsxin theDownloadsfolder. - To delete, click
 of the item.
- To edit, click
Upload Non-wage Income
The following describes how to batch upload income earners of non-wage income.
- Click the ‘Admin Menu’ on the PC web screen, and then click ‘Payroll’ in the pop-up window.
- Click at the top left of the screen
- Click ‘Non-wage Income > Manage Income Earner’ from the menu.
- Click ‘Upload’.
- In the Upload Income Earner page, click ‘Income Earner Upload Form’ to download the template file.
- The sample file is downloaded as an Excel file.
- Create and save the income earner of non-wage income by referring to the template file.
- In the Upload Income Earner page, drag the income earner of non-wage income file into the ‘Drag the file with the mouse.’ area, click ‘Attach File’ to select the income earner of non-wage income file, and then click ‘Open’.
- In the preview list of upload files, check the income earner of non-wage income to be uploaded, and then click ‘Enter’.
- If the upload fails, then you can check the reason in the Upload Error Details area. Resolve the cause of the error and upload again.
Manage Business Income
You can manage the business income of residents.
Manage the business income of non-residents in the ‘Payroll > Non-wage Income > Manage Non-resident Income’ menu.
Enter Business Income
The following describes how to enter the business income.
To enter the business income, you must set the open year in the ‘Payroll > Non-wage Income > Manage Open Year’ menu.
- Click the ‘Admin Menu’ on the PC web screen, and then click ‘Payroll’ in the pop-up window.
- Click at the top left of the screen
- Click ‘Non-wage Income > Manage Business Income’ from the menu.
- Click ‘Enter business income’.
- The business income of the current imputed month is searched for all business places.
- If necessary, enter the search conditions in the search window, and then click ‘Search’.
- You can search the business income that meets the search conditions.
- Click 'Add'.
- Enter the information in the Add Business Income pop-up window, check the tax by clicking ‘Calculate Tax Amount’, and then click ‘Save’.
- Enter the information from Imputed Year to Total Payment Amount, and then click ‘Calculate Tax Amount’. Income tax and local income tax are calculated automatically according to the entered total payment amount and business category type code.
- Imputed Year: The year selected in the ‘Manage Open Year’ menu is set automatically.
- Business Place: Select the business place of the withholding agent. It can be the same as the managing business place, but this may differ for double income earners.
- Income Earner: Select the income earner to be added to the business income. The list of income earners is displayed according to the Income Earner Type set in the ‘Manage Income Earner’ menu.
- Imputed Month: Select the imputed month. The imputed month must be the same as the month of the payment date, or before.
- Payment Date: Select the payment date. Enter the actual payment date.
- Business Category Type: Select the business category type code that applies to the income earner. Since the tax rates differ according to Korean/foreigner status and business category type, select the accurate business category type.
- Business Category Type Code Table
Code Business Category Type Code Business Category Type Code Business Category Type Code Business Category Type Code Business Category Type Code Business Category Type 940100 Writers 940200 Artists 940301 Composers 940302 Actors 940303 Models 940304 Singers 940305 Vocalists 940306 One-person media content creators 940500 Entertainment assistants 940600 Consultants/advisors 940901 Baduk players 940902 Flower arrangement teachers 940903 Academy teachers 940904 Professional sportspersons 940905 Service charge recipients 940906 Insurance salespersons 940907 Beverage delivery 940908 Door-to-door sales 940909 Other self-employment 940910 Multilevel marketing sales 940911 Other collection allowances 940912 Caregivers 940913 Designated driving service workers 940914 Caddies 940915 Bathing attendants 940916 Event assistants 940917 Errand service workers 940918 Courier service workers 940919 Goods delivery 940920 Workbook visiting teachers 940921 Private education visiting teachers 940922 Rental product visiting inspectors 940923 Loan solicitors 940924 Credit card solicitors 940925 After school teachers 851101 Hospitals - Tax Rates According to Business Category Type
Business Category Type Applied Tax Rate 940904 Professional sportspersons Tax rate of 20% applied to foreigners 940905 Service charge recipients Tax rate of 5% applied Other business categories other than the two business categories above Tax rate of 3% applied
- Business Category Type Code Table
- Total Payment Amount: Enter the total payment amount.
- Tax Rate: The tax rate is set automatically according to the business category type code.
- Income Tax, Local Income Tax: Income tax and local income tax are calculated automatically when you click ‘Calculate Tax Amount’, according to the entered total payment amount and business category type code. The automatically calculated income tax and local income tax can be edited.
- Remarks: Enter the description of the business income.
- Check that the business income has been added to the list.
- To edit, click of the item.
- Click ‘Download’ to download. The downloaded file is saved as
ManageBusinessIncome_BusinessIncome_yyyymmdd_hhmmss.xlsxin theDownloadsfolder. - To delete, click of the item.
- To edit, click
Upload Business Income
The following describes how to batch upload business incomes.
- Click the ‘Admin Menu’ on the PC web screen, and then click ‘Payroll’ in the pop-up window.
- Click at the top left of the screen
- Click ‘Non-wage Income > Manage Business Income’ from the menu.
- Click ‘Enter business income’.
- Click ‘Upload’.
- In the Upload Business Income page, click ‘Business Income Upload Form’ to download the template file.
- The sample file is downloaded as an Excel file.
- Compose and save the business income by referring to the template file.
- In the Upload Business Income page, drag the business income file into the ‘Drag the file with the mouse.’ area, or click ‘Attach File’ to select the business income file and click ‘Open’.
- From the preview list of upload files, check the business income to be uploaded, and then click ‘Enter’.
- If the upload fails, then you can check the reason in the Upload Error Details area. Resolve the cause of the error and upload again.
View Business Income
The following describes how to search business income.
- Click the ‘Admin Menu’ on the PC web screen, and then click ‘Payroll’ in the pop-up window.
- Click at the top left of the screen
- Click ‘Non-wage Income > Manage Business Income’ from the menu.
- Click the ‘View Business Income’ tab.
- The business income of the current imputed month is searched for all business places.
- If necessary, enter the search conditions in the search window, and then click ‘Search’.
- You can search the business income that meets the search conditions.
- Check the business income in the search list.
- To download the searched business income list, click ‘Download’. The downloaded file is saved as
ManageBusinessIncome_BusinessIncome_yyyymmdd_hhmmss.xlsxin theDownloadsfolder.
- To download the searched business income list, click ‘Download’. The downloaded file is saved as
Print Business Income
The following describes how to print business income.
- Click the ‘Admin Menu’ on the PC web screen, and then click ‘Payroll’ in the pop-up window.
- Click at the top left of the screen
- Click ‘Non-wage Income > Manage Business Income’ from the menu.
- Click ‘Print Business Income’.
- The business income of the current imputed month is searched for all business places.
- If necessary, enter the search conditions in the search window, and then click ‘Search’.
- You can search the business income that meets the search conditions.
- Check to select the business income to be printed in the list viewed, and then click ‘Print’.
- To download the searched business income list, click ‘Download’. The downloaded file is saved as
ManageBusinessIncome_BusinessIncome_yyyymmdd_hhmmss.xlsxin theDownloadsfolder.
- To download the searched business income list, click ‘Download’. The downloaded file is saved as
- Enter the printing information in the Print pop-up window, and then click ‘Print’. You can download the output file in the form of payment statement (withholding tax receipt) in the PDF format.
- Print Date: It displays the date of printing. You can select the Print Date.
- Type: You can select the print type between For Storage by Income Earner and For Storage by Issuer.
- When selecting multiple income earners for printing, multiple income earners are saved as one PDF file.
- When printing the PDF file, it is printed according to the business category type of the withholding agent and income earner.
Manage Other Income
You can manage other income of residents.
Manage other income of non-residents in the ‘Payroll > Non-wage Income > Manage Non-resident Income’ menu.
Enter Other Income
The following describes how to enter the other income.
To enter the other income, you must set the open year in the Payroll > Non-wage Income > Manage Open Year menu.
- Click the ‘Admin Menu’ on the PC web screen, and then click ‘Payroll’ in the pop-up window.
- Click at the top left of the screen
- Click ‘Non-wage Income > Manage Business Income’ from the menu.
- Click the ‘ Enter Other Income’ tab.
- The other income of the current imputed month is searched for all business places.
- If necessary, enter the search conditions in the search window, and then click ‘Search’.
- You can search the other income that meets the search conditions.
- Click 'Add'.
- Enter the information in the Add Other Income pop-up window, check the tax by clicking ‘Calculate Expenses’ and ‘Calculate Tax Amount’, and then click ‘Save’.
- Enter the information from Imputed Year to Total Payment Amount, and then click ‘Calculate Tax Amount’. Income tax and local income tax are calculated automatically according to the entered total payment amount and business category type code.
- Imputed Year: The year selected in the Manage Open Year menu is set automatically.
- Business Place: Select the business place of the withholding agent. It can be the same as the managing business place, but this may differ for double income earners.
- Income Earner: Select the income earner to be added to the other income. The list of income earners is displayed according to the Income Earner Type set in the Manage Income Earner menu.
- Imputed Month: Select the imputed month. The imputed month must be the same as the month of the payment date, or before.
- Payment Date: Select the payment date. Enter the actual payment date.
- Income Type: Select the income type code of the income. Since the expense and tax rates differ according to the income type, select the accurate income type.
- Income Type Code Table:
Income Type Code Income Type Code Income Type Code Other income without necessary expenses (excluding 63) 60 Nontaxable other income 68 Manuscript fees, etc. 75 Profit from exercising stock option having requested the application of payment exception* General profit from exercising stock option: income type code 62 61 Separately taxed other income 69 Lecture fees, etc. 76 Other income with necessary expenses (excluding 61, 64, 68, 69, and 71 to 76) 62 Prizes 71 Income from religious organizations 77 Income from termination of mutual aid fund for small enterprises and small entrepreneurs 63 Mining rights, etc. 72 Reward 78 Transfer income from paintings and antiques 64 Easement, etc. 73 Advisory fees, etc. 79 Compensation for employee invention for retired workers (excess of nontaxable limit) 65 Compensation of move in deferment 74 Income from renting out goods at or less than 5 million KRW. 80 If you select Transfer income from paintings and antiques, then you must also submit the transfer income from paintings and antiques statement. For more information, see ‘Create Transfer Income From Paintings and Antiques Statement’.
- Income Type Code Table:
- Total Payment Amount: Enter the total payment amount.
- Retention Period: Select the retention period. This item is only activated when the Income Type Code 64 - Transfer income from paintings and antiques is selected.
- Calculate Expenses: After entering the total payment amount or selecting the retention period, click ‘Calculate Expenses’ to calculate Necessary Expenses.
- Necessary Expenses: The expense value is calculated automatically.
- Tax Rate: The tax rate is set automatically according to the income type code.
- Income Tax, Local Income Tax: Income tax and local income tax are calculated automatically when you click ‘Calculate Tax Amount’, according to the entered total payment amount and business category type code. The automatically calculated income tax and local income tax can be edited.
- Special Tax for Rural Development: Enter if there is a special tax for rural development.
- Remarks: Enter the description of the other income.
- Check that the other income has been added to the list.
- To edit, click of the item.
- Click ‘Download’ to download.
- To delete, click of the item.
- To edit, click
Create Transfer Income From Paintings and Antiques Statement
If the income type code is 64 - Transfer income from paintings and antiques when entering other income, then the transfer income from paintings and antiques statement must be filled out separately.
The following describes how to fill out the transfer income from paintings and antiques statement.
- Click the ‘Admin Menu’ on the PC web screen, and then click ‘Payroll’ in the pop-up window.
- Click at the top left of the screen
- Click ‘Non-wage Income > Manage Other Income’ from the menu.
- Click the ‘Enter Other Income’ tab.
- The other income of the current imputed month is searched for all business places.
- If necessary, enter the search conditions in the search window, and then click ‘Search’.
- You can search the other income that meets the search conditions.
- From the list viewed, click in the Painting Specifications column of the other income.
- In the Enter Paintings and Antiques pop-up window, click ‘Add’ to fill out the transfer income from paintings and antiques statement, and then click ‘Save’.
- Piece Code: Select the piece code of the code.
- Total Transfer Price: Enter the total transfer price for the piece.
- Payment Amount: Enter the payment amount for the piece.
- Assignee: Enter the personal information (name, resident registration number, type) of the assignee to whom the piece was transferred.
- Artist: Enter the name of the artist for the piece.
- Piece Name: Enter the piece name.
- Size: Enter the size of the piece. You can enter both numbers and letters.
- Production Year: Enter the production year of the piece.
- To download the created statement, click ‘Download’. The downloaded file is saved as
PaintingsandAntiques_yyyymmdd_hhmmss.xlsxin theDownloadsfolder
Upload Other Income
The following describes how to batch upload other incomes.
- Click the ‘Admin Menu’ on the PC web screen, and then click ‘Payroll’ in the pop-up window.
- Click at the top left of the screen
- Click ‘Non-wage Income > Manage Other Income’ from the menu.
- Click the ‘Enter Other Income’ tab.
- Click ‘Upload’.
- In the Upload Other Income page, click ‘Other Income Upload Form’ to download the template file.
- The sample file is downloaded as an Excel file.
- Compose and save the other income by referring to the template file.
- In the Upload Other Income page, drag the other income file into the ‘Drag the file with the mouse.' area, or click ‘Attach File’ to select the other income file, and then click ‘Open’.
- From the preview list of upload files, check the other income to be uploaded, and then click ‘Enter’.
- If the upload fails, then you can check the reason in the Upload Error Details area. Resolve the cause of the error and upload again.
View Other Income
The following describes how to search other income.
- Click the ‘Admin Menu’ on the PC web screen, and then click ‘Payroll’ in the pop-up window.
- Click at the top left of the screen
- Click ‘Non-wage Income > Manage Other Income’ from the menu.
- Click the ‘View Other Income’ tab.
- The other income of the current imputed month is searched for all business places.
- If necessary, enter the search conditions in the search window, and then click ‘Search’.
- You can search the other income that meets the search conditions.
- Check the other income in the search list.
- To download the searched other income list, click ‘Download’. The downloaded file is saved as
ManageOtherIncome_OtherIncome_yyyymmdd_hhmmss.xlsxin theDownloadsfolder. - To download the transfer income from paintings and antiques statement, click in the Painting Specifications column of the other income, and then click ‘Download’ in the View Input Details of Paintings and Antiques pop-up window. The downloaded file is saved as
PaintingsandAntiques_yyyymmdd_hhmmss.xlsxin theDownloadsfolder
- To download the searched other income list, click ‘Download’. The downloaded file is saved as
Print Other Income
The following describes how to print the other income.
- Click the ‘Admin Menu’ on the PC web screen, and then click ‘Payroll’ in the pop-up window.
- Click at the top left of the screen
- Click ‘Non-wage Income > Manage Other Income’ from the menu.
- Click the ‘Print Other Income’ tab.
- The other income of the current imputed month is searched for all business places.
- If necessary, enter the search conditions in the search window, and then click ‘Search’.
- You can search the business income that meets the search conditions.
- Check to select the other income to be printed in the list viewed, and then click ‘Print’.
- To download the searched other income list, click ‘Download’. The downloaded file is saved as
ManageOtherIncome_OtherIncome_yyyymmdd_hhmmss.xlsxin theDownloadsfolder.
- To download the searched other income list, click ‘Download’. The downloaded file is saved as
- Enter the printing information in the Print pop-up window, and then click ‘Print’. You can download the output file in the form of payment statement (withholding tax receipt) in the PDF format.
- Print Date: It displays the date of printing. You can select the Print Date.
- Type: You can select the print type between For Storage by Income Earner and For Storage by Issuer.
- When selecting multiple income earners for printing, multiple income earners are saved as one PDF file.
- When printing the PDF file, it is printed according to the business category type of the withholding agent and income earner.
Manage Interest and Dividend Income
You can manage interest and dividend income of residents and non-residents.
Enter Interest and Dividend Income
The following describes how to enter the interest and dividend income.
To enter the interest and dividend income, you must set the open year in the Payroll > Non-wage Income > Manage Open Year menu.
- Click the ‘Admin Menu’ on the PC web screen, and then click ‘Payroll’ in the pop-up window.
- Click at the top left of the screen
- Click ‘Non-wage Income > Manage Interest and Dividend Income’ from the menu.
- Click the ‘Enter Interest and Dividend Income’ tab.
- The interest and dividend income of the current imputed month is searched for all business places.
- If necessary, enter the search conditions in the search window, and then click ‘Search’.
- You can search the interest and dividend income that meets the search conditions.
- Click 'Add'.
- Enter the information in the Add Interest and Dividend Income pop-up window, check the tax by clicking ‘Calculate Tax Amount’, and then click ‘Save’.
- Enter the information from Imputed Year to Special Taxation, and then click ‘Calculate Tax Amount’. Income tax (corporate tax for corporations) and local income tax are calculated.
- Imputed Year: The year selected in the Manage Open Year menu is set automatically.
- Business Place: Select the business place of the withholding agent. It can be the same as the managing business place, but this may differ for double income earners.
- Income Earner: Select the income earner to be added to the business income. The list of income earners is displayed according to the Income Earner Type set in the Manage Income Earner menu.
- Imputed Month: Select the imputed month. The imputed month must be the same as the month of the payment date, or before.
- Payment Date: Select the payment date. Enter the actual payment date.
- Type: Select the income type between Interest and Dividend.
- Income Type: Select the income type according to the type selected.
- Income Type Table:
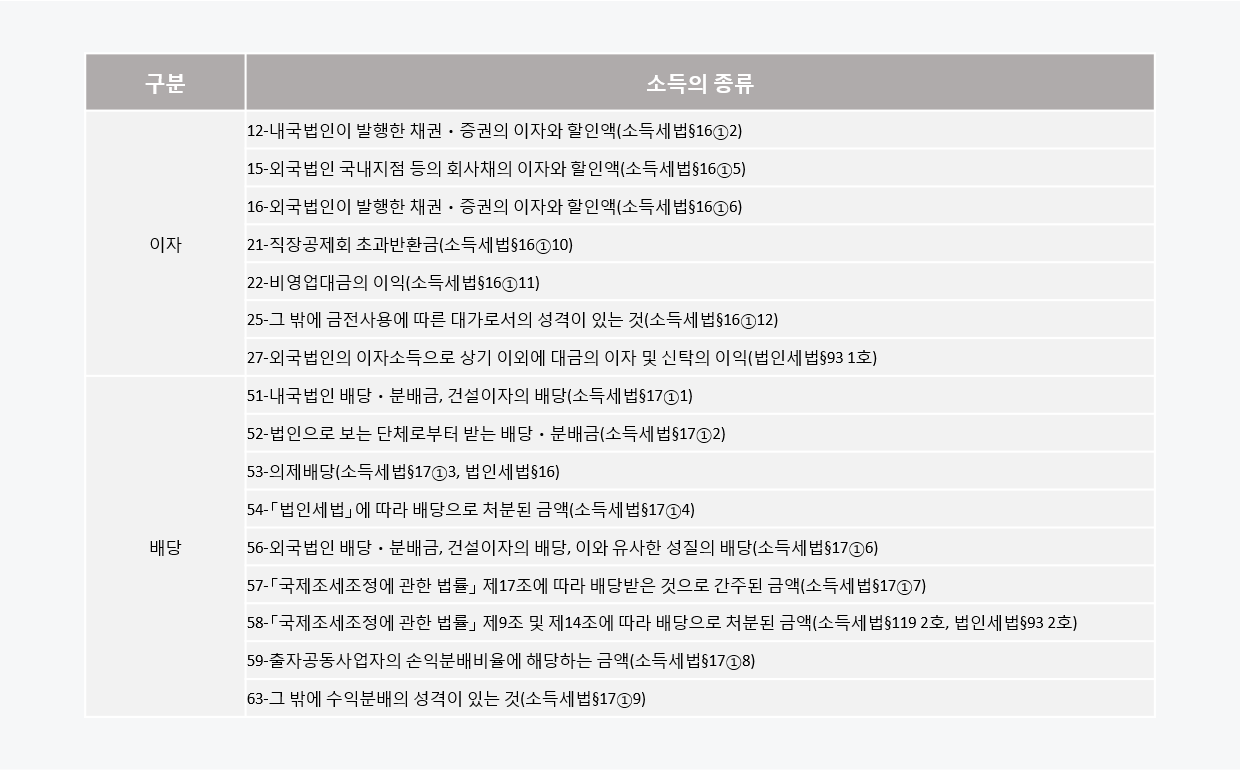
- Income Type Table:
- Payment Period: Select the payment period.
- Interest Rate (%): Enter the interest rate. For investment trusts, enter the dividend income amount per 1,000 shares in the Interest Rate field.
- Payment Amount: Enter the payment amount for the piece.
- Financial Product Code: Select the financial product code.
- Bond Interest Type: Select the bond interest type code.
- Trust Profit Status: Select [Y] if trust profit is applicable or [N] if not applicable.
- Account Number: Enter the account number. Enter this item according to the type of the selected income. Enter this item according to the type of the selected income.
- Securities Code (Business Registration Number): Enter this item according to the type of the selected income.
- Tax Type: Select the tax type code.
- Special Taxation: Select the special taxation code of the interest and dividend income.
- Tax Rate (%): Select the tax rate according to the selected income earner, income type, tax type, and special taxation.
- Income Tax, Corporate Tax, Local Income Tax: After selecting the tax rate, click ‘Calculate Tax Amount’ to calculate the income tax (corporate tax for corporations) and local income tax. The automatically calculated income tax (corporate tax for corporations) and local income tax can be edited.
- Basis of Limited Tax Rate: This item can be entered if necessary.
- Check that the interest and dividend income has been added to the list.
- To edit, click of the item.
- Click ‘Download’ to download. The downloaded file is saved as
ManageInterestandDividendIncome_InterestandDividendIncome_yyyymmdd_hhmmss.xlsxin theDownloadsfolder. - To delete, click of the item.
- To edit, click
View Interest and Dividend Income
The following describes how to search interest and dividend income.
- Click the ‘Admin Menu’ on the PC web screen, and then click ‘Payroll’ in the pop-up window.
- Click at the top left of the screen
- Click ‘Non-wage Income > Manage Interest and Dividend Income’ from the menu.
- Click the ‘View Interest and Dividend Income’ tab.
- The interest and dividend income of the current imputed month is searched for all business places.
- If necessary, enter the search conditions in the search window, and then click ‘Search’.
- You can search the interest and dividend income that meets the search conditions.
- Check the interest and dividend income in the search list.
- To download the searched interest and dividend income list, click ‘Download’. The downloaded file is saved as
ManageInterestandDividendIncome_InterestandDividendIncome_yyyymmdd_hhmmss.xlsxin theDownloadsfolder.
- To download the searched interest and dividend income list, click ‘Download’. The downloaded file is saved as
Print Interest and Dividend Income
The following describes how to print the interest and dividend income.
- Click the ‘Admin Menu’ on the PC web screen, and then click ‘Payroll’ in the pop-up window.
- Click at the top left of the screen
- Click ‘Non-wage Income > Manage Interest and Dividend Income’ from the menu.
- Click the ‘Print Interest and Dividend Income’ tab.
- The interest and dividend income of the current imputed month is searched for all business places.
- If necessary, enter the search conditions in the search window, and then click ‘Search’.
- You can search the business income that meets the search conditions.
- Check to select the interest and dividend income to be printed in the list viewed, and then click ‘Print’.
- To download the searched interest and dividend income list, click ‘Download’. The downloaded file is saved as
ManageInterestandDividendIncome_InterestandDividendIncome_yyyymmdd_hhmmss.xlsxin theDownloadsfolder.
- To download the searched interest and dividend income list, click ‘Download’. The downloaded file is saved as
- Enter the printing information in the Print pop-up window, and then click ‘Print’. You can download the output file in the form of payment statement (withholding tax receipt) in the PDF format.
- Print Date: It displays the date of printing. You can select the Print Date.
- Type: You can select the print type from among For Storage by Income Earner, For Storage by Issuer, and For Report by Issuer.
- When selecting multiple income earners for printing, multiple income earners are saved as one PDF file.
- When printing the PDF file, it is printed according to the business category type of the withholding agent and income earner.
Manage Non-resident Income
You can manage business income and other income of non-residents.
Enter Non-resident Income
The following describes how to enter the non-resident income.
To enter the non-resident income, you must set the open year in the Payroll > Non-wage Income > Manage Open Year menu.
- Click the ‘Admin Menu’ on the PC web screen, and then click ‘Payroll’ in the pop-up window.
- Click at the top left of the screen
- Click ‘Non-wage Income > Non-resident Income’ from the menu.
- Click the ‘Enter Non-resident Income’ tab.
- The non-resident income of the current imputed month is searched for all business places.
- If necessary, enter the search conditions in the search window, and then click ‘Search’.
- You can search the non-resident income that meets the search conditions.
- Click 'Add'.
- Enter the information in the Add Non-resident Income pop-up window, check the tax by clicking ‘Calculate Tax Amount’, and then click ‘Save’.
- Enter the information from Imputed Year to Total Payment Amount, and then click ‘Calculate Tax Amount’. Income tax and local income tax are calculated.
- Imputed Year: The year selected in the ‘Manage Open Year’ menu is set automatically.
- Business Place: Select the business place of the withholding agent. It can be the same as the managing business place, but this may differ for double income earners.
- Income Earner: Select the income earner to be added to the non-resident income. The income earner list only displays those registered as non-resident individual or corporation in Manage Income Earner.
- Imputed Month: Enter the imputed month. The imputed month must be the same as the month of the payment date, or before.
- Payment Date: Select the payment date. Enter the actual payment date.
- Income Type: Select the income type.
Income Type Code 40 - Business income 41 - Rental income from ships, etc. 42 - Personal service income 61 - Royalty income 62 - Other income (virtual assets, etc.) - Total Payment Amount: Enter the income amount.
- Necessary Expenses: You can enter necessary expenses.
- Tax Rate (%): Select the tax rate according to the income type. The income tax and local income tax are calculated according to the selection to include/exclude local income tax. The calculated taxes are reflected by rounding down to the closest whole number.
Type Income tax Local Income tax Total Tax Rate Exclude Local Income Tax 9.09% 0.91% 10.0% Include Local Income Tax 10% 1.00% 11.0% - Income Tax, Corporate Tax, Local Income Tax: After selecting the tax rate, click ‘Calculate Tax Amount’ to calculate the income tax (corporate tax for corporations) and local income tax. The automatically calculated income tax (corporate tax for corporations) and local income tax can be edited.
- Special Tax for Rural Development: You can enter this item if necessary.
- Basis of Tax Reduction and Limited Tax Rate: You can enter this item if necessary.
- Check that the non-resident income has been added to the list.
- To edit, click of the item.
- Click ‘Download’ to download. The downloaded file is saved as
ManageNon-residentIncome_Non-residentIncome_yyyymmdd_hhmmss.xlsxin theDownloadsfolder. - To delete, click of the item.
- To edit, click
View Non-resident Income
The following describes how to search the non-resident income.
- Click the ‘Admin Menu’ on the PC web screen, and then click ‘Payroll’ in the pop-up window.
- Click at the top left of the screen
- Click ‘Non-wage Income > Non-resident Income’ from the menu.
- Click the ‘View Non-resident Income’ tab.
- The non-resident income of the current imputed month is searched for all business places.
- If necessary, enter the search conditions in the search window, and then click ‘Search’.
- You can search the non-resident income that meets the search conditions.
- Check the non-resident income in the search list.
- To download the searched non-resident income list, click ’Download’. The downloaded file is saved as
ManageNon-residentIncome_Non-residentIncome_yyyymmdd_hhmmss.xlsxin theDownloadsfolder.
- To download the searched non-resident income list, click ’Download’. The downloaded file is saved as
Print Non-resident Income
The following describes how to print the non-resident income.
- Click the ‘Admin Menu’ on the PC web screen, and then click ‘Payroll’ in the pop-up window.
- Click at the top left of the screen
- Click ‘Non-wage Income > Non-resident Income’ from the menu.
- Click the ‘Print Non-resident Income’ tab.
- The non-resident income of the current imputed month is searched for all business places.
- If necessary, enter the search conditions in the search window, and then click ‘Search’.
- You can search the business income that meets the search conditions.
- Check to select the non-resident income to be printed in the list viewed, and then click ‘Print’.
- To download the searched non-resident income list, click ’Download’. The downloaded file is saved as
ManageNon-residentIncome_Non-residentIncome_yyyymmdd_hhmmss.xlsxin theDownloadsfolder.
- To download the searched non-resident income list, click ’Download’. The downloaded file is saved as
- Enter the printing information in the Print pop-up window, and then click ‘Print’. You can download the output file in the form of payment statement (withholding tax receipt) in the PDF format.
- Print Date: It displays the date of printing. You can select the Print Date.
- Type: You can select the print type between For Storage by Income Earner and For Storage by Issuer.
- When selecting multiple income earners for printing, multiple income earners are saved as one PDF file.
- When printing the PDF file, it is printed according to the business category type of the withholding agent and income earner.
File for Non-wage Income Taxes
You can search and download payment statements and simplified payment statements, and submit them to the National Tax Service.
Payment Statement
The following describes how to search payment statements for filing taxes.
- Click the ‘Admin Menu’ on the PC web screen, and then click ‘Payroll’ in the pop-up window.
- Click at the top left of the screen
- Click ‘Non-wage Income > File for Non-wage Income Taxes’ from the menu.
- Click the ‘Payment Statement’ tab.
- It is searched and displayed based on non-wage income of the year.
- If necessary, enter the search conditions in the search window, and then click ‘Search’.
- You can search the income earner information for the income that meets the searched year and income type conditions.
- From the list viewed, check the data to report or download as a file to be submitted to the National Tax Service.
- To check the data to be reported in advance, check and select the target in the list, click ‘Preview’, enter the download information in the Preview Business Income Tax Filing pop-up window, and click ‘Download’. You can download and check the report data as an Excel file.
- Submission Date: Select a submission date.
- Submission Target Period: Select from among Annual Aggregate Submission, Irregular Submission From Suspension or Closure, and Irregular Split Submission.
- Managing Business Place of Filing: Select the business place that manages the filing When submitting the payment statement, it is entered with the submitter's information (Record A).
- Submitter Type: Select between Corporate and Individual.
- Manager Name, Manager Department, Manager Phone Number: Enter the information for the manager.
- To download the statement that can be submitted to National Tax Service Hometax, check and select the target to be filed in the list viewed, and then click ‘Download Plain Text’.
- The saved file can't be previewed.
- The downloaded file can be submitted in the Converted Submission Method menu of the Hometax payment statement.
- To check the data to be reported in advance, check and select the target in the list, click ‘Preview’, enter the download information in the Preview Business Income Tax Filing pop-up window, and click ‘Download’. You can download and check the report data as an Excel file.
Simplified Payment Statement
The following describes how to create monthly simplified payment statements for business income earners.
- Click the ‘Admin Menu’ on the PC web screen, and then click ‘Payroll’ in the pop-up window.
- Click at the top left of the screen
- Click ‘Non-wage Income > File for Non-wage Income Taxes’ from the menu.
- Click the ‘Simplified Payment Statement’ tab.
- Enter the statement creation information.
- Type: This item is automatically set as the business income.
- Imputed Year, Imputed Month: Select the imputed year and imputed month.
- Print Date: Select the print date. The print date refers to the submission date (the date at the bottom for the PDF file).
- Type: Select the purpose of the statement between For Storage and For Submission.
- Extraction Criteria: Select the extraction criteria for filing with National Tax Service electronic media between the Imputed Date and Payment Date.
- Download the statement file and submit it to National Tax Service Hometax
- Click ‘View PDF’ to save the PDF file in the National Tax Service format.
- Click ‘Download Electronic Media Excel File’ to download the content for electronic media as an Excel file.
- Click ‘Download Electronic Media Plain Text’ to download the electronic media file. The saved file can't be previewed.
- The downloaded file can be submitted in the ‘Converted Submission Method’ menu of the Hometax payment statement.
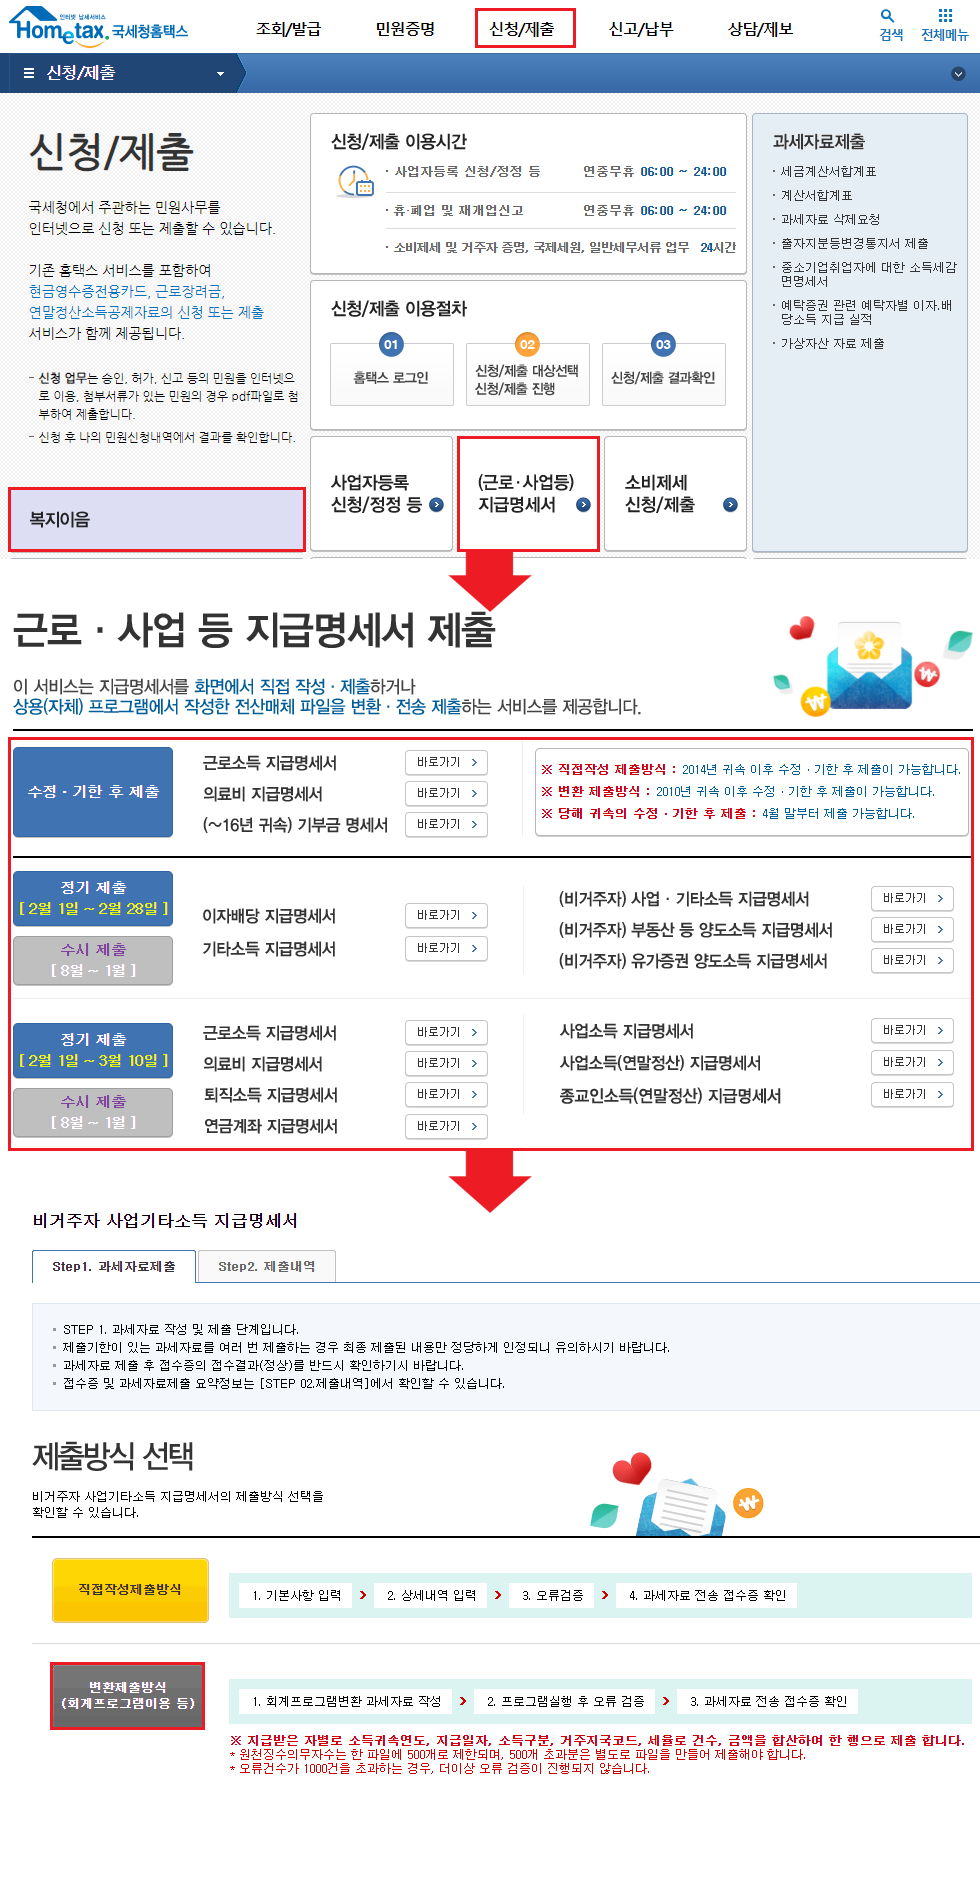
The entered income data must be submitted as a (simplified) payment statement on Hometax (https://www.hometax.go.kr).
- Access Hometax, and log in with the ID and password or with a public certificate.
- Click the Request/Submit menu. Go to the detailed request/submission page.
- Click ‘(Wage, Business, etc.)Payment Statement’ or ‘Welfare Ieum’ to select the payment statement to be submitted.
- Select the direct creation submission method or converted submission method in the Select Payment Statement Submission Method page, and submit the payment statement.
- You can select the Converted submission method, and upload and submit the file downloaded with Download Plain Text from the ‘File for Non-wage Income’ menu.
- You can select the Converted submission method, and upload and submit the file downloaded with Download Plain Text from the ‘File for Non-wage Income’ menu.
Manage Open Year
You can manage the open year and imputed year for non-wage income.
You can only enter the non-wage income statement after setting the open year.
The following describes how to manage the open year.
- Click the ‘Admin Menu’ on the PC web screen, and then click ‘Payroll’ in the pop-up window.
- Click at the top left of the screen.
- Click ‘Non-wage Income > Manage Open Year’ from the menu.
- Select the open year of the income for which you want to enter the statement, and then click ‘Save’.
- The open year set is automatically set in the Imputed Year item when entering non-wage income statements.