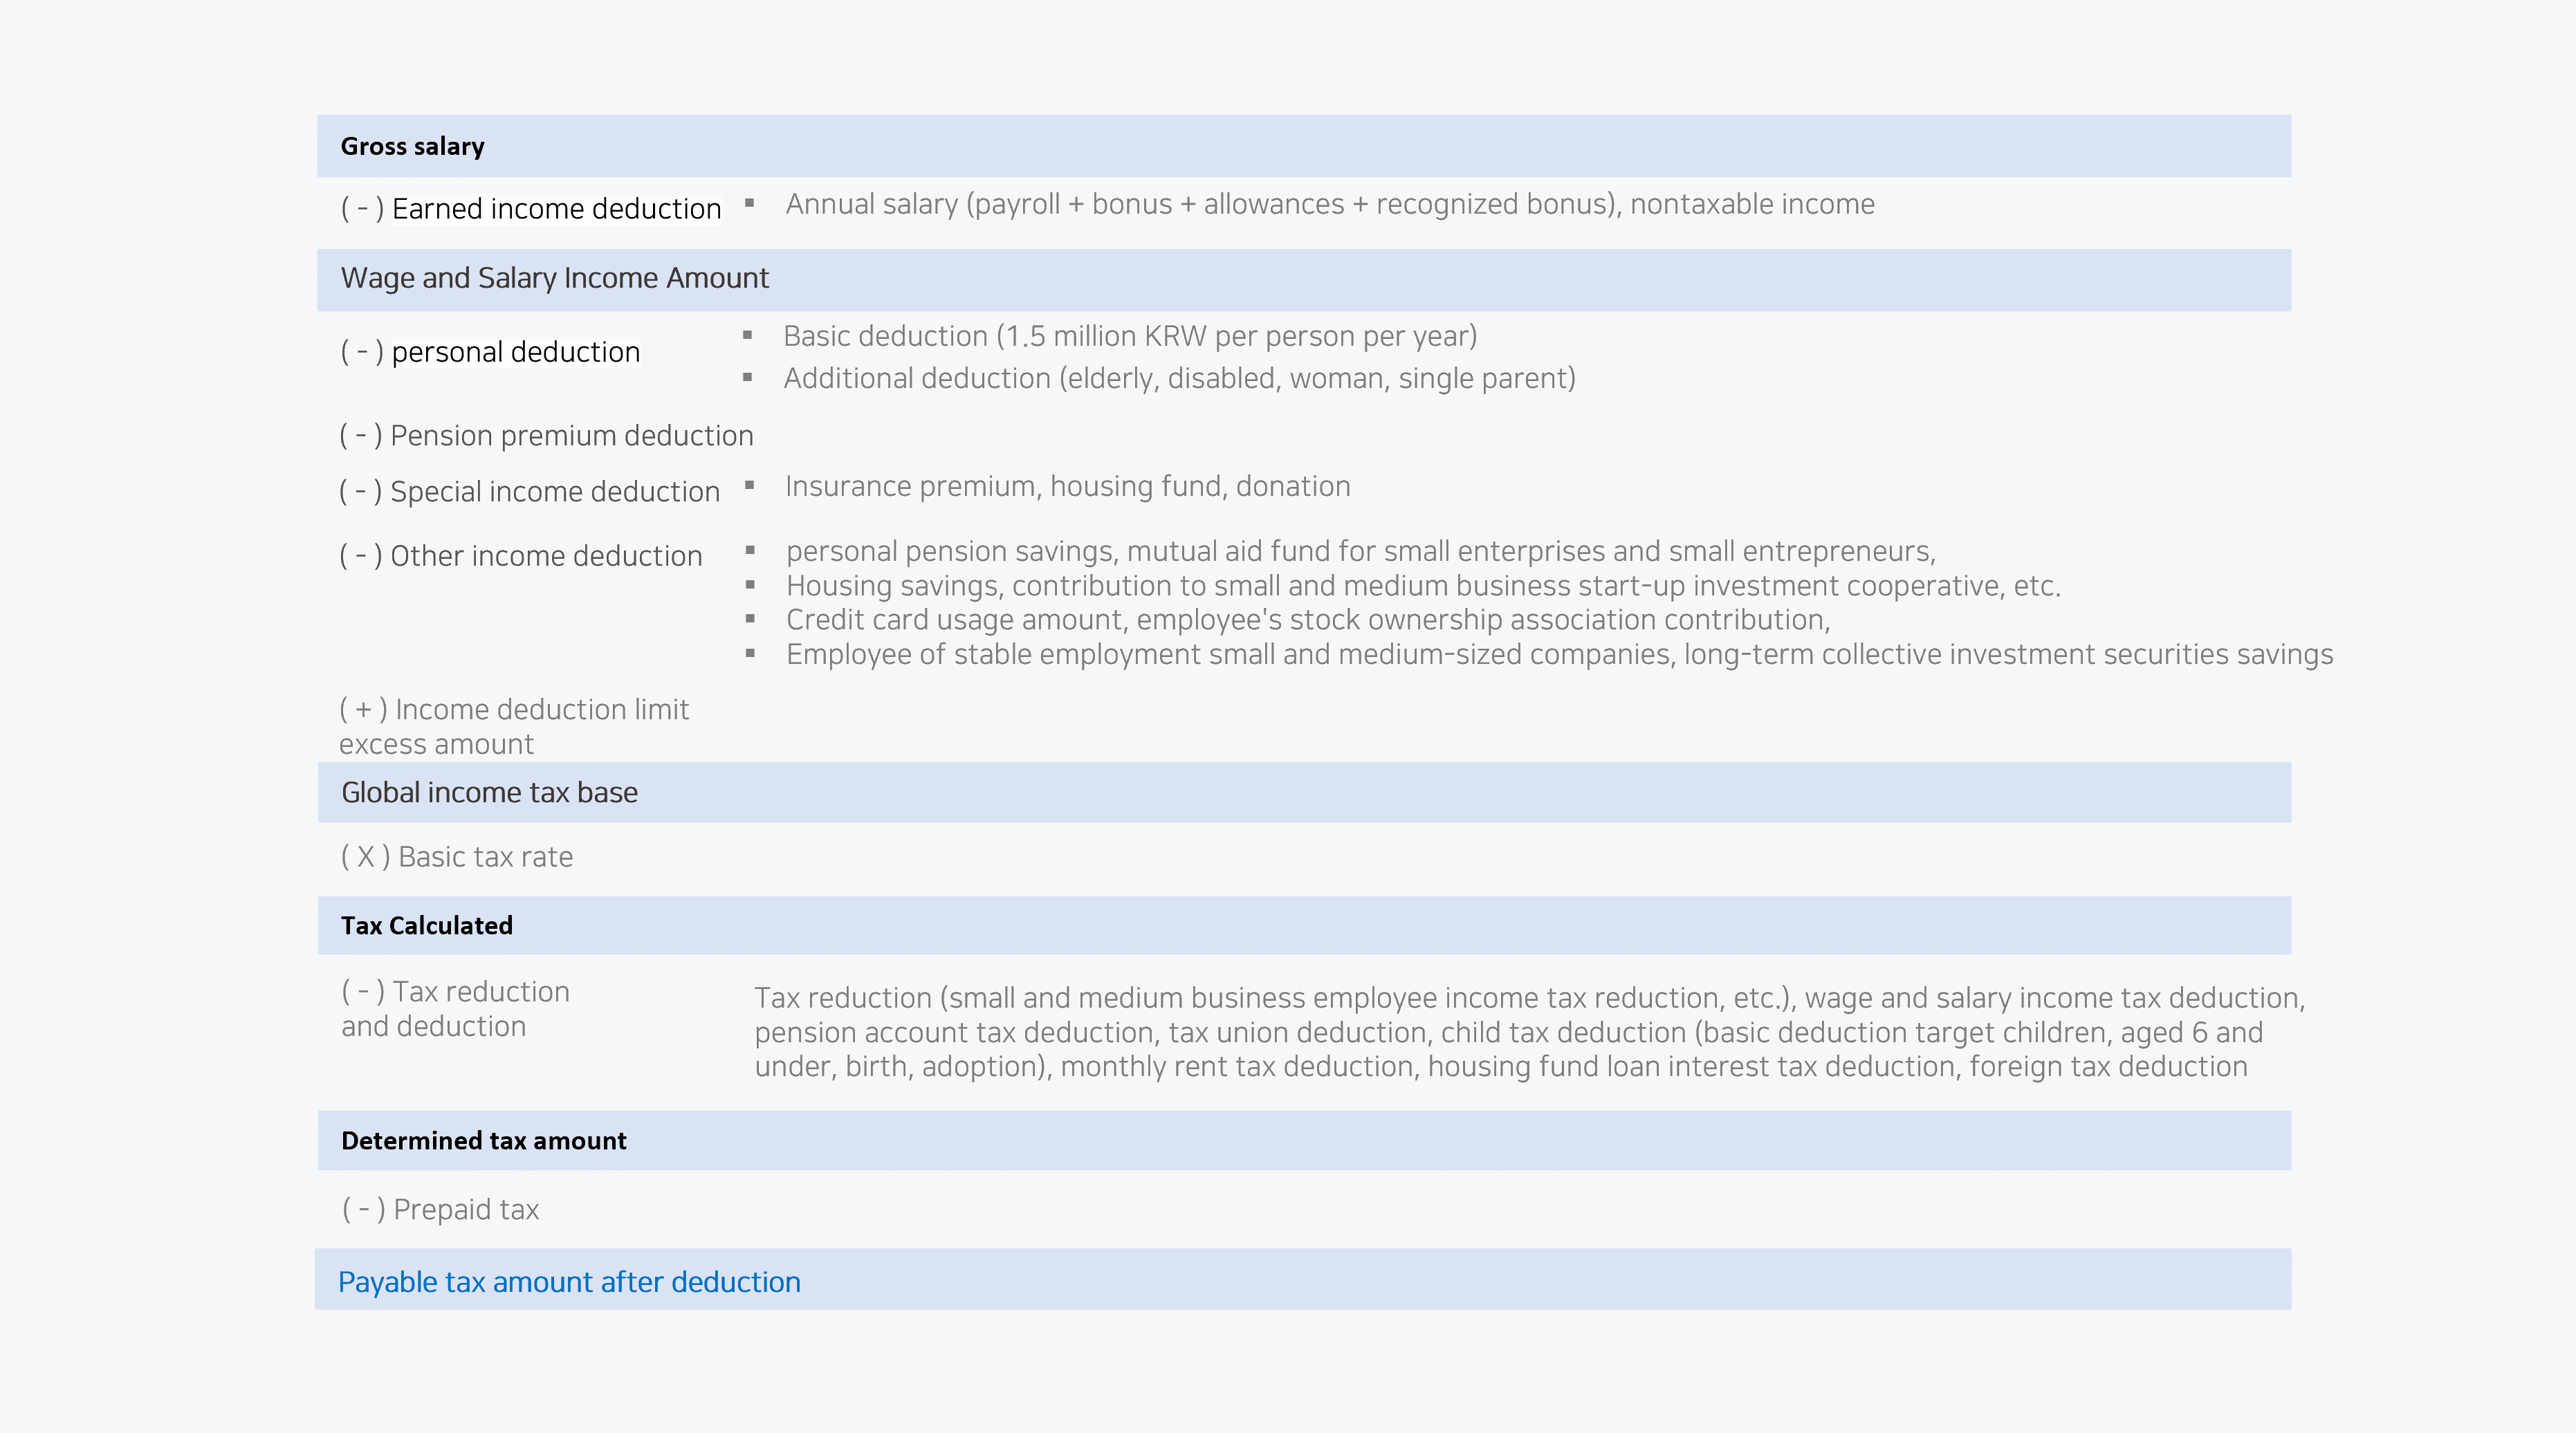
Year-end tax settlement calculates the final taxes to be paid to the country after applying various income deductions and tax deductions to the total payroll received by an employee for a year.
The Year-end Tax Settlement of Payroll service, employees can download and upload National Tax service data, as well as manually enter additional deduction data. Employees can attach supporting documents by self-inspecting inadequate documents. The year-end tax settlement manager can easily review the information and supporting documents submitted by employees.
You can immediately check the results of performing simulated settlement based on the submitted year-end tax settlement information.
The flow of year-end tax settlement is as follows.

Refer to the following for the method of calculating the tax amount.
Manage Year-end Tax Settlement Schedule
You can manage all schedules related to year-end tax settlement. You can set the imputed year, supporting document data submission range, etc. for current and retired employees.
Managing Settlement Year
You can designate and manage the settlement year for year-end tax settlement and retired employees, respectively as one year. You can edit and use a new settlement year in every year.
The following describes how to manage the year of year-end tax settlement.
- Click 'Admin Menu' in the upper right corner of the PC web, then click 'Payroll' in the pop-up window.
- Click
 at the top left of the screen.
 - Click 'Year-end Tax Settlement > Manage Year-end Tax Settlement Schedule' from the menu.
- Click 'Manage Settlement Year'.
- Enter the information such as the year of year-end tax settlement, supporting document data of National Tax Service, etc. for current and retired employees, and then click ‘Save’.
- Year of Year-end Tax Settlement for Current Employees: Select the year of year-end tax settlement to be processed.
- For example, for year-end tax settlement processed in January 2024, select 2023 because it is year-end tax settlement for 2023..
- Year of Year-end Tax Settlement for Retired Employees: Select the imputed year to process interim settlement of retired employees.
- For example, select 2023 to process settlement of an employee who retired in May 2023.
- Wage and Salary Income Tax Withholding Agent: Select the withholding agent to be displayed when printing the receipt for labor and salary income and income deduction report between Company Name and Business Place Name.
- You must select and save before aggregating the targets. Since changes after aggregation don't apply, aggregate again if a change is made.
- Information to check about supporting document data of National Tax Service, etc., in the income deduction report of employees: Select the items to be checked by the manager in the list of supporting documents submitted. Judge whether only the checked supporting document items have been registered.
- If the checked supporting document items haven't been registered by Register Supporting Documents, then they are viewed in the unsubmitted list of the ‘7 Evidence List’ tab in the Perform Year-end Tax Settlement > Settlement Details (click
 클릭) screen.
 - Be careful when setting as unchecked supporting document items are processed without supporting documents.
- If the checked supporting document items haven't been registered by Register Supporting Documents, then they are viewed in the unsubmitted list of the ‘7 Evidence List’ tab in the Perform Year-end Tax Settlement > Settlement Details (click
- Year of Year-end Tax Settlement for Current Employees: Select the year of year-end tax settlement to be processed.
Managing Split Payment Month
You can enter the payroll month and sequence to make split payment of taxes collected after year-end tax settlement.
The following describes how to set split payment month.
- Click 'Admin Menu' in the upper right corner of the PC web, then click 'Payroll' in the pop-up window.
- Click at the top left of the screen.
- Click 'Year-end Tax Settlement > Manage Year-end Tax Settlement Schedule' from the menu.
- Click the ‘Manage Split Payment Month’ tab.
- Searches the information of the split payment schedule from the past years.
- If necessary, enter the search conditions in the search window, and then click ‘Search’.
- You can search the split payment month items of the settlement year that match the entered conditions.
- Click 'Add'.
- Enter the information in the input field newly added to the split payment month list, and then click ‘Save’.
- Settlement Year: Enter the year of year-end tax settlement for the current employee entered. The year-end tax settlement payroll month is entered automatically.
- For the split payment payroll month, additional year-end tax settlement items paid are displayed as appropriate for the applicable time only if they are registered in the’ Payroll > Payroll > Manage Payday menu’. Register the payroll month in advance.
- Split Payment Payroll Month, Payroll Sequence: Enter the payroll sequence of the payroll month to reflect split payment.
- Check that the split payment month has been set properly in the list.
- To delete the split payment month set, click
 of the target item.
- You can only delete the year set to the current settlement year and can't delete closed settlement years.
- To download the list of split payment months set, click ‘Download’. The downloaded file is saved as
ManageYear-endTaxSettlementSchedule_Year-endTaxSettlementSplitPaymentDate_yyyymmdd_hhmmss.xlsxin theDownloadsfolder.
- To delete the split payment month set, click
You can split the payment into 3 times if the tax amount collected after deduction is 100,000 KRW or above after completing year-end tax settlement.
Employees can set the split payment status of each individual in the ‘My Work > Manage Payroll > Perform Year-end Tax Settlement’ menu.Click ‘Settle’ to set the split payment status in the ‘Basic Information’ tab.
Managing Deduction Request Schedule
You can manage the period during which employees can manually enter their year-end tax settlement data.
Employees can manually enter in the ‘My Work > Manage Payroll > Perform Year-end Tax Settlement’ menu.
The following describes how to manage deduction request schedules.
- Click 'Admin Menu' in the upper right corner of the PC web, then click 'Payroll' in the pop-up window.
- Click at the top left of the screen.
- Click 'Year-end Tax Settlement > Manage Year-end Tax Settlement Schedule' from the menu.
- Click the ‘Manage Deduction Request Schedule’ tab.
- Enter the setting information, and then click ‘Save’.
- Year-end Tax Settlement Menu Open Period: Set the period during which employees can enter their year-end tax settlement data.
- This items plays the role of Automatic Closing to disallow employees to enter after exceeding the year-end tax settlement menu open period.
- If the open period has been exceeded or deleted, then the ‘My Work > Manage Payroll > Perform Year-end Tax Settlement menu’ is not displayed.
- Manage Supporting Data Input Sequence: Select the sequence of year-end tax settlement data input from 1st to 9th. It is mostly managed as the 1st sequence. You can exceptionally register another sequence when supporting documents need to be received by sequence. The last sequence entered represents the final data to be reflected in year-end tax settlement.
- Year-end Tax Settlement Menu Open Period: Set the period during which employees can enter their year-end tax settlement data.
Managing Wage and Salary Income Receipt Search
You can allow employees to search receipts for wage and salary income tax withholding. This feature is used to disclose the year-end tax settlement results to employees after validating year-end tax settlement.
The following describes how to set and allow employees to search receipts for wage and salary income tax withholding.
- Click 'Admin Menu' in the upper right corner of the PC web, then click 'Payroll' in the pop-up window.
- Click at the top left of the screen.
- Click 'Year-end Tax Settlement > Manage Year-end Tax Settlement Schedule' from the menu.
- Click the ‘Manage Wage and Salary Income Receipt Search’ tab.
- Searches the information of the targets according to the year and year-end tax settlement type.
- If necessary, enter the search conditions in the search window, and then click ‘Search’.
- You can search the targets that match the entered conditions.
- Check to select the target in the list viewed, and then set the possibility of searching receipts for wage and salary income tax withholding of employees.
- To disclose, check to select the targets, and then click ‘Disclose’. To not disclose, click ‘Do Not Disclose’.
- If disclosed, then employees can check the year-end tax settlement results for the applicable year in the ‘My Information > Manage Payroll > View Year-end Tax Settlement’ menu.
- Progress: You can check the review status of year-end tax settlement or input progress status.
- Disclosure Status: You can check the disclosure status of each target.
- To download the list viewed, check to select the target, and then click ‘Download’. The downloaded file is saved as
ManageYear-endTaxSettlementSchedule_yyyymmdd_hhmmss.xlsxin theDownloadsfolder. - When searching receipts for wage and salary income tax withholding, the ‘Draft’ mark can be indicated. For view settings, see Perform Year-end Tax Settlement.
- To disclose, check to select the targets, and then click ‘Disclose’. To not disclose, click ‘Do Not Disclose’.
Aggregate Annual Payroll
Automatically aggregate year-end tax settlement payroll
You can aggregate the payroll of current employees, such as taxable and tax exempt payroll and reduction income, etc. to be reflected in year-end tax settlement.
- Click 'Admin Menu' in the upper right corner of the PC web, then click 'Payroll' in the pop-up window.
- Click at the top left of the screen.
- Click 'Year-end Tax Settlement > Aggregate Yearly Payroll' from the menu.
- Click the ‘Automatic Aggregation of Year-end Tax Settlement Payroll’ tab.
- You can search the list of year-end tax settlement targets for the year set in the settlement year.
- If necessary, enter the search conditions in the search window, and then click ‘Search’.
- You can search the targets that match the entered conditions.
- Check to select the target in the list viewed, and then set automatic aggregation of year-end tax settlement.
- To download the list viewed, check to select the target, and then click ‘Download’. The downloaded file is saved as
AggregateYearlyPayroll_AggregateYearlyPayroll_AutomaticAggregationofYear-endTaxSettlementPayroll_yyyymmdd_hhmmss.xlsxin theDownloadsfolder. - To start new year-end tax settlement, click ‘Reset and Aggregate Automatically’.
- If you set the progress stage to ‘Pending’ by clicking ‘Reset and Aggregate Automatically’, then employees can process year-end tax settlement in the ‘Perform Year-end Tax Settlement menu’.
- If only payroll has been changed, then click ‘Only Aggregate Payroll Again’. Since the details for year-end tax settlement entered is not reset, supporting documents entered or submitted by employees are not deleted. The year-end tax settlement progress stage is changed to Pending.
- Progress Stage: You can check the progress stage entered by the employee or the stage entered and reviewed by the payroll manager.
- The progress stages are displayed in the order of ‘Pending > Basic Information > Annual Income > Dependent Family > National Tax Service File > Deductible Item 1 (Indicated for each subtab) > Deductible Item 2 (indicated for each subtab, indicating house-related deductible items as house funds) > Supporting Document List > Settlement History > Closed’.
- Once the employee completes submission, the progress stage is displayed as Settlement History.
- Payroll Aggregation Status: This item turns to ‘Y’ after completing payroll aggregation.
- If the payroll aggregation status is ‘N’, then the progress stage is shown as ‘Pending’, which means that the year-end tax settlement information has not been entered. In this case, you can only select Reset and Aggregate Automatically.
- To download the list viewed, check to select the target, and then click ‘Download’. The downloaded file is saved as
Check the progress stage and click ‘Reset and Aggregate Automatically’ or ‘Only Aggregate Payroll Again’.
You can only view the screen for entering the year-end tax settlement information in the ‘My Work > Manage Payroll > Perform Year-end Tax Settlement’ menu after completing yearly payroll aggregation.
Automatically Aggregating Settlement Payroll of Retired Employees
You can aggregate the payroll of employees who retired during the year, such as taxable and tax exempt payroll and reduction income, etc. to be reflected in settlement.
Settlement for retired employees is only done using the items deducted by default (self, national pension premium, health insurance premium, employment insurance premium).
- Click 'Admin Menu' in the upper right corner of the PC web, then click 'Payroll' in the pop-up window.
- Click at the top left of the screen.
- Click 'Year-end Tax Settlement > Aggregate Yearly Payroll' from the menu.
- Click the ‘Automatic Aggregation of Settlement Payroll for Retired Employees’ tab.
- You can search the list of retired employees for the year set in the settlement year.
- If necessary, enter the search conditions in the search window, and then click ‘Search’.
- You can search the targets that match the entered conditions.
- Check to select the target in the list viewed, and then set automatic aggregation of year-end tax settlement.
- To download the list viewed, check to select the target, and then click ‘Download’. The downloaded file is saved as
AggregateYearlyPayroll_AggregateYearlyPayroll_AutomaticAggregationofSettlementPayrollforRetiredEmployees_yyyymmdd_hhmmss.xlsxin theDownloadsfolder. - To start new year-end tax settlement, click ‘Reset and Aggregate Automatically’.
- If only payroll has been changed, then click ‘Only Aggregate Payroll Again’. The details for year-end tax settlement entered are not reset, and the year-end tax settlement progress stage is changed to Pending.
- Progress Stage: You can check the progress stage entered and reviewed by the payroll manager.
- The progress stages are displayed in the order of ‘Pending > Basic Information > Annual Income > Dependent Family > National Tax Service File > Deductible Item 1 (Indicated for each subtab) > Deductible Item 2 (indicated for each subtab, indicating house-related deductible items as house funds) > Supporting Document List > Settlement History > Closed’.
- Once supporting documents are completed, the progress stage is displayed as Settlement History.
- Payroll Aggregation Status: This item turns to ‘Y’ after completing payroll aggregation.
- If the payroll aggregation status is ‘N’, then the progress stage is shown as ‘Pending’, which means that the year-end tax settlement information has not been entered. In this case, you can only select Reset and Aggregate Automatically.
- To download the list viewed, check to select the target, and then click ‘Download’. The downloaded file is saved as
Managing Year-end Tax Settlement Adjustment Payroll
You can enter the taxable income (including tax exempt) and various deduction amounts, which are not included in the monthly payroll paid, but they must be added to year-end tax settlement. (E.g. welfare points, etc.)
You can only import if the payroll month is entered as 99th. For information about the 99th payroll month, check the reference on the payroll month and sequence in Manage Payday.
The following describes how to manage the year-end tax settlement adjustment payroll.
- Click 'Admin Menu' in the upper right corner of the PC web, then click 'Payroll' in the pop-up window.
- Click at the top left of the screen.
- Click 'Year-end Tax Settlement > Aggregate Yearly Payroll' from the menu.
- Click ‘Manage Year-end Tax Settlement Adjustment Payroll’ tab.
- The payroll month and sequence in Manage Year-end Tax Settlement Adjustment Payroll are set to ‘99th Sequence of December’ of the settlement year by default.
- If necessary, enter the search conditions in the search window, and then click ‘Search’.
- You can search the targets that match the entered conditions.
- Select the target from the list of results viewed to manage the year-end tax settlement adjustment payroll.
- To add the amount to a payroll item, click of the target item from the list, enter the amount in the applicable item of the Enter Payroll screen, and then click ‘Save’.
- To download the searched list, click ‘Download’. The downloaded file is saved as
AggregateYearlyPayroll_ManageYear-endTaxSettlementAdjustmentPayroll_yyyymmdd_hhmmss.xlsxin theDownloadsfolder.
- To add the amount to a payroll item, click
Since the sequence is the same as December, if you entered tax exemption at once, the tax exemption limit is applied based on one month.
For example, if you enter the tax exempt meal allowance for one year as 2,400,000 KRW in the adjustment payroll, only 200,000 KRW for the month of December is acknowledged as the tax exempt meal allowance. Since remaining 2,200,000 KRW is acknowledged as taxable, you must enter the payroll to apply tax exemption in monthly payroll. The tax exemption limit is reflected accurately by additionally opening the payroll month and sequence of the payroll to be uploaded and uploading it. For the method of bulk uploading payroll, see Import Data.
Tips for Managing Year-end Tax Settlement Adjustment Payroll
If you can't search targets of year-end tax settlement, then process it in the same way as the method of entering payroll.
- In the ‘Payroll > Manage Payday’ menu, open the payday as 99th sequence of December of the applicable year.
- In the ‘Payroll > Manage Targets’ menu, import or add the targets who need to adjust payroll and close aggregation.
- Close aggregation in each tab of the ‘Payroll > Close Basic Data’ menu.
- You can search targets in the ‘Manage Year-end Tax Settlement Adjustment Payroll’ tab of the ‘Payroll > Year-end Tax Settlement > Aggregate Yearly Payroll’ menu.
Perform Year-end Tax Settlement
Review overall year-end tax settlement information of employees entered (employees and retirees); the admin can run year-end tax settlements on behalf of employees.
- Click 'Admin Menu' in the upper right corner of the PC web, then click 'Payroll' in the pop-up window.
- Click at the top left of the screen.
- Click 'Year-end Tax Settlement > Perform Year-end Tax Settlement' from the menu.
- The settlement year set in the ‘Manage Settlement Year’ tab of the ‘Year-end Tax Settlement > Manage Year-end Tax Settlement Schedule’ menu is set automatically, and the targets for whom payroll aggregation has been completed are searched in the ‘Year-end Tax Settlement > Aggregate Yearly Payroll’ menu.
- If an employee submits the income deduction report, then the final work date and time appear to be identical to the Member submission date and time. If the employee edits the year-end tax settlement information and submits again, then the final work date and time appear to be the same as the Member submission date and time again.
- If necessary, enter the search conditions in the search window, and then click ‘Search’.
- You can search the targets that match the entered conditions.
- Select the target from the list of results viewed to manage the year-end tax settlement closing status, etc.
- Closed: You can set to disable editing after completing input or review of year-end tax settlement.
- Cancel Closing: If the year-end tax settlement information needs to be changed after closing, then click ‘Cancel Closing’ and enter the information to be edited.
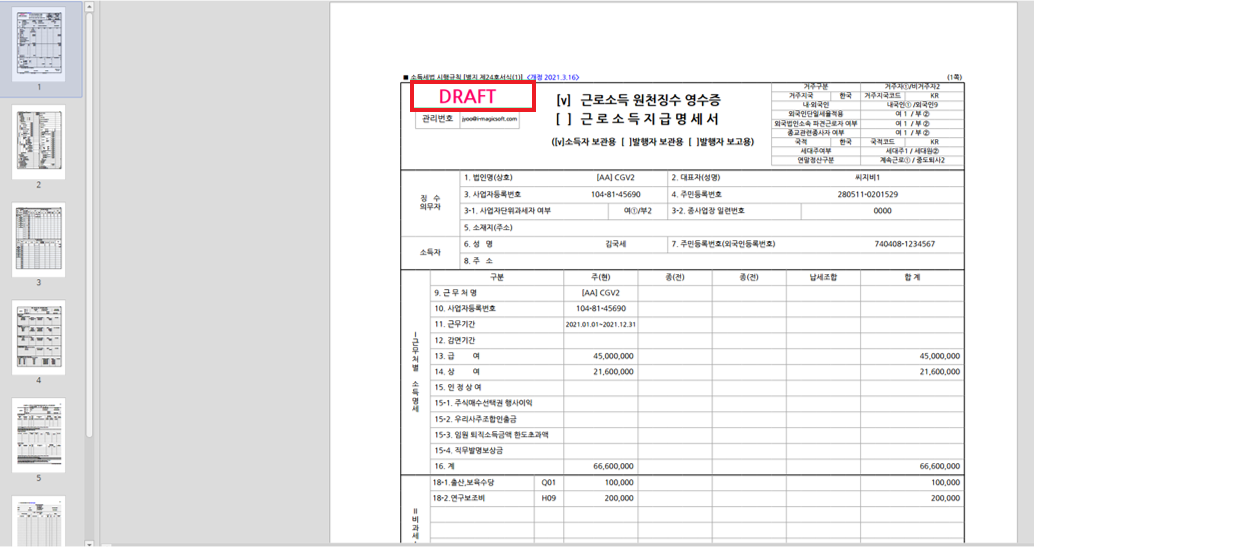
- Display Draft, Do Not Display Draft: You can select whether to display Draft when searching receipts for wage and salary income tax withholding.
- If Draft hasn't been removed after the end of year-end tax settlement, then ‘Draft’ will be displayed when printing through the Issue Receipt for Wage and Salary Income Tax Withholding feature in the ‘Payroll > View Payroll Tax Forms’ menu.
- After completing the final submission of electronic media for payment statements, you must click ‘Remove Draft’ to remove it.
- Income Deduction Report: You can search and print the entered income deduction report in the PDF file format.
- Receipt for Wage and Salary Income Tax Withholding: You can search and print the receipt for wage and salary income tax withholding in the PDF file format.
- Settlement: Employees can edit or review the entered year-end tax settlement information, and the payroll manager can manually enter the year-end tax settlement information of employees.
- To edit the year-end tax settlement information, click of the target item and edit. If an employee is entering the year-end tax settlement information, then the employee is taken to the applicable progress stage. Go to the ‘Basic Information’ tab to proceed.
- To edit the year-end tax settlement information, click
Meaning of ‘Draft’ Display
This display refers to the expected result of year-end tax settlement prior to final confirmation.
Use and issue after removing draft if you have submitted the final year-end tax settlement electronic media.
Settlement
The following describes how to perform year-end tax settlement.
- Click 'Admin Menu' in the upper right corner of the PC web, then click 'Payroll' in the pop-up window.
- Click at the top left of the screen.
- Click 'Year-end Tax Settlement > Perform Year-end Tax Settlement' from the menu.
- If necessary, enter the search conditions in the search window, and then click ‘Search’.
- You can search the targets that match the entered conditions.
- Click of the item for the target to implement year-end tax settlement, and edit it.
- Since employees can't edit deactivated fields, the payroll manager needs to edit them if they have been entered incorrectly.
- Set the year-end tax settlement stages in order, and then click ‘Save’.

- '1. Basic Information’ tab is the first stage. Follow the stages, in that order.
- To move between tabs, click ‘Previous’ or ‘Next’.
- Add: Click ‘Add’ to enter additional details that need to be registered other than the data provided by National Tax Service.
- Register Supporting Documents: Click ‘Register Supporting Documents’ to register supporting document data by history. You must only register supporting document data other than the simplified National Tax Service files. You can check the required supporting documents that haven't been registered in the unsubmitted list of the ‘7. Evidence List’ tab.
- Save: The ‘Save’ can be displayed at the bottom after completing edit and additional input. Click it if you need to save the content.
- The Settlement stages are as follows.
1. Basic Information
The information of employees is searched. Enter the basic information of year-end tax settlement, and then click ‘Save’.
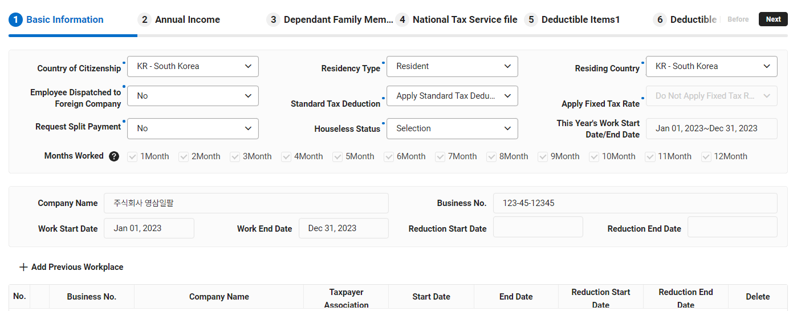
- Nationality: Enter the nationality of the selected employee.
- Residency Type: Select resident or non-resident. The range of the year-end tax settlement income deduction (tax deduction) changes according to the selection.
- Country of Residence: For residents, KR - Korea is selected. For non-residents, select the country of residence.
- Employee Dispatched to Foreign Company: Select Yes if the employee is dispatched to a foreign company.
- Standard Tax Deduction: Select from Apply standard tax deduction if tax amount is small, Always apply standard tax deduction, and Do not apply standard tax deduction. By default, Apply standard tax deduction if tax amount is small is selected. If you select a value other than the default value, then the tax amount for year-end tax settlement can become too high.
- Apply Fixed Tax Rate: For foreigners, select the method of applying the fixed tax rate. For residents, ‘Do not Apply Fixed Tax Rate’ is set by default.
- Always apply fixed tax rate: The fixed tax rate is applied without comparing the tax rates.
- Apply fixed tax rate if tax amount is small: The fixed tax rate is applied if the tax amount of the fixed tax rate is smaller compared to the general tax rate. Select when paying a small tax amount.
- Apply fixed tax rate if tax amount is large: The fixed tax rate is applied if the tax amount of the fixed tax rate is larger compared to the general tax rate. Select when paying a large tax amount.
- Do not apply fixed tax rate: The fixed tax rate is not applied without comparing the tax rates, and the general tax rate is applied.
- Request Split Payment: Select to request split payment. If you request split payment, then employees can split the payment into 3 times if the payment amount is 100,000 KRW or above. (Split payments are deducted from payrolls for February, March, and April.)
- Houseless Status: This status is judged by combining the houses owned in the name of family members who live at the same address on the certified copy of resident registration (including a spouse configured separately on the certified copy of resident registration). Select ‘Yes’ for houseless and ‘No’ for householder.
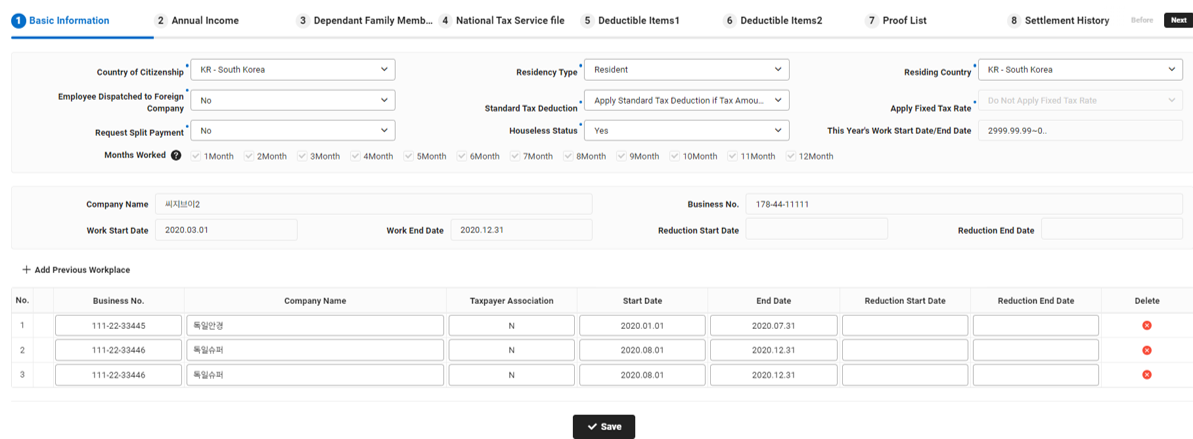
- This Year's Work Start Date/End Date: This is the work period of this year. For employees who joined during this year, the employment date is the start date. After entering the previous workplace, the period for the previous workplace is included in this period.
- E.g. If the work period is 2023. 9. 8. - 2023. 12. 31. for the current workpalce and 2023. 6. 1. - 2023. 8. 31. for the previous workplace, it is indicated as 2023.06.01 - 2023.12.31.)
- Company Name/Business Number/Work Start Date/Reduction Start Date/Reduction End Date: Displays the information of the current workplace.
- Months Worked: Months worked after automatically selected according to this year's work start/end date.
- If there is a previous workplace or a workplace to be added, then click ‘Add Previous Workplace’ and enter the information of the previous workplace.
- Click ‘Delete’ to delete the previous workplace entered.
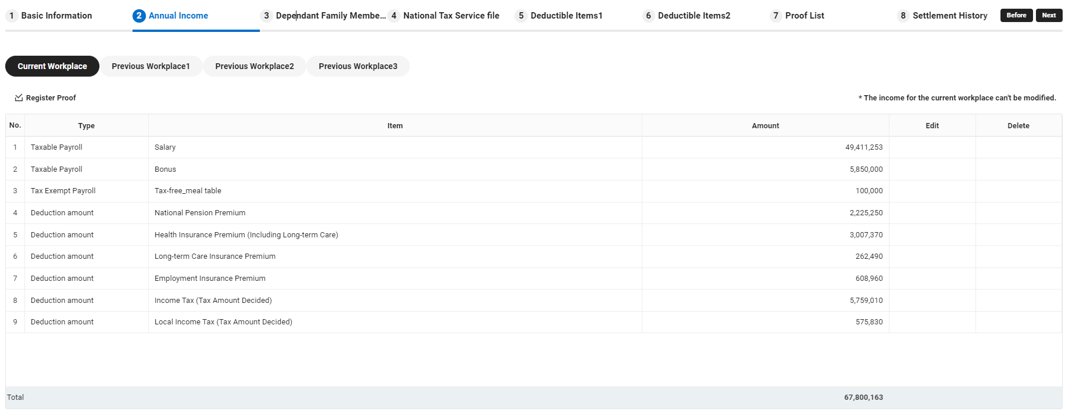
2. Annual Income
You can search the income amount for the current workplace and enter the income for the previous workplace. Taxable, tax exempt, and deduction amounts are provided based on the payroll ledger registered.
Check the income amount for the current workplace, enter the income for the previous workplace, and then click ‘Save’.
- Current Workplace Tab: Click to aggregate the paid and deducted incomes for the current workplace necessary for year-end tax settlement.
- We recommend that you add or edit data on the 'Year-end Settlement Adjustment Salary Management' tab in 'Payroll > Year-end Settlement > Annual Payroll Aggregation' rather than revising the month and order of salary that has already been paid.
- To upload supporting documents of National Tax Service, etc., click ‘Register Supporting Documents’.
- We recommend that you add or edit data on the 'Year-end Settlement Adjustment Salary Management' tab in 'Payroll > Year-end Settlement > Annual Payroll Aggregation' rather than revising the month and order of salary that has already been paid.
- Previous Workplace Tab: The Previous Workplace tab is created according to the number of previous workplaces entered in the '1. Basic Information’ tab. Select a previous workplace to view the company name and work period. Enter the data for the previous workplace selected.

- You can check the name of the previous workplace and period under ① of the example screen above.
- Click ‘Add’ for each income and deductible item, enter the amount on the Receipt for Wage and Salary Income Tax Withholding issued by the previous workplace in the Enter Annual Income pop-up window, and then click ‘Save’.
- Type: Select the type of the taxable payroll, deductible payroll, tax exempt payroll, and reduced income to be entered.
- Item: You can select the item according to the selected type.
- Amount: Enter the amount of the selected item.
- To upload supporting documents of National Tax Service, etc. issued by the previous workplace, click ‘Register Supporting Documents’.
- To edit the information of registered dependent family, click of the target.
- To delete the information of registered dependent family, click of the target.
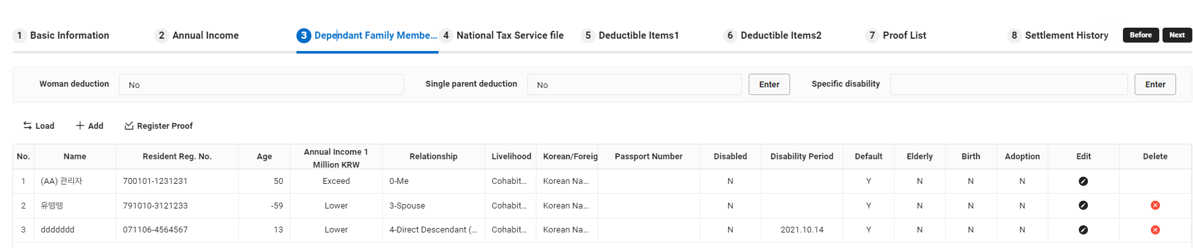
3. Dependent Family
Register the information of employees and the information of the basic deductible targets to be deduced as dependent family during year-end tax settlement.
Only the employee can be viewed when processing year-end tax settlement for the first time in WORKS Payroll. The family information registered in the employee information of the HR service can only be imported in the first year.
The following describes how to register dependent family.
- Click ‘Import’ to import the family information registered in the HR service.
- If you processed year-end tax settlement by importing, then the dependent family information is searched automatically during year-end tax settlement for the following year, and only ‘Add’ is displayed.
You can edit the imported dependent family information. After clicking ‘Edit’ for dependent family, make sure to check the information in the pop-up window and edit to make the information accurate. The dependent family information must be accurate to accurately reflect the income deductible items. - Click ‘Add’ to enter the dependent family to be added, and then click ‘Save’.
- Check the deduction conditions before registering since the dependents under the National Health Insurance Act differ from the dependent family subject to income deduction during year-end tax settlement.
- The dependent family must be registered, even if you only receive income deductions (credit card, educational expense, etc.) without basic deductions.
- If the employee is applicable for Woman Deduction or Single-Parent Deduction, click ‘Enter’ at the top, enter the information in the Request Woman/Single-Parent Deduction pop-up window, and then click ‘Save’.
- Check the details at the top of the pop-up, and then select the deductible item. Woman deduction and single-parent deduction can't be received at the same time, so you can only select one of them.
- If the target can't apply woman deduction, then ‘Woman Deduction’ is not displayed in the Select Deduction item.
- If the direct descendant spouse among dependent family members is disabled, click the applicable ‘Enter’ at the top, enter the information in the Register Specific Disabled Direct Descendant (Other) pop-up window, and then click ‘Save’.
- Specific disabled persons can only be registered by entering 5. Direct Descendant (Other) for the relationship code.
- If the income earner paid for the pre-employment education expenses of a direct dependent child whose annual income exceeds 1 million KRW, then click ‘Enter’ above, enter the information in the Register Pre-employment Education Expense Deduction pop-up window, and click ‘Save’.
- Click ‘Register Supporting Documents’ and register the certified copy of resident registration, family relation certificate, certificate of person with disability, etc. to prove the relationship with the dependent family.
- To edit the information of registered dependent family, click of the target.
- To delete the information of registered dependent family, click of the target.
- To edit the information of registered dependent family, click
4. National Tax Service File
You can easily enter year-end tax settlement information by registering simplified year-end tax settlement files downloaded from Hometax. Simplified files are automatically entered in the ‘Deductible Item 1’ and ‘Deductible Item 2’ tabs.
Click ‘Register Simplified File’ to select the simplified file to be uploaded. It is saved upon selection.

- Once you register the simplified file, the ‘Download Simplified File’ and ‘Search Simplified File Data’ buttons are displayed.

- To download the simplified file uploaded, click ‘Download Simplified File’.
- To search details for the simplified file data uploaded, click ‘Search Simplified File Data’.
- The simplified data uploaded can't be edited by employees and the payroll manager (admin) and can only be deleted.
5. Deductible Item 1
You can check the details for the National Tax Service simplified file uploaded or enter the insurance premium, medical expense, educational expense, credit card, and donation.
Enter the deductible amount by clicking the ‘Insurance Premium’, ‘Medical Expense’, ‘Educational Expense’, ‘Credit Card’, or ‘Donation’ tab.
- ‘Insurance Premium’ Tab: Searches the insurance premium data in the simplified file uploaded.
- Click ‘Add’, and additionally enter the premium insurance in the newly added field.
- Editable: If you enter by clicking ‘Add’, then Editable is changed to ‘Y’.
- Insurance Type: Select the insurance type from ‘Guarantee, Regional Health, Regional National Pension, Guarantee for Disabled’ according to the type of the insurance premium to be entered.
- Source: Enter the data source between National Tax Service and Other. Select Other for data issued by a general insurance company.
- Policyholder: Select the policyholder on the insurance policy.
- Primary Insurant, etc.: Select the primary insurant or additional insurant on the insurance policy.
- Amount: Enter the payment amount.
- To delete the insurance premium that is not deductible, click of the item.
- You can't edit National Tax Service data and can only delete them.
- After completing editing and additional input, check the Request Deduction item for the target, and click ‘Save’ at the bottom. The expenditure amount of the dependent family for which ‘Request Deduction’ is unchecked is not deducted.
- Click ‘Add’, and additionally enter the premium insurance in the newly added field.
- ‘Medical Expense’ Tab: The medical expense data of the simplified National Tax Service file uploaded are added and searched for each dependent family.
- Register Supporting Documents: Click ‘Register Supporting Documents’ to register supporting document data, such as doctor's note, etc. You must only register supporting document data other than the simplified National Tax Service files.
- To edit, click of the target item in the list.
- To register an additional medical expense other than the data provided by National Tax Service, click ‘Add’ and enter the information in the newly added field.
- Supporting Document Type: Select the medical expense receipt to be entered from National Tax Service Medical Expense Data, National Health Insurance Service Statement, Medical Expense/Medicine Expense Invoice, Long-term Care Expense, and Other Medical Expense.
- Data Code: Select the code of the medical expense data to be entered.
- Place of Payment, Business Number: Enter the place of payment and business number for the medical expense to be entered. For National Tax Service data, you don't need to enter the place of payment and business number.
- Number of Cases: Enter the number of cases.
- Expenditure: Enter the amount of medical expense paid.
- Fee-for-Service Insurance Amount: Enter the amount of fee-for-service insurance received from the fee-for-service insurance company. Enter the fee-for-service insurance amount for each dependent family of the insurant.
- To delete the insurance expense item that is not deductible in the Medical Expense Details screen of the target, click of the item.
- You can't edit National Tax Service data and can only delete them.
- After completing editing and additional input, check the Request Deduction item for the target, and click ‘Save’ at the bottom. The expenditure amount of the dependent family for which Request Deduction is unchecked is not deducted.
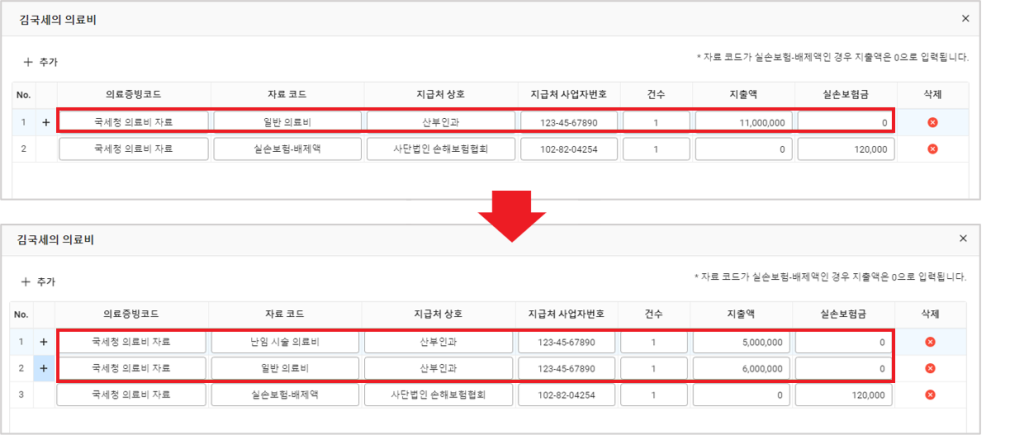
The deductible limits of the infertility operation expenses and medical expenses for premature babies and children with congenital conditions are different than for general medical expenses.
If the simplified National Tax Service data includes medical expenses for infertility operation expenses or medical expenses for premature babies or children with congenital conditions, they must be separated from general medical expenses.
After deleting the applicable medical expenses uploaded, enter the amounts for infertility operations or medical expenses for premature babies or children with congenital conditions separately from the amounts for general medical expenses. (E.g., See the entry image for the distinction between infertility and general medical expenses.)
- 'Educational Expense' Tab: The educational expense data of the simplified National Tax Service file uploaded is added and searched for each dependent family.
- To edit, click of the target item in the list. You can search data of the simplified National Tax Service file uploaded.
- To register an additional educational expense history other than the data provided by National Tax Service, click ‘Add’ and enter the information in the newly added field.
- Source: Enter the data source between ‘National Tax Service’ and ‘Other’. Select ‘National Tax Service’ for simplified data issued by National Tax Service and ‘Other’ when entering data issued by other institutions.
- School Type: Select the school type from ‘Preschool Child’, ‘Elementary, Middle, or High School’, ‘University’, ‘Disabled’, ‘Graduate School’, ‘Vocational Training’, and ‘Not Deductible’.
- Expense Type: Select the expense type from ‘Tuition Fee, etc.’, ‘Vocational Training Expense’, ‘School Uniform Purchase Expense’, ‘Field Experience Learning Expense’, ‘Redemption of Student Loan’, and ‘College Entrance Examination Fees/CSAT Test Fees’.
- Payment Amount: Enter the payment amount.
- Excluded Amount: Enter the excluded amount.
- To delete the educational expense item that is not deductible, click of the item.
- You can't edit National Tax Service data and can only delete them.
- After completing editing and additional input, check the Request Deduction item for the target, and click ‘Save’ at the bottom. The expenditure amount of the dependent family for which Request Deduction is unchecked is not deducted.
- To edit, click
- 'Credit Card' Tab: The credit card data of the simplified National Tax Service file uploaded is added and searched for each dependent family.
- To edit, click of the target item in the list. You can search data of the simplified National Tax Service file uploaded.
- To register an additional credit card history other than the data provided by National Tax Service, click ‘Add’ and enter the information in the newly added field.
- Input Type: For manual input other than the simplified National Tax Service file, Manual Input is selected for Input Type.
- Source: Enter the data source between ‘National Tax Service’ and ‘Other’. Select ‘National Tax Service’ for simplified data issued by National Tax Service and ‘Other’ when entering data issued by credit card companies, etc.
- Card Type: Select the credit card type from ‘Credit Card’, ‘Debit Card’, and ‘Cash Receipt’.
- Usage Type: Select the usage type from ‘General Usage’, ‘Traditional Market Usage - Q1’, ‘Traditional Market Usage - Q2 - Q4’, ‘Public Transportation Usage’, ‘Books and Performances - Q1’, and ‘Books and Performances - Q2 - Q4’.
- Used Amount: Enter the total used amount.
- Deducted Amount: Enter the deducted amount. (E.g., if a company expense was used by a personal credit card, etc.)
- To delete the credit card item that is not deductible, click of the item.
- You can't edit National Tax Service data and can only delete them.
- After completing editing and additional input, check the Request Deduction item for the target, and click ‘Save’ at the bottom. The expenditure amount of the dependent family for which Request Deduction is unchecked is not deducted.
- To edit, click
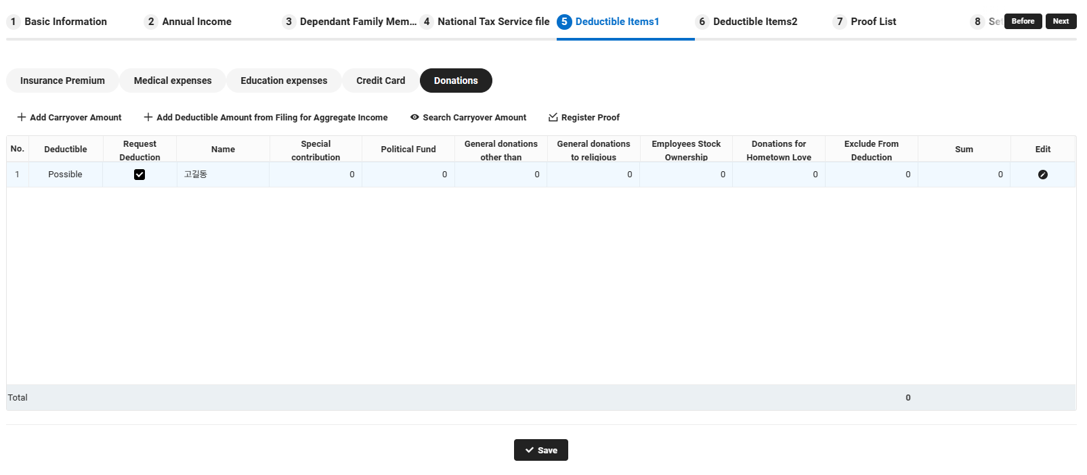
- ‘Donation’ Tab: The total amount of the simplified National Tax Service data is searched for the dependent family.
- Add Carryover Amount: The amount of donation not deduced can be carried over and deducted for a certain period. If there is a donation carryover from the previous workplace because of joining the company during this year, or changes to the donation entered when filing for the general income tax, then you must enter the carryover amount again. Click ‘Add Carryover Amount’, enter the carryover amount in the Add Carryover Amount pop-up window, and then click ‘Save’.
- Donation Year: Select the year of the carryover amount to be entered from 2013 - 2022. Each year must be entered separately.
- Donation Type: Select the donation type from ‘Special Donation’, ‘Political Funds’, ‘General Donation (Non-religious Organization)’, ‘General Donation (Religious Organization)’, ‘Employee Stock Ownership Association’, and ‘Hometown Love Donation’. Each donation type must be entered separately. (E.g., if there are 2 donation amounts for 2022, including a special donation and a general donation (non-religious organization))
- Donation Amount: Enter the donation amount.
- Donation Amount Added by Filing for General Income: Enter the additional donation amount added by filing for the general income.
- Deducted Amount: Enter the amount deducted already.
- Deductible Target Amount: The carryover donation amount not deduced until the previous year is calculated based on the details entered.
- To add a new donation, click ‘Add’, and enter the information in the newly added field.
- Add Deductible Amount From Filing for General Income: You can add the deductible amount from filing for the general income. Click ‘Add Deductible Amount From Filing for General Income’, and then enter the deductible amount from filing for the general income.
- To search the carryover amount, click ‘Search Carryover Amount’.
- To upload supporting document data for donations, click ‘Register Supporting Documents’.
- To edit, click of the target item in the list. You can search data of the simplified National Tax Service file uploaded.
- To register an additional donation history other than the data provided by National Tax Service, click ‘Add’ and enter the information in the newly added field.
- Source: Enter the data source between National Tax Service and Other.
- Donation Type: Select the donation type from ‘Special Donation, Political Funds, General Donation (Non-religious Organization), General Donation (Religious Organization), Employee Stock Ownership Association, and Hometown Love Donation’.
- Union Fee Classification: It is activated is the donation type is ‘General Donation (Non-religious Organization)’. Enter this item according to the union fee submission classification. However, enter union fees for unions with 1000 or fewer members in ‘Fairly Disclosed Union Fees’.
- Donation Details: Select the donation details between Cash and Kind.
- Business Number and Name of Place of Donation: Enter the business number and name of the place of donation. Don't enter this information for a political fund donation.
- Number of Cases: Enter the number of donation cases.
- Deductible Donation: Enter the deductible donation.
- Donation Subsidy Request Amount: Enter the donation subsidy request amount.
- Total Donation: The total amount of deductible donations and donation subsidy requests is indicated automatically.
- To delete the donation that is not deductible, click of the item.
- After completing editing and additional input, check the Request Deduction item for the target, and click ‘Save’ at the bottom. The expenditure amount of the dependent family for which Request Deduction is unchecked is not deducted.
- Add Carryover Amount: The amount of donation not deduced can be carried over and deducted for a certain period. If there is a donation carryover from the previous workplace because of joining the company during this year, or changes to the donation entered when filing for the general income tax, then you must enter the carryover amount again. Click ‘Add Carryover Amount’, enter the carryover amount in the Add Carryover Amount pop-up window, and then click ‘Save’.
6. Deductible Item 2
You can enter the pension savings, house rent loan, long-term housing-backed loan, house-purchasing savings, monthly rent, others, and foreign tax amount. You can also check the details uploaded by the simplified National Tax Service file.
Click ‘Pension Savings‘, ‘House Rent Loan‘, ‘Long-term Housing-backed Loan‘, ‘House-purchasing Savings‘, ‘Monthly Rent‘, ‘Other‘, and ‘Foreign Tax Amount‘ tab to enter the deductible amount.
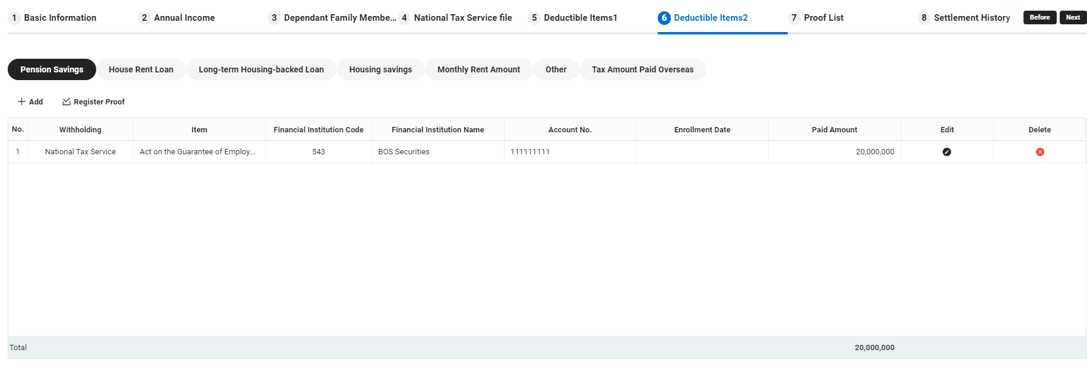
- Click ‘Add’ to enter details for the pension savings, and then click ‘Save’.
- Since the limits are different by deduction type, accurately select the income deduction type.
- If you selected the tax deduction type as ‘young adult long-term collective investment securities savings’, make sure to enter the enrollment date and the contract period.
- To edit, click of the target item in the list.
- You can't edit National Tax Service data and can only delete them.
- Since only the amount spent by the employee is deductible, delete any history of spending by the dependent family registered.
- 'Pension Saving' Tab: Searches the data of the simplified National Tax Service file uploaded. Searches the data of the simplified National Tax Service file uploaded. Employees can enter their personal pension savings, pension savings, Employee Retirement Benefit Security Act (retirement pension), deductibles for scientists and engineers, and long-term collective investment security savings.
- Since the limits are different by deduction type, accurately select the income deduction type.
- If you selected the tax deduction type as ‘young adult long-term collective investment securities savings’, make sure to enter the enrollment date and the contract period.
- To edit, click of the target item in the list.
- You can't edit National Tax Service data and can only delete them.
- Since only the amount spent by the employee is deductible, delete any history of spending by the dependent family registered.
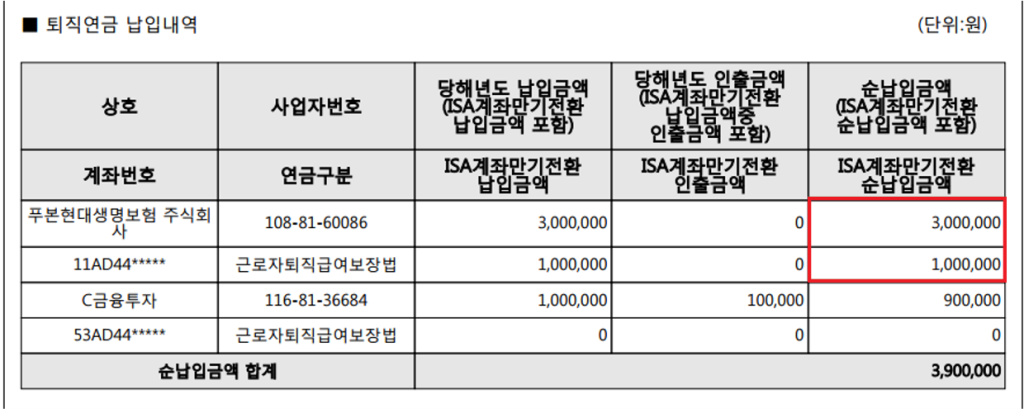
When entering pension savings and retirement pension, if they include the net payment amount for maturity-transformed ISA account, then separately enter the pension amount and net payment amount for maturity-transformed ISA account for the Income Deduction Type.<Example>Select the Employee Retirement Benefit Security Act, and enter 2,000,000 KRW. Select Transfer From ISA to Retirement Pension (IRP), and enter 1,000,000 KRW.
- 'House Rent Loan' Tab: Searches the data of the simplified National Tax Service file uploaded.
- Since the National Tax Service data shows the data provided by the lender, etc. as is, you must apply the deductible status of the item by checking the survey and submitted documents.
- '1. Basic Information’ tab has Houseless Status. You can enter if you selected ‘Yes’.
- Add Lender: If the history to be deducted hasn't been registered as the National Tax Service data, then you can enter the loan details by receiving the Housing Fund Repayment Certificate issued by the lender. Click ‘Add Lender’, enter the loan details, and click ‘Create Survey’ to create the survey. After creating the survey, click ‘Save’.
- Add Between Residents: If you took out a loan through a person-to-person transaction instead of a financial institution, then you can enter the loan details. Click ‘Add Between Residents’, enter the loan details, and click ’Create Survey’ to create the survey. After creating the survey, click ‘Save’.
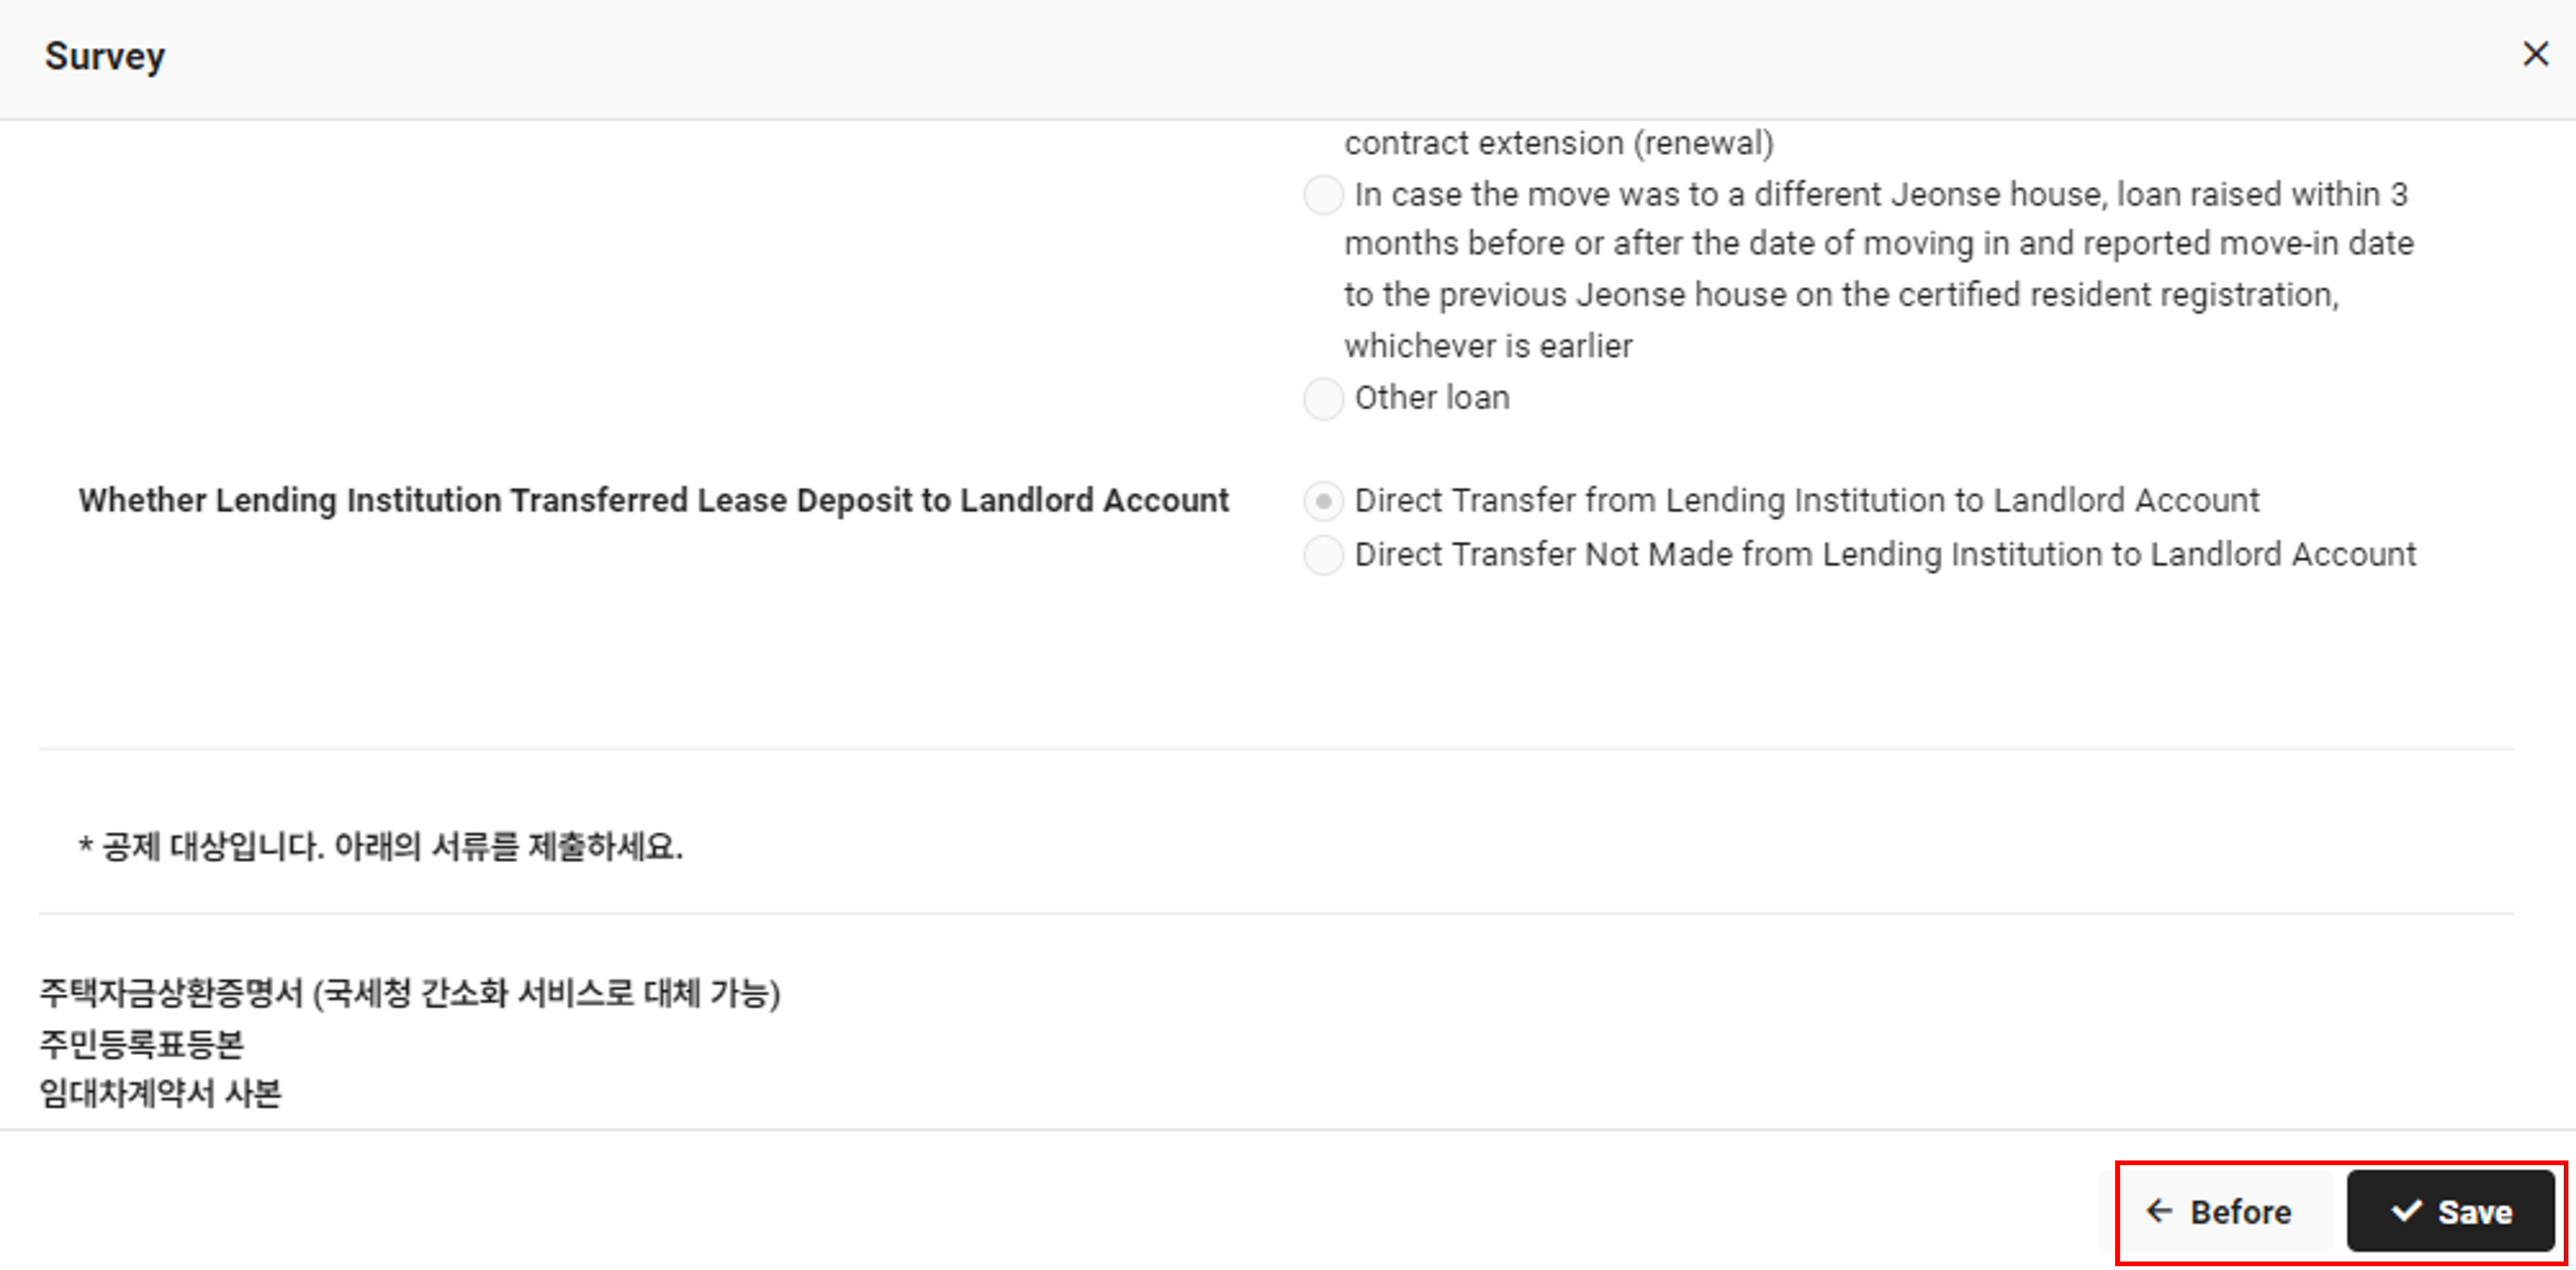
- Register Evidence: Once the survey is created, the documents to submit are indicated at the bottom of the pop-up window. After checking the submitted documents, click ‘Register Supporting Documents’ in the ‘House Rent Loan’ tab to register the documents to be submitted.
- Evidence List
- Housing fund repayment certificate (can be replaced by the National Tax Service simplified service)
- Certified copy of resident registration
- Copy of lease contract
- Documents guided in the survey check item (limited to targets)
- To edit, click of the target item in the list viewed. If edited, then the survey needs to be created again.
- You can't edit National Tax Service data and can only delete them.
- To delete the item that is not deductible, click of the item.
- To create the survey for the National Tax Service data uploaded, click of the target item in the list viewed.
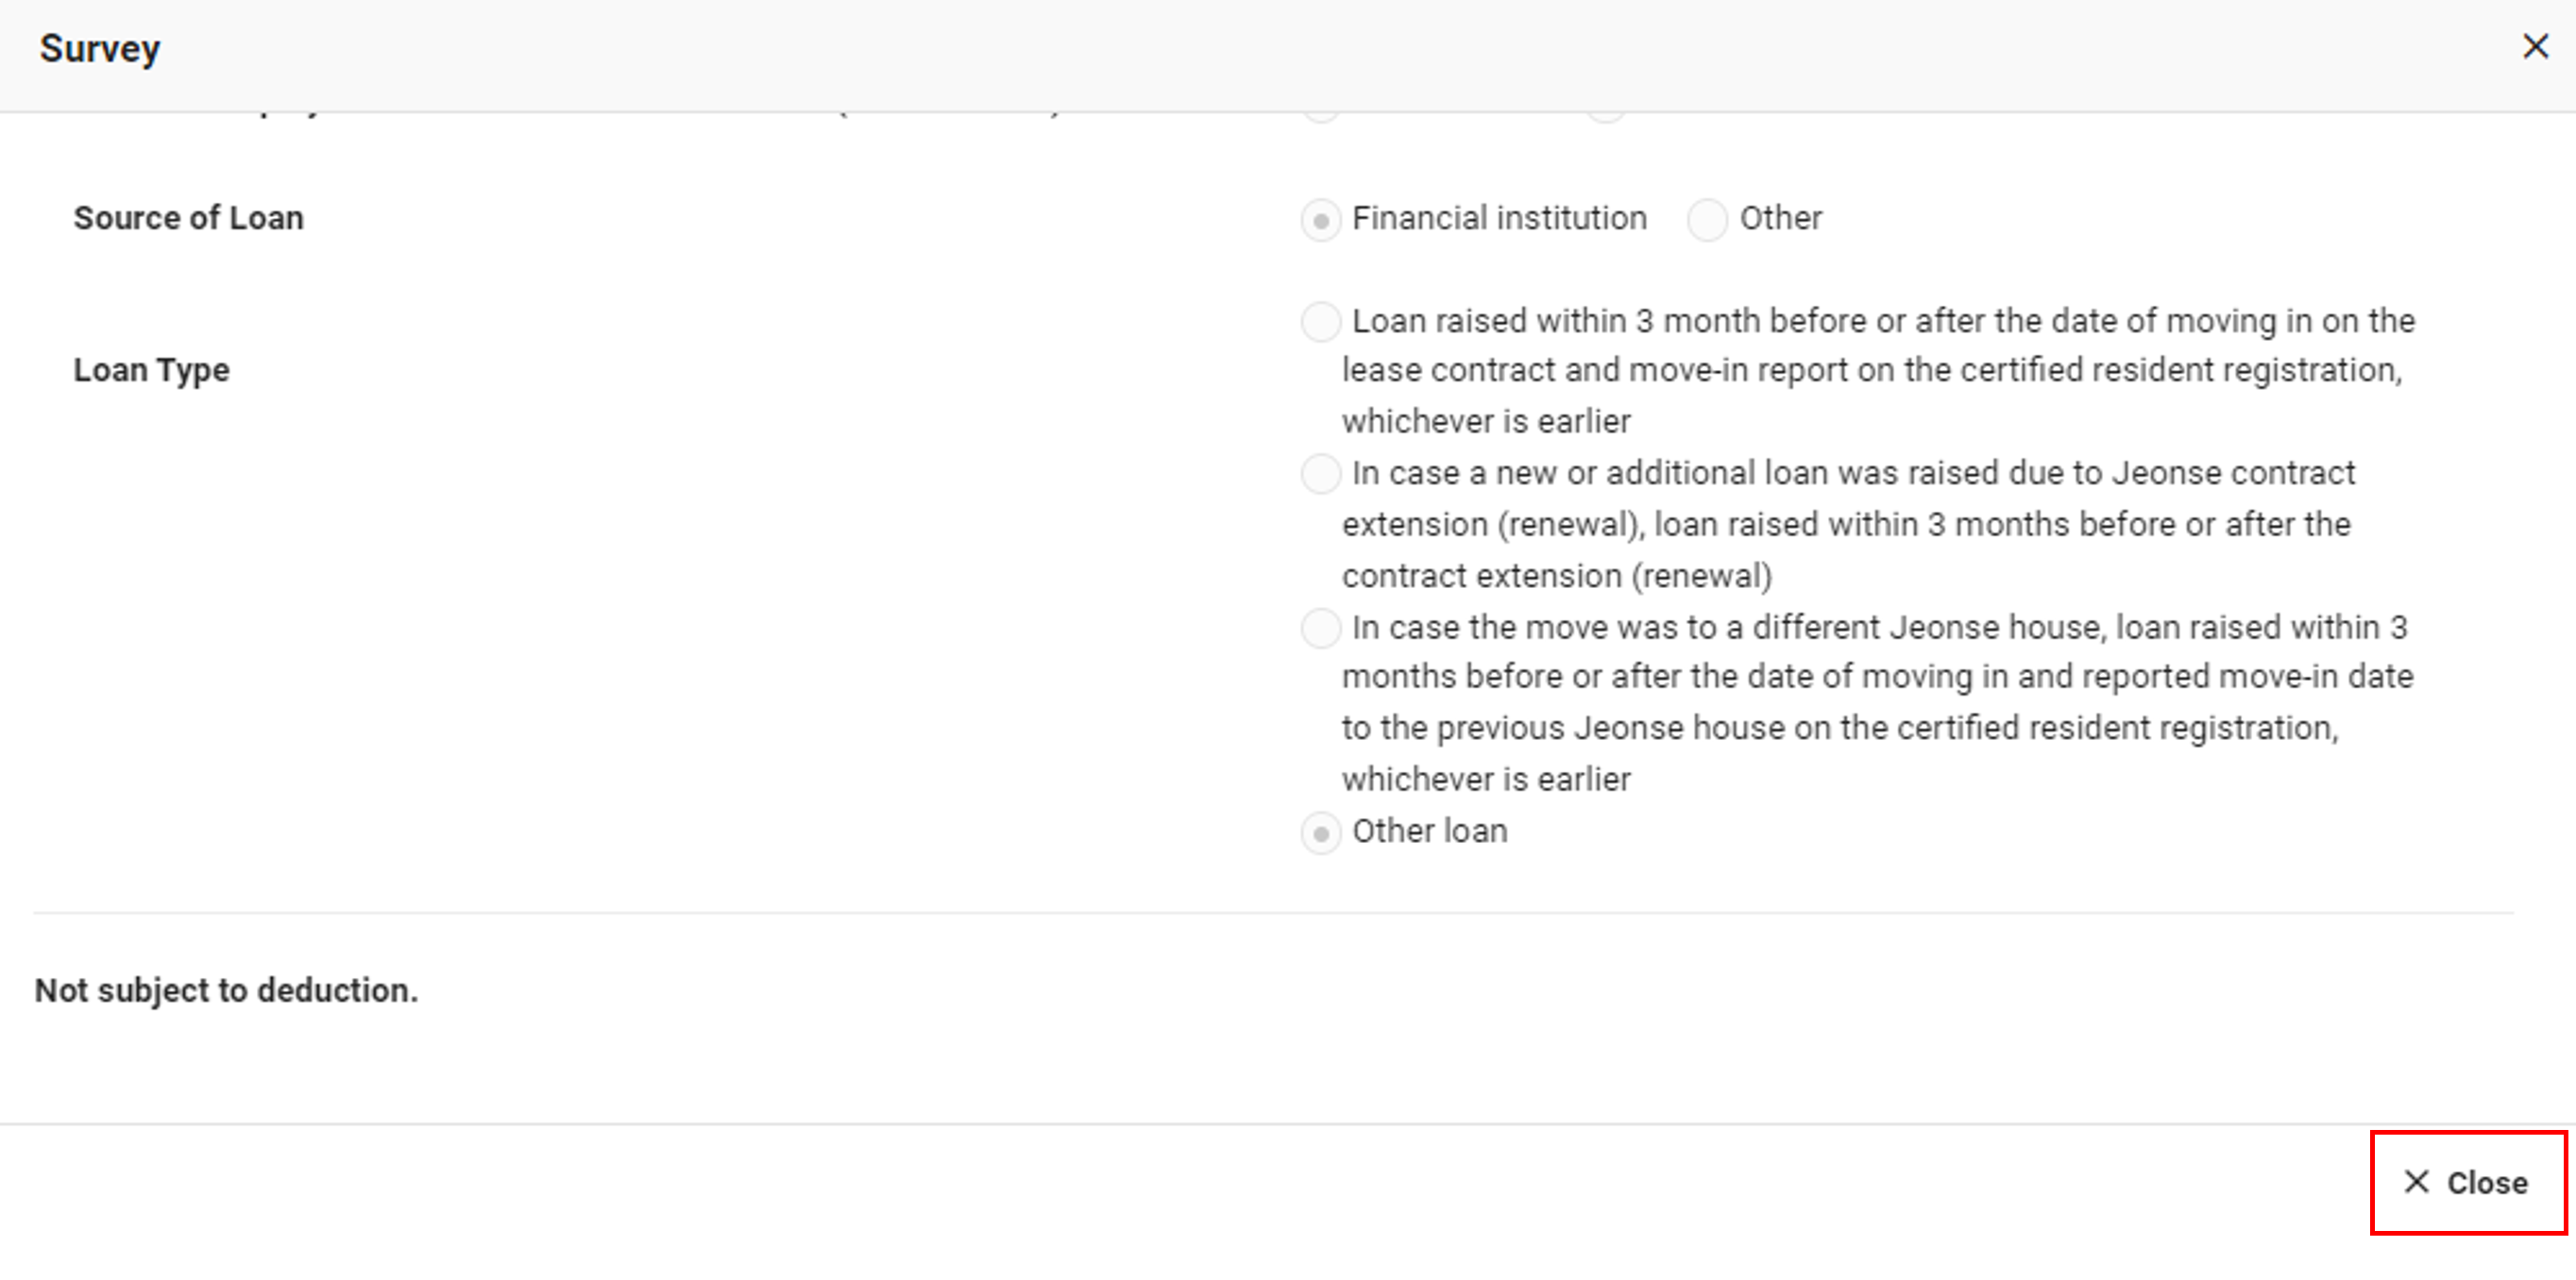
Create Survey:
You must create the survey to check again whether you can deduct the housing fund requested. The survey must be created every year, even if you uploaded the National Tax Service data. The survey needs to be created for every loan case.
Click ‘Create Survey’, and then click the answers to the questions according to order in the Create Survey screen.
- The questions continue to show up if the answer to the question matches the answer subject to income deduction, and the list of necessary documents appears at the end.
- Example of a case where the survey can't be progressed
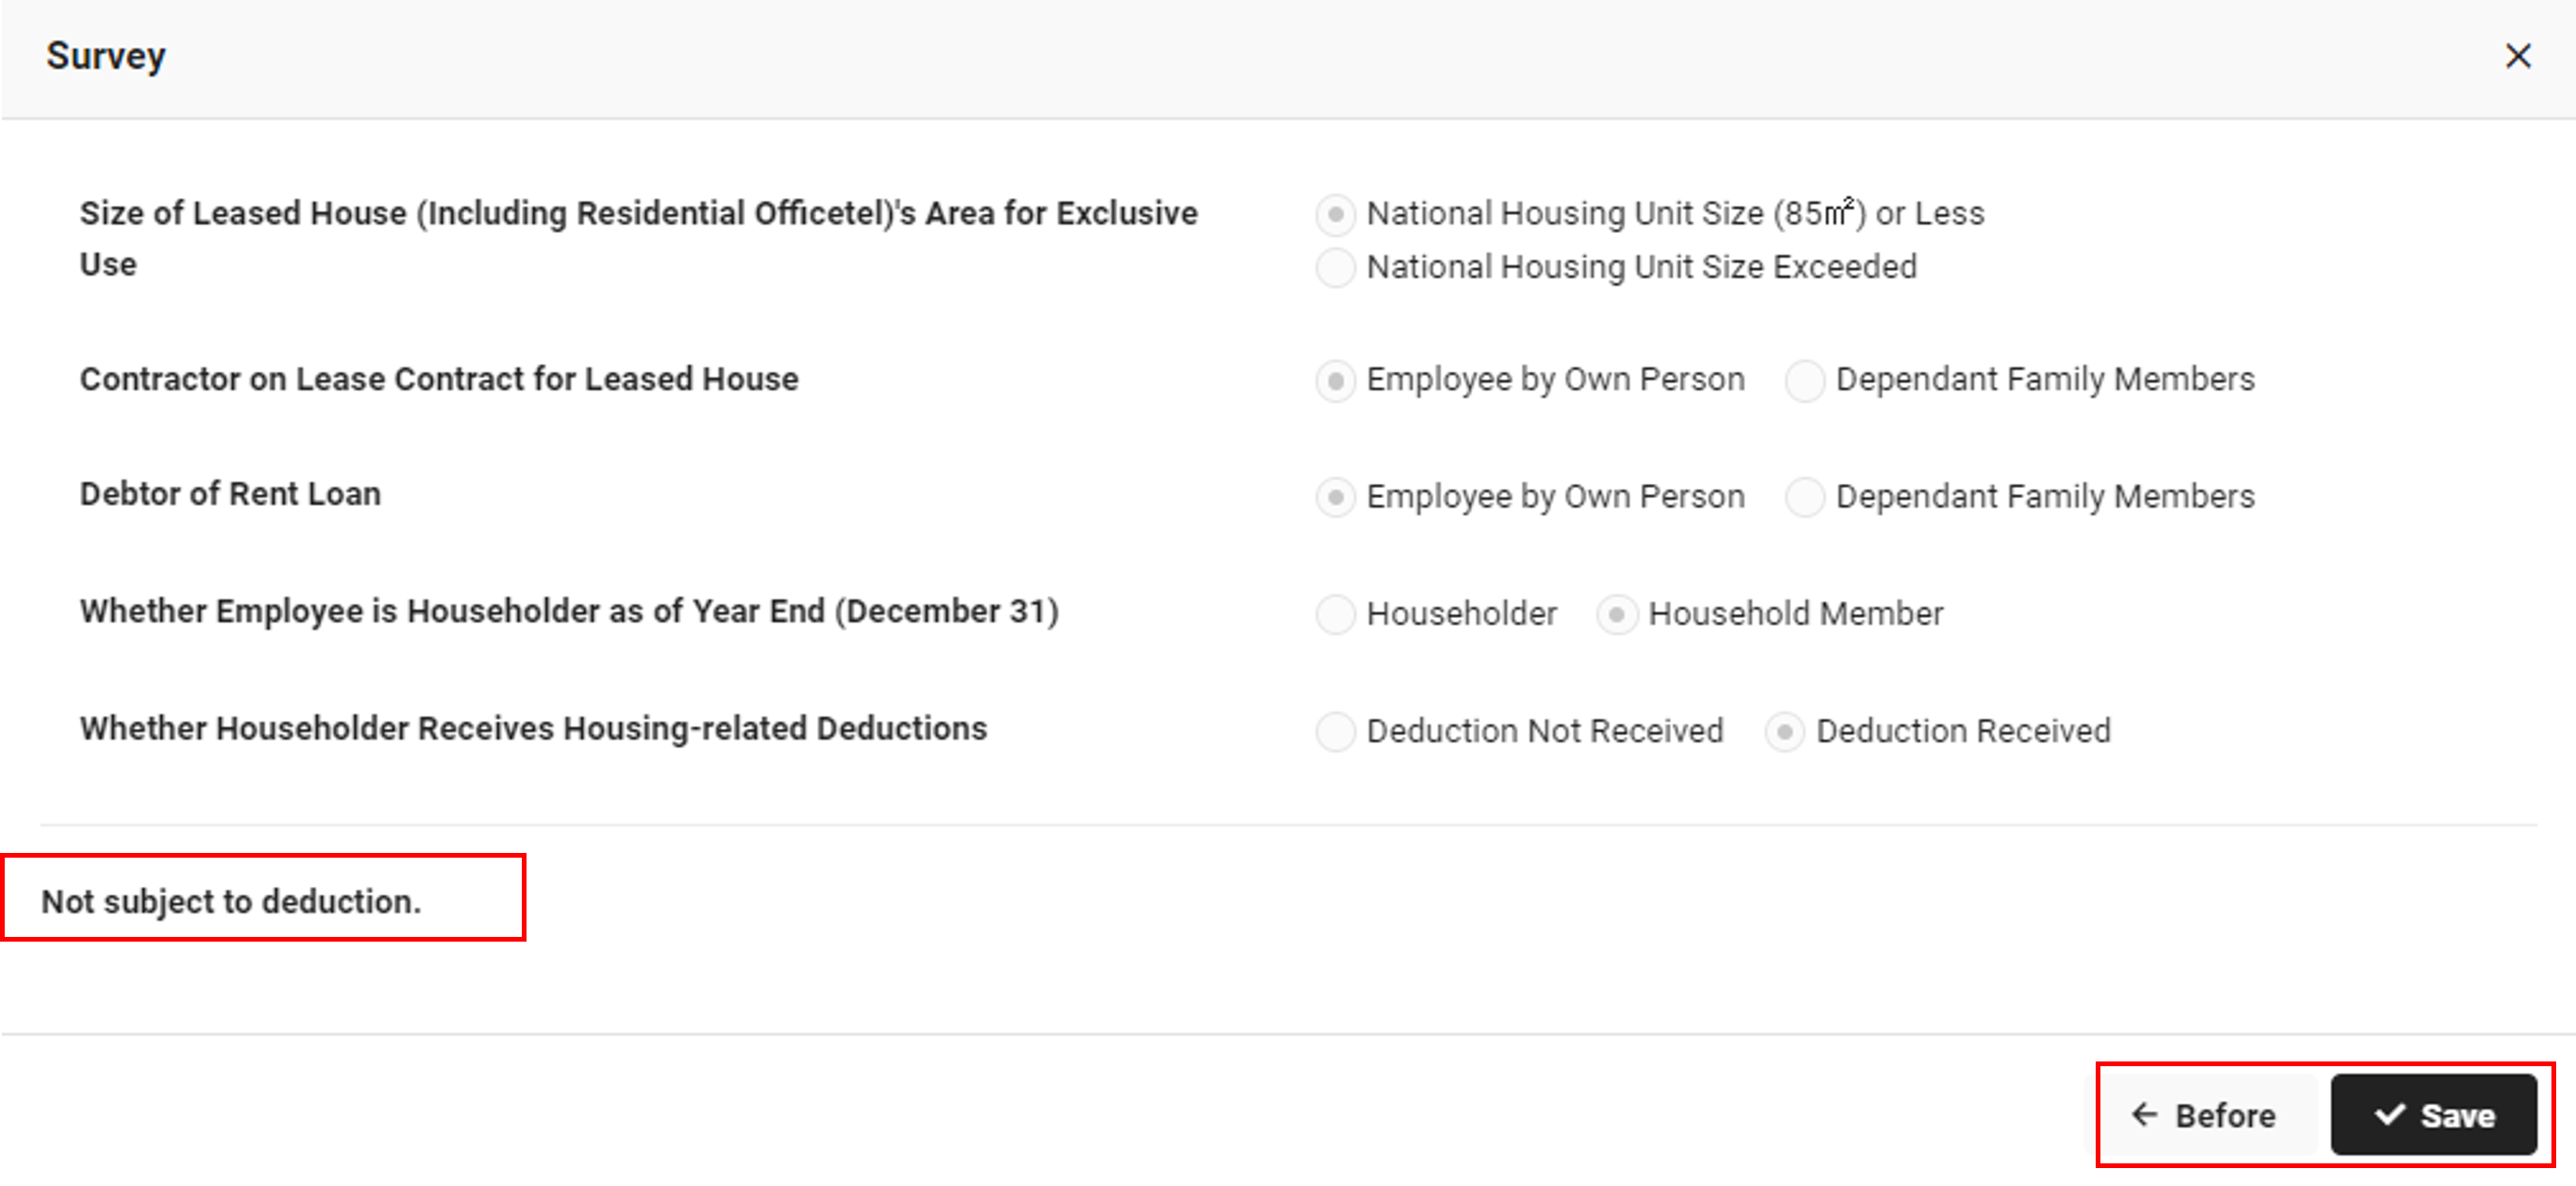
- Example of a case where the survey can't be progressed
- Example of a case where the survey is complete
- If the answer to a question doesn't match the answer subject to income deduction, then the ‘It is not deductible.’ message is displayed, and you can't complete the survey.
- If you need to edit or recreate the survey, click 'Back' before saving. Then, click 'Create Survey' again to create a new survey. After saving, click ‘Edit’ of the target to be edited, and then create a new survey.
- To search surveys, click ‘View Details’. Searched surveys can't be edited.
- ‘Long-term Housing-backed Loan’ Tab: Searches the data of the simplified National Tax Service file uploaded.
- Since the National Tax Service data shows the data provided by the lender, etc. as is, you must apply the deductible status of the item by checking the survey and submitted documents.
- Add: If the history to be deducted hasn't been registered as the National Tax Service data, then you can enter the loan details by receiving the Long-term Housing-backed Loan Interest Repayment Certificate issued by the lender. If there are 2 or more loans, then they must be entered separately. Click ‘Add’, enter the loan details, and click ‘Create Survey’ to create the survey. After creating the survey, click ‘Save’.
- Register Evidence: Once the survey is created, the documents to submit are indicated at the bottom of the pop-up window. After checking the submitted documents, click ‘Register Supporting Documents’ in the Long-term Housing-backed Loan tab to register the documents to be submitted.
- Evidence List
- Long-term housing-backed loan interest repayment statement (can be replaced by the National Tax Service simplified service, a document that can check the debt sharing ratios in the case of joint debtors)
- Certified copy of resident registration
- Certified copy of building register or sale-in-lots contract
- Individual house price confirmation or apartment house price confirmation
- Copy of loan contract (only applicable to persons who changed (or repaid) the loan product, submitting copies of the contract before and after the change)
- To edit, click of the target item in the list. If edited, then the survey needs to be created again.
- For details about creating the survey, check the note in the ‘Deductible Item 2 > House Rent Loan’ tab.
- To search surveys, click
 . Searched surveys can't be edited.
 - You can't edit National Tax Service data and can only delete them.
- To delete the item that is not deductible, click of the item.
- ‘House-Purchasing Saving’ Tab: Searches the data of the simplified National Tax Service file uploaded.
- Since the National Tax Service data shows the data provided by the lender, etc. as is, you must apply the deductible status of the item by checking the survey and submitted documents.
- Add: If the history to be deducted hasn't been registered as the National Tax Service data, you can enter the details by receiving the House-Purchasing Savings Payment Certificate issued by the financial institution. If there are 2 or more savings records, then they must be entered separately. Click ‘Add’, enter the loan details, and click ‘Create Survey’ to create the survey. After creating the survey, click ‘Save’.
- Register Evidence: Once the survey is created, the documents to submit are indicated at the bottom of the pop-up window. After checking the submitted documents, click ‘Register Supporting Documents’ in the ‘House-Purchasing Savings’ tab to register the documents to be submitted.
- Evidence List
- House-purchasing savings payment certificate (can be replaced by the National Tax Service simplified service)
- To edit, click of the target item in the list. If edited, then the survey needs to be created again.
- For details about creating the survey, check the note in ‘Deductible Item 2 > House Rent Loan’ tab.
- To search surveys, click . Searched surveys can't be edited.
- You can't edit National Tax Service data and can only delete them.
- To delete the item that is not deductible, click of the item.
- ‘Monthly Rent’ Tab: Searches the data of the simplified National Tax Service file uploaded.
- For monthly rent, there is other data than the simplified National Tax Service data, so you must enter details for the Lease Contract. You must apply the deductible status of the item by checking the survey and submitted documents.
- ‘1. Basic Information’ tab has Houseless Status. You can enter if you selected ‘Yes’.
- Add: If the history to be deducted hasn't been registered as the National Tax Service data, then you can enter the details for the Lease Contract. If there are 2 or more monthly rent records, then they must be entered separately. Click ‘Add’, enter the monthly rent details, and click ‘Create Survey’ to create the survey. After creating the survey, click ‘Save’.
- E.g., if the monthly rent has been increased or there are 2 lease contracts because of moving
- Check the details for the lease contract, and enter all applicable details.
- Enter the monthly rent spent during the lease period from January 1 to December 31. However, exclude the management expense if it is included.
- If you move during the year or the monthly rent is changed, then convert the total annual amount into days and register it.
- Deductible Monthly Rent Calculation: Monthly Rent 12 Number of Lease Days of the Year / 365 (or 366 days)
- Register Evidence: Once the survey is created, the documents to submit are indicated at the bottom of the pop-up window. After checking the submitted documents, click ‘Register Supporting Documents’ in the House-Purchasing Savings tab to register the documents to be submitted.
- Evidence List
- Certified copy of resident registration
- Copy of lease contract
- Documents proving payment of the monthly rent to the leaseholder, such as cash receipt, bank transfer receipt, deposit slip, etc.
- To edit, click of the target item in the list. If edited, then the survey needs to be created again.
- For details about creating the survey, check the note in ‘Deductible Item 2 > House Rent Loan’ tab.
- To search surveys, click . Searched surveys can't be edited.
- You can't edit National Tax Service data and can only delete them.
- To delete the item that is not deductible, click of the item.
- Other Tab: Searches the data of the simplified National Tax Service file uploaded. You can enter deductible installments for small business owners, employee stock ownership association contributions, employees of stable employment small and medium-sized companies, and investments in investment associations.
- Click the Add button for each item, and then enter the deductible details.
- Add Deductible Installments for Small Business Owners: Check the source of data, and then enter the amount and registration date.
- Add Employee Stock Ownership Association Contributions: Check the source of data, and then enter the amount.
- Add Employees of Stable Employment Small and Medium-sized Companies: Check the source of data, and then enter the amount.
- Add Investments in Investment Associations: Check the source of data, and then enter the information such as the investment association financing type and investment type, financial institution, etc.
- To edit, click of the target item in the list.
- To delete the item that is not deductible, click of the item.
- ‘Foreign Tax Amount’ Tab: If there is a tax amount paid (or to be paid) in a foreign country for an income received in a foreign country, then you can enter the payment tax amount.
- Add: Click ‘Add’, enter the information in the Enter Foreign Tax Amount pop-up window, and then click ‘Save’.
7. Evidence list
The list of supporting documents submitted and supporting documents not submitted is searched.

- Register Supporting Documents: Unsubmitted data can be registered by clicking ‘Register Supporting Documents’ at the bottom.
- Select the item and target of the data to be uploaded to attach them in the Register Evidence pop-up window, and then click ‘OK’.
- Additional registration can be requested after the payroll admin reviews the supporting document data registered by the employee.
- For management unsubmitted evidence data, see Manage Settlement Year of the ‘Year-end Tax Settlement > Manage Year-end Tax Settlement Schedule menu’.
- To download the submitted data, click ‘Download’.
- If the submitted documents have errors or need to be registered again, then click of the item to delete and register it again.
- Unsubmitted supporting document data can be attached by clicking ‘Register Supporting Documents’.
8. Settlement history
You can check the settlement history based on the data submitted.
- To download the settlement history, click ‘Download’.
Post-managing Year-end Tax Settlement
You can send emails to guide about approaching submission end dates for year-end tax settlement documents or unsubmitted documents, and reflect the tax amount after deducting year-end tax settlement in the payroll ledger.
서류미비자 안내 메일 발송
You can send emails to guide about approaching submission end dates for year-end tax settlement documents or unsubmitted documents.
The following describes how to send a email to guide employees who haven't submitted documents.
- Click 'Admin Menu' in the upper right corner of the PC web, then click 'Payroll' in the pop-up window.
- Click at the top left of the screen.
- Click 'Year-end Tax Settlement > Post-manage Year-end Tax Settlement' from the menu.
- Click the ‘Send Email Guiding Unsubmitted Documents’ tab.
- You can search the progress stage and final work date and time of the targets of year-end tax settlement.
- If necessary, enter the search conditions in the search window, and then click ‘Search’.
- You can search the targets that match the entered conditions.
- Check to select the target to be sent to in the list viewed, and then click ‘Send Email’.
- Check to select the type of the email to be sent in the Send Email pop-up window, and then click ‘Send Email’.
- Since it is a notification email, send a separate email when requesting detailed supporting documents to an employee.
Reflecting Settled Tax Amount in Payroll Ledger
You can reflect the tax amount of employees after deducting year-end tax settlement in the payroll ledger.
After closing year-end tax settlement, you can frequently check both current and retired employees to reflect them in the payroll sequence.
The following describes how to reflect the settled tax amount in the payroll ledger.
- Click 'Admin Menu' in the upper right corner of the PC web, then click 'Payroll' in the pop-up window.
- Click at the top left of the screen.
- Click 'Year-end Tax Settlement > Post-manage Year-end Tax Settlement' from the menu.
- Click the ‘Reflect Settled Tax Amount in Payroll Ledger’ tab.
- You can search the employees who closed year-end tax settlement.
- If the employee requested split payment, then Split Payment Request by Employee is viewed as ‘Yes’ or ‘No’.
- If the tax amount collected after deducting year-end tax settlement is Refund, then the entire refunded tax amount is reflected in the payroll month and sequence for February, even if the employee requested split payment.
- If necessary, enter the search conditions in the search window, and then click ‘Search’.
- You can search the targets that match the entered conditions.
- Check to select the target to be reflected in the payroll ledger from the list viewed, and then click ‘Record in Payroll Ledger’.
- Select the payday and sequence.
- The settled tax amount is reflected in the selected payroll month and sequence.
- Even if no employee requested split payment, the payday and sequence to record the settled amount (split payment) must be set in advance.
- E.g., Set payday and sequence for February, March, and April of 2024 for year-end tax settlement of 2023.
- You can set the payday and sequence in the ‘Payroll > Manage Payday menu’.
- The deduction code must be set to income tax settlement (T2), local income tax settlement (R2), or special tax for rural development settlement (F2).
- You can check and set the payroll code in the ‘Manage Payroll Code’ tab of the ‘Payroll > Settings > Manage Code’ menu.
View Year-end Tax Settlement
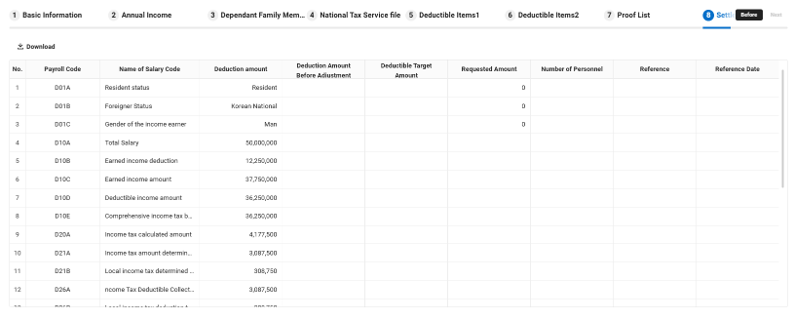
You can search details for year-end tax settlement to be utilized in a report form.
The following describes how to search details for year-end tax settlement.
- Click 'Admin Menu' in the upper right corner of the PC web, then click 'Payroll' in the pop-up window.
- Click at the top left of the screen.
- Click 'Year-end Tax Settlement > View Year-end Tax Settlement' from the menu.
- You can search the list of employees whose year-end tax settlement progress stage is Settlement History or Closed.
- If necessary, enter the search conditions in the search window, and then click ‘Search’.
- Check to select the targets to View Year-end Tax Settlement from the list viewed.
- Click the dropdown menu at the top of the list to select the type of the year-end tax settlement report to search, and click ‘Search’.
- The searched history can be downloaded as an Excel file.
View Year-end Tax Settlement Tax Forms
You can download and search income deduction reports or receipts for wage and salary income tax withholding of employees.
Other Forms
You can download the income deduction report of an employee whose year-end tax settlement progress stage is Settlement History or Closed in the PDF file format.
The following describes how to search other tax forms of year-end tax settlement.
- Click 'Admin Menu' in the upper right corner of the PC web, then click 'Payroll' in the pop-up window.
- Click at the top left of the screen.
- Click 'Year-end Tax Settlement > View Year-end Tax Settlement Tax Forms' from the menu.
- Click the ‘Other Forms’ tab.
- You can search the list of employees whose year-end tax settlement progress stage is Settlement History or Closed.
- If necessary, enter the search conditions in the search window, and then click ‘Search’.
- Check to select the other tax forms of year-end tax settlement to be searched in the list viewed, and then click ‘Search Income Tax Reports’.
- The selected search history is downloaded as a PDF file.
Receipts for Wage and Salary Income Tax Withholding
You can download or print receipts for wage and salary income tax withholding of employees.
The following describes how to download or print receipts for wage and salary income tax withholding.
- Click 'Admin Menu' in the upper right corner of the PC web, then click 'Payroll' in the pop-up window.
- Click at the top left of the screen.
- Click 'Year-end Tax Settlement > View Year-end Tax Settlement Tax Forms' from the menu.
- Click the ‘Receipts for Wage and Salary Income Tax Withholding’ tab.
- You can search the list of employees whose year-end tax settlement progress stage is Settlement History or Closed.
- If necessary, enter the search conditions in the search window, and then click ‘Search’.
- Check to select the target receipts for wage and salary income tax withholding to be searched in the list viewed, and then click ‘Print Receipts for Wage and Salary Income Tax Withholding’.
- Select the printing options in the Print Receipt for Wage and Salary Income Tax Withholding pop-up window, and then click ‘Print Receipt for Wage and Salary Income Tax Withholding’.
- The selected search history is downloaded as a PDF file.
- You can set the Draft display status for the downloaded receipt file in the ‘Year-end Tax Settlement > Perform Year-end Tax Settlement’ menu.
Filing for Year-end Tax Settlement Taxes
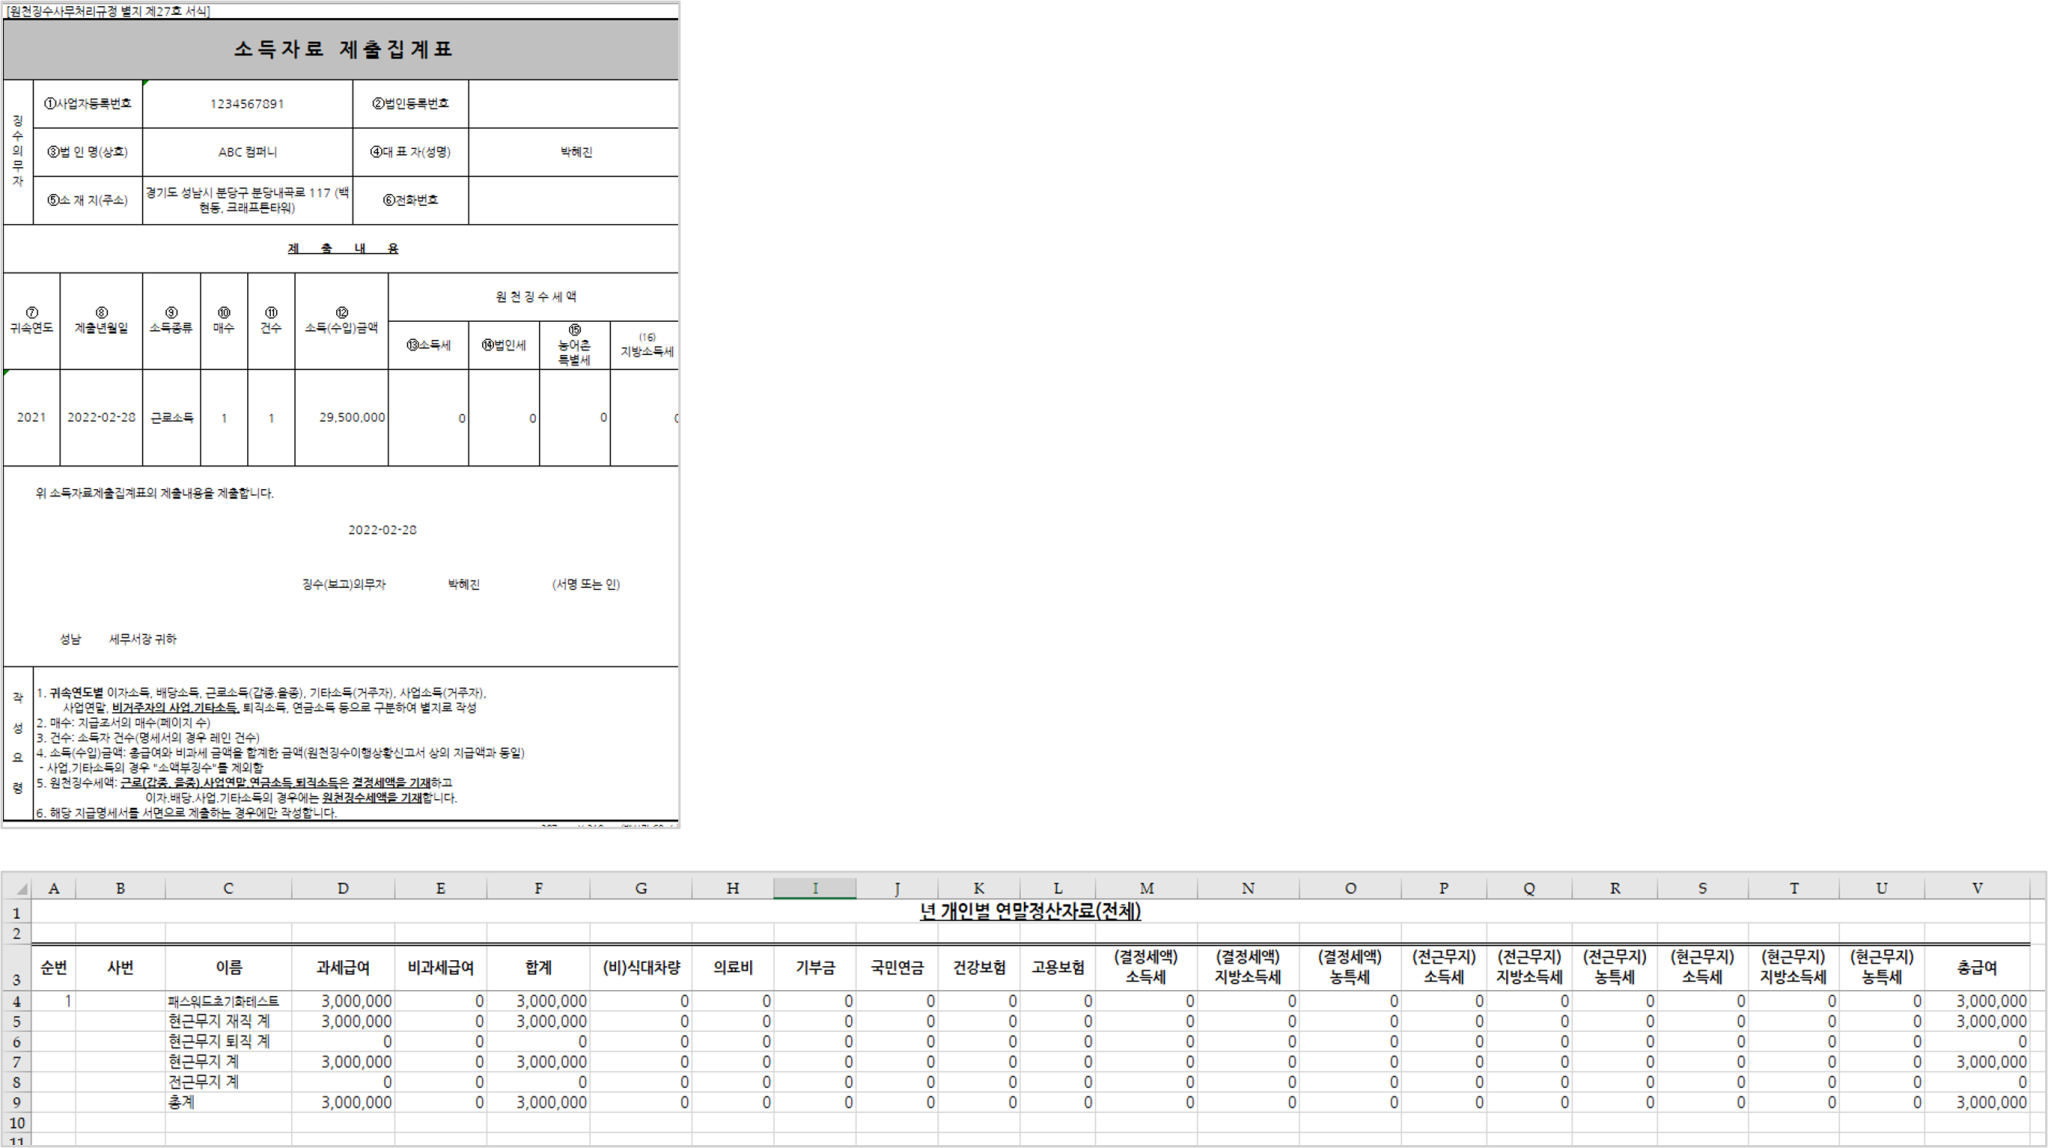
You can download the payment statement and payment record submission history to file for taxes on National Tax Service Hometax as Excel files.
Payment Statement
You can preview the payment statement submitted to National Tax Service Hometax or file for it by downloading as a plain text.
For the method of submitting payment statements, see File for Non-wage Income.
The following describes how to download payment statements to file for taxes on National Tax Service Hometax.
- Click 'Admin Menu' in the upper right corner of the PC web, then click 'Payroll' in the pop-up window.
- Click at the top left of the screen.
- Click 'Year-end Tax Settlement > File for Year-end Tax Settlement Taxes' from the menu.
- Click the 'Payment Statement' tab.
- You can search the list of employees who closed year-end tax settlement.
- If necessary, enter the search conditions in the search window, and then click ‘Search’.
- Check to select the submitted payment statements to be searched from the list viewed, and then click ‘Preview’ to check details before filing.
- Enter the information in the Preview Payment Statement pop-up window, and then click ‘Download’.
- The downloaded preview file is saved for each record, so you can separately check the file for each record.
- Check to select the target to file for from the list viewed, and then click ‘Download Plain Text’.
- Enter the submission information in the Download Payment Statement in Plain Text pop-up window, and then click ‘Download’.
- You can download the payment statement file as an electronic file that can be submitted to National Tax Service Hometax.
Tally on Submitted Income Data
The following describes how to download the history of payment records submitted as an Excel file.
- Click 'Admin Menu' in the upper right corner of the PC web, then click 'Payroll' in the pop-up window.
- Click at the top left of the screen.
- Click 'Year-end Tax Settlement > File for Year-end Tax Settlement Taxes' from the menu.
- Click the ‘Tally on Submitted Income Data’ tab.
- You can search the list of employees who closed year-end tax settlement.
- If necessary, enter the search conditions in the search window, and then click ‘Search’.
- Check to select the history of payment records submitted in the list viewed, and then click ‘Download Tally on Submitted Income Data’.
- Select the download options in the Download Tally on Income Data pop-up window, and then click ‘Download’.
- The selected search history is downloaded as an Excel file.
- The selected search history is downloaded as an Excel file.