You can view registered pledge forms, register new pledge forms, and manage registered forms.
The Manage Forms screen is laid out as follows.
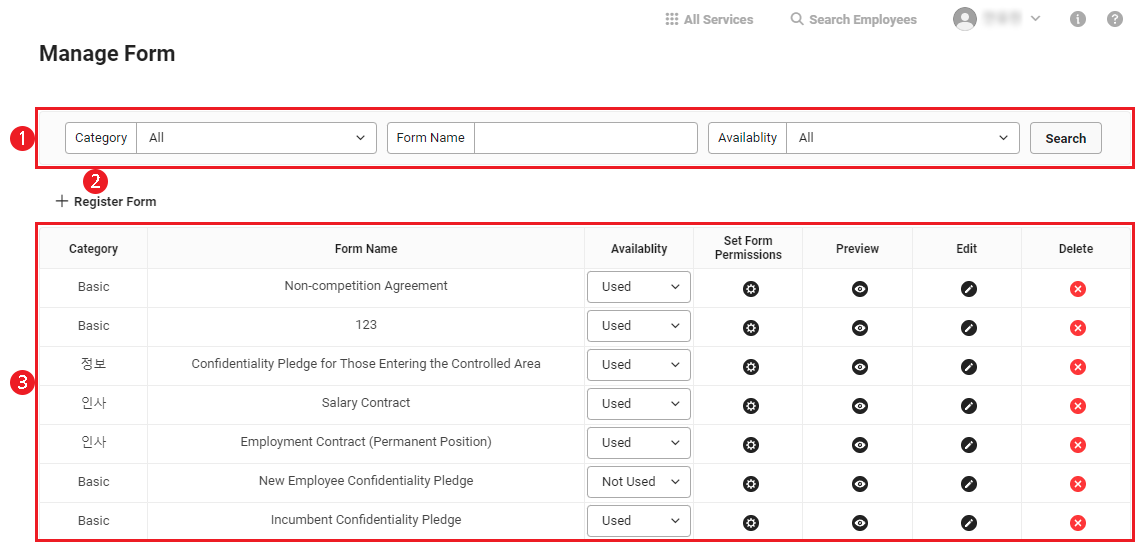
| Area | Description |
|---|---|
| ① Search Window | Searches registered forms by category, form name, and use. |
| ② Register Form | Registers a new pledge form. (See Registering Forms) |
| ③ List of Forms | Views and manages registered forms. (See Manage Registered Forms) |
Registering Forms
You can use the default forms or write a new pledge in a blank form. Also you can create and register a new pledge form based on a form previously registered by the company.
The following shows how to register pledge forms.
- Click ‘Admin Menu’ at the top right of the PC web screen, and then click ‘Pledge’ in the pop-up window.
- Click
 at the top left of the screen.
 - Click 'Manage Forms' from the menu.
- Click ‘Register Form’.
- Select the template to use when creating the form.
- Blank Form: Creates a blank form.
- Provided Form: Selects and uses a provided form, or creates a form by partially editing as necessary.
- My Company's Form: Selects a previously registered form to create a form.
If you're using as a corporate group, ‘Other Company's Forms’ is displayed if you're authorized with pledge forms of other companies in the corporate group. You can select these forms and use them as templates.
- Select the category to register the form.
- To add a new category, see Manage Category.
- Enter the form name.
- Compose the content of the form.
- Category: Select the category of the form. You can click ‘Add Category’ to create a new category and select it.
- Form Name: Enter the pledge form name.
- Substitute Character: You can integrate with company basic information or member information and automatically display what applies to each target. Place the mouse cursor on the position to insert a substitute character, and select the substitute character to be inserted in the Substitute Character area.
- Depending on the usage settings of the information, the content displayed in the substitute character area may differ.
- When the admin views the pledge delivery status and pledge status, some parts of the member's personal information are masked. (E.g., Mobile phone number, resident registration number, home address, etc.)
- You can add and use substitute characters manually as needed. Click ‘Set User Substitute Characters’ to set new substitute characters.
- Click ‘Add’ in the Set User Substitute Characters pop-up window to add substitute characters.
- The added substitute characters are added to the Substitute Characters area.
- Please upload the values to be applied to user substitute characters in the User Substitute Characters item when sending the pledge. (See Adding Pledges)
- Click 'Save Form'.
- To cancel creating the form, click ‘Cancel’.
- To save the form temporarily while creating, click ‘Save Temporarily’. Temporarily saved forms can be checked by clicking ‘Save Temporarily’ at top right corner of the Register Form screen.
- Select the member or permission group to grant the send/view/edit/delete permission of the form in the Set Permissions pop-up window, and then click ‘OK’.
- When using as a corporate group, you can grant form management permissions to employees of the corporate group.
If the employee to be granted permissions does not have a pledge manage permission, grant Pledge admin permissions in Admin.- Permissions can be granted by employee, department, and permission group.
- When granting permissions to a group, click ‘Manage Groups’ to open ‘View Group Details’ pop-up window. You can select a group from the pop-up to grant permissions.
- Added groups can also be used in other services.
- The created form is registered and displayed in the list.
In places where substitute characters are used, the company information registered in ‘Business Support Settings > Company Information > Manage Company Information’, employee information registered in ‘HR > Member > Manage Employees’, and additional information and supplementary information in ‘HR > Settings > Set Personnel Information’ are applied. Before using substitute characters, check that the information corresponding to substitute characters have been registered properly in the menus below.
- Business Support Settings > Company Information > Manage Company Information
- HR > Member > Manage Employee
- HR > Settings > Set Personnel Information
- Personal Information > Manage Signature (managed individually by employee)
If the company has changed information that was being used to ‘Not use’, then the information may not be displayed for substitute characters. In this case, edit them by referring to Modify Forms.
Manage Registered Forms
You can manage forms registered in the form list.
Changing Form Use
- Click the dropdown list in the ‘Use’ column of the item to change settings in the form list.
- Select Use or Not Use.
- Use: The form can be sent in the Send Pledges menu.
- Not Use: The form does not appear in the Send Pledges menu.
Change Form Permissions
You can change form use permissions (view/modify/delete).
- Click
 of the form to change permissions in the form list.
 - Select the employee, department, or permission group to be granted permissions, and then click ‘OK’.
- To add a group, click ‘Manage Groups’
- Added groups can also be used in other services.
Previewing Forms
- Click
 of the form to be confirmed in the form list.
 - Check the preview content.
- To see how it appears in the PC screen, click ‘PC’ tab.
- To see how it appears in the mobile screen, click ‘MOBILE’ tab.
Modifying Forms
- In the form list, click
 of the form to be modified.
 - Modify the form, and then click ‘Save Form’.
- Enter the reason for changing the form, and then click ‘OK’.
- The edited content is reflected.
- Click the ‘Information Change History’ at the top right corner of the Modify Form screen to check the form modification history (form at each point of modification, reason for modification).
- To confirm the form at each point of modification, click in the Information Change History pop-up window.
- To confirm the reason for modification, click
 in the Information Change History pop-up window.
- To confirm the form at each point of modification, click
- Only an employee who was granted permissions when Registering Forms can modify the form.
- For more information about modifying forms, see procedures 5-8 of Registering Forms.
Deleting Forms
- In the form list, click
 of the form to be deleted.
 - Check the details in the confirmation pop-up window, and click ‘Delete’.
- The form will be deleted.
- Only an employee who was granted permissions when Registering Forms can delete the form.
- You can also delete the form in the Modify Forms screen. To delete the form in the Modify Forms screen, click ‘Delete Form’ at the bottom of the screen.