This feature is available after applying for the Pledge option.
You can send the pledges. Also, you can edit or delete pledges with status set as Not Sent or Scheduled for Delivery.
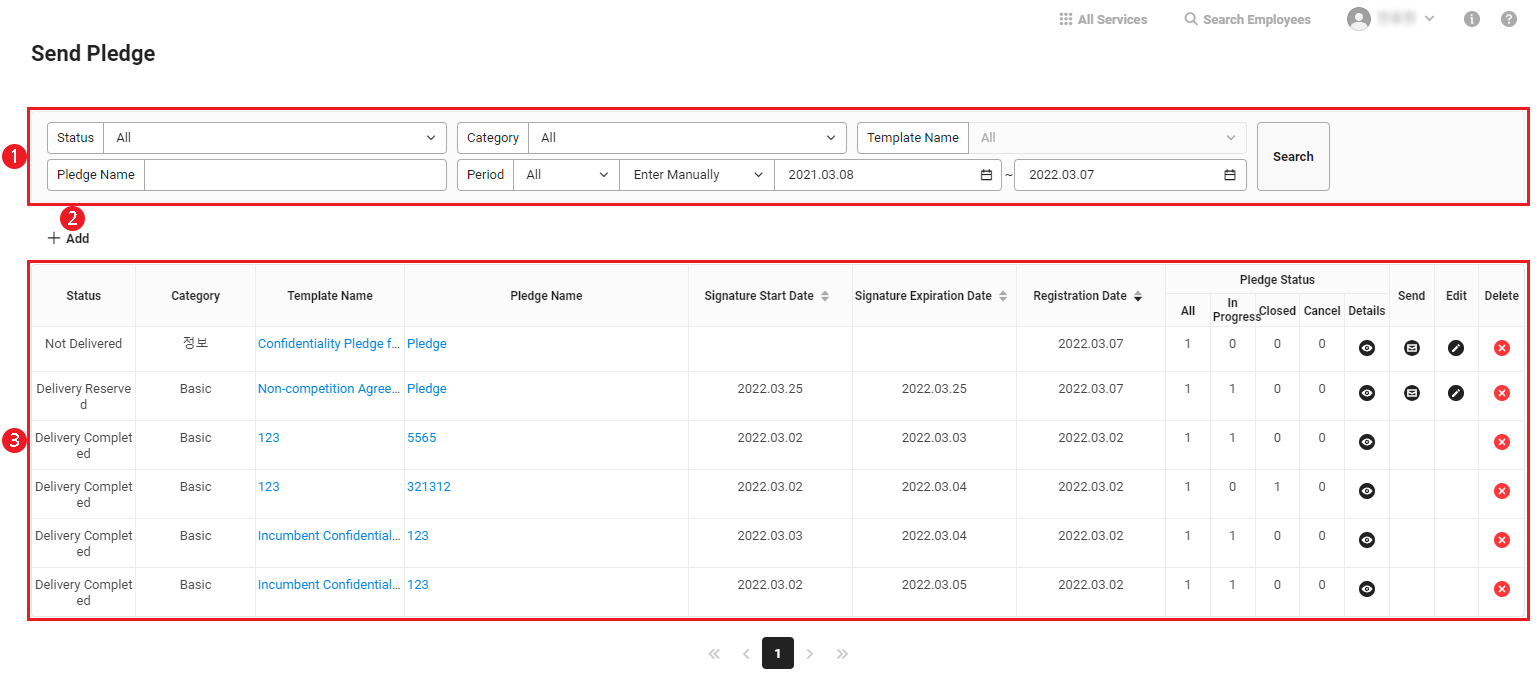
The Send Pledges screen is laid out as follows.
| Area | Description |
|---|---|
| ① Search Window | Searches added pledges by status, category, form name, pledge name, and period. |
| ② Add | Adds a new pledge (See Adding Pledges) |
| ③ Pledge List | Views and manages added pledges (See Send Added Pledges and Manage Pledges) |
Adding Pledges
The following shows how to add a pledge to be sent.
- Click ‘Admin Menu’ at the top right of the PC web screen, and then click ‘Pledge’ in the pop-up window.
- Click
 at the top left of the screen.
 - Click 'Send Pledges' from the menu.
- Click 'Add'.
- Select the category and form name, and enter the pledge name.
- Search and add the member or department to sign the pledge.
- If Include Suborganizations is selected, the pledge is sent to all members of suborganizations of the selected department.
- If substitute characters are applied to the pledge form, click ‘Upload File’ to upload the substitute character file.
- Click ‘Download Sample File’ to download the substitution character upload form.
- The comma is only applied if the cell type of the substitution characters is specified as Number in the Excel upload.
- Click ‘Save’.
- The added pledge is saved and displayed in the list.
The added pledge is not sent automatically. Make sure to send manually by referring to Send Added Pledges.
Send Added Pledges
The following shows how to send added pledges to the signer.
- Click ‘Admin Menu’ at the top right of the PC web screen, and then click ‘Pledge’ in the pop-up window.
- Click at the top left of the screen.
- Click 'Send Pledges' from the menu.
- In the pledge list, click
 .
. - Designate the settings in the Settings pop-up window, and then click ‘OK’.
- To deliver the pledge immediately, select ‘Immediate Delivery’ and designate the signature expiration date. The pledge will be delivered immediately.
- To deliver the pledge on a designated date, select ‘Reserve’ and designate the signature start date and signature expiration date. The pledge will be delivered on the designated signature start date.
Manage Pledges
You can confirm, modify, or delete details of added pledges.
Confirm Pledge Details
To confirm details of pledges, click ![]() in the pledge list.
in the pledge list.
- Go to the Pledge Status screen.
- For more information about the Pledge Status screen, see Pledge Status.
Edit Pledges
If the pledge status is ‘Not Sent’ or ‘Scheduled for Delivery’, you can edit the content of the pledge.
The following shows how to edit pledges.
- In the pledge list, click
 of the item to be edited.
 - Apply the edited content, and then click ‘Save’.
- The edited content is saved.
Delete Pledges
If the pledge status is’ Not Sent’ or ‘Scheduled for Delivery’, you can delete the pledge.
- Deleted signature requests can't be recovered. Please delete with caution.
- If the pledge status is ‘Complete’ or ‘Deletion Requested’, the pledge can't be deleted in ‘Send Pledges’.Please delete pledges individually in the Pledge Status menu.
The following shows how to delete a pledge.
- In the pledge list, click
 of the item to be deleted.
 - Check the details in the confirmation pop-up window, and click ‘Delete’.
- The selected item will be deleted.