In the Manage Inventory menu, you can manage inventory movement between warehouses as well as warehousing/shipment management, inventory checks to check and match computerized and physical inventory, current inventory inquiry, inventory receipt and payment status inquiry, and monthly inventory closing management.
Manage Warehousing
You can register the inbound shipments history and download the history as an Excel file.
When the warehousing history is registered, the inventory is increased by the warehousing quantity. The sales items can be categorized into Produced Warehousing, shipped through direct production, Purchase Warehousing, shipped from external purchase, and Other Warehousing, which is neither produced nor purchased, for management. You can manage the warehousing for each warehouse registered in the ‘Sales > Sales Standard Information > Warehouse Information’.
The Manage Warehousing page is laid out as follows.
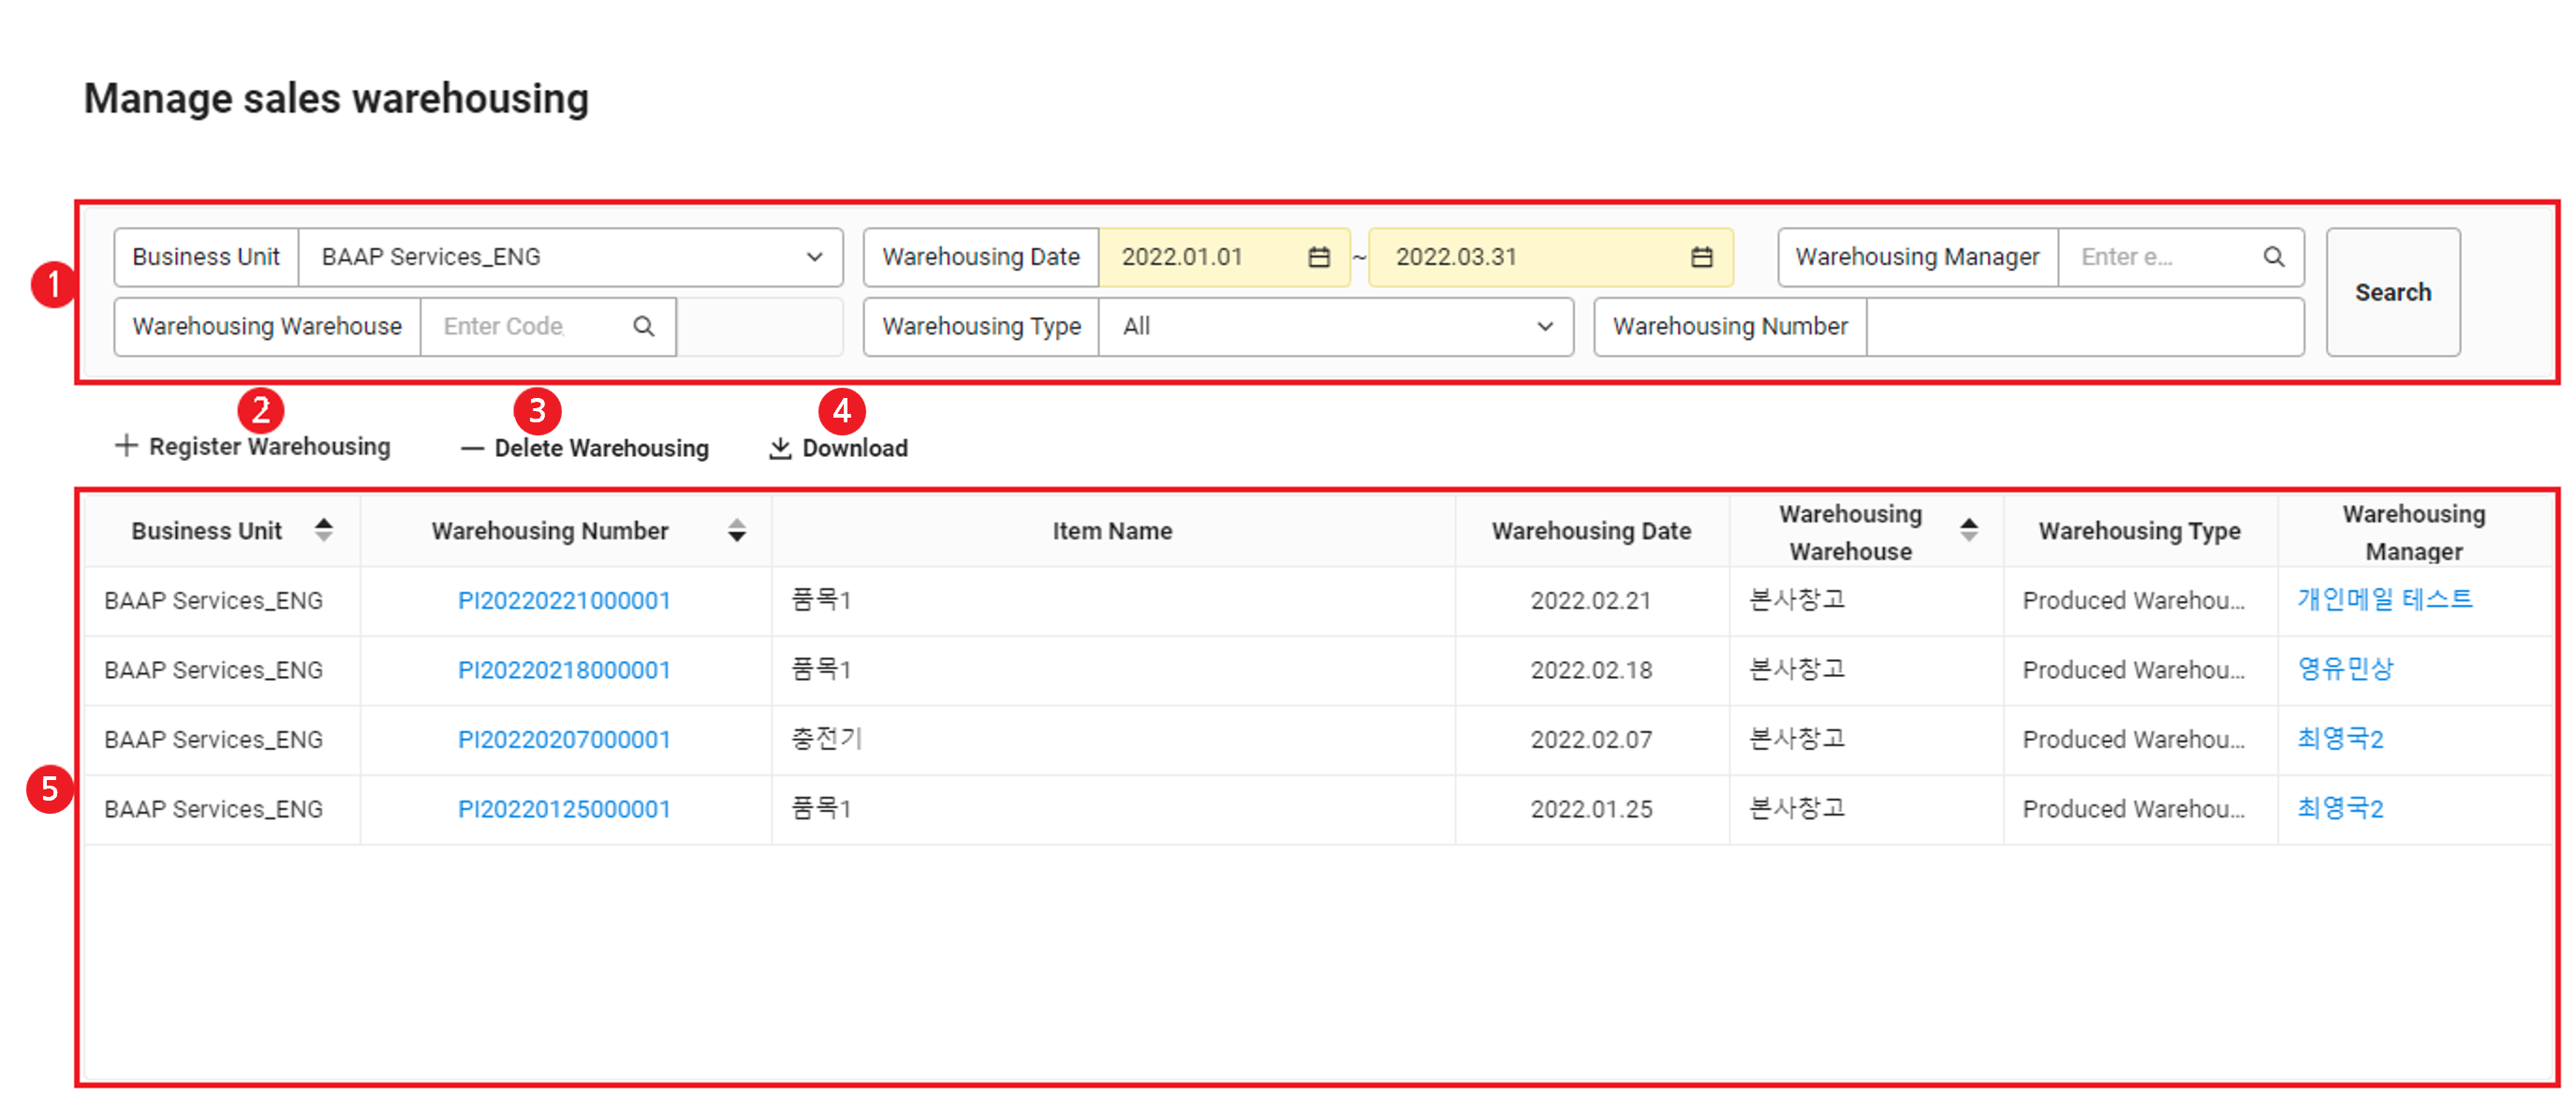
| Area | Description |
|---|---|
| ① Search Window | Search by business place, warehousing date, warehousing manager, warehousing warehouse, warehousing type, or warehousing number conditions |
| ② Register Warehousing | Register warehousing history (See Register Warehousing) |
| ③ Delete Warehousing | Delete selected warehousing history (See Delete Warehousing) |
| ④ Download | Download the Manage Warehousing list as an Excel file (See Download Warehousing History) |
| ⑤ Warehousing History List | Search the warehousing history list
|
Register Warehousing
The following describes how to register warehousing history.
- Click ‘Admin Menu’ at the top right of the PC web screen, and then click ‘Sales’ in the pop-up window.
- Click
 at the top left of the screen.
 - Click ‘Manage Inventory > Manage Warehousing’ from the menu.
- Click ‘Register Warehousing’.
- The fields marked in yellow are required items.
- Warehousing Number: The warehousing number is added automatically. (Numbering rule: PI + yyyymmdd + 6 digit sequence)
- Business Place: Select the business place item.
- Warehousing Warehouse: Select a warehouse of the selected business place. You can't add items unless you select a warehousing warehouse.
- Warehousing Date: You can only select a past date including the current date.
- Warehousing Type: Select the warehousing type.
- Kind of Warehousing Type: Select the warehousing type (produced warehousing, purchase warehousing, and other warehousing).
- Warehousing Manager: Select the warehousing manager.Enter the warehousing information and click ‘Add’.
- Enter the warehousing item information.
- Item Code: Select the item code field to select items to warehouse. When you select an item code, the Item Group, Standard, Inventory Quantity, and Inventory Unit are entered automatically.
- Warehousing Quantity: Enter the warehousing quantity (required field). You can only enter positive integers in the Warehousing Quantity field.
- Duplicated items can't be saved.
- To delete the added item, click ‘Delete’.
- Click ‘Save’.
Download Warehousing History
The following describes how to download warehousing history as an Excel file.
- Click ‘Admin Menu’ at the top right of the PC web screen, and then click ‘Sales’ in the pop-up window.
- Click at the top left of the screen.
- Click ‘Manage Inventory > Manage Warehousing’ from the menu.
- Enter the warehousing conditions to be searched in the search window, and then click ‘Search’.
- You can search the warehousing history records that match the entered conditions.
- Click 'Download'.
- The warehousing history is downloaded as an Excel file.
ManageWarehousing_YYYYMMDD_XXXXXX.xlsx in the Downloads folder.Delete Warehousing
The following describes how to delete warehousing history.
- Click ‘Admin Menu’ at the top right of the PC web screen, and then click ‘Sales’ in the pop-up window.
- Click at the top left of the screen.
- Click ‘Manage Inventory > Manage Warehousing’ from the menu.
- Select the warehousing data to delete.
- Click 'Delete Warehousing'.
- In the notification pop-up window, click ‘OK’ .
- The warehousing data is deleted.
You can't delete warehousing data in the following cases.
- Warehousing data of closed month
- If the company has set negative inventory to Now allow (‘Sales > Settings’ menu) and the inventory becomes less than 0 when deleting the warehousing data
Manage Outbound Shipment
You can register or search outbound shipment history information for items to sell. In addition to outbound shipments from normal sales, you can also manage inventory through other outbound shipment processing when outbound shipment processing is needed for purposes such as processing as loss or discard, and the inventory decreases by the shipment quantity.
The Manage Outbound Shipment page is laid out as follows.
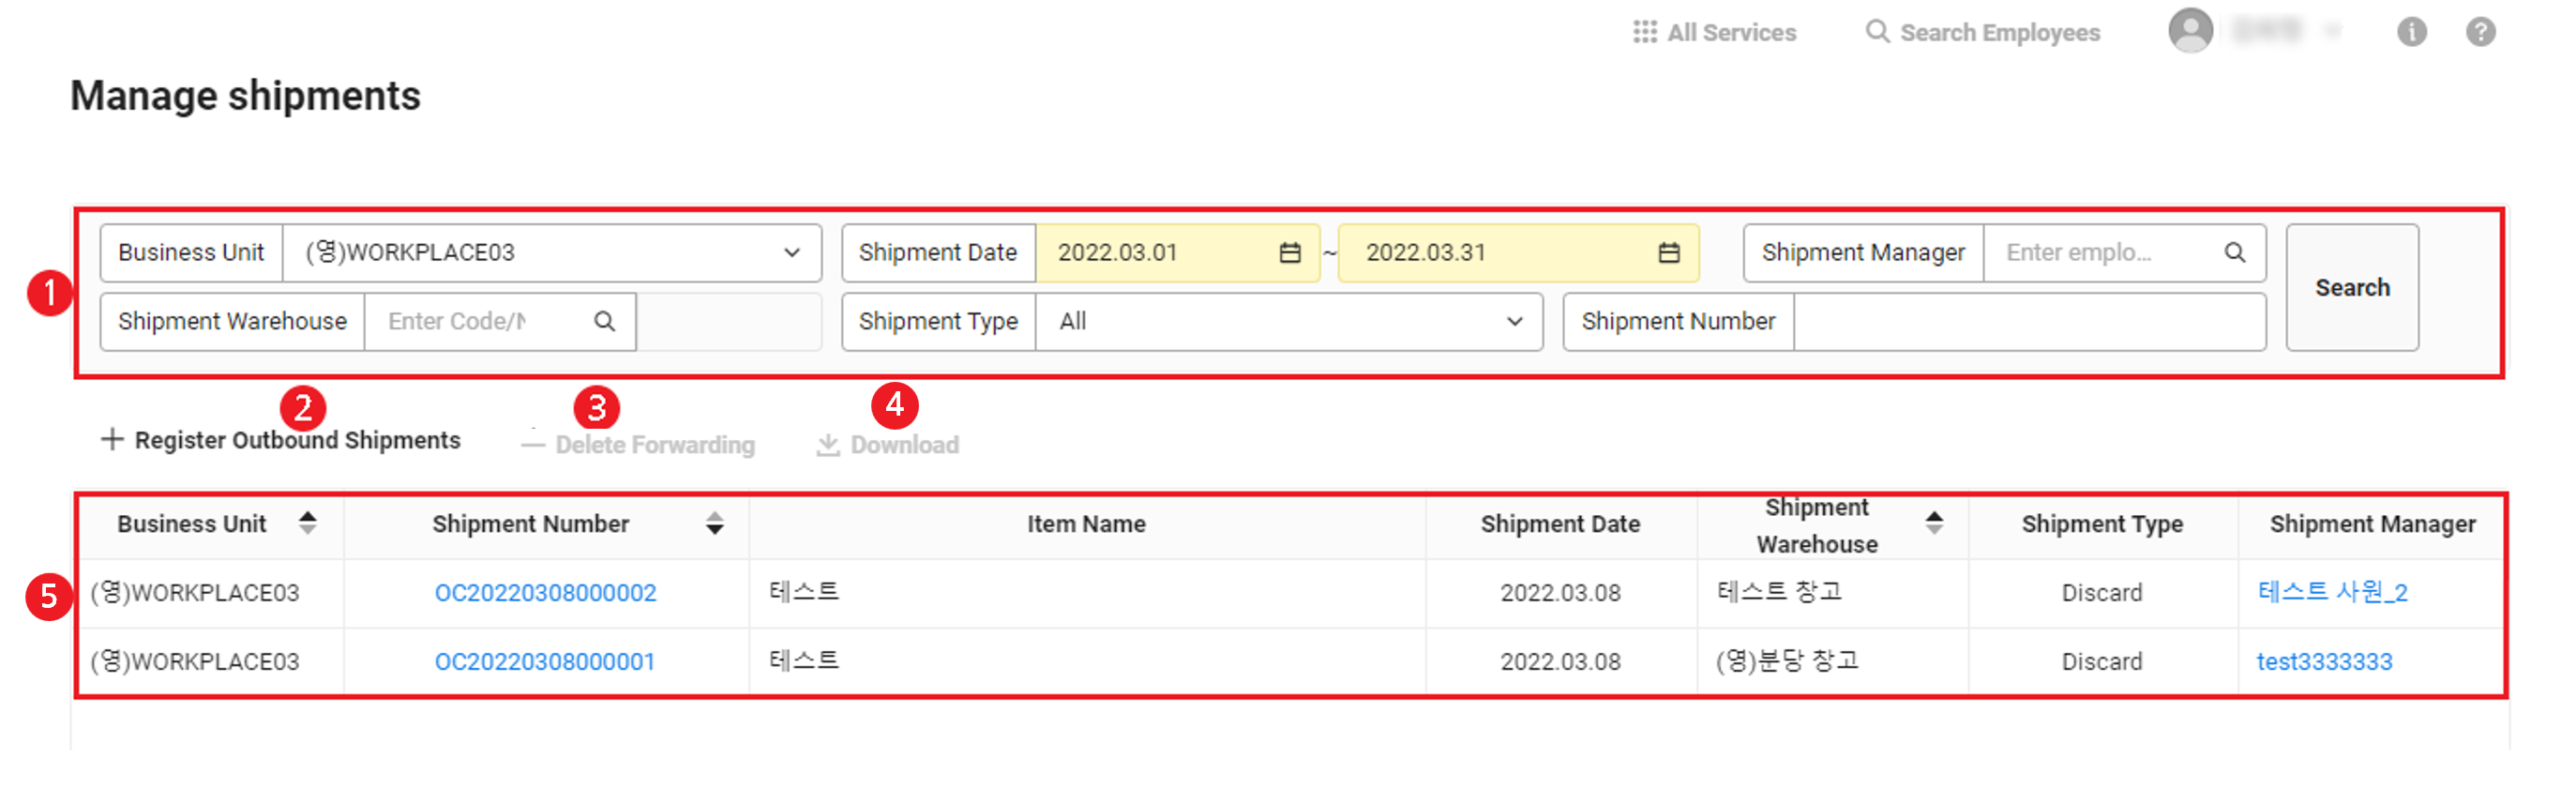
| Area | Description |
|---|---|
| ① Search Window | Search by business place, shipment date, shipment manager, shipment type, and shipment number conditions |
| ② Register Outbound Shipment | Register new outbound shipment history (See Register Outbound Shipment) |
| ③ Delete Outbound Shipment | Delete selected outbound shipment history (See Delete Outbound Shipment) |
| ④ Download | Download the Manage Outbound Shipment list as an Excel file (See Download Outbound Shipment History) |
| ⑤ Outbound Shipment History List | Search the outbound shipment history list
|
Register Outbound Shipment
The following describes how to register outbound shipment history.
- Click ‘Admin Menu’ at the top right of the PC web screen, and then click ‘Sales’ in the pop-up window.
- Click at the top left of the screen.
- Click ‘Manage Inventory > Manage Outbound Shipments’ from the menu.
- Click ‘Register Outbound Shipment’.
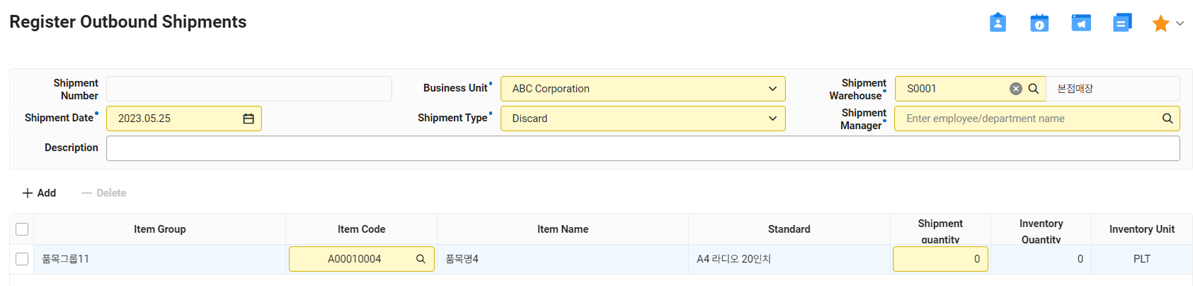
- The fields marked in yellow are required items.
- Outbound Shipment Number: The outbound shipment number is added automatically. (Numbering rule: OC +yyyymmdd+ 6 digit sequence)
- Business Place: Select the business place.
- Shipment Warehouse: Select a warehouse of the selected business place. You can't add items unless you select a shipment warehouse.
- Shipment Date: You can only select a past date including the current date.
- Shipment Type: Select the shipment type (discard, processed as loss, or others).
- Shipment Manager: Select the shipment manager. Enter the outbound shipment information and click ‘Add’.
5.
-
- Item Code: Select the item code field to select items to ship. When you select an item code, the Item Group, Standard, Inventory Quantity, and Inventory Unit are entered automatically.
- Shipment Quantity: Enter the shipment quantity (required field). You can only enter positive integers in the Shipment Quantity field.
- The negative inventory is not allowed for the outbound shipment quantity in this menu. However, the negative inventory is allowed for the sale registration.
- Duplicated items can't be saved.
- To delete the added item, click ‘Delete’.
6. Click ‘Save’.
Download Shipment History
The following describes how to download shipment history as an Excel file.
- Click ‘Admin Menu’ at the top right of the PC web screen, and then click ‘Sales’ in the pop-up window.
- Click at the top left of the screen.
- Click ‘Manage Inventory > Manage Outbound Shipments’ from the menu.
- Enter the shipment conditions to be searched in the search window, and then click ‘Search’.
- You can search the shipment history records that match the entered conditions.
- Click 'Download'.
- The shipment history is downloaded as an Excel file.
The downloaded file is saved as
ManageOutboundShipment_YYYYMMDD_XXXXXX.xlsxin theDownloadsfolder.
- The shipment history is downloaded as an Excel file.
Delete Outbound Shipment
The following describes how to delete outbound shipment data.
- Click ‘Admin Menu’ at the top right of the PC web screen, and then click ‘Sales’ in the pop-up window.
- Click at the top left of the screen.
- Click ‘Manage Inventory > Manage Outbound Shipments’ from the menu.
- Select the outbound shipment data to delete.
- Click ‘Delete Outbound Shipment’.
- In the notification pop-up window, click ‘OK’ .
- The outbound shipment data is deleted.
Manage Inventory Movement
You can register inventory movement results between business places or between warehouses and manage the history. When registering the movement results, their history is applied to the warehousing/shipment warehouse respectively. If the business places of the outbound shipment and warehousing are different, then the warehousing/shipment type is Business Place Relocation. If they're in the same business place with different warehouses, then the warehousing/shipment type is Warehouse Relocation.
The Manage Inventory Movement page is laid out as follows.
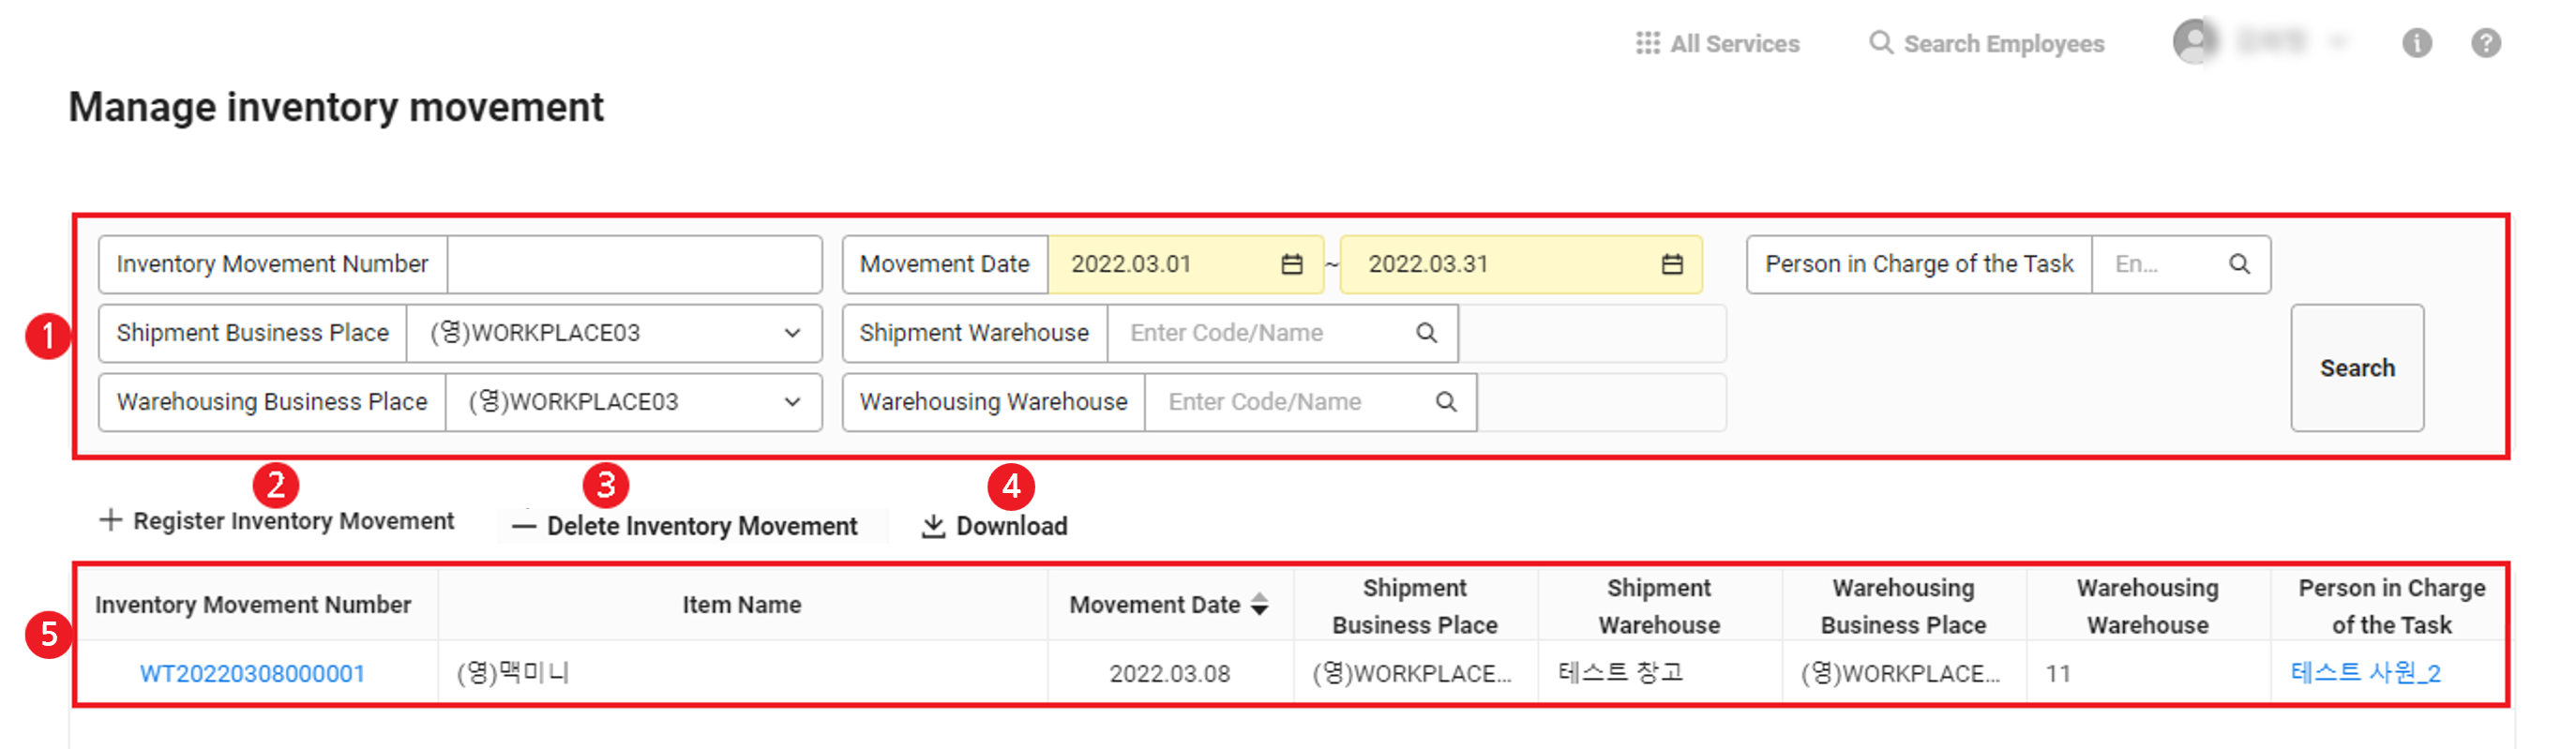
| Area | Description |
|---|---|
| ① Search Window | Search by inventory movement number movement date, manager, shipment business place, shipment warehouse, warehousing business place, and warehousing warehouse conditions |
| ② Register Inventory Movement | Register inventory movement (See Register Inventory Movement) |
| ③ Delete Inventory Movement | Delete selected inventory movement history (See Delete Inventory Movement) |
| ④ Download | Download the inventory movement list as an Excel file (See Download Inventory Movement History) |
| ⑤ Inventory Movement History List | Search the inventory movement history list
|
Register Inventory Movement
The following describes how to register inventory movement history.
- Click ‘Admin Menu’ at the top right of the PC web screen, and then click ‘Sales’ in the pop-up window.
- Click at the top left of the screen.
- Click ‘Manage Inventory > Manage Inventory Movement’ from the menu.
- Click ‘Register Inventory Movement’.
- The fields marked in yellow are required items.
- Inventory Movement Number: The inventory movement number is automatically added. (Numbering rule: WT + yyyymmdd + 6 digit sequence)
- Manager: Select the manager to be in charge of the inventory movement.
- Movement Date: You can only select a past date including the current date.
- Outbound Shipment Business Place: Select the business place to ship the inventory from.
- Shipment Warehouse: Select a warehouse of the outbound shipment business place. You can't add items unless you select a shipment warehouse.
- Warehousing Business Place: Select the business place to warehouse the inventory.
- Warehousing Warehouse: Select a warehouse of the warehousing business place. Enter the inventory movement information and click ‘Add’.
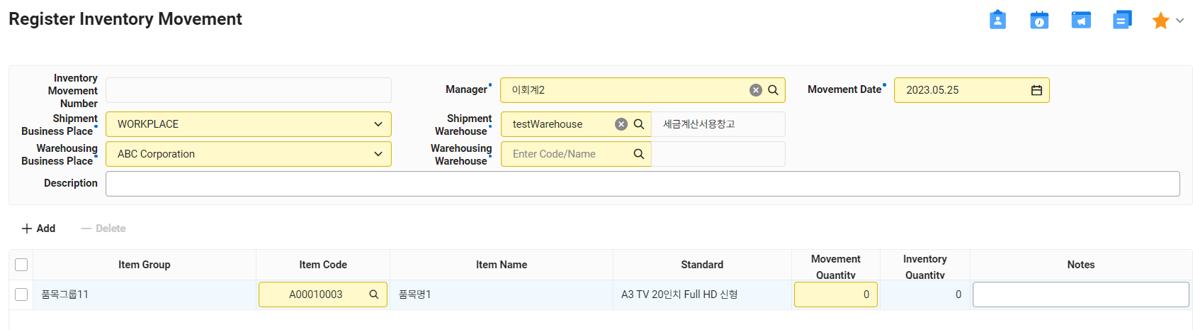
- Enter the inventory movement item information.
- Item Code: Select the item code field to select items to warehouse. When you select an item code, the Item Group, Standard, Inventory Quantity, and Inventory Unit are entered automatically.
- Movement Quantity: Enter the movement quantity. The movement quantity can't be greater than the inventory quantity. You can only enter positive integers in the Movement Quantity field.
- Duplicated items can't be saved.
- To delete an added item, select the item to delete, and then click ‘Delete’.
- Click ‘Save’.
Download Inventory Movement History
The following describes how to download inventory movement history as an Excel file.
- Click ‘Admin Menu’ at the top right of the PC web screen, and then click ‘Sales’ in the pop-up window.
- Click at the top left of the screen.
- Click ‘Manage Inventory > Manage Inventory Movement’ from the menu.
- Enter the inventory movement conditions to be searched in the search window, and then click ‘Search’.
- You can search the inventory movement history records that match the entered conditions.
- Click 'Download'.
- The inventory movement history is downloaded as an Excel file.
ManageInventoryMovement_YYYYMMDD_XXXXXX.xlsx in the Downloads folder.Delete Inventory Movement
The following describes how to delete inventory movement data.
- Click ‘Admin Menu’ at the top right of the PC web screen, and then click ‘Sales’ in the pop-up window.
- Click at the top left of the screen.
- Click ‘Manage Inventory > Manage Inventory Movement’ from the menu.
- Select the inventory movement data to delete.
- Click ‘Delete Inventory Movement’.
- In the notification pop-up window, click ‘OK’ .
- The inventory movement data is deleted.
You can't delete inventory movement data in the following cases.
- Inventory movement data of closed month
- If the company has set negative inventory to Now allow (‘Sales > Settings’ menu) and the inventory becomes less than 0 when deleting the inventory movement data
Manage Inventory Check
You can register and manage the results of the regular checks on the inventory in the warehouse according to the company's internal rules, the cycle checks according to the item's importance, and the irregular checks for managing the actual inventory quantity.
The Manage Inventory Checks page is laid out as follows.
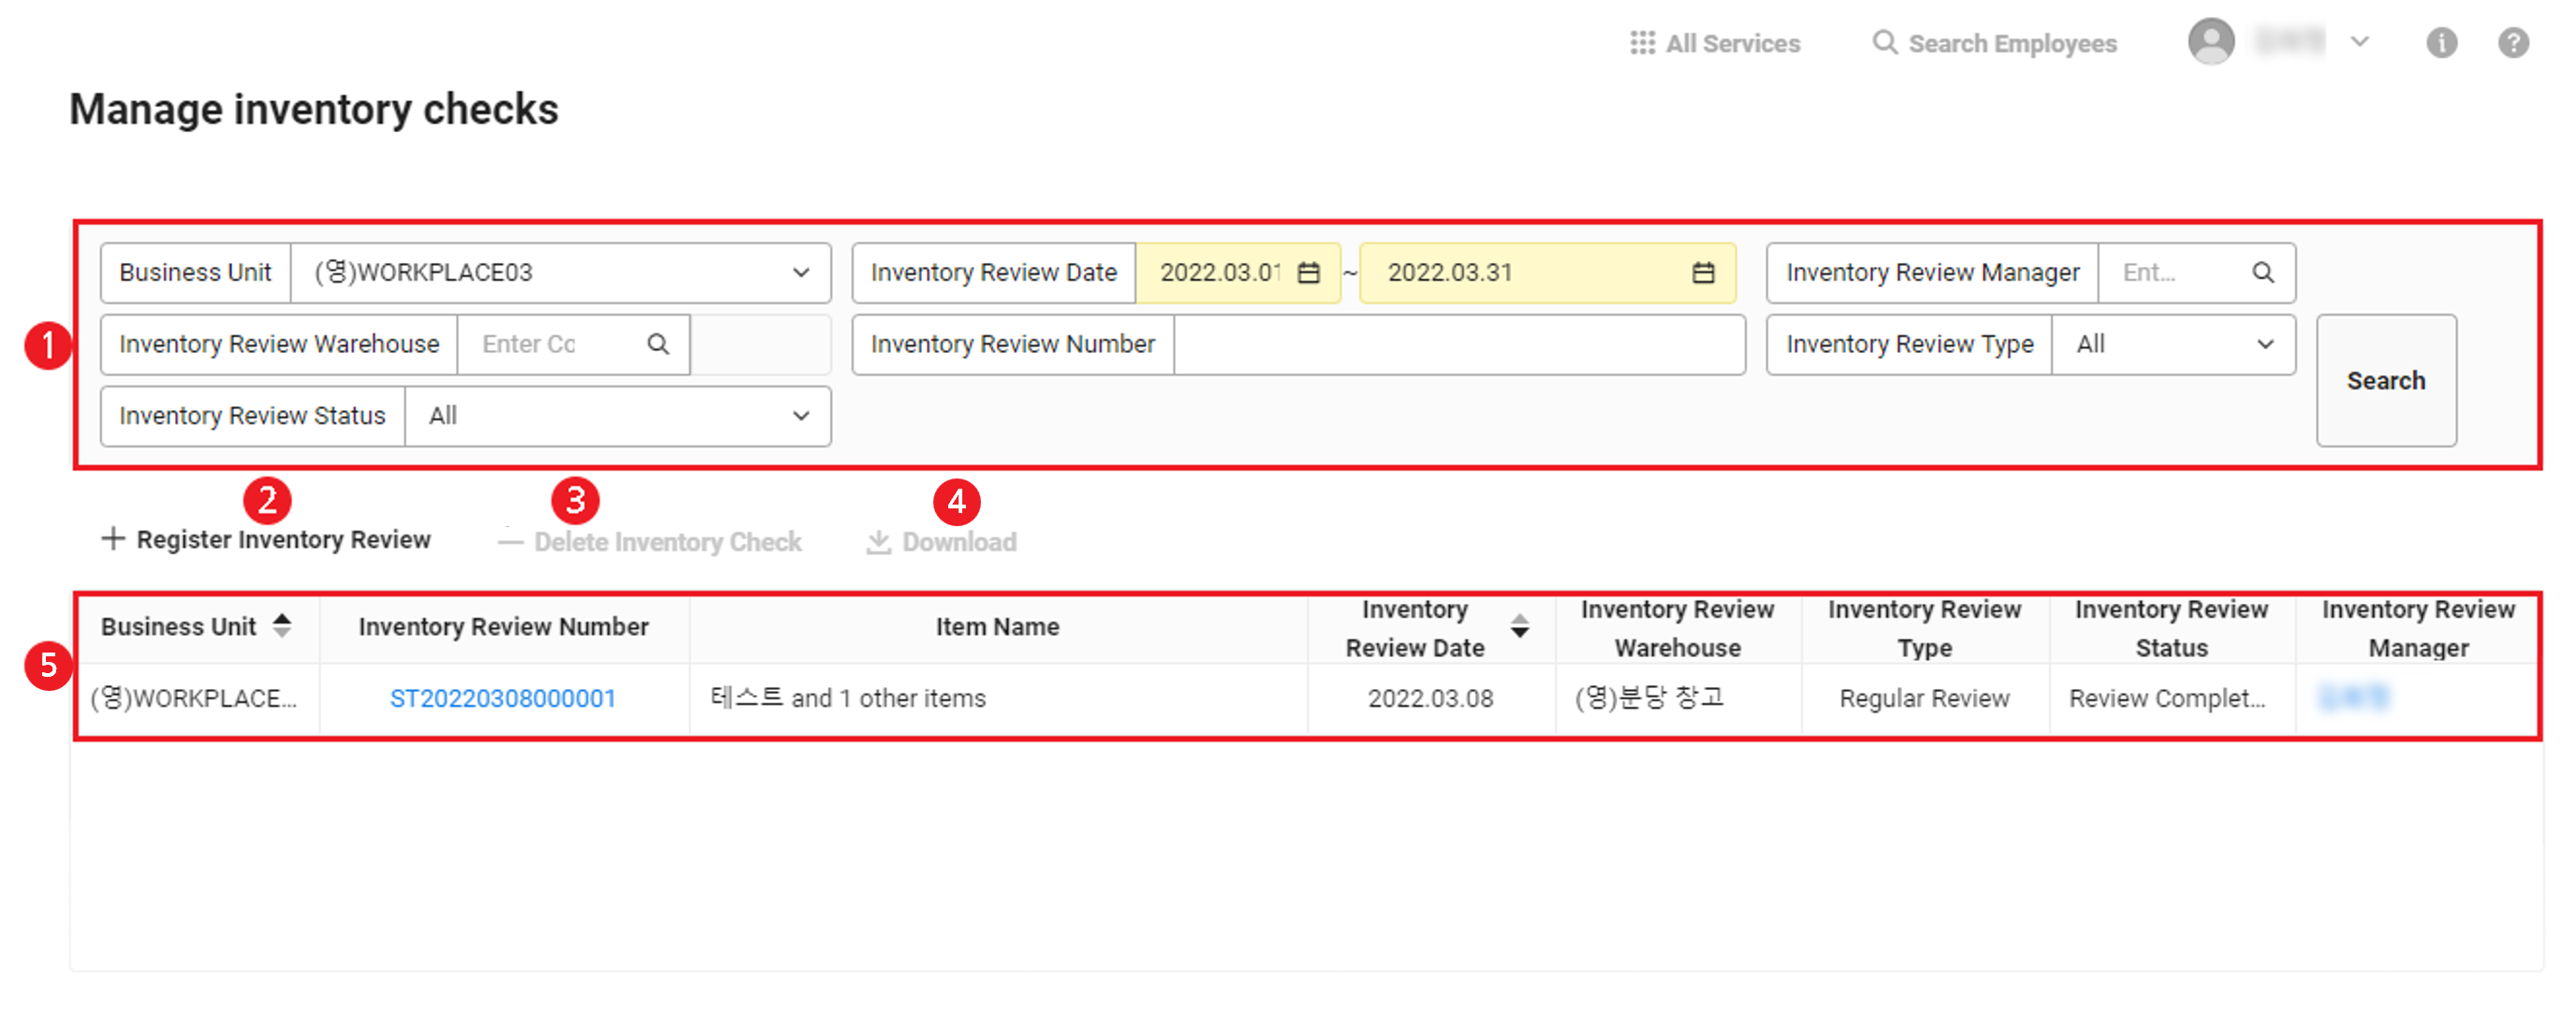
| Area | Description |
|---|---|
| ① Search Window | Search by business place, inventory check date, inventory check manager, inventory check warehouse, inventory check number, inventory check type, and inventory check status conditions |
| ② Register Inventory Check | Register inventory checks (See Register Inventory Check) |
| ③ Delete Inventory Check | Delete selected inventory check history (See Delete Inventory Check) |
| ④ Download | Download the inventory checks list as an Excel file (See Download Inventory Check History) |
| ⑤ Inventory Check History List | Search the inventory check history list
|
- The inventory check type is divided as follows.
- Regular checks: inventory check that is conducted once a year, quarter, half-year, or month (e.g., regular checks on the fourth Friday of each month)
- Cycle Check: inventory check periodically executed by inspecting the real inventory to match the real inventory quantity to the inventory quantity in the ledger
- Irregular Checks: inventory check executed at any time when an unexpected inventory check is needed for specific items
- The inventory check status is entered automatically according to the save status, which is divided as follows.
- Checks in Progress: saved temporarily
- Checks Completed: checks completed (saved), a stage before the inventory adjustment
- Adjustment Completed: a stage where the inventory adjustment is completed and applied
Register Inventory Check
The following describes how to register inventory check history.
- Click ‘Admin Menu’ at the top right of the PC web screen, and then click ‘Sales’ in the pop-up window.
- Click at the top left of the screen.
- Click ‘Manage Inventory > Manage Inventory Checks’ from the menu.
- Click ‘Register Inventory Checks’.
- The fields marked in yellow are required items.
- Inventory Checks Number: The inventory checks number is added automatically. (Numbering rule: WT + yyyymmdd + 6 digit sequence)
- Business Place: Select the business place.
- Inventory Checks Warehouse: Select a warehouse for the inventory checks. You can't add items unless you select a warehouse for the inventory checks.
- Inventory Checks Name: Enter an inventory checks name.
- Inventory Checks Date: Enter an inventory checks date.
- Inventory Checks Type: Select an inventory checks type.
- Regular checks: inventory check that is conducted once a year, quarter, half-year, or month (e.g., regular checks on the fourth Friday of each month)
- Cycle Check: inventory check periodically executed by inspecting the real inventory to match the real inventory quantity with the inventory quantity in the ledger.
- Irregular Checks: inventory check executed at any time when an unexpected inventory check is needed for specific items
- Inventory Checks Manager: Select an inventory check manager from the combo box.
- Inventory Check Status: The inventory check status is entered automatically according to the save status.
- Checks in Progress: saved temporarily
- Checks Completed: checks completed (saved), a stage before the inventory adjustment
- Application Completed: The inventory adjustment has been completed, and the inventory is applied.번역 불필요
- Enter the inventory checks item information.
- Item Code: Select an item code to select items to warehouse. When you select an item code, the Item Group, Standard, Inventory Quantity, and Inventory Unit are entered automatically.
- Quantity from Inventory Checks: Enter the actual quantity of the item. You can only enter positive integers in the Quantity from Inventory Checks field.
- Quantity Difference: The quantity difference is the ‘Quantity from Inventory Checks’ - ‘Quantity on System’.
- Duplicated items can't be saved.
- To delete an added item, select the item to delete, and then click ‘Delete’.
- Click ‘Save’ > ‘OK’ to enter the inventory movement information.
- In the Inventory Check History List, the ‘Inventory Check Status is displayed as Check Completed’.
- If the inventory check hasn't been completed, then click ‘Save Temporarily’. In the Inventory Check History List, the Inventory Check Status is displayed as ‘Check in Progress’.
- If the inventory check has been completed, complete the inventory adjustment, and then click ‘Apply Inventory’. In the Inventory Check History List, the Inventory Check Status is displayed as ‘Adjustment Completed’.
Download Inventory Check History
The following describes how to download inventory check history as an Excel file.
- Click ‘Admin Menu’ at the top right of the PC web screen, and then click ‘Sales’ in the pop-up window.
- Click at the top left of the screen.
- Click ‘Manage Inventory > Manage Inventory Checks’ from the menu.
- Enter the inventory checks conditions to be searched in the search window, and then click ‘Search’.
- You can search the inventory check history records that match the entered conditions.
- Click 'Download'.
- The inventory check history is downloaded as an Excel file.
ManageInventoryCheck_YYYYMMDD_XXXXXX.xlsx in the Downloads folder.Delete Inventory Check
The following describes how to delete inventory check data.
- Click ‘Admin Menu’ at the top right of the PC web screen, and then click ‘Sales’ in the pop-up window.
- Click at the top left of the screen.
- Click ‘Manage Inventory > Manage Inventory Checks’ from the menu.
- Select the inventory check data to delete.
- Click ‘Delete Inventory Check’.
- In the notification pop-up window, click ‘OK’ .
- The inventory check data is deleted.
You can't delete inventory check data in the following cases.
- Inventory check data of closed month
- If the company has set negative inventory to ‘Now allow’ (‘Sales > Settings’ menu) and the inventory becomes less than 0 when deleting the inventory check data in the ‘Adjustment completed’ status
View Current Inventory
You can search the current inventory quantity managed by business place, warehouse, or item.
The View Current Inventory page is laid out as follows.
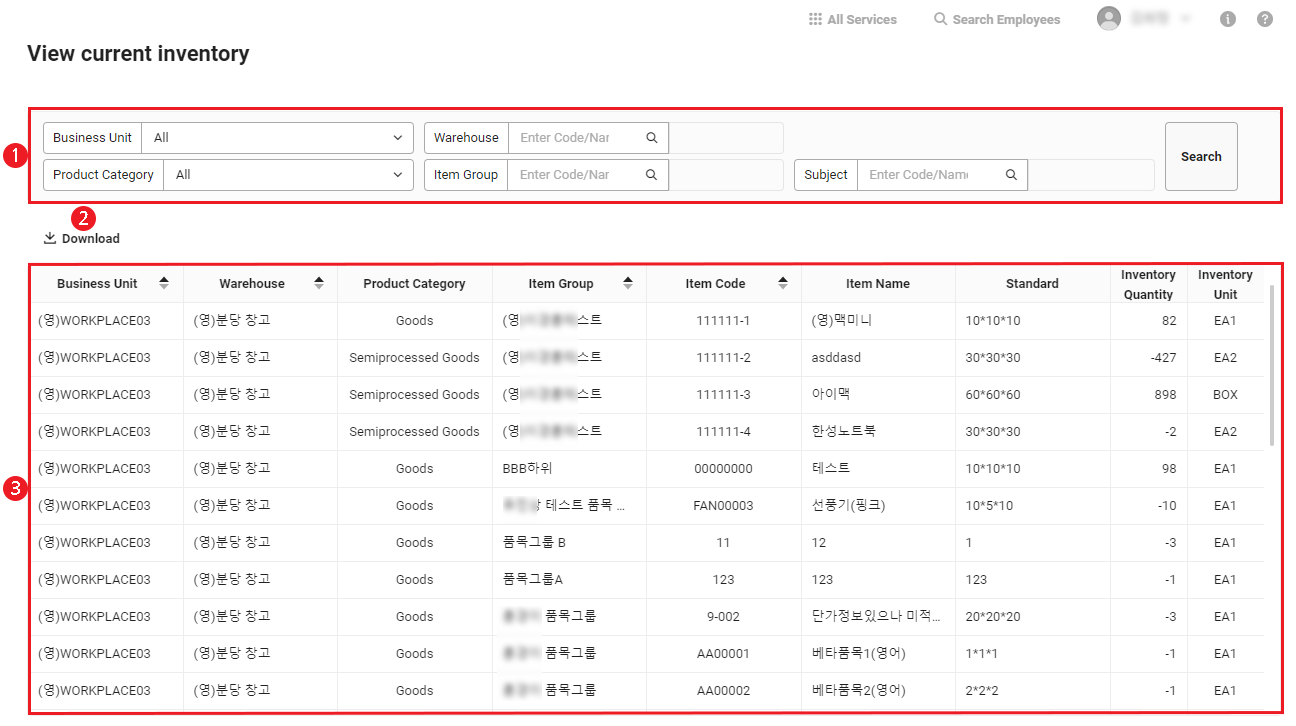
| Area | Description |
|---|---|
| ① Search Window | Search by business place, warehouse, item category, item group, and item conditions |
| ② Download | Download the list of current inventory status as an Excel file (See Download Current Inventory Status) |
| ③ List of Current Inventory Status | Search the list of current inventory status |
Download Current Inventory Status
The following describes how to download the current inventory status as an Excel file.
- Click ‘Admin Menu’ at the top right of the PC web screen, and then click ‘Sales’ in the pop-up window.
- Click at the top left of the screen.
- Click ‘Manage Inventory > Search Current Inventory’ from the menu.
- Enter the conditions to be searched in the search window, and then click ‘Search’.
- You can view the current inventory status that matches the entered conditions.
- Click 'Download'.
- The list of current inventory is downloaded as an Excel file.
View Current Inventory_YYYYMMDDXXXXXX.xlsx in the Downloads folder.Inventory Receipt and Payment Status
You can view all warehousing/shipment history by warehouse. You can view all warehousing and outbound shipment history by type including normal sales outbound shipment, returned sales, other outbound shipment, sales warehousing, inventory movement, and business place relocation.
The Inventory Receipt and Payment Status page is laid out as follows.
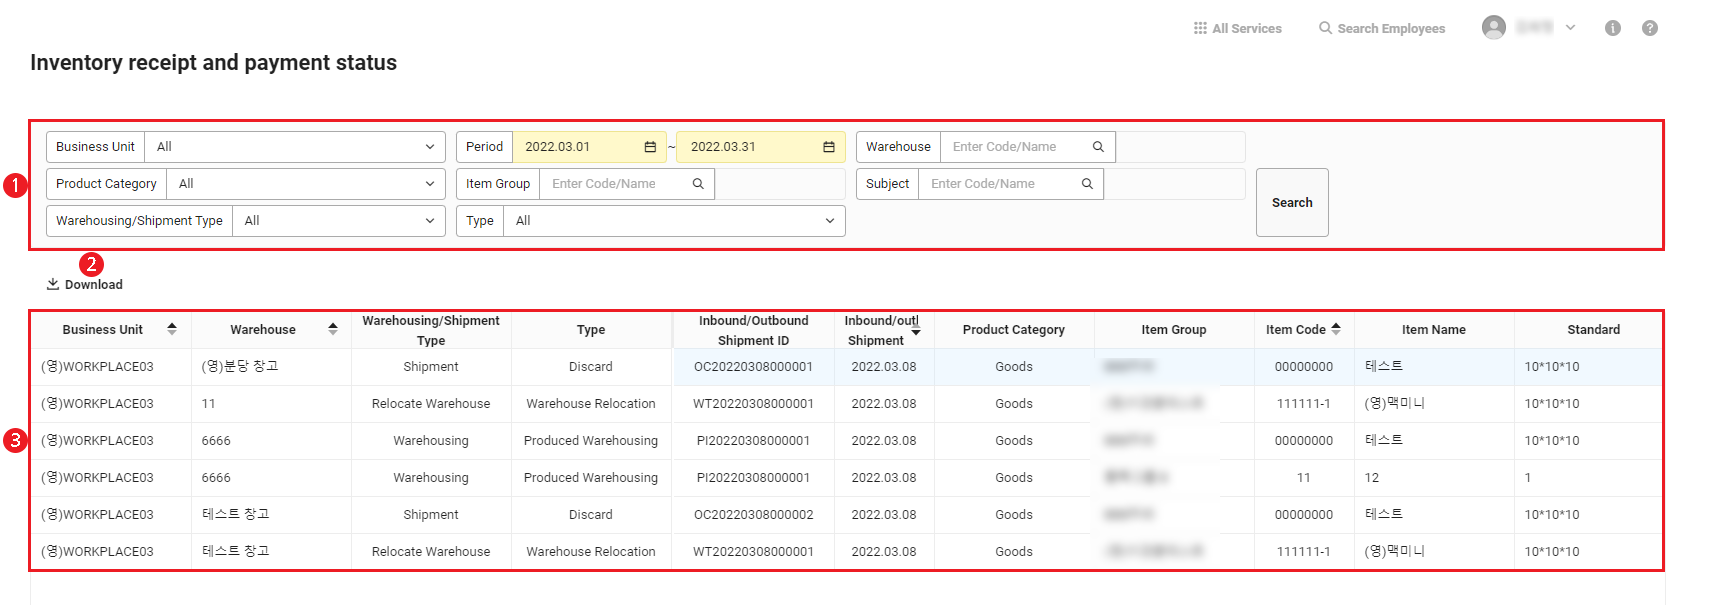
| Area | Description |
|---|---|
| ① Search Window | Search by business place, period, warehouse, item category, item group, item, and warehousing/shipment type conditions |
| ② Download | Download the list of inventory receipt and payment status as an Excel file (See Download List of Inventory Receipt and Payment Status) |
| ③ List of inventory receipt and payment status | Search the list of inventory receipt and payment status |
Download Inventory Receipt and Payment Status
The following describes how to download the inventory receipt and payment status as an Excel file.
- Click ‘Admin Menu’ at the top right of the PC web screen, and then click ‘Sales’ in the pop-up window.
- Click at the top left of the screen.
- Click ‘Manage Inventory > Inventory Receipt and Payment Status’ from the menu.
- Enter the conditions to be searched in the search window, and then click ‘Search’.
- You can view the inventory receipt and payment status that match the entered conditions.
- Click 'Download'.
- The list of inventory receipt and payment status is downloaded as an Excel file.
InventoryReceiptandPaymentStatus_YYYYMMDD_XXXXXX.xlsx in the Downloads folder.Inventory Closing
To process monthly accounting closing, you need to first control the warehousing and outbound shipment of the inventory through inventory closing.
In the Inventory Closing menu, you can close the inventory by business place or by month to control the warehousing/outbound shipment processing.
The Inventory Closing page is laid out as follows.
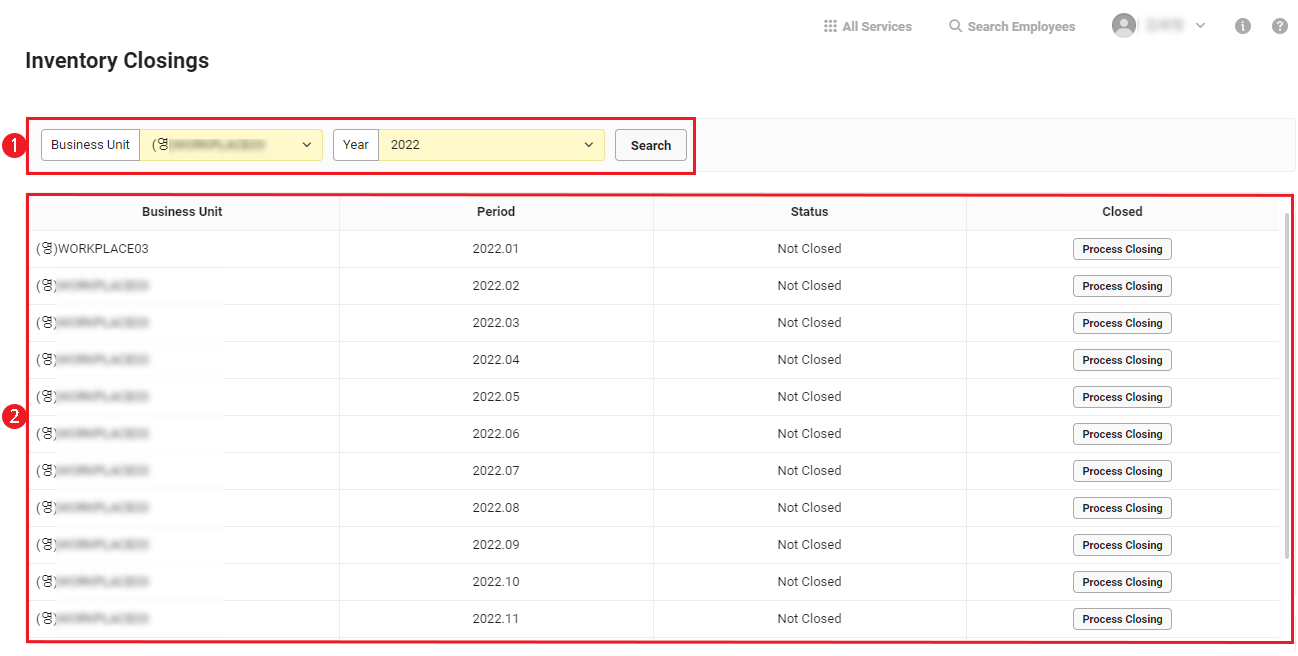
| Area | Description |
|---|---|
| ① Search Window | Search by business place, or year conditions |
| ② Inventory closing list | View the list of inventory closing |
Process Inventory Closing
The following describes how to process the inventory closing.
- Click ‘Admin Menu’ at the top right of the PC web screen, and then click ‘Sales’ in the pop-up window.
- Click at the top left of the screen.
- Click ‘Manage Inventory > Inventory Closing’ from the menu.
- Click ‘Process Closing’ on the row of the period when you process the closing.
- Check the details in the pop-up window, and then click ‘OK’.
- When the Process Closing is completed, the status is changed to ‘Closed’, and the button is changed to ‘Cancel’. In the Closed status, you can't process warehousing or outbound shipment for the year and month for the closed business place from the Register Sale or Manage Inventory menu in Manage Sale.
- To cancel the Process Closing, click ‘Cancel’ on the row of the period to cancel. The status is changed to ‘Not Closed’, and the button is changed to ‘Process Closing’. In the ‘Not Closed’ status, you can execute inventory movement in the Manage Inventory Movement menu.
- You can process the closing in order, from the year and month where the initial warehousing/outbound shipment occurred.
- If the closing of the previous month of warehousing/outbound shipment has not been processed, then you have to process the closing of the previous month.
- If the month following the month for which you want to cancel the closing is closed, then you must cancel the closing of the following month first.
View Inventory Change History
You can view the inventory change history, such as an increase, decrease, or deletion of inventory and changing personnel information.
The change history viewed in the View Inventory Change History page is the change history of Manage Warehousing, Manage Outbound Shipments, Manage Inventory Movement, Manage Inventory Checks, and Register Sales pages.
The View Inventory Change History page is laid out as follows.
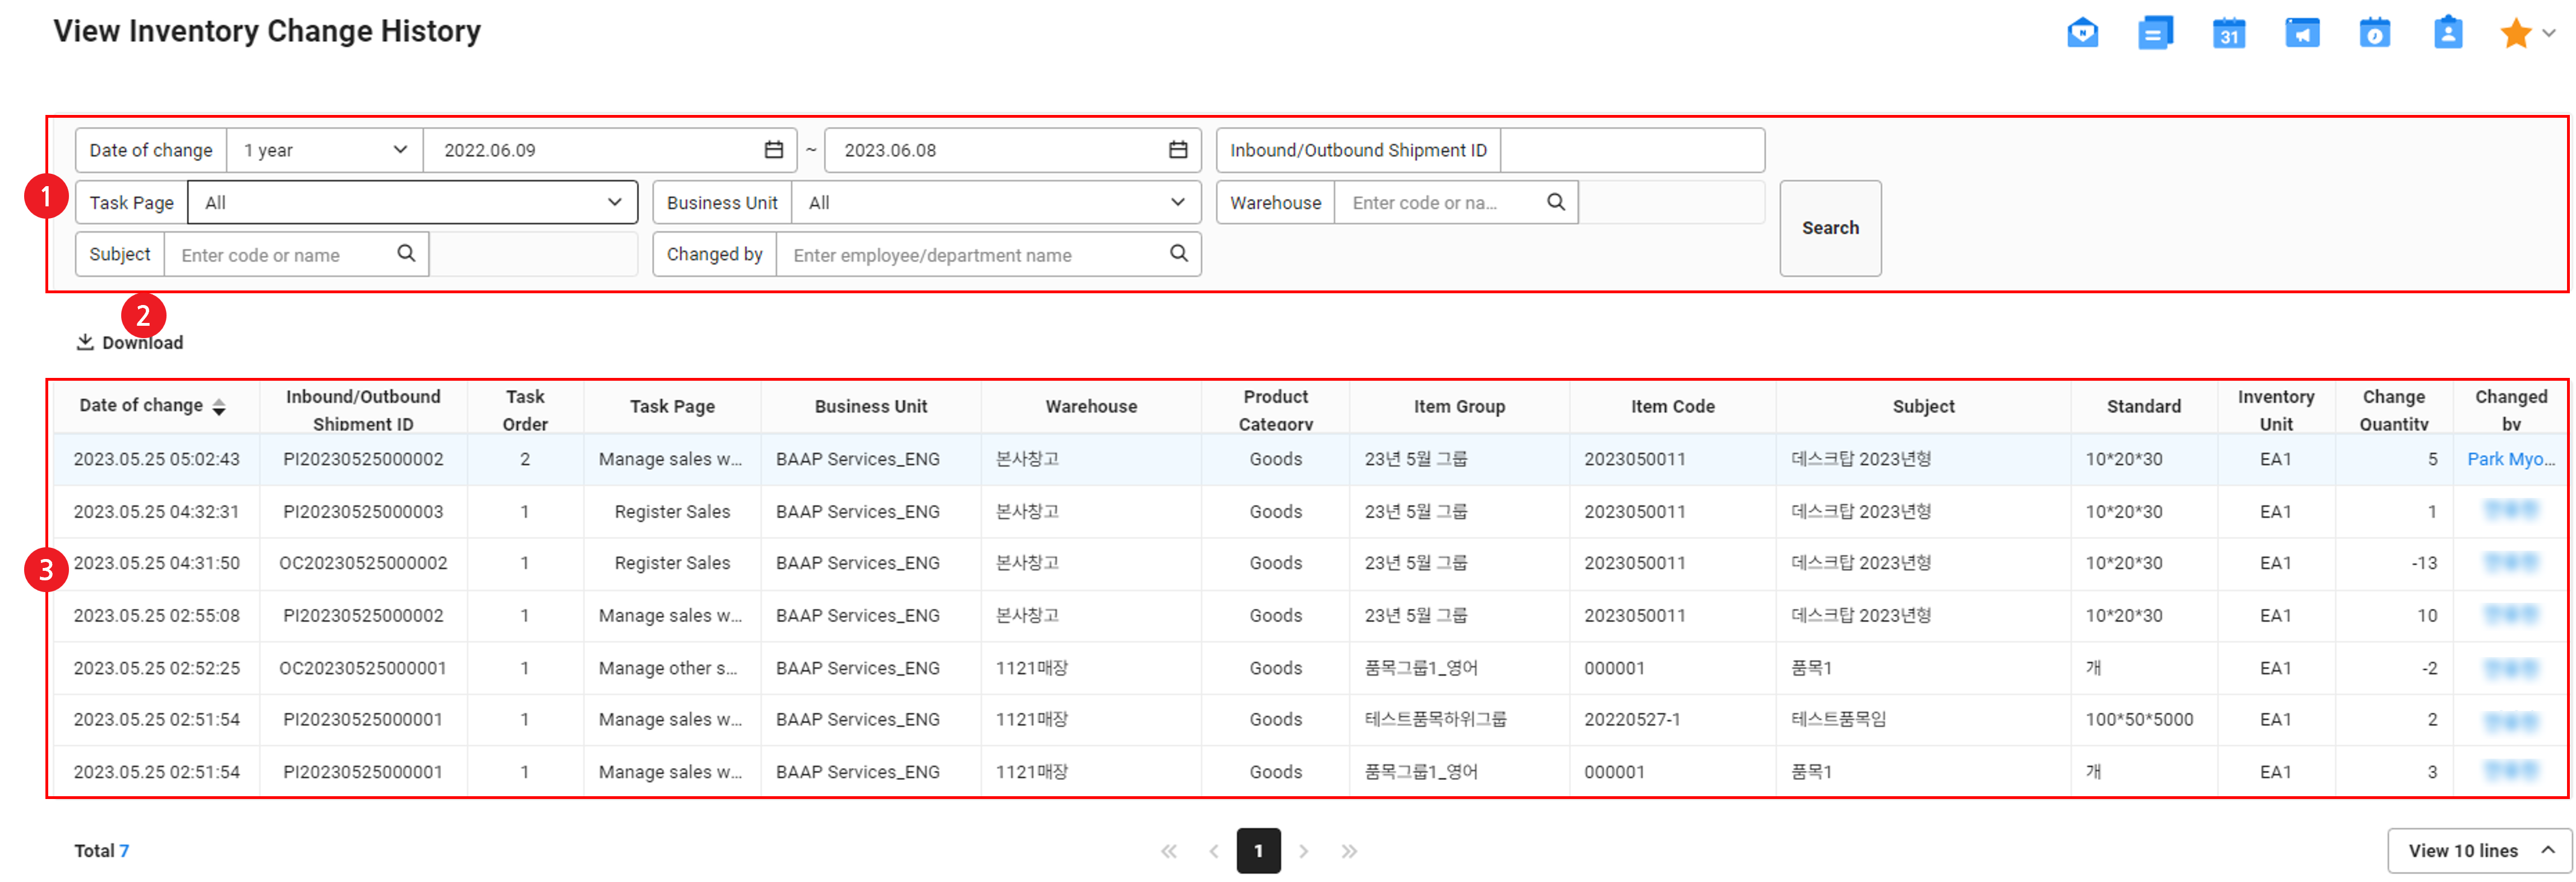
| Area | Description |
|---|---|
| ① Search Window | Search by the date of change, warehousing/shipment number, job page, business place, warehouse, item, and changing personnel conditions |
| ② Download | Download the list of inventory changes as an Excel file (See Download Inventory Change History) |
| ③ List of inventory change records | View inventory change history
|
Download Inventory Change History
The following describes how to download the inventory change history as an Excel file.
- Click ‘Admin Menu’ at the top right of the PC web screen, and then click ‘Sales’ in the pop-up window.
- Click at the top left of the screen.
- Click ‘Manage Inventory > View Inventory Change History’ from the menu.
- Enter the conditions to be searched in the search window, and then click ‘Search’.
- You can view the inventory change history that matches the entered condition.
- Click 'Download'.
- The list of inventory change history is downloaded as an Excel file.
InventoryChangeHistory_YYYYMMDDXXXXXX.xlsx in the Downloads folder.