You can register and manage the quotation history and order history. In addition, you can manage order closing that will no longer make progress.
Check FAQs.
Q. What is quotation request?
- To buy products they need, customers request the specifications or unit price of those products. This is referred to as a quotation request.
Q. In the first page of the Manage Orders menu, sometimes the Search is not processed immediately. What is the criteria for immediate search?
- If the logged-in user belongs to two or more sales groups, then they are not viewed immediately upon accessing the page. If the user belongs to only one sales group, then it is searched directly upon accessing the page. If the user does not belong to any sales group, then the user can't use the Manage Orders menu.
Q. Is item information not shown when composing a quotation?
- If you don't see item information when composing a quotation after registering item information, then check if the item unit price information has been added. The item information is not shown if there's no unit price per item information registered. You can add item unit prices from the Sales > Sales Standard Information > Manage Item Unit Price menu.
Q. After creating a quotation and proceeding with the subsequent process, how can I cancel or delete the data?
- Sequence to Cancel and Delete Data
- Delete the slip from Accounting (when using the Accounting service)
- Sales > Cancel History of Submissions for Accounting (when using the Accounting service)
- Delete the applicable sales record in Sales > Manage Sales
- Delete the applicable order form in Manage Orders > Manage Order Forms
- Delete the applicable quotation in Manage Orders > Manage Quotations
- Conditions for When Documents Can't be Deleted
- If processes such as order and sales have been executed after the quotation, then it can't be deleted right away. You can follow the sequence to delete as shown above.
- If the quotation and specifications of transaction mails have already been sent, then you can't delete the documents.
Q. How do I reflect the company seal to the quotation?
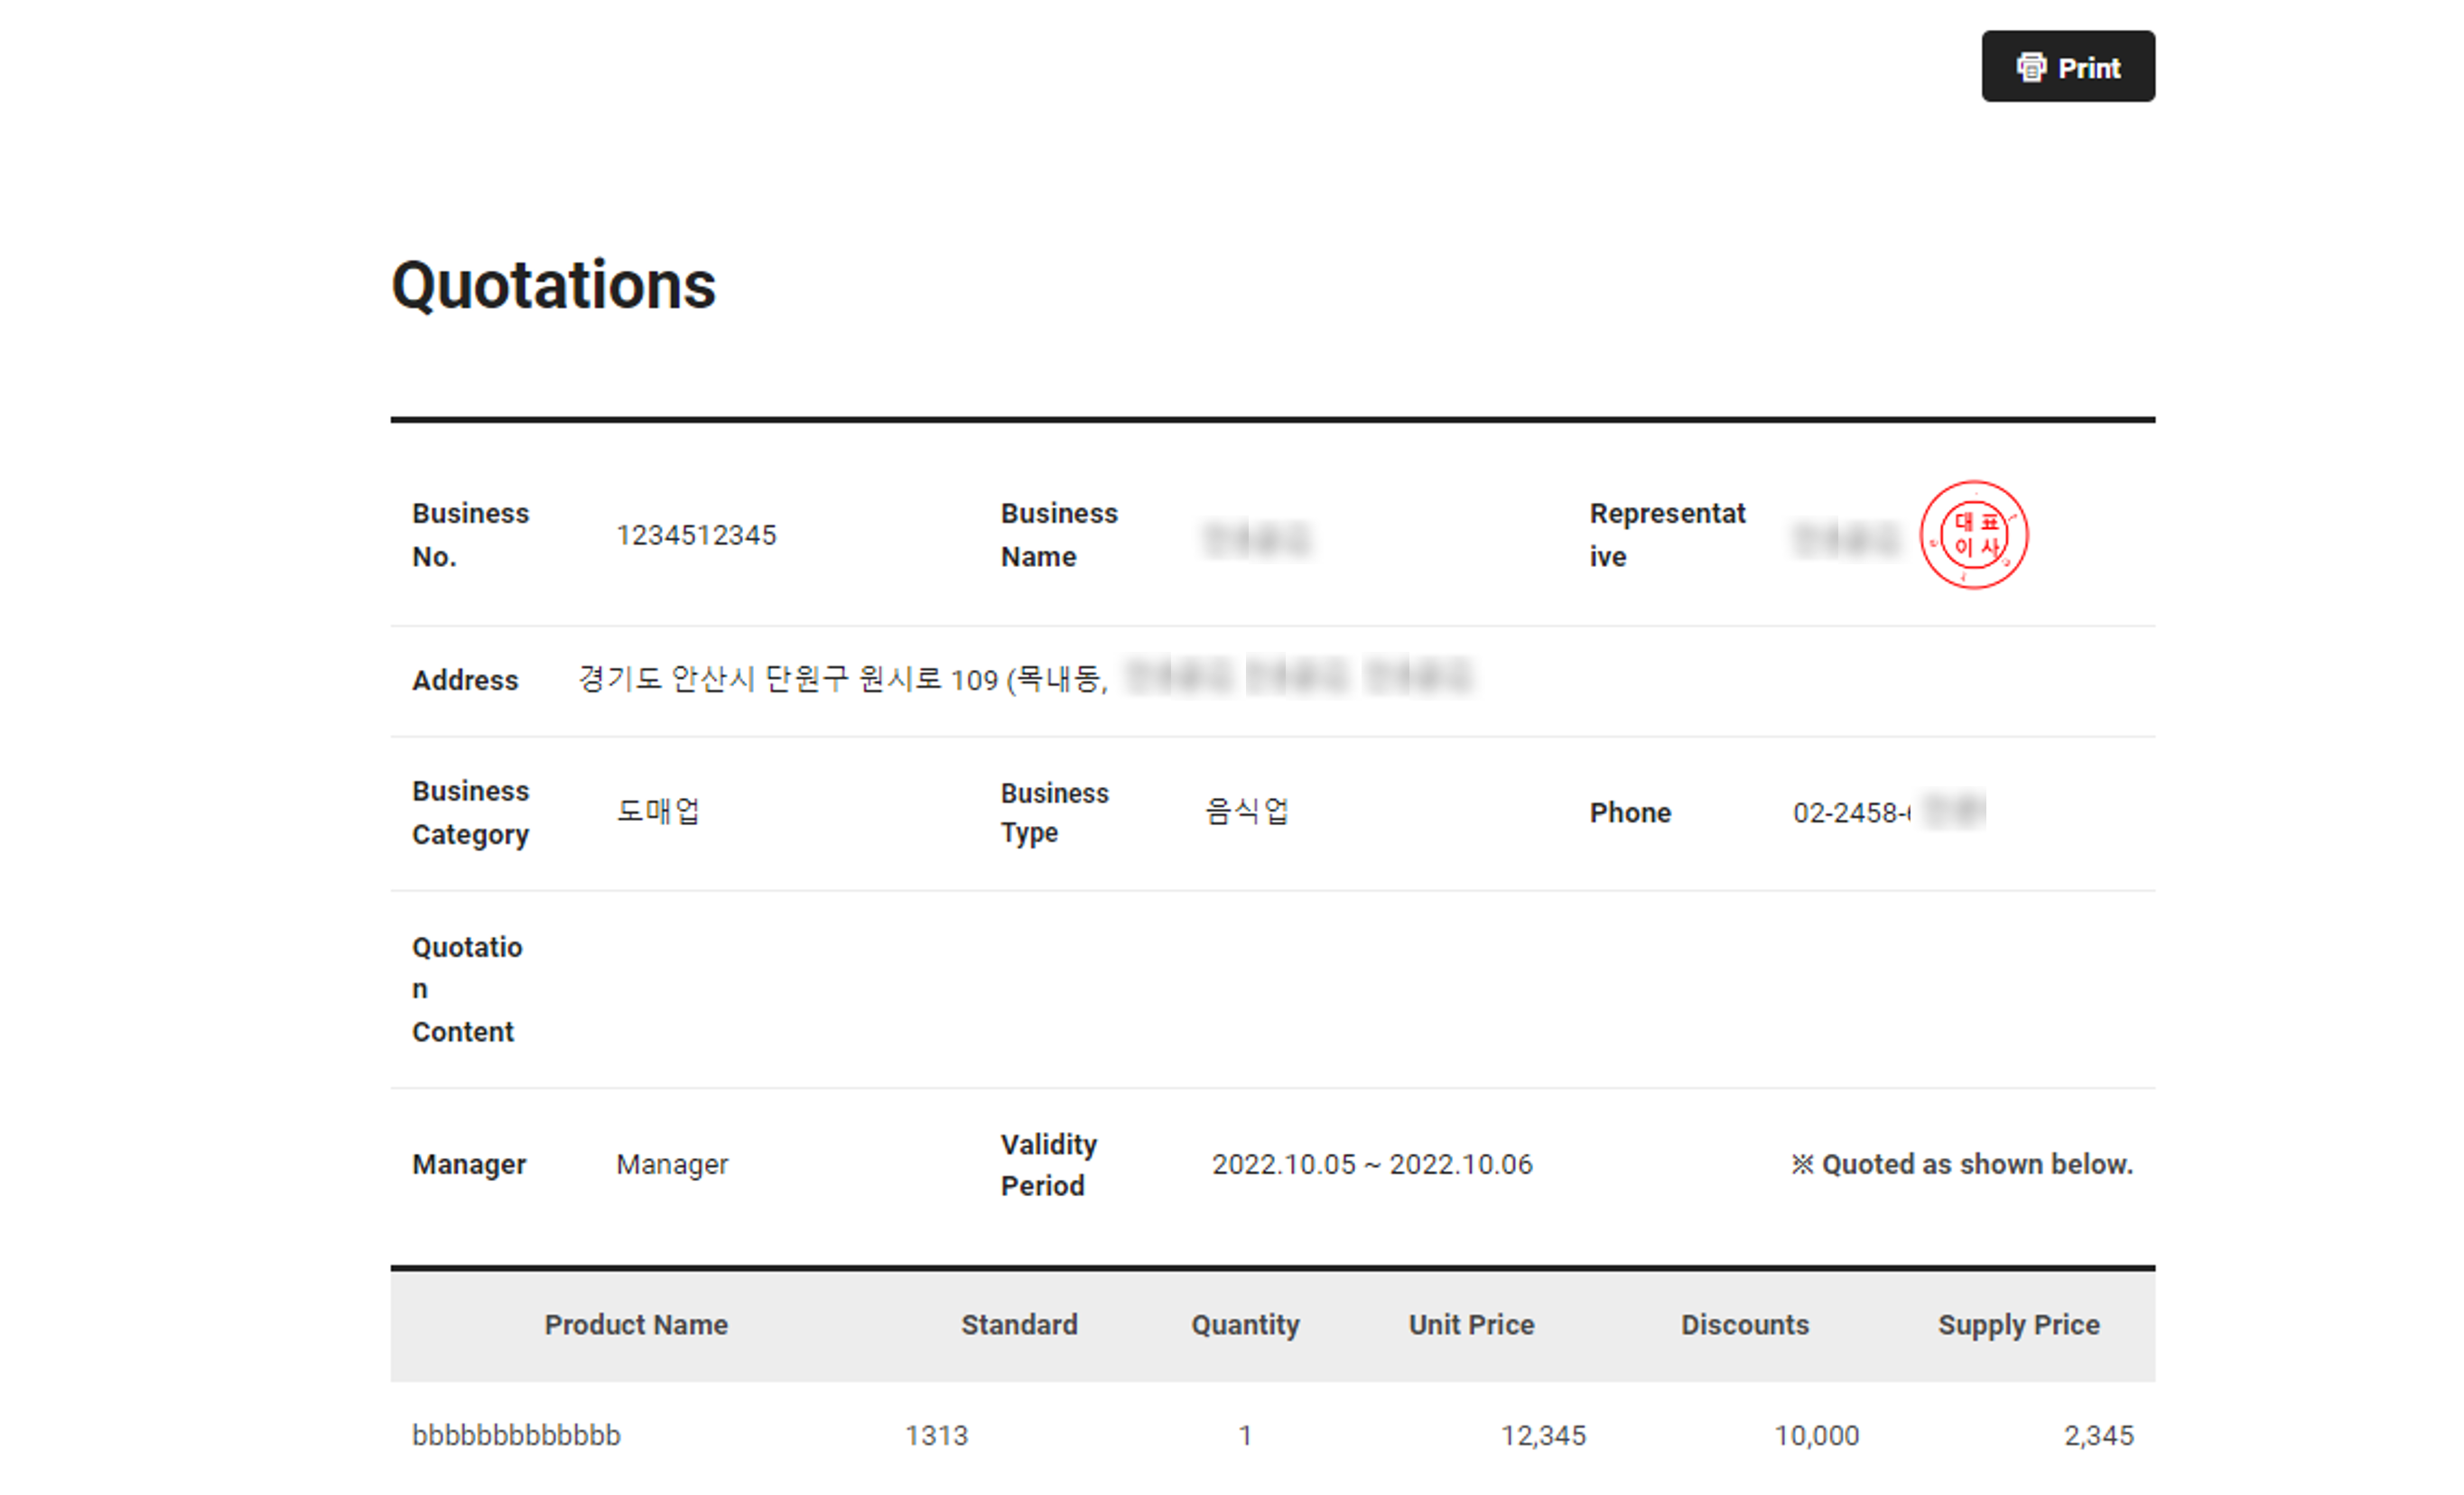
- Once you register the company seal from the ‘Business Support Settings > Company Information > Manage Company Information’ menu, the company seal will be displayed on the quotation approval reporting, email sending, and printing pages.
Create Quotation
You can register and manage the quotation details.
The Create Quotation page is laid out as follows.
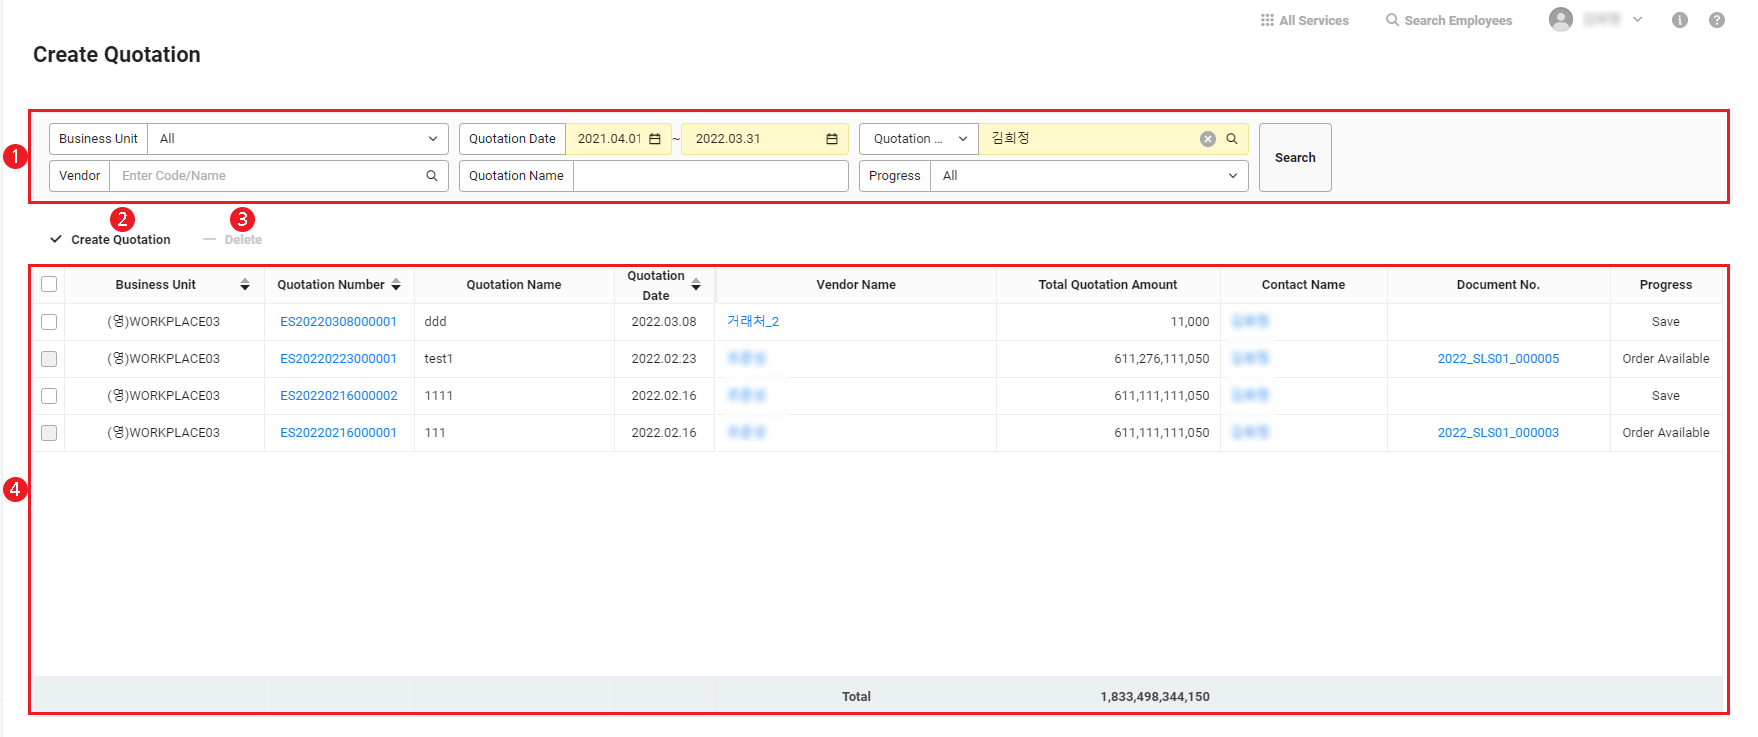
| Area | Description |
|---|---|
| ① Search Window | Search by business place, date of quotation, quotation manager, vendor, quotation name, and progress status conditions |
| ② Create Quotation | Create a new quotation |
| ③ Delete | Delete the selected quotation |
| ④ Quotation list | View quotation list
|
Create New Quotation
The following describes how to create a quotation.
- Click ‘Admin Menu’ at the top right of the PC web screen, and then click ‘Sales’ in the pop-up window.
- Click
 at the top left of the screen.
 - Click ‘Manage Orders > Create Quotation’ from the menu.
- Click ‘Create Quotation’.
- Enter information and click ‘Add’.
- The fields marked in yellow are required items.
- Business Place: Select the business place.
- Quotation Number: The quotation number is added automatically. (Numbering rule: ES + yyyymmdd + 6 digit sequence)
- Vendor: Select one from the registered vendors. If you don't see the vendor in the search, then register it in the ‘Business Support Settings > Manage Common Code > Manage Vendor’ menu.
- Quotation Manager: Select a registered quotation manager.
- Quotation Name: Enter the quotation name.
- Quotation Date: Select the quotation date. (Default: current date)
- Quotation Validity Period: The validity period from the quotation date set by the admin (Settings menu) is displayed. (<Example> Valid for 15 days)
- VAT Type: Select a VAT type (taxation, tax exemption, or zero tax rate).
- Currency: Select the currency. According to the selected currency, you can add items that correspond to the currency.
- Progress: Select the progress (new, saved, or order available).
- New: You're entering the content for a new quotation
- Saved: You have clicked ‘Save’ after entering the content for the quotation, which is editable
- Order Available: You have clicked ‘Save’ and then ‘Approve’, which is non-editable. You can send the entered quotation via E-mail
- Attach Quotation Related Data: Attach quotation related data.
- Enter the quotation information by item.
- Item Code: Select the item code field to select items to create a quotation for. When you select an item code, the item group, item name, specifications, unit, and sales unit price are entered automatically.
- Quotation Quantity: Enter the warehousing quantity.
- Discount Amount: To apply discounts to added items in bulk, select items to apply discounts, and then click ‘Apply Discount’. Enter the discount information (default: 0).
-
To apply discounts, select items to apply them, select ‘Apply Discount’, and then enter the following items.
-
If you have chosen ‘Percentage’ for the Discount Unit, then enter the percentage in the Discount Rate field.
-
If you have chosen ‘Discount Amount’ for the Discount Unit, then enter the discount amount in the Discounted Amount field.
-
Enter round down units and end digit handling.
-
Click ‘Save’.
-
If ‘Use Unit Price per Item’ is selected for unit price setting in the ‘Sales > Settings’ menu, entered discounts are applied to selected items in bulk. If ‘Item Unit Price by Vendor’ is selected for the unit price setting, item unit price discounts are applied to selected vendors, and it doesn't affect other vendors.
-
-
-
To cancel the discount, select ‘Cancel Discount Application’, and then click ‘Save’.
-
The discounts for the items are reset.
-
-
- Duplicated items can’t be saved.
- To delete an added item, select the item to delete, and then click ‘Delete’.
- To register a quotation, all required values for items should be entered, and there must be one or more items.
- Click ‘Save’.
- After checking the content, clicking ‘Save’ will save the created quotation. Click ‘Approve’ to approve the quotation.
- If it's been set to get approved through the Approval service, then ‘Report Approval’ is displayed. Check the approval line and sharing information, and then click ‘Report’.
- If Whether to Get the Approval for Quotation is set to ‘Y’ in the ‘Sales > Settings’ menu, then the approval process is conducted on the created quotation. If it's set to ‘N’, then the quotation is approved in the Sales service.
- For more details about the approval line and sharing information settings, see Set Approval Line and Sharing Settings.
- For more information about document approval, see Approve Document on PC or Approve Document on Mobile.
- If the company seal is registered, then it is displayed on the quotation approval reporting, vendor email sending, and printing pages. (Register from the Business Support Settings > Company Information > Manage Company Information menu.)
Delete Quotation
The following describes how to delete a quotation.
- Click ‘Admin Menu’ at the top right of the PC web screen, and then click ‘Sales’ in the pop-up window.
- Click at the top left of the screen.
- Click ‘Manage Orders > Create Quotation’ from the menu.
- If necessary, enter the quotation conditions to be searched in the search window, and then click ‘Search’.
- You can view the quotation status that matches the entered conditions.
- Select the quotation to delete.
- Click 'Delete'.
- If processes such as order and sales have been executed after the quotation, then the document can't be deleted.
- If the quotation and specifications of transaction mails have already been sent, then documents can't be deleted.
Quotation Status
You can view the quotation history registered in the Create Quotation menu.
The Quotation Status page is laid out as follows.
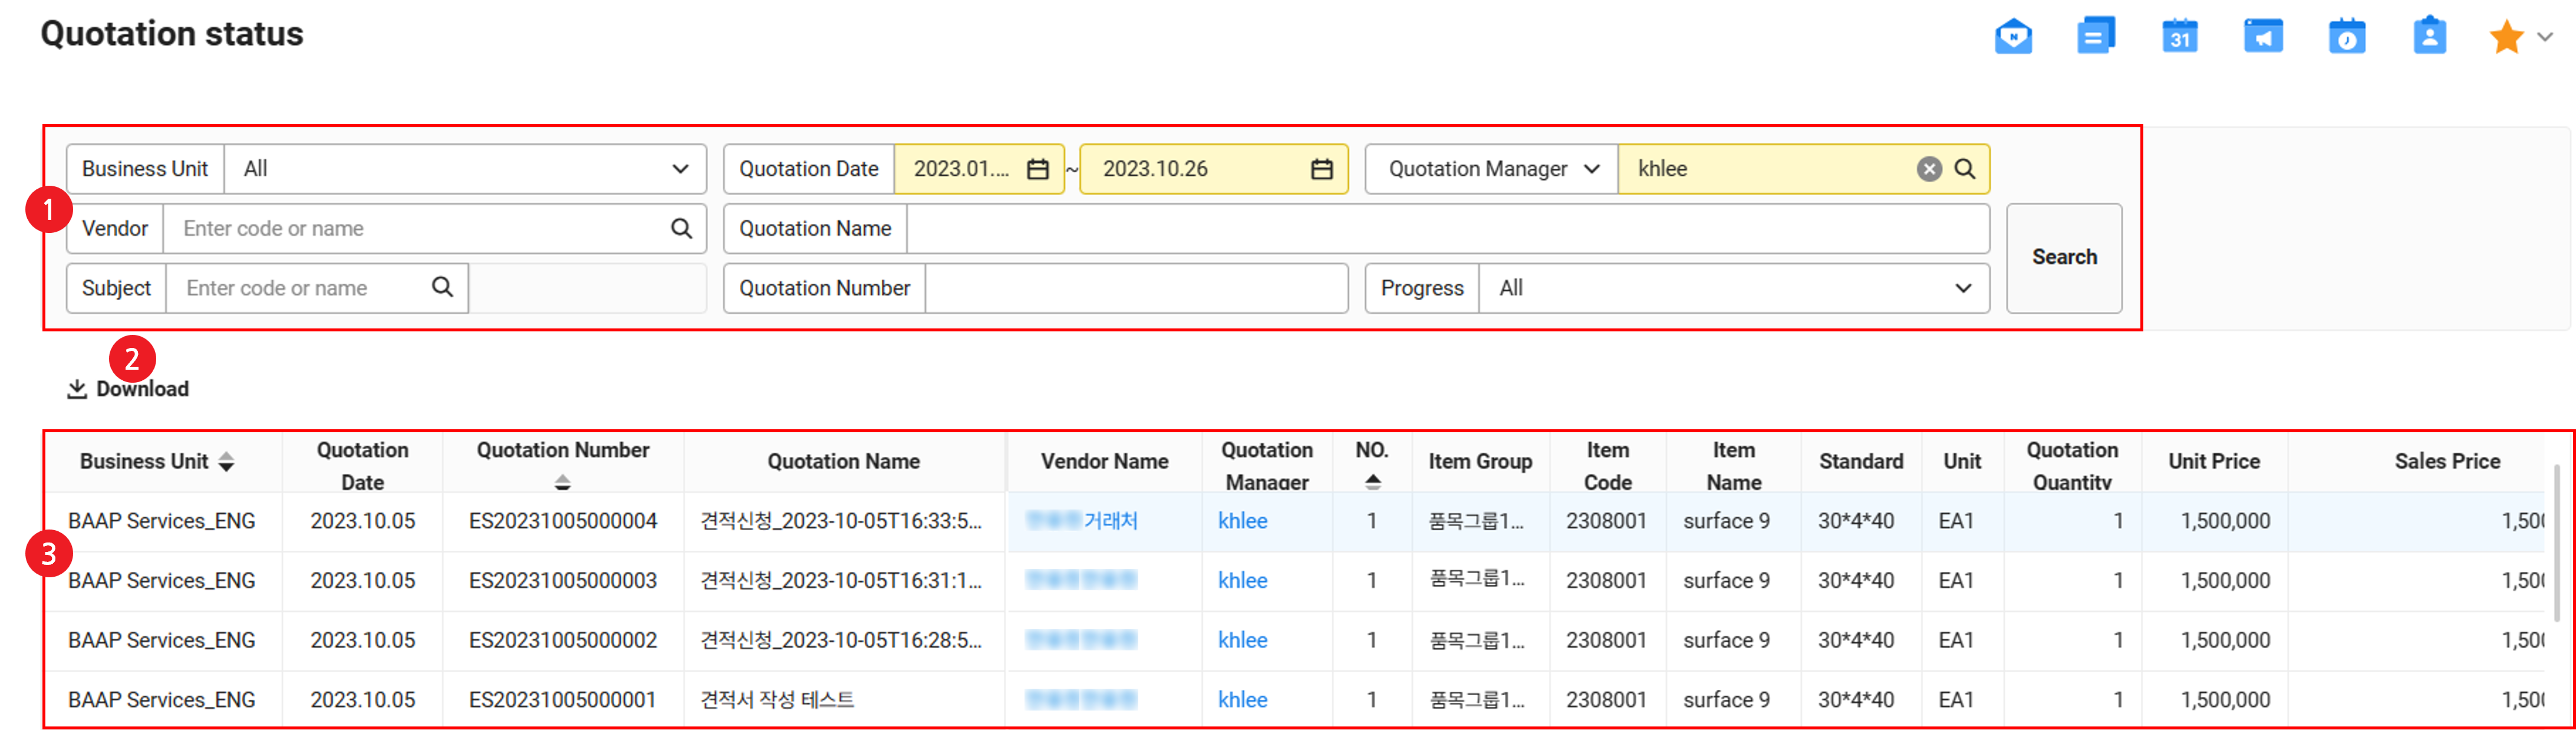
| Area | Description |
|---|---|
| ① Search Window | Search by business place, date of quotation, quotation manager, or sales group, vendor, quotation name, item, quotation number, and progress status conditions |
| ② Download | Download the quotation status list as an Excel file |
| ③ Quotation status list | View quotation status list |
Download Quotation Status
The following describes how to download a quotation status as an Excel file.
- Click ‘Admin Menu’ at the top right of the PC web screen, and then click ‘Sales’ in the pop-up window.
- Click at the top left of the screen.
- Click ‘Manage Orders > Quotation Status’ from the menu.
- If necessary, enter the quotation conditions to be searched in the search window, and then click ‘Search’.
- You can view the quotation status that matches the entered conditions.
- Click 'Download'.
- The quotation status is downloaded as an Excel file.
Order Status Compared to Quotation
You can check the order status compared to quotation by connecting information on the orders using the quotation reference, or view the actual order quantity compared to the quotation quantity.
The Order Status Compared to Quotation page is laid out as follows.
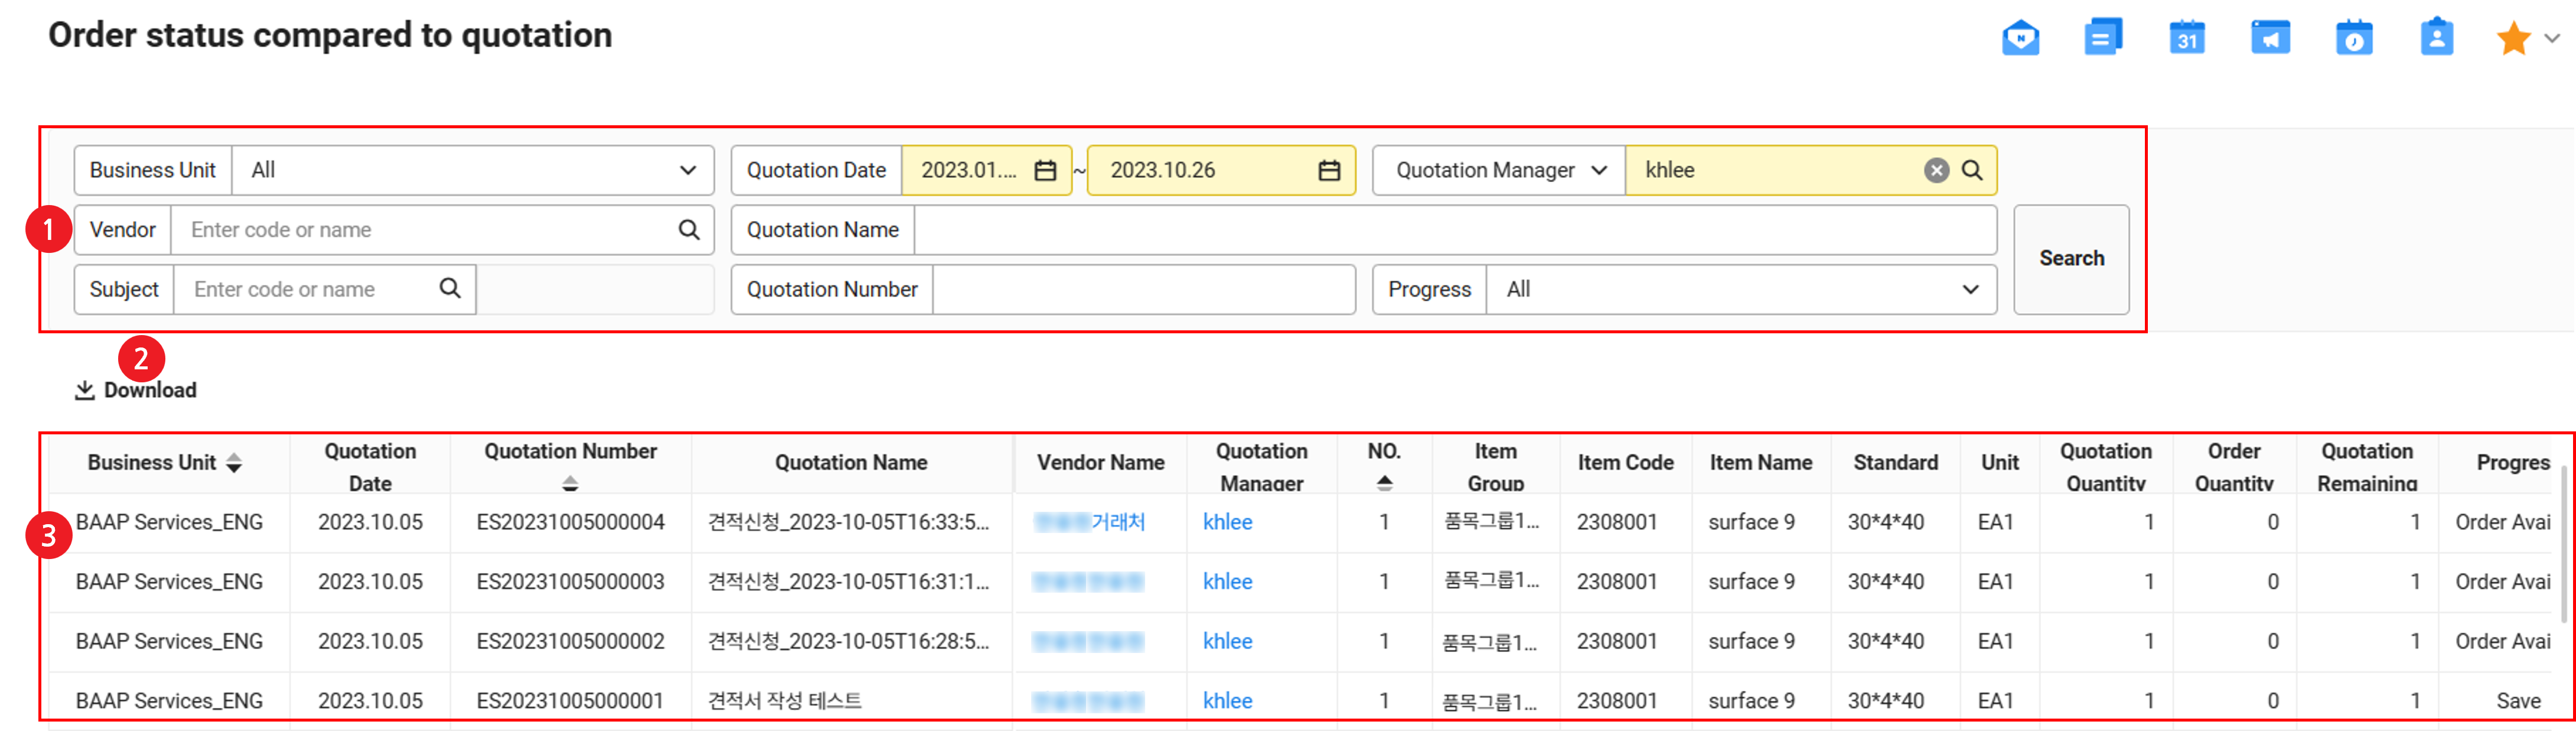
| Area | Description |
|---|---|
| ① Search Window | Search by business place, date of quotation, quotation manager, or sales group, vendor, quotation name, item, quotation number, and progress status conditions |
| ② Download | Download the quotation status list as an Excel file |
| ③ List of order status compared to quotation | View list of order status compared to quotation |
Download Order Status Compared to Quotation
The following describes how to download order status compared to quotation as an Excel file.
- Click ‘Admin Menu’ at the top right of the PC web screen, and then click ‘Sales’ in the pop-up window.
- Click at the top left of the screen.
- Click ‘Manage Orders > Order Status Compared to Quotation’ from the menu.
- If necessary, enter the quotation conditions to be searched in the search window, and then click ‘Search’.
- You can view the order status compared to quotation that matches the entered conditions.
- Click 'Download'.
- The order status compared to quotation is downloaded as an Excel file.
Create Order Form
You can register the order details from vendors or create an order form based on the approved quotation. In addition, you can apply discount amount to the ordered items registered in bulk, and register the sale history by referring to the order form content when processing the sale.
The Create Order Form page is laid out as follows.
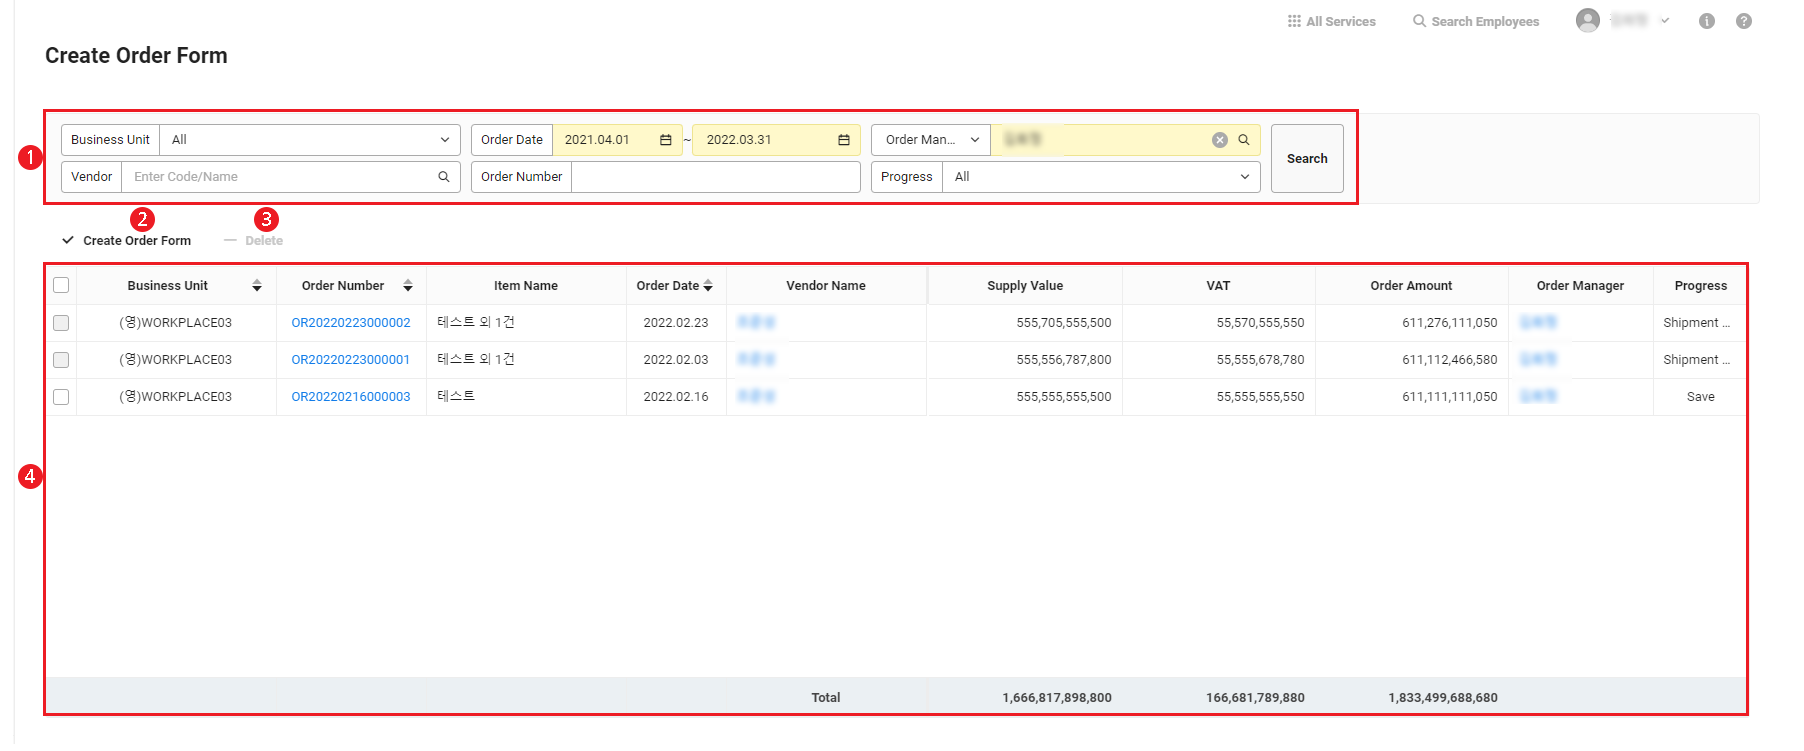
| Area | Description |
|---|---|
| ① Search Window | Search by business place, order date, order manager, vendor, order number, and progress status conditions |
| ② Create Order Form | Go to the Register page to create an order form (See Create Order Form) |
| ③ Delete | Delete a selected order form |
| ④ Order form list | View order form list |
Create Order Form
The following describes how to create an order form.
- Click ‘Admin Menu’ at the top right of the PC web screen, and then click ‘Sales’ in the pop-up window.
- Click at the top left of the screen.
- Click ‘Manage Orders > Create Order Form’ from the menu.
- Click ‘Create Order Form’.
- Enter the order form information and click ‘Add’.
- The fields marked in yellow are required items.
- Business Place: Select the business place.
- Order Number: The order number is added automatically. (Numbering rule: OR + yyyymmdd + 6-digit sequence)
- Order Manager: Select a registered order manager.
- Vendor: Select one from the registered vendors.
- Place of Collection: Select a place of collection.
- Order Date: Select the order date. (Default: Current Date)
- VAT Type: Select a VAT type (taxation, tax exemption, or zero tax rate).
- Currency: Select the currency. According to the selected currency, you can add items that correspond to the currency.
- Unit Price Confirmation Status: Select whether to confirm the unit price.
- Progress: Select the progress (new, saved, or shipment available).
- New: You're entering the content for a new order form.
- Saved: You have clicked ‘Save’ after entering the content for the order form, which is editable
- Shipment Available: You have clicked ‘Save’ and then Approve’, which is non-editable
- Shipment in Process: Sale is in-progress in Manage Sales.
- Enter the order information by item.
- Item Code: Select item codes to select items to order. When you select an item code, the item group, item name, specifications, unit, and sales unit price are entered automatically.
- Order Quantity: Enter the order quantity.
- Supply Date: Enter the supply date for the items.
- Discount Amount: To apply discounts to added items in bulk, select items to apply discounts, and then click ‘Apply Discount’. Enter the discount information.
- To apply discounts, select items to apply them, select ‘Apply Discount’, and then enter the following items.
- If you have chosen Percentage for the Discount Unit, then enter the percentage in the Discount Rate field.
- If you have chosen Discount Amount for the Discount Unit, then enter the discount amount in the Discounted Amount field.
-
-
Click ‘Save’.
-
If ‘Use Unit Price per Item’ is selected for unit price setting in the ‘Sales > Settings’ menu, entered discounts are applied to selected items in bulk. If ‘Item Unit Price by Vendor’ is selected for the unit price setting, item unit price discounts are applied to selected vendors, and it doesn't affect other vendors.
-
- To cancel the discount, select ‘Cancel Discount Application’, and then click ‘Save’. The discounts for the items are reset.
- To apply discounts, select items to apply them, select ‘Apply Discount’, and then enter the following items.
- To delete an added history, select the item to delete, and then click ‘Delete’.
- Click ‘Save’. After checking the content, clicking ‘Save’ will save the created order form. Click ‘Approve’ to approve the order form.
- If it's been set to get approved through the Approval service (‘Sales > Settings’ menu), then ‘Report Approval’ is displayed. Check the approval line and sharing information, and then click ‘Report’.
- The order form approval has to be completed in order to create sales history by referencing the approved order from Manage Sales.
If Whether to Get the Approval for Order Form is set to Use in the ‘Sales > Settings’ menu, then the approval process is conducted on the created order form. If it's set to ‘Not use’, then the order form is approved in the Sales service.
For more details about the approval line and sharing information settings, see Set Approval Line and Sharing Settings. For more information about document approval, see Approve Document on PC or Approve Document on Mobile.
Create Order Form by Referring to Quotation
The following describes how to create an order form by referring to a quotation.
- Click ‘Admin Menu’ at the top right of the PC web screen, and then click ‘Sales’ in the pop-up window.
- Click at the top left of the screen.
- Click ‘Manage Orders > Create Order Form’ from the menu.
- Click ‘Refer to Quotation’.
- Enter the quotation conditions to be searched in the search window, and then click ‘Search’.
- Click the quotation number of the quotation you want to refer to.
- Quotation items and quantity are automatically entered.
- Edit or enter the order information by item.
- Item Code: Select item codes to select items to order. When you select an item code, the item group, item name, specifications, unit, and sales unit price are entered automatically.
- Order Quantity: Enter the order quantity.
- Supply Date: Enter the supply date for the items.
- Discount Amount: To apply discounts to added items in bulk, click ‘Apply Discount’ and then enter the discount information and click ‘OK’. (Default: 0).
- If you have chosen Percentage for the Discount Unit, then enter the percentage in the Discount Rate field.
- If you have chosen Discount Amount for the Discount Unit, then enter the discount amount in the Discounted Amount field.
- If you click ‘OK’ after entering the discount information, then the entered discount details will be applied to all registered items in bulk.
- To delete an added history, select the item to delete, and then click ‘Delete’.
- To delete an item, select the item to delete, and then click ‘Delete’.
- Click ‘Save’.
- Check the details, and then click ‘Save’ or ‘Approve’.
- Clicking ‘Save’ will save the created order form.
- Clicking ‘Approve’ will complete your order form.
Delete Order Form
The following describes how to delete an order form.
- Click ‘Admin Menu’ at the top right of the PC web screen, and then click ‘Sales’ in the pop-up window.
- Click at the top left of the screen.
- Click ‘Manage Orders > Create Order Form’ from the menu.
- If necessary, enter the quotation conditions to be searched in the search window, and then click ‘Search’.
- You can view the order form status that matches the entered conditions.
- Select the order form to delete.
- Click 'Delete'.
Order Form Status
You can view the order history registered in Manage Order Forms in detail to the item unit. You can also view the amount unsold by comparing actual sales amount compared to the order amount.
The Order Form Status page is laid out as follows.
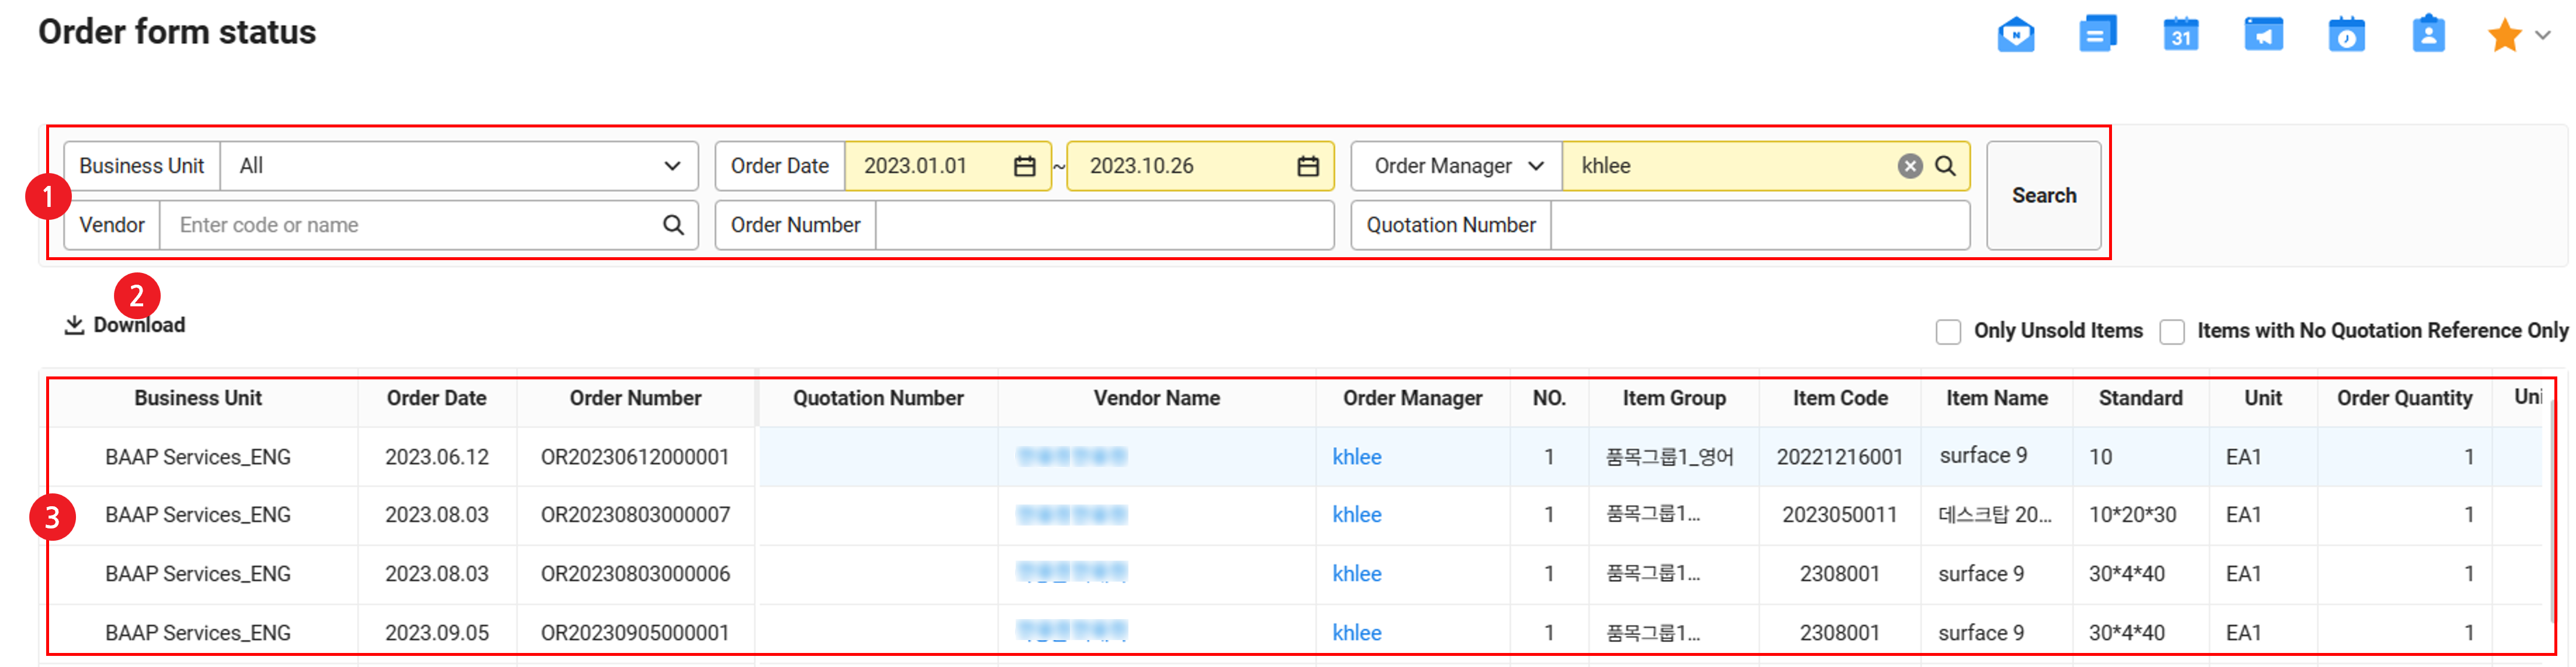
| Area | Description |
|---|---|
| ① Search Window | Search by business place, order date, order manager or sales group, vendor, order number, and quotation number conditions |
| ② Download | Download the order form status list as an Excel file |
| ③ Order form status list | View order form status list |
Download Order Form Status
The following describes how to download an order form status as an Excel file.
- Click ‘Admin Menu’ at the top right of the PC web screen, and then click ‘Sales’ in the pop-up window.
- Click at the top left of the screen.
- Click ‘Manage Orders > Order Form Status’ from the menu.
- If necessary, enter the order form status conditions to be searched in the search window, and then click ‘Search’.
- You can view the order form status that matches the entered conditions.
- Click 'Download'.
- The order form status is downloaded as an Excel file.
Order Progress Status
You can search the order progress status including the order quantity, order amount, sale quantity, sale amount, and sales processing amount, etc.
The Order Progress Status page is laid out as follows.
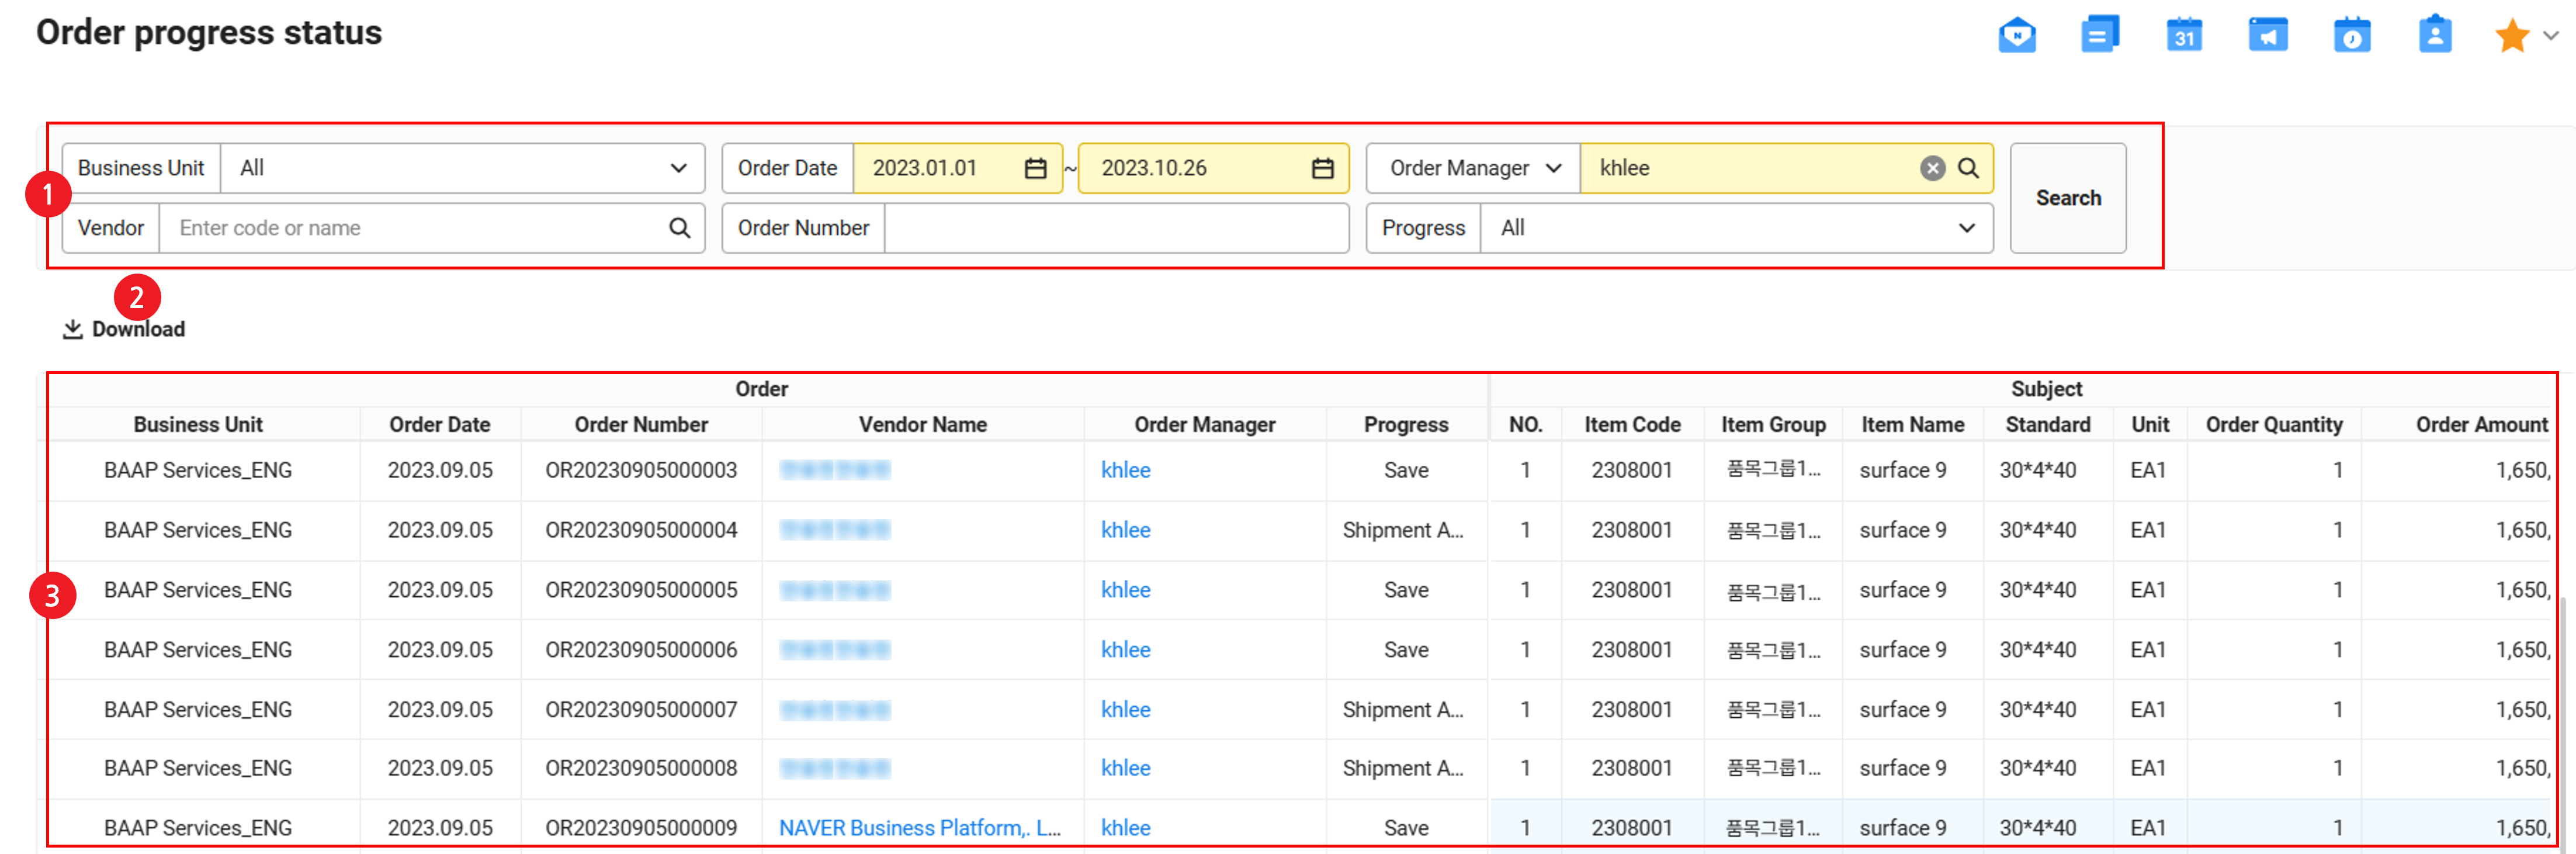
| Area | Description |
|---|---|
| ① Search Window | Search by business place, order date, order manager or sales group, vendor, order number, and progress status conditions |
| ② Download | Download the order progress status list as an Excel file |
| ③ Order progress status list | View order progress status list |
Download Order Progress Status
The following describes how to download an order progress status as an Excel file.
- Click ‘Admin Menu’ at the top right of the PC web screen, and then click ‘Sales’ in the pop-up window.
- Click at the top left of the screen.
- Click ‘Manage Orders > Order Form Status’ from the menu.
- If necessary, enter the order progress status conditions to be searched in the search window, and then click ‘Search’.
- You can view the order progress status that matches the entered conditions.
4. Click 'Download'. The order progress status is downloaded as an Excel file.
Close Order
You can select and close orders that are no longer in progress due to reasons such as order cancellations, from orders registered and approved in the Manage Order Form menu. When you register sales from Manage Sales, the closed orders are not referred to.
The following describes how to close an order.
- Click ‘Admin Menu’ at the top right of the PC web screen, and then click ‘Sales’ in the pop-up window.
- Click at the top left of the screen.
- Click ‘Manage Orders > Close Order’ from the menu.
- If necessary, enter the order form information to be searched in the search window, and then click ‘Search’.
- You can search the order form that matches the entered conditions.
- Select the order form you want to close, and then click ‘Process Closing’.
- The order form is processed closing.
- To cancel the closing, select the order form processed closing, and then click ‘Cancel Closing’.