In the Sales Standard Information, you can register and manage the standard information for sales management such as item, unit price, and store. As for item information, item unit price information, and item unit price by vendor, you can register already managed information in bulk by uploading an Excel file.
Manage Item Information
You can create item groups to manage items by item group. In the Manage Item Information menu, you can create item groups, add items to item groups, or manage them. For set items, you can register and manage component item and component quantity. You can easily batch register large amounts of item information using the Upload Excel File function.
For more information about item information management, see Manage Item Information.
Warehouse Information
You can register and manage the warehouse information by business place. You can register warehouses of business places without limitations in the number of warehouses, and manage the distributed inventory information of all warehouses.
The Warehouse Information screen is laid out as follows.
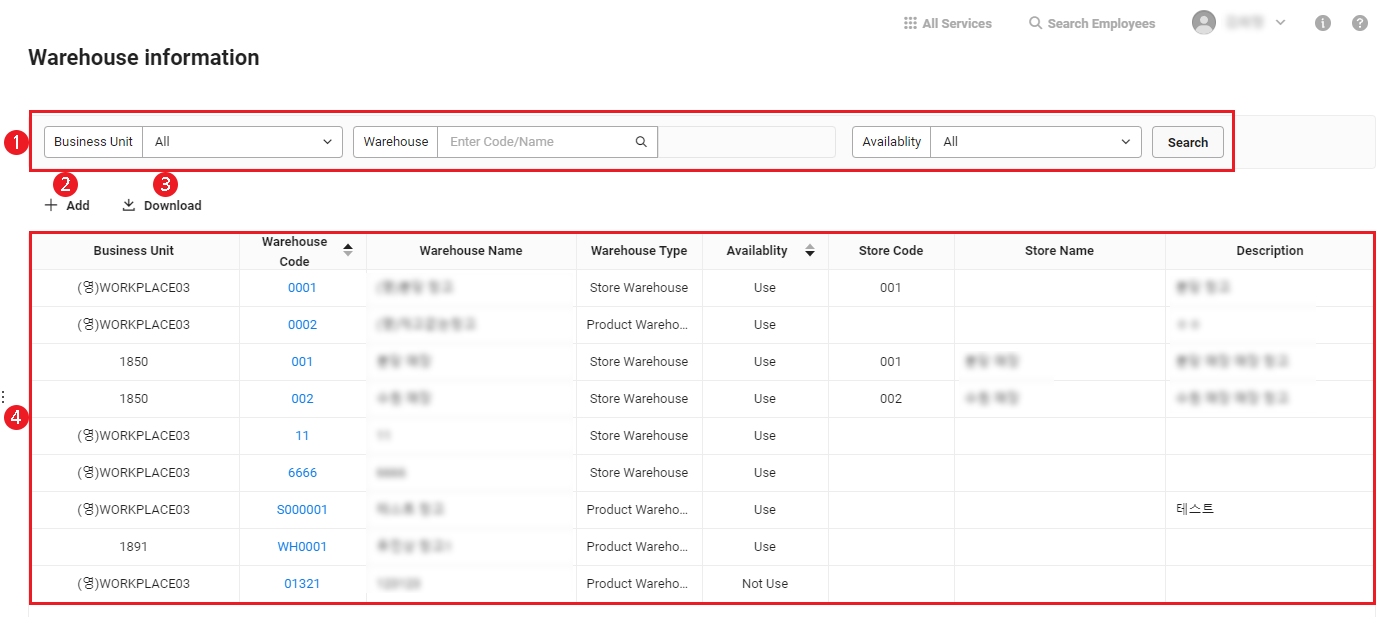
| Field | Description |
|---|---|
| ① Search Window | Search by business place, warehouse, and use status conditions |
| ② Add | Add new warehouse information (See Add Warehouse information) |
| ③ Delete | Delete selected warehouse (See Delete Warehouse) |
| ④ Download | Download the warehouse information as an Excel file |
| ⑤ Warehouse List | Search the warehouse information.
|
Add Warehouse Information
The following describes how to add new warehouse information.
- Click ‘Admin Menu’ at the top right of the PC web screen, and then click ‘Sales’ in the pop-up window.
- Click
 at the top left of the screen.
 - Click ‘Sales Standard Information > Warehouse Information’ from the menu.
- Click 'Add'.
- Enter Warehouse Details.
- The fields marked in yellow are required items.
- The warehouse code can be created with a combination of uppercase and lowercase English letters, and numbers, and it can't be duplicated.
- Store item can be entered only when selecting ‘Store Warehouse’ in the Warehouse Type.
- When the Use Status is set to ‘Not Use’, the warehouse does not appear in the Sales service.
- Click ‘Save’.
Edit Warehouse Information
The following describes how to edit warehouse information.
- Click ‘Admin Menu’ at the top right of the PC web screen, and then click ‘Sales’ in the pop-up window.
- Click at the top left of the screen.
- Click ‘Sales Standard Information > Warehouse Information’ from the menu.
- Click a warehouse code you want to edit.
- Edit the Warehouse Details.
- You can edit all items except for the business place and warehouse code. However, for warehouses created automatically when registering the Store Information, only its use status can be changed.
- If the warehouse code is different from the store code, then it is recognized as a supplementary warehouse when you select the warehouse type as the store warehouse.
- If the warehouse code is identical to the store code, then it is recognized as a required warehouse for the store and the information can't be edited.
- Click ‘Save’.
Delete Warehouse
The following describes how to delete warehouses.
- Click ‘Admin Menu’ at the top right of the PC web screen, and then click ‘Sales’ in the pop-up window.
- Click at the top left of the screen.
- Click ‘Sales Standard Information > Warehouse Information’ from the menu.
- Select the warehouse to delete.
- Click 'Delete'.
- In the notification pop-up window, click ‘OK’ .
- The selected warehouse is deleted.
You can't delete warehouses in the following cases.
- If the inventory data exists in the warehouse
- If there is sales data registered with the warehouse
- The warehouse can be deleted after deleting the sales data.
When deleting a store warehouse, the connection with the store is removed.
Current Item Unit Price
You can check currently-applied item unit price, and download the list of item unit price as an Excel file.
- Current Item Unit Price menu is only displayed when the Set Unit Price item in the Settings menu is set to ‘Use Unit Price per Item’.
- The most recently registered unit price in the Manage Item Unit Price is applied as the item unit price.
The Current Item Unit Price screen is laid out as follows.
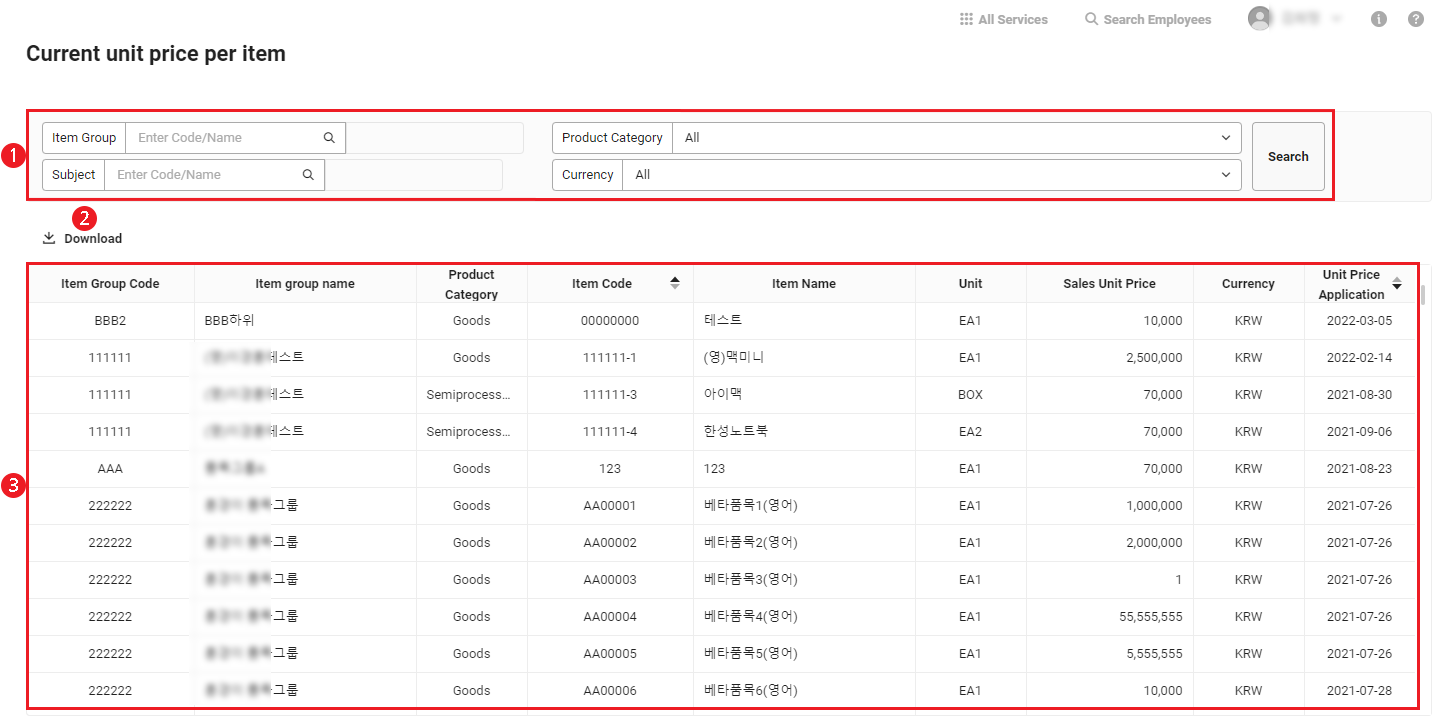
| Area | Description |
|---|---|
| ① Search Window | Search by item group, item category, item, and currency conditions |
| ② Download | Download the current item unit price information as an Excel file |
| ③ List of Current Item Unit Prices | Search List of Current Item Unit Prices |
Manage Item Unit Price
You can manage sales unit price of each item by application date. You can easily batch register multiple pieces of item unit price information using the Upload Excel File function.
If you want to apply the same item unit price for all vendors (customers), then select Set Unit Price in the ‘Sales > Settings’ menu to ‘Use Unit Price per Item’.
The Manage Item Unit Price screen is laid out as follows.
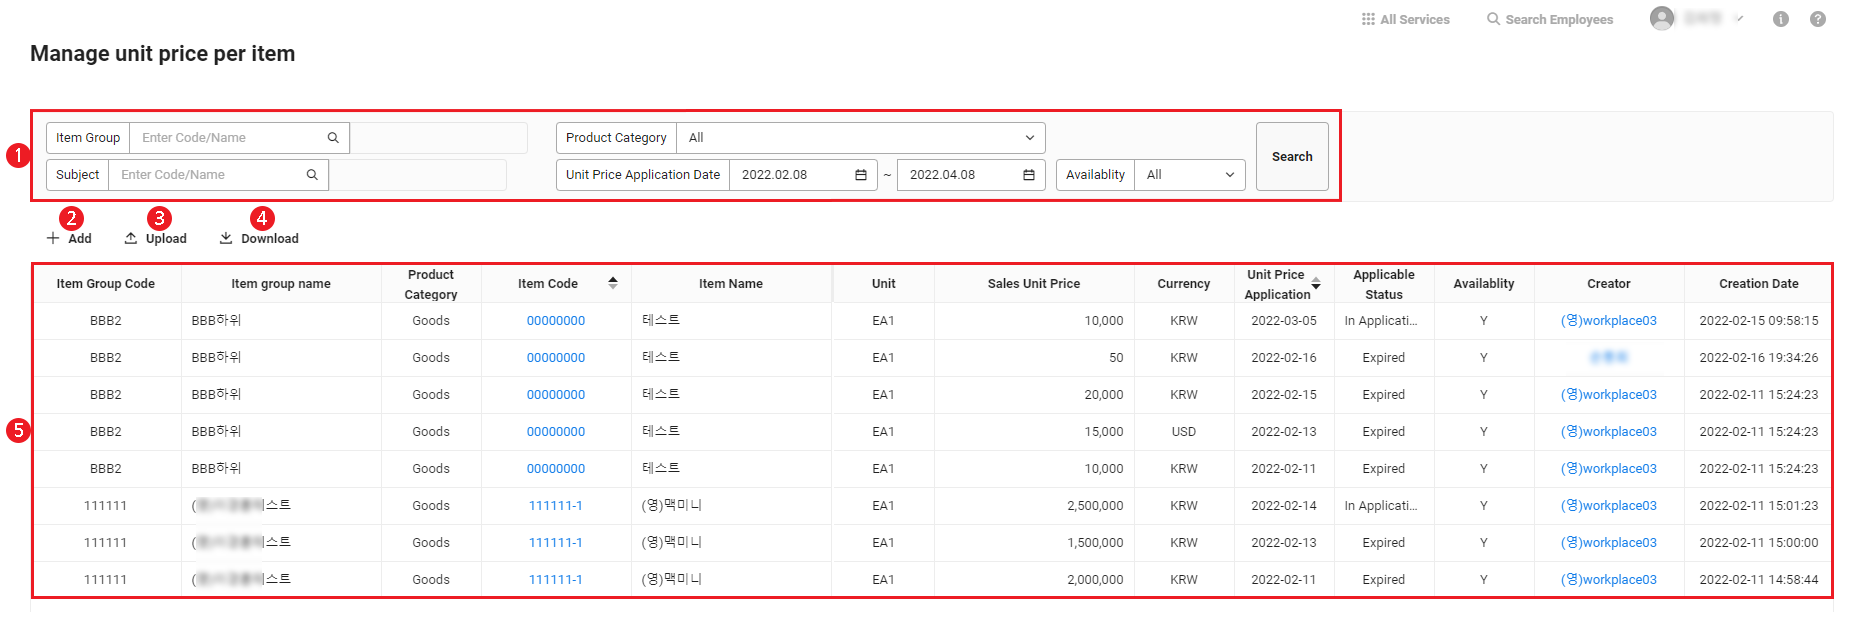
| Field | Description |
|---|---|
| ① Search Window | Search by item group, item category, item, unit price application date, and use status conditions |
| ② Add | Add item unit price (See Add Item Unit Price) |
| ③ Delete | Delete selected item unit price(See Delete Item Unit Price) |
| ④ shared data | Bulk register item unit price information using an Excel file (See Bulk Register Item Unit Price) |
| ⑤ Download | Download the item unit price information as an Excel file |
| ⑥ List of Item Unit Prices | Search item unit price list.
|
Add Item Unit Price
The following describes how to add item unit price.
- Click ‘Admin Menu’ at the top right of the PC web screen, and then click ‘Sales’ in the pop-up window.
- Click at the top left of the screen.
- Click ‘Sales Standard Information > Manage Item Unit Price’ from the menu.
- Click 'Add'.
- Enter item unit price information.
- The fields marked in yellow are required items.
- Item Code: Select Item Code field to select from registered item information. When you select an item code, the values for the Item Name, Standard, and Sales Unit are entered automatically as the value saved in the Item Information.
- Sales Unit Price: Enter the amount of item's sales unit price.
- Currency: Select the Currency field to select the currency you want to use.
- Unit Price Application Date: Enter the application date of sales unit price for the item. The sales unit price for the item is applied from the application date.
- Use Status: Select the use status of entered item unit price history. When set to Not Use, the item unit price is not applied.
- Click ‘Save’.
- If the same unit price application date is entered for the same item code and saved, then the item unit price history duplication check pop-up appears.
Register Item Unit Price at Once
The following describes how to register multiple item unit prices using an Excel file at once.
- Click ‘Admin Menu’ at the top right of the PC web screen, and then click ‘Sales’ in the pop-up window.
- Click at the top left of the screen.
- Click ‘Sales Standard Information > Manage Item Unit Price’ from the menu.
- Click ‘Upload’.
- Click ‘Download Sample File’ to download the sample file.
- The sample file is saved as
Item Unit Price History Template.xlsxin theDownloadfolder.
- The sample file is saved as
- Write and save the item information in the sample file form.
- Click the ‘Attach the file from your PC, or drag the file here’ field to upload the written file, or drag the written file to the applicable field.
- Click 'OK'.
Edit Item Unit Price
The following describes how to edit the item unit price.
- Click ‘Admin Menu’ at the top right of the PC web screen, and then click ‘Sales’ in the pop-up window.
- Click at the top left of the screen.
- Click ‘Sales Standard Information > Manage Item Unit Price’ from the menu.
- Click an item code of the item unit price you want to edit.
- Edit the information, and then click ‘Save’.
Delete Item Unit Price
The following describes how to delete the item unit price.
- Click ‘Admin Menu’ at the top right of the PC web screen, and then click ‘Sales’ in the pop-up window.
- Click at the top left of the screen.
- Click ‘Sales Standard Information > Manage Item Unit Price’ from the menu.
- Select the item unit price data to delete.
- Click 'Delete'.
- In the notification pop-up window, click ‘OK’ .
- The item unit price is deleted.
Current Item Unit Price by Vendor
You can check currently-applied item unit price by vendor, and download the list of item unit prices as an Excel file.
- Current Item Unit Price by Vendor menu is only displayed when the Set Unit Price item in the Settings menu is set to Use Item ‘Unit Price by Vendor’.
- The most recently registered unit price in the Manage Item Unit Price by Vendor is applied as the item unit price.
The Current Item Unit Price by Vendor screen is laid out as follows.
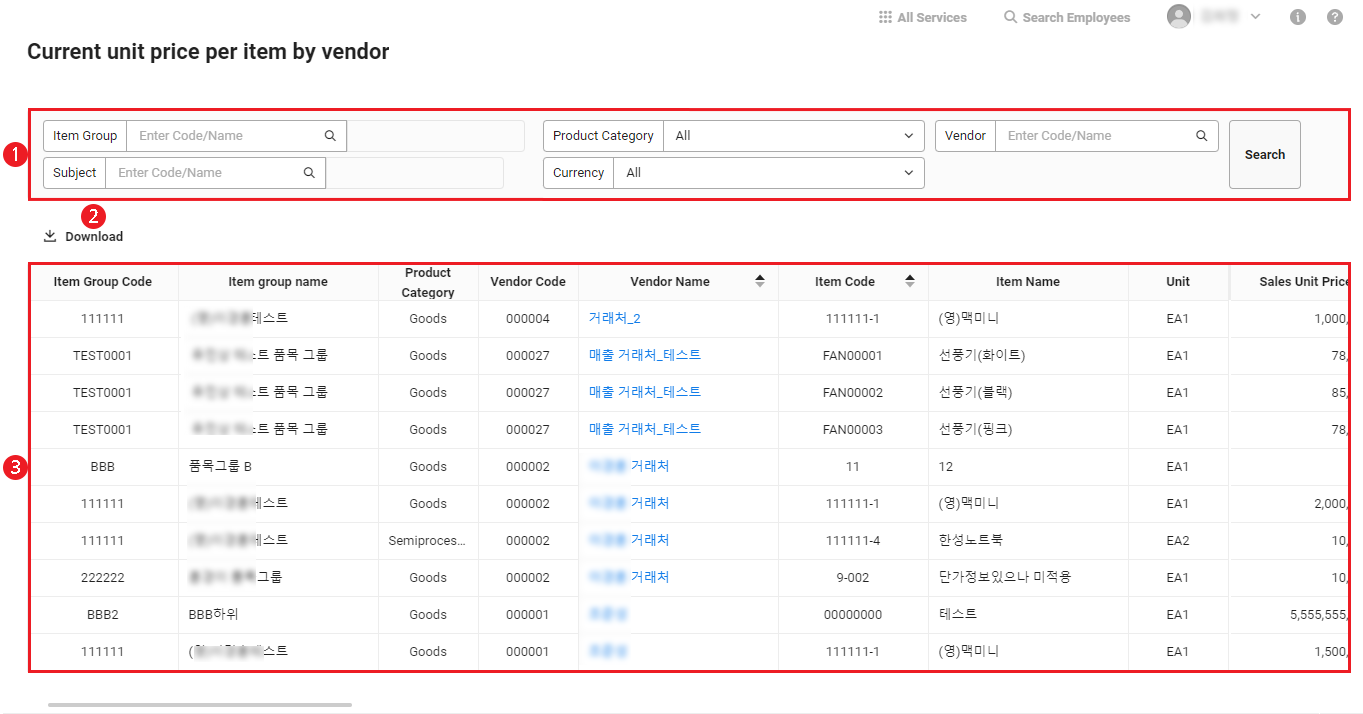
| Area | Description |
|---|---|
| ① Search Window | Search by item group, item category, vendor, and currency conditions. |
| ② Download | Download the information about current item unit price by vendor as an Excel file. |
| ③ List of Current Item Unit Prices by Vendor | Search List of Current Item Unit Prices by Vendor |
Manage Item Unit Price by Vendor
You can manage sales unit price of each item by application date. You can easily batch register multiple pieces of item unit price information using the Upload Excel File function.
The Manage Item Unit Price by Vendor screen is laid out as follows.
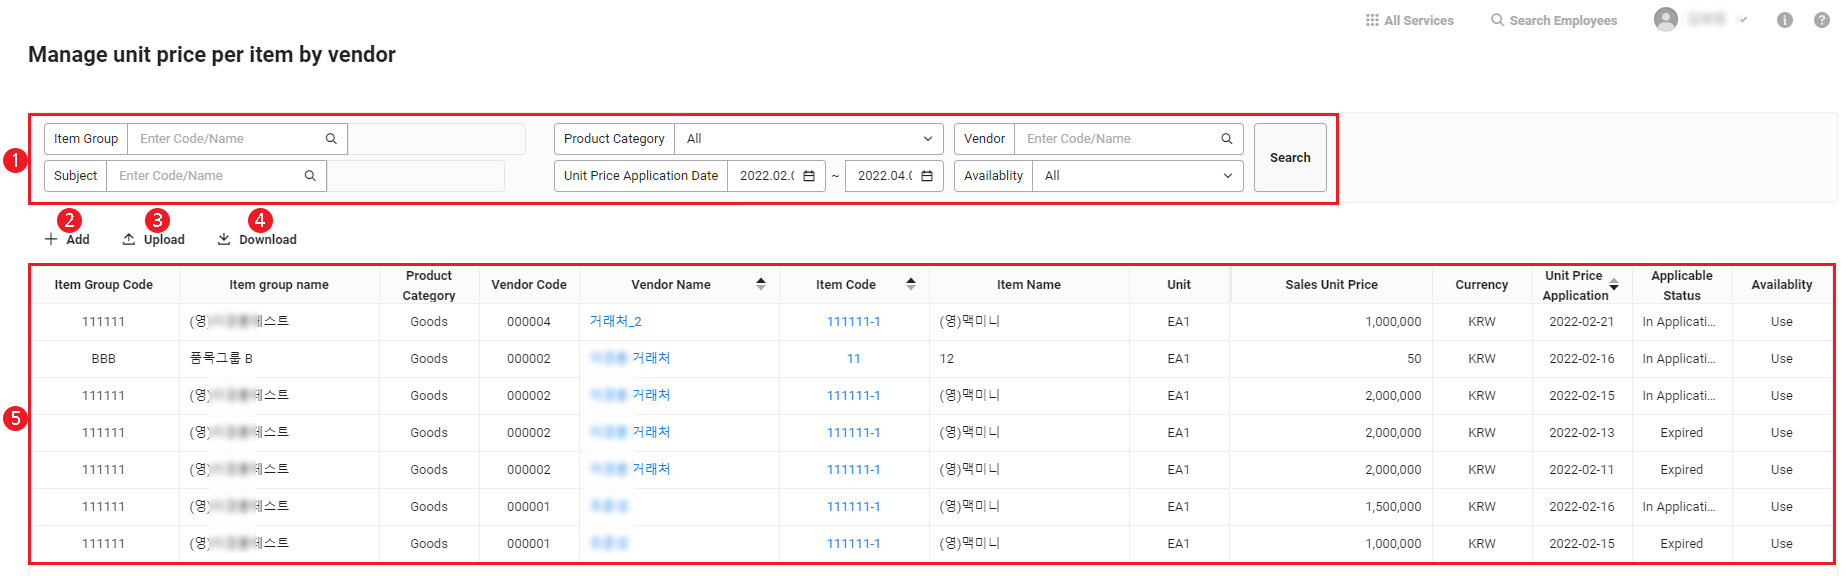
| Field | Description |
|---|---|
| ① Search Window | Search by item group, item category, vendor, item, unit price application date, and usage status conditions. |
| ② Add | Add item unit price by vendor. (See Add Item Unit Price by Vendor) |
| ③ Delete | Delete selected item unit price by vendor. (See Delete Item Unit Price by Vendor) |
| ④ shared data | Bulk register information about item unit price by vendor using an Excel file. (See Bulk Register Item Unit Price by Vendor) |
| ⑤ Download | Download the information about item unit price by vendor as an Excel file. |
| ⑥ List of Item Unit Prices by Vendor | Search the list of item unit prices by vendor.
|
Add Item Unit Price by Vendor
The following describes how to add item unit price by vendor.
- Click ‘Admin Menu’ at the top right of the PC web screen, and then click ‘Sales’ in the pop-up window.
- Click at the top left of the screen.
- Click ‘Sales Standard Information > Manage Item Unit Price by Vendor’ from the menu.
- Click 'Add'.
- Enter item unit price information.
- The fields marked in yellow are required items.
- Vendor: Select the Vendor field to select registered vendor.
- Item Code: Select Item Code field to select from registered item information. When you select an item code, the values for the Item Name, Standard, and Sales Unit are entered automatically as the value saved in the Item Information.
- Sales Unit Price: Enter the amount of sale unit price for items by vendor.
- Currency: Select the Currency field to select the currency you want to use.
- Unit Price Application Date: Enter the application date of sales unit price for the item by vendor. The sales unit price for the item by vendor is applied starting on the application date.
- Use Status: Select the use status of entered the unit price history for item by vendor. When set to Not Use, the item unit price by vendor is not applied.
- Click ‘Save’.
- If the same unit price application date is entered for the item code of the same vendor and saved, then the duplication check pop-up for the item unit price by vendor appears.
Bulk Register Item Unit Price by Vendor
The following describes how to register multiple item unit prices by vendor using an Excel file at once.
- Click ‘Admin Menu’ at the top right of the PC web screen, and then click ‘Sales’ in the pop-up window.
- Click at the top left of the screen.
- Click ‘Sales Standard Information > Manage Item Unit Price by Vendor’ from the menu.
- Click ‘Upload’.
- Click ‘Download Sample File’ to download the sample file.
- The sample file is saved as
Item Unit Price by Vendor Template.xlsxin theDownloadfolder.
- The sample file is saved as
- Write and save the item information in the sample file form.
- Click the ‘Attach the file from your PC, or drag the file here’ field to upload the written file, or drag the written file to the applicable field.
- Click 'OK'.
Edit Item Unit Price by Vendor
The following describes how to edit item unit price by vendor.
- Click ‘Admin Menu’ at the top right of the PC web screen, and then click ‘Sales’ in the pop-up window.
- Click at the top left of the screen.
- Click ‘Sales Standard Information > Manage Item Unit Price by Vendor’ from the menu.
- Click an item code of the item unit price you want to edit.
- Edit the information, and then click ‘Save’.
Delete Item Unit Price by Vendor
The following describes how to delete item unit price by vendor.
- Click ‘Admin Menu’ at the top right of the PC web screen, and then click ‘Sales’ in the pop-up window.
- Click at the top left of the screen.
- Click ‘Sales Standard Information > Manage Item Unit Price by Vendor’ from the menu.
- Select the item unit price data to delete.
- Click 'Delete'.
- In the notification pop-up window, click ‘OK’ .
- The item unit price by vendor is deleted.
If the item was used by the vendor for creating quotation/order form or registering sales, then the item unit price by vendor can't be deleted.
You can delete the item unit price after deleting the quotation/order form or the sales data.
- The item unit price by vendor is deleted.
Store Information
For companies selling directly to consumers through directly managed stores, you can register and manage information of directly managed stores.
If you set the Use Store Management item to ‘Y’ in the ‘Sales > Settings’ menu and register stores, then the warehouse information is created automatically with the same code as the store code, which is used as the default warehouse for the store.
The Store Information screen is laid out as follows.
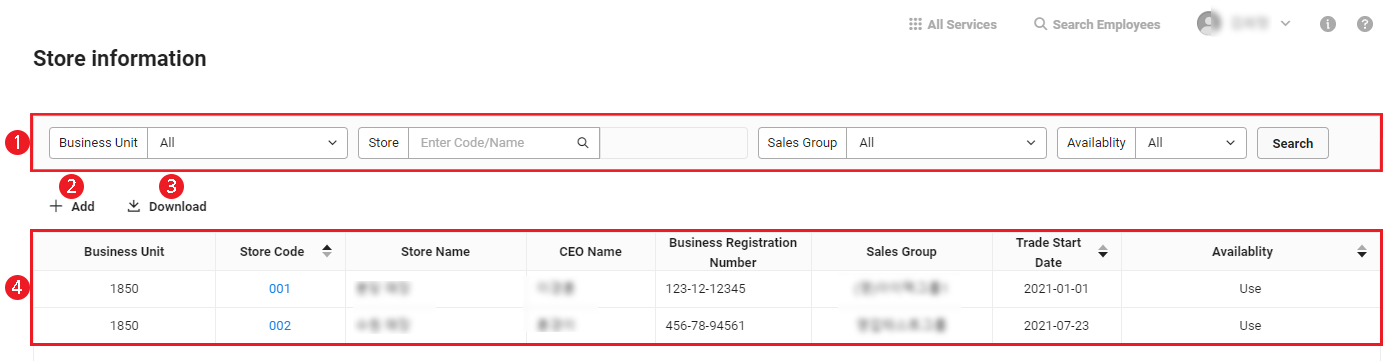
| Field | Description |
|---|---|
| ① Search Window | Search by business place, store, sales group, and usage status conditions. |
| ② Add | Add store information(See Add Store information) |
| ③ Delete | Delete selected store information(See Delete Store Information) |
| ④ Download | Download the store information as an Excel file. |
| ⑤ Store Information List | Search the store information list.
|
Add Store Information
The following describes how to add store information.
- Click ‘Admin Menu’ at the top right of the PC web screen, and then click ‘Sales’ in the pop-up window.
- Click at the top left of the screen.
- Click ‘Sales Standard Information > Store Information’ from the menu.
- Click 'Add'.
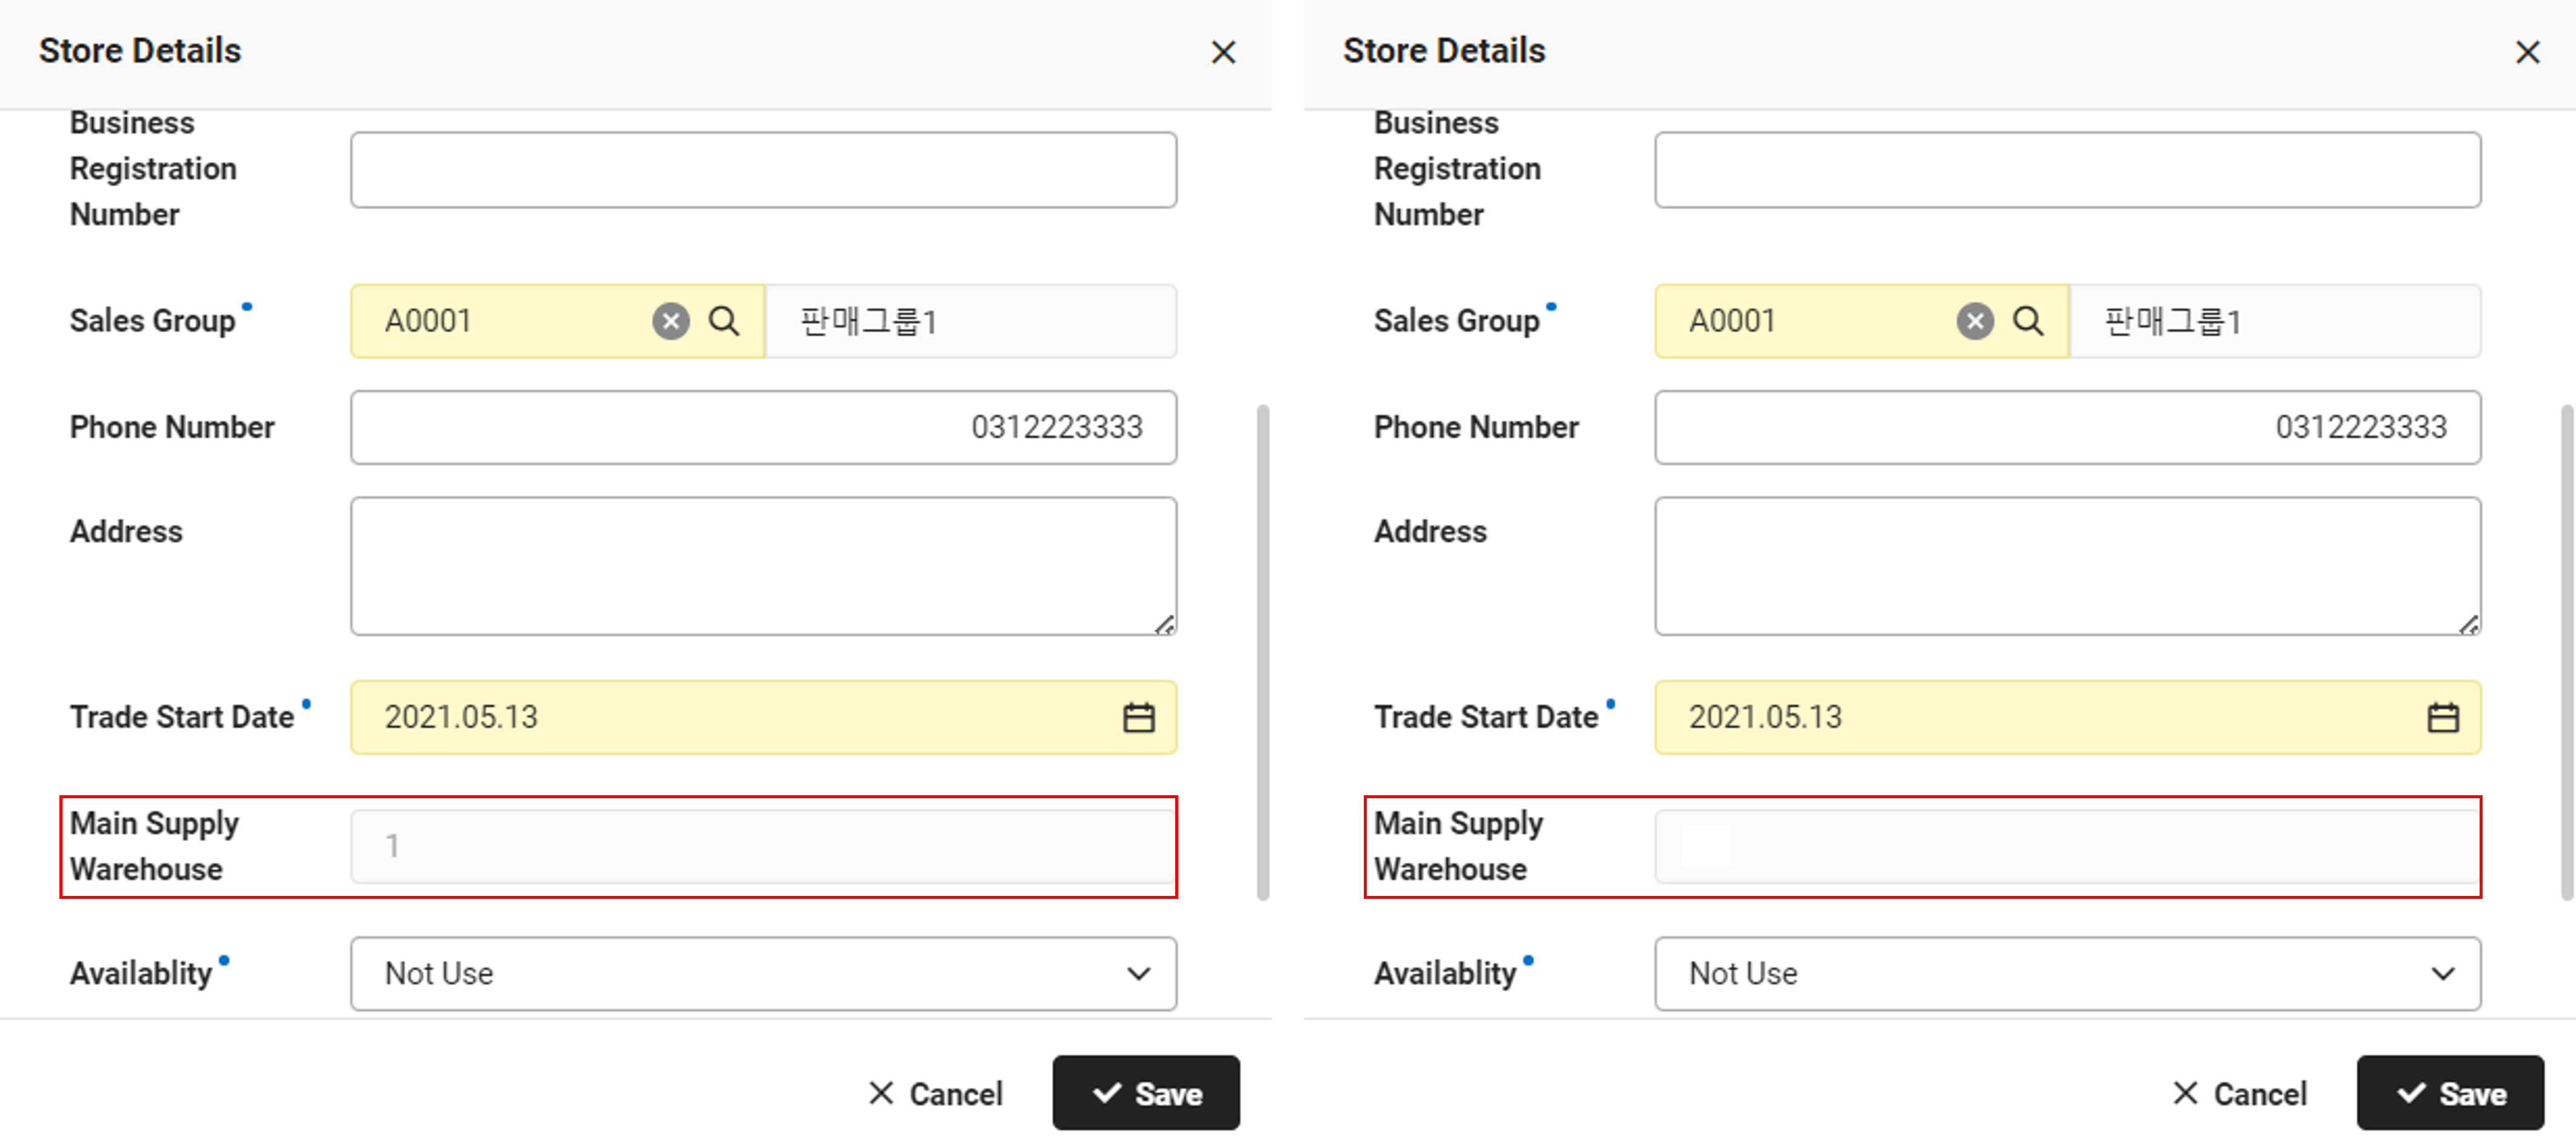
- Enter the store information.
- The fields marked in yellow are required items.
- Business Place: Select the business place item.
- Store Code: Enter the store code. The store code can be created with a combination of uppercase and lowercase English letters, and numbers, and it can't be duplicated.
- Store Name: Enter a store name.
- Representative Name: Enter the name of the store's representative.
- Business Registration Number: Enter the business registration number. You must enter 10 digits for the business registration number. (E.g., 3124425901)
- Sales Group: Select the sales group.
- Telephone Number: Enter the telephone number. The phone number must follow the phone number format. (E.g., 0313357676, 01023234545)
- Address: Enter the address of the store.
- Trade Start Date: Enter the trade start date.
- Main Supply Warehouse: When you save, the main supply warehouse is automatically entered with the store name.
- Use Status: Select the use status. If the sale is registered, then it can't be entered to the store.
- Click ‘Save’.
Edit Store Information
The following describes how to edit store information.
- Click ‘Admin Menu’ at the top right of the PC web screen, and then click ‘Sales’ in the pop-up window.
- Click at the top left of the screen.
- Click ‘Sales Standard Information > Store Information’ from the menu.
- Click a store code you want to edit.
- You can edit all items except for the Business Place and Warehouse Code.
- Edit the information, and then click ‘Save’.
Delete Store Information
The following describes how to delete store information.
- Click ‘Admin Menu’ at the top right of the PC web screen, and then click ‘Sales’ in the pop-up window.
- Click at the top left of the screen.
- Click ‘Sales Standard Information > Store Information’ from the menu.
- Select the store information to delete.
- Click 'Delete'.
- In the notification pop-up window, click ‘OK’ .
- The store information is deleted.
When deleting store information, you need to first delete all connected warehouse information. (See Delete Warehouse Information)
You can't delete stores in the following cases.
- If the inventory data exists in the warehouse connected to the store
- If the sales data exists in the store
- The warehouse can be deleted after deleting the sales data.
Sales Group
You can register and manage the sales group (organization) information of the company. Sales groups can be created and employees can be mapped in a variety of format, by department, by region, etc., separate from the regular company organization.
Members who belong to specific sales group can only use related information for the specific sales group according to the permissions granted from sales planning, order management, sales management, etc.
Manage by group
You can manage employees by sales group.
The Manage by Group page is laid out as follows.
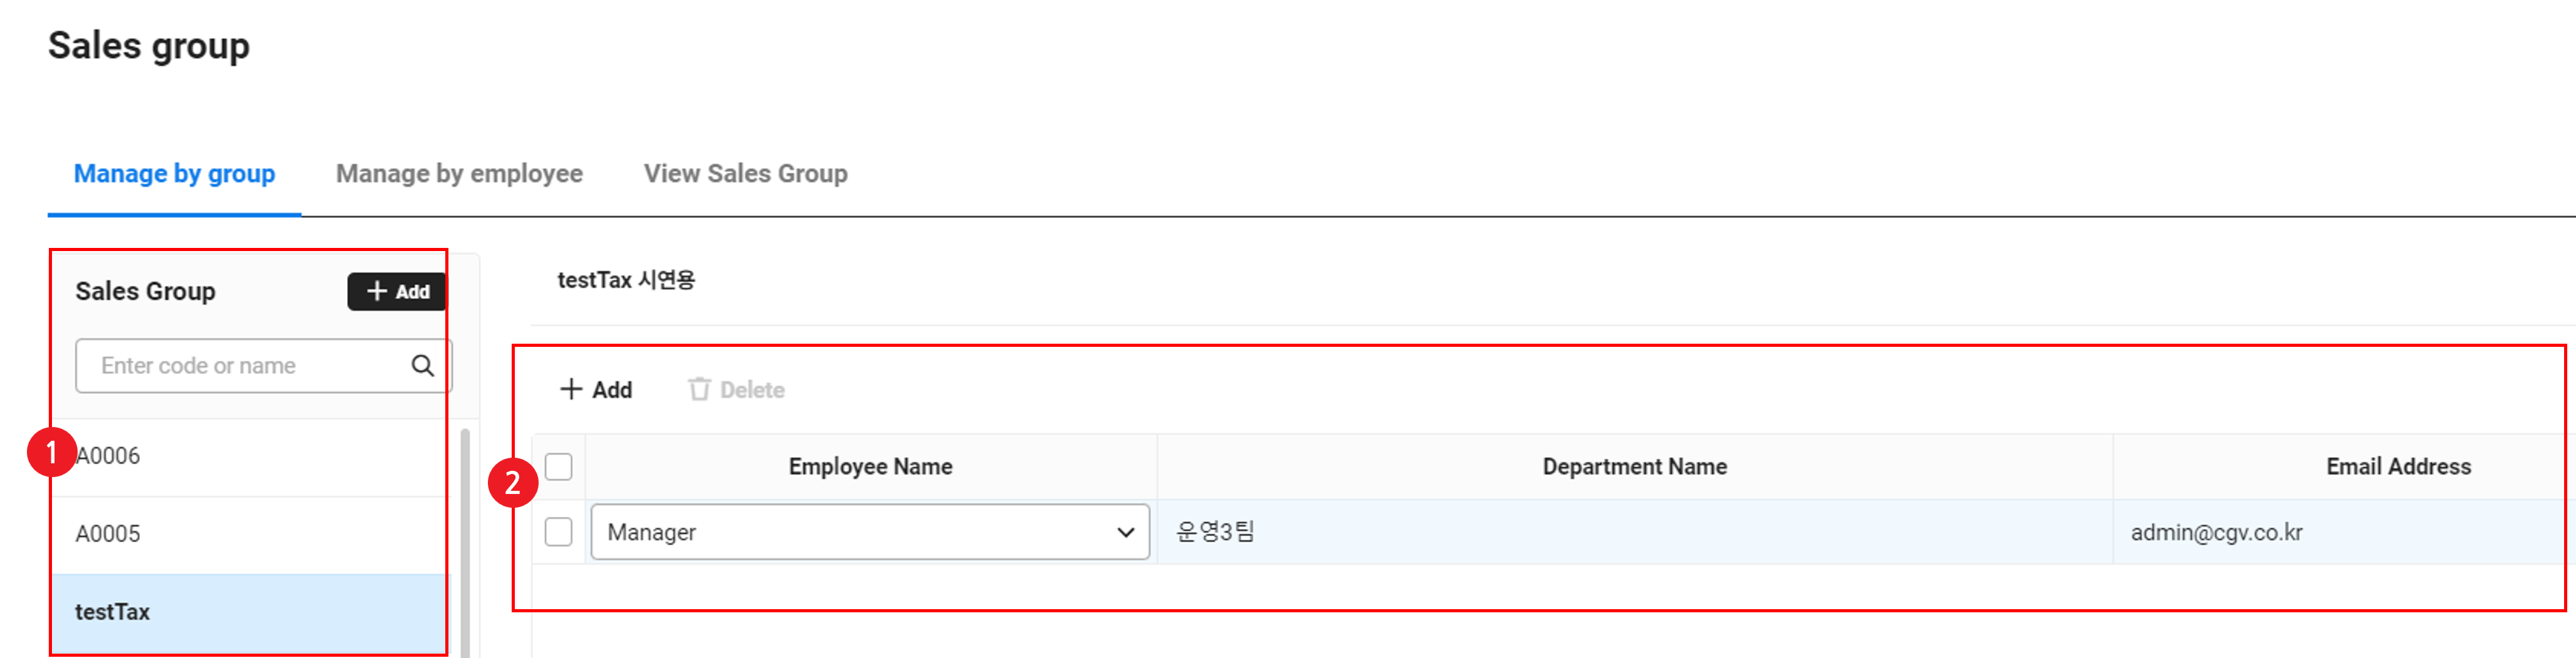
| Field | Description |
|---|---|
| ① Sales Group List | View added sales groups.
|
| ② Employee List | View employees who belong to the selected sales group.
|
Add Sales Group
The following describes how to add a sales group.
- Click ‘Admin Menu’ at the top right of the PC web screen, and then click ‘Sales’ in the pop-up window.
- Click at the top left of the screen.
- Click ‘Sales Standard Information > Sales Group’ from the menu.
- Click ‘Add’ from the sales group list area.
- Enter areas marked yellow in the Sales Group pop-up window.
- Enter the sales group code that is not a duplicate.
- Enter the sales group name.
- Set the usage status.
- Enter the notes if needed.
- Click ‘Save’.
- The sales group is added.
Delete Sales Group
The following describes how to delete a sales group.
- Click ‘Admin Menu’ at the top right of the PC web screen, and then click ‘Sales’ in the pop-up window.
- Click at the top left of the screen.
- Click ‘Sales Standard Information > Sales Group’ from the menu.
- Select the sales group to delete in the sales group list area, and then click ‘Delete’.
- Click 'OK'.
Add Employee to Sales Group
The following describes how to add an employee to a sales group.
- Click ‘Admin Menu’ at the top right of the PC web screen, and then click ‘Sales’ in the pop-up window.
- Click at the top left of the screen.
- Click ‘Sales Standard Information > Sales Group’ from the menu.
- Select a sales group to which you want to add an employee in the sales group list area.
- Click ‘Add’ located in the Employee List field.
- Select an employee in the Employee Name drop-down list.
- To add multiple employees, repeat steps 5 to 6.
- Click ‘Save’.
Delete Employee from Sales Group
The following describes how to delete an employee from a sales group.
- Click ‘Admin Menu’ at the top right of the PC web screen, and then click ‘Sales’ in the pop-up window.
- Click at the top left of the screen.
- Click ‘Sales Standard Information > Sales Group’ from the menu.
- Select a sales group from which you want to delete an employee in the sales group list area.
- Mark the checkbox of the employee to delete from the employee field, and then click ‘Delete’.
- Click 'OK'.
Manage by employee
You can manage sales groups by employee.
The Manage by Employee page is laid out as follows.
| Field | Description |
|---|---|
| ① Employee list | View sales groups by employee.
|
| ② Sales Group List | View sales groups mapped to the employee.
|
Delete/Edit Employee
You can delete an employee added to a sales group, or edit it with a different employee.
The following describes how to delete or edit an employee mapped to a sales group.
- Click ‘Admin Menu’ at the top right of the PC web screen, and then click ‘Sales’ in the pop-up window.
- Click at the top left of the screen.
- Click ‘Sales Standard Information > Sales Group’ from the menu.
- Click the ‘Manage by Employee’ tab.
- Select an employee from the employee list, and check sales groups they're mapped to.
- To delete the employee from all sales groups they're mapped to, place the cursor over the employee name and click the delete icon to delete the employee.
- Delete carefully since the employee is delete from all sales groups they're mapped to when you delete them. If you want to delete the employee only from a specific sales group, proceed with it in the ‘Manage by Group’ tab.
- To map a different employee, search and select the employee name you want to edit to.
- Make sure you don't duplicate an employee that already exists in the employee list.
- To add an employee who already exists in the employee list to a specific sales group, see Add Employee to Sales Group.
- Click the check icon.
- To delete the employee from all sales groups they're mapped to, place the cursor over the employee name and click the delete icon to delete the employee.
- Click ‘Save’.
- Employee deletion or modification is completed.
Map Sales Group to Employee
The following describes how to additionally map a sales group to an employee.
- Click ‘Admin Menu’ at the top right of the PC web screen, and then click ‘Sales’ in the pop-up window.
- Click at the top left of the screen.
- Click ‘Sales Standard Information > Sales Group’ from the menu.
- Click the ‘Manage by Employee’ tab.
- Select an employee from the employee list.
- Click ‘Add’ from the sales group list on the right, and select the sales group code or name you want to map.
- To edit a mapped sales group, click the magnifying glass icon on the sales group name you want to edit to delete it, and then select the sales group name.
- Click ‘Save’.
- The sales group is mapped to the employee.
Delete Sales Group Mapped to Employee
The following describes how to delete a sales group mapped to an employee.
- Click ‘Admin Menu’ at the top right of the PC web screen, and then click ‘Sales’ in the pop-up window.
- Click at the top left of the screen.
- Click ‘Sales Standard Information > Sales Group’ from the menu.
- Click the ‘Manage by Employee’ tab.
- Select an employee from the employee list.
- Select the sales group to delete in the sales group list on the right, and then click the Delete button.
- Click ‘Save’.
- The sales group mapped to the employee is deleted.
View Sales Group
You can view the information of added employees by sales group.
The View Sales Group page is laid out as follows.
| Field | Description |
|---|---|
| ① Search Window | Search by sales group, employee, or department name. |
| ② Download | Download the sales group list. |
| ③ Sales Group List | View sales group list. |
Download Sales Group Information
The following describes how to download the list of sales groups as an Excel file.
- Click ‘Admin Menu’ at the top right of the PC web screen, and then click ‘Sales’ in the pop-up window.
- Click at the top left of the screen.
- Click ‘Sales Standard Information > Sales Group’ from the menu.
- Click the ‘View Sales Group’ tab.
- If necessary, enter the conditions to search in the search window, and click ‘Search’.
- The list of sales groups that meets the entered conditions is searched.
- Click 'Download'.
- The downloaded file is saved as
Sales Group_YYYYMMDD_hhmmss.xlsxin the Download folder.
- The downloaded file is saved as