You can create and manage sales history by attaching the registered warehousing history based on approved order form details. You can confirm sales, submit them to Accounting (if using) for slip processing, or request issuance of tax invoices (if using Electronic Tax Invoice service). You can also print out the transaction statement or send emails to customers or vendors.
Check FAQs first.
Q. In the first page of the Manage Sales menu, sometimes the Search is not processed immediately. What is the criteria for immediate search?
- If the logged-in user belongs to two or more sales groups, then they are not searched directly upon accessing the page. If the user belongs to only one sales group, then it is searched directly upon accessing the page. If the user does not belong to any sales group, then the user can't use the Manage Sales menu.
Q. How do I reflect the company seal to the specification of transaction?
- Once you register the company seal from the ‘Business Support Settings > Company Information > Manage Company Information’ menu, the company seal will be displayed on the Print Specification of Transaction and Send Email pages.
Register Sales
You can register and manage the history of items sold (shipped) to vendors.
You can create sales history based on approved order form history, or load warehousing history to create sales history. Also, the sales manager can directly create and Register Sales history.
Using the batch discount application feature, you can apply a discount amount for registered order items at once. You can print specifications of transaction by registered sales item, and send an Email to the vendor.
For returns, if you select the sales type as ‘Return’ to register, then they are processed as returns. For normal sales, the inventory decreases by the item quantity registered in the sales history. For returns, the inventory increases.
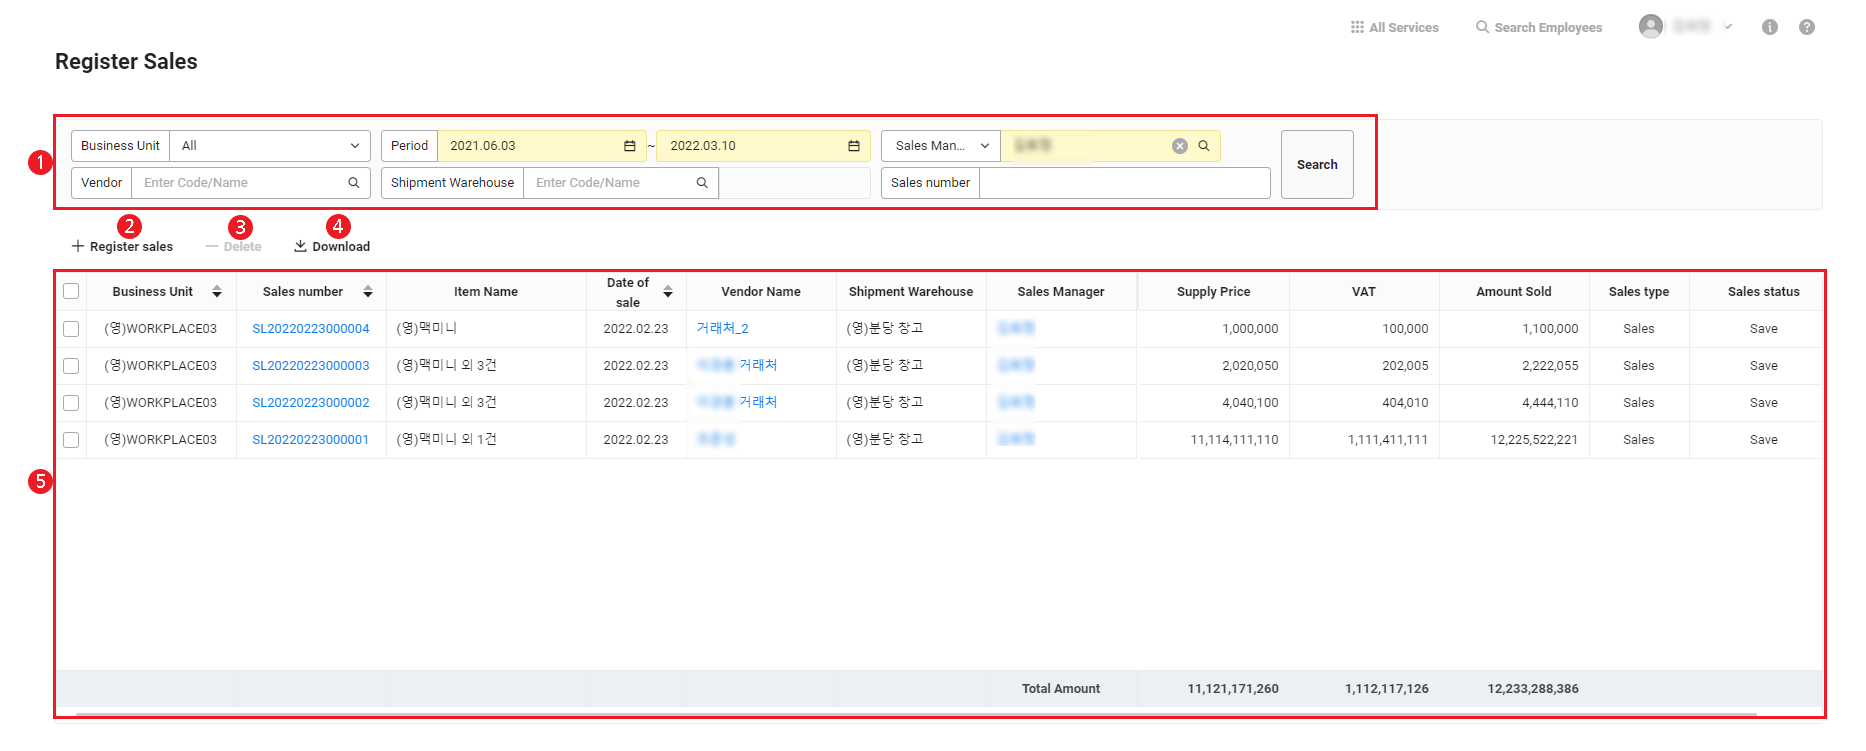
The Register Sales page is laid out as follows.
| Area | Description |
|---|---|
| ① Search Window | Search by business place, period, sales manager or sales group, vendor, outbound shipment warehouse, and sale number. |
| ② Register Sales | Register new sales history (See Register Sales History) |
| ③ Delete | Delete selected sales history (See Delete Sales History) |
| ④ Download | Download the selected sales list as an Excel file (See Download Sales History) |
| ⑤ Sales History List | View the registered sales history list
|
Register Sales History
The following describes how to register new Sales History.
- Click ‘Admin Menu’ at the top right of the PC web screen, and then click ‘Sales’ in the pop-up window.
- Click
 at the top left of the screen.
 - Click ‘Manage Sales > Register Sales’ from the menu.
- Click ‘Register Sales’.
- Enter the sale information, and then click ‘Add’.
- The fields marked in yellow are required items.
- Business Place: Select the business place item from the combo box.
- Sale Number: The sale number is added automatically. (Numbering rule: SL + yyyymmdd + 6 digit sequence)
- Sale Type: Select the sale type (sale, return).
- Sale Manager: Select a registered sale manager.
- Vendor: Select one from the registered vendors.
- Place of Collection: Select the place of collection from registered vendors.
- Confirmation Status: This item, displayed when viewing sales history, shows whether the sale is confirmed (Confirmed/Unconfirmed).
- Sales Group: It's a sales group to which the sales history is to be added. The sales group selected from the list is displayed.
- Vendor Manager: (If using the Electronic Tax Invoice service) Enter the vendor manager.
- Contact: (If using the Electronic Tax Invoice service) Enter the vendor manager's contact number.
- Email: (If using the Electronic Tax Invoice service) Enter the vendor manager's email address.
- Creation Date: Select a sales registration date.
- Sale Date: Select a sale date. (Default value: current date)
- Shipment Warehouse: Select a warehouse from which the outbound shipment of the sale item will be made.
- Order Number: The order number is entered automatically when you Reference Order Form.
- VAT Type: Select a VAT type (taxation, tax exemption, or zero tax rate).
- Collection Type: Select the collection type (credit revenue, credit card, cash).
- Currency: Select the currency. According to the selected currency, you can add items that correspond to the currency.
- Receipt/Bill: Select the classification of either receipt or billing.
- Select the classification of either receipt or billing.
- Item Code: Select item code field to select items to sell. When you select an item code, the item group, item name, specifications, unit, and sales unit price are entered automatically.
- Sale Quantity: Enter the sale quantity.
- Discount Amount: To apply discounts to added items in bulk, select items to apply discounts, and then click ‘Apply Discount’. Enter the discount information (default: 0)
-
To apply discounts, select Apply Discount, and then enter the following items.
-
If you have chosen Percentage for the Discount Unit, then enter the percentage in the Discount Rate field.
-
If you have chosen Discount Amount for the Discount Unit, then enter the discount amount in the Discounted Amount field.
-
Enter round down units and end digit handling.
-
Click ‘Save’.
-
If ‘Use Unit Price per Item’ is selected for unit price setting in the ‘Sales > Settings’ menu, entered discounts are applied to selected items in bulk. If ‘Item Unit Price by Vendor’ is selected for the unit price setting, item unit price discounts are applied to selected vendors, and it doesn't affect other vendors.
-
-
-
To cancel the discount, select ‘Cancel Discount Application’, and then click ‘Save’.
-
The discounts for the items are reset.
-
-
- Whether to Reflect Component Items to Inventory: If the selected item uses a set item, then mark this item.
- Duplicated items can't be saved.
- To delete an added item, select the item to delete, and then click ‘Delete’.
When you mark Whether to Reflect Component Items to Inventory, the set item inventory is reflected for the item inventory, rather than the selected item inventory.
- Click ‘Save’.
Register Sales History by Referring to Order Form or Warehousing History
The following describes how to Register Sales history by referring to an order form or warehousing history.
- Click ‘Admin Menu’ at the top right of the PC web screen, and then click ‘Sales’ in the pop-up window.
- Click at the top left of the screen.
- Click ‘Manage Sales > Register Sales’ from the menu.
- Click ‘Register Sales’.
- When referring to warehousing history, enter the vendor.
- Click ‘Reference Order Form’ or ‘Reference Warehousing History’.
- Click the order number or warehousing number of the order form or warehousing history you want to reference.
- Items and quantity in the order form or the warehousing history are automatically entered.
- If necessary, edit or enter the sale information by item.
- Item Code: Select item code field to select items to sell. When you select an item code, the item group, item name, specifications, unit, and sales unit price are entered automatically.
- Sale Quantity: Enter the sale quantity.
- Discount Amount: To apply discounts to added items in bulk, select items to apply discounts, and then click ‘Apply Discount’. Enter the discount information (default: 0)
-
To apply discounts, select Apply Discount, and then enter the following items.
-
If you have chosen Percentage for the Discount Unit, then enter the percentage in the Discount Rate field.
-
If you have chosen Discount Amount for the Discount Unit, then enter the discount amount in the Discounted Amount field.
-
Enter round down units and end digit handling.
-
Click ‘Save’.
-
If ‘Use Unit Price per Item’ is selected for unit price setting in the ‘Sales > Settings’ menu, entered discounts are applied to selected items in bulk. If ‘Item Unit Price by Vendor’ is selected for the unit price setting, item unit price discounts are applied to selected vendors, and it doesn't affect other vendors.
-
-
-
To cancel the discount, select ‘Cancel Discount Application’, and then click ‘Save’.
-
The discounts for the items are reset.
-
-
- Whether to Reflect Component Items to Inventory: If the selected item uses a set item, then mark this item.
- Duplicated items can't be saved.
- To delete an added item, select the item to delete, and then click ‘Delete’.
When you mark Whether to Reflect Component Items to Inventory, the set item inventory is reflected for the item inventory, rather than the selected item inventory.- To delete an item, select the item to delete, and then click ‘Delete’.
- To apply discounts to added items in bulk, click ‘Apply Discount’ to enter the discount information, and then click ‘OK’.
9. Click ‘Save’.
View/Edit Sales History Details
The following describes how to view or edit sales history registered.
- Click ‘Admin Menu’ at the top right of the PC web screen, and then click ‘Sales’ in the pop-up window.
- Click at the top left of the screen.
- Click ‘Manage Sales > Register Sales’ from the menu.
- If necessary, enter the Sales History conditions to be searched in the search window, and then click ‘Search’.
- Click the sale number of the sales history to view.
- The sales history that is in the ‘Unconfirmed’ status can be edited. Edit it as necessary.
- ‘Confirmed’ sales history can't be edited, but you can print a transaction statement or send it in an email to a vendor manager.
- If there have been any changes, then click ‘Save’.
Delete Sales History
The following describes how to delete Sales History.
- Click ‘Admin Menu’ at the top right of the PC web screen, and then click ‘Sales’ in the pop-up window.
- Click at the top left of the screen.
- Click ‘Manage Sales > Register Sales’ from the menu.
- If necessary, enter the Sales History conditions to be searched in the search window, and then click ‘Search’.
- Mark the checkbox of the Sales History to delete.
- A sales history with the ‘Confirmed’ sales confirmation status can't be deleted.
- Click 'Delete'.
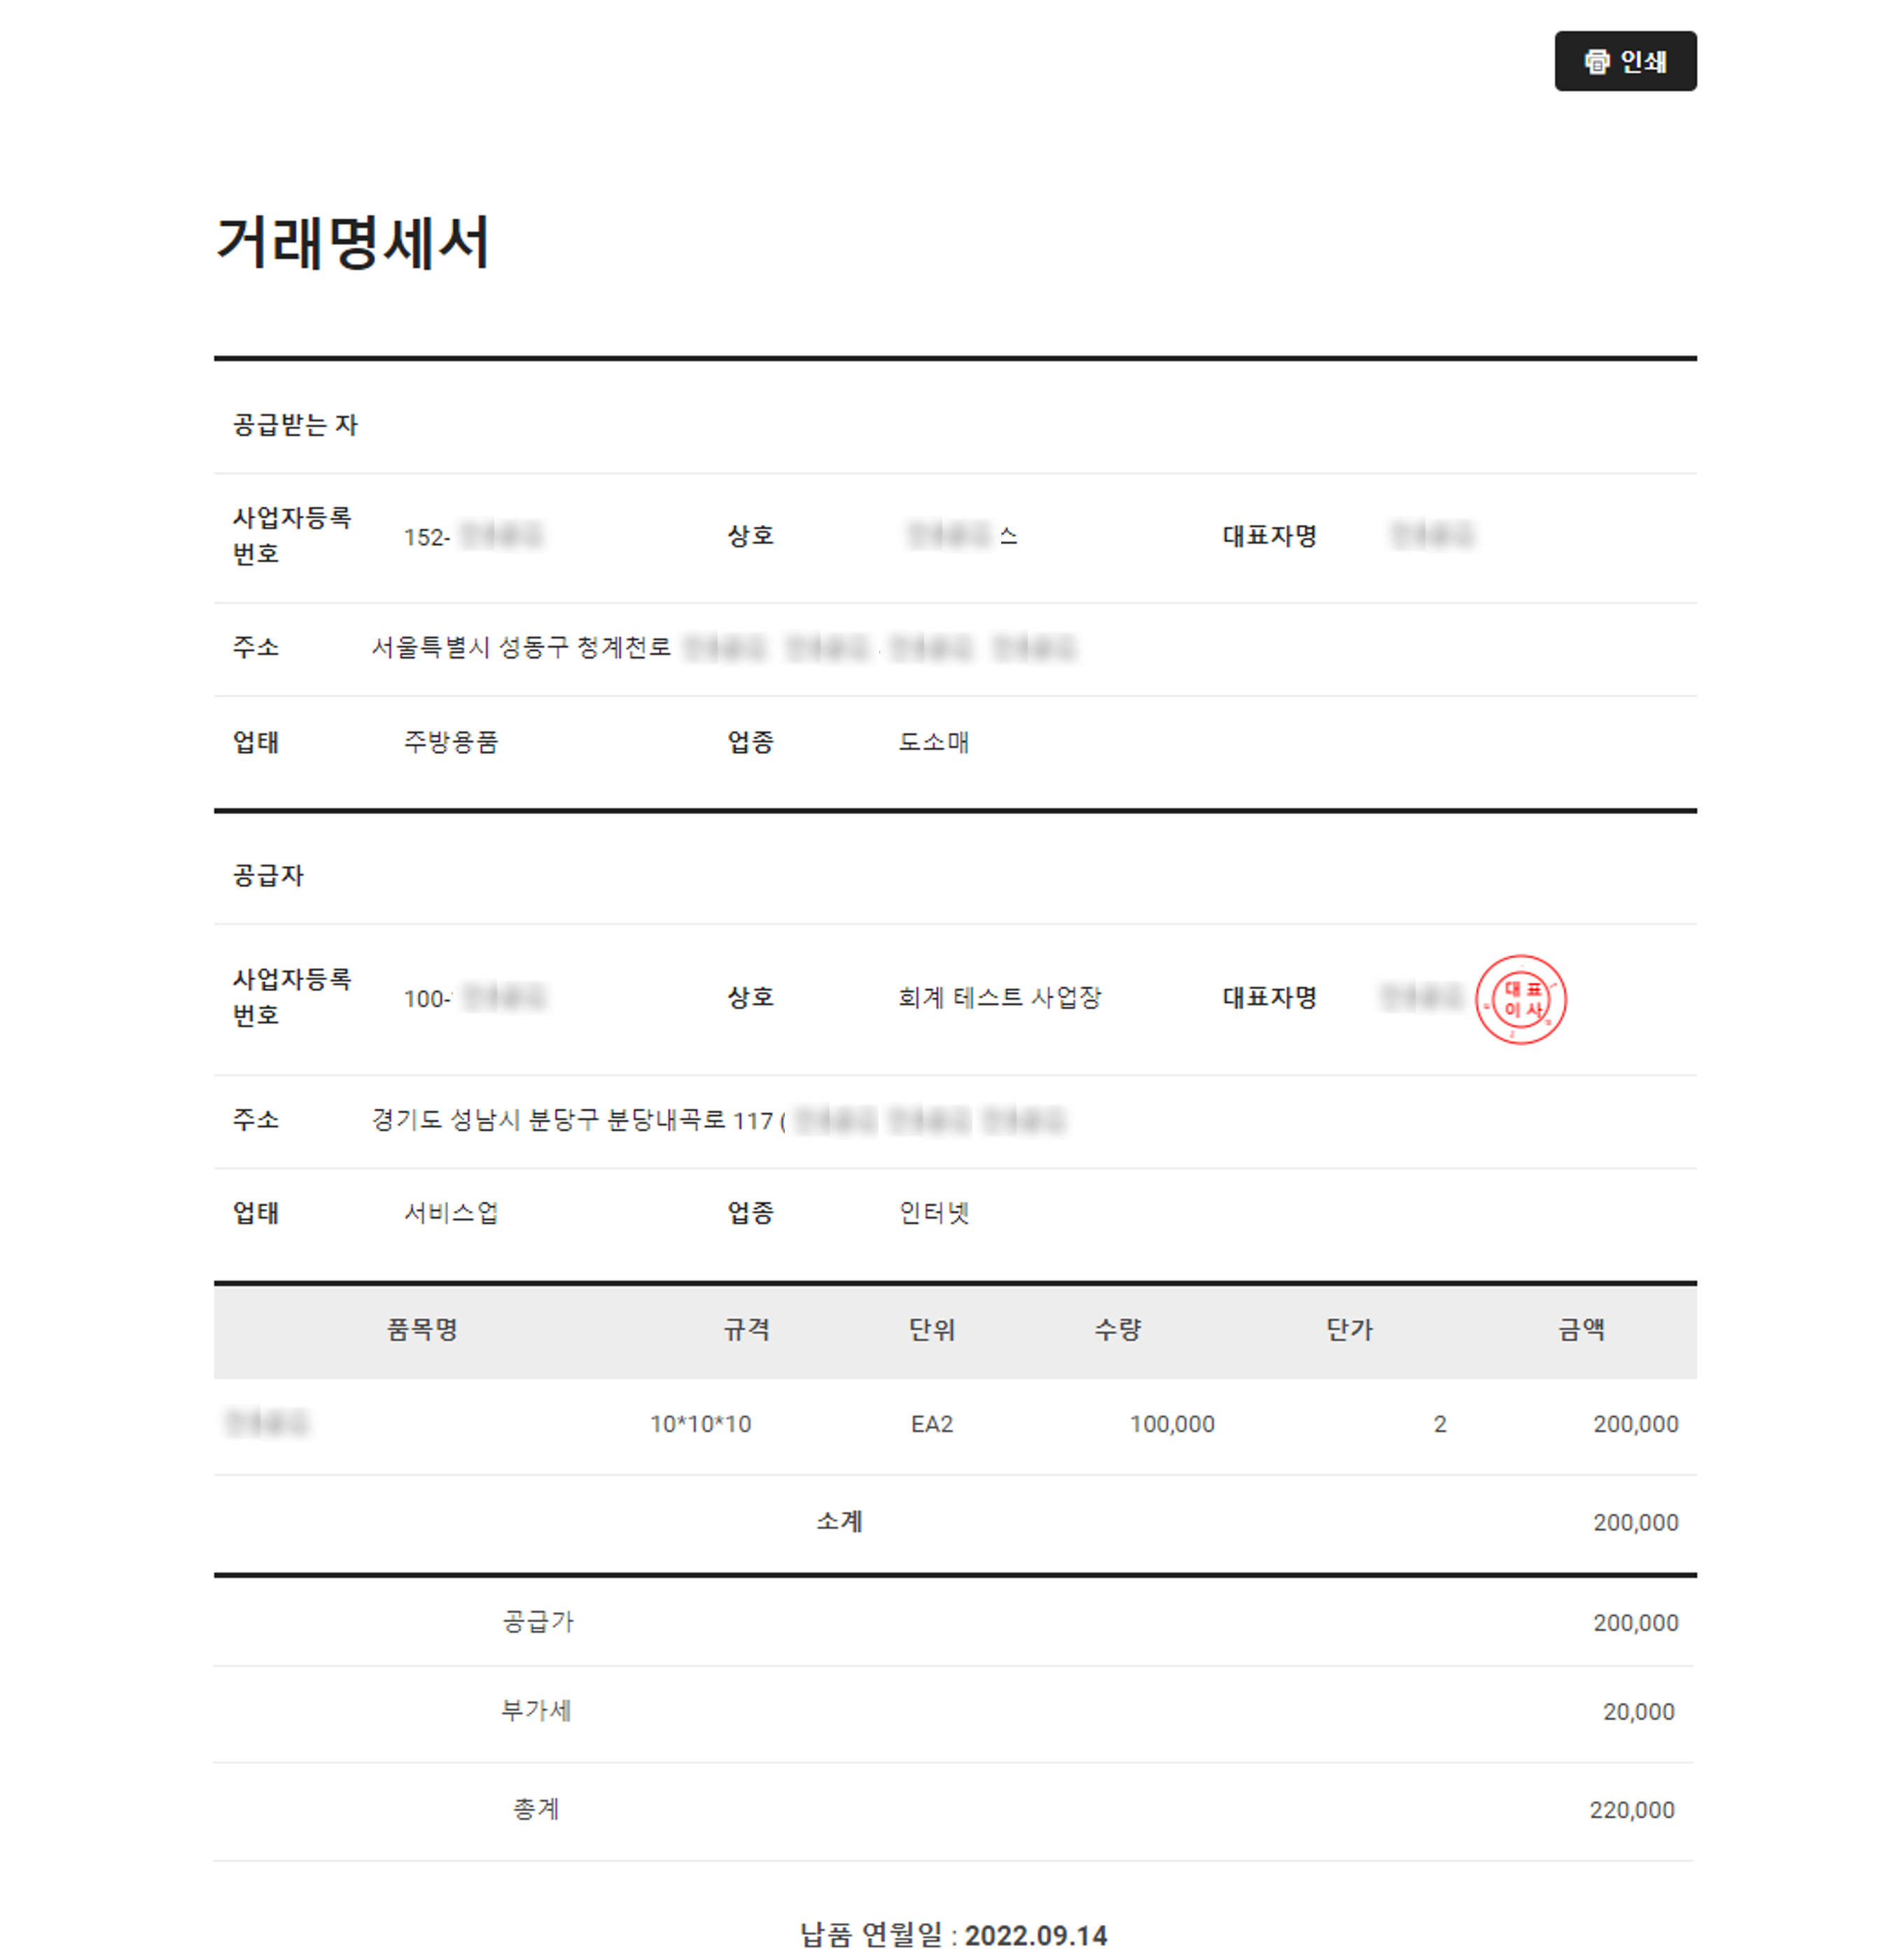
Print Specification of Transaction
The following describes how to print the specifications of sale transaction.
- Click ‘Admin Menu’ at the top right of the PC web screen, and then click ‘Sales’ in the pop-up window.
- Click at the top left of the screen.
- Click ‘Manage Sales > Register Sales’ from the menu.
- If necessary, enter the Sales History conditions to be searched in the search window, and then click ‘Search’.
- Click the sale number of Sales History to print the specifications of transaction.
- Click ‘Print’.
If the company seal is registered, then it is displayed on the Print Specification of Transaction and Send Email pages. (Register from the Business Support Settings > Company Information > Manage Company Information menu.)
Send Sales History Email
The following describes how to send a sales history email.
- Click ‘Admin Menu’ at the top right of the PC web screen, and then click ‘Sales’ in the pop-up window.
- Click at the top left of the screen.
- Click ‘Manage Sales > Register Sales’ from the menu.
- If necessary, enter the Sales History conditions to be searched in the search window, and then click ‘Search’.
- Click the sale number of Sales History to send by Email.
- Click ‘Send Email’.
- Enter the mail title and content, select a manager, and then click ‘Send Email’.
Download Sales History
The following describes how to download Sales History as an Excel file.
- Click ‘Admin Menu’ at the top right of the PC web screen, and then click ‘Sales’ in the pop-up window.
- Click at the top left of the screen.
- Click ‘Manage Sales > Register Sales’ from the menu.
- If necessary, enter the Sales History conditions to be searched in the search window, and then click ‘Search’.
- Mark the checkbox of the Sales History to download.
- Click 'Download'.
- The list of Sales History records is downloaded as an Excel file.
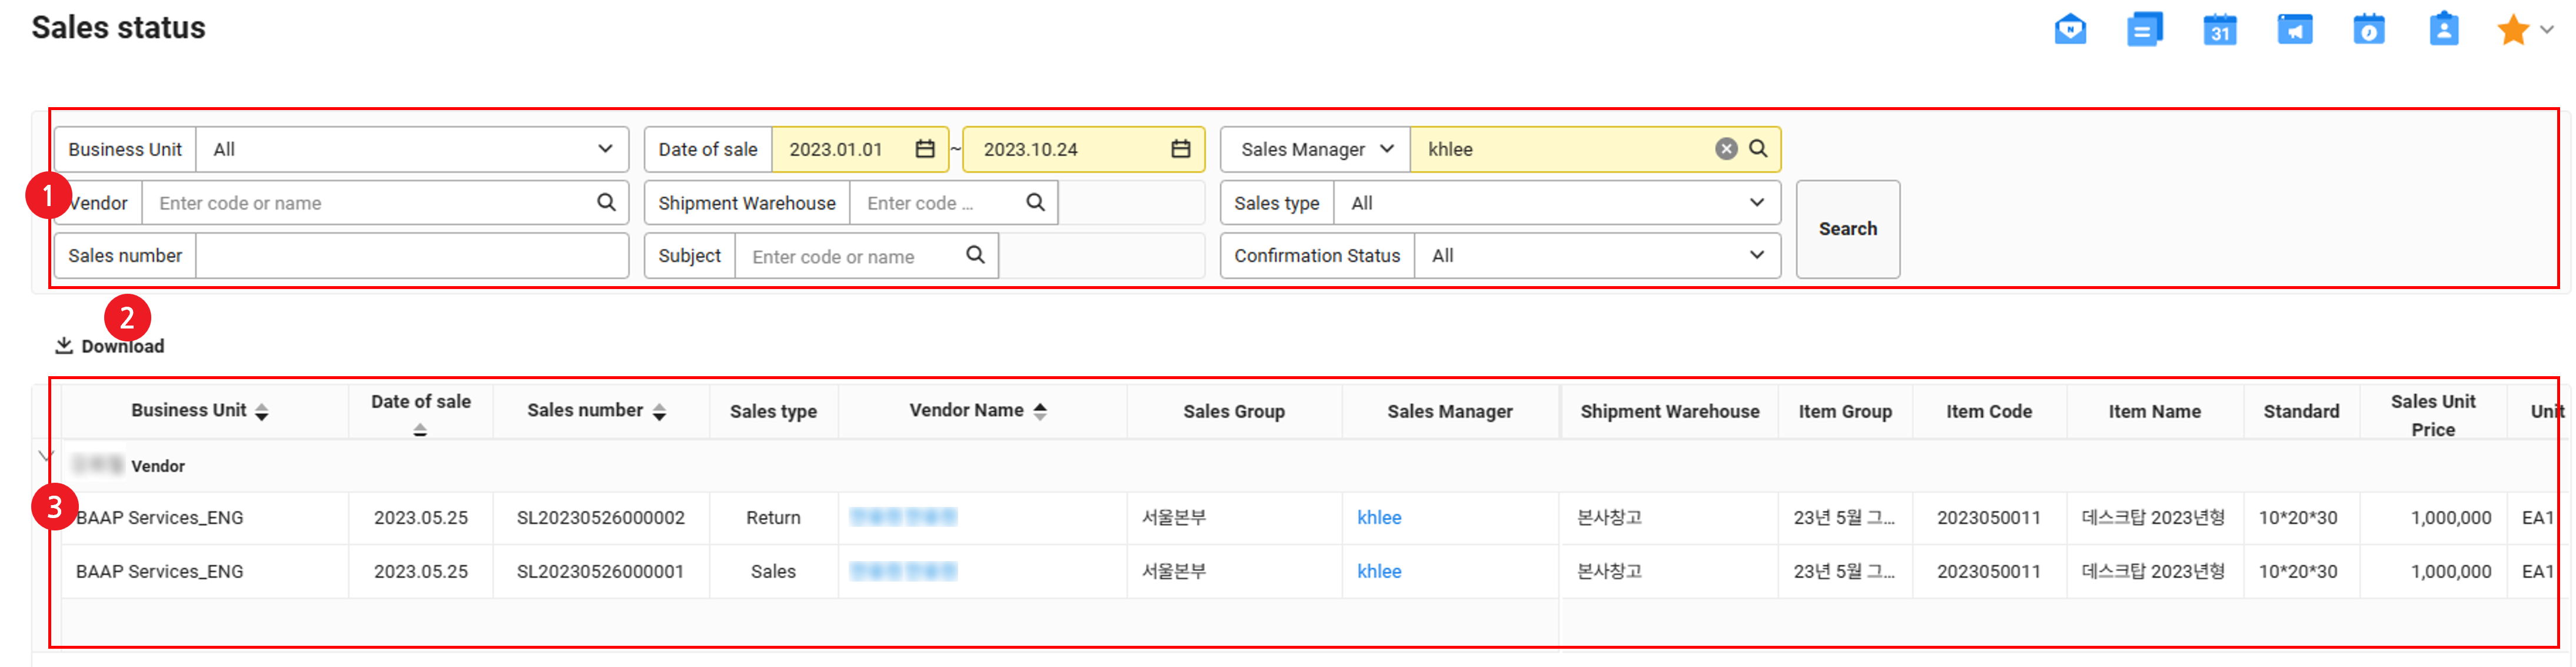
Sales Status
You can view the registered Sales History in detail to the item unit.
The Sales Status page is laid out as follows.
| Area | Description |
|---|---|
| ① Search Window | Search registered sales status by conditions of business place, date of sale, sales manager or sales group, vendor or customer, outbound shipment warehouse, sale type, sale number, item, and revenue processing status |
| ② Download | Download the sales status list as an Excel file (See Download Sales Status) |
| ③ Sales Status List | View the sales status list
|
Download Sales Status
The following describes how to download sales status as an Excel file.
- Click ‘Admin Menu’ at the top right of the PC web screen, and then click ‘Sales’ in the pop-up window.
- Click at the top left of the screen.
- Click ‘Manage Sales > Sales Status’ from the menu.
- If necessary, enter the sales status conditions to be searched in the search window, and then click ‘Search’.
- Click 'Download'.
- The sales status is downloaded as an Excel file.
Manage Sales History
You can confirm sale of a registered sales history A confirmed sales history record can be submitted to Accounting to create a slip if you're using the Accounting service, or you can request a tax invoice for it if you're using the Electronic Tax Invoice service.
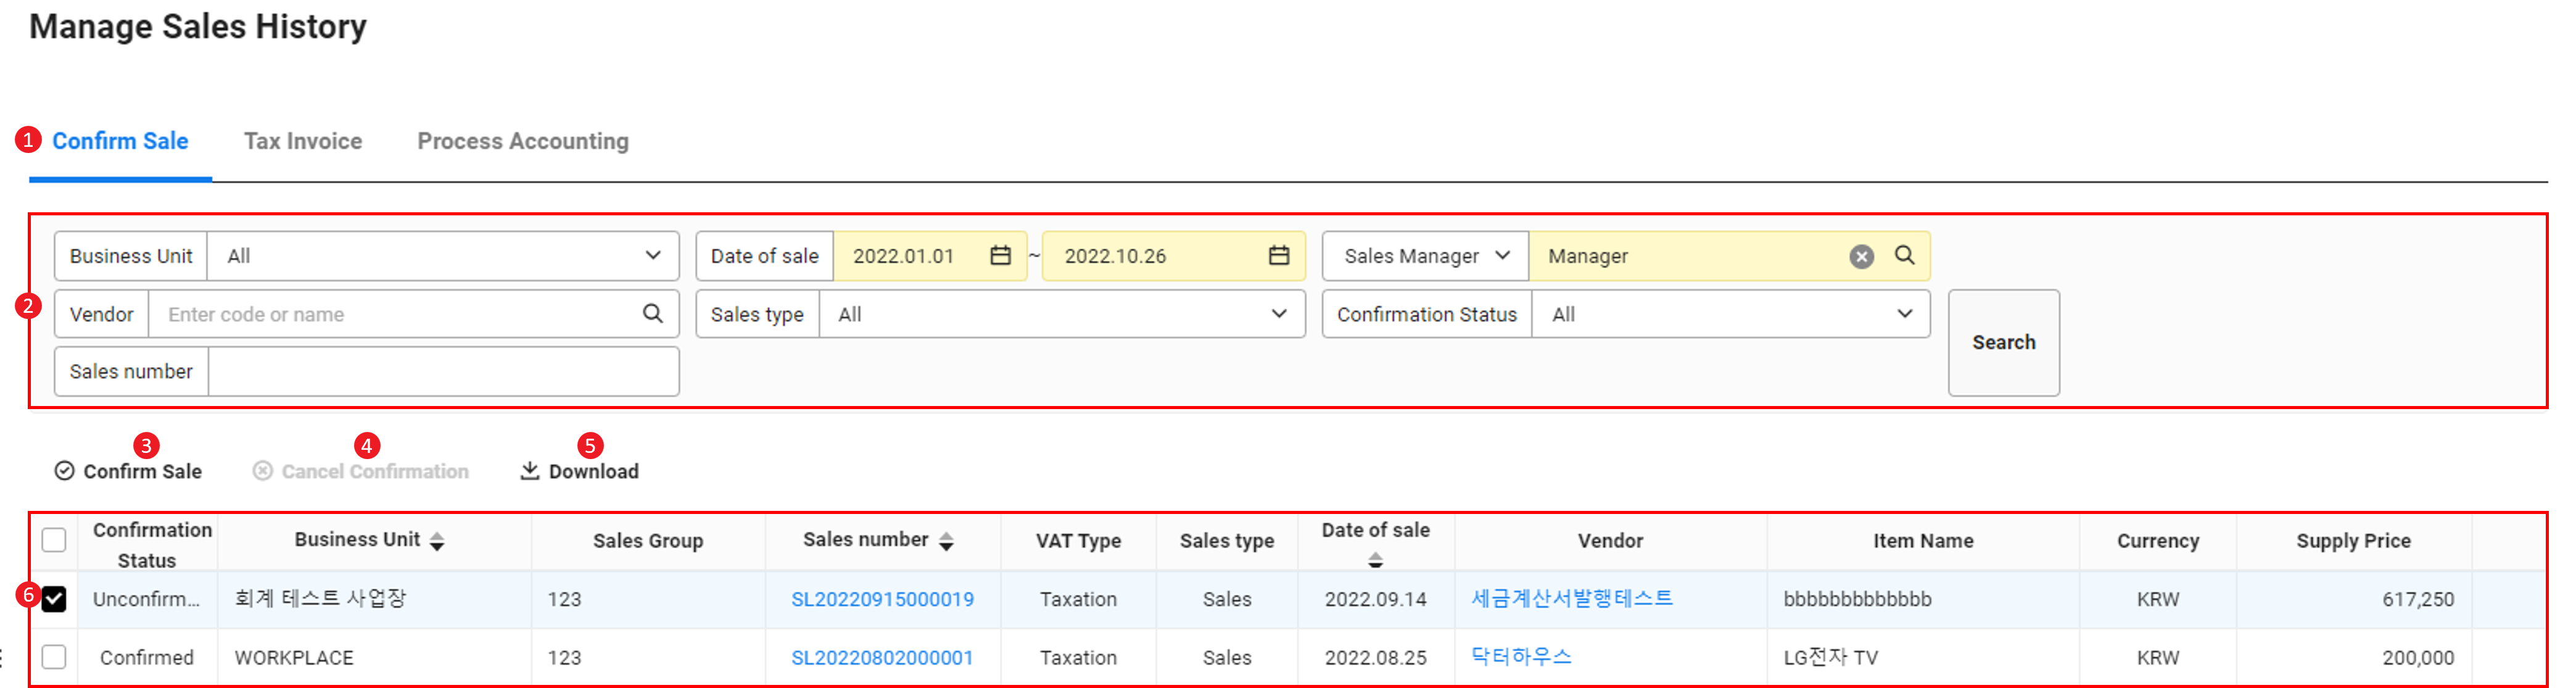
Confirm Sale
The Confirm Sale page is laid out as follows.
| Area | Description |
|---|---|
| ① Content tab | Click the Confirm Sale tab to confirm a sale |
| ② Search Window | Search sales history by conditions of business place, sale date, sales manager (sales group), vendor or customer, sale type, confirmation status, and sale number |
| ③ Confirm Sale | Select a sales history record that is in the ‘Unconfirmed’ status, and then click to confirm the sale |
| ④ Cancel Confirmation | Select a sales history record that is in the "Confirmed" status, and then click to cancel the sale confirmation (See Cancel Sale Confirmation) |
| ⑤ Download | Download the sales history as an Excel file (See Download Sales Data List) |
| ⑥ Sales data list | View the sales history as a list The sales history for which a tax invoice has been issued or that has been submitted to Accounting can be viewed in the ‘Issue Tax Invoice’ tab or the ‘Process Accounting’ tab
|
The following describes how to confirm a sales history record.
- Click ‘Admin Menu’ at the top right of the PC web screen, and then click ‘Sales’ in the pop-up window.
- Click at the top left of the screen.
- Click ‘Manage Sales > Manage Sales History’ from the menu.
- Enter the sales history conditions to be searched in the ‘Confirm Sale’ tab's search window, and then click ‘Search’.
- Select a sales history record to confirm, and then click ‘Confirm Sale’.
- In the notification pop-up window, click ‘OK’ .
- The sale will be confirmed. Confirmed sales history is reflected to the dashboard's sales aggregation.
Cancel Sale Confirmation
The following describes how to cancel confirmation of a confirmed sales history.
- Click ‘Admin Menu’ at the top right of the PC web screen, and then click ‘Sales’ in the pop-up window.
- Click at the top left of the screen.
- Click ‘Manage Sales > Manage Sales History’ from the menu.
- Enter the search conditions in ‘Confirm Sale’ tab's search window, and then click ‘Search’.
- Select a sales history record to cancel confirmation, and then click ‘Cancel Confirmation’.
- In the notification pop-up window, click ‘OK’ .
- The sale's confirmation will be canceled.
Download Confirmed Sale List
The following describes how to download the list of confirmed sales as an Excel file.
- Click ‘Admin Menu’ at the top right of the PC web screen, and then click ‘Sales’ in the pop-up window.
- Click at the top left of the screen.
- Click ‘Manage Sales > Manage Sales History’ from the menu.
- If necessary, enter the Sales History conditions to be searched in the search window, and then click ‘Search’.
- Mark the checkbox of the confirmed sales history to download from the ‘Confirm Sale’ tab.
- Click 'Download'.
- The list of Sales History records is downloaded as an Excel file.
Tax invoice
You can request issuance of tax invoice for confirmed sales.
The Tax Invoice page is laid out as follows.
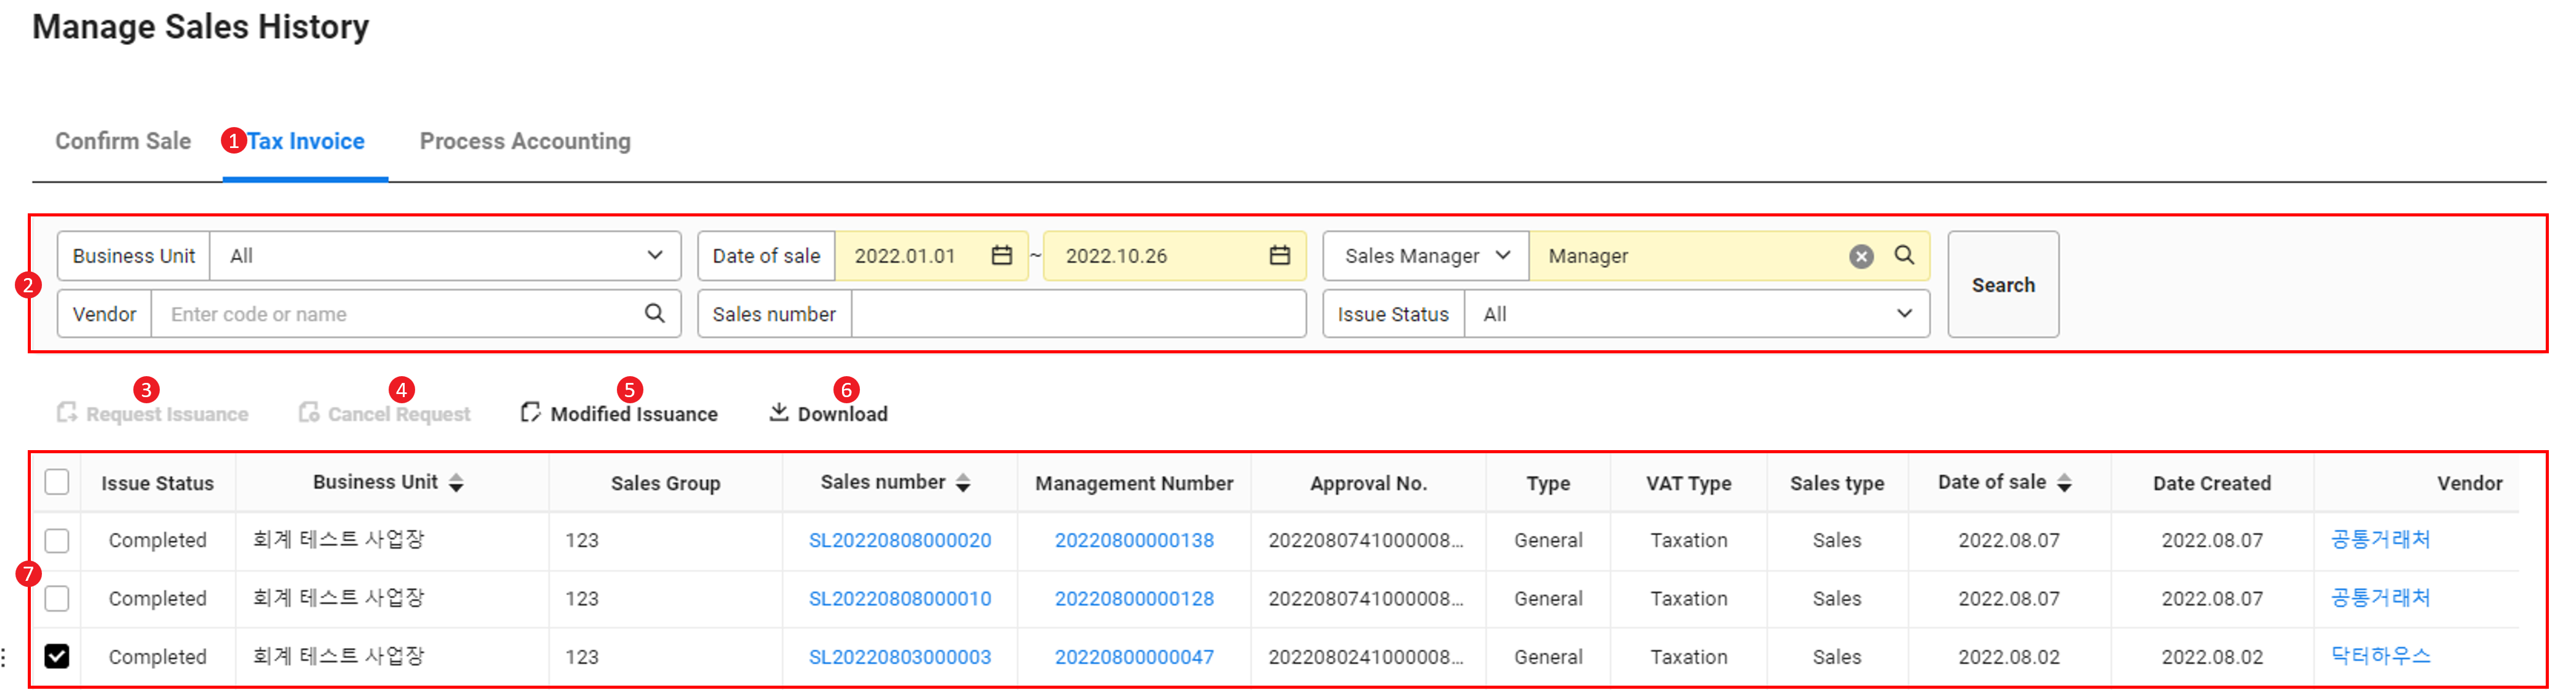
| Area | Description |
|---|---|
| ① Content tab | Click the Tax Invoice tab to request tax invoice to be issued |
| ② Search Window | Search sales history by conditions of business place, sale date, sales manager (sales group), vendor or customer, and sale number |
| ③ Request Issuance | Select a sales history record in the ‘Before Request’ status, and then click it to Request Issuance of a tax invoice |
| ④ Cancel Issuance | You can cancel a tax invoice issuance request by selecting a sales history record in the ‘Requested’ status and clicking it (See Cancel Issuance Request) |
| ④ Modified Issuance | You can select a sales history record in the ‘Issued’ status and click it to issue a modified tax invoice according to the cause of modification (See Electronic Tax Invoice Service > Manage Issuance > Issue Modified Electronic Tax Invoice) |
| ⑥ Download | Download the list of the tax invoices issued as an Excel file (See Download Issued Tax Invoice List) |
| ⑦ Sales data list | View the sales history as a list
|
Notes for issuing modified tax invoice from the Sales service
- If you select "Reversal" as the reason for modification, then enter a positive number in the reversed quantity field.
- If you select "Supply Price Changes" as the reason for modification, then you must select to reflect inventory quantity from the modified issuance request pop-up. The entered value will be reflected on the inventory when you select to reflect inventory quantity.
Request Issuance
The following describes how to request tax invoice issuance for confirmed sales history.
- Click ‘Admin Menu’ at the top right of the PC web screen, and then click ‘Sales’ in the pop-up window.
- Click at the top left of the screen.
- Click ‘Manage Sales > Manage Sales History’ from the menu.
- Enter the search conditions in the search window, and then click ‘Search’.
- Click the ‘Tax Invoice’ tab.
- Select the sales history to request issuance, and then click ‘Request Issuance’.
- You can cancel the issuance request of sales data whose issuance status is Requested by clicking ‘Cancel Request’. (See Cancel Issuance Request)
- The items for which the issuance is canceled in the Electronic Tax Invoice service are displayed in the ‘Before Request’ status, but you can't request issuance for those.
- Click 'Yes'.
- You can check the tax invoice requested to be issued in the ‘Forward Issuance’ tab on the ‘Electronic Tax Invoice Service > Manage Issuance > Manage Issuance Request.
Cancel Issuance Request
The following describes how to cancel the issuance request of tax invoice that is requested to be issued.
- Click ‘Admin Menu’ at the top right of the PC web screen, and then click ‘Sales’ in the pop-up window.
- Click at the top left of the screen.
- Click ‘Manage Sales > Manage Sales History’ from the menu.
- Enter the search conditions in the search window, and then click ‘Search’.
- Click the ‘Tax Invoice’ tab.
- Select the sales data with the issuance status at Requested, and then click ‘Cancel Request’.
- Click 'Yes'.
Download Issued Tax Invoice List
The following describes how to download the list of tax invoices issued as an Excel file.
- Click ‘Admin Menu’ at the top right of the PC web screen, and then click ‘Sales’ in the pop-up window.
- Click at the top left of the screen.
- Click ‘Manage Sales > Manage Sales History’ from the menu.
- If necessary, enter the Sales History conditions to be searched in the search window, and then click ‘Search’.
- Mark the checkbox of the sales history to download under the ‘Tax Invoice’ tab.
- Click 'Download'.
- The list of tax invoices issued will be downloaded as an Excel file.
Process Accounting
You can submit sales histories for which the sale is confirmed or tax invoice is issued to Accounting and process slips, or cancel submission to Accounting.
The Process Accounting page is laid out as follows.
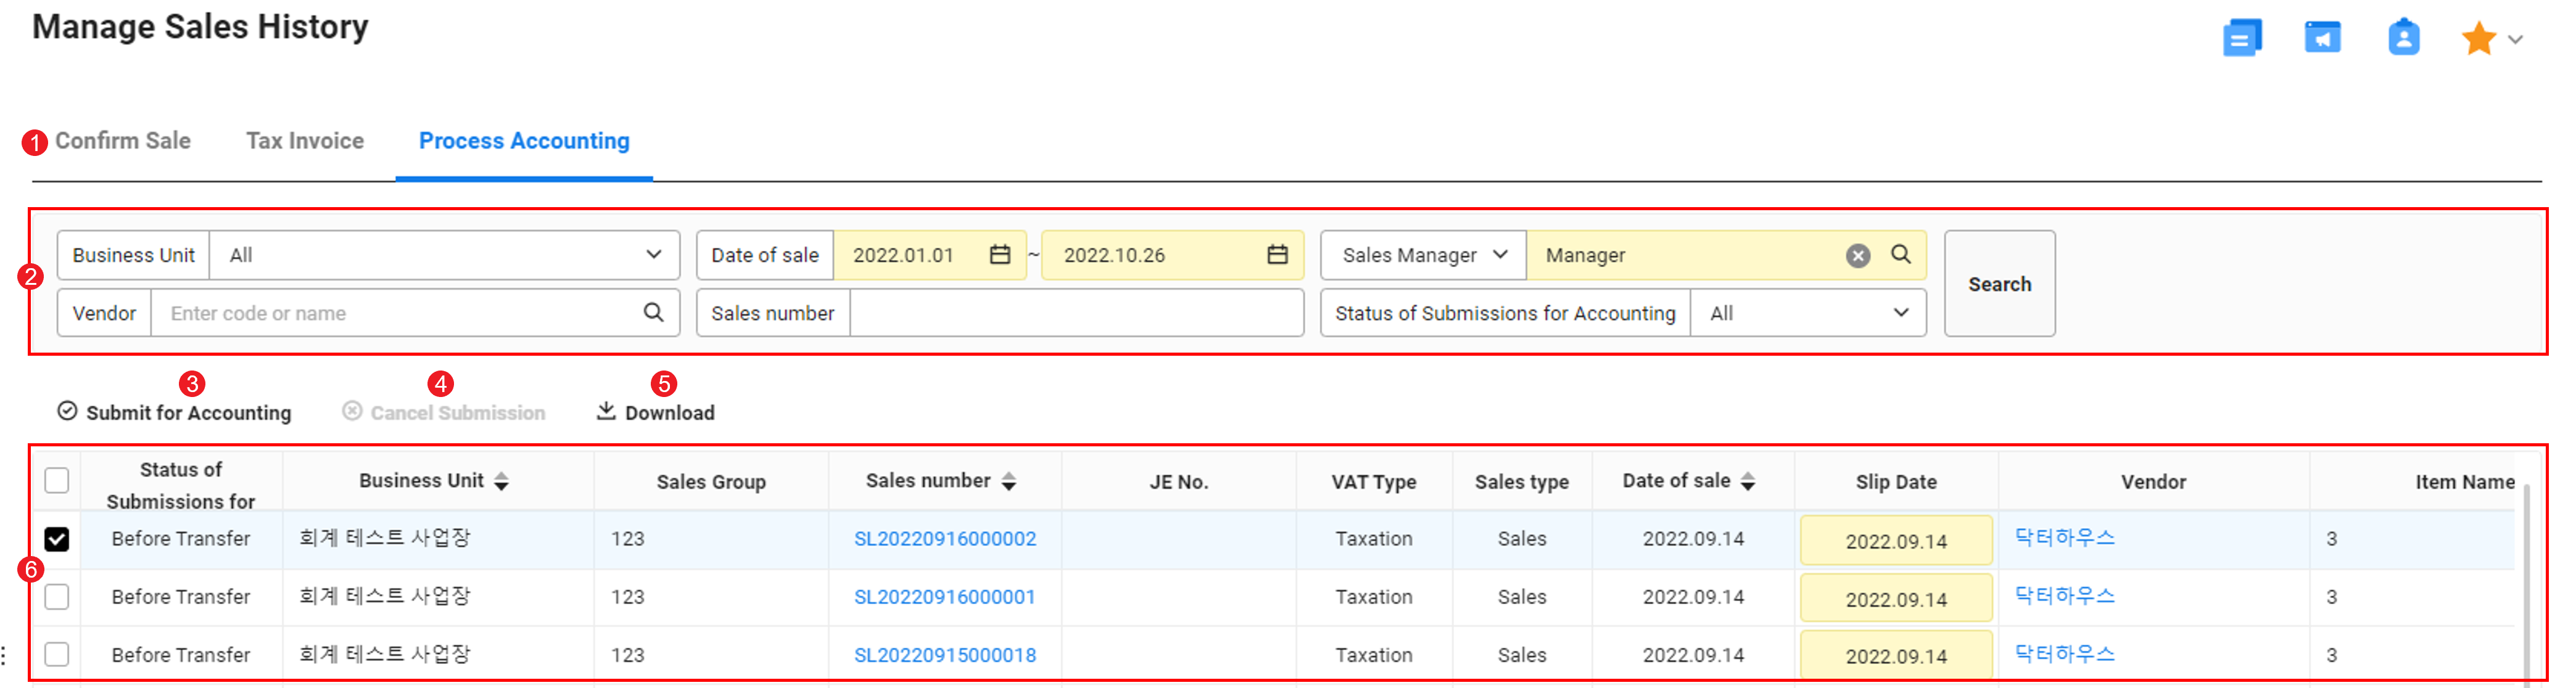
| Area | Description |
|---|---|
| ① Content tab | Click the Process Accounting tab to submit the sales history to Accounting |
| ② Search Window | Search sales data by conditions of business place, sale date, sales manager (sales group), vendor or customer, sale number, and submission status to Accounting |
| ③ Submit for Accounting | Select a sale in the ‘Before Submission’ status and click it to submit to Accounting (See Submit for Accounting) |
| ④ Cancel Submission | You can select a sale in the ‘Submission Completed’ status and click it to cancel submission of the submitted sales history to Accounting (See Cancel Submission for Accounting) |
| ⑤ Download | Download the list of submissions for accounting as an Excel file (See Download Accounting Submission List) |
| ⑥ Sales data list |
|
Submit for Accounting
The following describes how to submit confirmed sales history to Accounting.
- Click ‘Admin Menu’ at the top right of the PC web screen, and then click ‘Sales’ in the pop-up window.
- Click at the top left of the screen.
- Click ‘Manage Sales > Manage Sales History’ from the menu.
- Enter the search conditions in the search window, and then click ‘Search’.
- Click the ‘Process Accounting’ tab.
- You can view the history of submissions for accounting status that matches the entered conditions.
- Select a sales history record in the ‘Before Submission’ status, and then click ‘Submit for Accounting’.
- In the notification pop-up window, click ‘OK’ .
- The sale data will be submitted to Accounting. Submission history can be seen from the ‘Accounting > Manage Slips > Create Integrated Data Slip’.
Download Accounting Submission List
The following describes how to download the list of accounting submissions as an Excel file.
- Click ‘Admin Menu’ at the top right of the PC web screen, and then click ‘Sales’ in the pop-up window.
- Click at the top left of the screen.
- Click ‘Manage Sales > Manage Sales History’ from the menu.
- Enter the sales history conditions to search in the search window, and then click ‘Search’.
- Click the ‘Process Accounting’ tab.
- You can view the history of submissions for accounting status that matches the entered conditions.
- Click 'Download'.
- The history of submissions for accounting status is downloaded as an Excel file.
Cancel Accounting Submission
You can cancel accounting submission if slip creation is not completed for the sales submitted for accounting.
The following describes how to cancel an accounting submission.
- Click ‘Admin Menu’ at the top right of the PC web screen, and then click ‘Sales’ in the pop-up window.
- Click at the top left of the screen.
- Click ‘Manage Sales > Manage Sales History’ from the menu.
- Enter the sales history conditions to search in the search window, and then click ‘Search’.
- Click the ‘Process Accounting’ tab.
- You can view the history of submissions for accounting status that matches the entered conditions.
- Select the history of submissions for accounting to cancel, and then click ‘Cancel Submission’.
- Click 'OK'.
View Sales History
You can view list of confirmed sales, history of tax invoices issued, and processed slip details.
Depending on the services you're using, the data searched on this page is displayed under the following conditions.
- Only using the Sales service: only displays items with confirmed sales
- Using the Sales + Electronic Tax Invoice services: only displays items with confirmed sales and their tax invoices issued
- Using the Sales + Accounting services: only displays items with confirmed sales and their accounting slips created
- Using the Sales + Electronic Tax Invoice + Accounting services: only displays items with confirmed sales, their tax invoices issued, and their accounting slips created
The View Sales History page is laid out as follows.
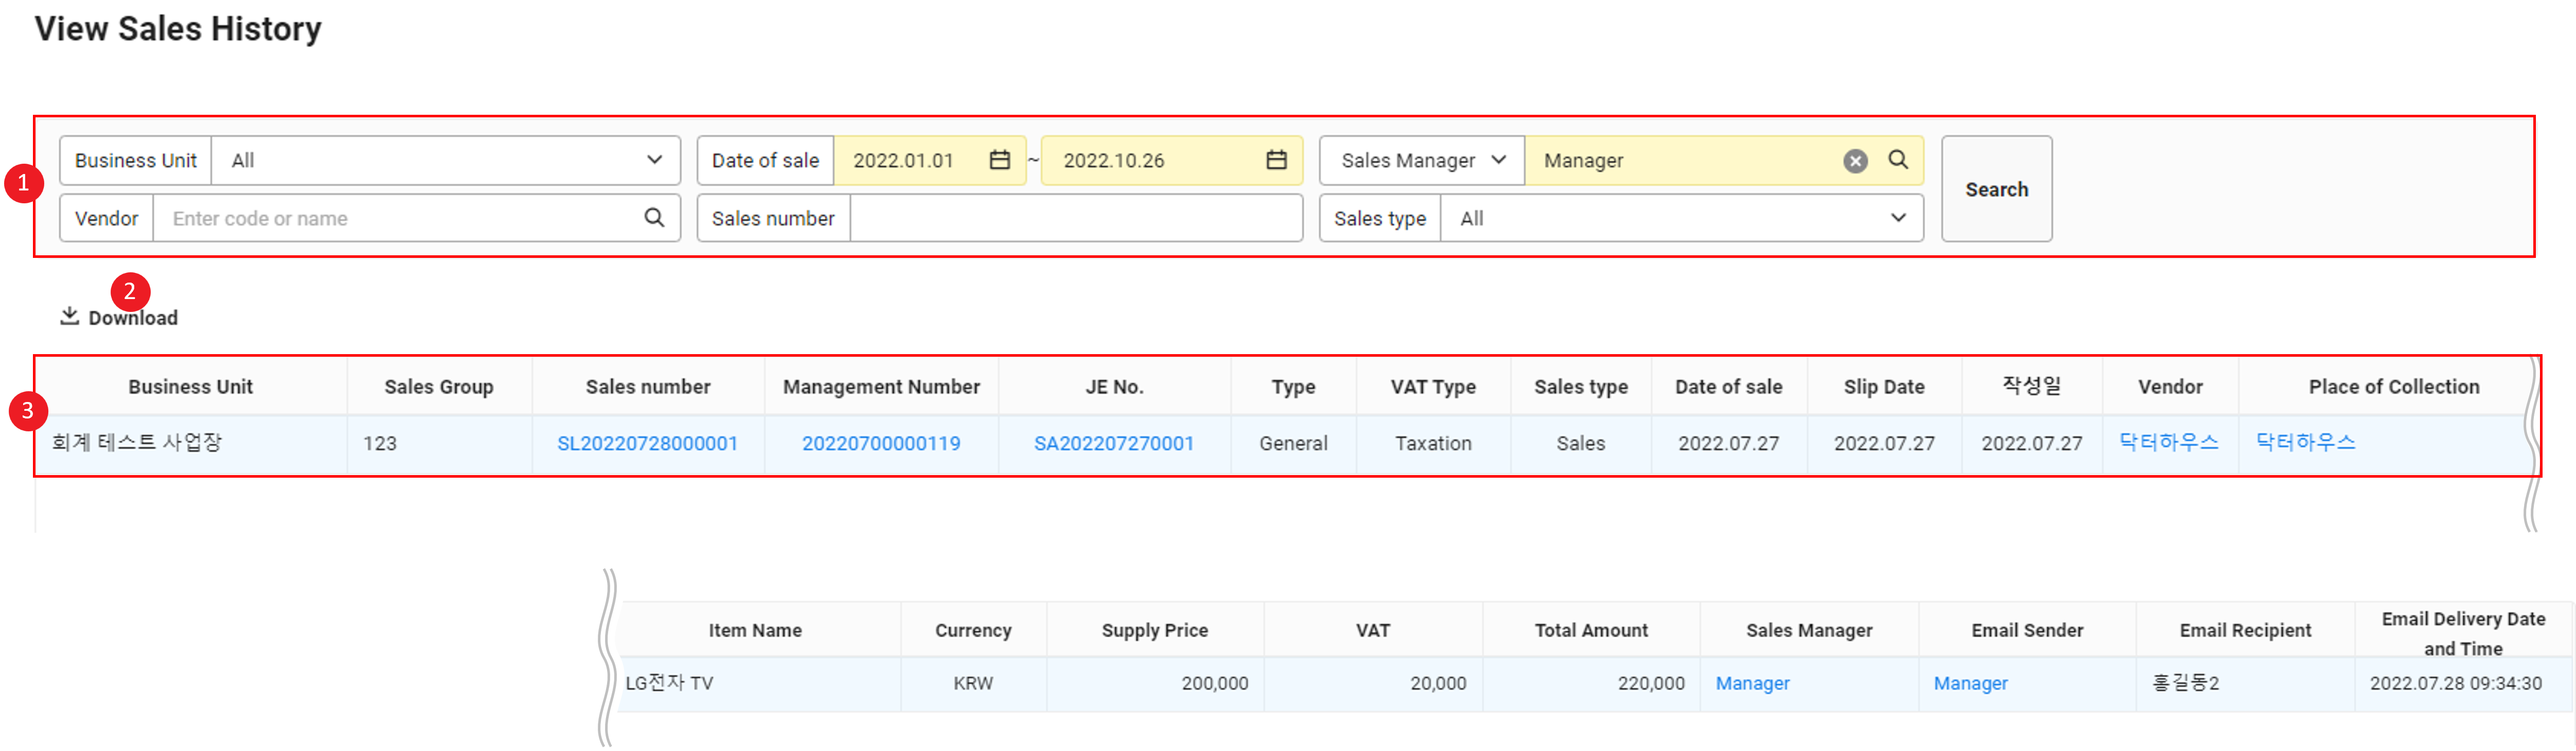
| Area | Description |
|---|---|
| ① Search Window | Search sales data by conditions of business place, sale date, sales manager (sales group), vendor or customer, sale number, and sale type |
| ② Download | Download the list of sales as an Excel file (See Download List of Sales History) |
| ③ Sales data list | View the sales history in a list
|
Download Sales History List
The following describes how to download the list of confirmed sales as an Excel file.
- Click ‘Admin Menu’ at the top right of the PC web screen, and then click ‘Sales’ in the pop-up window.
- Click at the top left of the screen.
- Click ‘Manage Sales > Manage Sales History’ from the menu.
- Enter the search conditions in the search window, and then click ‘Search’.
- You can view the history of submissions for accounting status that matches the entered conditions.
- Click 'Download'.
- The list of confirmed sales will be downloaded as an Excel file.