You can set the use of, register, and manage project codes used in the Expense, Accounting and Expenditure services. You can also register and manage vendors used in common in the Accounting, Expenditure, and Sales services.
Manage Common Code
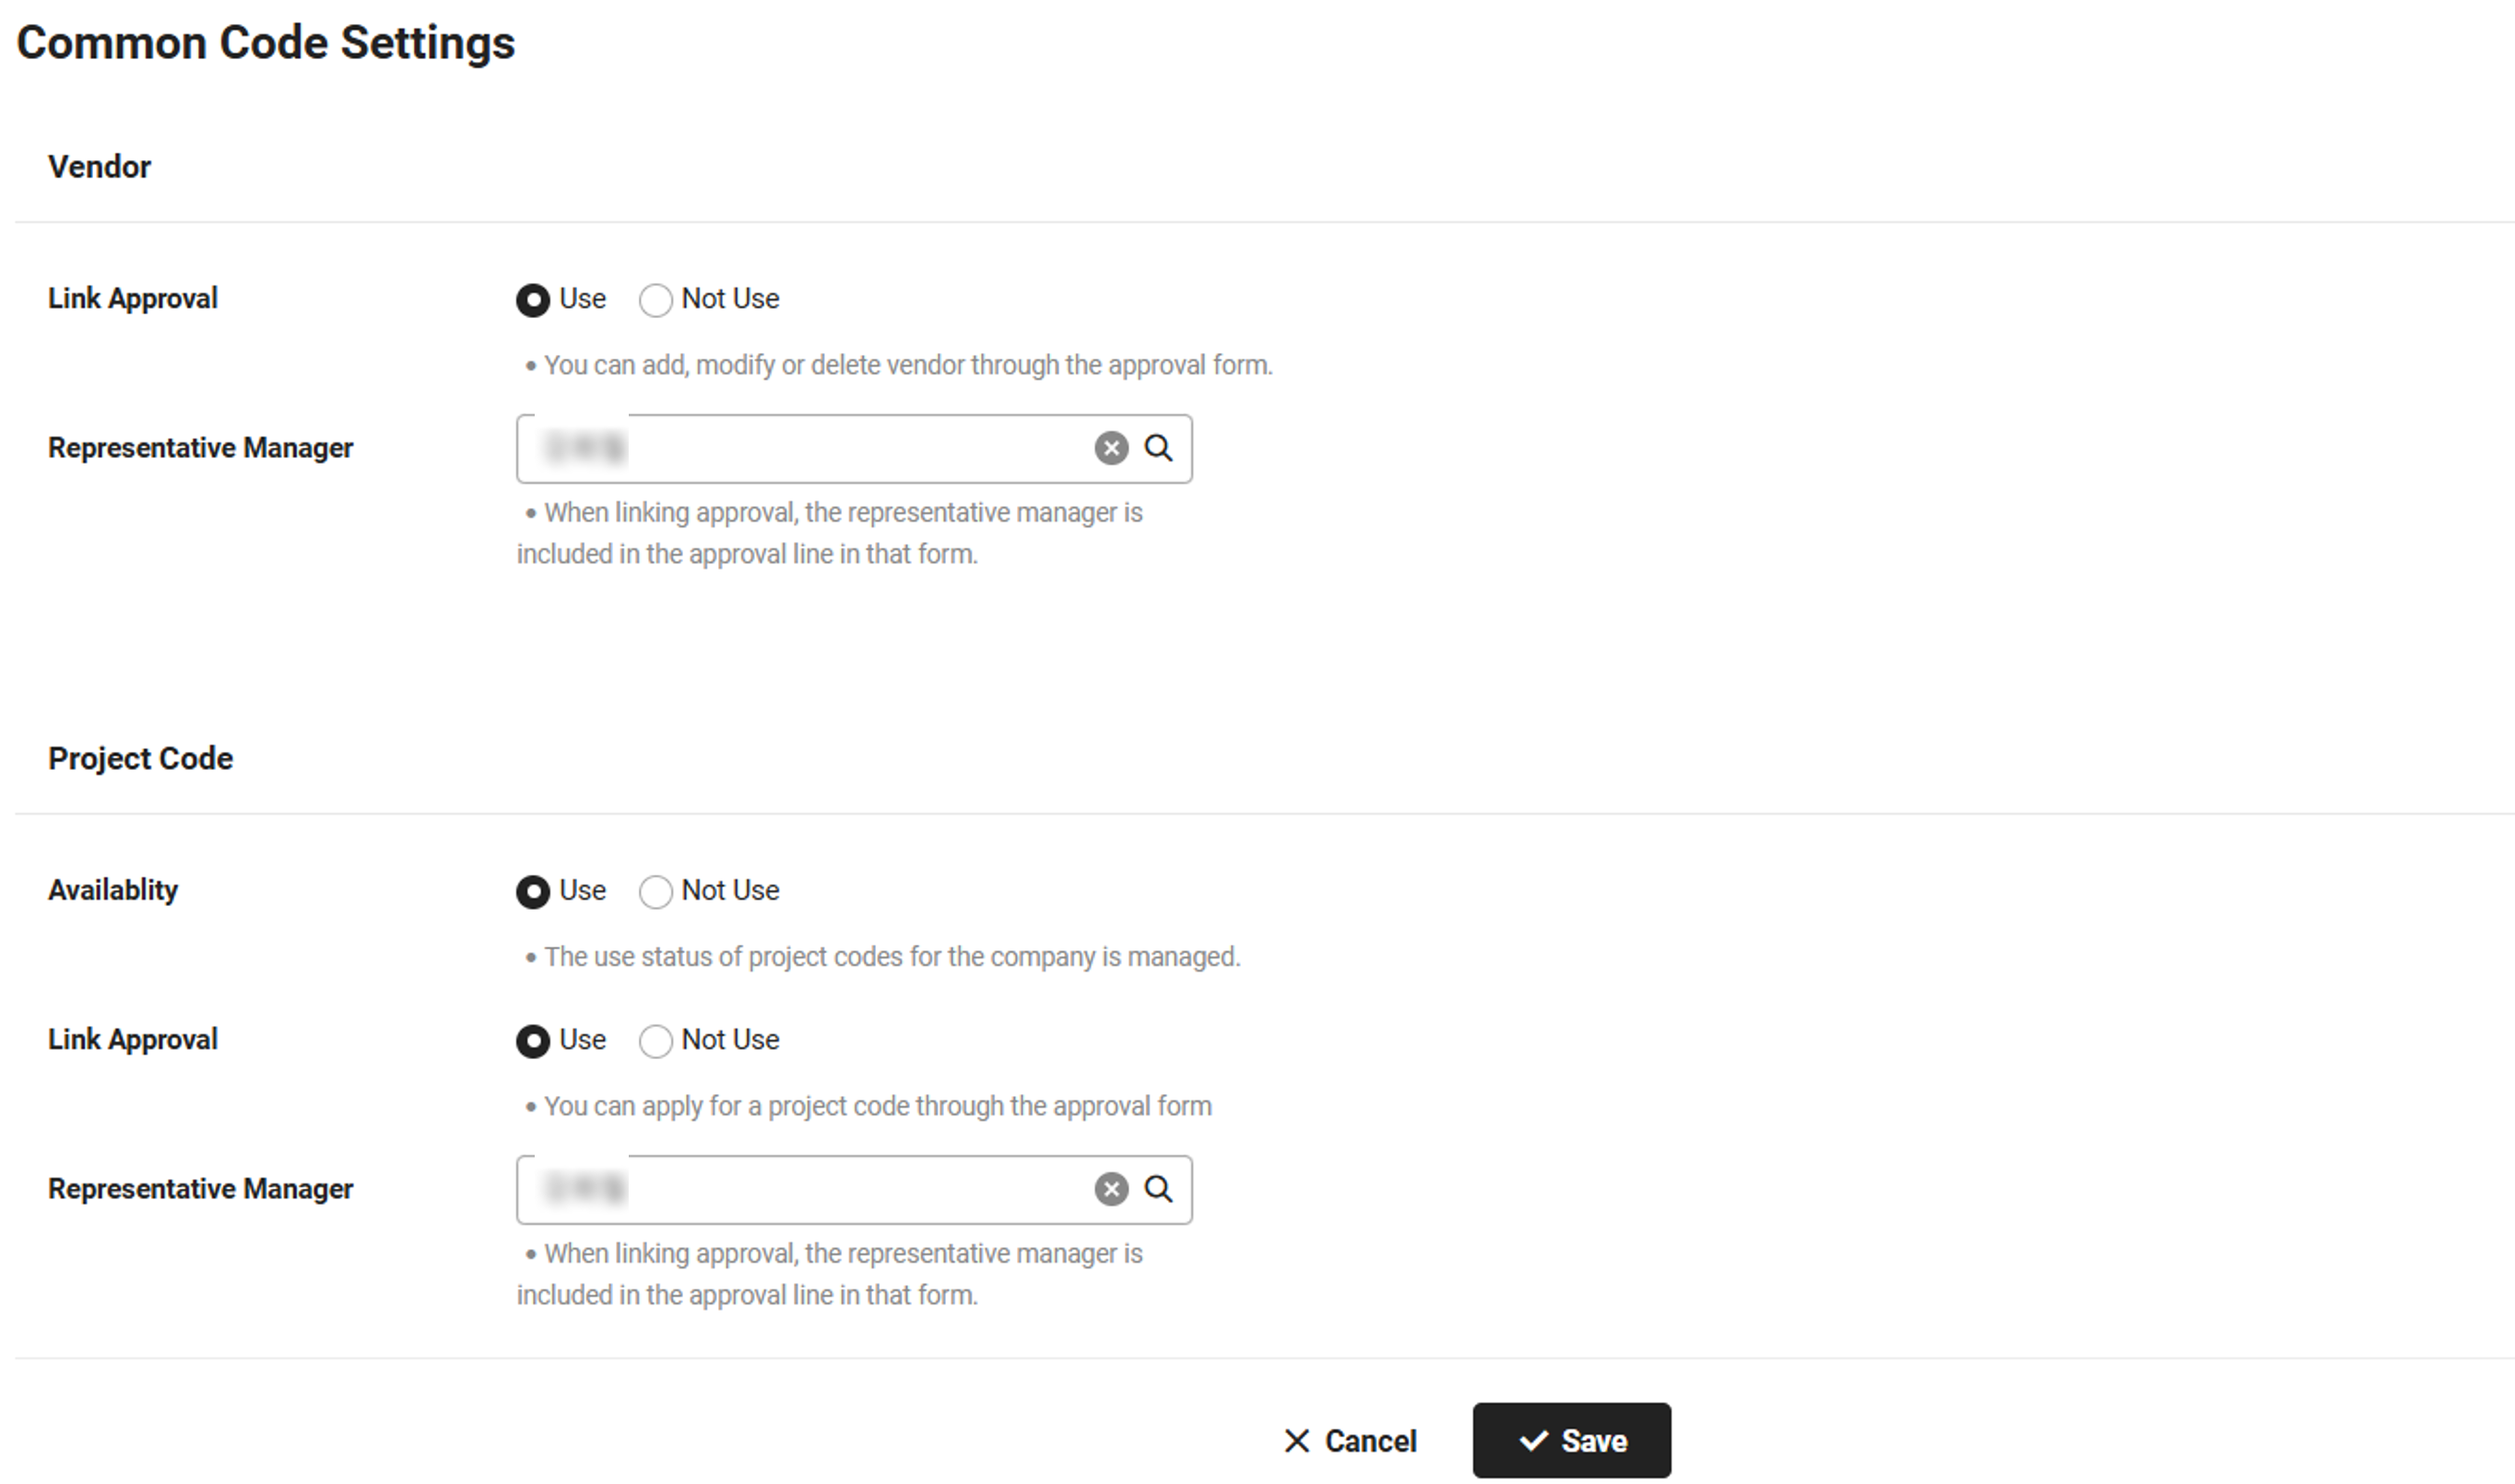
You can set whether to link vendors with approval, use project codes, and link them with Approval. You can settle or aggregate expenses for each project by using project codes.
Set Vendor
- Click 'Admin Menu' in the upper right corner of the PC web screen, then click 'Business Support Settings' in the pop-up window.
- Click
 at the top left of the screen.
 - In the menu, click ‘Common Code > Manage Common Code’.
- In the Vendor area, select whether to link vendors with Approval.
- If you use the integration with Approval, then the vendor request form is provided under ‘Approval Home > Compose Document’ of the user.
- The user can use this form to report approval documents and request addition of new vendors or modification or deletion of existing vendor information. (See Create Vendor Request Form)
- The request history can be viewed from the ‘Request’ tab under ‘Business Support Settings > Common Code > Manage Vendor’. Once the document approval is completed, the updated vendor information is displayed in the ‘Manage’ tab of the ‘Manage Vendor’ menu. (See Manage Vendor)
- If you change it to ‘Not use’ while using vendors integration with Approval
- The vendor request form is not provided in ‘Approval Home > Compose Document’.
- The ‘Request’ tab is not displayed in the ‘Common Code > Manage Vendor’ menu.
- (When using linkage of vendors with Approval) Enter the representative admin of vendors.
- The set representative admin is automatically added to the approval line of the vendor request form, and they can't be deleted.
- Click 'Save'.
Set Project Code
- Click 'Admin Menu' in the upper right corner of the PC web screen, then click 'Business Support Settings' in the pop-up window.
- Click at the top left of the screen.
- In the menu, click ‘Common Code > Manage Common Code’.
- In the Project Code area, select whether to use a project code.
- If you set to ‘Use project codes’
- The ‘Business Support Settings > Common Code > Manage Project Code’ menu is provided.
- The ‘Project Code’ item appears in the Expense Plan Request and Expense Settlement Request pages.
- The ‘Project Code’ item appears in View Settlement/Plan Status and Violation Status page of the Expense service.
- The ‘Project Code’ item appears in pages related to slip creation of the Accounting service.
- If you set to ‘Use project codes’
- (When using project codes) Select whether to integrate them with Approval.
- If you use the integration with Approval, then the project code request form is provided under ‘Approval Home > Compose Document’ of the user.
- The user can use this form to report approval documents and request addition of new project codes or modification or deletion of existing project code information. (See Create Project Code Request Form)
- The request history can be viewed from the ‘Request’ tab under ‘Business Support Settings > Common Code > Manage Project Code’. Once the document approval is completed, the updated project code information is displayed in the ‘Manage’ tab of the Manage Project Code menu. (See Manage Project Code)
- If you change it to Not Use while using integration of project codes with Approval
- The project code request form is not provided in ‘Approval Home > Compose Document’.
- The ‘Request’ tab is not displayed in the ‘Common Code > Manage Project Code’ menu.
- The Project Code item does not appear in related pages of Expense and Accounting.
- (When using integration of project codes with Approval) Enter the representative admin of project codes.
- The set representative admin is automatically added to the approval line of the project code request form, and they can't be deleted.
- Click 'Save'.
Manage Vendor
In the Manage Vendor menu, you can register and manage vendors individually or in bulk. You can also search and view the vendor list by condition and download the vendor list as an Excel file.
If the company uses integration of vendors with Approval, then the vendor addition, modification, and deletion history requested by the user can be viewed.
- When using the Accounting service, you can also register and manage vendors in ‘Manage Standard Information > Manage Vendor’ menu of the Accounting service.
- When viewing vendors in each service, you can view the detailed information of vendors according to the information protection standard of each service.
- Credit card companies registered in the ‘Expense > Settings > Manage Card’ are automatically added to the vendor list. Only the name of credit card companies registered in the vendor list is entered. Enter other information manually.
- You can't delete a vendor if it's being used by a related service, such as Accounting, Expenditure, Electronic Tax Invoice, and Sales. If you change the usage status to ’N’, then the vendor won't be displayed when you use it.
Request
Displayed when integration of vendors with Approval is used (See Manage Common Code). The history of requests made with approval documents by the user can be viewed.
The Request page is laid out as follows.
| Area | Description |
|---|---|
| ① Search window | Search the vendor list by request type, approval status, creator, transaction type, vendor name, and creation date |
| ② Vendor list | List of vendors with requests
|
Manage
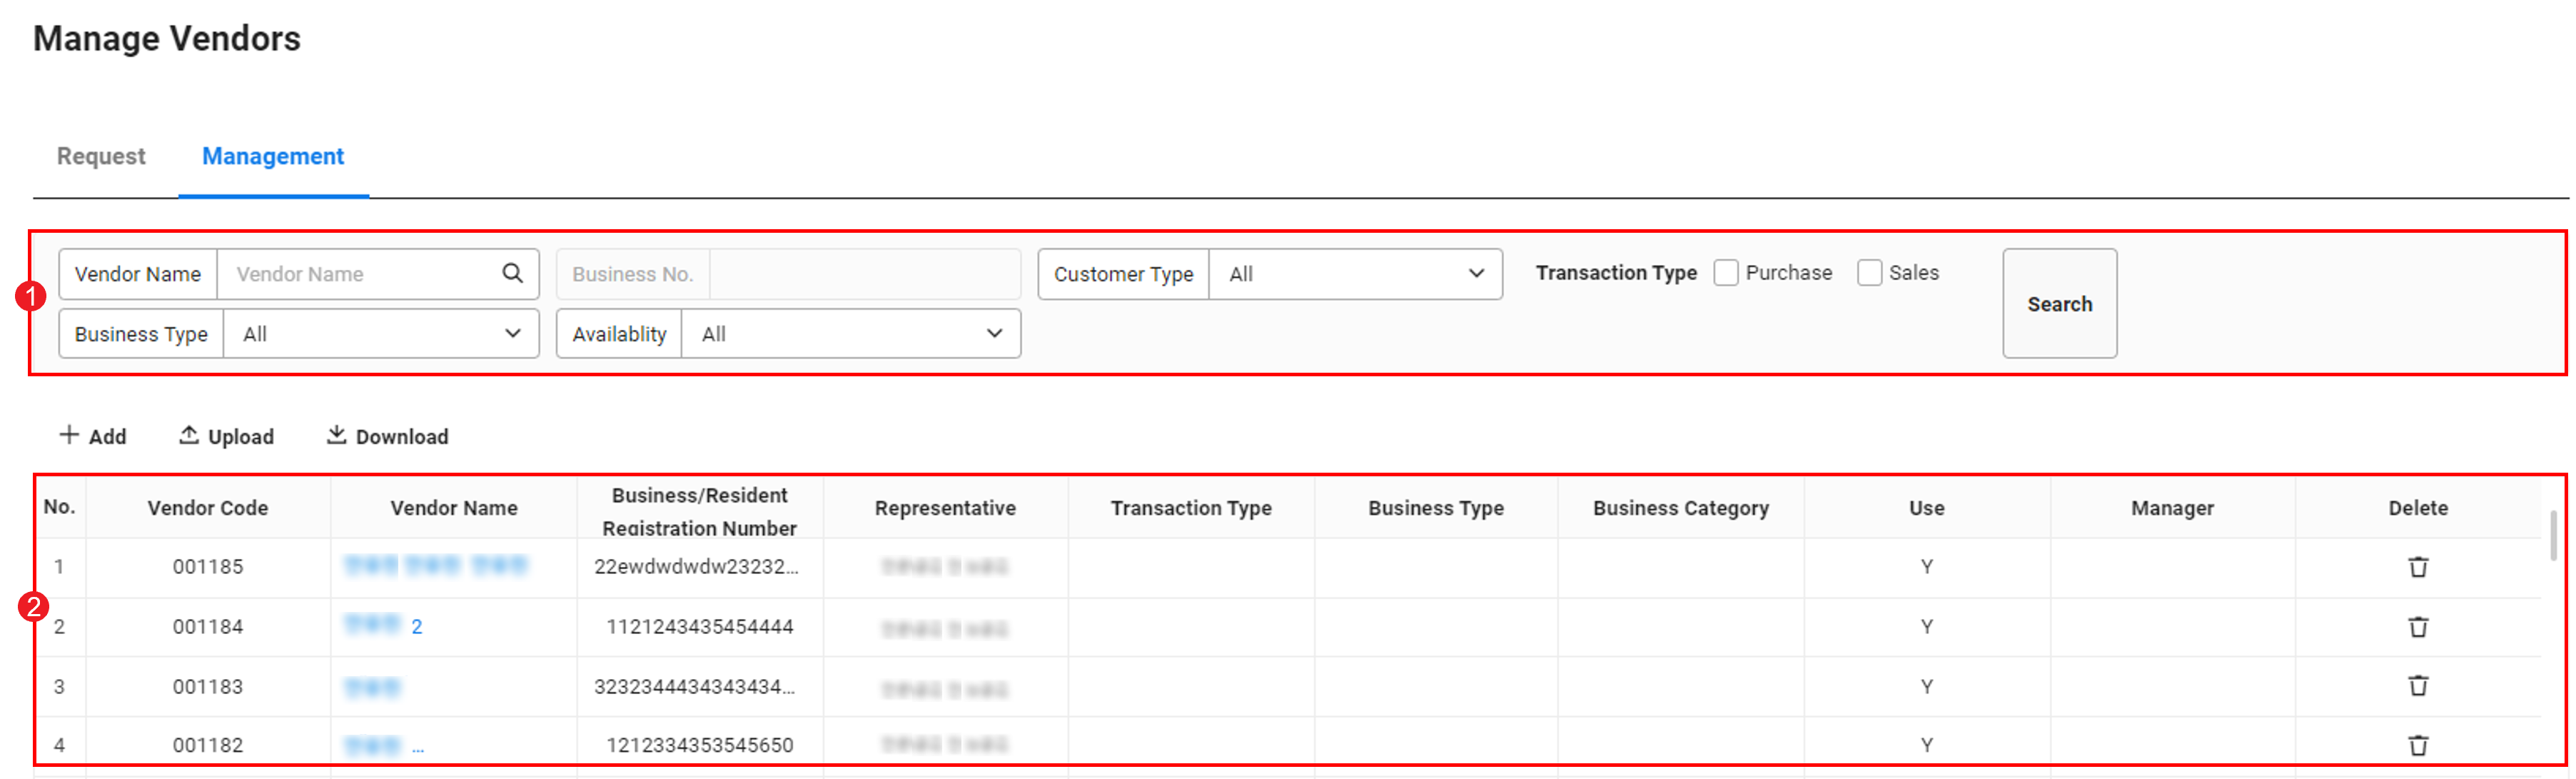
You can manage the list of registered vendors and add vendors.
The Manage page is laid out as follows.

| Area | Description |
|---|---|
| ① Search window | Search the vendor list by vendor name, vendor type, business type, and usage status |
| ② Add | Register vendors individually (See Add Vendors Individually) |
| ③ Upload | Register vendors in bulk (See Add Vendors in Bulk) |
| ④ Download | Download the list of vendors as an Excel file (See Download Vendor List) |
| ⑤ Vendor list | It displays the vendor information
|
Add Vendors Individually
The following describes how to add vendors individually.
- Click 'Admin Menu' in the upper right corner of the PC web screen, then click 'Business Support Settings' in the pop-up window.
- Click at the top left of the screen.
- In the menu, click 'Common Code > Manage Vendor'.
- Click 'Add'.
- Enter the vendor information.
- When selecting Bank or Credit Card Company for Vendor Type, search and select the vendor bank or credit card company.
- By clicking and selecting ‘Purchase’ for Transaction Type and registering the payment conditions, the payment date for the vendor is entered into the scheduled date when creating the slip.
- By clicking and selecting ‘Sales’ for Transaction Type and registering the receivable payment conditions, the payment date for the vendor is entered into the scheduled date when creating the slip.
- To register an evidence document, click ‘Attach File’ of the evidence document to be registered.
- To specify the manager, click
 and enter the information of the manager.
 - To register an account, click and enter the account information.
- Click 'Save'.
- The vendor is added, and the vendor code is granted according to the added order.
Add Vendors in Bulk
The following describes how to add vendors in bulk.
- Click 'Admin Menu' in the upper right corner of the PC web screen, then click 'Business Support Settings' in the pop-up window.
- Click at the top left of the screen.
- In the menu, click 'Common Code > Manage Vendor'.
- Click ‘Upload’.
- Click ‘Download Sample File’ to download the sample file.
- The downloaded sample file is saved as ‘sample.xlsx’ in the Download folder.
- Enter the vendor information into the sample file, and then save it.
- Click ‘Attach File’ in the Upload pop-up window to upload the sample file created.
- Click 'Save'.
- The vendors are added in bulk from the sample file.
Modify Vendor Information
The following describes how to modify vendor information.
- Click 'Admin Menu' in the upper right corner of the PC web screen, then click 'Business Support Settings' in the pop-up window.
- Click at the top left of the screen.
- In the menu, click 'Common Code > Manage Vendor'.
- Click the name of the vendor whose information you want to modify.
- It directs you to View Vendor Details page.
- Apply the modified content in the ‘Basic Information’ tab.
- The vendor code can't be modified once granted.
- Enter the reason for changing, and then click ‘Save’.
- The modified content is reflected, and the change history is saved in the ‘Information Modification History’ tab of the View Vendor Details page.
Download Vendor List
The following describes how to download the vendor list as an Excel file.
- Click 'Admin Menu' in the upper right corner of the PC web screen, then click 'Business Support Settings' in the pop-up window.
- Click at the top left of the screen.
- In the menu, click 'Common Code > Manage Vendor'.
- If necessary, enter the vendor conditions to be searched in the Search window, and then click ‘Search’.
- You can view the vendors that apply to the entered conditions.
- Click 'Download'.
- The vendor list is downloaded as an Excel file.
Manage Project Code
You can register and manage project codes to aggregate data of your company's projects. You can also search and view project codes by condition and download the list of registered project codes as an Excel file.
If the company uses integration of project codes with Approval, then the project code addition, modification, and deletion history requested by the user can be viewed.
Request
The Request tab is displayed when integration of project codes with Approval is used (See Manage Common Code), and the history of requests made with approval documents by the user can be viewed.
The Request page is laid out as follows.
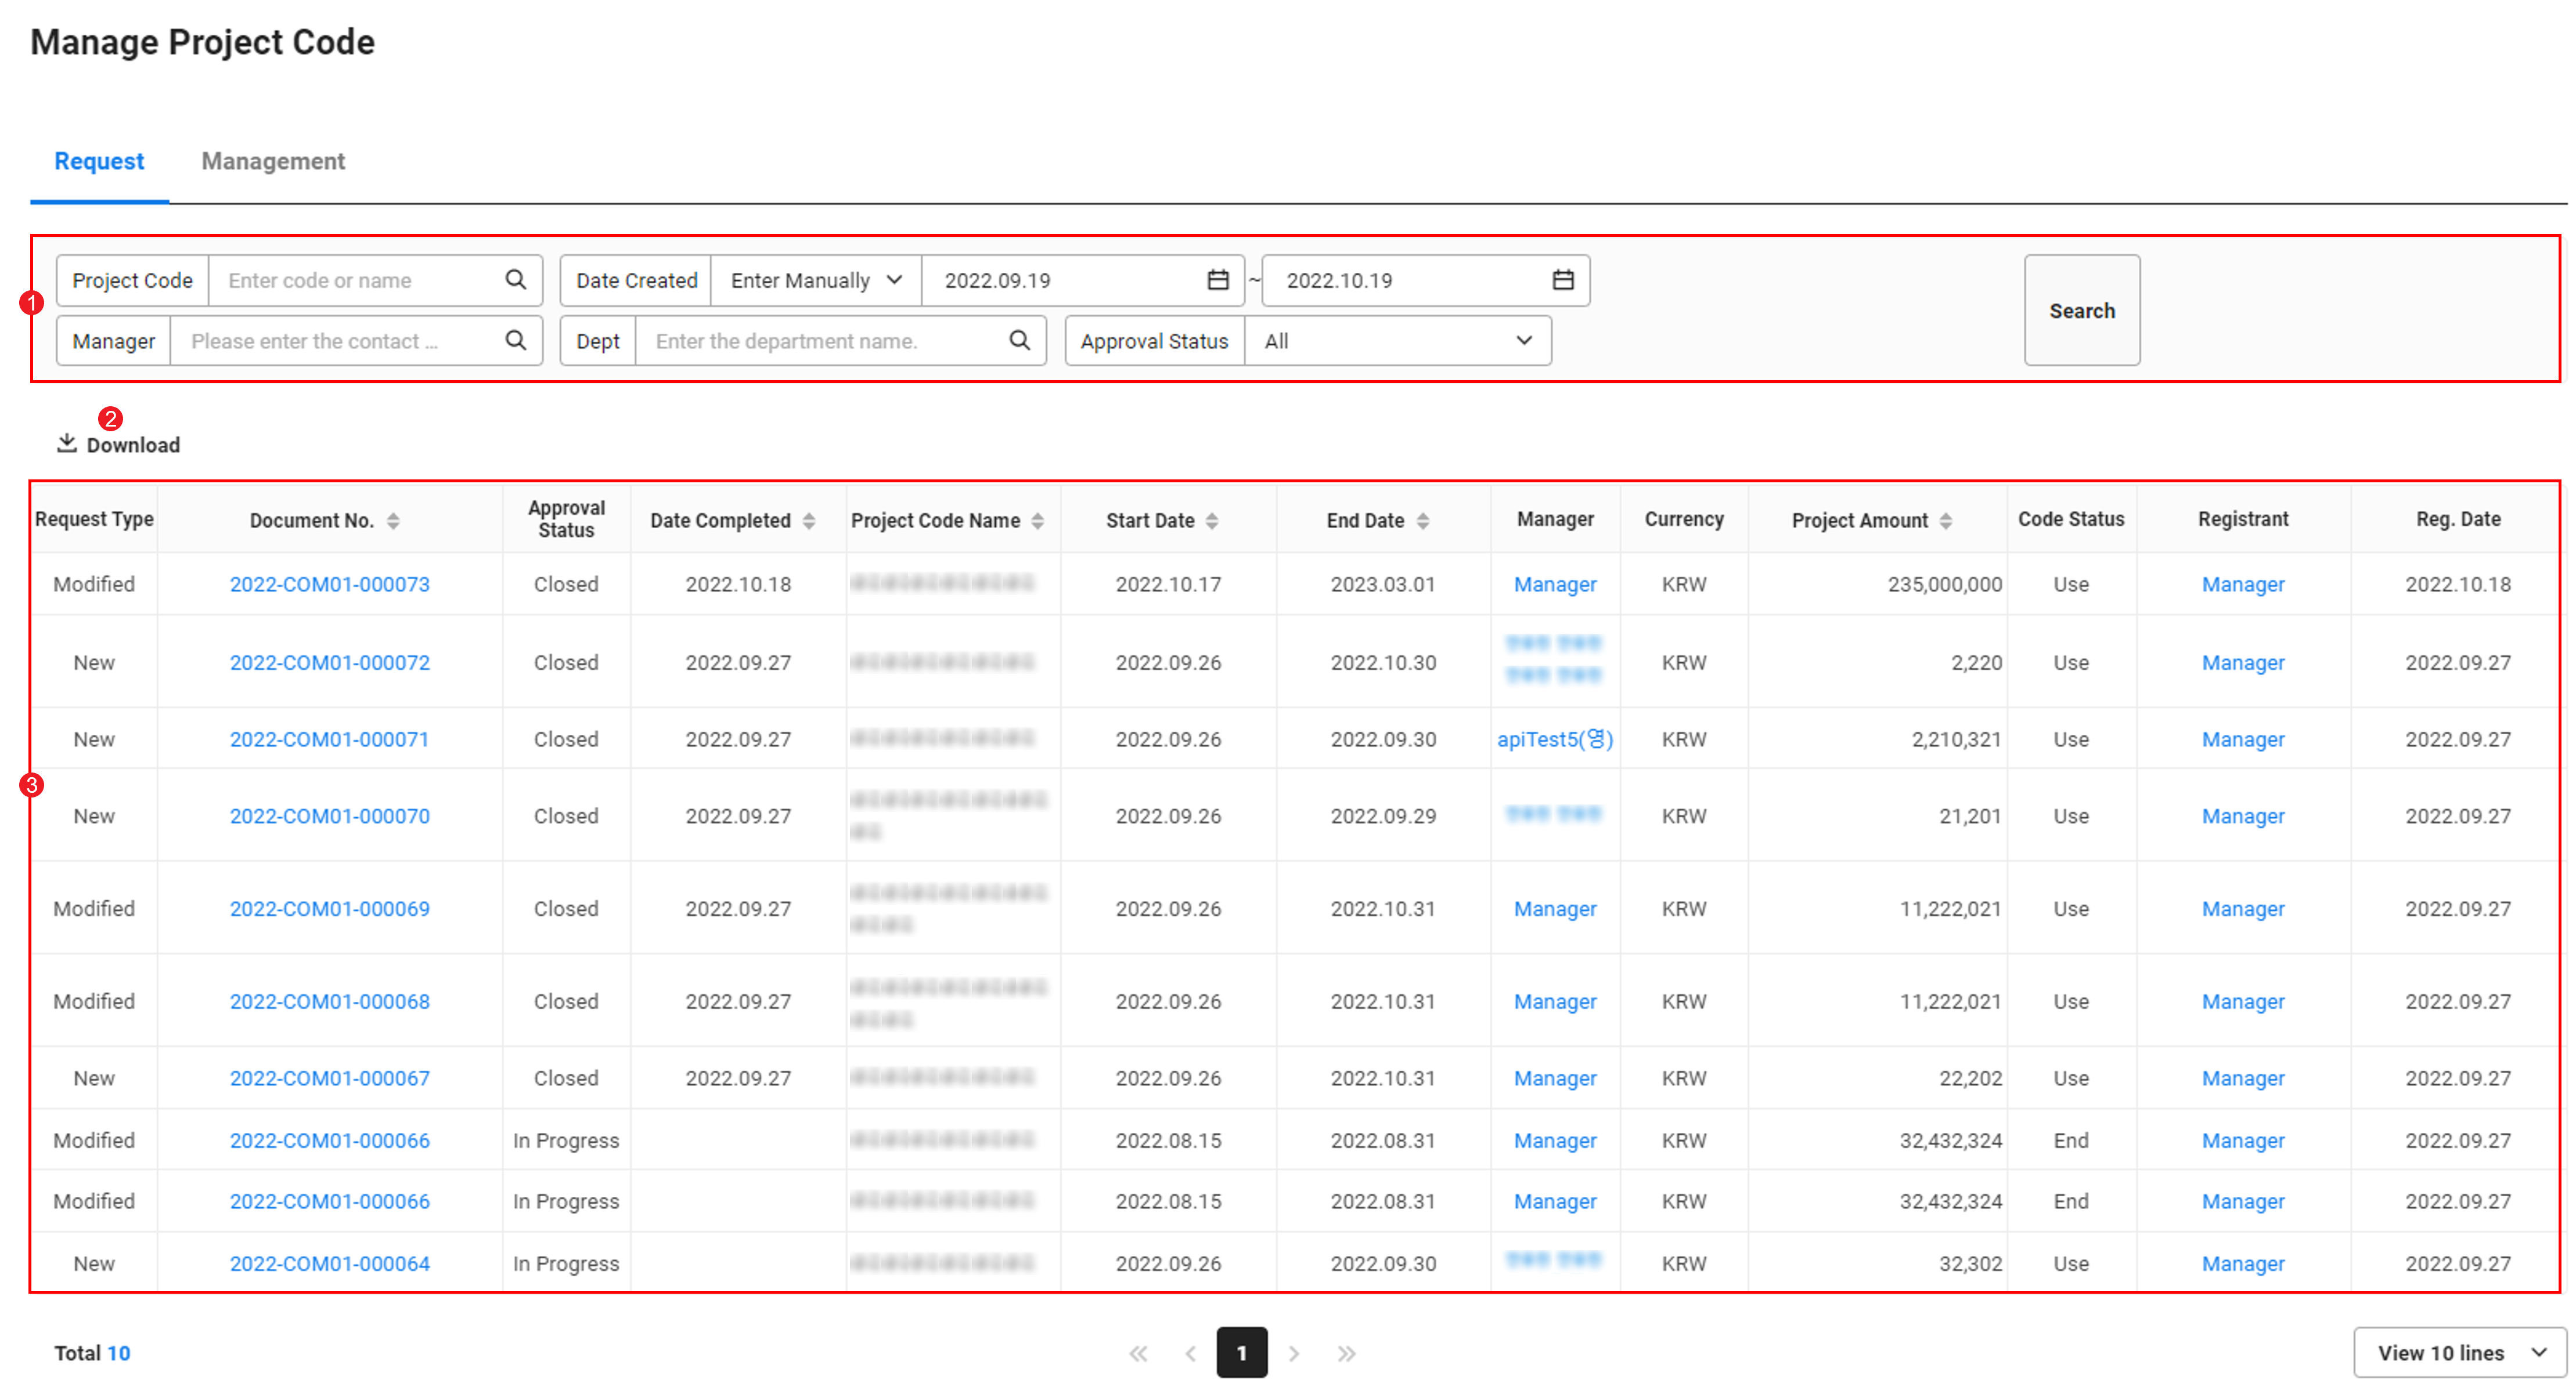
| Area | Description |
|---|---|
| ① Search window | Search project codes by project code, creation date, manager, department, and approval status |
| ② Download | Download the list of project code requests as an Excel file (See Download Project Code List) |
| ③ Project list | List of vendors with requests
|
Manage
In the Manage tab, you can manage the list of project codes and add project codes.
The Manage page is laid out as follows.
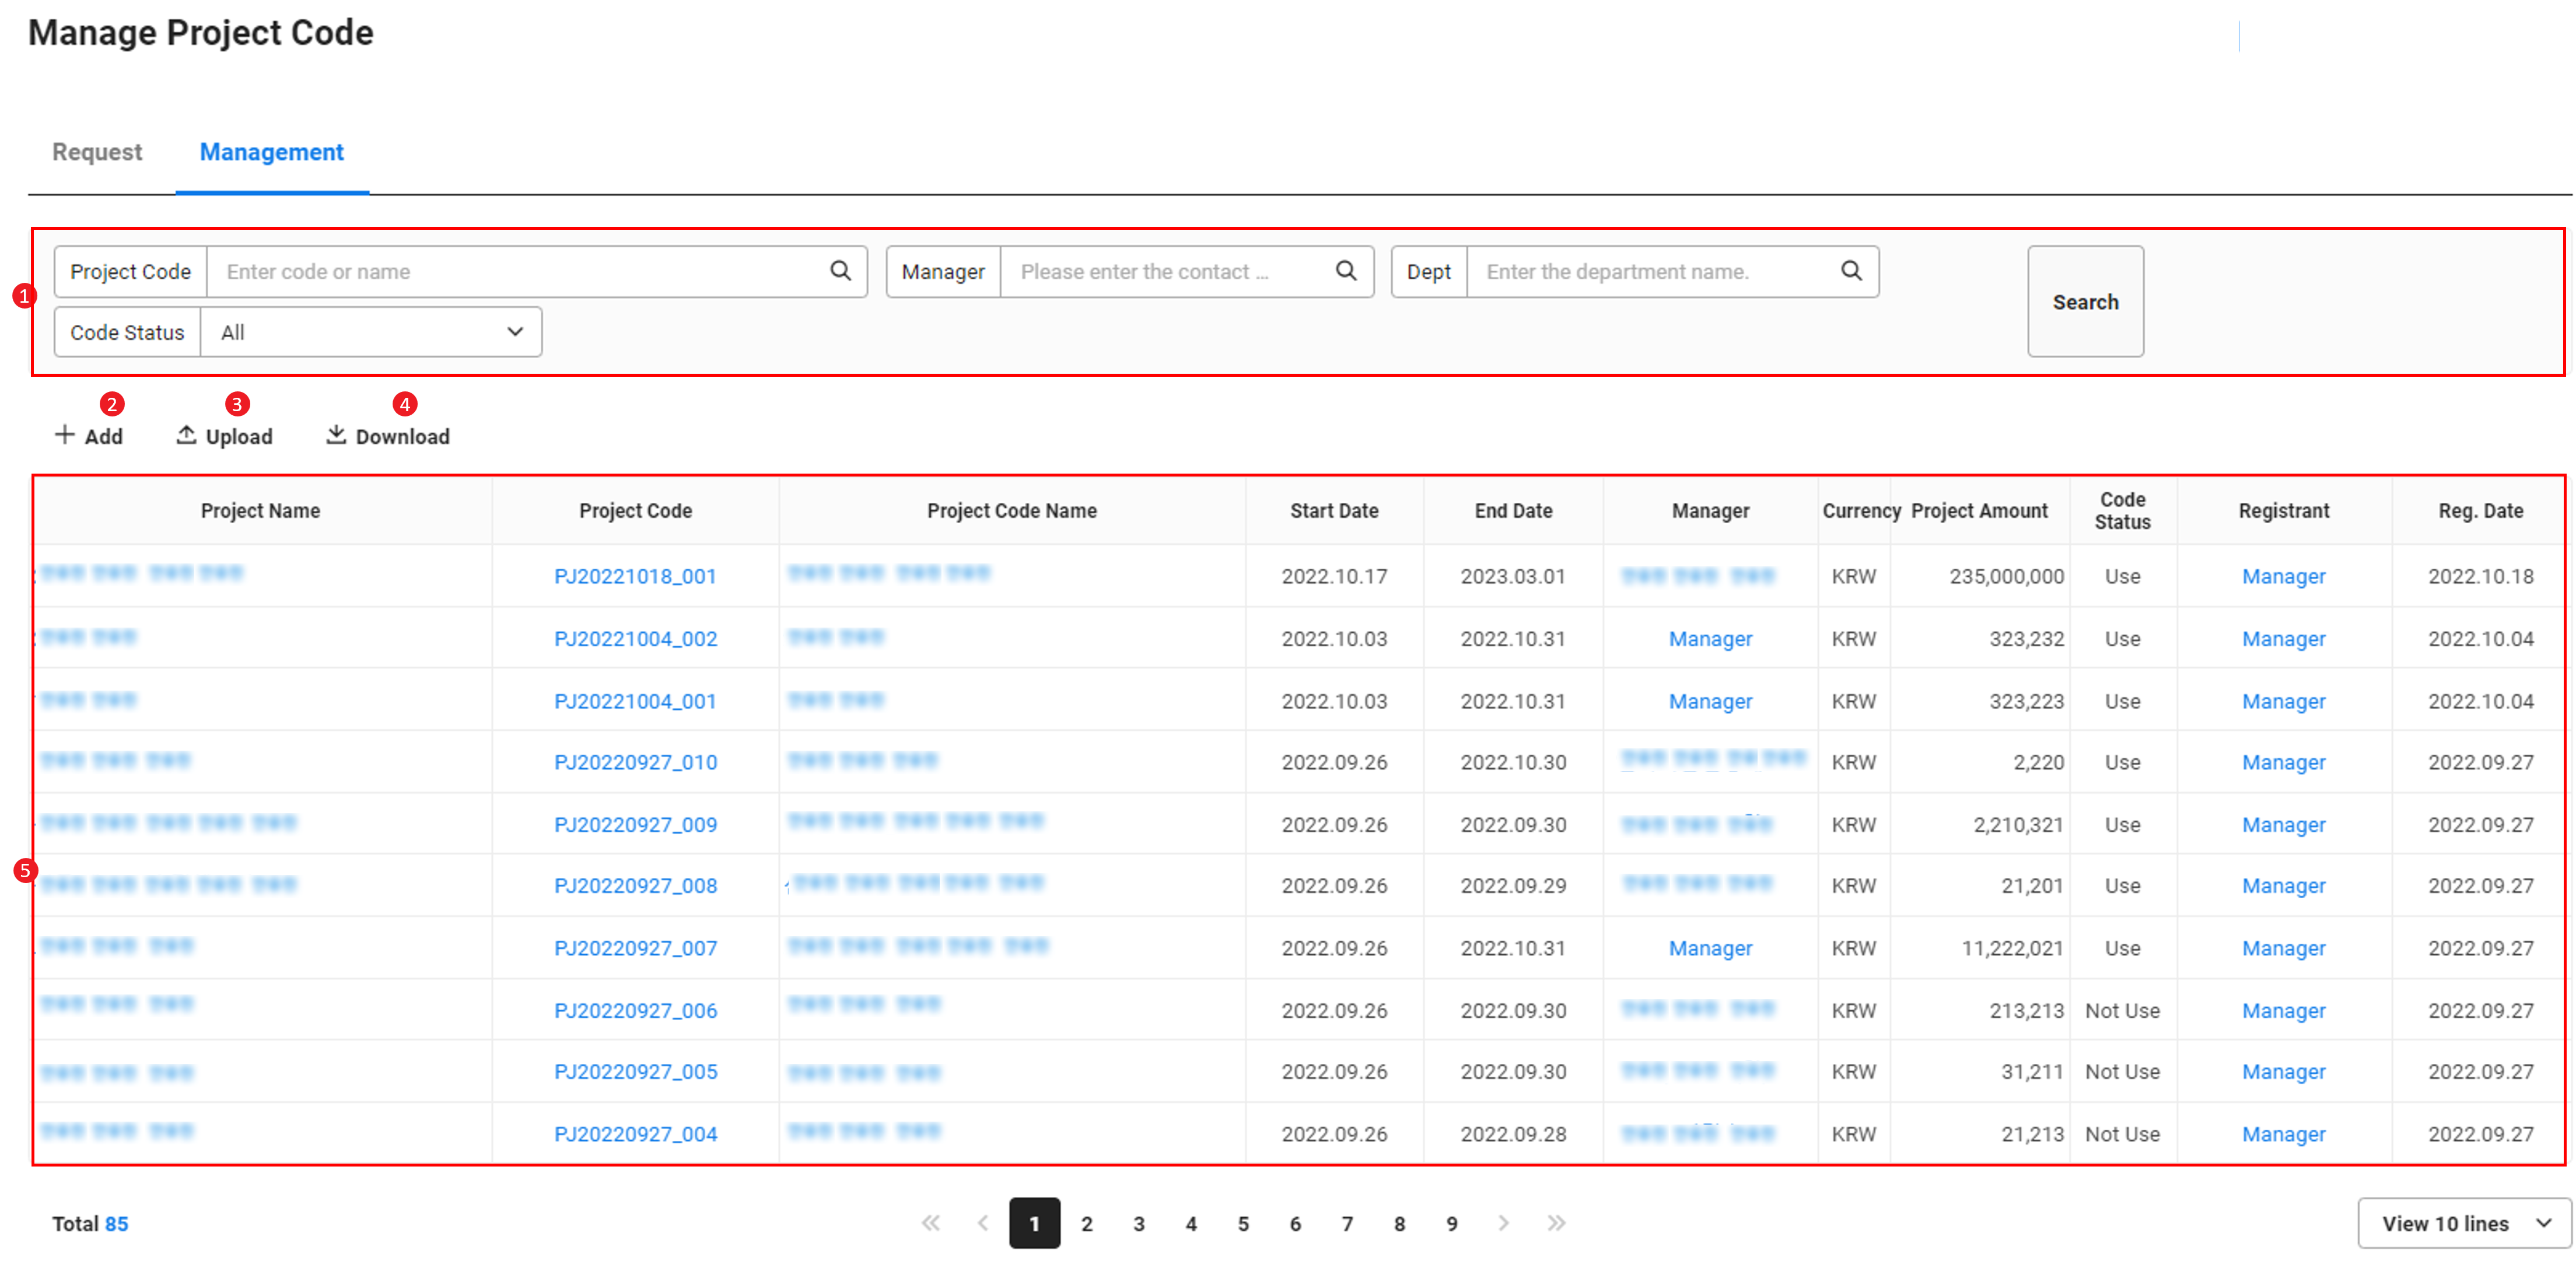
| Area | Description |
|---|---|
| ① Search window | Search project codes by project, creation date, manager(associate manager) and approval status |
| ② Add | Add new project codes individually (See Add Project Codes Individually) |
| ③ Upload | Add project codes in bulk (See Add Project Codes in Bulk) |
| ④ Download | Download the list of project codes as an Excel file (See Download Project Code List) |
| ⑤ Project code list | It displays the project code information
|
| ⑥ Number of displayed items | Sets the number of project codes to be displayed in a single page of the list |
Add Project Codes Individually
The following describes how to add project codes individually.
- Click 'Admin Menu' in the upper right corner of the PC web screen, then click 'Business Support Settings' in the pop-up window.
- Click at the top left of the screen.
- In the menu, click 'Common Code > Manage Project Code'.
- Click 'Add'.
- Enter the project information.
- The code status can be selected between ‘Used’ and ‘Not used’.
- If Not used is selected, it is not displayed when entering project codes.
- When a project code is modified, ‘Closed’ and ‘Deleted’ are added to the code status options. (See View and Modify Project Code)
- Manager: Select the project manager. You can also add associate project managers by the unit of an employee or a department if needed.
- The manager is the person responsible for the project and only one person can be assigned to it.
- When using Approval integration, managers and associate managers can request modification or deletion of project codes.
- Add Associate Manager: When adding as employees, you can add multiple employees. When adding as department, it includes all members affiliated with the department. If you select ‘Include Suborganizations’, then the members who belong to suborganizations of the selected department are also included
- The project amount can be entered by selecting one of the currencies managed in the Manage Basic Code menu of the ‘Business Support Settings’.
- To attach files, click ‘Attach File’ or drag and drop the files into the ‘Drag the file with the mouse’ area.
- The code status can be selected between ‘Used’ and ‘Not used’.
- Click 'Save'.
- The project code is added.
Add Project Codes in Bulk
The following describes how to add project codes in bulk.
- Click 'Admin Menu' in the upper right corner of the PC web screen, then click 'Business Support Settings' in the pop-up window.
- Click at the top left of the screen.
- In the menu, click 'Common Code > Manage Project Code'.
- Click ‘Upload’.
- Click ‘Download Sample File’ to download the sample file.
- The downloaded file is saved as ‘sample.xlsx’ in the Download folder.
- Manager: Enter the login ID of the employee.
- Associate Manager: Enter the login ID for employees, and department code for departments. (The department code can be viewed by downloading the organization chart in the ‘HR > Organization > Manage Organization Chart’ menu.)
- When entering multiple employee login IDs or department codes, separate them with commas.
- When entering a department code, suborganizations aren't included.
- Fill out the downloaded sample file.
- Click ‘Attach File’ in the Upload pop-up window to upload the sample file created.
- Click 'Save'.
- In the notification pop-up window, click ‘OK’ .
- The project codes are added from the sample file.
View and Modify Project Code
The following describes how to view and modify added project codes.
- Click 'Admin Menu' in the upper right corner of the PC web screen, then click 'Business Support Settings' in the pop-up window.
- Click at the top left of the screen.
- In the menu, click the ‘Manage’ tab under the ‘Common Code > Manage Project Code’ menu.
- Click the project name, project code, or project code name of the project code to be modified in the project code list.
- You can view the detailed information of the added project code.
- In the ‘Details’ tab, click ‘Modify’.
- Apply the content to be modified.
- Make sure to enter the reason for modification in the Reason field.
- You can change the code status.
Code Status Description Entry Availability View Availability Not used The code has been newly registered but not used. X X Used The code is being used. O O Closed The project has been closed and the code can't be used. Only previous data can be viewed - The code can be used after being changed to the Used status.
X O Deleted The code has been deleted - Only codes in the Not used status can be deleted
X X
- Click 'Save'.
- The modified content is reflected.
- When viewing a project code, you can check the modification history in the ‘Information Modification History’ tab.
Download Project Code List
The following describes how to download the list of project codes as an Excel file.
- Click 'Admin Menu' in the upper right corner of the PC web screen, then click 'Business Support Settings' in the pop-up window.
- Click at the top left of the screen.
- In the menu, click the 'Request' tab or the 'Manage' tab in 'Common Code > Manage Project Code'.
- If necessary, enter the project code conditions to be searched in the Search window, and then click ‘Search’.
- You can view the project codes that apply to the entered conditions.
- Click 'Download'.
- The list of project codes is downloaded as an Excel file.
Manage Item Information
You can create item groups to manage items by group. In the Manage Item Information menu, you can create item groups, add items to item groups, or manage item groups. For set items, you can register and manage component items and component quantity. You can easily bulk register large amounts of item information using the Upload Excel File feature.
The Manage Item Information page is laid out as follows.
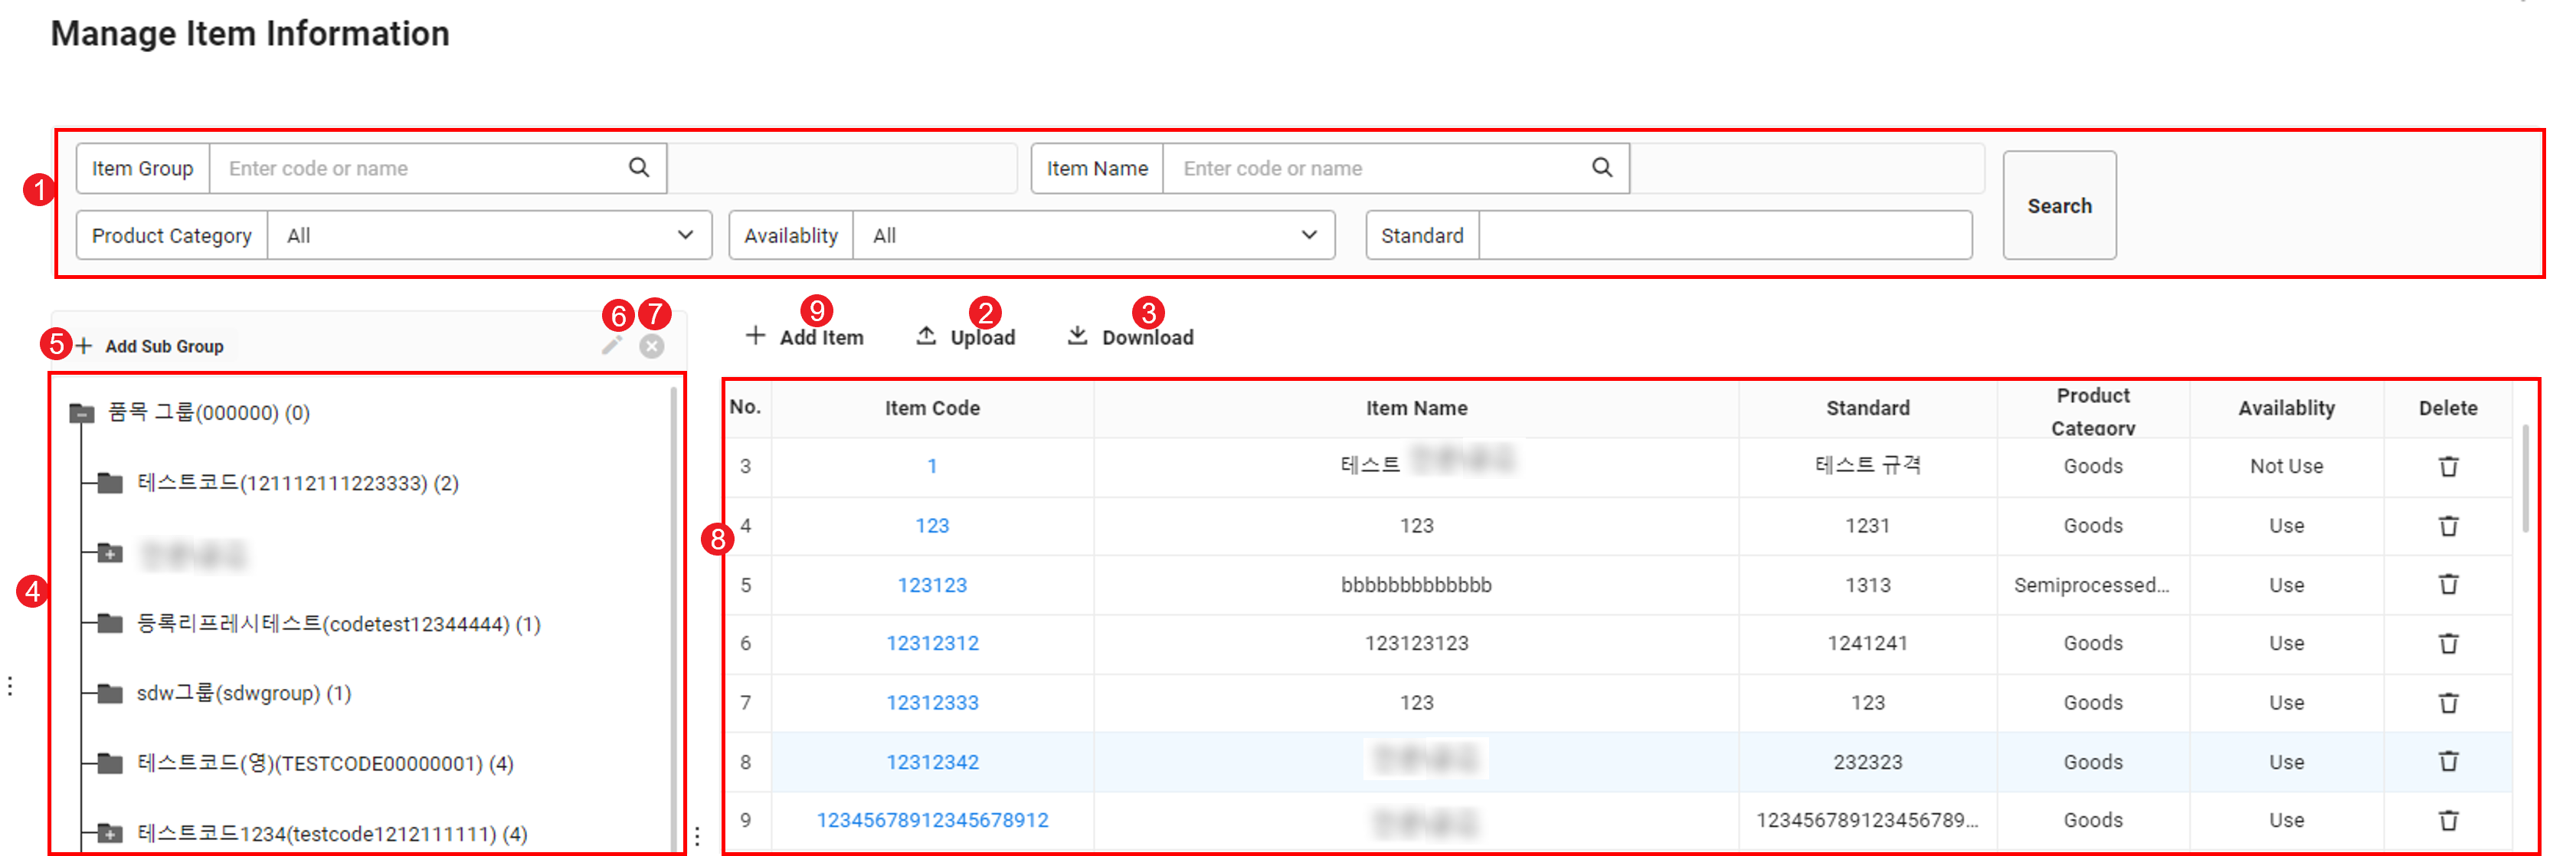
| Area | Description |
|---|---|
| ① Search window | Search by item group, item name, item category, usage status, and specification conditions |
| ② Upload | Bulk upload item information using an Excel file (See Register Items in Bulk) |
| ③ Download | Download the item information as an Excel file |
| ④ Item group list | View the item group list. |
| ⑤ Add Sub Group | Add item groups under the selected item group (See Add Item Group) |
| ⑥ Modify Item Group | Modify the selected item group information (See Modify Item Group Information) |
| ⑦ Delete Item Group | Delete selected item group (See Delete Item Group) |
| ⑧ Item list | View item list
|
| ⑨ Add Item | Add a new item (See Add Item) |
Add Item Group
The following describes how to add an item group.
- Click 'Admin Menu' in the upper right corner of the PC web screen, then click 'Business Support Settings' in the pop-up window.
- Click at the top left of the screen.
- In the menu, click 'Common Code > Manage Item Information'.
- Select a parent item group to which you want to add a new item group.
- Click 'Add Sub Group'.
- Enter the item group details in the Item Group Details field.
- Item Group Code: Enter the item group code to identify item groups. The item group codes can't be duplicated. It should be in the form of a combination of uppercase and lowercase English letter and numbers.
- Item Group Name: Click the item group name entry window and enter the item group name in the language field corresponding to the country your company uses.
- Parent Group: It is set automatically according to the tree structure.
- Sort Order: Enter the sorting order of the item group.
- Usage: Select the usage status of the item group. When you select ‘N’, you can't use the item group.
- When you select ‘N’ for the usage status of a parent group, the usage status of all applicable sub groups becomes ‘N’.
- Note: Enter if you have content to record.
- Click 'Save'.
Modify Item Group Information
The following describes how to modify the item group information.
- Click 'Admin Menu' in the upper right corner of the PC web screen, then click 'Business Support Settings' in the pop-up window.
- Click at the top left of the screen.
- In the menu, click 'Common Code > Manage Item Information'.
- Select the item group you want to modify, and then click
 .
. - Modify the details for the item group.
- Item Group Code: Enter the item group code to identify item groups. The item group codes can't be duplicated. It should be in the form of a combination of uppercase and lowercase English letter and numbers.
- Item Group Name: Click the item group name entry window and enter the item group name in the language field corresponding to the country your company uses.
- Parent Group: It is set automatically according to the tree structure.
- Sort Order: Enter the sorting order of the item group.
- Usage: Select the usage status of the item group. When you select ‘N’, you can't use the item group.
- When you select ‘N’ for the usage status of a parent group, the usage status of all applicable sub groups becomes ‘N’.
- You can modify all items except Item Group Code and Parent Group.
- When you select the item group status to ‘N’, the status will be changed not to use applicable group and all of its sub groups.
- If there is item information in use in the item group, then you can't change the status to ‘N’.
- Click 'Save'.
Delete Item Group
The following describes how to delete an item group.
- Click 'Admin Menu' in the upper right corner of the PC web screen, then click 'Business Support Settings' in the pop-up window.
- Click at the top left of the screen.
- In the menu, click 'Common Code > Manage Item Information'.
- Select the item group you want to delete, and then click .
- Click 'Delete'.
Add Item
The following describes how to add new item information.
- Click 'Admin Menu' in the upper right corner of the PC web screen, then click 'Business Support Settings' in the pop-up window.
- Click at the top left of the screen.
- In the menu, click 'Common Code > Manage Item Information'.
- Click 'Add item'.
- Enter basic information of the item.
- The fields marked in yellow are required items.
- Item code: Enter the item code to identify items. Item codes can't be duplicated.
- Item Name: Select the item name entry window, and then enter the item name in the field for each language.
- Standard: Enter the standard information of the item.
- Item Category: Select the status of the item.
- In Item Category, you can select one of the following: ‘Product, Goods, Semi-processed goods, Raw material, Subsidiary material, Stored goods, and Complimentary goods.’
- Item Group: Select the item group to which the item belongs.
- You can only select item groups registered in the Item Group menu with its status as Used.
- Inventory Unit: Select the inventory status of the item.
- HS code: Enter the HS code.
- What is HS Code?: It is a code granted for the international product classification in the exchange of products between countries.
- Sales Item Status: Select the sales item status.
- Set Item Status: Select the set item status. When you select not to use set items, the content saved in the ‘Set Information’ tab is not applied to the Sales service. If the set item (parent item) is being used in quotation, order, and sales, then the component items can't be modified. You have to create a separate set item code to change them.
- Usage Status: Select the usage status of an item.
- Other Information: If necessary, enter other information.
- If necessary, click ‘Additional Information’> ‘Add’ in that order, and then enter the additional information.
- Item Name: Enter the name of the additional information item.
- Item Type: Select the type of the additional information item.
- Item Value: Enter the value of the additional information item.
- Item Unit: Enter the unit of the additional information item.
- For a set item, click ‘Set Information’ > ‘Add’, in that order, and then enter the set information.
- Component Item Code: Select the Component Item by selecting a component item code cell.
- When you select a component item code, the values for the Item Name, Standard, and Sales Unit are entered automatically.
- Component Quantity: Enter the quantity of items to be sold as sets.
- When you set the Set Item Status to Not Use in the Basic Information, if you add the set information, then the information will not be applied.
- If the set item (parent item) is being used in quotation, order, and sales, then the component items can't be modified. Create a separate set item code to change them.
- Component Item Code: Select the Component Item by selecting a component item code cell.
- Click 'Save'.
- To delete an item, click 'Delete' for the item you want to delete from the item list.
- The items already being used can't be deleted. In other words, if the item is being used in unit price information, quotation, order, and sales, then you can't delete item. You can only change its usage status.
- To delete an item, click 'Delete' for the item you want to delete from the item list.
Modify Item Information
The following describes how to modify the item information.
- Click 'Admin Menu' in the upper right corner of the PC web screen, then click 'Business Support Settings' in the pop-up window.
- Click at the top left of the screen.
- In the menu, click 'Common Code > Manage Item Information'.
- Click an item code you want to modify.
- Modify the information.
- You can modify all fields except for the item code.
- However, you can't modify the item category and inventory unit of the item information already being used. In other words, if the item is being used in unit price information, quotation, order, and sales, then you can't modify its item category or inventory unit.
- You can modify all fields except for the item code.
- Click 'Save'.
Register Items in Bulk
The following describes how to register multiple items using an Excel file at once.
- Click 'Admin Menu' in the upper right corner of the PC web screen, then click 'Business Support Settings' in the pop-up window.
- Click at the top left of the screen.
- In the menu, click 'Common Code > Manage Item Information'.
- Click ‘Upload’.
- Click the tab menu of the information you want to register.
- Click ‘Download Sample File’ to download the sample file.
- The sample file is saved as "ItemCodeSample.xlsx" in the Download folder.
- Enter and save the item information according to the sample file form.
- Click the Attach the file from your PC, or ‘drag the file here.’ field to upload the created file, or drag the created file to the applicable field.
- Click 'OK'.
Manage Basic Code
You can manage basic codes used by related services, such as Accounting, Sales, Expense, and Expenditure, or by vendor and project information.
The Manage Basic Code page is laid out as follows.
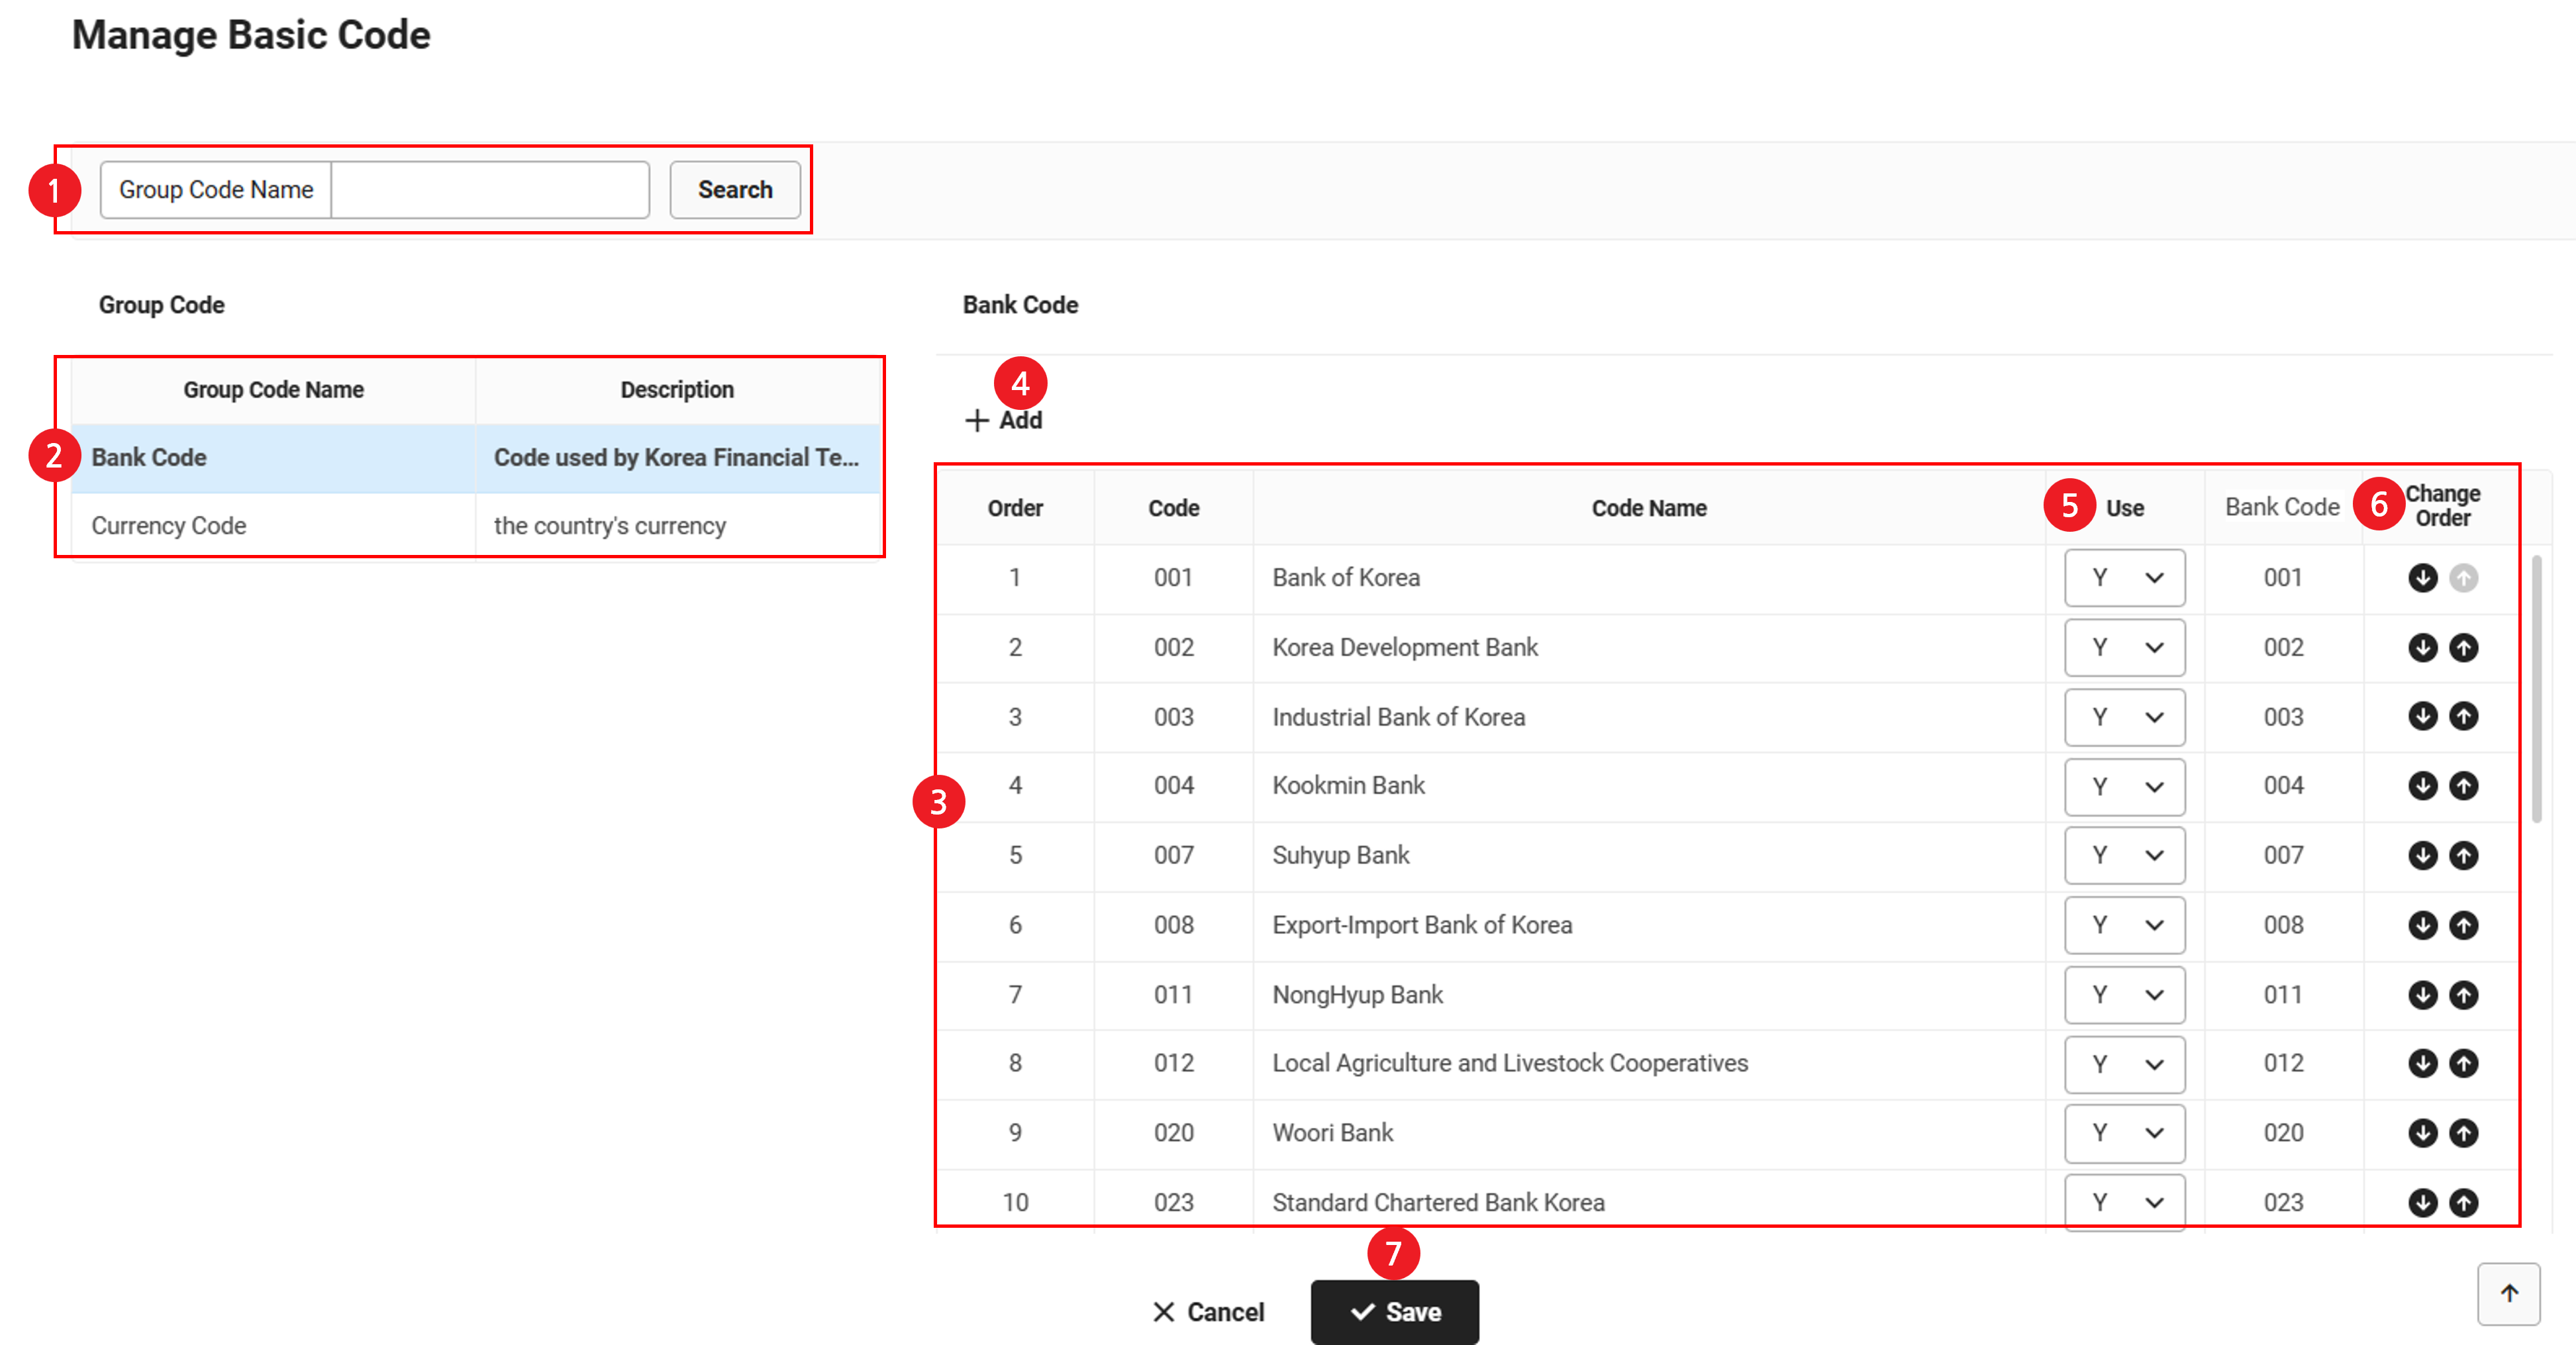
| Area | Description |
|---|---|
| ① Search window | Search common codes based on group code conditions |
| ② List of Group Codes | It displays the group codes provided
|
| ③ List of Detailed Codes | It displays detailed codes that belong to the selected group code Values for Usage Status, Digits, and Unit can be edited. (See Add Detailed Code)
|
| ④ Add | Add a new detailed code to the selected group code (See Add Detailed Code) |
| ⑤ Usage Status | Set usage status of the detailed code |
| ⑥ Change Order of Detailed Codes | Changes the order in which the detailed code is displayed in the list upon clicking it. |
| ⑦ Save | Click to save the edited content |
Add Detailed Code
The following describes how to add a detailed code to a group code.
- Click 'Admin Menu' in the upper right corner of the PC web screen, then click 'Business Support Settings' in the pop-up window.
- Click at the top left of the screen.
- Click the ‘Common Code > Manage Basic Code’ menus, in that order.
- Click the group code where a detailed code will be added.
- Click ‘Add’ above the detailed code list.
- Enter the code, code name, digits, unit, and usage status according to the group code.
- Click 'Save'.