You can check and modify company information. You can also check the information for business places affiliated with the company or add them, and add and manage certificates of registered business places.
Manage Company Information
You can check company information and modify specific information if necessary.
The Manage Company Information page is laid out as follows.
| Area | Description |
|---|---|
| ① Company Information | Check and modify company information (Refer to Modify Company Information) |
| ② Company Basic Information | Check access URL, country, time zone, default language, and multi-language usage settings. |
Modify Company Information
The information entered in the company information is reflected in the company information of the ‘Business Support Settings > Company Information > Manage Business Place’ and added to the business place list.
The following describes how to modify company information.
- Click 'Admin Menu' at the top right of the PC web screen, then click 'Business Support Settings' in the pop-up window.
- Click
 at the top left of the screen.
 - From the menu, click ‘Company Information > Manage Company Information’.
- Apply the changes in the ‘Company Information’ area.
- Company name and phone number are information set when activating Business Support and cannot be changed. (Refer to Activate Business Support)
-
- Register the company seal.
-
To upload a company seal file in use, select the ‘Search File’.
-
A transparent background and image size of 74 x 74 pixels or larger are recommended for the company seal image.
-
-
To create a stamp using the company seal, click ‘Create Stamp’. Refer to '' below to create a stamp and then register it.
-
Click

-
- Click 'Save' to reflect the modified content.
If you register a company seal, it will be used for the following.
-
When issuing a certificate yourself, you can print a certificate with a company seal.
-
If you use the Payroll service, then you can issue the withholding tax receipt and income tax withholding confirmation with the company seal.
-
If you use Official Document, you can print the official document with the company seal stamped or download it as a PDF document.
Create Stamp
The following describes how to create a stamp to be used as the company seal.
- In the Manage Company Information page, click ‘Create Stamp’.
- Enter the name to be used in the stamp, and then click ‘Create’.
- Stamp samples will be displayed.
- Select the stamp to be used, and then click ‘Select’.
- The selected stamp is used as the company seal.
Basic Company Information
In Basic Company Information, you can check access URL, country, time zone, default language, and multi-language usage settings.
- Access URL and country are information set when activating Business Support and cannot be changed. (Refer to Activate Business Support)
- Language/time zone can be changed in Admin.
-
The
-
If you need to change your company URL, please contact .
Activate Business Support
Before using Business Support, you need to enter the following information to activate it.
- Enter the access URL.
- As the company's access URL, the company admins cannot make direct changes if any modifications are necessary. Instead, they can contact Support for assistance.
- Select the business country.
- Default currency can be selected or changed automatically depending on your business country.
- Language and time zones reflect what admin has set and cannot be modified.
- Language is reflected as the 'Basic Language' of Business Support.
Manage Business Place
you can check the company information entered in the Manage Company Information menu and add and manage business places. You can also register and manage certificates of each business place.
Business Place Information
you can manage the company information and business place information.
The Manage Business Place page is laid out as follows.
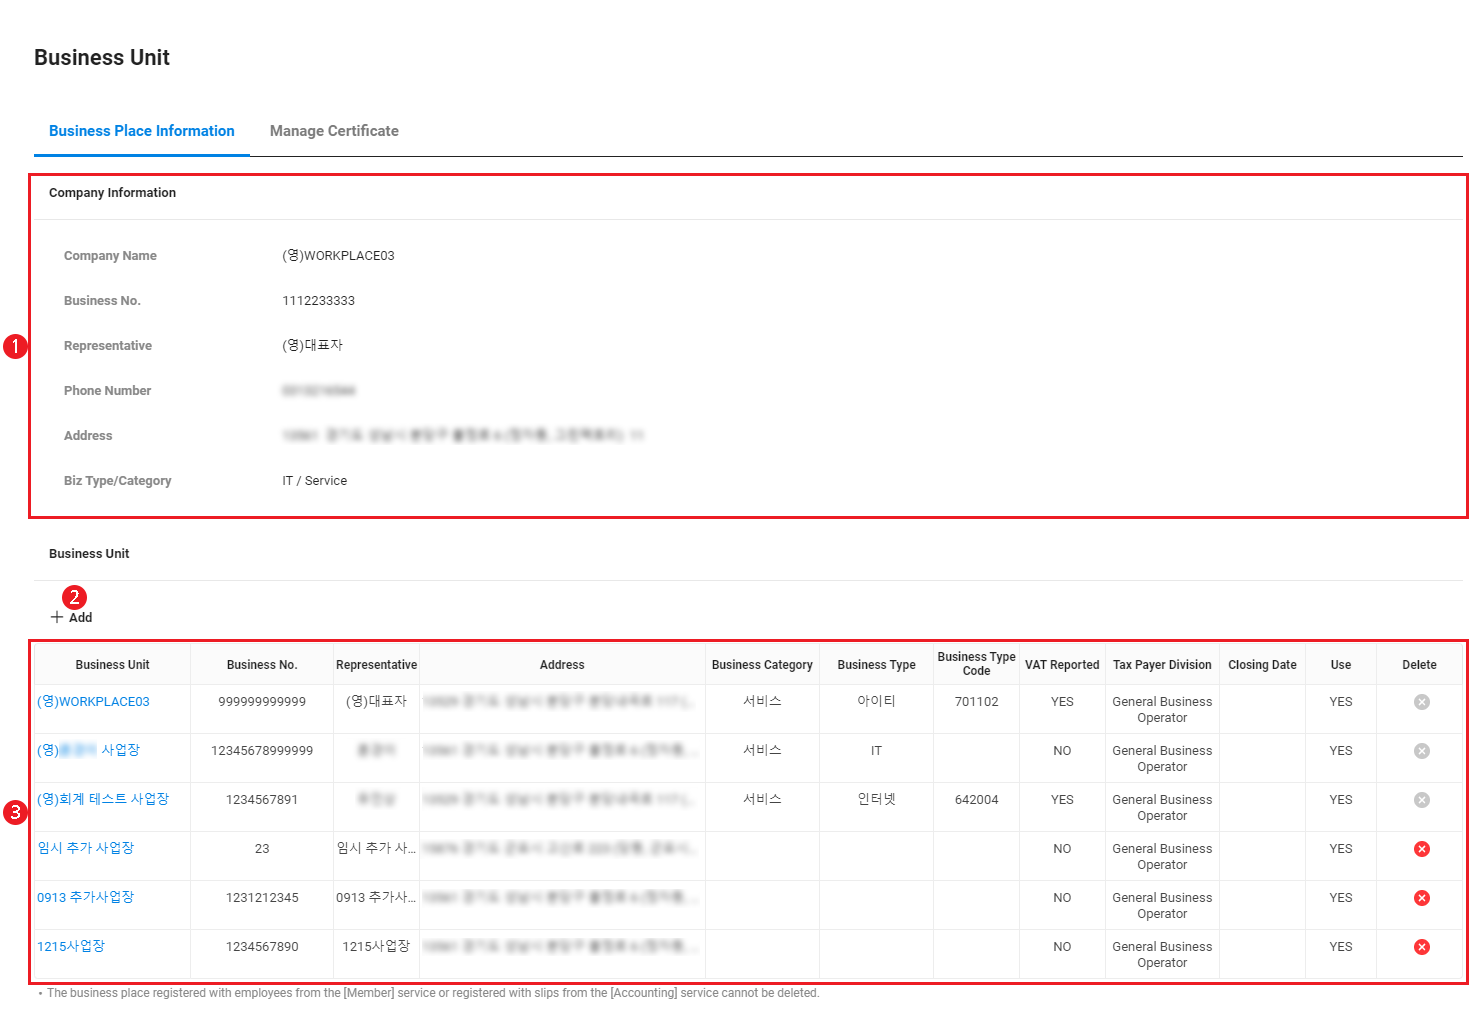
| Area | Description |
|---|---|
| ① Company Information | Displays the company information |
| ② Add (Business Place Information) | Registers a new business place (Refer to Add Business Place) |
| ③ Business place list | Displays the information of added business places The designated default business place is marked as 'Default'.
|
Add Business Place
The following describes how to add a business place.
- Click 'Admin Menu' at the top right of the PC web screen, then click 'Business Support Settings' in the pop-up window.
- Click at the top left of the screen.
- Click ‘Company Information > Manage Business Place’ from the menu.
- Click ‘Add’.
- Enter the business place information.
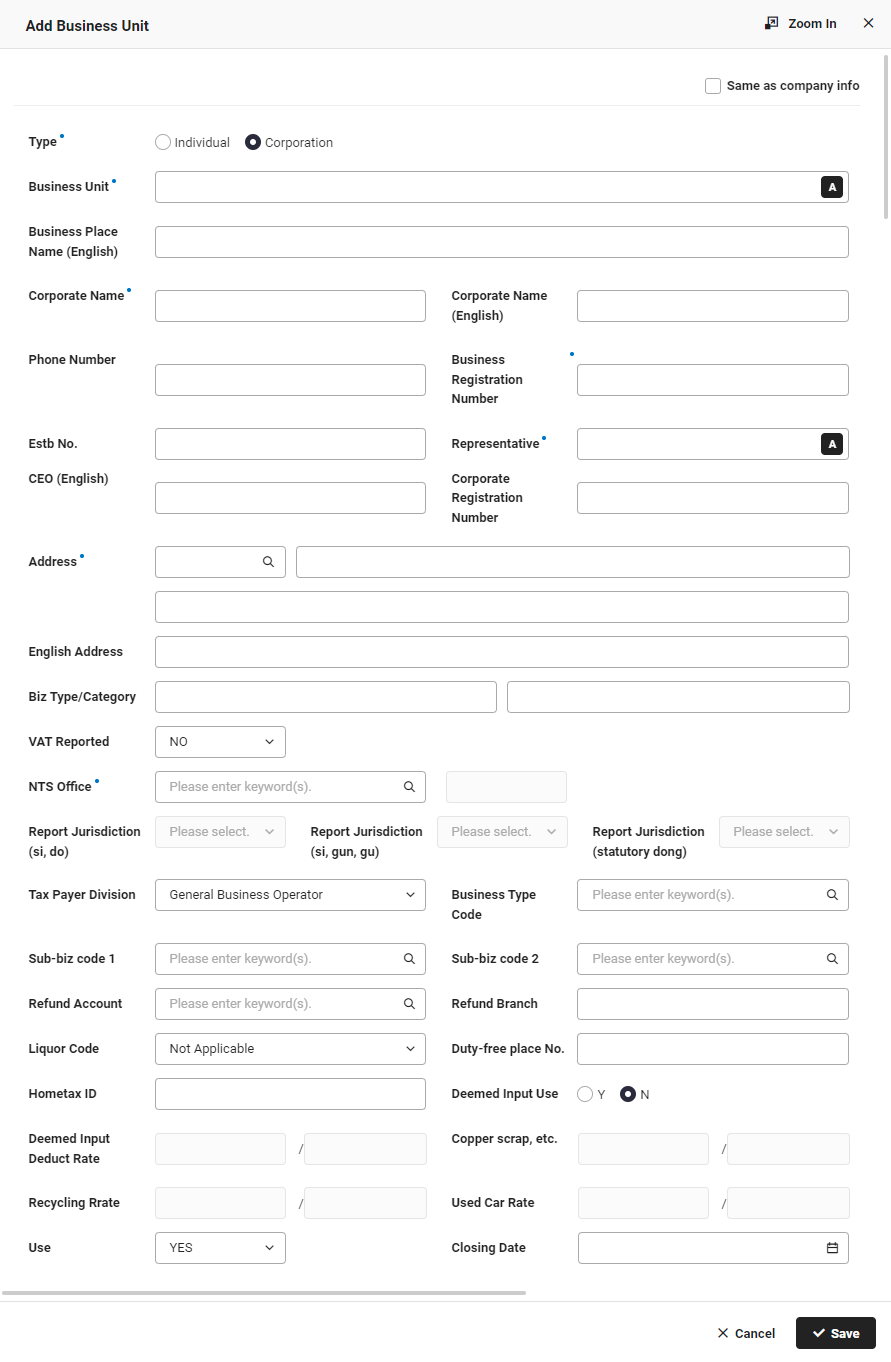
- To enter the same information as the company information, select ‘Same as company information’.
- Select the business type. Input items change according to the business type.
- Select whether to report VAT.
- If you select ‘Yes’, then the Tax Office, Taxpayer Classification, Business Code, Refund Account, Refund Branch, Liquor Code, and Hometax ID are managed as required items. You can manage VAT in the Accounting service. (Refer to Report VAT)
- The required information entered must be accurate as they will be included in the electronic media files needed when reporting VAT.
- Set the deemed input tax rate in the numerator/denominator form for each deductible item if you are a taxable entrepreneur who manufactured or processed agricultural, stock farm, marine, or forest products as raw materials, or an entrepreneur eligible for a tax credit report of deemed input tax to file for VAT by obtaining waste treatment for recycling business permission pursuant to the Waste Control Act or filing a waste treatment recycling report.
- Enter the business code or sub-business code if your business is subject to mandatory submission of the cash sales statement (e.g., lawyer, judicial scrivener, etc.).
- When using the Payroll service, you must enter the Tax Office field. (Refer to Manage Service Use)
- Also enter the information for city/province, city/gun/gu, and administrative dong of the reporting jurisdiction.
- The information for the reporting jurisdiction is reflected in the national tax, local tax, and employee's share of resident tax reports.
- Select the deemed input usage status.
- If you selected ‘Y’, then enter the deemed input deduction rate, copper scrap, recycling waste resources purchase deduction rate, and user car purchase deduction rate in the fraction form (numerator/denominator).
- Select ‘Yes’ for the business place usage status. If you select ‘No’, you can't use the business place even if you add it.
- If the end date is specified, then you can only use the business place until the end date.
Modify Business Place Information
The following describes how to modify business place information.
- Click 'Admin Menu' at the top right of the PC web screen, then click 'Business Support Settings' in the pop-up window.
- Click at the top left of the screen.
- Click ‘Company Information > Manage Business Place’ from the menu.
- Click the business name of the business place to be modified.
- Apply the content to be modified.
- Click 'Save'.
- The modified content is reflected.
- Click ‘Copy’ to add a business place with the same information as the business place information entered.
Delete Business Place
The following describes how to delete a business place.
- Click 'Admin Menu' at the top right of the PC web screen, then click 'Business Support Settings' in the pop-up window.
- Click at the top left of the screen.
- Click ‘Company Information > Manage Business Place’ from the menu.
- Click of the business place to be deleted.
- In the Delete pop-up window, click 'Yes'.
- The business place is deleted.
- Business places with registered employee information or a slip card deposit/installment savings account can't be deleted.
Manage Certificate
You can add and manage certificates of each business place.
- Certificates are used in the following cases.
- Used to scrape electronic (tax) invoices, cash receipts, sales, and purchase records by integrating with the National Tax Service (NTS) Hometax system, and also to scrape transaction details linked to financial accounts.
- Certificates are registered to provide the transaction history and balance of financial accounts, and they do not support actual deposit/withdrawal transactions with financial institutions.
- They are used to scrape corporate credit card usage history by linking to credit card companies.
- They are used to link to SmartBill, which issues electronic tax invoices.
- Used to scrape electronic (tax) invoices, cash receipts, sales, and purchase records by integrating with the National Tax Service (NTS) Hometax system, and also to scrape transaction details linked to financial accounts.
The Manage Certificate tab page is laid out as follows.
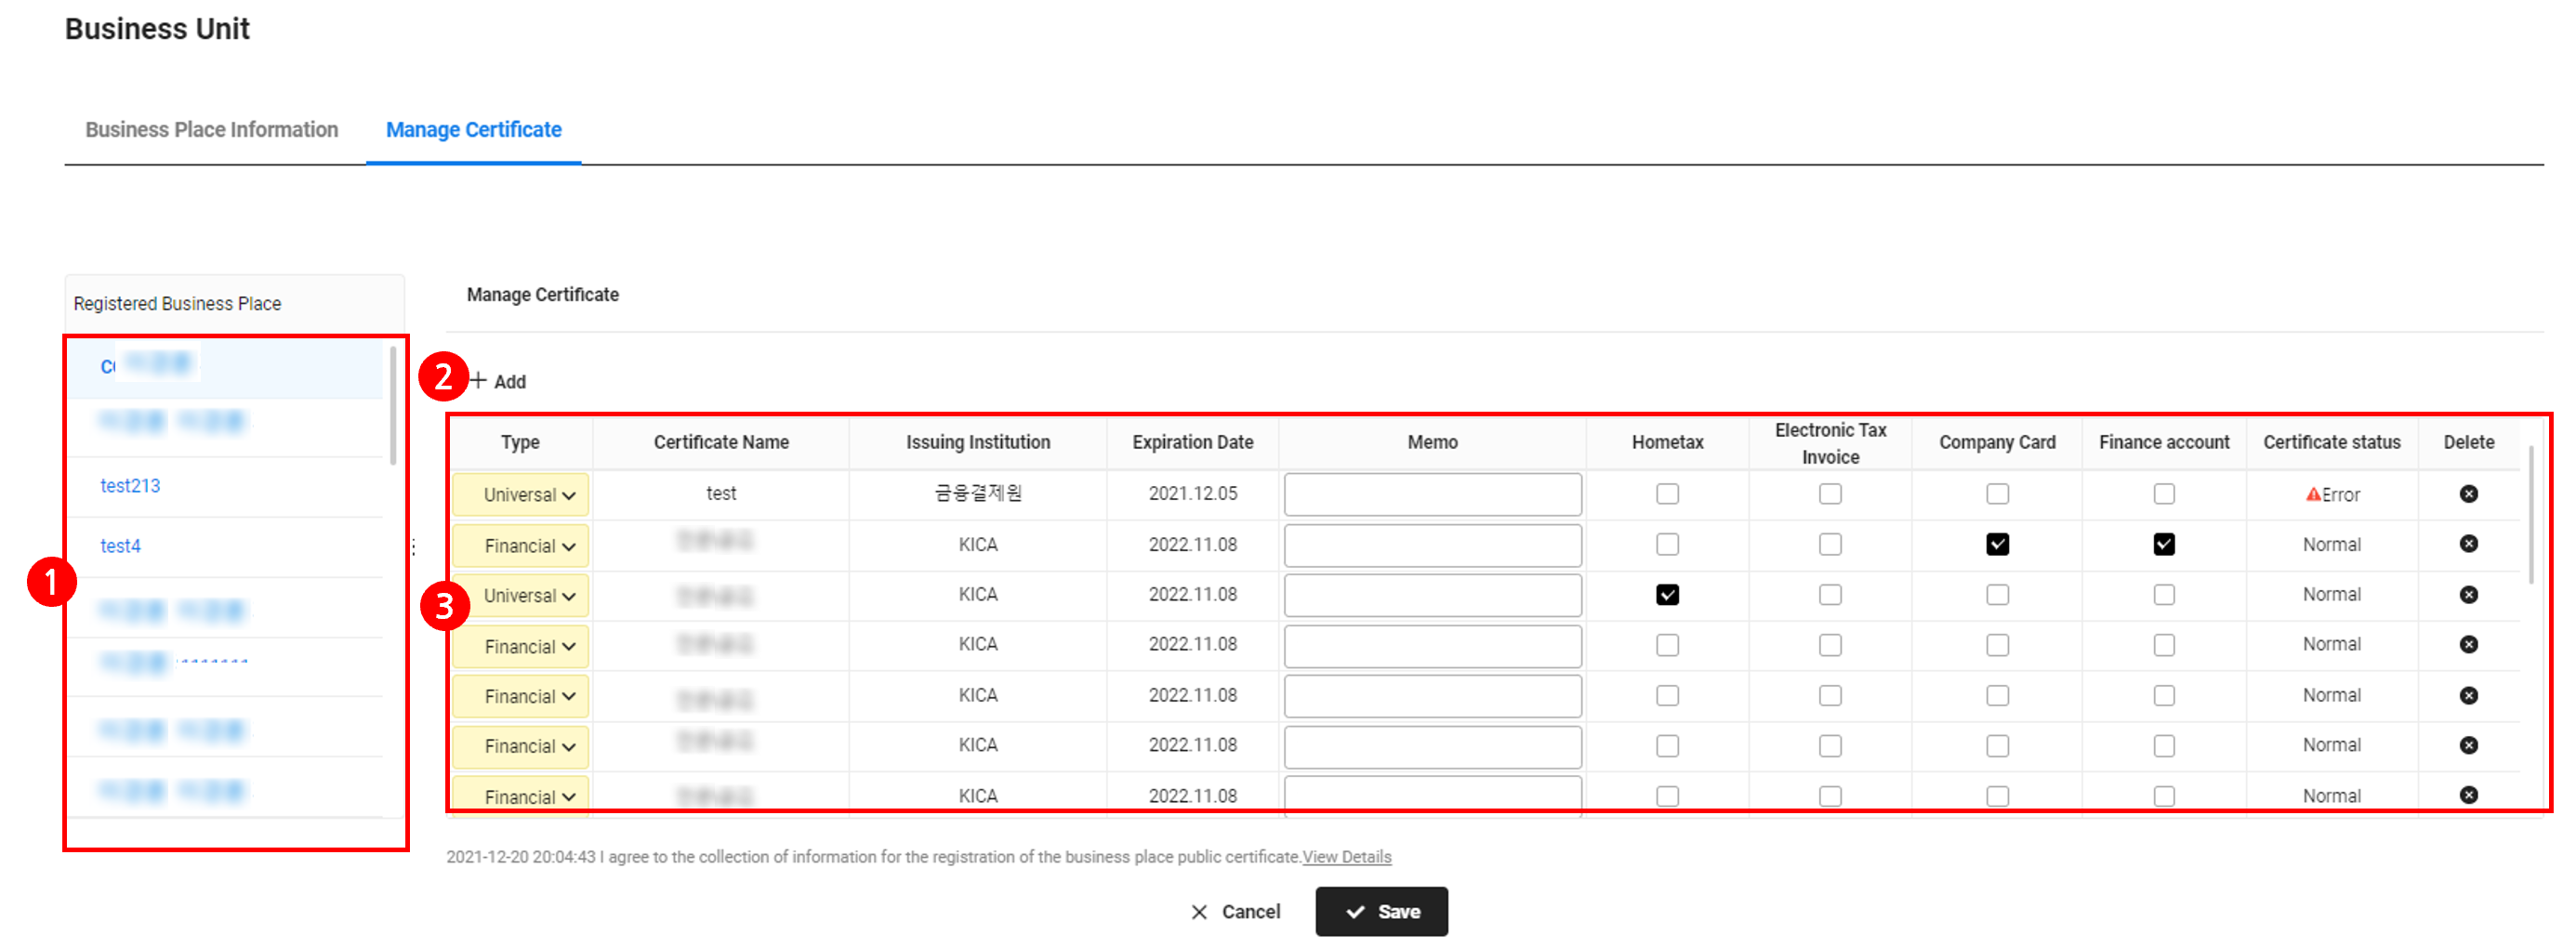
| Area | Description |
|---|---|
| ① Registered business place list | Displays registered business places |
| ② Add (Manage Certificate) | Registers a company certificate issued by a financial institution (Refer to Register Business Joint Certificate) |
| ③ Certificate list | Displays registered certificates of each business place |
Register Business Joint Certificate
The following describes how to register a business joint certificate.
- Click 'Admin Menu' at the top right of the PC web screen, then click 'Business Support Settings' in the pop-up window.
- Click at the top left of the screen.
- Click ‘Company Information > Manage Business Place’ from the menu.
- Click the ‘Manage Certificate’ tab.
- Select the business place to register the certificate from the list of registered business places.
- Click ‘Add’.
- After agreeing to the Collection and Use of Personal Information, click ‘OK’.
- Select the joint certificate to be registered, enter the certificate password, and then click ‘OK]’.
- Select the certificate type.
- Universal certificates can be used to link financial accounts, Hometax data, and credit card companies, and issue electronic tax invoices.
- Financial certificates can be used to link financial accounts, Hometax data, and credit card companies.
- Electronic Tax certificates can be used to link Hometax data or issue electronic tax invoices.
- Enter the certificate notes, and then select the corresponding fields.
- If you select ‘Hometax’, then the certificate is used to link Hometax data.
- ‘Hometax’ is displayed when ‘Hometax linkage status’ is set to ‘Y’ in ‘Accounting > Settings’.
- Only one certificate can be specified for Hometax per business place.
- The certificate automatically scrapes National Tax Service Hometax data (tax invoice, invoice, cash receipt) for the business place registered with the certificate. For the scraped Hometax data, refer to View Hometax Data and Create/View Purchase Data.
- When removing the ‘Hometax’ selection, the Hometax linkage linked with the certificate is automatically removed.
- If you select ‘Electronic Tax Invoice’, it is used for linking the SmartBill account which issues electronic tax invoices.
- The Electronic Tax Invoice checkbox is displayed when using the Electronic Tax Invoice service.
- Only one certificate can be specified for electronic tax invoices per business place.
- Electronic tax invoices can be issued only for the business place whose Electronic Tax Invoice field is selected.
- When removing the ‘Electronic Tax Invoice’ selection, the certificate registered in SmartBill will be deleted at the same time. (Refer to SmartBill Linkage Settings)
- When changing the ‘Electronic Tax Invoice‘ selection for each business place, you need to register the certificate again in ‘Electronic Tax Invoice > Settings > SmartBill Integration Settings’.
- If you select ‘Corporate Credit Card’, then the certificate is used to link credit card companies.
- ‘Corporate Credit Card’ is displayed when using the Expense service.
- When changing or removing ‘Corporate Credit Card’ selection, the credit card company linkage linked with the certificate is automatically removed. (Refer to Link Credit Card Company)
- When removing ‘Corporate Credit Card’ selection, the credit card company linkage linked with the certificate is automatically removed.
- If you select ‘Financial Account’, then the certificate is used to integrate financial accounts.
- ‘Financial Account’ is displayed when ‘Integrate Financial Account’ is set to ‘Y’ in ‘Accounting > Settings’.
- You can check the deposit/withdrawal history, transaction history, and account balance of the vendor (bank) where the certificate is registered. Refer to Link Financial Account.
- When removing the ‘Financial Account’ selection, the financial institution linkage linked with the certificate is automatically removed.
- If you select ‘Hometax’, then the certificate is used to link Hometax data.
- Check the certificate status.
- Normal: The certificate is linked normally.
- Error: The certificate has expired. Hover the mouse cursor over
 to check the certificate expiration message.
 - If a normal certificate is deleted, then it may not be linked.
- Click 'Save'.
- The joint certificate is registered.
- You can create and use multiple certificates for the same business place, according to its purposes.
- Purpose according to certificate type
| Type | Hometax | Finance account | Corporate credit card | Electronic tax invoice |
|---|---|---|---|---|
| Universal | O | O | O | O |
| Financial | O | O | O | - |
| Electronic Tax | O | - | - | O |
- You can't use financial certificates when issuing electronic tax invoices.
- You can't use electronic (tax) invoice certificates when linking financial accounts or corporate credit cards.