You can set and manage the Business Support use environment. Also, you can integrate an external solution to check notifications and absence schedules within that external solution.
Manage Service Usage
You can manage the usage status of services.
- You can set whether to use all services except for Approval, Reservation, HR, and Business Support Settings.
- Set whether to use the Approval and Reservation services that provide user menus in 'Admin > Security > Service Authority'.
- For the Electronic Tax Invoice service, you can only view the usage status and can set whether to use in 'Admin > Purchase & Billing > Usage Status'. The Electronic Tax Invoice service is only available if you use a paid version of WORKS Approval.
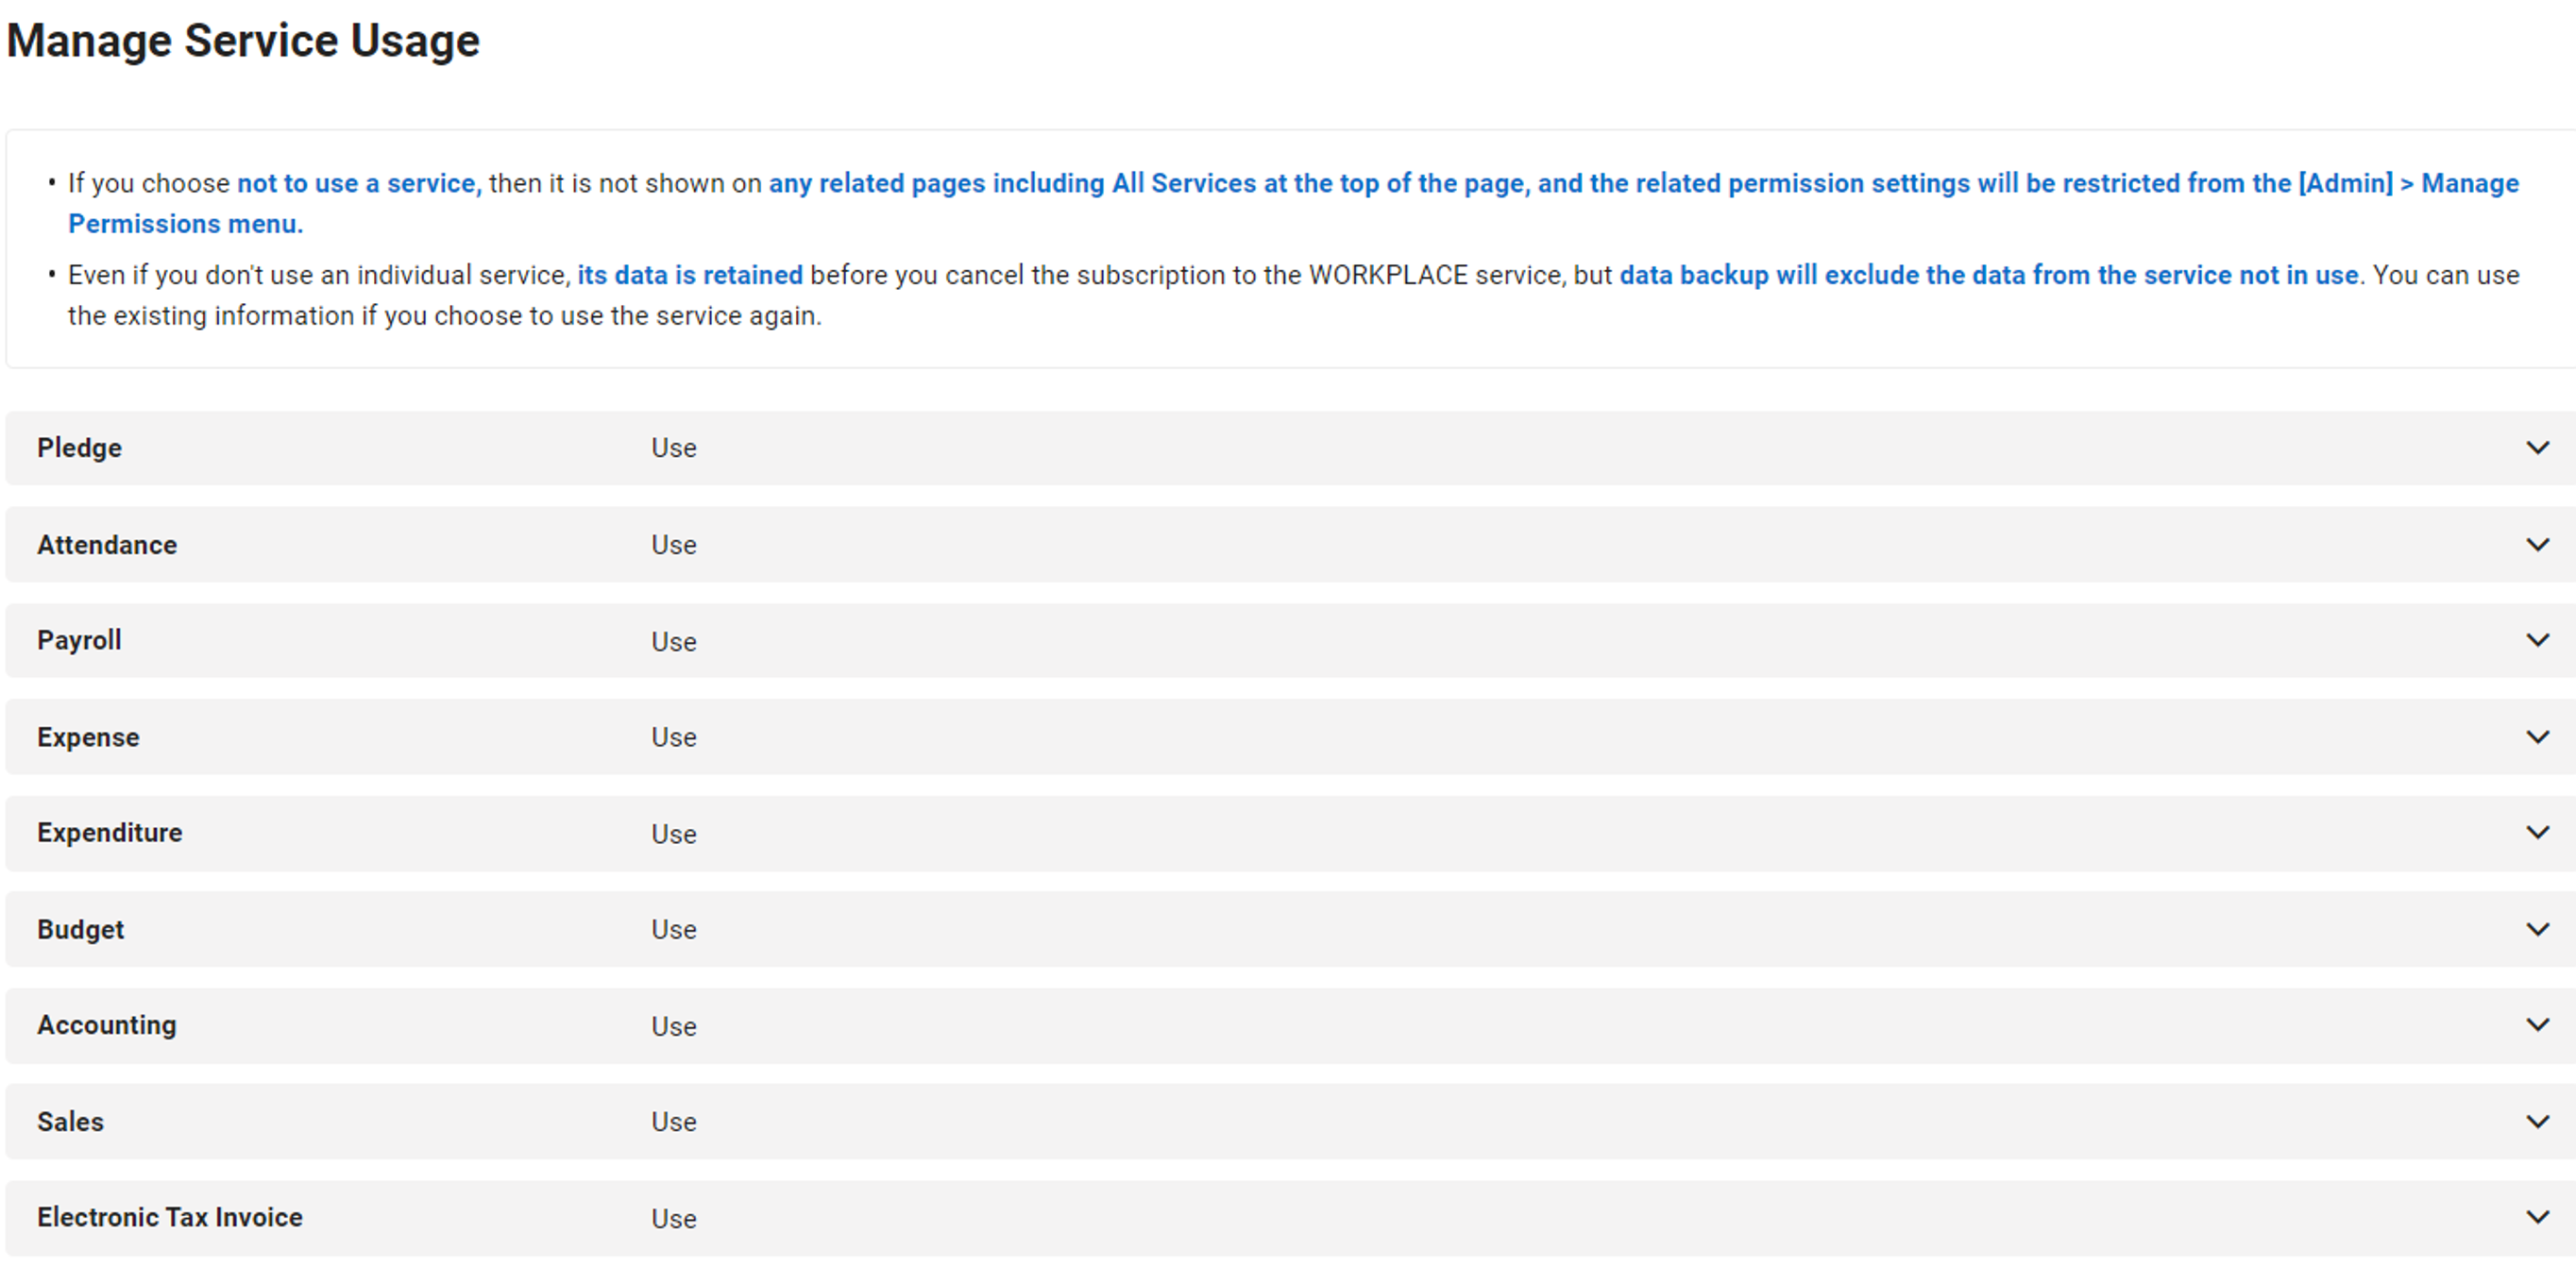
The following detailed services can set use status based on the service requested.
| Service | Set Service Usage Status |
|---|---|
| Pledge | Pledge |
| Attendance | Attendance |
| Payroll | Payroll |
| Finance | Expenses, Expenses, Budgeting, Accounting, Sales |
The features provided when using services are as follows.
Pledge service
You can configure pledge forms for your company and get members to consent (sign) digitally. You can send details of each individual, such as annual salary and personal information, using substitute characters, and also set up scheduled deliveries. You can check the pledge status of the pledge sent out in real time.
Attendance Service
You can create a work arrangement that fits the company's characteristics and record clock in and clock out according to the work pattern of each employee. Employees' clock-in and clock-out times are calculated as work hours. You can manage late clock-in, early clock-out, and mandatory work (core time). You can establish the annual leave usage plan and promote and notify the use of annual leaves to encourage employees to use their annual leaves.
Payroll Service
Integrated management is available for monthly payroll, retirement benefit, and year-end tax settlement, as well as business/other/interest dividend incomes. You can manage the payment rates for overtime work, leave of absence, and retirement in integration with member information, appointment history, and attendance closing records. You can create National Tax Service withholding tax performance reports, simplified payment statements of wage and salary electronic media, and report data for the four major insurance reporting agencies.
Expense Service
You can quickly and conveniently settle expenses and transparently manage expense usage by adding internal and external participants through the Corporate Card Integration and AI OCR features. You can preset the company's expense usage rules to check if employees used the expense in accordance with the expense rules on their own. If you use the Budget service, then you can view and use the allocated budget when requesting expense settlement.
Expenditure Service
You can process medium to large scale expenses and automatically create slips using expenditure resolution reports. The intuitive report format allows you to quickly identify settlement status by vendor or expenditure item. If you use the Budget service, then you can view and use the allocated budget.
Budget Service
It is a service that supports integrated management of company budgets. You can view and use planned budget as well as its project code from the Expense, Expenditure, and Accounting services, and manage the used budget.
Accounting Service
A slip is automatically created upon completing approval of an absence schedule (family event and business trip). You can create VAT return reports and attached documents based on the VAT information entered in slips to create VAT electronic media. Convenient Hometax VAT reporting is supported. You can systematically manage fixed assets from registering and selling company's fixed assets to calculating depreciation. Setting up the bank/account integration will allow you to view the company's deposit/withdrawal history and compare the account balance and created slips easily.
Sales Service
You can plan the sales plan of the company and compare it. This service supports efficient sales activities from sales planning to quotations, orders, sales, and accounting. Using the mobile app, tasks can be handled quickly in the sales field.
Changes When Changing Usage Status
By changing the use status of each service from ‘Use’ to ‘Not Use’, the pages change as shown below.
Pledge service
- The ‘My Work > Pledge’ menu is not displayed.
- The pledge item is not displayed in the Register/Edit Checklist page of the ‘HR > Joining/Retirement Checklist > Manage Checklist’ menu.
- The ‘Business Support Settings > Security > Pledge Deletion Status’ menu is not displayed.
- The ‘Pledge’ button is deleted from ‘Admin Menu’.
- Pledge data will not be backed up when backing up data.
Attendance Service
- ‘Clock-in/out’, ‘My Annual Leaves’, ‘My Work Hours’, and ‘Department Attendance Status’ widgets are unavailable in the Home page.
- The work plan request, work result request, work result request cancellation, absence schedule, absence schedule cancellation, and annual leave usage plan (if the annual leave promotion policy is applied) forms are not displayed in Approval Home > Create Document.
- The ‘My Work > Manage Attendance’ and ‘My Work > Management > Department Absence Status, Department Work Status’ menus are not displayed.
- The annual leave, special leave, and absence history of members is not shown in ‘My Work > Management > Member Status’.
- The vacation leave and vacation history of part-time employees are not shown in ‘My Work > Management > Part-timer Status’.
- The 'Attendance' button is deleted from 'Admin Menu'.
- Attendance data will not be backed up when backing up data.
Payroll Service
- The ‘My Work > Manage Payroll Account, Manage Payroll’ menu is not displayed.
- Payroll certificate request form is not displayed in ‘Approval Home > Create Document’.
- The ‘Pledge’ button is deleted from ‘Admin Menu’.
- Payroll data will not be backed up when backing up data.
Expense Service
- The ‘This Month's Settlement’, ‘Corporate Credit Card Settlement’, ‘Expense Plan Not Settled (if using expense plans)’, and ‘Department Expense Status’ widgets are unavailable in the Home page.
- The Expense Plan Request (if using expense plans) and Expense Settlement Request forms are not displayed in ‘Approval Home > Create Document’.
- The ‘My Work > Manage Expense’ and ‘My Work > Management > Department Expense Status, Personal Expense Status’ menus are not displayed.
- The 'Expenses' button is deleted from 'Admin Menu'.
- Expense data will not be backed up when backing up data.
When changing to ‘Not use’ while using the Expense service
- If you're using credit card company integration and have integrated credit card companies, then you can't change the Expense service to ‘Not use’. Proceed according to the following steps.
- Cancel subscription to Corporate Credit Card product in 'Admin > Purchase & Billing'
- Change the Expense service to ‘Not use’ in the ‘Business Support Settings > Settings > Manage Service Usage’ menu
Expenditure Service
- The expenditure resolution report form will not be displayed in the ‘Approval Home > Create Document’ menu.
- The 'Expenditure' button is deleted from 'Admin Menu'.
- Expenditure data will not be backed up when backing up data.
Budget Service
- The 'Budget' button is deleted from 'Admin Menu'.
- The ‘My Work > My Budget Status’ menu is not displayed.
- You can't view/use budgets from related services (Expense, Expenditure, Accounting).
Accounting Service
- (If using the Expense service) The Payment Status is not displayed in ‘My Work > Manage Expense > Expense Settlement Status’.
- You can't use the purchase price settlement request template.
- The ‘Business Support Settings > Company Information > Manage Business Place’ tab is not displayed.
- The 'Accounting' button is deleted from 'Admin Menu'.
- Accounting data will not be backed up when backing up data.
When changing to ‘Not use’ while using the Accounting service
- If you're financial account integration or Hometax integration, then you can't change the Accounting service to ‘Not use’. Proceed according to the following steps.
- Change both Financial Account Integration Status and Hometax Integration Status to ‘Not use’ in the ‘Accounting > Settings > Set Accounting’ menu.
- Change the Accounting service to ‘Not use’ in the ‘Business Support Settings > Settings > Manage Service Usage’ menu
Sales Service
- The 'Sales' menu is not displayed in the 'Admin Menu’ of Mobile Home.
- The 'Sales' button is deleted from 'Admin Menu'.
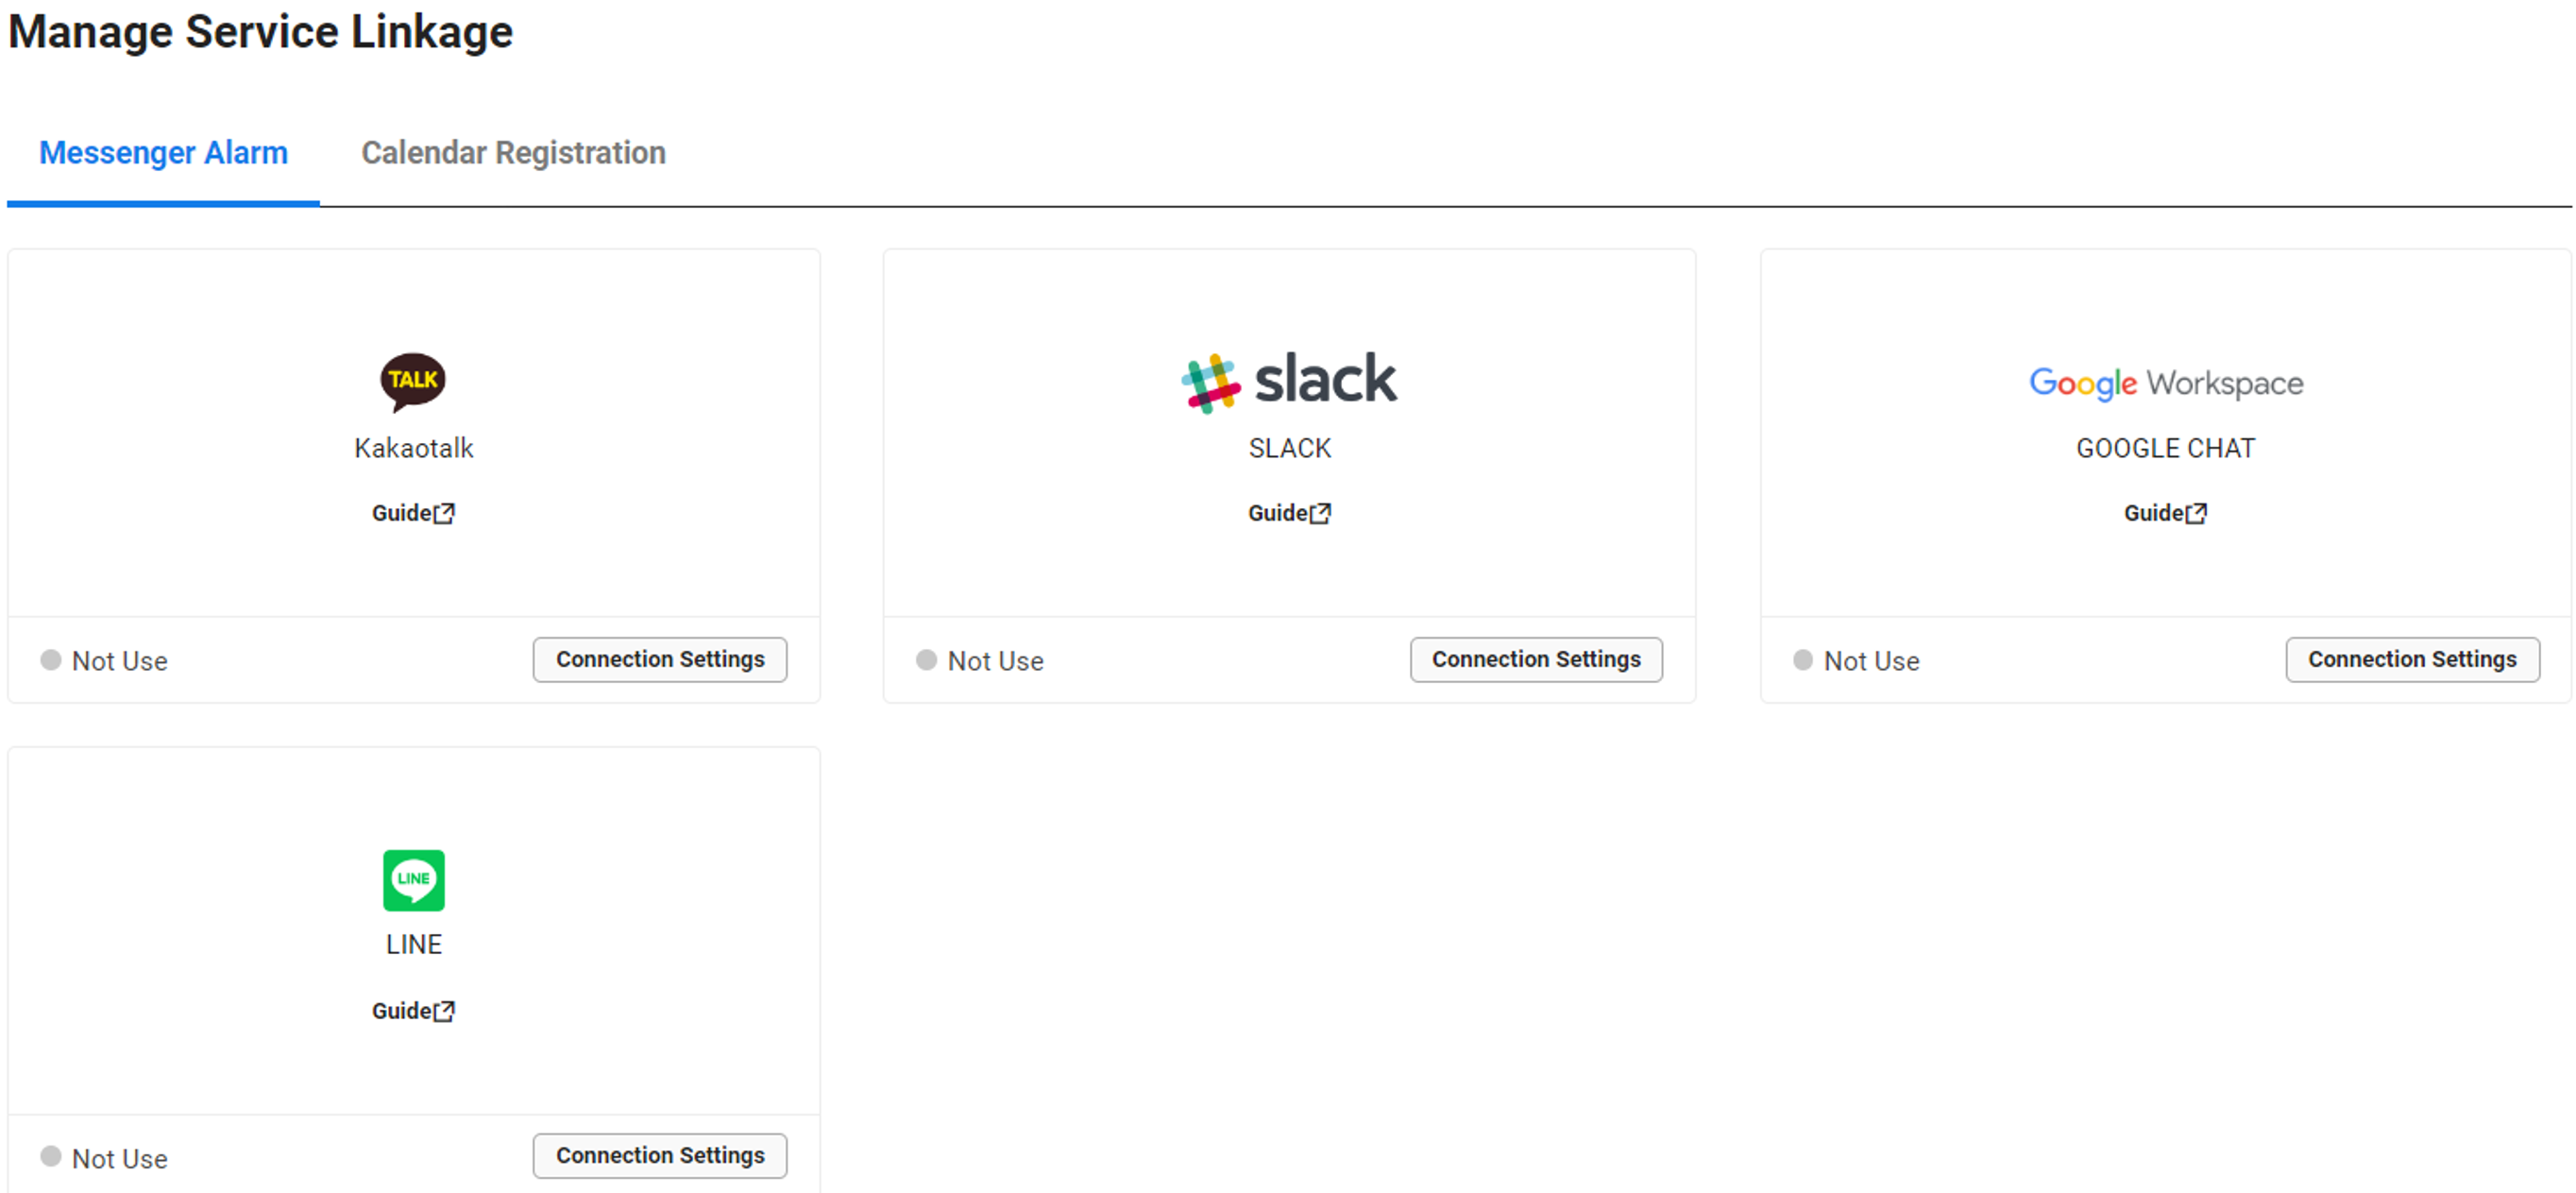
Manage Service Integration
By integrating an external solution, you can receive notifications from Business Support across different external solutions. Also, if you request an absence schedule, you can check it on your external calendar.
The services can be integrated are as follows.
| Service Type | Supported Solutions for Integration | Description | Integration Information to be Entered by Individual |
|---|---|---|---|
| Messenger notification service |
|
|
Personnel Information > ‘Linked Information’ tab
|
| Calendar Registration Service |
|
You can check My Absence Schedule from an external calendar. | Personnel Information > ‘Linked Information’ tab
|
To learn how to integrate notifications, see Integrate with Kakao Talk, Integrate with Slack, Integrate with LINE, and Integrate with Google Chat.
To learn how to integrate a calendar, see Integrate Google Workspace.
Integrate with Messenger (Kakao Talk)
By integrating Kakao Talk, you can conveniently check notifications on the Kakao Talk app without having to build a message server.
The following describes how to integrate Kakao Talk
- Access Kakao Business to create a Kakao Talk business account, and create a channel.
- See Kakao Channel Creation Guide.
When viewing the information for the channel created, searchable ID is looked up as an encrypted code and used when registering the Kakao Talk channel in Simple & Easy Notification Service.
- See Kakao Channel Creation Guide.
- Click ‘Create Project’ in Console > Simple & Easy Notification Service > Project to create a project.
- See Project Creation Guide.
- Once project creation is complete, you can click
 to check Service ID.
- Register the Kakao Talk channel in ‘Console > Simple & Easy Notification Service > Biz Message > Kakao Talk Channel’.
- Kakao Talk Channel: Enter the searchable ID of the encrypted Kakao Talk channel that starts with @.
- You can check the searchable ID in the ‘Channel Admin Center > Manage > Detailed Settings’ menu of Kakao Business.
- Admin Contact: Enter the mobile phone number of the admin.
- Business Category: Select the category according to the business registration information for the company.
- Verification Code: Verify by entering the verification code sent to the admin's mobile phone number.
- For a more detailed guide about the entry method, see Register Kakao Talk Channel.
- The registered Kakao Talk channel is added to the list at the bottom of the page.
- Kakao Talk Channel: Enter the searchable ID of the encrypted Kakao Talk channel that starts with @.
- Click ‘Register Template’ in ‘Console > Simple & Easy Notification Service > Biz Message > Alim Talk Template’
- Enter the template information, and then click ‘Register’
- Kakao Channel: View the registered Kakao Talk channel information. Select the Kakao Talk channel for which you want to register a template.
- Template Code: Enter the template code. This code is used as an identifier that must be unique within the same Kakao Talk channel.
- Template Name: Enter the template name. The name must be unique within the same Kakao Talk channel.
- Template Content: Enter the message to be received by Alim Talk. Enter the phrase to be used as the variable in the form of #{substitution character}. (E.g., approval notification, #{name} #{content}).
- Button: Add buttons to be used in the template.
- Button Type: Select Web Link.
- Button Link: Enter a URL that starts with
http://orhttps://. When using a variable for a button link, you must specify thehttp://orhttps://protocol to register it. (<Example> PC:https://#{url}, Mobile:https://#{url}). - For a more detailed guide about the entry method, see Register Alim Talk Template.
- Click 'Admin Menu' at the top right of the PC web, and then click 'Business Support Settings' in the pop-up window.
- Click
 at the top left of the screen, and then click 'Settings > Manage Service Integration' from the menu.
 - Click ‘Integration Settings’ on Kakao Talk.
- Select ‘Use’ for the use status, and then enter the integration information.
- You can check the access key ID and secret key in ‘NAVER Cloud Platform > My Page > Manage Authentication Key’.
- You can check the Kakao Talk Channel ID in ‘Console > Biz Message > Kakao Talk Channel’.
- You can check the registered Service ID in ‘Console > Biz Message > Kakao Talk Channel > Project’.
- In Template Code, enter the template code that you entered during registration.
- Click ‘Save’.
Before saving, check to make sure that the details have been entered accurately. If incorrect information has been entered, then the Kakao channel is displayed in the ‘Approval Service > Settings > Manage Notifications’ menu, but notifications can't be sent out properly.
- Click the ‘Approval Service > Settings > Manage Notifications’ menus, in that order.
- Set the notification items to receive in Kakao Talk in the ‘KAKAOTALK’ channel.
- For notification item settings, see Manage Notifications of Manage Approval.
- You can receive notifications as web links on Kakao Talk.
Integrate with Messenger (Slack)
By integrating Slack, you can check notifications on Slack.
The following describes the method for admins to set up integration with Slack.
- Access the Slack Website or log in to the Slack app.
- Click the ‘Open Slack’ at the top right, and create a new workspace to be used or select an existing workspace used by the company.
- Click on 'Find Slack' at the top left corner, and then click the 'Apps' menu.
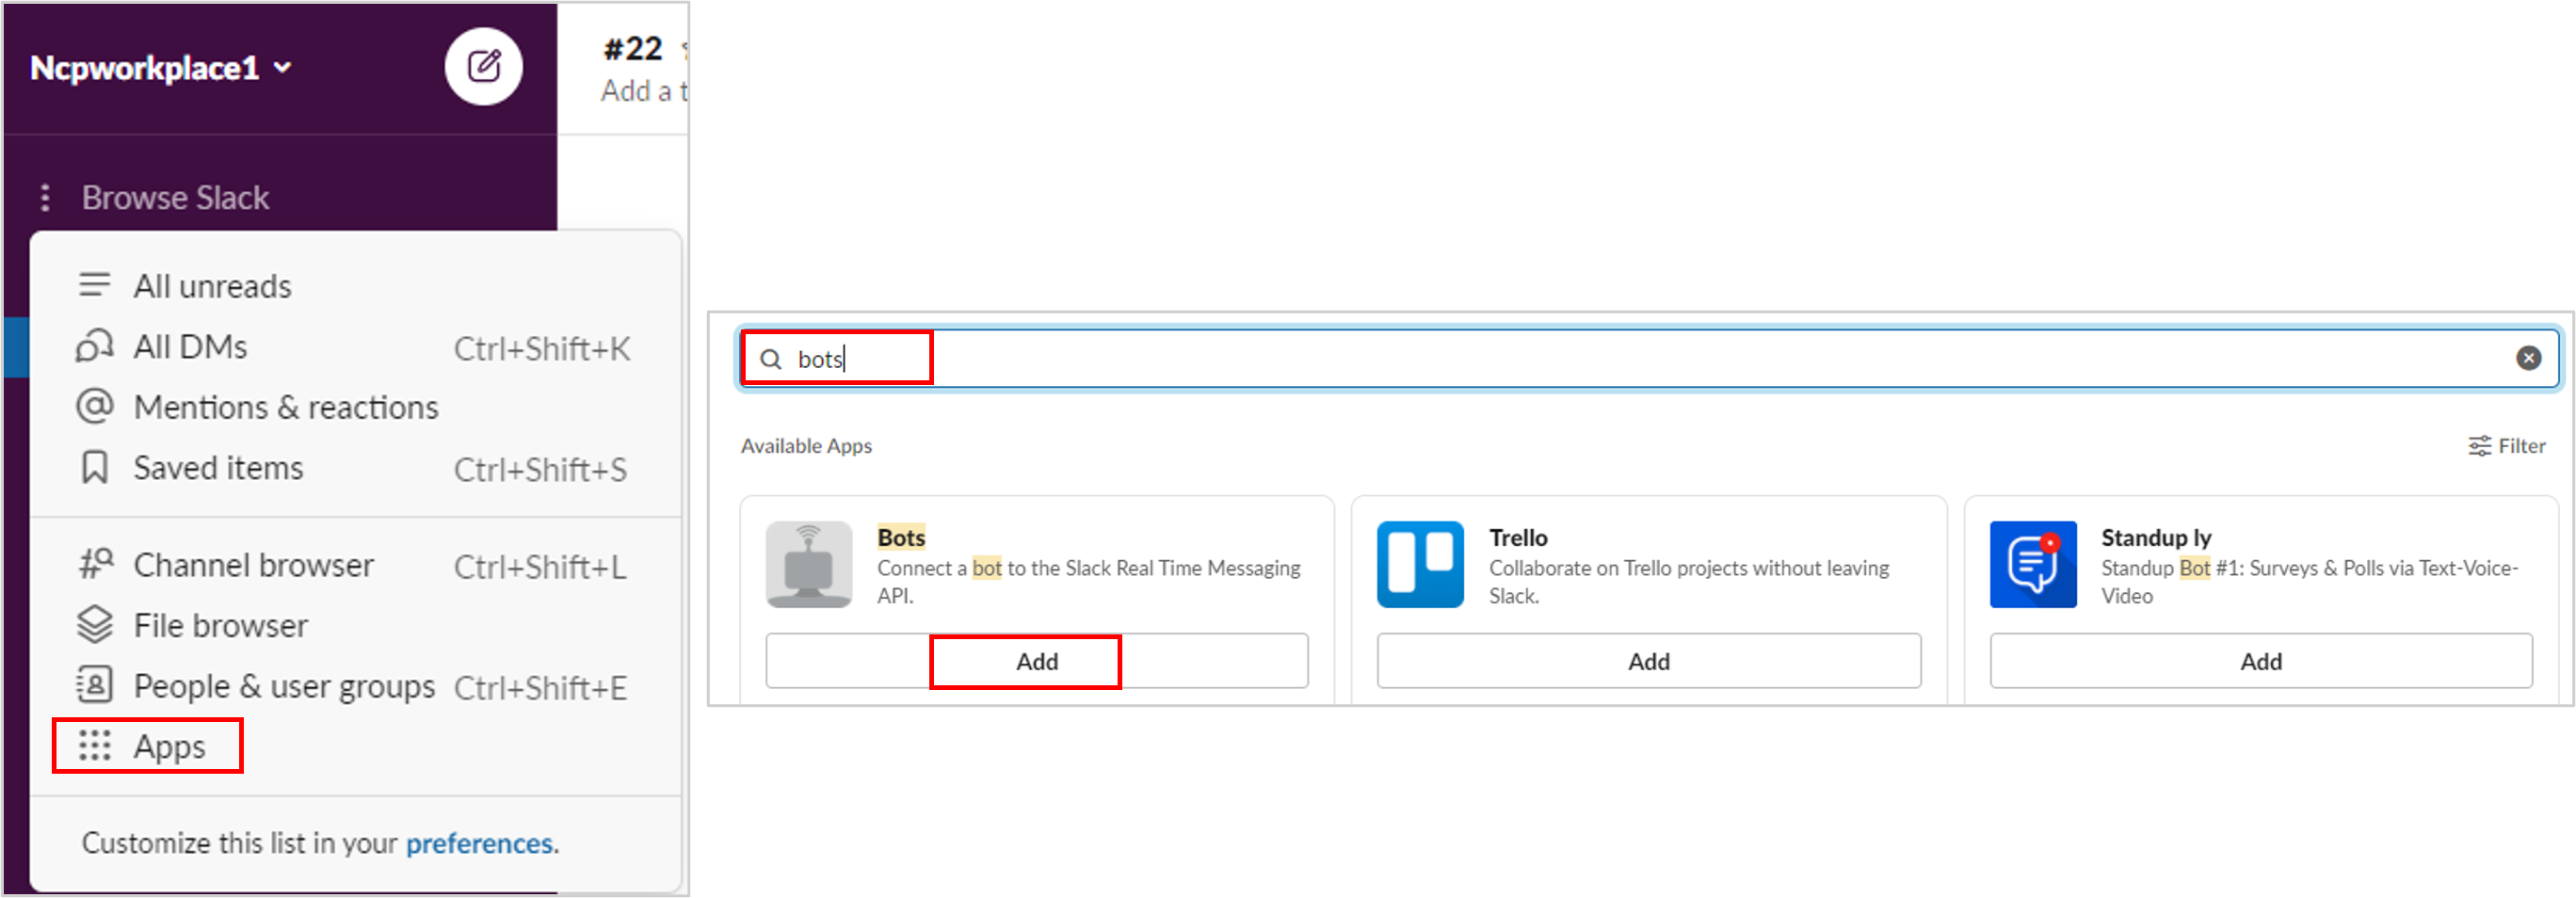
- Search 'Bots' in app search and click 'Add'.
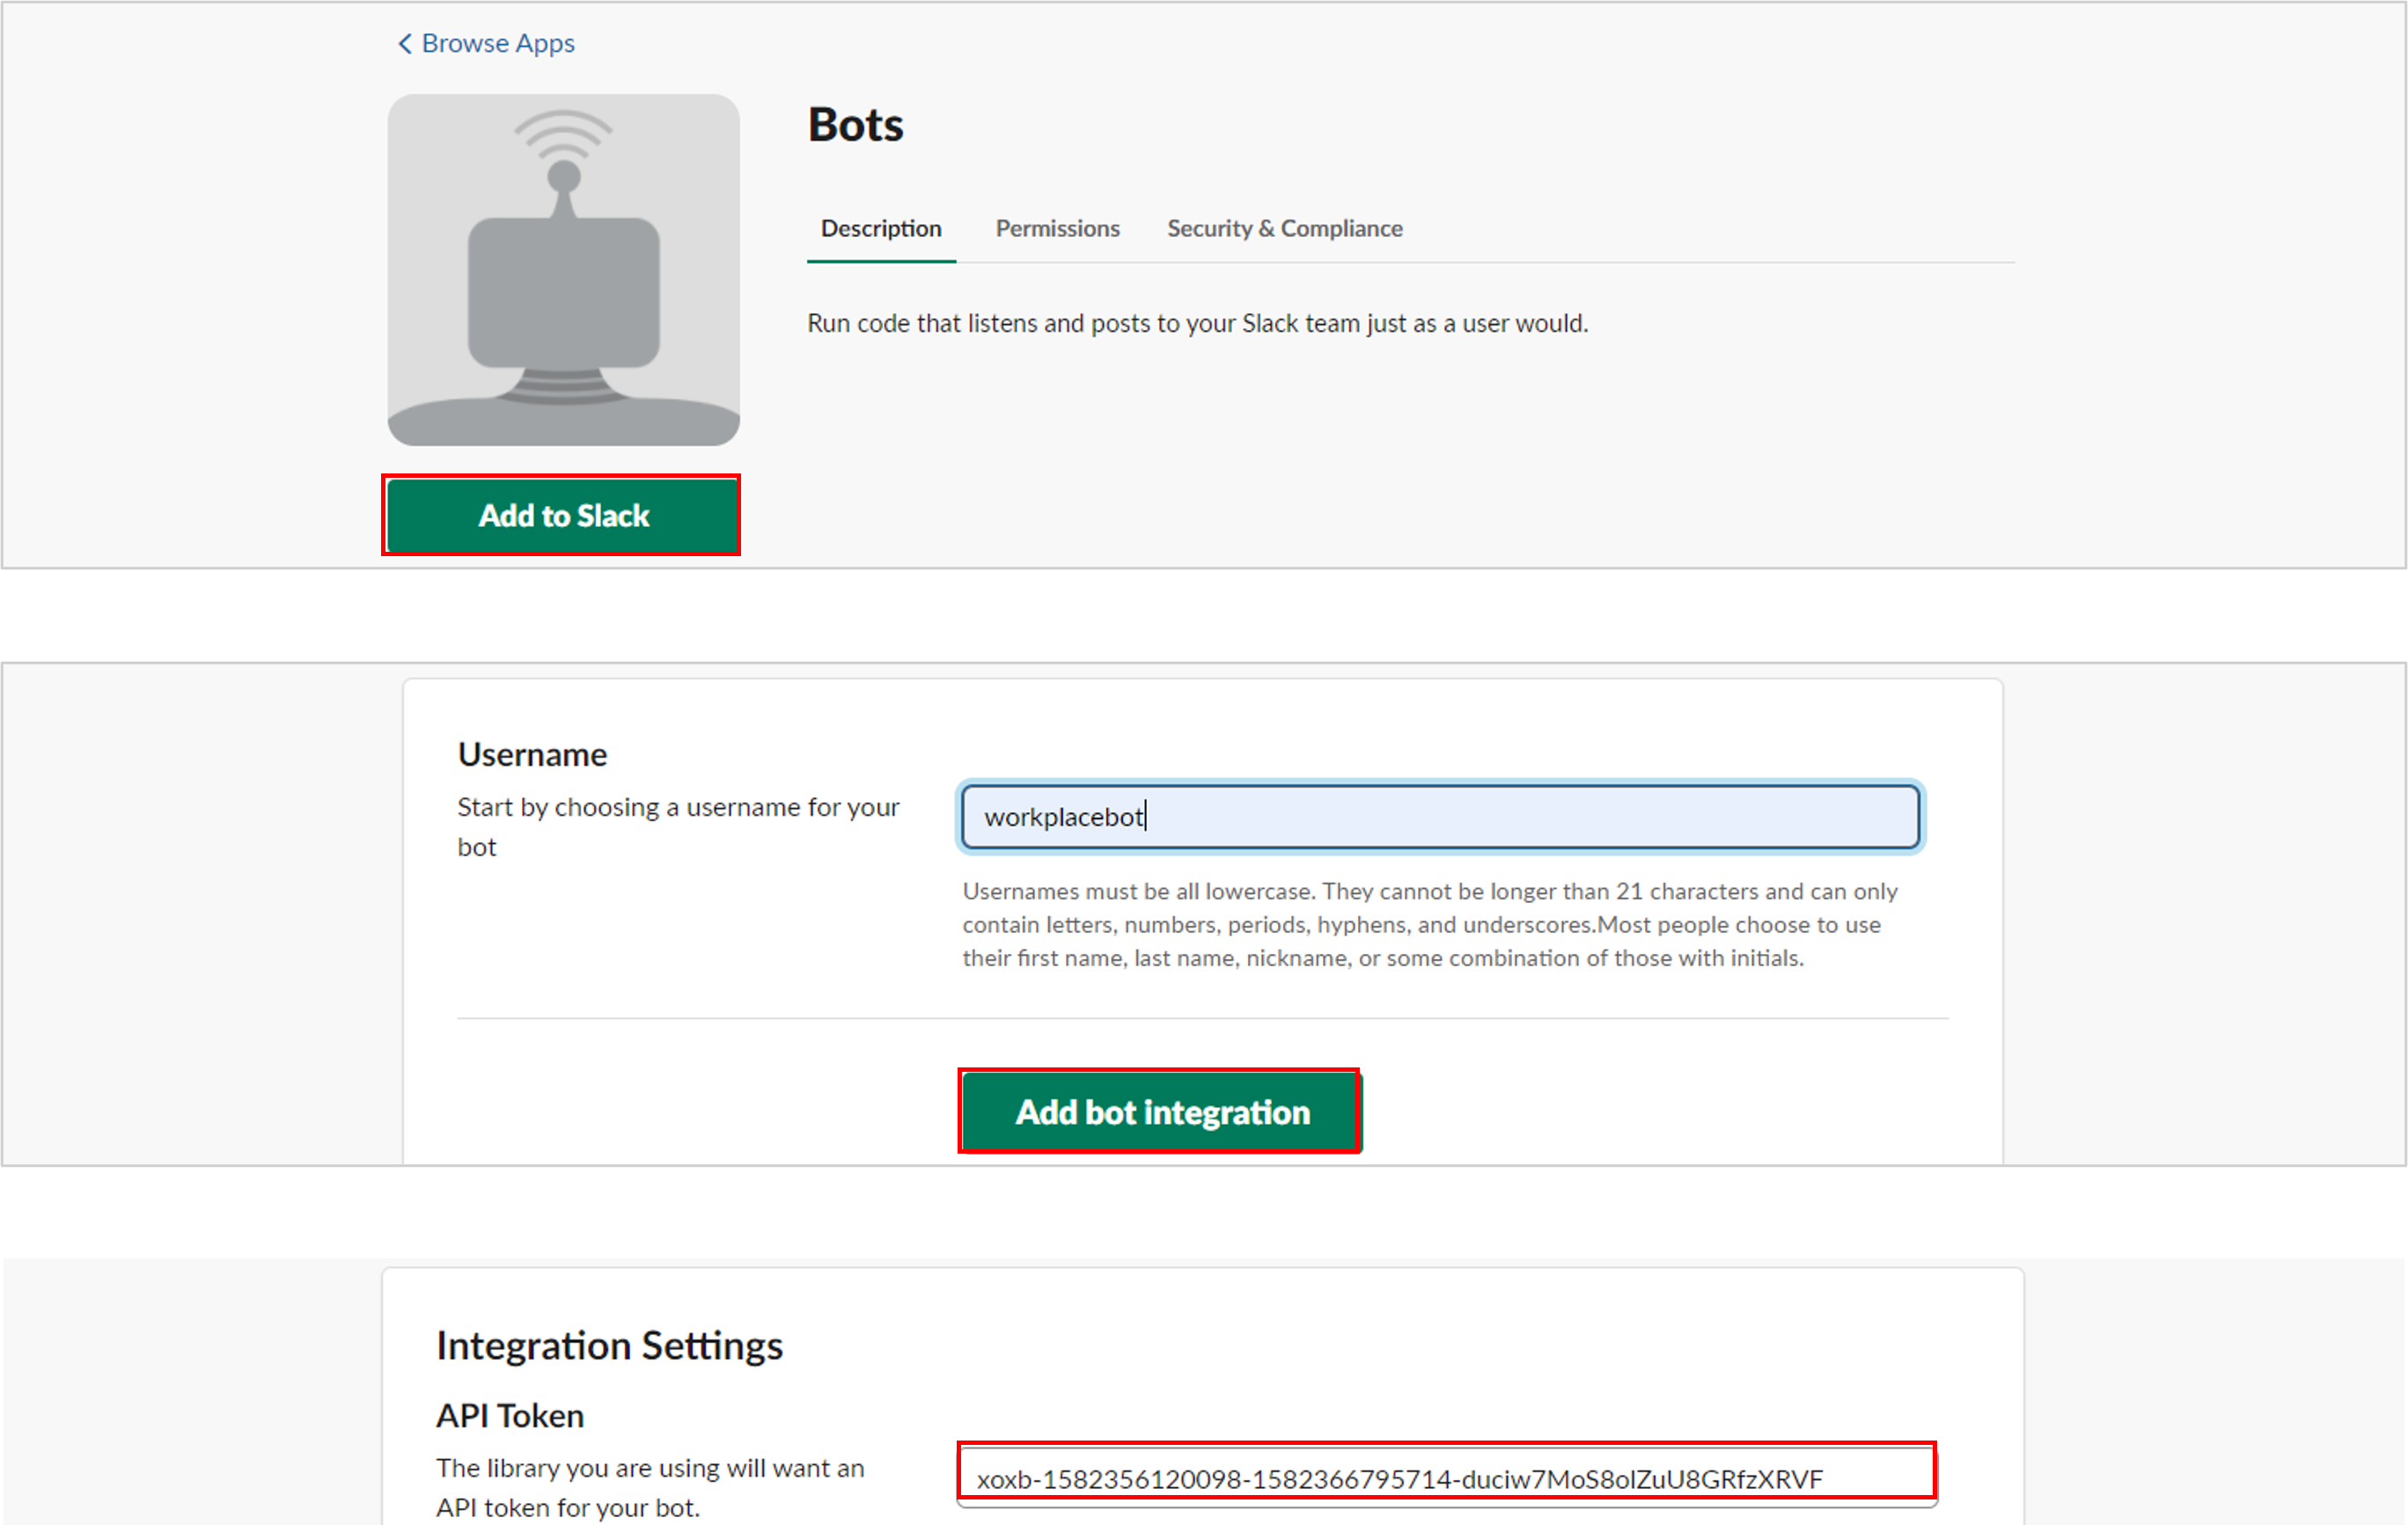
- Click 'Add Slack' and then enter the bot name in the 'Username' field.
- Click ‘Add Bot Integration App’.
- An API token will be created.
- Click 'Admin Menu' at the top right of the PC web, and then click 'Business Support Settings' in the pop-up window.
- Click at the top left of the screen, and then click 'Settings > Manage Service Integration' from the menu.
- Click ‘Integration Settings’ on Slack.
- Set the use status to ‘Use’, and then enter the API token issued from Step 6.
- Click ‘Save’.
- Click the ‘Manage Approval > Settings > Manage Notifications’.
- Select the notification item to receive in Slack in the ‘Slack’ channel, and then click ‘OK’.
- For notification item settings, see Manage Notifications of Manage Approval.
To receive notifications on Slack, individual members must enter the member ID in ‘Slack Information ID’ of the ‘Personnel Information > Integration Information’ tab.
You can check the member ID by accessing Slack and going to ‘View Profile > View More’.

Integrate with Messenger (Google Chat)
By integrating Google Chat, you can check notifications on Google Chat.
The following describes the method for user to set up integration with Google Chat.
- Access Google Chat or the Google Chat app.
- Log in to the Google Workspace account used by the company.
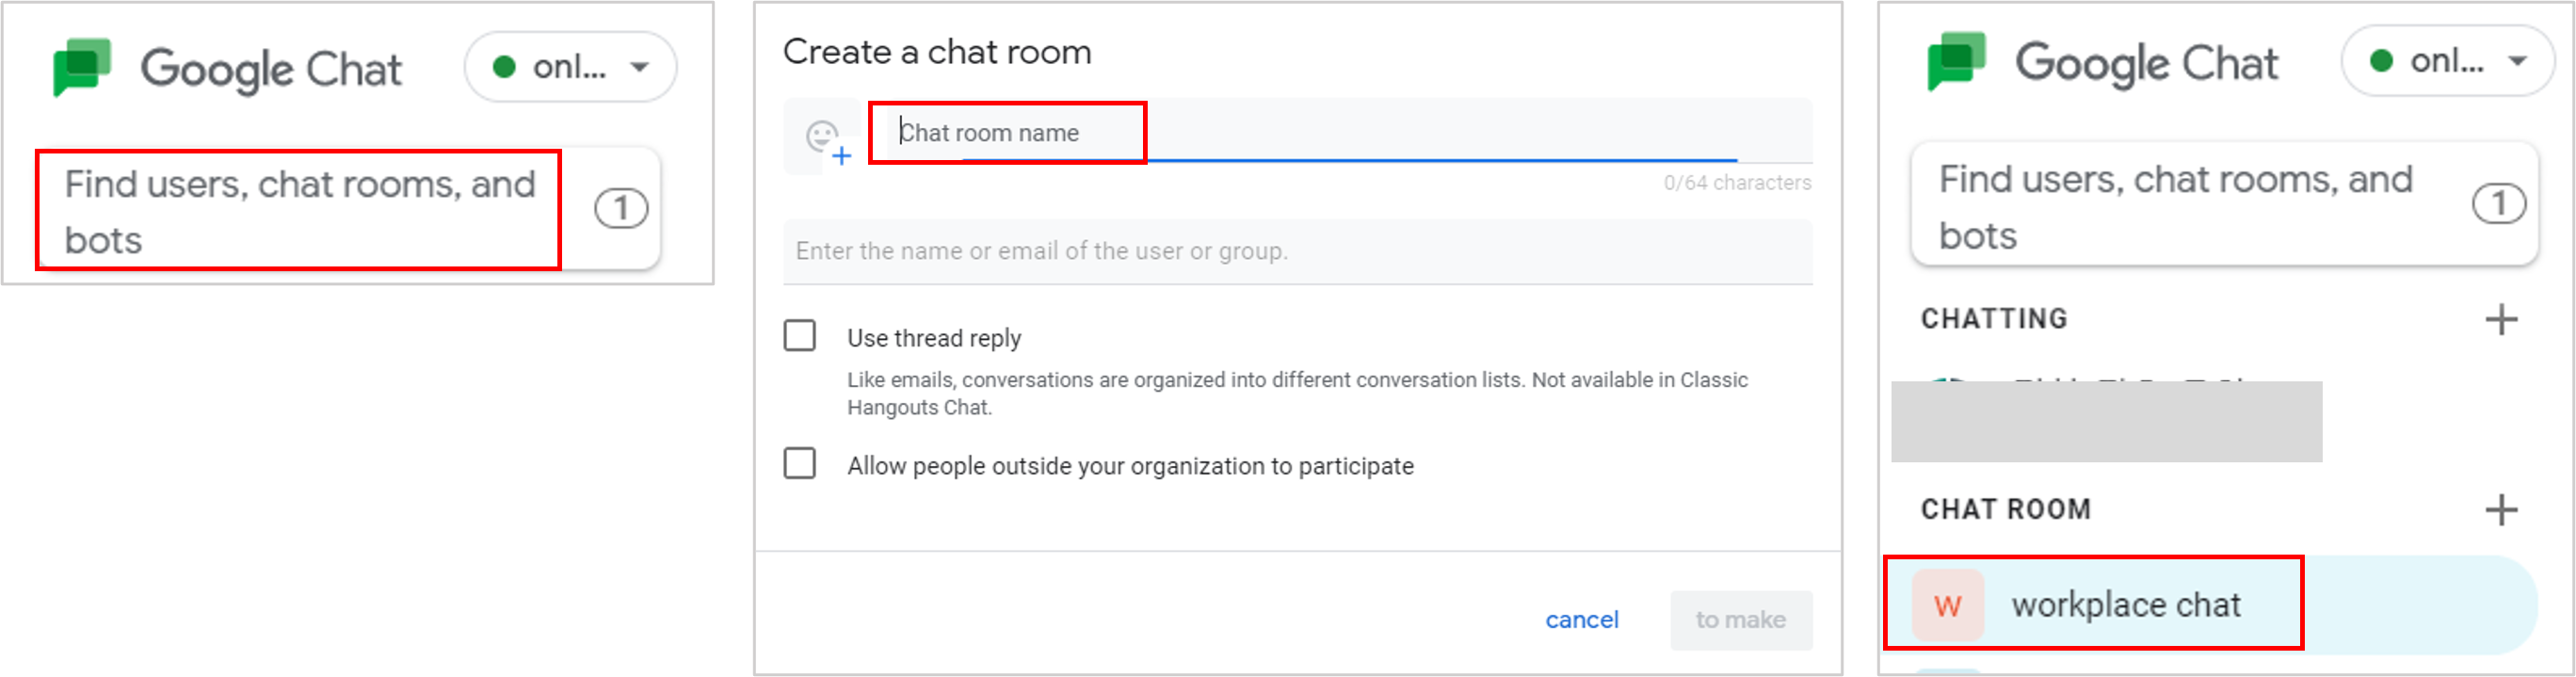
- Click the search window, and then click ‘Create a Chatroom’.
- Enter the chatroom name, and then click ‘Create’.
- A chatroom will be created.
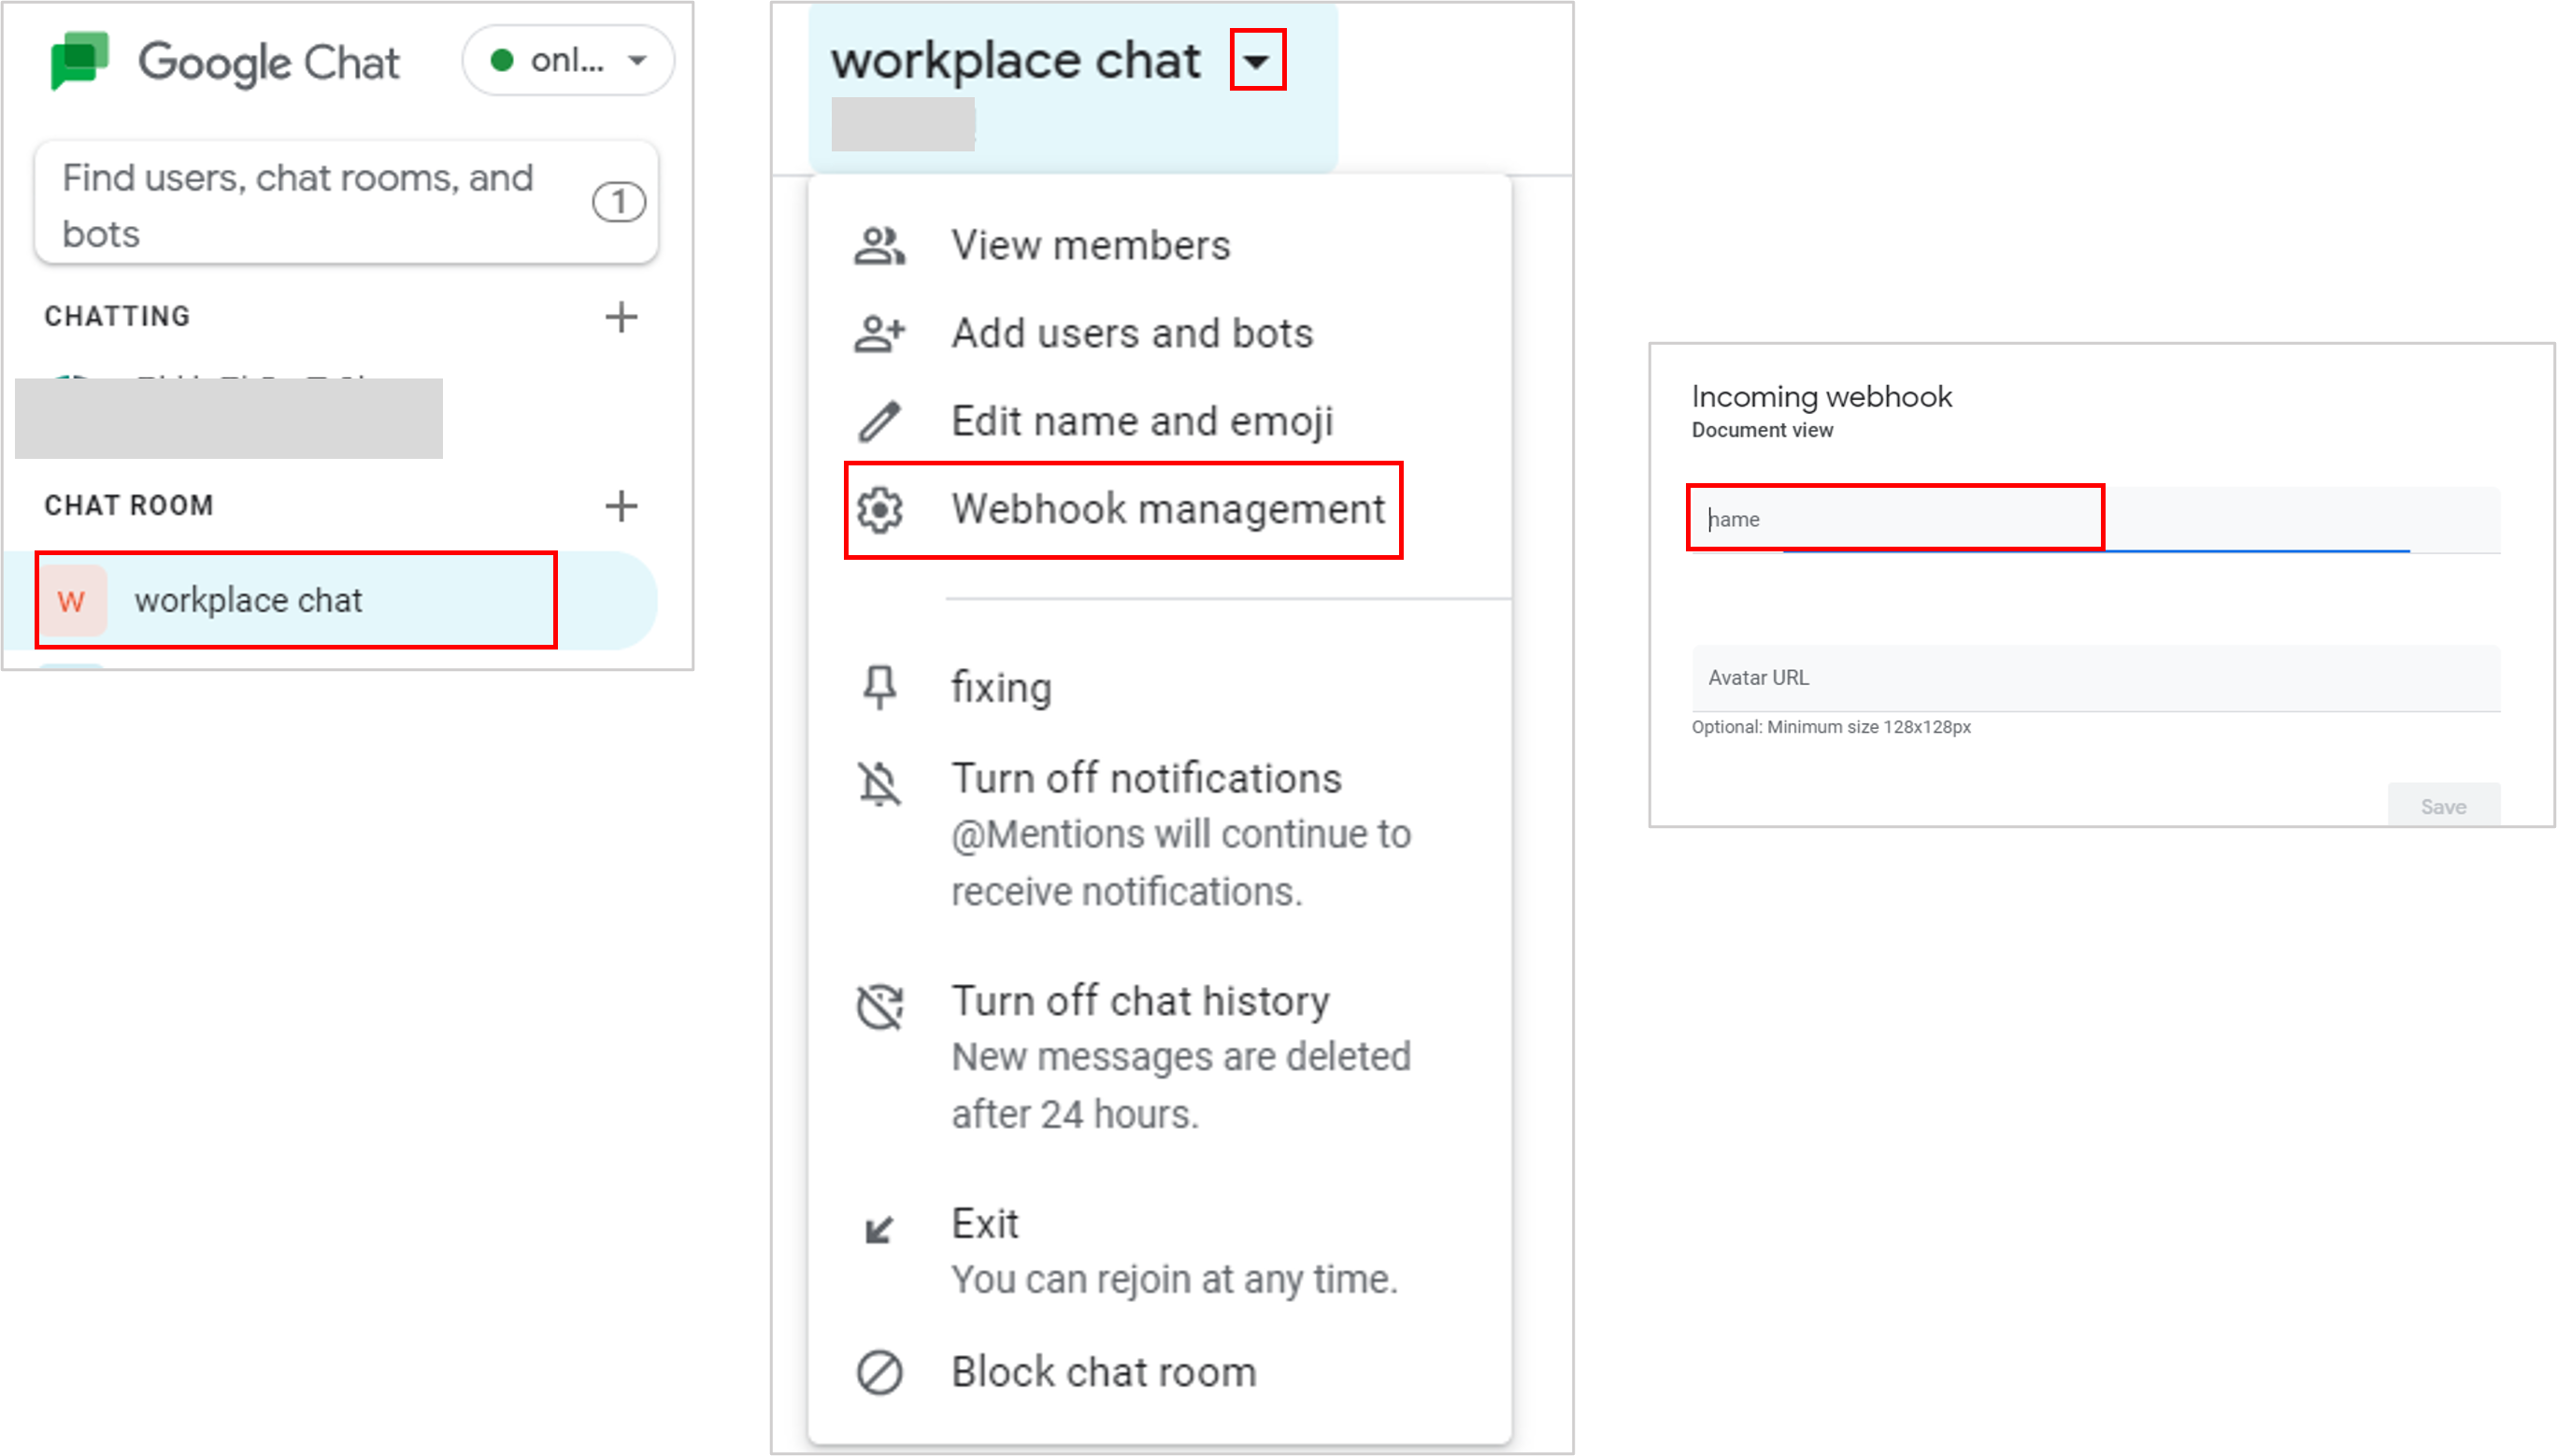
- Click the created chatroom.
- The chatroom is displayed at the top of the page.
- Click
 and click ‘Manage Webhooks’.
 - Enter the webhook name, and then click ‘Copy’.
- When you enter the webhook name, a URL is created at the bottom. Click ‘Copy’ to copy the created URL.
- In the ‘Personnel Information > Linked Information’ tab, enter the Google Chat URL and then click ‘Save’.
Integrate with Messenger (LINE)
By integrating LINE, you can check notifications on LINE.
The following describes how to integrate LINE.
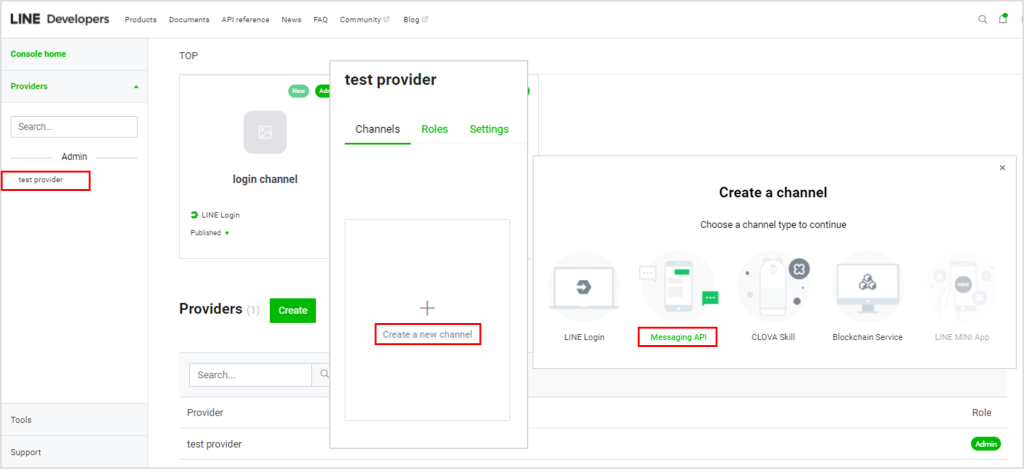
- Log in to the LINE console with a LINE account.
- Click 'Create a New Provider’
- Enter the provider name, and then click ‘Create’.
- Click ‘Create a LINE Login channel’.
- Enter the channel information, and then click ‘Create’.
- Enter the LINE login channel name to be created in Channel name.
- Enter the detailed channel description in Channel Description.
- Select ‘Web App’ for the app type to be integrated to LINE.
- The email address indicates the email address of the admin.
- Agree to the Terms and Conditions.
- Go to the ‘Basic Settings’ tab.
- Click ‘Developing’, and then click ‘Publish’.

- In the left-side menu area, click the provider created earlier.
- Click ‘Create a New Channel’.
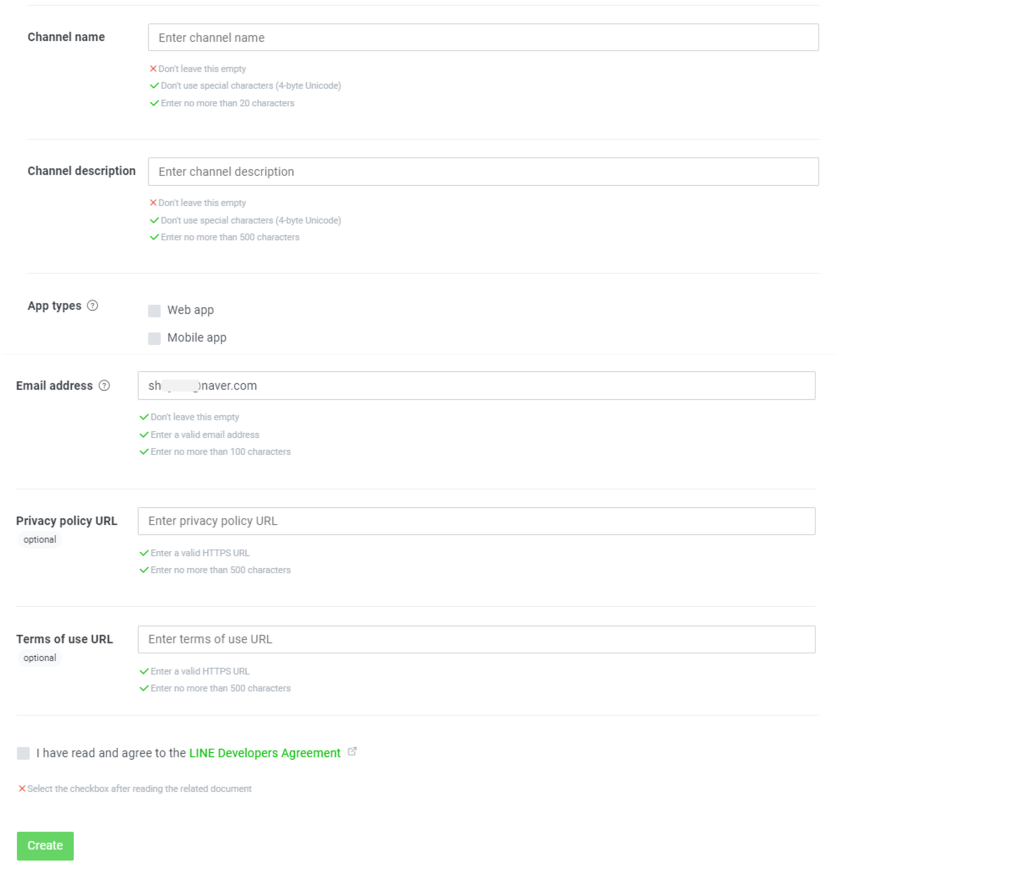
- Click 'Messaging API'.
- Enter the API channel information, and then click ‘Create’.

- Enter the Messaging API channel name to be created in Channel Name.
- Enter the detailed API channel description in Channel Description.
- Select the categories and sub categories that correspond to the work.
- Agree to all Terms and Conditions.
- Click ‘Create’.
- Click the ‘Messaging API’ tab, and then click ‘Edit’ for the auto-reply messages item.
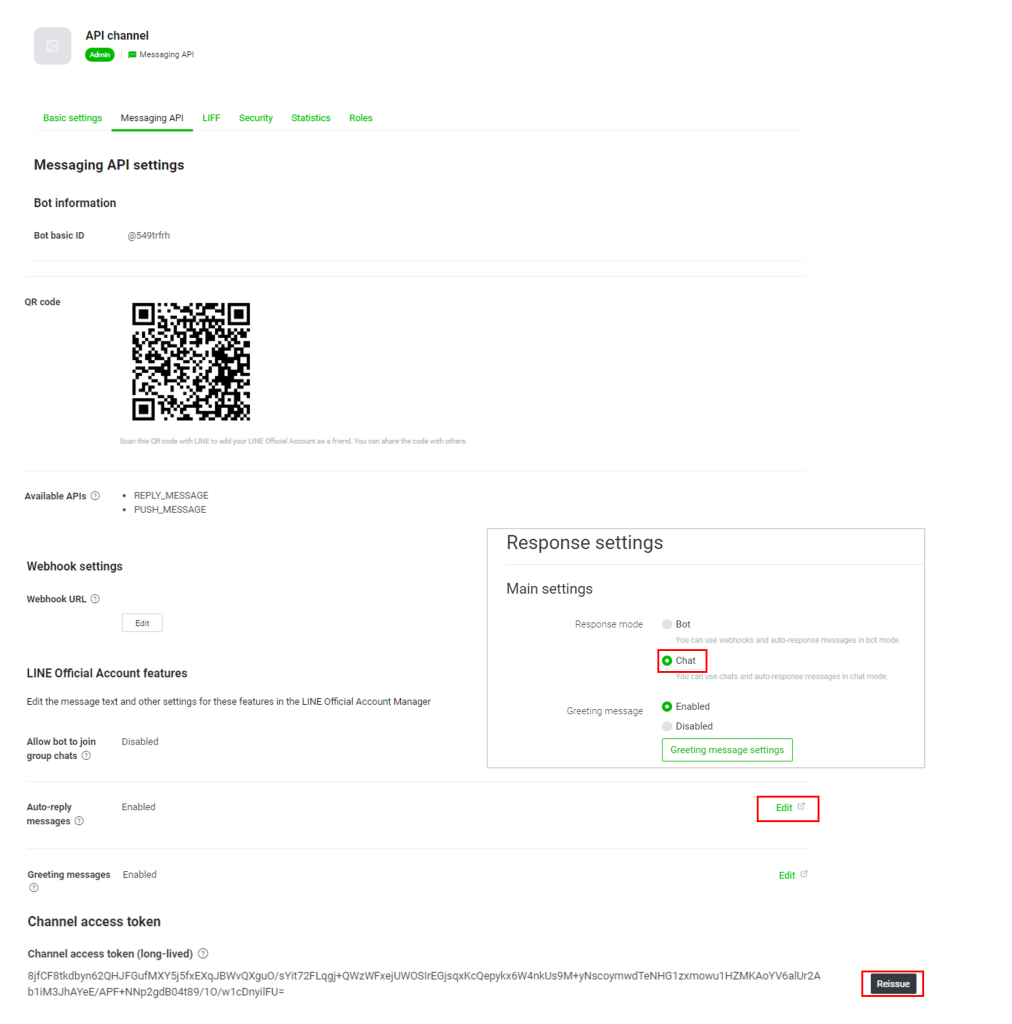
- Click the ‘Messaging API’ tab, and then click ‘Edit’ for the auto-reply messages item.
- Select Conversation for the response mode, and then click ‘OK’.
- After editing, close the window.
- Click ‘Issue’.
- Clicking ‘Issue’ will create a token. Click ‘Reissue’ to get the token issued again.
- Click the
 button to copy the issued token.
- Access LINE Office Account Manager and click the channel account created.
- In the left-side menu area, click the ‘Find Friends > Add Friends’ Tool menu.
- Click ‘Create URL’.
- An invitation URL will be generated.
- Click 'Admin Menu' at the top right of the PC web, and then click 'Business Support Settings' in the pop-up window.
- Click at the top left of the screen, and then click 'Settings > Manage Service Integration' from the menu.
- Click ‘Integration Settings’ of LINE.
- Set the use status to ‘Use’, and then enter the integration information.
- Enter the Channel ID from the ‘Basic Settings’ tab in Login Channel ID.
- Enter the Channel Secret Key from the ‘Basic Settings’ tab in Login Channel Secret Key.
- Enter the token issued from the ‘Messaging API’ tab in Message Channel Access Token.
- Enter the created invitation URL in Invitation Link.
- Click to copy the Login Callback URL.
- In the ‘LINE Login’ tab of LINE Developers, enter the copied URL in the Callback URL item, and then click ‘Update’.
- Click ‘Save’.
- Click the ‘Manage Approval > Settings > Manage Notifications’.
- Select the notification items to receive in LINE in the ‘LINE’ tab, and then click ‘OK’.
- For notification item settings, see Manage Notifications.
If added successfully, then you can receive the friend added notification message.
Integrate with Calendar (Google Workspace)
By integrating Google Workspace to WORKPLACE, you can conveniently check My Absence Schedule using Google Calendar.
You can integrate with Google Workspace as follows.
- Access the Google Developers console and log in.
- Click ‘Create project’.
- Enter the project name, and then add the location to create the project.
- Click Create'.
- Select the created project, and then click the ‘OAuth consent page’ menu.
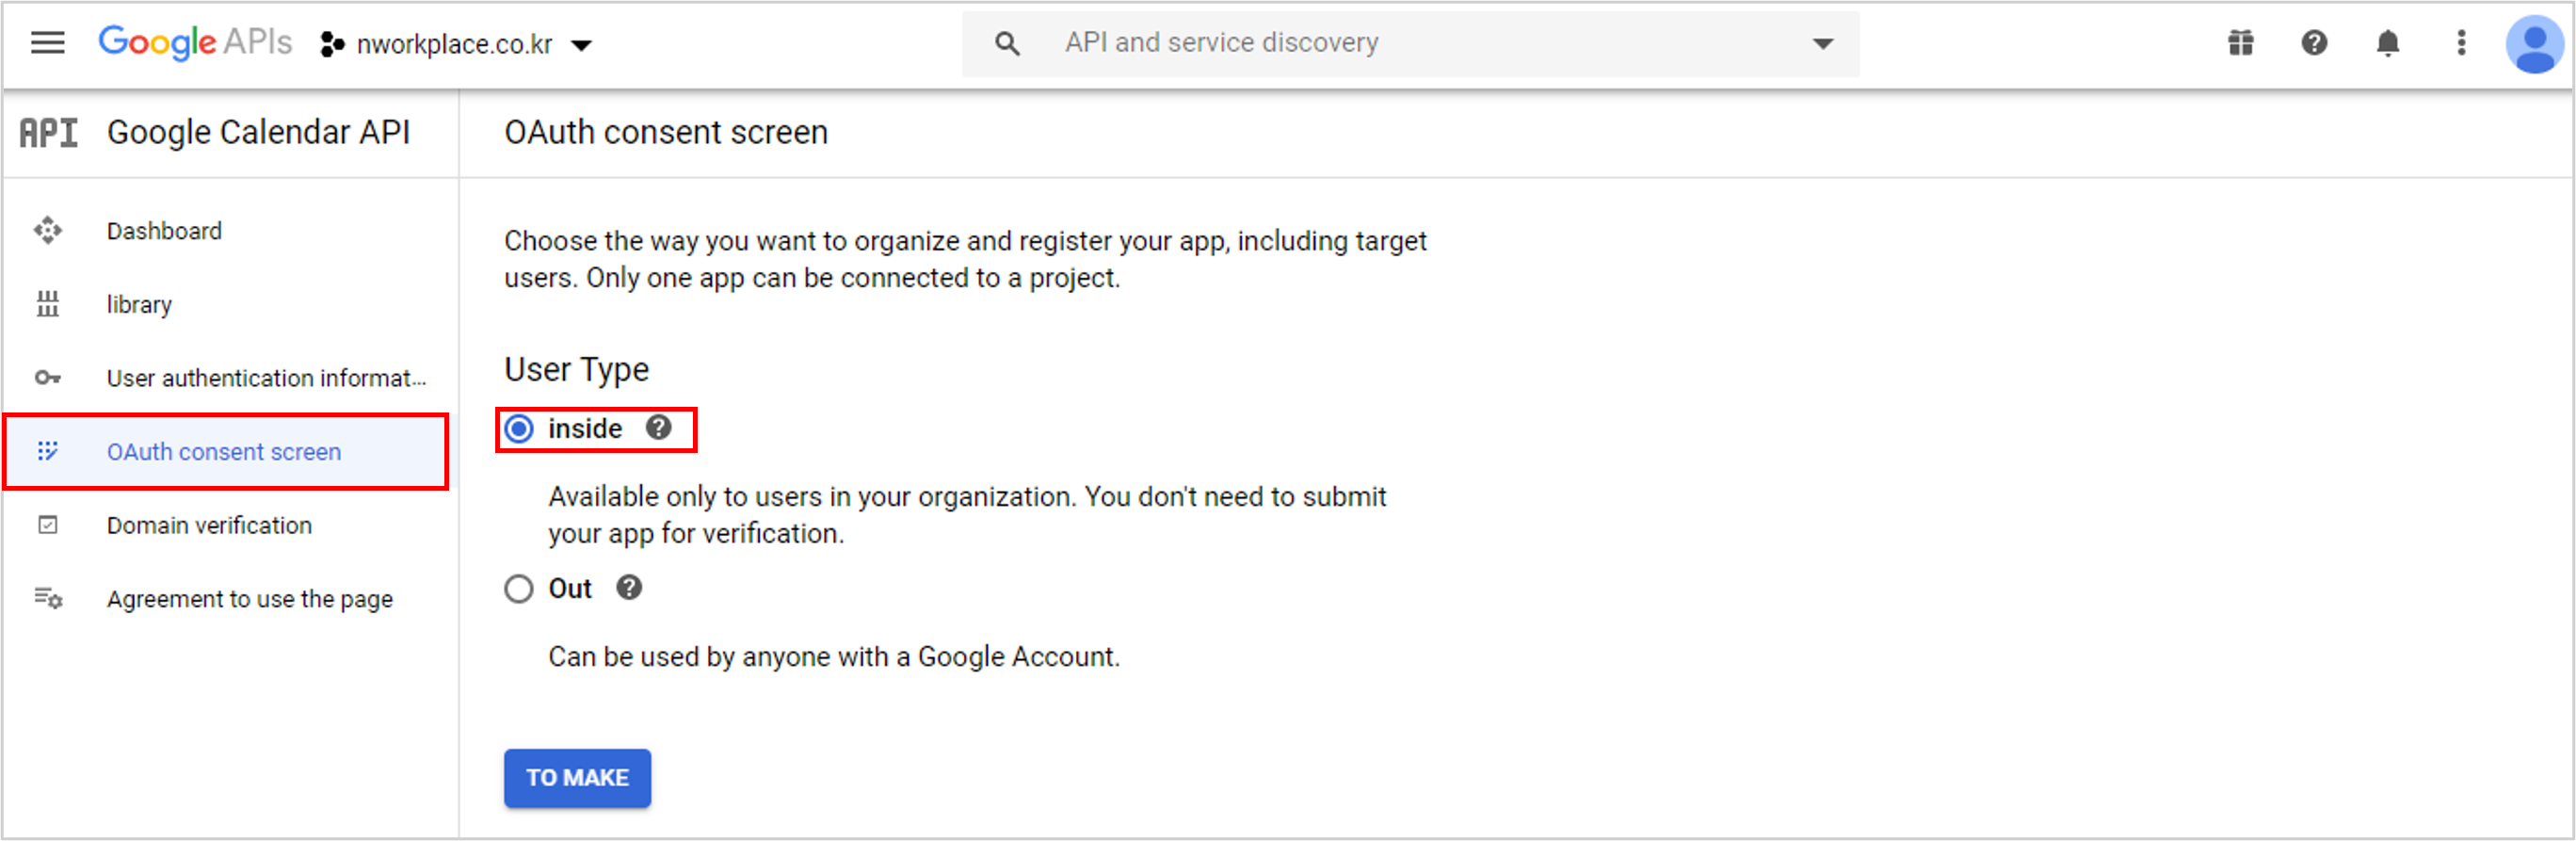
- Select ‘Internal’ for User Type, and then click ‘Create’.
- Enter ‘Google Calendar API’ in the search window to search.
- Click Google Calendar API, and then click ‘Use’.
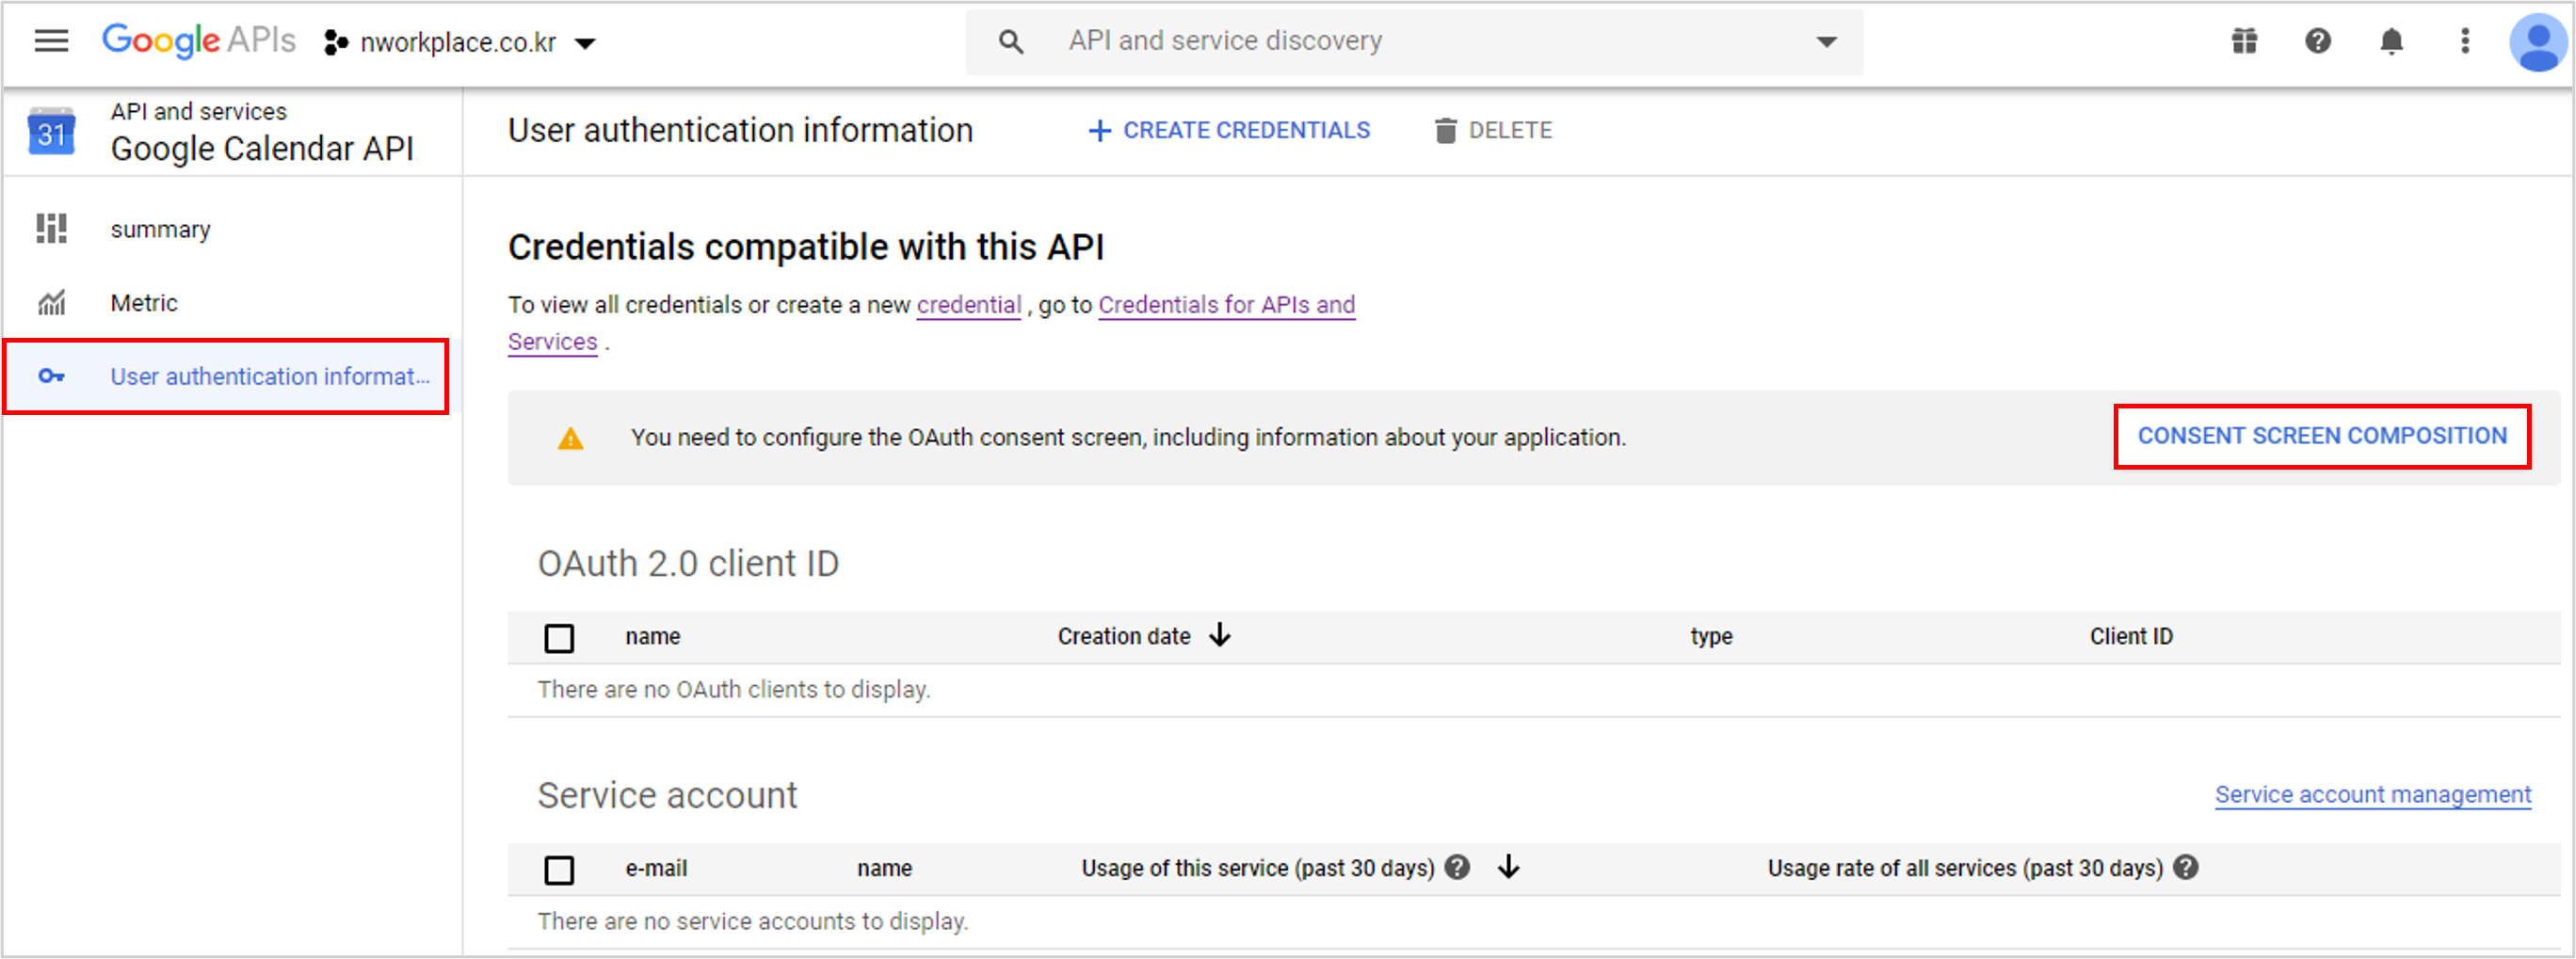
- Click the ‘Credentials’ menu, and then click ‘Configure consent page’.
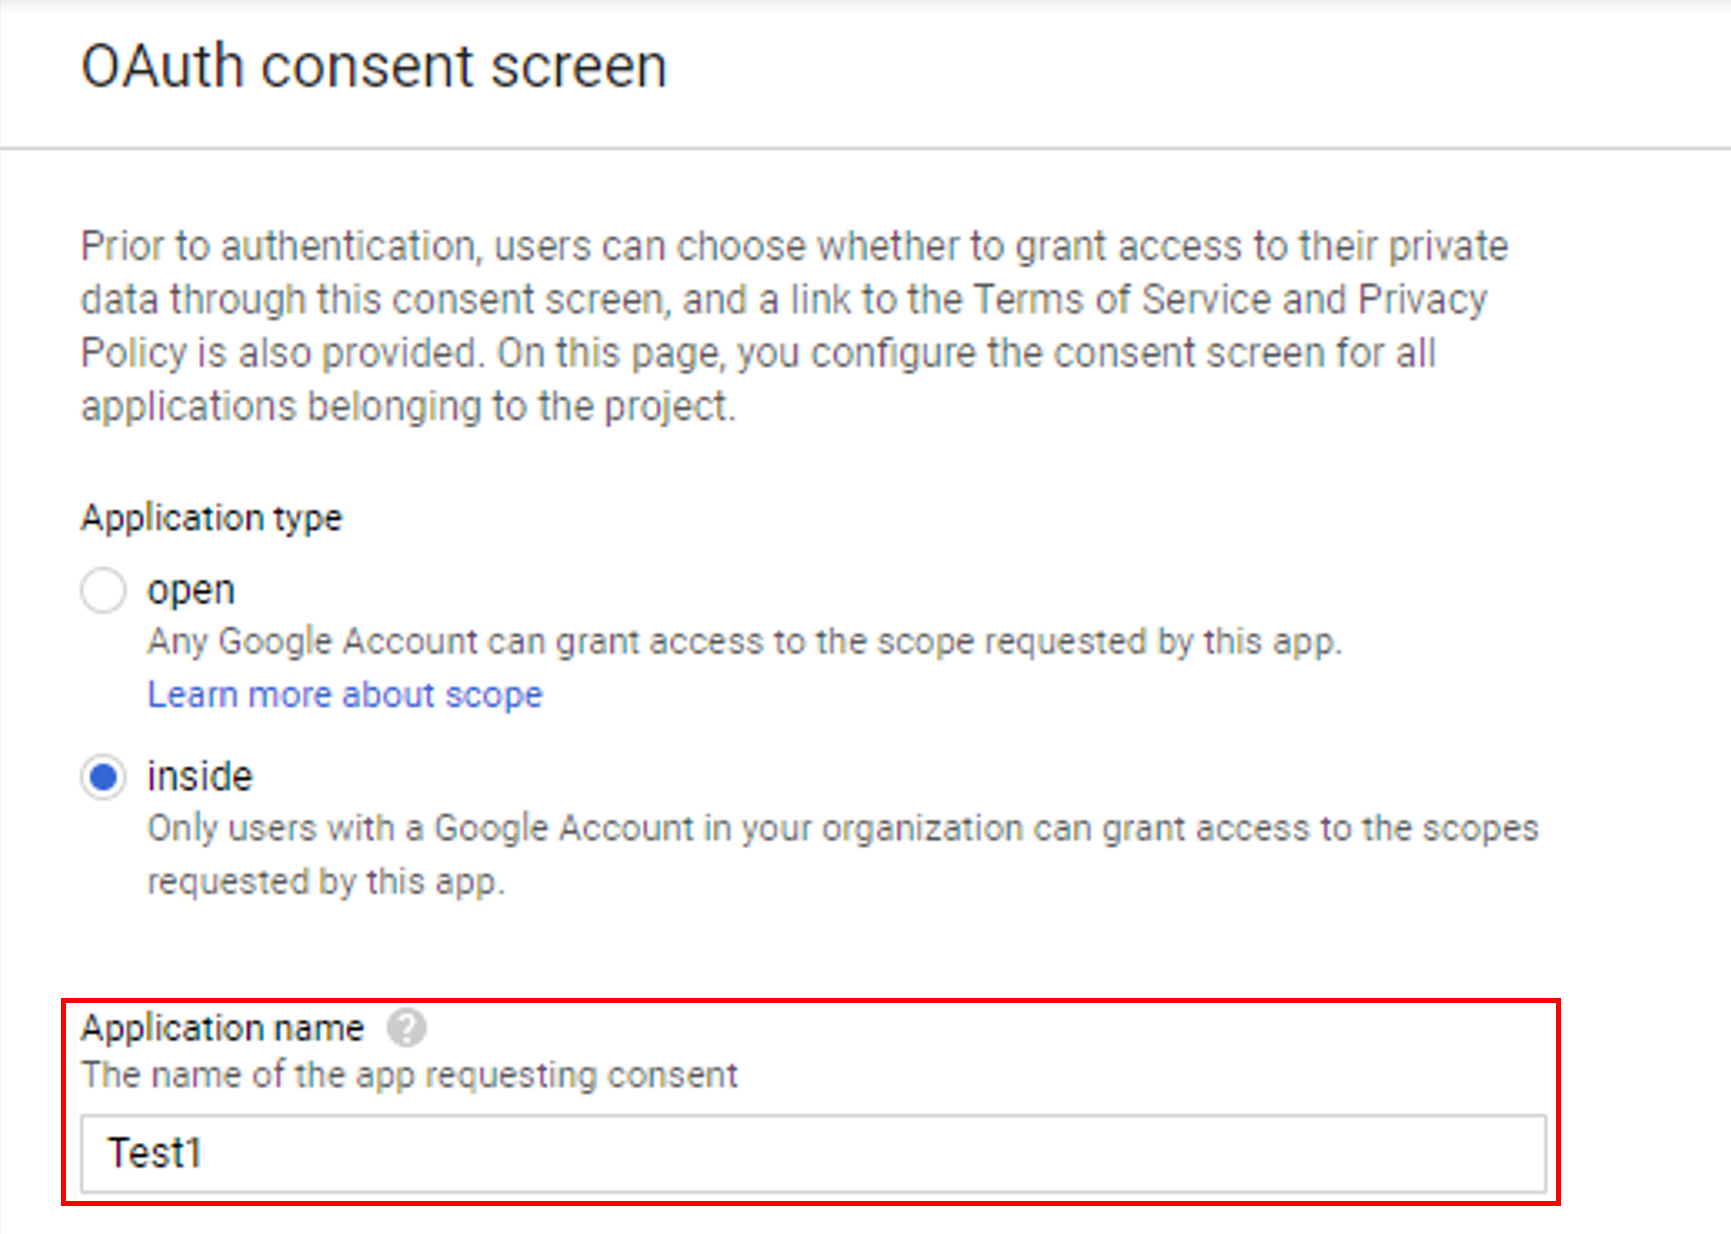
- Enter the consent page configuration information, and then click ‘Save’.
- Set Application type to ‘Internal’.
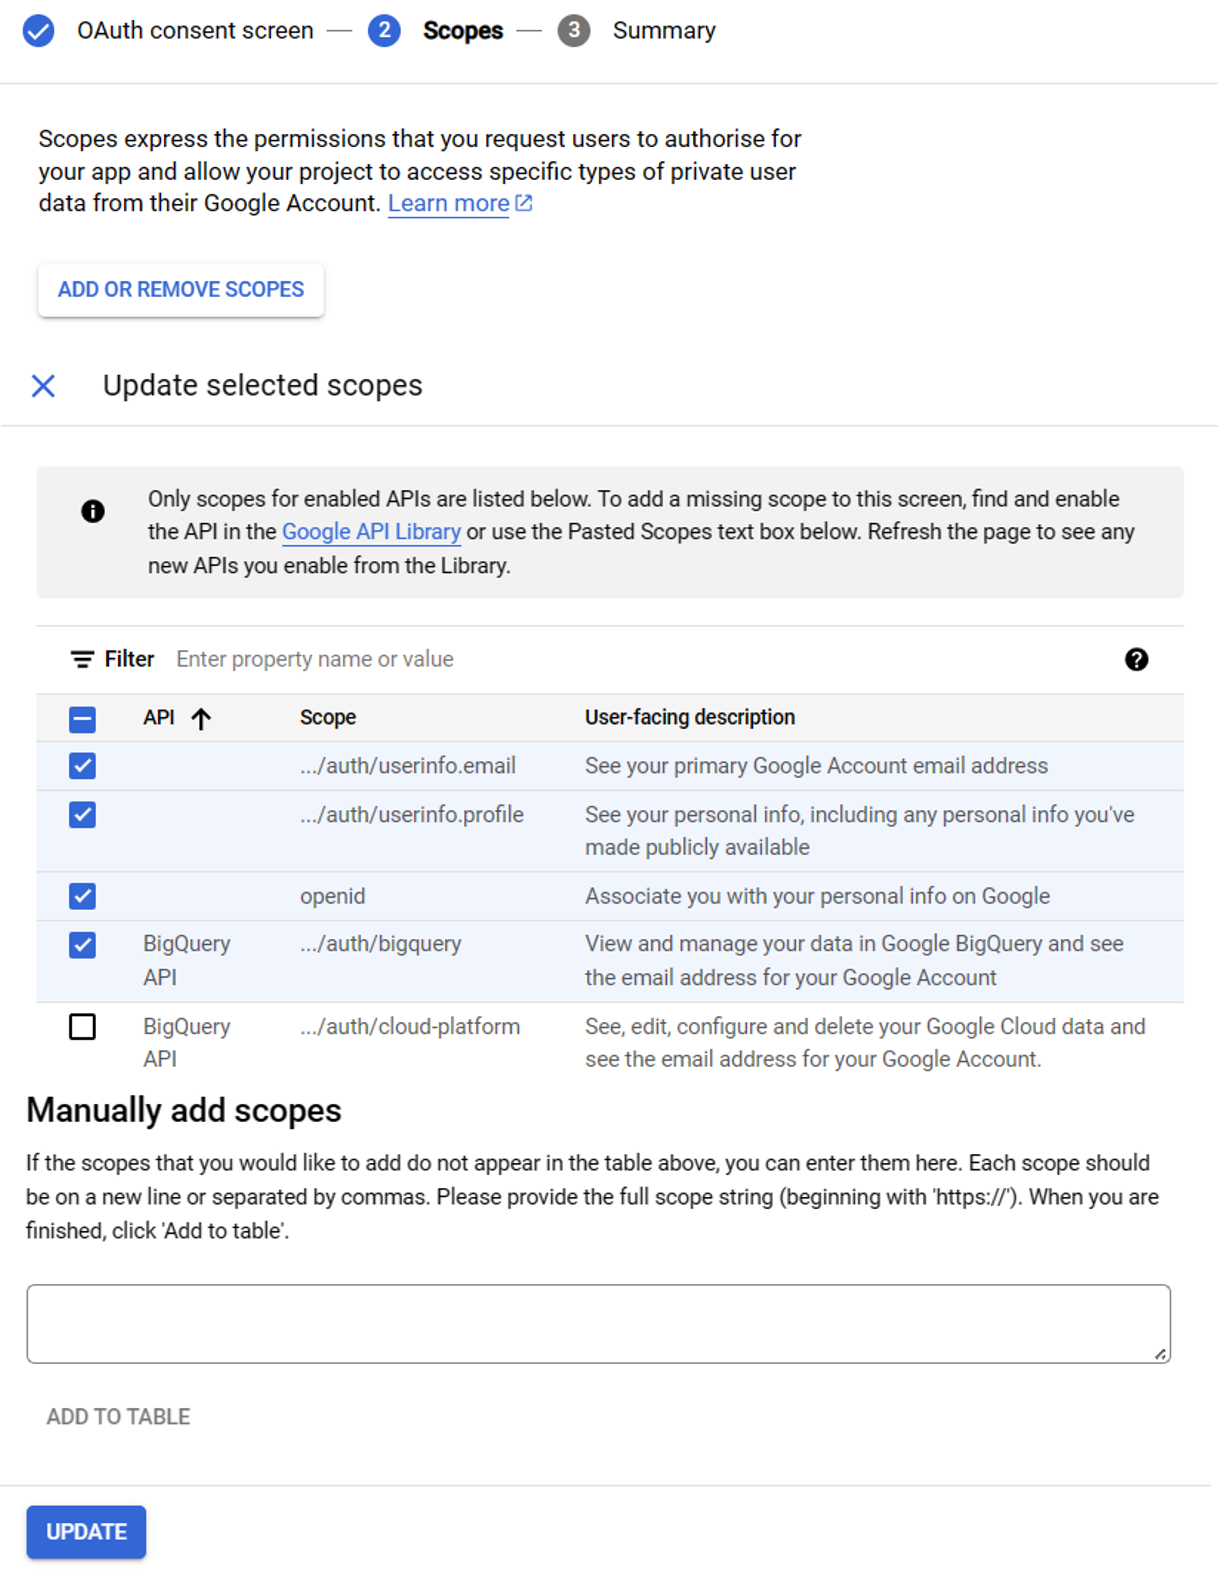
- Click ‘Add or Delete Scope’ to select the scope to add in the pop-up window, and then click ‘Update’.
- Set Application type to ‘Internal’.
- Click ‘Create credentials’, and then click OAuth client ID.

- Select ‘Web application’ as Application type.
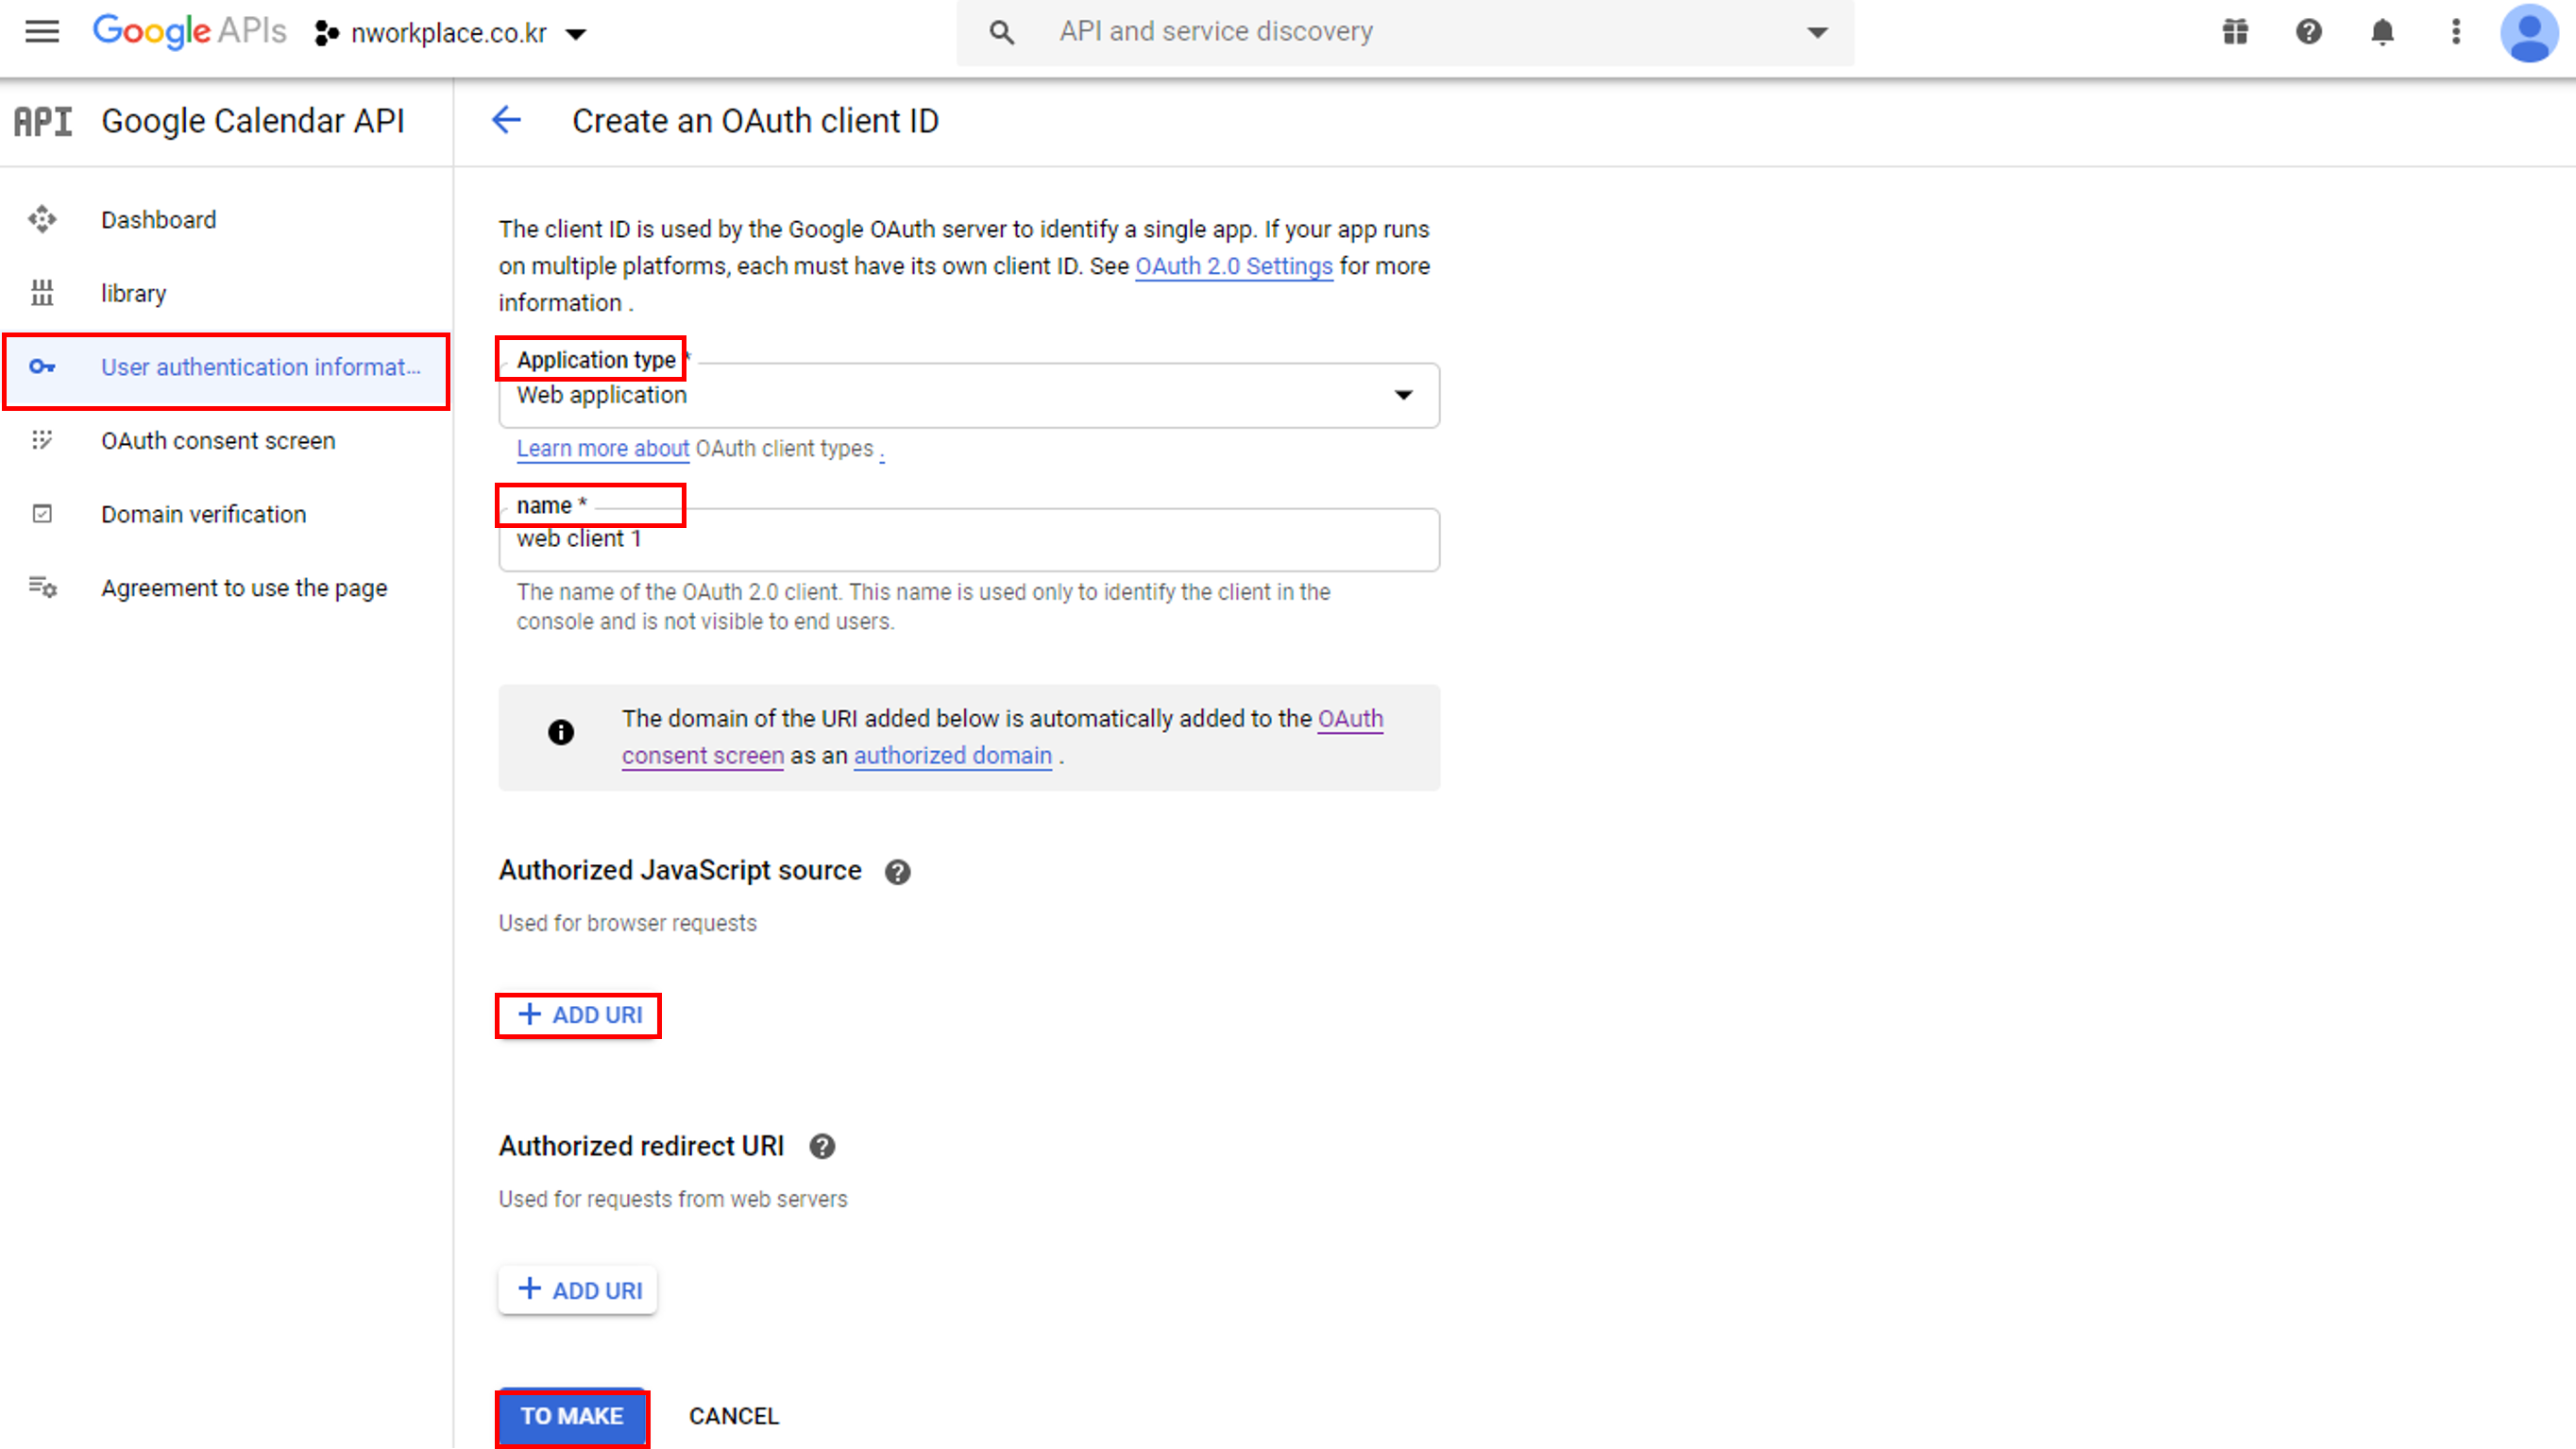
- Enter the name.
- Click ‘Add URI’ of approved redirection URIs and enter the URI.
- You can check the URI by clicking ‘Integration Settings’ of Google Workspace in ‘WORKPLACE > Admin> Settings > Manage Service Integration > Register Calendar’ and setting the use status to ‘Use’.
- Select ‘Web application’ as Application type.
- Click ‘Create’.
- It is added to the OAuth 2.0 Client ID list.
- Click
 to download the OAuth 2.0 Client ID authentication information created.
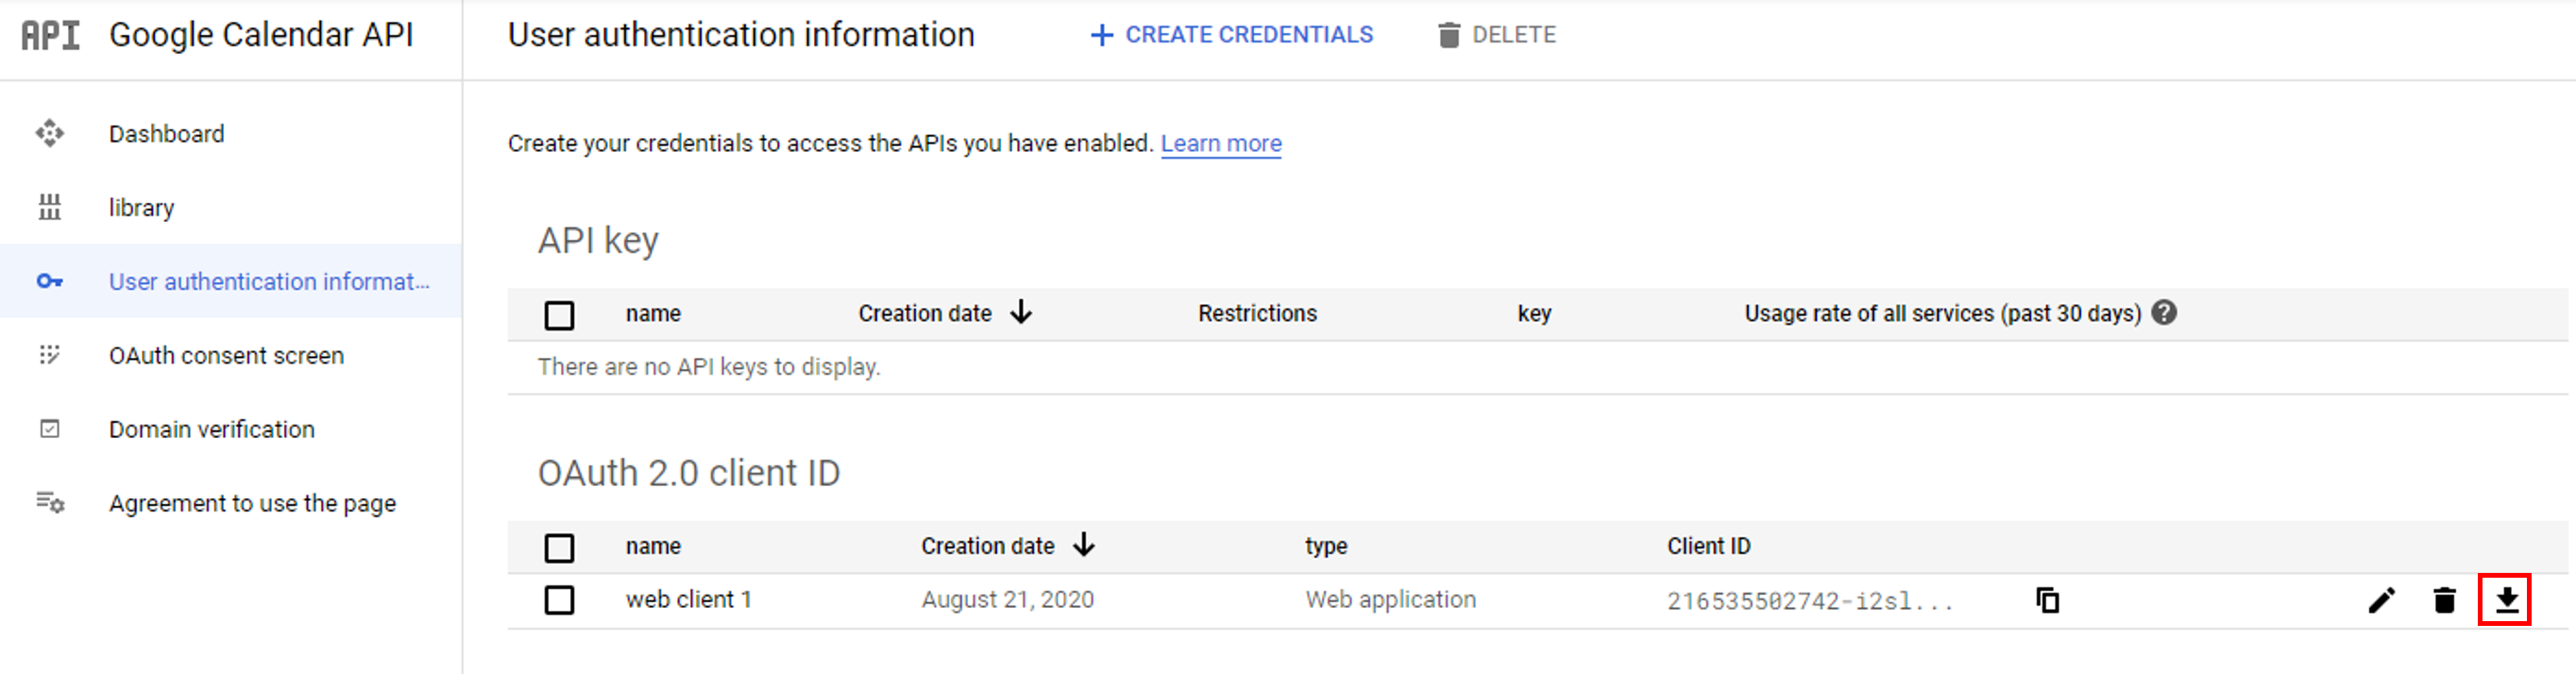
- The authentication information is downloaded as a
.jsonfile format in theDownloadfolder.
- The authentication information is downloaded as a
- Click 'Admin Menu' at the top right of the PC web, and then click 'Business Support Settings' in the pop-up window.
- Click at the top left of the screen, and then click 'Settings > Manage Service Integration' from the menu.
- Click the ‘Register Calendar’ tab, and then click ‘Integration Settings’ for Google Workspace.
- Set the use status to ‘Use’, and then enter the integration information.
- Click ‘Upload Files’ and upload the downloaded authentication information.
- Enter the company domain entered when signing up for Google Workspace in Company Domain.
- Click ‘Save’.
Manage Company Holidays
You can specify the company holidays or specify and manage weekly holidays and weekly days off.
The Manage Company Holidays page is laid out as follows.
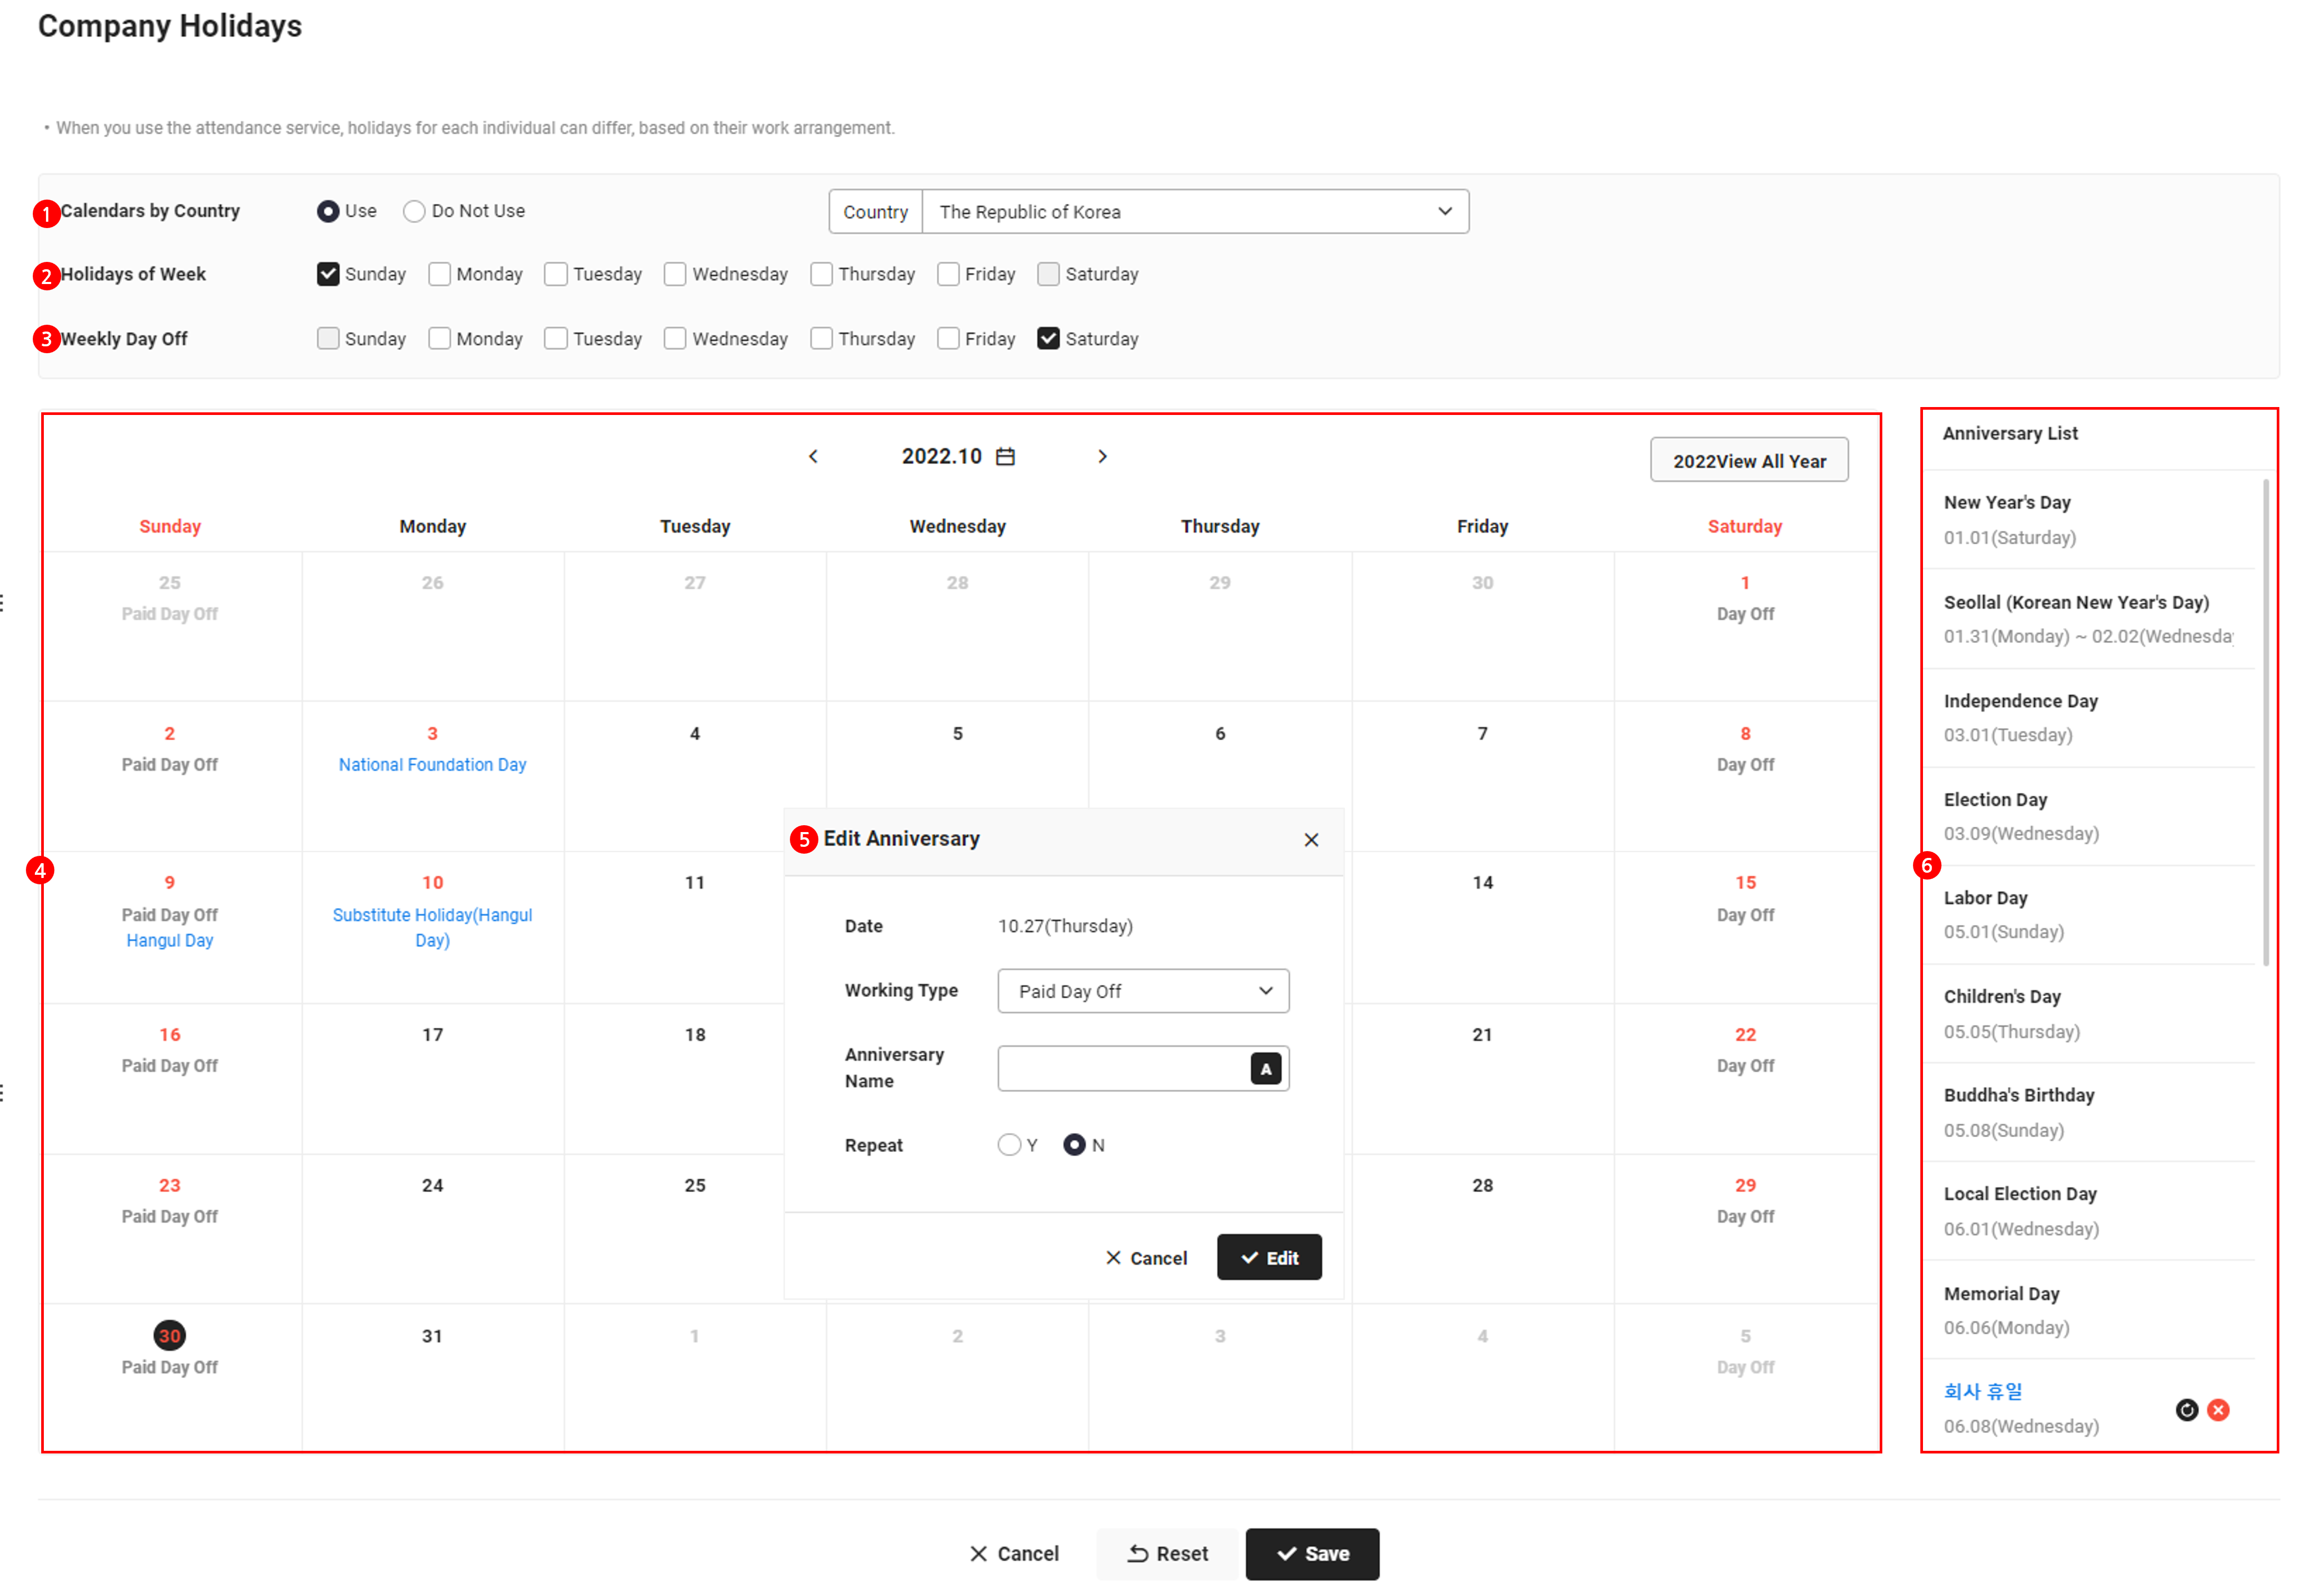
| Area | Description |
|---|---|
| ① Calendar by Country | Select a calendar that displays public holidays of each country, such as Korea, USA, Japan, and China
|
| ② Weekly Holidays | Select days of the week to be specified as weekly holidays |
| ③ Weekly Days Off | Select days of the week to be specified as the weekly days off |
| ④ Calendar area | It displays public holidays of each country, holidays/days off, and company holidays |
| ⑤ Register Holiday | Register company holidays (See Register Company Holiday) |
| ⑥ Holiday list | It displays public holidays and registered company holidays |
- The work type of public holidays based on the calendar of each country is automatically set as ‘Holiday’.
- The work type of the dates set as weekly holidays and weekly days off is automatically set as ‘Holiday’.
- Annual leaves are not deduced for the dates set as weekly holidays and weekly days off.
- If you use the Attendance service, then the weekly holiday/day off/workday information according to the work arrangement settings takes precedence.
- If you check ‘Don't Work on Public Holidays and Predetermined Holidays’ in the Working Standards area of the ‘Attendance Service > Work > Manage Work Arrangement; menu, then the work arrangement of public holidays and company anniversary is defined according to the work type (holiday/day off/workday) applied to company's holiday management.
Register Company Holiday
The following describes how to register company holidays.
- Click 'Admin Menu' at the top right of the PC web, and then click 'Business Support Settings' in the pop-up window.
- Click at the top left of the screen, and then click 'Settings > Manage Company Holidays' from the menu.
- Click the days to be specified as holidays.
- Select the work type and enter the anniversary name.
- If ‘Holiday’ or ‘Day Off’ is selected for the work type, then employees don't work, and annual leaves are not deducted for the date.
- Select the repetition status, and then click ‘Edit’.
- The specified holiday is added to the holiday list.
- Click ‘Save’ at the bottom of the Calendar area.
- The added company holidays are saved.
- Click ‘Cancel’ to cancel the holidays added.
- Click 'Reset’ to reset the settings.
Edit Company Holiday
The following describes how to edit company holidays.
- Click 'Admin Menu' at the top right of the PC web, and then click 'Business Support Settings' in the pop-up window.
- Click at the top left of the screen, and then click 'Settings > Manage Company Holidays' from the menu.
- Click the holiday to be modified in the holiday list on the right side.
- Make the necessary changes, and then click ‘Save’.
- Click ‘Save’ at the bottom of the Calendar area.
- The edited content is reflected.
- Changing the work type to ‘Holiday’ can affect the following items, and if adjustments are necessary, then the Attendance admin must change work hours and adjust annual leaves manually.
- If there is an absence request that adds up to the work hours, then the requested absence day is not changed to a holiday, even if it was a workday.
- A past date with the work arrangement set is not changed to a holiday if it is a workday.
- The dates with existing clock-in/out records can't be set as holidays.
Delete Company Holiday
The following describes how to delete company holidays.
- Click 'Admin Menu' at the top right of the PC web, and then click 'Business Support Settings' in the pop-up window.
- Click ‘Settings > Manage Company Holidays’ from the menu.
- Click
 of the holiday to be deleted in the list of holidays.
 - Click ‘OK’.
- Click ‘Save’ at the bottom of the Calendar area.
- The holiday is deleted.
- Click ‘Cancel’ to cancel the holidays deleted.
- Click ‘Reset’ to delete all specified company holidays and return to the initial settings.
- When requesting settlement of an expense used on a holiday, follow-up management is available after the settlement. Regarding settlement of expenses used on a holiday or day off, you can ask the requester to explain the expenses in ‘Expense Service > View Self Check > Holiday Usage’. (See Holiday Usage)
Manage Notifications
You can set up completion notifications to be sent to users for data backup downloads (See Exporting data ) . Notifications can be received via email, and if integrated with external solutions (such as KakaoTalk, LINE, Slack, Google Chat, etc.), notification messages can be received through external channels.
The Manage Notifications page is laid out as follows.
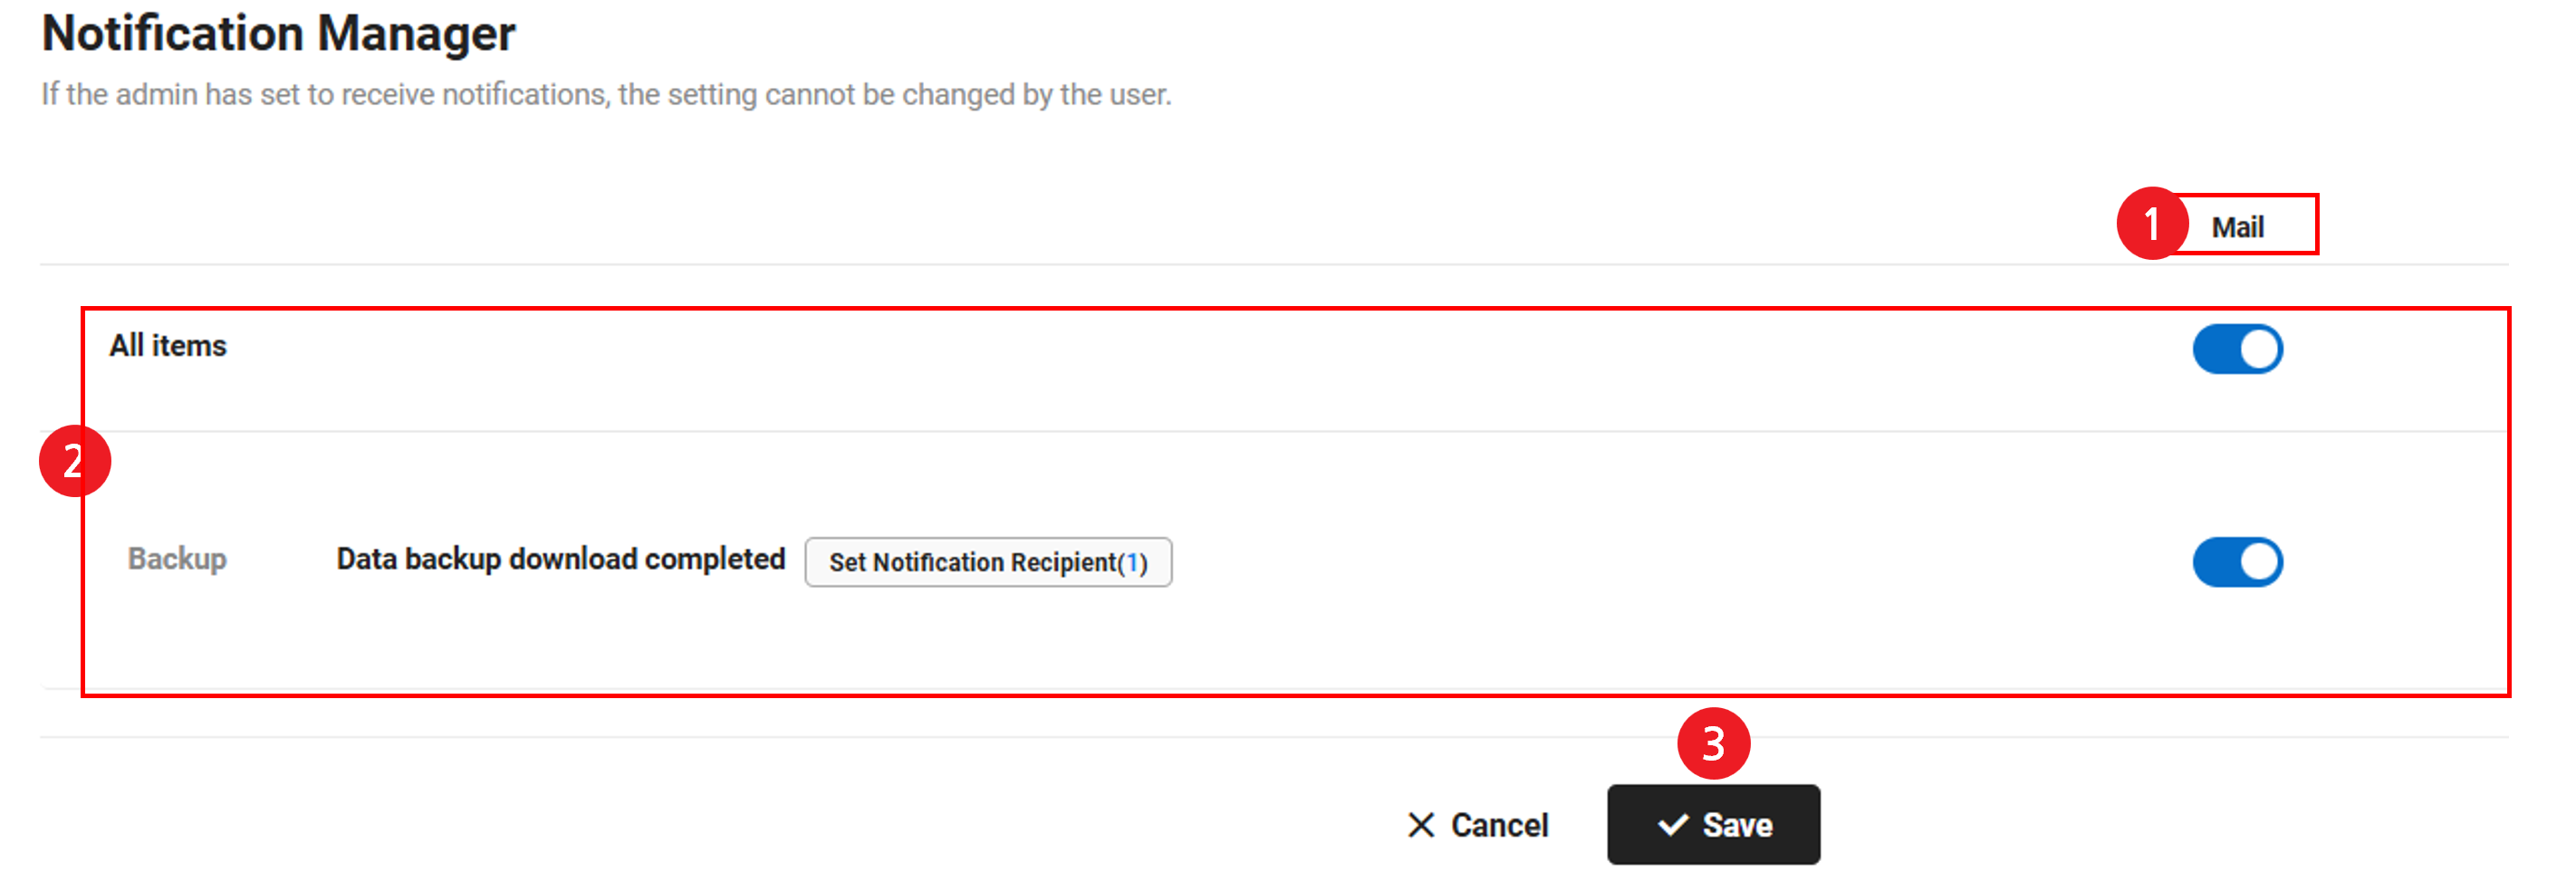
| Area | Description |
|---|---|
| ① Notification channels | Send to email
|
| ② Set Notifications | Set notifications to be sent or not sent by channel and item
|
| ③ Save | It saves the settings |