You can add electronic tax invoices by issuance type. The tax invoices added can be issued.
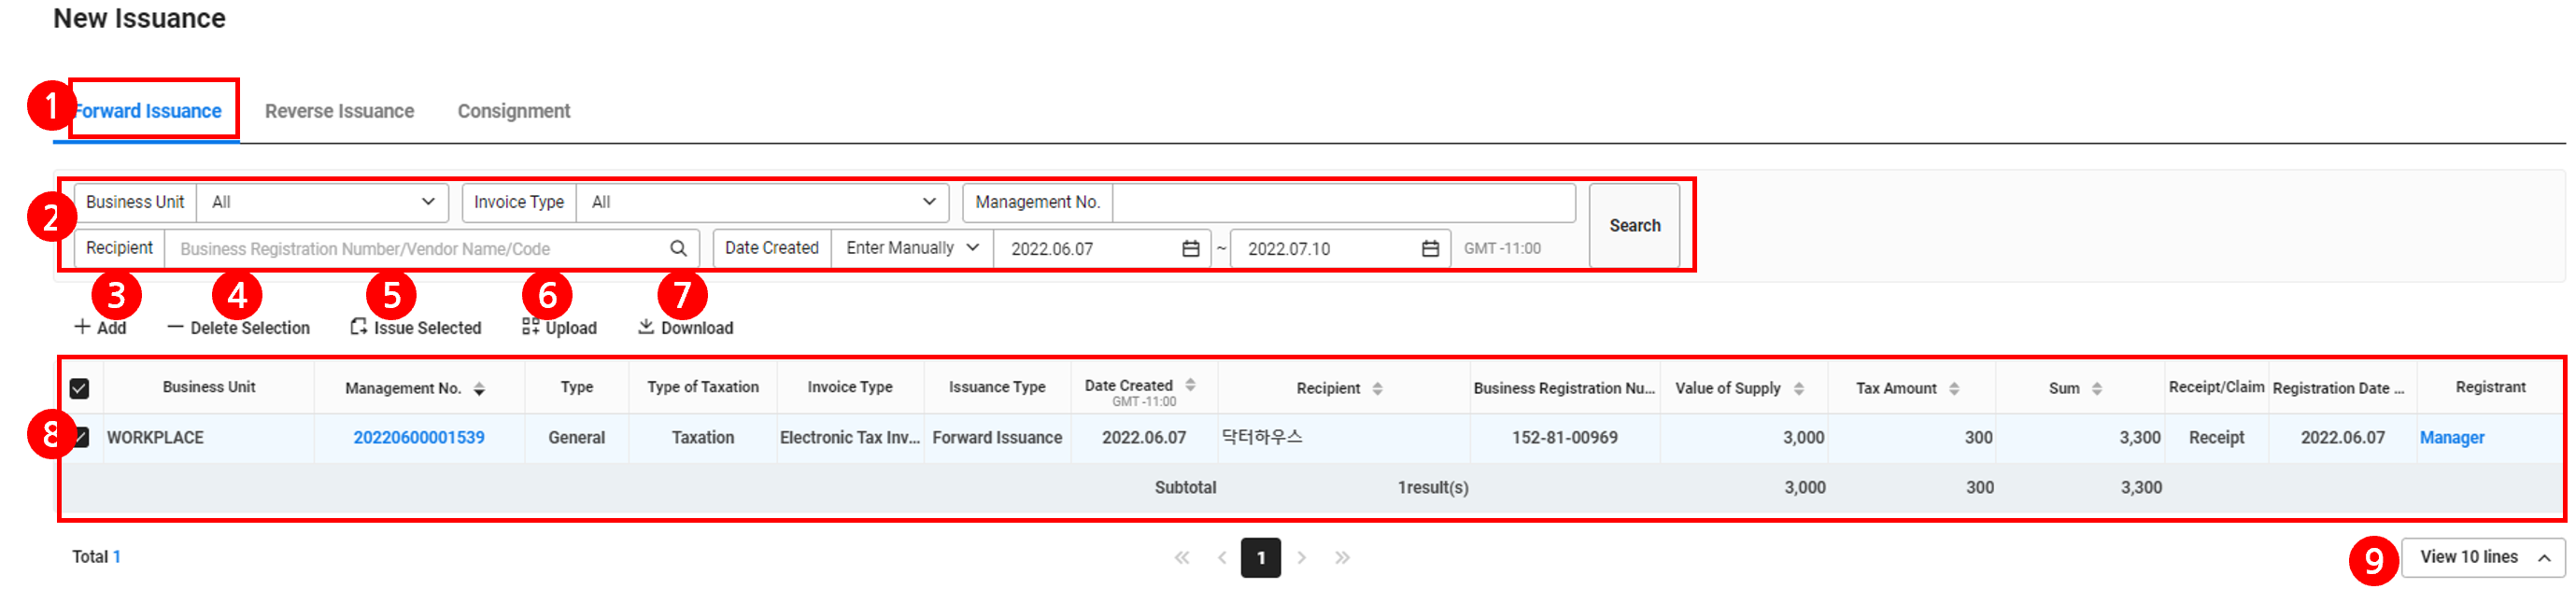
The New Issuance page is laid out as follows.
| Area | Description |
|---|---|
| ① Content tab | Click to display the list of electronic tax invoices by issuance type |
| ② Search window | Search invoice according to business place, invoice type, management number, supplier/recipient and creation date conditions |
| ③ Add | Click to add a new electronic tax invoice (See Add Electronic Tax Invoice)
|
| ④ Issue Selected | Click to issue the selected electronic tax invoice (See Issue Electronic Tax Invoice) |
| ⑤ Delete Selected | Click to delete the selected electronic tax invoice (See Delete Electronic Tax Invoice) |
| ⑥ shared data | Upload electronic tax invoices. (See Issue Electronic Tax Invoice Upload) |
| ⑦ Download | Download the list of electronic tax invoices as an Excel file (See Download Electronic Tax Invoice List) |
| ⑧ Electronic Tax Invoice List | Display Electronic Tax Invoice list
|
| ⑨ Number of displayed items | Set the number of electronic tax invoices to be displayed on a single page of the list |
Add New Electronic Tax Invoice
The following describes how to add an electronic tax invoice.
- Click 'Admin menu' in the top right corner of your PC web screen, then click 'Electronic Tax Invoice' in the pop-up window.
- Click
 at the top left of the screen.
 - Click ‘Manage Issuance > New Issuance’ from the menu.
- Click the tab according to the issuance type of electronic tax invoice.
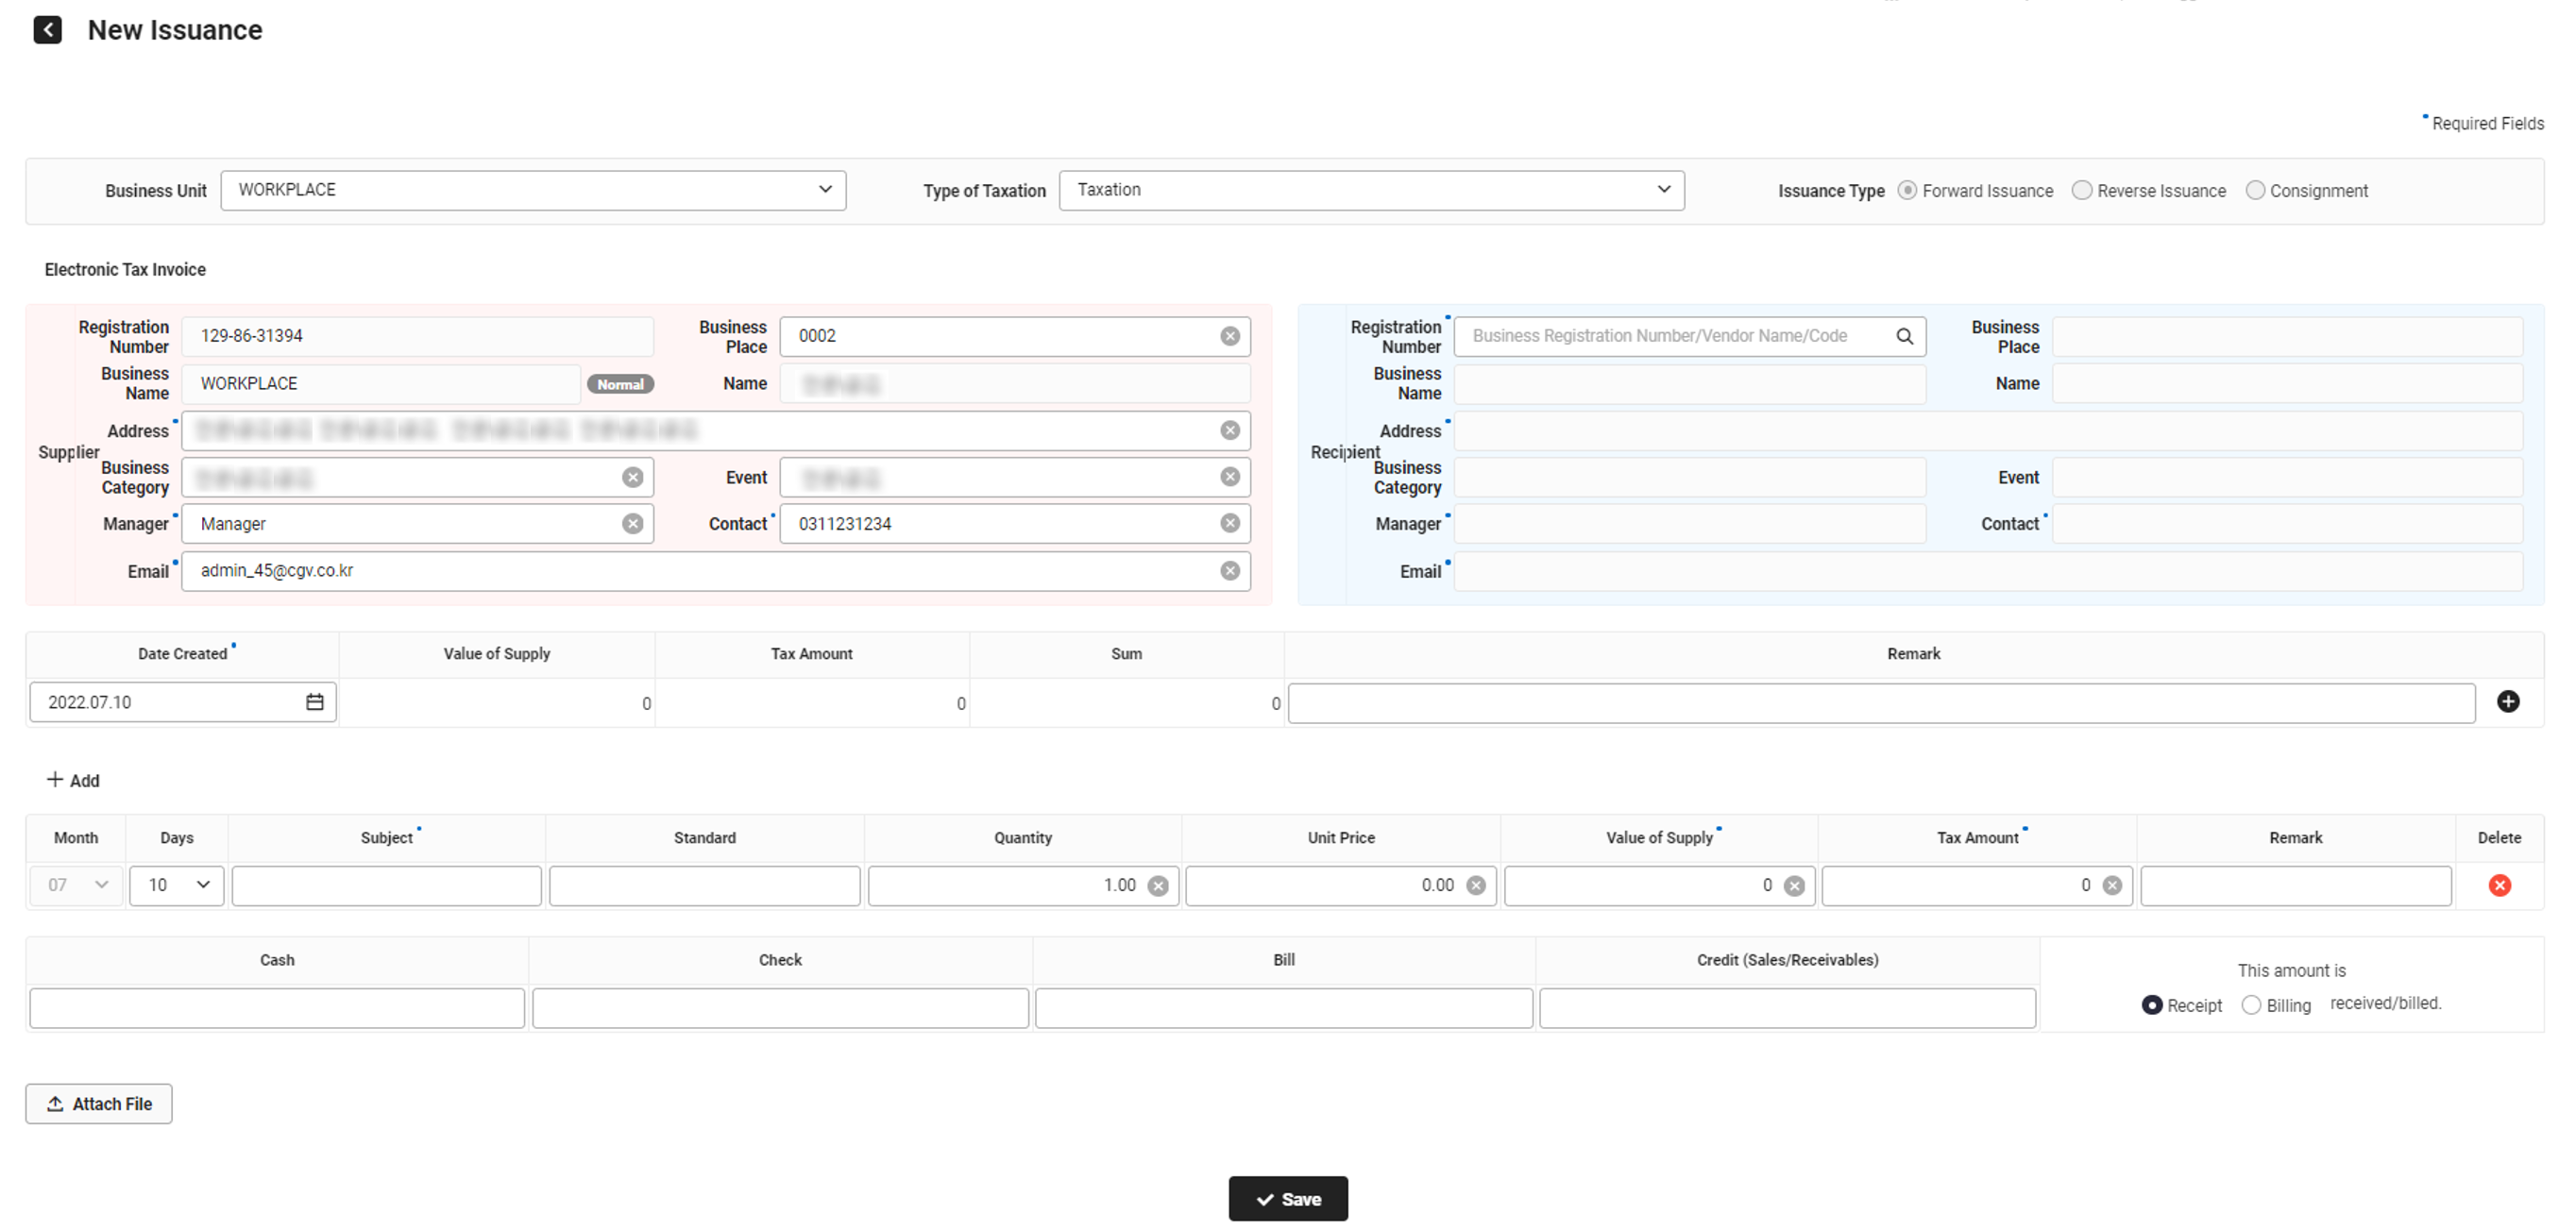
- Click 'Add'.
- Select the business place.
- If there is only one business with permission, it is automatically displayed.
- If you set a default business place in Settings > SmartBill Linkage Settings, it is displayed as default.
- Select a taxation type.
- If you selected Tax Exemption, it is displayed as Electronic Invoice.
- Select the issuance type.
- Enter the supplier area, recipient area or consigned business information according to issuance type.
If the vendor is not registered, then register it in the ‘Business Support Settings > Common Codes > Manage Vendor’ menu first. (See Manage Vendor)
- Click
 in Registration Number to select the vendor.
- The selected vendor information is automatically displayed. Please check the required information. Please make corrections if necessary.
- If there are one or more registered vendor managers, please select the person in charge.
- The business place information is automatically displayed in the supplier area for Forward Issuance, in the recipient area for Reverse Issuance and in the consigned business area for Consignment Issuance. Please check the details and modify if necessary.
- If you set a default business place in Electronic Tax Invoice Service > Settings > SmartBill Linkage Settings, the default business place information is imported and displayed. If there is no default business place, the business place information that the user selected is displayed.
- The business registration numbers of supplier, recipient and consigned business must be different to be issued.
- Click
- Creation Date: Please enter the creation data of electronic tax invoice.
- You cannot select a date later than today.
- If you set Delayed Issuance Unavailable as ‘Y’ on the ‘Settings > Set Electronic Tax Invoice’ menu, then issuing tax invoices as of a date before the current month becomes unavailable from 11th of each month onward.
- Item Information: Click ‘Add’ to add item information.
- Month/Date: The creation date entered is automatically displayed. Please check the issuance date.
- The issuance month cannot be modified. If necessary, the creation date can be modified to a desired date.
- Item: Select the entry type, and enter the information.
- Enter manually: Enter the item name and specification directly.
- Item information entered manually is not updated on the ‘Business Support Settings > Common Codes > Manage Item Information’ page.
- Search item: You can click to select from registered items. The specification is displayed automatically upon selecting the item. For the registration of item information, see the Business Support Settings > Common Codes > Manage Item Information menu.
- Enter manually: Enter the item name and specification directly.
- Quantity: If necessary, enter the quantity of the item.
- Unit Price: If necessary, enter the unit price of the item.
- Supply Price: Enter the supply price excluding tax.
- Tax Amount: The tax amount according to the supply price is displayed. Please make corrections if necessary.
- Note: If necessary, enter note.
- If you want to enter one or more items, click the ‘Add’ to add a row and enter the item information.
- To delete the entered item, click .
- Month/Date: The creation date entered is automatically displayed. Please check the issuance date.
- Enter the total amount of the added items according to the type (cash/cheque/promissory note or credit) and select Receipt/Claim.
- If necessary, click ‘Attach File’ to register evidentiary documents.
- Click ‘Save’.
Edit Electronic Tax Invoice
The contents of the electronic tax invoice being created before issuance can be modified.
The following describes how to modify an electronic tax invoice.
- Click 'Admin menu' in the top right corner of your PC web screen, then click 'Electronic Tax Invoice' in the pop-up window.
- Click at the top left of the screen.
- Click ‘Manage Issuance > New Issuance’ from the menu.
- If necessary, enter the electronic tax invoice conditions to be modified in the search window, and click ‘Search’.
- You can view the list corresponding to the entered conditions.
- Click the Management Number of the electronic tax invoice to be modified.
- Apply the modified content, and click ‘Save’.
- The modified information is saved.
Delete Electronic Tax Invoice
The contents of the electronic tax invoice being created before issuance can be deleted.
- The deleted electronic tax invoice cannot be recovered.
The following describes how to delete an electronic tax invoice.
- Click 'Admin menu' in the top right corner of your PC web screen, then click 'Electronic Tax Invoice' in the pop-up window.
- Click at the top left of the screen.
- Click ‘Manage Issuance > New Issuance’ from the menu.
- If necessary, enter the electronic tax invoice conditions to be modified in the search window, and click ‘Search’.
- You can view the list corresponding to the entered conditions.
- Select the electronic tax invoice to delete, and click ‘Delete Selected’.
- Check the details in the confirmation pop-up window, and click ‘Delete’.
- The selected electronic tax invoice will be deleted.
Issue Electronic Tax Invoice
The following describes how to issue an electronic tax invoice.
- Click 'Admin menu' in the top right corner of your PC web screen, then click 'Electronic Tax Invoice' in the pop-up window.
- Click at the top left of the screen.
- Click ‘Manage Issuance > New Issuance’ from the menu.
- Select the electronic tax invoice to issue, and click ‘Issue Selected’.
- To view the details of each electronic tax invoice first, click the Management Number, view the details, and click ‘Issue’ on the page.
- Click 'OK'.
Cautions for electronic tax invoice issuance:
- An electronic tax invoice can be issued only when the selected business place meets the following conditions.
- The business place must be integrated with a SmartBill account.
- A valid Electronic Tax Invoice certificate must be registered at the business place. (See Business Support Settings > Manage Business Place > Manage Certificate)
- The certificate registered in the Manage Certificate in NAVER WORKS Business Support Settings must be sent to SmartBill, or the certificate must be registered in SmartBill. (See SmartBill Linkage Settings)
- If NAVER WORKS and the certificate in SmartBill do not match, the electronic tax invoice cannot be issued. Set it up according to the following guide.
- Remove the Electronic Tax Invoice certificate of the business place in ‘Business Support Settings > Company Information > Manage Business Place’.
- Register the certificate to use again and check the Electronic Tax Invoice item.
- Submit the certificate registered in ‘Electronic Tax Invoice Service > Settings > SmartBill Linkage Settings’ to SmartBill. (See SmartBill Linkage Settings)
- If the vendor to be issued is closed, the ‘Closed Vendors’ notification pop-up will open. Check the details and issue it, if necessary.
- Reverse issuance is available only for the vendors signed up to SmartBill.
- Billing standard: Issued electronic tax invoices are charged per case, and the cancelled invoices are also included in the billing.
Issue Electronic Tax Invoice Upload
The following describes how to upload and add an electronic tax invoice as a file.
- Click 'Admin menu' in the top right corner of your PC web screen, then click 'Electronic Tax Invoice' in the pop-up window.
- Click at the top left of the screen.
- Click ‘Manage Issuance > New Issuance’ from the menu.
- Click ‘Upload’.
- Click the [Download Template File] button of the template file to download.
- Click ‘Upload File’ to upload the created file.
- Check it in the ‘New Issuance’ list and modify, if necessary.
- Select the electronic tax invoice and issue it.
Download Electronic Tax Invoice
The following describes how to download the list of saved electronic tax invoices as an Excel file.
- Click 'Admin menu' in the top right corner of your PC web screen, then click 'Electronic Tax Invoice' in the pop-up window.
- Click at the top left of the screen.
- Click ‘Manage Issuance > New Issuance’ from the menu.
- If necessary, enter the electronic tax invoice conditions to be viewed in the search window, and then click ‘Search’.
- The list of electronic tax invoices that meets the entered conditions is shown.
- Click 'Download'.
- The list of electronic tax invoices is downloaded as an Excel file.
- The downloaded file is saved as
InvoiceManualIssue.xlsxin theDownloadfolder.
Manage Issuance Request
You can issue electronic tax invoices upon request from related services such as Accounting.
The Manage Request Issuance page is laid out as follows.
| Area | Description |
|---|---|
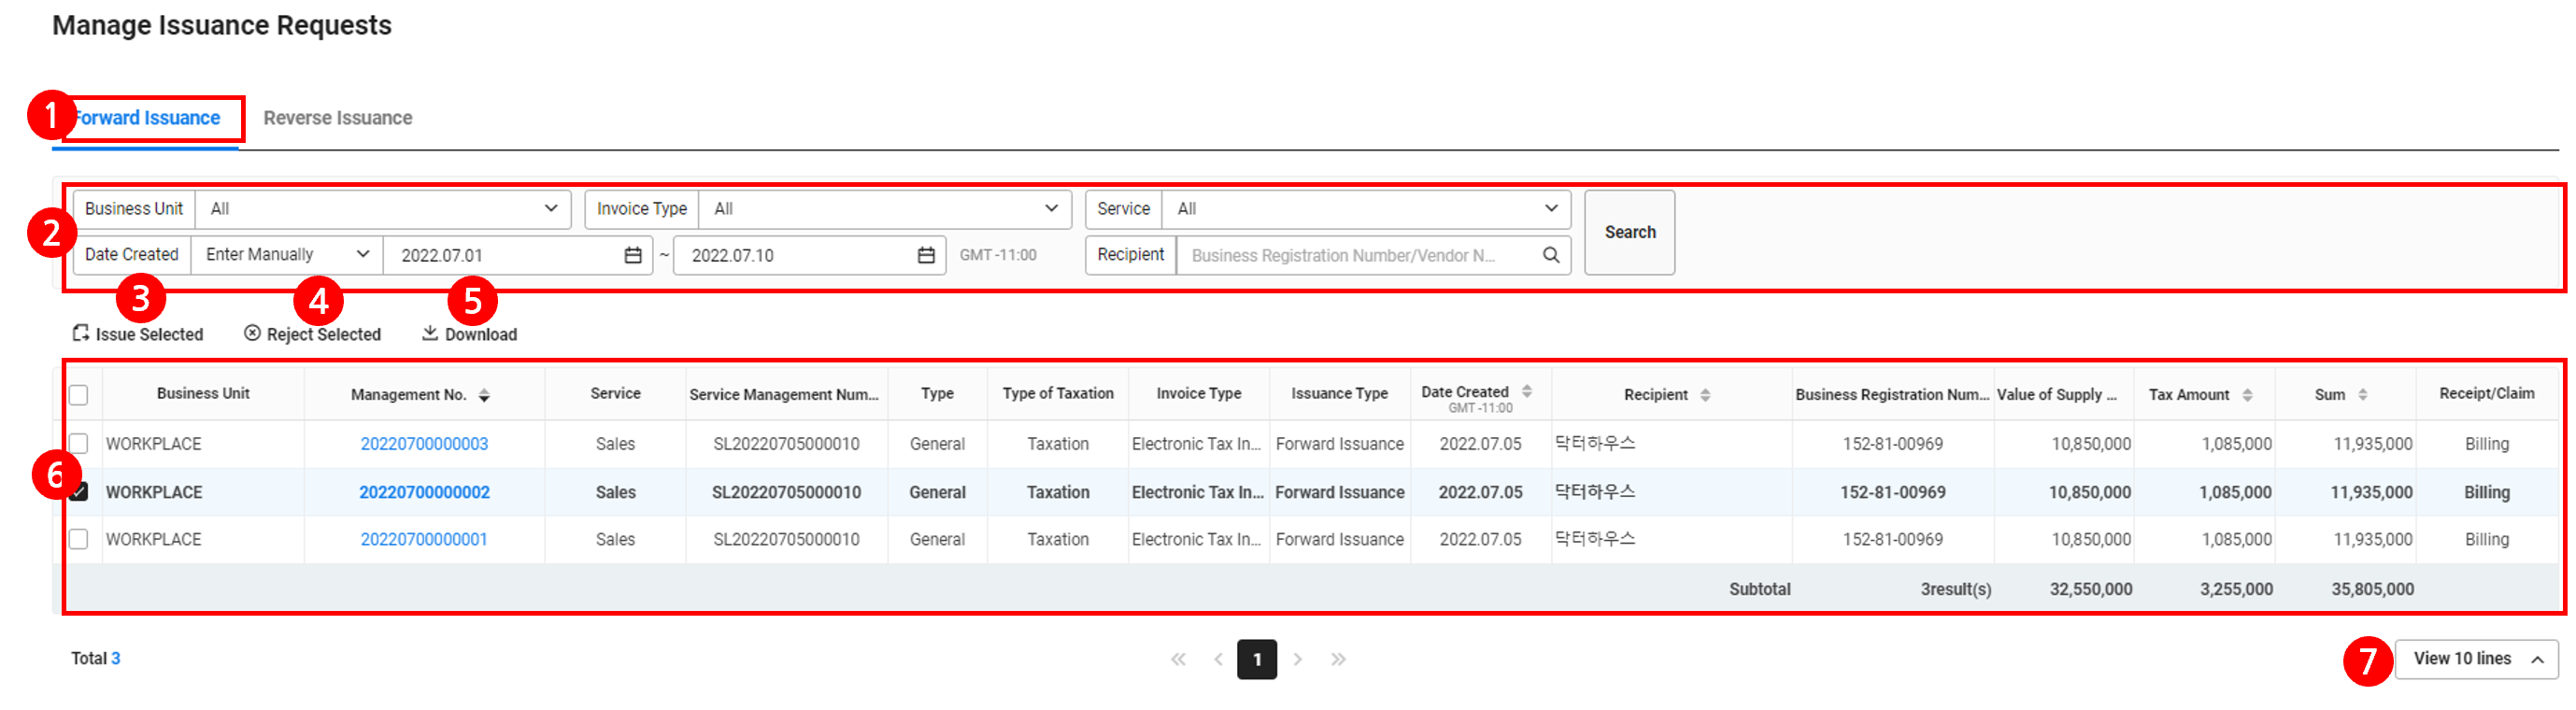
| ① Content tab | Click to display the list of electronic tax invoices by issuance type |
| ② Search window | Search tax invoices according to business place, invoice type, management number, supplier/recipient and creation date conditions |
| ③ Issue Selected | Click to issue the selected electronic tax invoice (See Issue Requested Electronic Tax Invoice), when the issuance request is canceled or the request is being processed in the issuance request service, it is not shown in the list, so view it in the View Issuance History page. |
| ④ Reject Selected | Click to reject the electronic tax invoice requested to be issued (See Reject Requested Electronic Tax Invoice), it is not shown in the list when rejected. |
| ⑤ Download | Download the list of electronic tax invoices requested to be issued as an Excel file |
| ⑥ Electronic Tax Invoice List | Displays electronic tax invoice list requested to be issued.
|
| ⑦ Number of displayed items | Set the number of electronic tax invoices to be displayed on a single page of the list |
View Issuance Request History
As the accounting service, the following shows how to check the electronic tax invoice details requested to be issued in the related service.
- Click 'Admin menu' in the top right corner of your PC web screen, then click 'Electronic Tax Invoice' in the pop-up window.
- Click at the top left of the screen.
- Click ‘Manage Issuance > Manage Issuance Request’ from the menu.
- If necessary, enter the electronic tax invoice conditions requested to be issued in the search window, and click ‘Search’.
- Click the Management Number of the electronic tax invoice to view.
- Check the details of the electronic tax invoice requested to be issued.
- In the details, the service requested to be issued will be displayed.
- The management number and approval number will be automatically crated after issuance.
Issue Requested Electronic Tax Invoice
As the accounting service, the following shows how to issue the electronic tax invoice requested to be issued in the related service.
- Click 'Admin menu' in the top right corner of your PC web screen, then click 'Electronic Tax Invoice' in the pop-up window.
- Click at the top left of the screen.
- Click ‘Manage Issuance > Manage Issuance Request’ from the menu.
- If necessary, enter the electronic tax invoice conditions requested to be issued in the search window, and click ‘Search’.
- Select the electronic tax invoice to issue, and click ‘Issue Selected’.
- To check the details of each electronic tax invoice first, click Management Item and click the ‘Issue’ on the details page.
- Click ‘OK’ in the confirmation pop-up window.
- If the certificate is not registered at the business place or it does not match the one registered in SmartBill, it cannot be issued. Check the ‘Cautions for electronic tax invoice issuance’ Note box in the Issue Electronic Tax Invoice.
Reject Requested Electronic Tax Invoice
As the accounting service, you can reject the electronic tax invoice requested to be issued in the related service.
The following describes how to reject an electronic tax invoice.
- Click 'Admin menu' in the top right corner of your PC web screen, then click 'Electronic Tax Invoice' in the pop-up window.
- Click at the top left of the screen.
- Click ‘Manage Issuance > Manage Issuance Request’ from the menu.
- Select the electronic tax invoice to reject, and click ‘Reject’.
- To check the details of each electronic tax invoice first, click Management Item and click ‘Reject’ on the details page.
- Click 'OK'.
- The tax invoice requested to be issued will be rejected.
- If it is rejected, then you can check the reject details in each service, modify them, and make a request again.
View Issuance History
You can view the document status and submission status of the issued Electronic Tax Invoice. If necessary, you can cancel the issuance or modify it before issuance.
The View Issuance History page is laid out as follows.
| Area | Description |
|---|---|
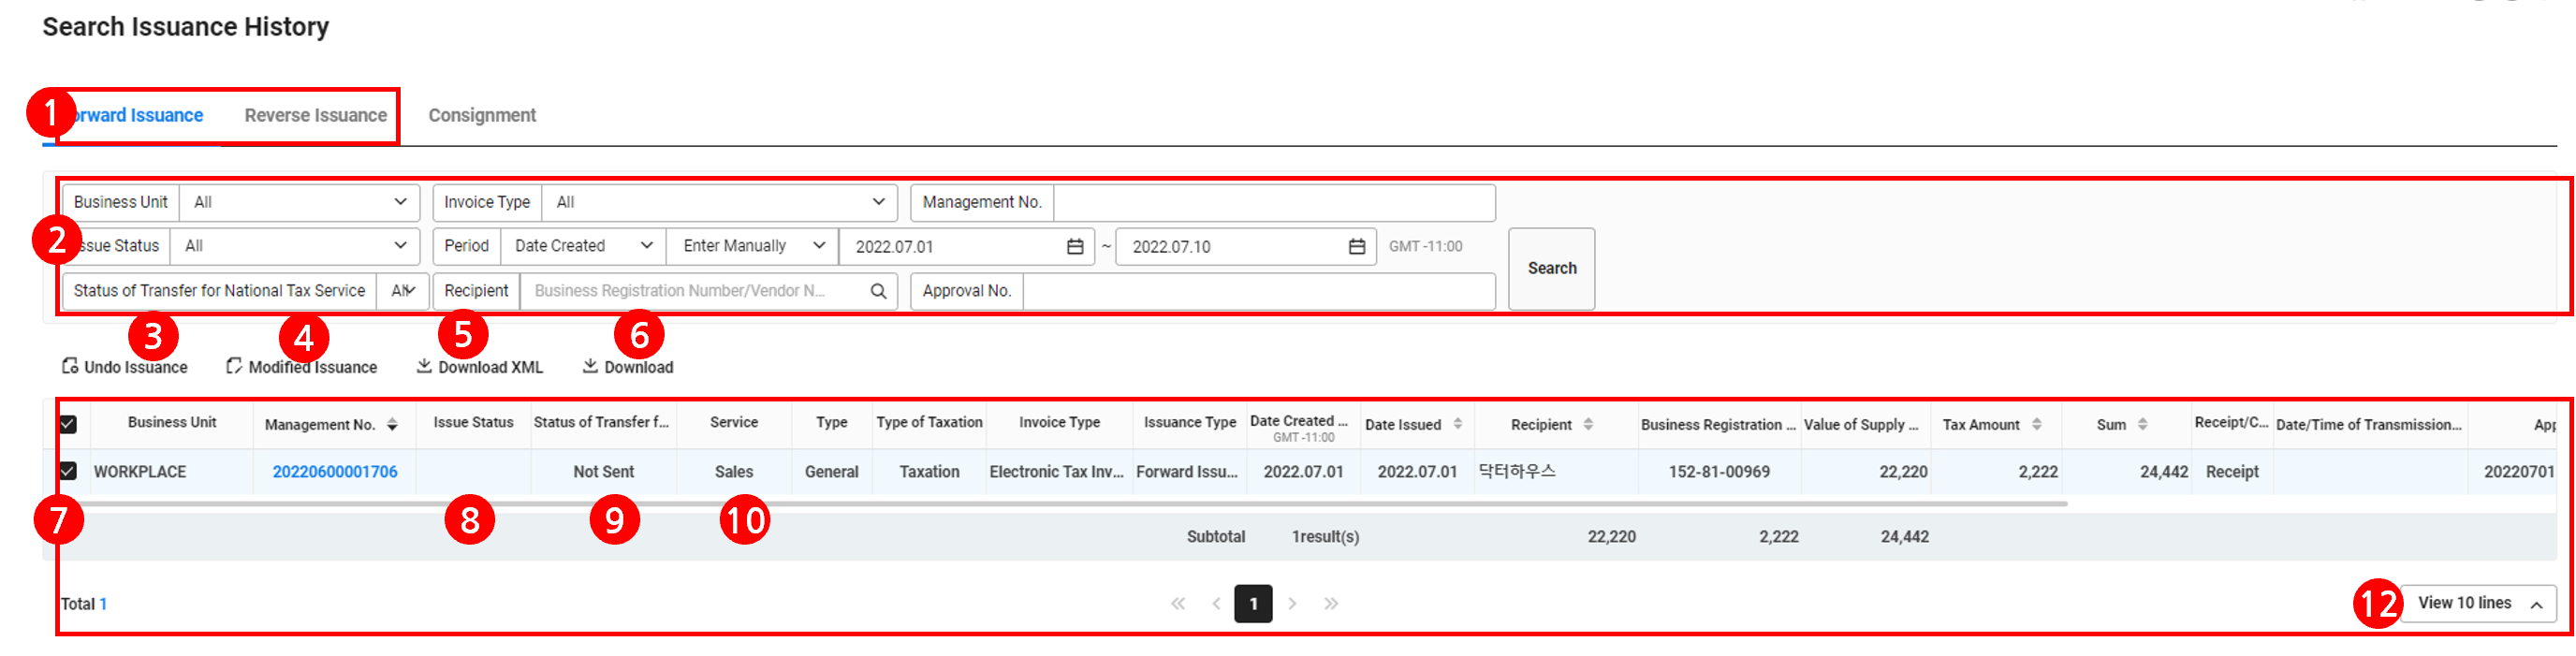
| ① Content tab | Click to display the list of electronic tax invoices by issuance type |
| ② Search window | Search Electronic Tax Invoice according to business place, invoice type, management number, document status, period, submission status, supplier/recipient and approval number conditions |
| ③ Cancel Issuance | Click to cancel the issuance of the selected electronic tax invoice (See Cancel Electronic Tax Invoice Issuance) |
| ④ Modified Issuance | When one electronic tax invoice issuance history is selected, the button becomes activated and click to modify and issue it (See Issue Modified Electronic Tax Invoice) |
| ⑤ Download | Click to download the list of electronic tax invoices as an Excel file |
| ⑥ Download XML | Click to download the selected electronic tax invoice as an XML file. |
| ⑦ Download Details | Click to download the selected electronic tax invoice details as a file |
| ⑧ List of issued electronic tax invoices | Displays the list of issued electronic tax invoices manually issued additionally or issued by other services.
|
| ⑨ Issuance Status | Displays the receipt status of issued electronic tax invoices.
|
| ⑩ NTS Submission Status | Displays the submission status of electronic tax invoice to NTS.
|
| ⑪ Service | Displays the service that requested issuance. Not displayed in the electronic tax invoice that you manually issued additionally |
| ⑫ Won invoice information | Displays the approval number/management number of won invoice, If the issuance status is Modified Issuance. |
| ⑬ Number of displayed items | Sets the number of electronic tax invoices to be displayed on a single page of the list |
Cancel Electronic Tax Invoice Issuance
The following describes how to cancel the issuance of electronic tax invoice.
- For electronic tax invoices issued on the day, the issuance status is ‘Receipt unapproved’ or ‘Receipt declined’, and the issuance can be canceled only when the NTS submission status is ‘Not submitted’.
- For the Electronic Tax Invoice that cannot be cancelled, issue a revised tax invoice. (See Issue Modified Electronic Tax Invoice)
- Click 'Admin menu' in the top right corner of your PC web screen, then click 'Electronic Tax Invoice' in the pop-up window.
- Click at the top left of the screen.
- Click ‘Manage Issuance > View Issuance History’ from the menu.
- Enter the conditions of electronic tax invoice to cancel issuance in the search window, and click ‘Search’.
- Select the electronic tax invoice to cancel issuance, and click ‘Cancel Issuance’.
- Click ‘OK’ in the pop-up.
- The issuance of the selected electronic tax invoice is canceled, deleted from the list, and added to the ‘Manage Issuance > New Issuance, Manage Issuance Request’ menu.
View Electronic Tax Invoice Details
You can view the details of the issued Electronic Tax Invoice and, if necessary, modify and issue it, or create a new electronic tax invoice by copying the issued tax invoice.
The following describes how to check the details of electronic tax invoice.
- Click 'Admin menu' in the top right corner of your PC web screen, then click 'Electronic Tax Invoice' in the pop-up window.
- Click at the top left of the screen.
- Click ‘Manage Issuance > View Issuance History’ from the menu.
- Enter the conditions in the search window, and click ‘Search’.
- Click the Management Number of the slip to view the details for.
- Click the button displayed by context.
- Click ‘Email Submission’ to submit a new electronic tax invoice with the vendor's email.
- Click ‘Send to NTS’ to manually submit the electronic tax invoice to NTS. This button is not provided for reverse issuance history.
- Click ‘Cancel Issuance’ to cancel issuance.
- Click ‘Print’ to print out the issuance history of electronic tax invoices.
- Click ‘Copy Electronic Tax Invoice’ to copy the electronic tax invoice in the same issuance form and move to the New Issuance page.
- Click ‘Issue Modified Electronic Tax Invoice’ to go to the Modified Issuance page. (See Issue Modified Tax Invoice)
Issue Modified Electronic Tax Invoice
The electronic tax invoice submitted to NTS cannot be canceled or modified so you have to issue an additional modified electronic tax invoice that reflects the reason for modification and modified items.
The following describes how to issue a modified electronic tax invoice that has been issued already.
- Click 'Admin menu' in the top right corner of your PC web screen, then click 'Electronic Tax Invoice' in the pop-up window.
- Click at the top left of the screen.
- Click ‘Manage Issuance > View Issuance History’ from the menu.
- Enter the conditions in the search window, and click ‘Search’.
- Select the electronic tax invoice to be modified and click ‘Modified Issuance’.
- To view the details of each electronic tax invoice first, click the Management Number, view the details, and click ‘Modified Issuance’ on the page.
- Click ‘OK’ in the confirmation pop-up window.
- Check the details of electronic tax invoice and modify it, if necessary.
- Select the reason for modification.
- Editable items may vary according to the selected reason for modification.
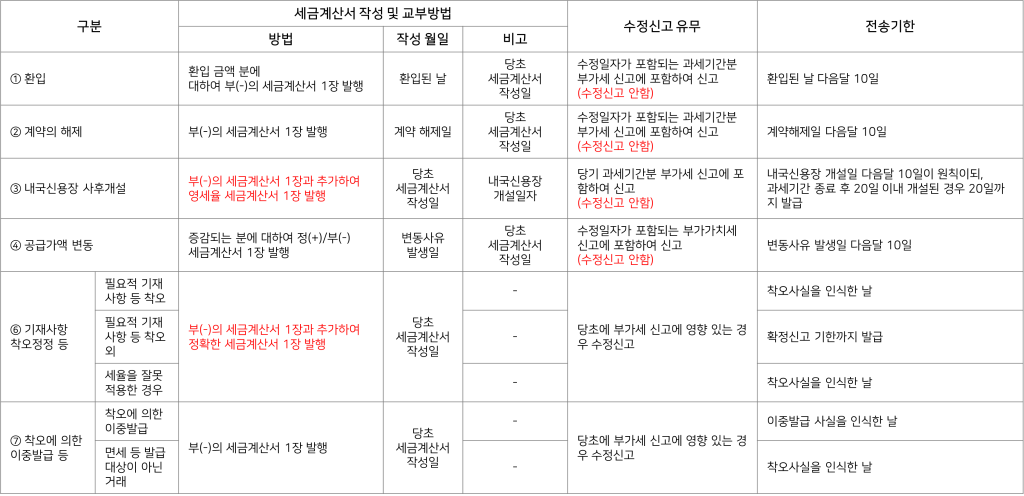
- If the reason for modification is error correction of entered items and follow-up opening of the local letter of credit, the electronic tax invoice of negative (-) will be automatically created and issued by NAVER WORKS Electronic Tax Invoice.
Reason for Modification:
- Click
 to see the details of the reason for the modification.
- Check the modified electronic tax invoice.
- If necessary, attach the file.
- Select the reason for modification.
- Click 'Issue'.
- If the certificate is not registered at the business place or it does not match the one registered in SmartBill, it cannot be issued. Check the Note box when issuing electronic tax invoices in the New Issuance menu.