You can enter basic settings to use the Electronic Tax Invoice service. Also, you can integrate a SmartBill account and send certificates by business place.
Set Electronic Tax Invoice
You can establish the basic settings to use the Electronic Tax Invoice service by setting the default taxation value, the use status of Delayed Issuance Unavailable, the calculation method of Automatic Tax Amount Calculation and the Point of Transfer for National Tax Service (NTS).
The Set Electronic Tax Invoice page is laid out as follows.
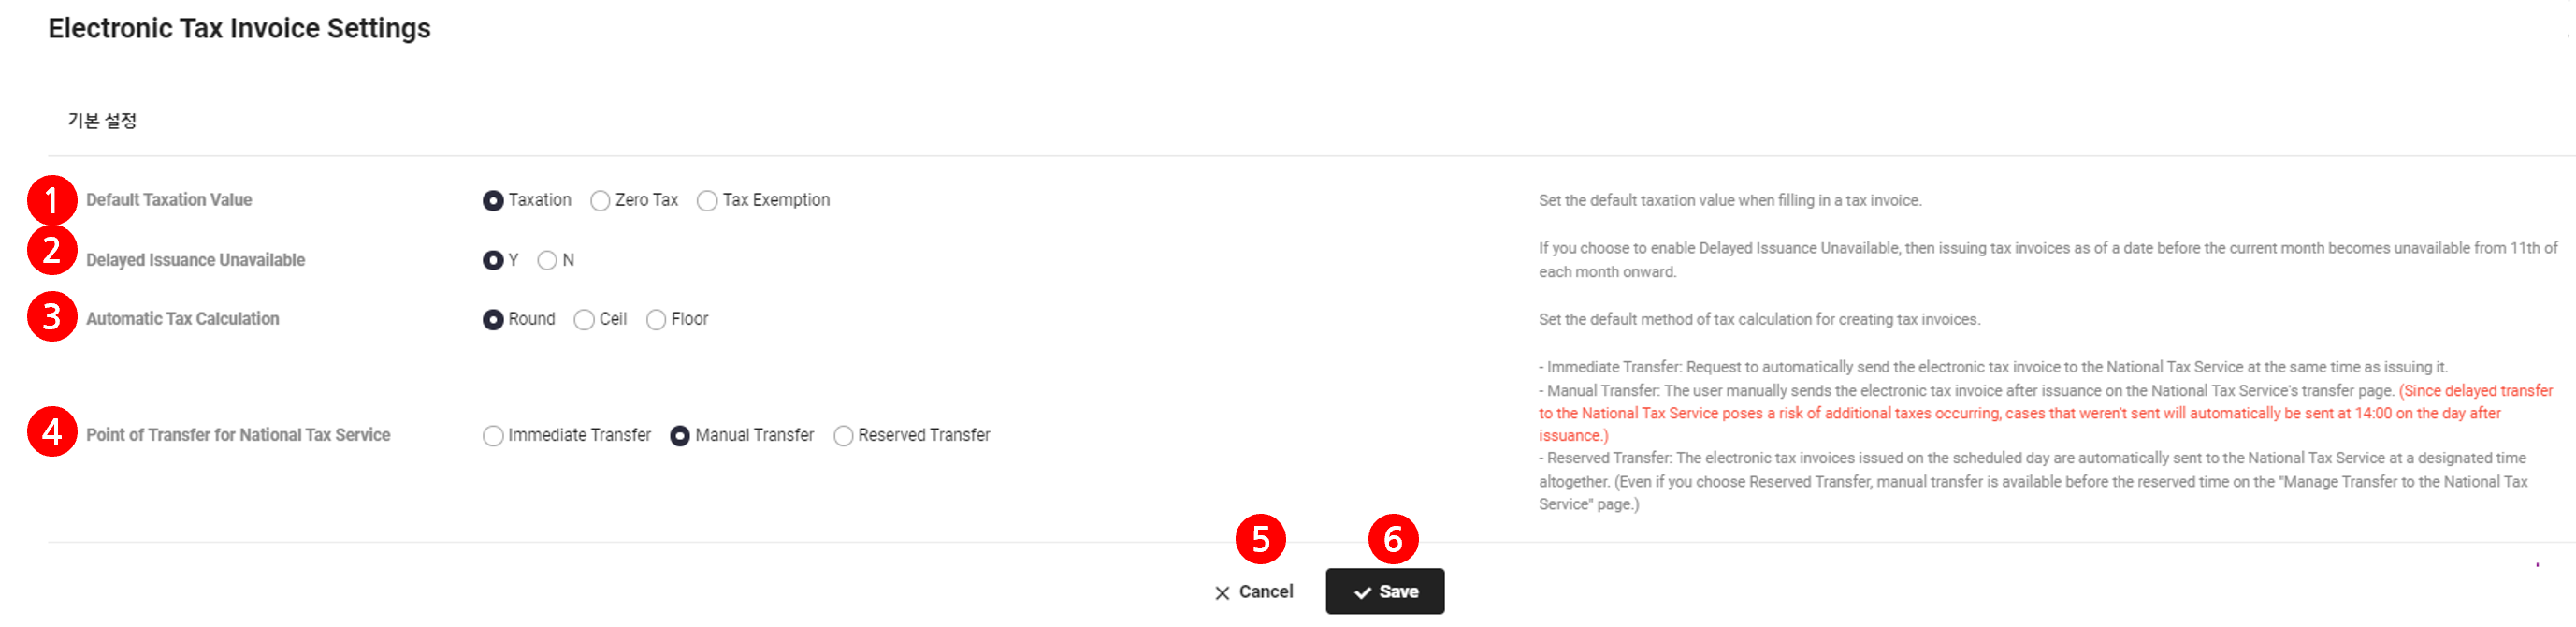
| Area | Description |
|---|---|
| ① Default Taxation Value | Set the default taxation value for creating tax invoices |
| ② Delayed Issuance Unavailable | Set the status of issuance date before the current month after the 10th of each month
|
| ③ Calculate Tax Amount Automatically | Set the processing method when a decimal point occurs in the tax amount when creating a tax invoice |
| ④ Point of Submission to National Tax Service | Set the point of submission to NTS
|
| ⑤ Cancel | Delete the setting, and refresh and open the previous page before making changes |
| ⑥ Save | It saves the settings |
SmartBill Integration Settings
It integrates with the SmartBill service to issue electronic tax invoices.
The NAVER WORKS Electronic Tax Invoice service provides tax invoice issuance and National Tax Service (NTS) submission management in partnership with SmartBill by Business Communications, Co., Ltd., which is the largest electronic tax invoice ASP company in Korea. Thus, before using the service, it must be integrated with the SmartBill account to be able to issue a tax invoice.
- Integrate SmartBill service by business place.
The SmartBill Integration Settings page is laid out as follows.
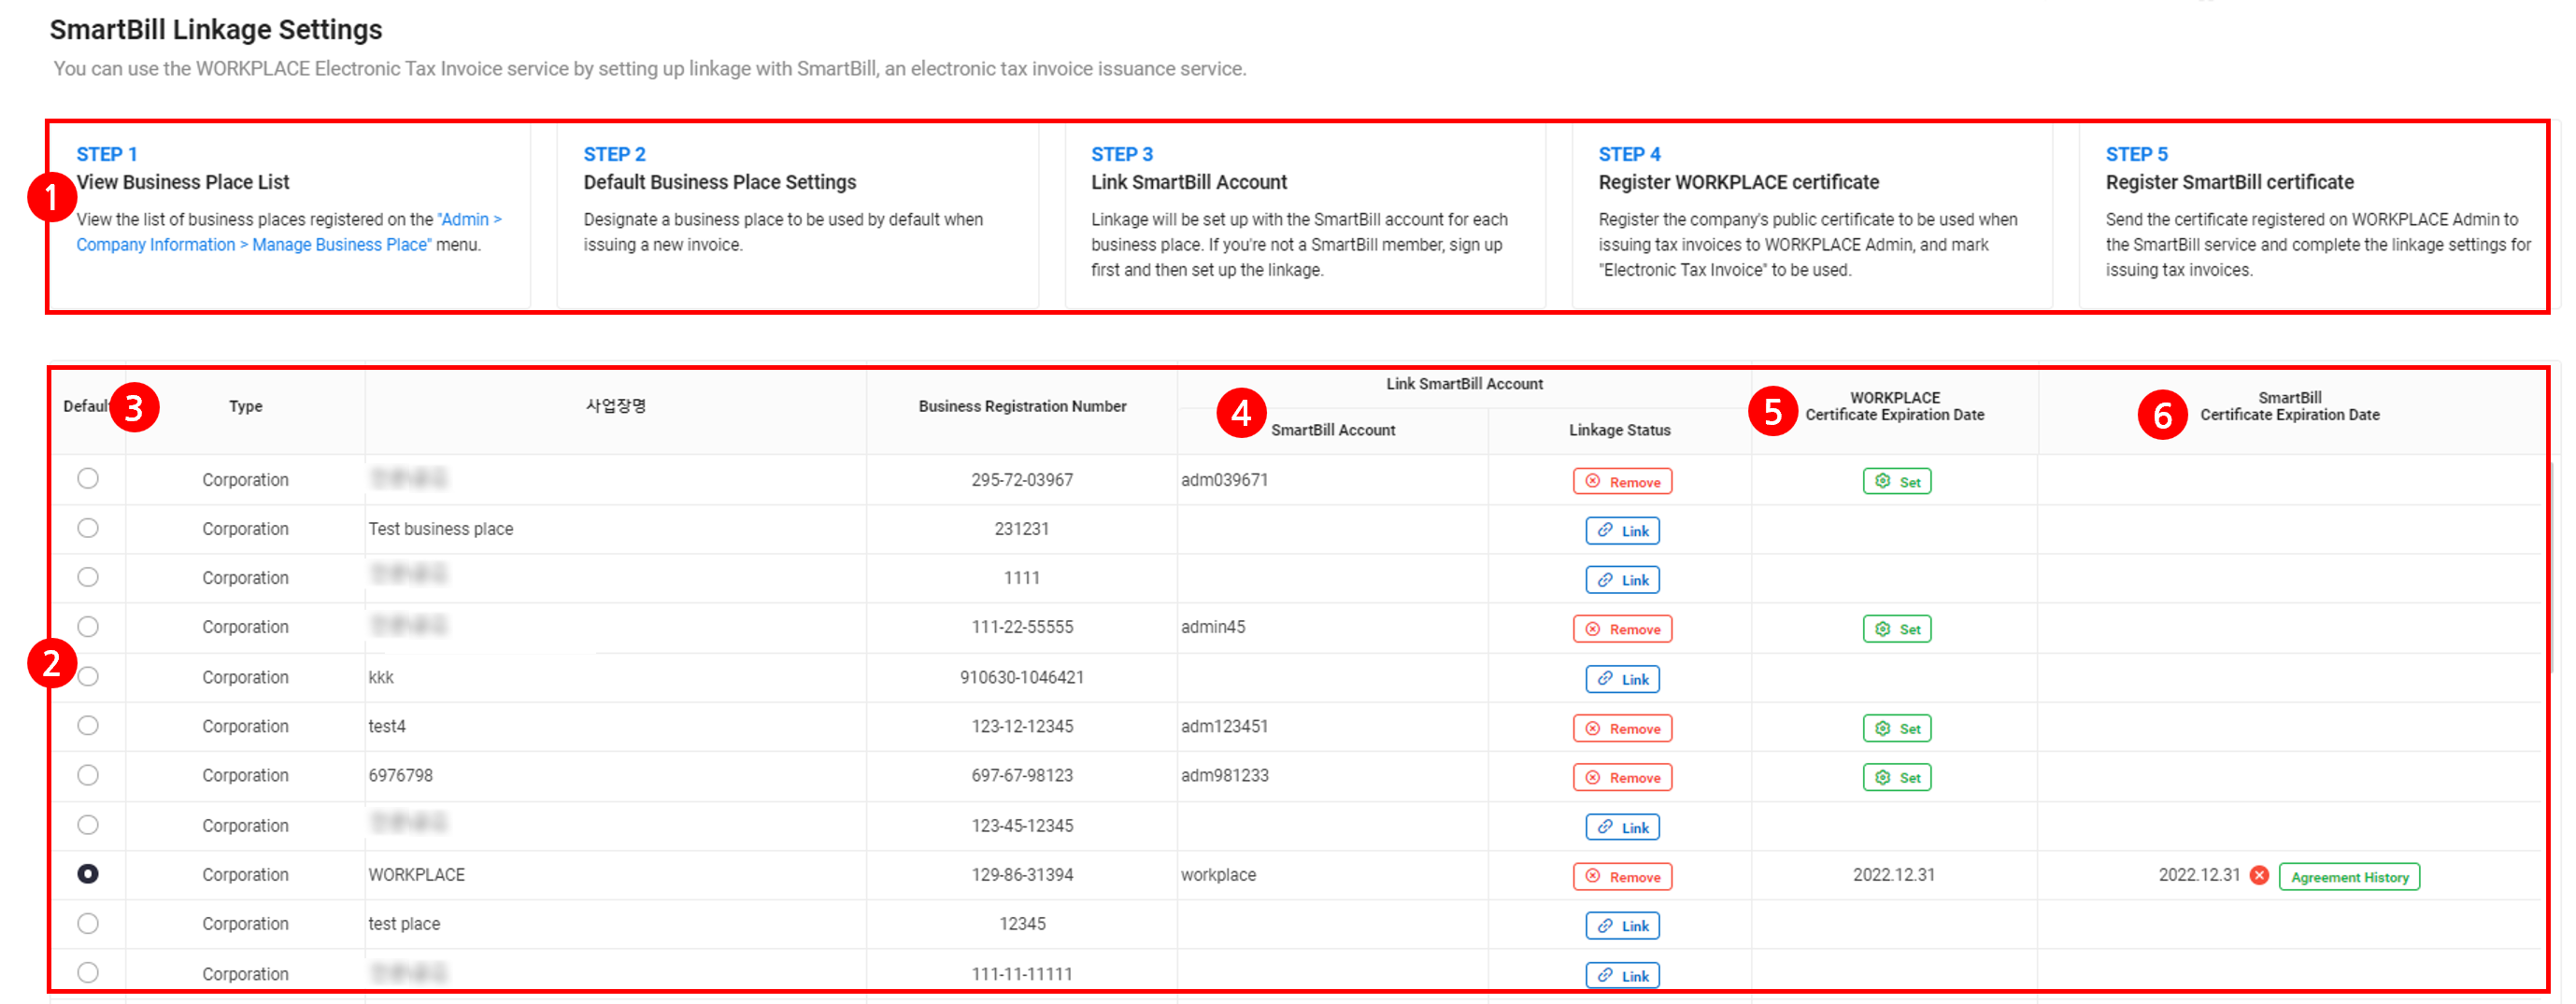
| Area | Description |
|---|---|
| ① Integration procedure | Information on the SmartBill integration procedure (See SmartBill Integration Procedure) |
| ② Business place list | It displays the list of registered business places (List registered in the ‘Business Support Settings > Company Information > Manage Business Place’ menu) |
| ③ Set Default Business Place | Set one of the business places as the default business place for issuing electronic tax invoices
|
| ④ Integrate SmartBill Account | It displays the SmartBill account and integration status for each business place
|
| ⑤ Certificate Expiration Date | It automatically displays the certificate expiration date when the SmartBill account is integrated with each business place
|
| ⑤ SmartBill Certificate Expiration Date | It displays the expiration date when the certificate is delivered to the SmartBill service; Agreement: Click to check the consent to the provision of certificate information
|
SmartBill Integration Procedure
The following describes how to integrate to SmartBill to issue electronic tax invoices.
- Check the list of business places and registration information in the ‘Business Support Settings > Company Information > Manage Business Place’ menu.
- Specify the business place to be used by default when issuing a new electronic tax invoice.
- The business place specified as default is automatically displayed in the issuance and view Electronic Tax Invoice page. If the default business place is not specified, the business place item is displayed blank.
- Integrate a SmartBill account by business place. If you're not a SmartBill member, sign up first, and set up the integration. (See Integrate SmartBill Account)
- Register the company's public certificate by business place in the ‘Business Support Settings > Company Information > Manage Business Place > Manage Certificate’ tab, and select ‘Electronic Tax Invoice’.
- Send the certificate registered in ‘Manage Certificate’ tab by business place and complete the integration settings to issue electronic tax invoices. (See Send SmartBill Certificate)
Integrate SmartBill Account
Set it as follows to integrate a SmartBill account.
Click ‘Integrate’ in the integration status item of the business place to integrate.
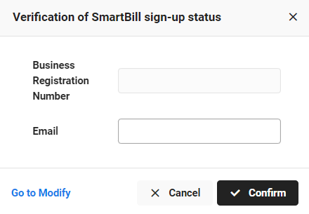
Verify SmartBill Member Status
The integrate procedure varies depending on the SmartBill membership status.
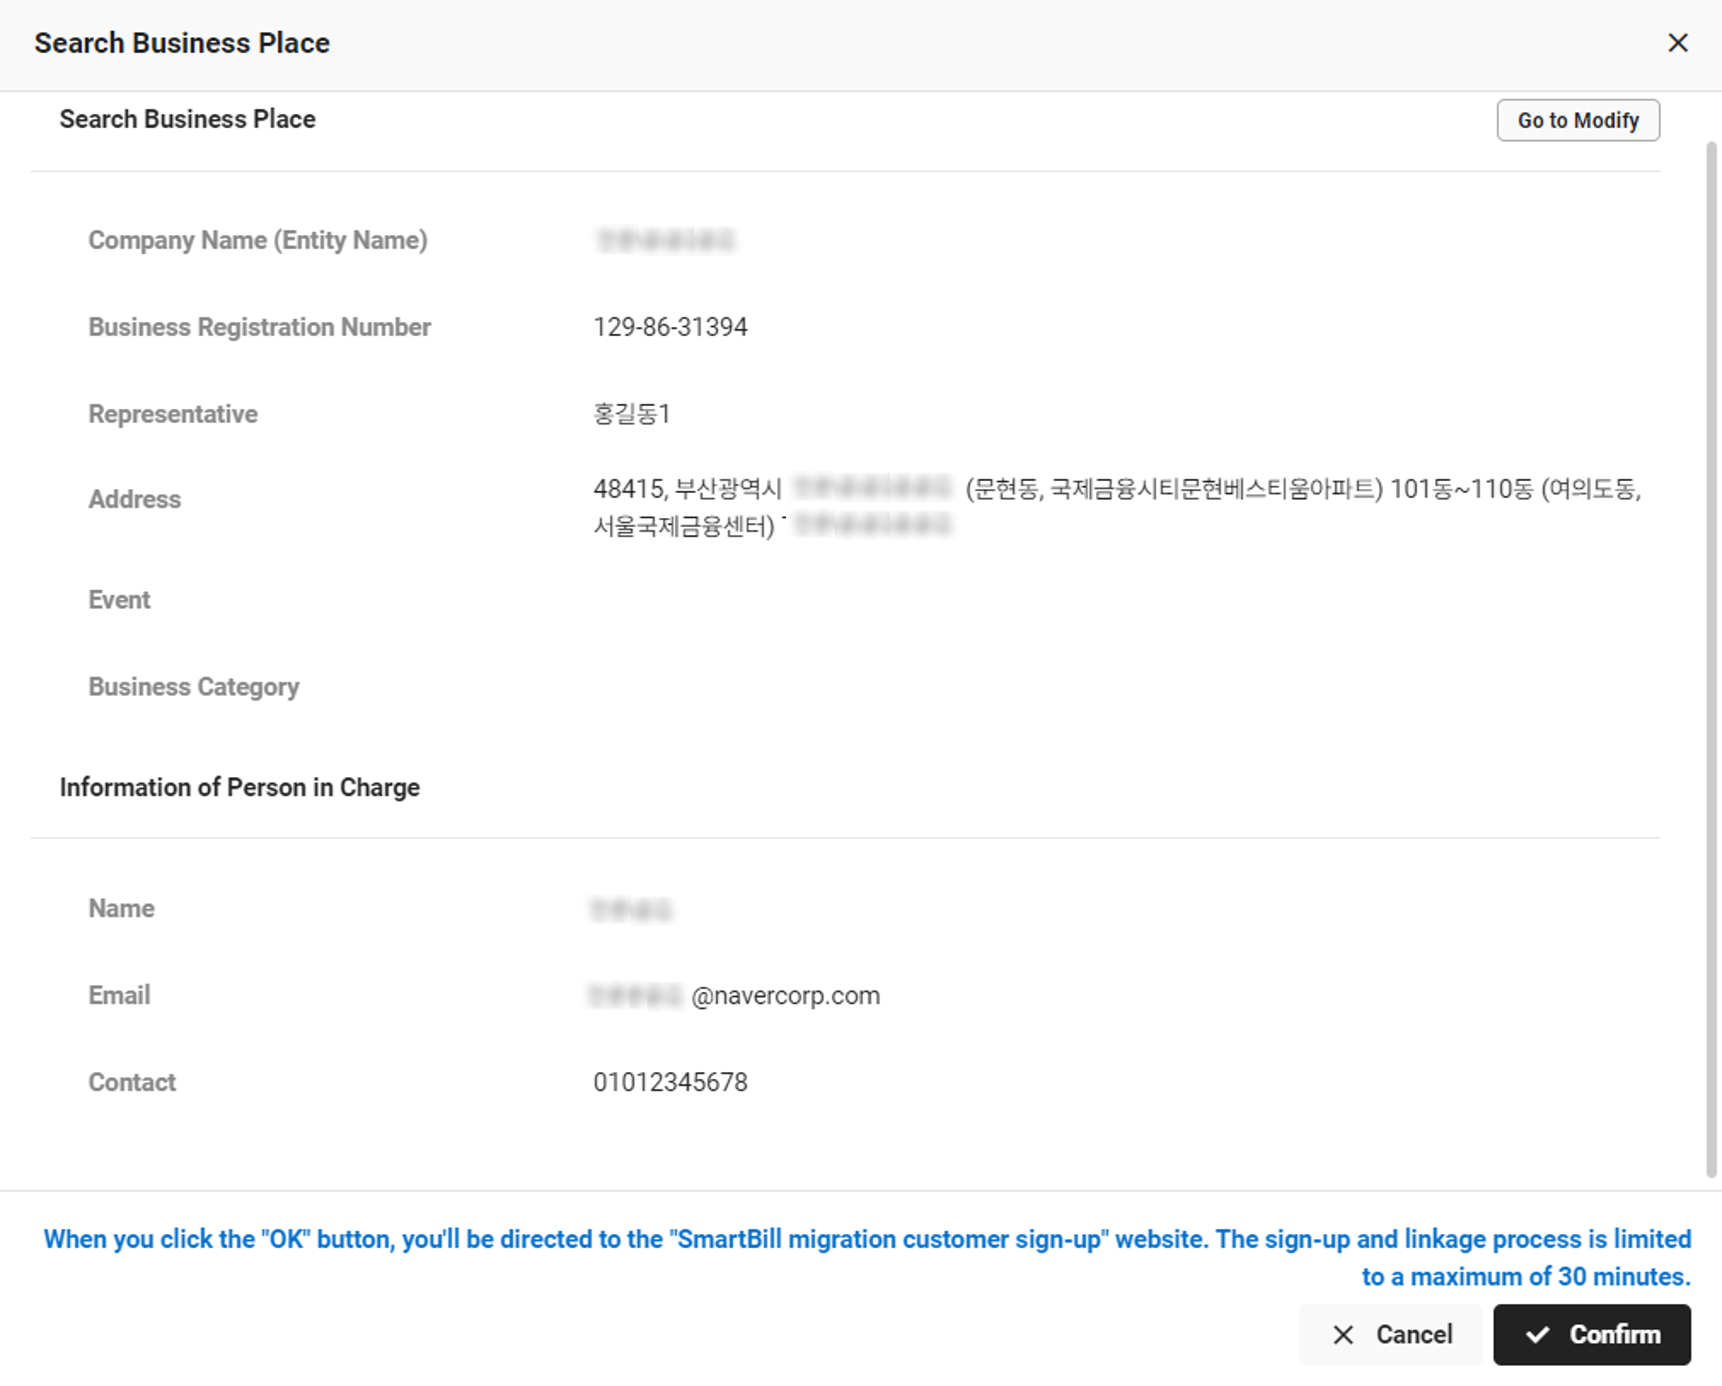
- Enter the email address in the SmartBill membership status verification pop-up window.
- If necessary, click ‘Go to Edit’ to edit the registered business place information. (See Business Support Settings > Company Information > Manage Business Place)
- Click 'OK'.
- If necessary, click ‘Go to Edit’ to edit the registered business place information. (See Business Support Settings > Company Information > Manage Business Place)
- Check the consent to the provision of information in the information provision guide pop-up for the verification of SmartBill member and click ‘OK’.
- The verification of SmartBill member status pop-up will appear.
- If you are already a SmartBill member, see ‘Integrate Existing SmartBill Member’, and if you are not a member, see ‘Integrate New SmartBill Member’.
When the Business Support Settings business place information and the SmartBill business place information is different
- When you sign up as a new SmartBill member and integrate the account, check the basic business place information that you have registered in ‘Business Support Settings > Company Information > Manage Business Place’ first, send it to SmartBill and complete the sign up process.
Thus, when registering as a new member, you will be registered as a SmartBill member with the same information as the business place information registered in Business Support Settings.
If you are a SmartBill member, we recommend that you manage your business place information in SmartBill and Business Support Settings in the same way.
When issuing tax invoices, the business place information (name, business type, business item, etc.) registered in Business Support Settings is issued.
Integrate Existing SmartBill Member
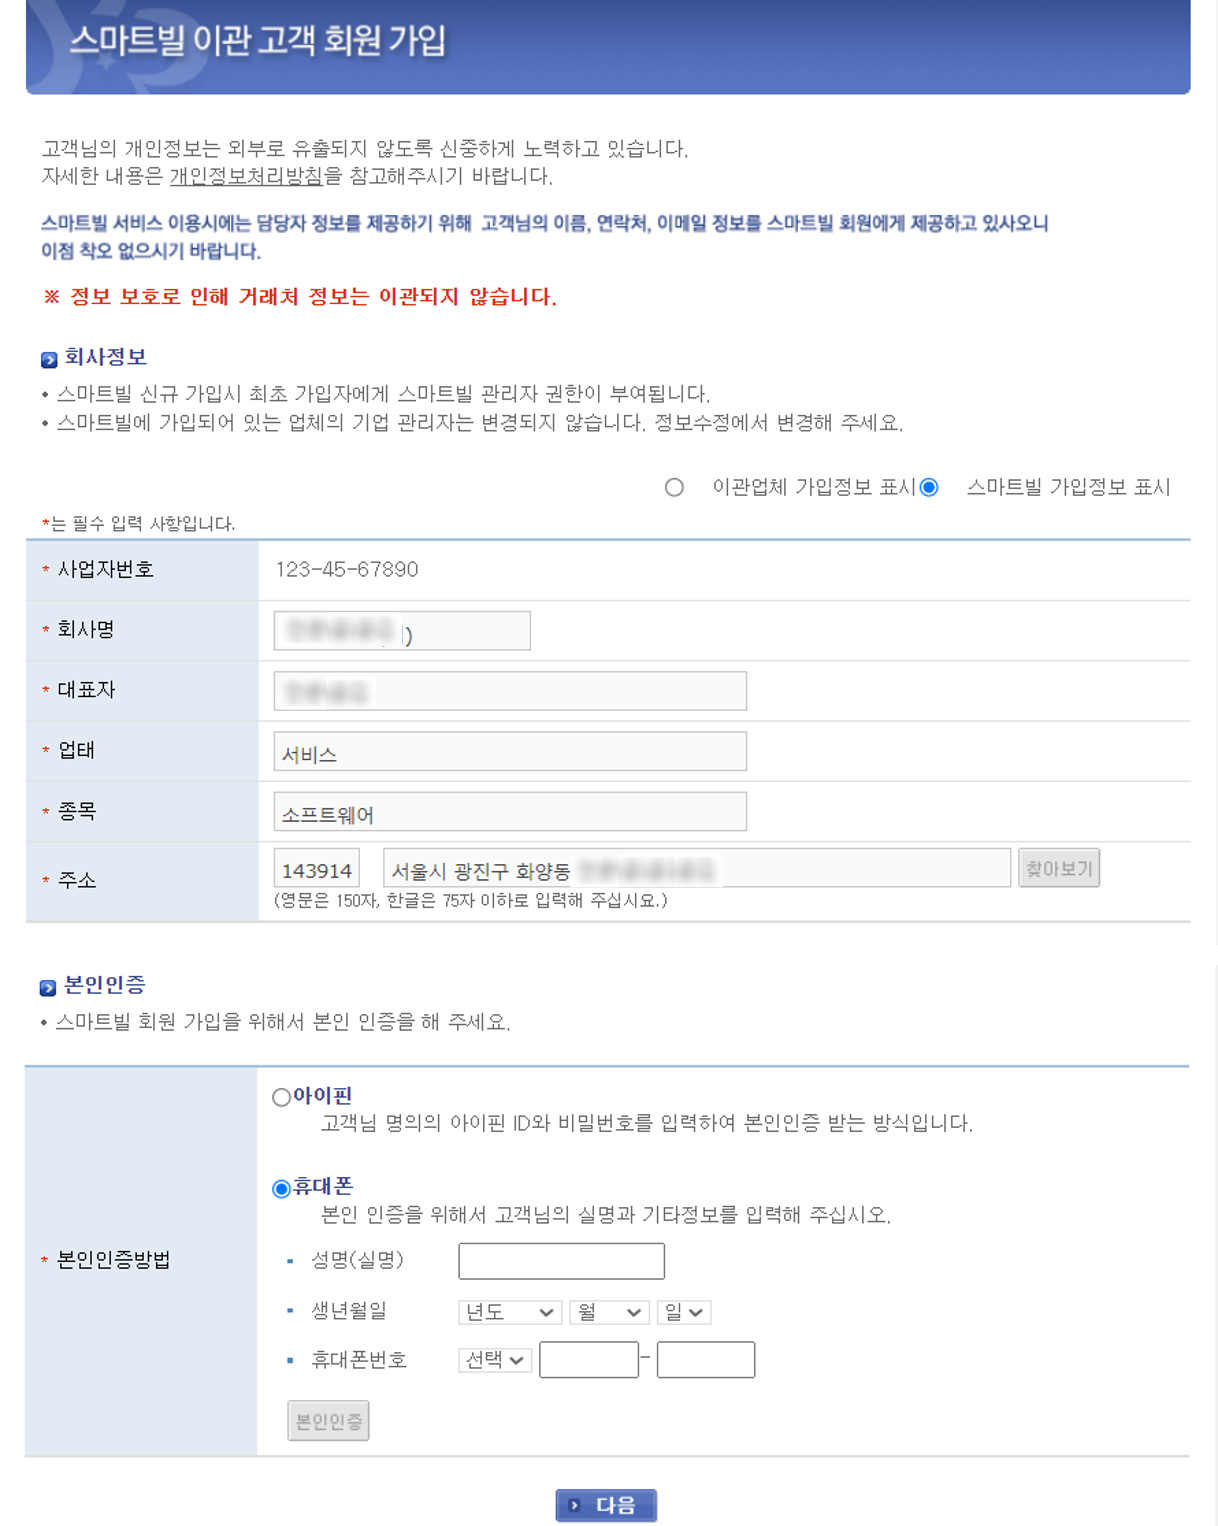
- If you are already a SmartBill member, a SmartBill transfer member sign-up pop-up window will appear.
- Please check the company information and edit it, if necessary.
- After entering the information, click ‘User Authentication’ to authenticate the user.
- After completing the authentication, click ‘Next’.
- A pop-up window to agree to terms and conditions for SmartBill transfer member will appear.
- After agreeing to terms and conditions, click ‘Next’.
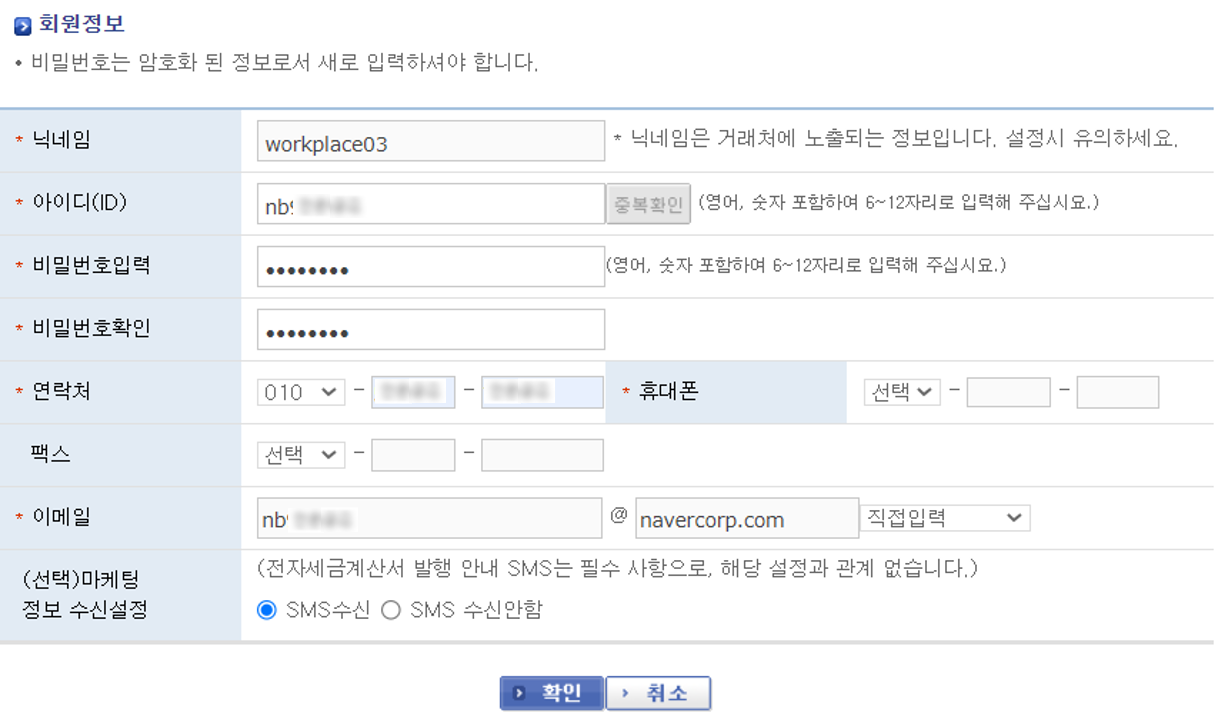
- In the SmartBill transfer member sign-up window, click ‘Login with SmartBill ID’.
- Enter the ID and password of SmartBill member and log in.
- When a SmartBill account integrate completion pop-up window appears, your business place and SmartBill account are integrated.
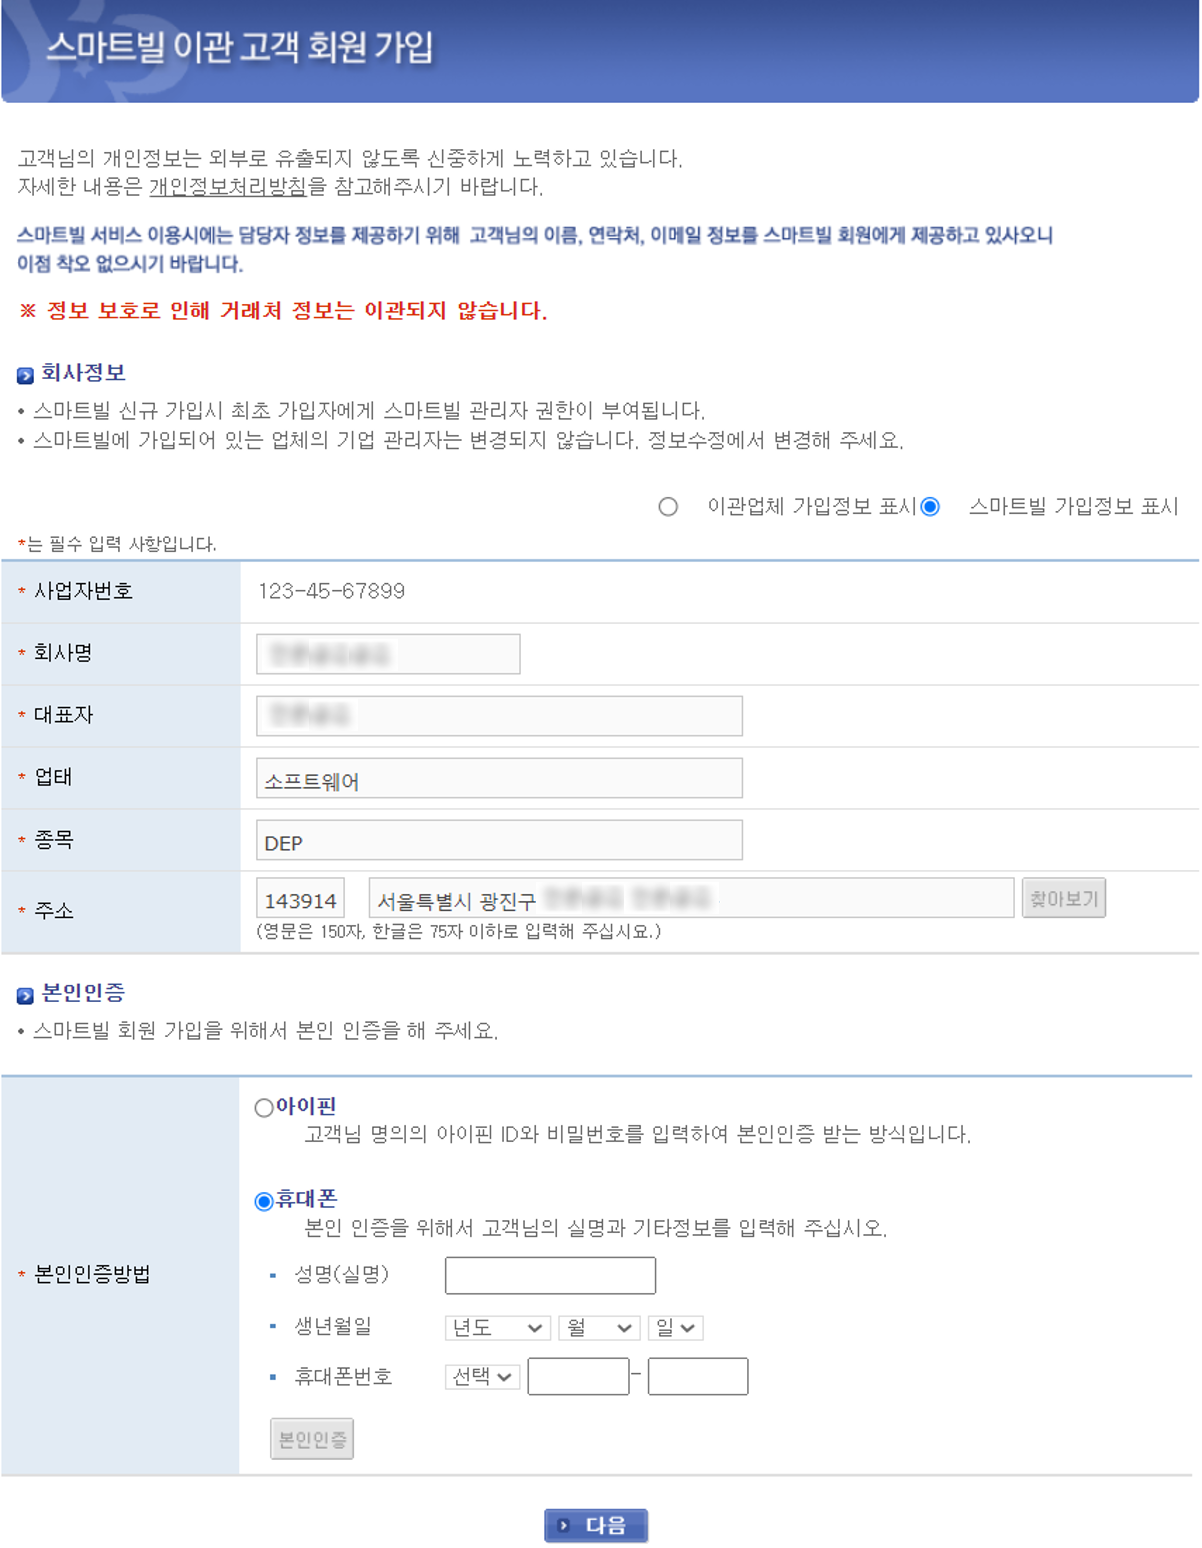
Integration for New SmartBill Member
- If you are not a SmartBill member, check the consent to the provision of information in the information provision guide pop-up for SmartBill member signup and click ‘OK’.
- A business place view pop-up window will open. After checking the business place information, click ‘OK’.
- If necessary, click ‘Go to Edit’ to edit the registered business place information. (See Business Support Settings > Company Information > Manage Business Place)
- A SmartBill transfer member sign-up pop-up window will open.
- Please check the company information and edit it, if necessary.
- After entering the information, click ‘User Authentication’ to authenticate the user.
- After completing the authentication, click ‘Next’.
- A pop-up window to agree to terms and conditions for SmartBill transfer member will appear.
- After agreeing to terms and conditions, click ‘Next’.
- In the SmartBill transfer member sign-up window, click ‘New Member Sign-up’.
- Enter the member information to sign up to SmartBill, and click ‘OK’.
- When a SmartBill account integrate completion pop-up window appears, your business place and SmartBill account are integrated.
Send SmartBill Certificate
The following describes how to send certificates to SmartBill.
- A certificate must be registered in SmartBill to issue electronic tax invoices.
- Send the certificate (check the Electronic Tax Invoice item) registered by vendor in ‘Business Support Settings > Business Place > Manage Certificate to SmartBill’. When the same certificate is registered to Business Support Settings and SmartBill by business place, the certification authentication process for the issuance of electronic tax invoice will be simplified.
- Click ‘Register’ in the SmartBill certificate expiration date item.
- Agree to the provision of business public certificate and click ‘OK’.
When the certificate registered in SmartBill and the one registered in Business Support Settings are different
- The same certificate must be registered in Business Support Settings and SmartBill to issue a tax invoice normally.
- Even if a certificate is registered in SmartBill, the certificate registered in ‘Business Support Settings > Manage Business Place > Manage Certificate’ menu will be updated to SmartBill via SmartBill certificate delivery.
- When you click 'Register' in the SmartBill Certificate Expiration Date item after integrating your SmartBill account and registering the certificate in Business Support Settings, the certificate will be automatically registered in SmartBill.
Manage Notifications
You can set Issue Electronic Tax Invoice-related notifications to be delivered to users. Users can receive service notifications and emails. Also, they can integrate with external solutions (KakaoTalk, LINE, Slack, Google Chat, etc.) to receive notification messages via external channels.
The Manage Notifications page is laid out as follows.
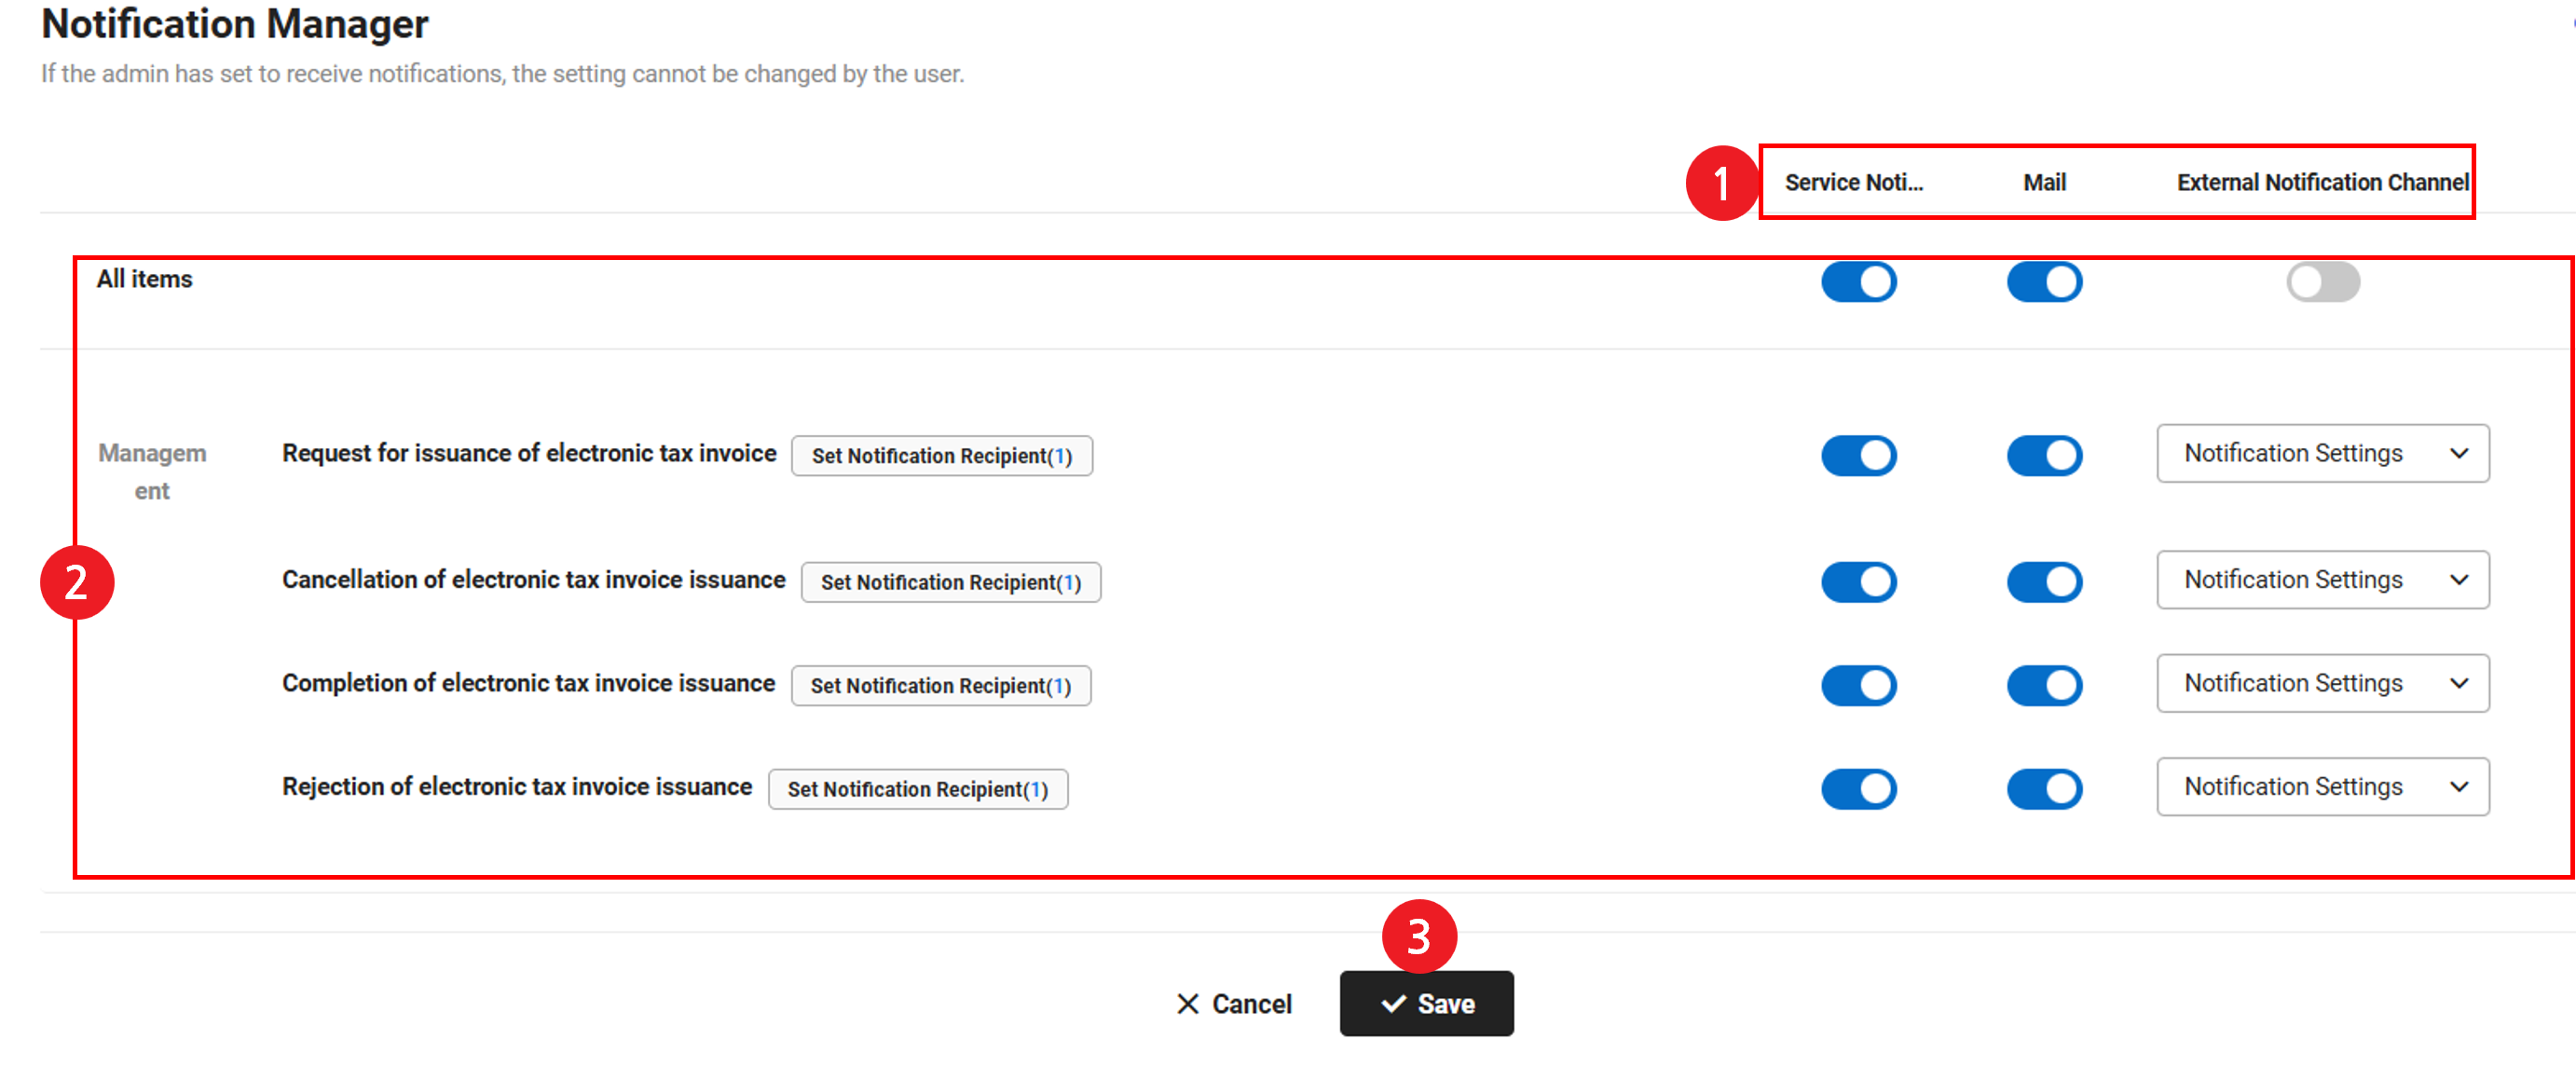
| Area | Description |
|---|---|
| ① Notification channels | Service Notifications, Send via Email
|
| ② Set Notifications | Set notifications to be sent or not sent by channel and item
|
| ③ Save | It saves the settings |