When a document approval request is made, the applicable document is displayed on the member's ‘Approval Home > Approval Document > Pending’ or ‘Scheduled’ menus, and an approval request email is sent. The approver can approve the document on the PC web and mobile pages or in the email page.
Approve Document on PC Web
The following describes how to approve documents on PC web.
- Click the
 icon at the PC web screen, and then click ‘Approval’ in the pop-up window.
 - You can view documents to approve in the ‘Approval Home > Approval Document > Pending’ menu.You can click the 'Approval Document' widget to go to the list of pending approval documents.
- If necessary, click ‘Settings’ and add an approver.
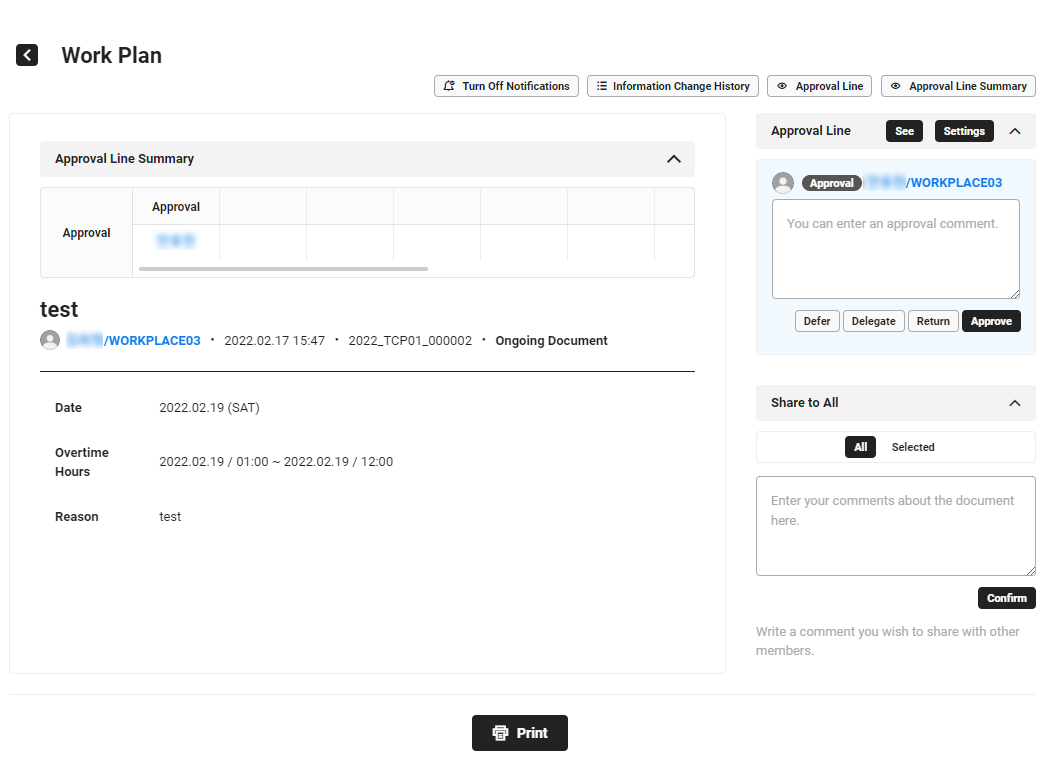
- Click the title of the document to approve.
When using as a corporate group, documents requested approval by employees in the primary company or other company's employees in the corporate group are displayed in the Document Pending Approval list. For more information, see Appoint Concurrent Position in Corporate Group.
- Check the content of the document.
- If necessary, click ‘Settings’ and add an approver.
- For more information on how to add approvers and the approval type, see Set Approval Line.
- When the admin has set the approval line as the Nth Reports To, if the creator has two or more Reports To, the creator must select one as the next approver.
- If necessary, enter the approval comment.
- Check the recipient. If necessary, add the recipient.
- When the admin has set to ‘Use’ receipt by form, the recipient area is displayed.
- If there are recipients set by the admin and document creator, then they are automatically displayed. If the admin has set to ‘Not Allow’ to Change Recipient, the recipient set by the admin can't change.
- If the admin has set to ‘Allow’ change of recipient, you can add recipients when approving documents. (See Add Recipient)
- Check the sharing options.
- The sharing options and targets set by the admin or document creator are displayed automatically. If the admin has set to ‘Not allow’ change of sharing targets, the sharing options set by the admin can't be changed.
- If the admin has set to ‘Allow’ change of sharing targets, you can change the sharing settings of the admin when approving documents. To change sharing, see Share Document.
- If necessary, click ‘Information Change History’ to view the document's approval line change history, sharing settings change history, and document revision history.
- If necessary, click ‘Turn Off Notifications’ to turn off the notifications for the document.
- Even if approval notifications are enabled, you won't receive notifications if you've turned off notifications for that specific document.
- If necessary, click ‘Settings’ and add an approver.
- Click the Approval button to approve the document.
- If the approver is a department, an approval notification is sent to all employees in the department. Any employee in that department at the time of approval can click and approve the document in the ‘Approval > Pending’ or ‘Scheduled’ document box. In addition to the employee who approved it, everyone in the department can view the document.
- After document approval, ‘Department’ is displayed under Approval Type (e.g., Agreement Approval - Department), and the name of the employee who approved is displayed (e.g., Gildong Hong/Planning team).
- If necessary, click ‘Edit’ and edit the content of the document.
- For more information, see Consent After Document Modification.
- The name of the Approval button varies depending on the Approval admin’s settings. For more information, see Manage Name.
- For more information on approval processing by case, see Approval Processing by Case.
- When the approval is complete, a approval complete notification is sent via service notifications or, email according to your settings.
- If the approver is a department, an approval notification is sent to all employees in the department. Any employee in that department at the time of approval can click and approve the document in the ‘Approval > Pending’ or ‘Scheduled’ document box. In addition to the employee who approved it, everyone in the department can view the document.
Approve Document on Email Page
The following describes how to approve documents on the email page.
- Check the content of the document in the approval request email you received.
- Click ‘Delegate’, ‘Reject’, or ‘Approve’ on the email page.
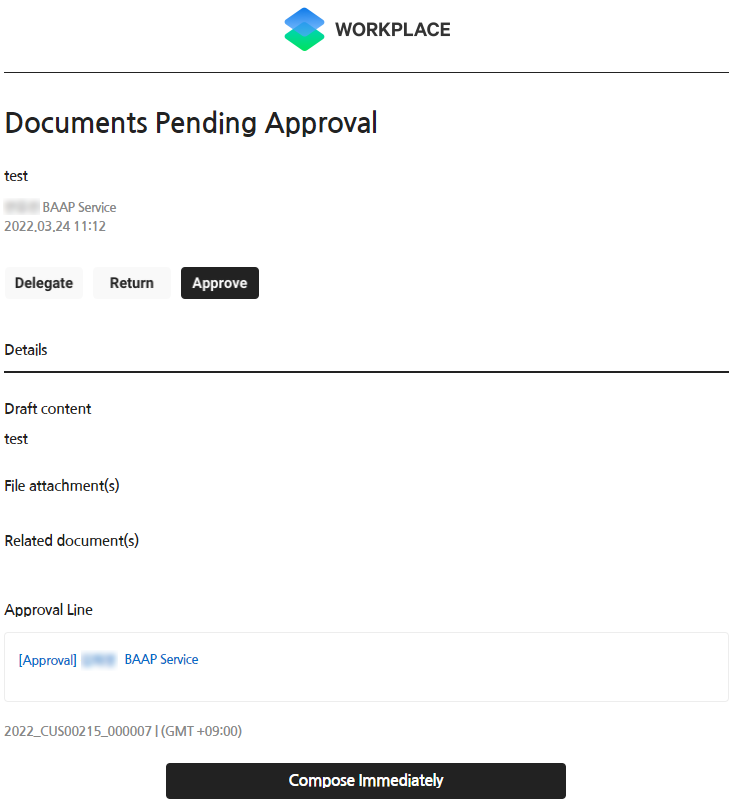
- The document is approved.
- The name of the Approval button on the email page varies, depending on the Approval admin’s settings. For more information, see Manage Name.
- To change the approval line or approve after changing sharing settings, click ‘Go to Document’ to open the PC web screen and see Approve Document on PC Web.
Approval Processing by Case
Depending on the case, proceed with the approval by referring to the followings.
- Delegate/Decline/Consent
- Pre-approval
- Defer Approval
- Arbitrary decision
- Reject and Specify
- Cancel Approval
- Consent After Document Modification
Delegate/Decline/Consent
- If approval type is Consent, Agreement, Parallel Approval, or Parallel Agreement, click one of the approval buttons (Delegate, Decline, Approve) to approve.
- ‘Delegate’ (or displayed as ‘Forward’): Delegate the decision-making duties regarding the document to another person.
- ‘Consent’ (or displayed as ‘Approve’, ‘Agree’ or ‘Confirm’): Consent to the content of the document and proceed with the next step.
- ‘Decline’ (or displayed as ‘Reject’, ‘Disagree’ or ‘Cancel’): Stop the proceedings of the document and do not proceed any further.
If you are set as a parallel approver or agreer and another parallel approver or agreer modifies the content or changes the approval line while expressing your opinion, then the content may not be saved. Do a refresh and check before processing. - If the approval type is ‘Automatic Consent’, then a separate consent process is not required, even if it still remains in the approval line.
- The Automatic Consent notification is sent to the automatic consent approver.
- If you need to delegate approval, click ‘Delegate’ and search for a delegate.
- An approval request notification email is sent to the delegate, and the approval request notification is displayed in the Documents Pending Approval card in ‘Home > Approval Document' widget of the delegate.
- You can check the approval status in the ‘Approval Home > Approval Document > Pending’ or ‘Scheduled’ menu of the delegator and the delegate.
- When the approval is completed, a notification is sent to both the delegated person and the delegating person.
- If the approval line for the subject document is set to Xth Reports To and there are two or more people left to approve the document, then the delegate must select the approver in ‘Select Reports To’ on behalf of the delegator.
- For expense-related documents, if the documents contain content that violates the company's audit rules, then it is indicated as ‘Audit Violation’ in the View Document page, and you can check the details by clicking on it.
- Check the content before the approval. ‘Audit Violation’ is only displayed in the Approve Documents stage and is not displayed after the Approval is completed.
- For more information on approval type, see Detailed Descriptions of Approval Type and Approver.
- The name of the Approval button varies depending on the Approval admin’s settings. For more information, see Manage Name.
Pre-approval
If the Approval admin enables pre-approval, then approvers whose turn has not yet arrived in the processing order can approve, regardless of their turn.
Select a document from the ‘Approval Home > Approval Document > Pending’ or ‘Scheduled’ menu and approve it.
Defer Approval
If the Approval admin allows deferring approval, then ‘Defer’ is additionally displayed in the Approval button area. When deferring a document, the progress of the document will stop temporarily.
- When the document approval is deferred, the next approver can't approve the document. However, approvers on the same parallel approval (agreement) line can approve the document.
- If the company uses pre-approval, then other approvers can process the approval, regardless of whether the approval is deferred.
- You can enter a deferral comment when processing the document deferral, and you can check the deferral comment in the View Document page.
- The approver deferring the document can reapprove it anytime.
Arbitrary Decision
If you exercise your arbitrary decision permission, then you can close the document approval, regardless of the processing order on the approval line.
If you have been granted the arbitrary decision permission, then Arbitrary Decision is displayed when you click ‘Approve’ in the Approval button area. To make an arbitrary decision on a document, click ‘Arbitrary Decision’.
- The processing status will be marked as ‘Arbitrary Decision’ for the approver who made the arbitrary decision, and ‘Consent to Arbitrary Decision’ for all other approvers.
- The permission to make arbitrary decisions can be granted by form. For more information, see Manage Form > Set Approval Line.
- If the company is using pre-approval, then it will be processed as ‘Consent to Arbitrary Decision’ for employees located before the arbitrary decision maker in the processing order who have not yet approved.
Reject and Specify
Reject and specify involve specifying one of the approvers who have already approved so that the approved document can be reapproved by the specified approver and other following approvers.
If the Approval admin enabled Reject and Specify, and there is a previous approver who approved the document before you, click ‘Reject’ and it is marked as ‘Reject and Specify’.
- In case of Reject and Specify, the approval by the approvers following the designated approver is canceled and converted to the pending approval status.
- When approving a document with pre-approval, ‘Reject and Specify’ is not displayed, and only general rejection is available.
- The button name of Reject and Specify may vary depending on the name setting by the admin (e.g., Specify and Decline, Specify and Oppose, Specify and Cancel).
- Once rejecting and specifying proceeds, the rejected approver and the current approver are added to a new position immediately following their original position in the approval line, with the unapproved status.
- Reject and Specify can only be performed once.
Cancel Approval
Employees who have approved a document may cancel the approval of the document approved by themselves.
For documents that you have approved, ‘Cancel Approval’ is displayed next to your name in the Approval Line area. To cancel document approval, click ‘Cancel Approval’.
- You can only cancel the approval before the next approver approves.
- Approvers who have set automatic consent can't cancel approval.
- You can't cancel the reject and specify.
- You can't cancel approval in case of arbitrary decision.
- If you cancel the approval of a document, then the document status returns to before approval and becomes available for approval again.
- When the company does not use pre-approval, if the document approval is canceled, then the next approver can't approve the document.
Consent After Document Modification
The approver can approve the document after editing its content at the time of approval. The admin sets whether each format of the document can be edited. (See Manage Form)Documents that are set as editable have ‘Edit’ displayed on the document approval page.Click ‘Edit’ and make the necessary changes, then approve the document by clicking ‘Consent After Saving’ or ‘Arbitrary Decision After Saving’.
- The modification history can be viewed in the Change Information History on the View Document page, and items edited by the approver are displayed in blue.
- However, in case of a form created by the company, if the component name is not entered, you can't check changed items. (See Create Form)
- You can't edit the purchase price settlement request form for accounting.
The modifiable items per form are as follows.
| Form Name | Modifiable Item |
|---|---|
| General Document | Title, Content, Attach File, Related Document |
| Certificate Request | Title, Number of Copies, manual input items, Reason |
| Absence Schedule | Title, Evidence Document, Period, Reason, Absence Status Sharing, Attach File, Related Document |
| Absence Schedule Cancellation | Title, Reason, Attach File |
| Work Result Request | Title, Clock-in/out, Breaks, Outside Work, Absence, Reason, Attach File |
| Cancel Work Result | Title, Reason, Attach File |
| Work Plan Request | Title, Overtime, Reason, Attach File |
| Expense Plan Request (only for unsettled cases) | Title, Estimated Schedule, Outsider/Attendee (not available in case of audit violation), Details, Reason, Related Document |
| Expense Settlement Request | Title, Expense Item, Receipt (additional), Outsider/Attendee (not available in case of audit violation), Details, Reason, Related document Modification of expense items follows the settings for the ‘Add Attendee’ value of the admin. (See Expense > Settings > Manage Expense Item Code) - Changes can be made between expense items whose Add Attendee value is ‘Y’. - Expense items whose Add Attendee value is ‘N’ can be changed to items whose Add Attendee value is ‘Y’. - Expense items whose Add Attendee value is ‘Y’ can be changed to items whose Add Attendee value is ‘N’. However, all attendee information is deleted |
| Expenditure Report Request | When using budgets: Title, Amount, Content, Reason, Attach File (Additional), Related document When not using budgets: Title, Amount, Content, Reason, Attach File (Additional), Related document, Expenditure Item, Project Code |
| Expenditure Resolution Request | Title, Evidence Data (additional), Content, Reason, Related Document |
| Request Payroll Certificate | Receipt for Wage and Salary Income Tax Withholding: Title, Certificate Item, Imputed Year, personal information, Language, Purpose of Issuance, Number of Copies Certificate of Income Tax Withheld: Title, Certificate Item, Payroll Month, Purpose of Use, Place of Submission, Creation Date, personal information, Language, Purpose of Issuance, Number of Copies Book of Wage and Salary Income Withheld: Payroll Month, Purpose of Issuance, Number of Copies |
| Forms created with Create Form | Components excluding instruction text, automatically displayed text, and automatic number issuance |