The created documents are automatically classified according to the document status and saved in respective document boxes under the ‘Approval Document’. A user set as a recipient can accept and process documents in ‘Inbox’. A sender can view the receipt status of documents in the ‘Outbox’ menu. In ‘Shared Document’, you can view and print shared documents. In ‘Document for Viewing’, you can view documents that have permission to read. In Official Document Box, you can view official documents for receipt/sending requested by users.
For information on how to view details and print searched documents, see View Approval Document Details and Print Document.
Document Box
The following describes how to view documents in Document Box.
- Click the
 icon at the top right of the PC web screen, and then click ‘Approval’ in the pop-up window.
 - Click
 at the top left of the Approval Home screen.
 - Click the Document Box to view from menu.
The document box types are as follows.
- Approval Document:
- Pending: It displays the list of documents you need to approve because your turn to approve has come.
- Scheduled: It displays the list of documents for which the approval line includes you but your turn to approve has not come yet.
- Ongoing: It displays the list of documents that you have created or approved and have been moved to the next approver.
- Completed: It displays the list of documents that you have created or you are approver for, for which the document procedure has been completed (rejected, canceled).
- All: It displays the list of all documents that you have created or for which you are an approver.
- Temporarily Saved: It displays the list of documents that you saved temporarily while creating or for which you performed Retrieve.
- Shared Document: It displays the list of documents for which you are included in their sharing targets.
- Document for Viewing: It displays the list of documents for which you have viewing permissions.
- Inbox: It displays the list of documents for which you or your organization is a recipient.
- Outbox: It displays the list of documents for which you are a creator or approver.
- Official Document Box: It displays the list of official document receipt and sending documents for which you are a creator or approver (approved official documents).
- Imported Document: It displays the list of imported documents that were created in other corporate management systems.
- View Approval Document Report: It displays the list of documents from approval document reports, for which you have been granted the viewing permission.
In the search window of Approval Document (Pending, Scheduled, Ongoing, Completed, All), Temporarily Saved, Shared Document, and Viewed Document Box, you can view documents by searching as follows.
- Form: you can view documents by selecting one or more desired forms.
- Click the department-tree icon to display all forms of the company.
- If you enter a search keyword and the search keyword is included in the form category or form name, it will be highlighted.
- When using as a corporate group, the ‘company’ item is displayed.
- Shared Recipient: You can only search for documents that are set as Share to Selected, and you are one of the people the document was shared with.
- Drafting Department: Click the department-tree icon to select a department to search.
- Documents drafted by members of selected department will be searched, and concurrent departments are not searched.
- The affiliated department at the time of drafting is searched.
- You can search for a document using the content type (title, body, title + body, attachment) and filters.
- If the search keyword is included in the document title, it will be highlighted.
For the ‘Approval Line’ in the list of pending documents, scheduled documents, and ongoing documents, you can visually check the name of the approver and current approval progress.

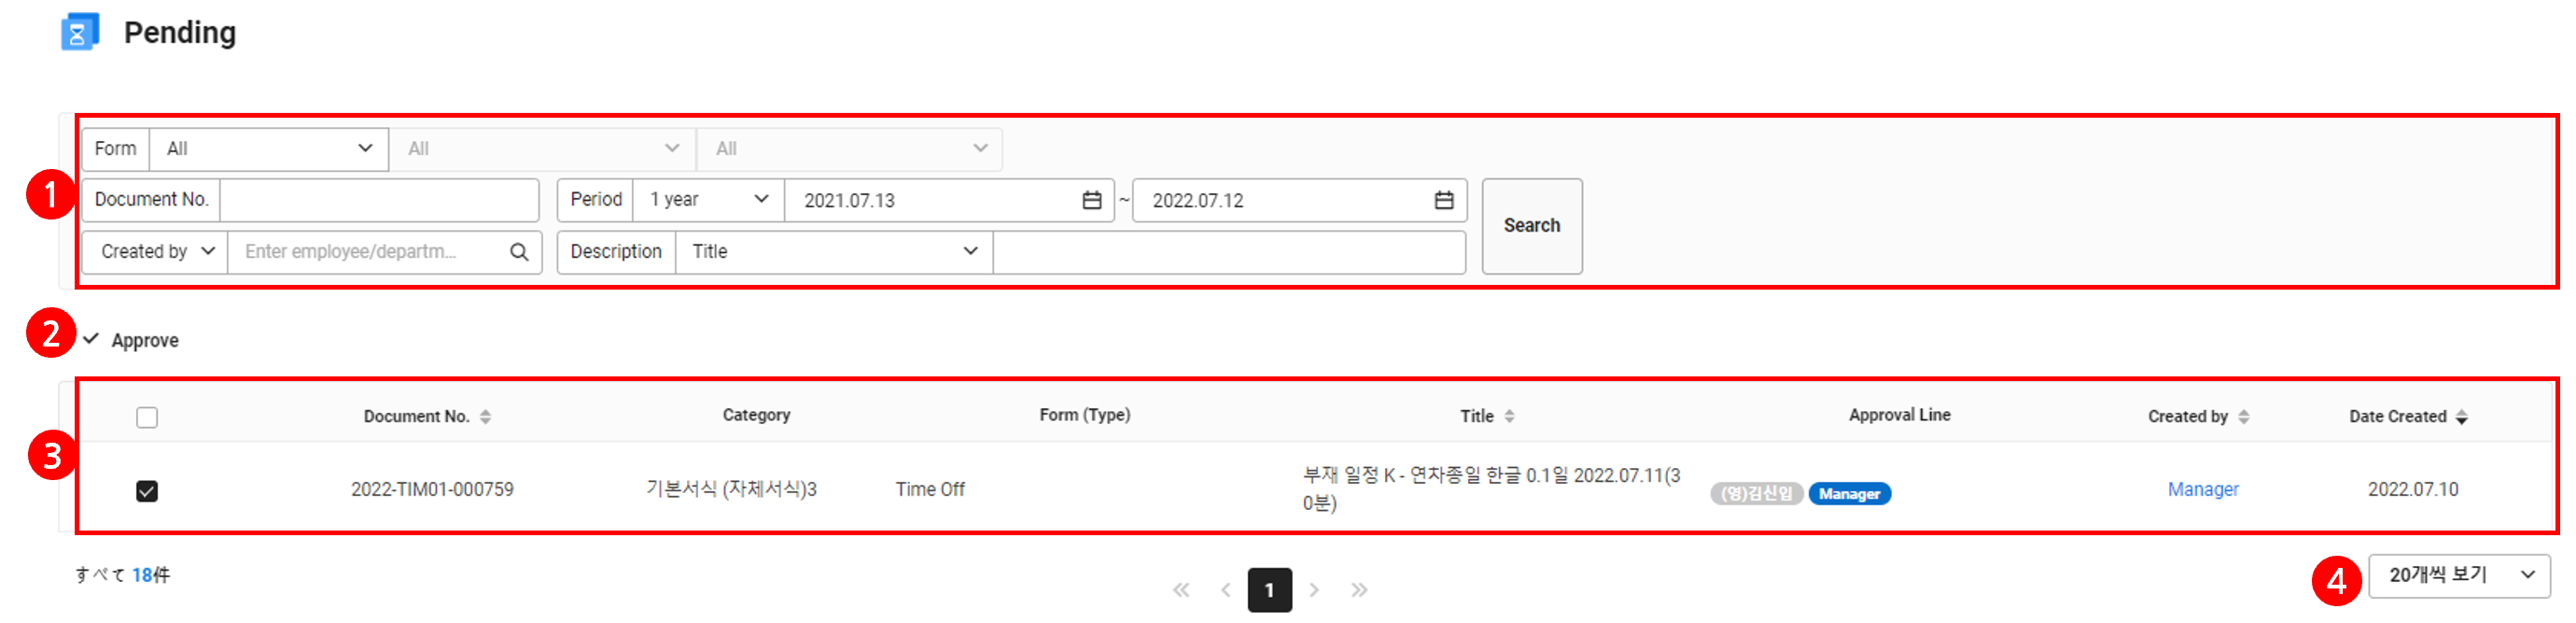
Pending Document
In the Pending Document menu, you can view documents you need to approve.
The Pending Document page is laid out as follows.
| Area | Description |
|---|---|
| ① Search Window | Search documents based on the form, document number, period, creator, approver, shared recipient, drafting department, company (when using as a corporate group), and content conditions
|
| ② Approve | If the admin has set Bulk Approval to Use, then you can select multiple documents and approve them in bulk |
| ③ Document list |
|
| ④ Number of displayed items | Set the number of documents to be displayed on a single page of the list |
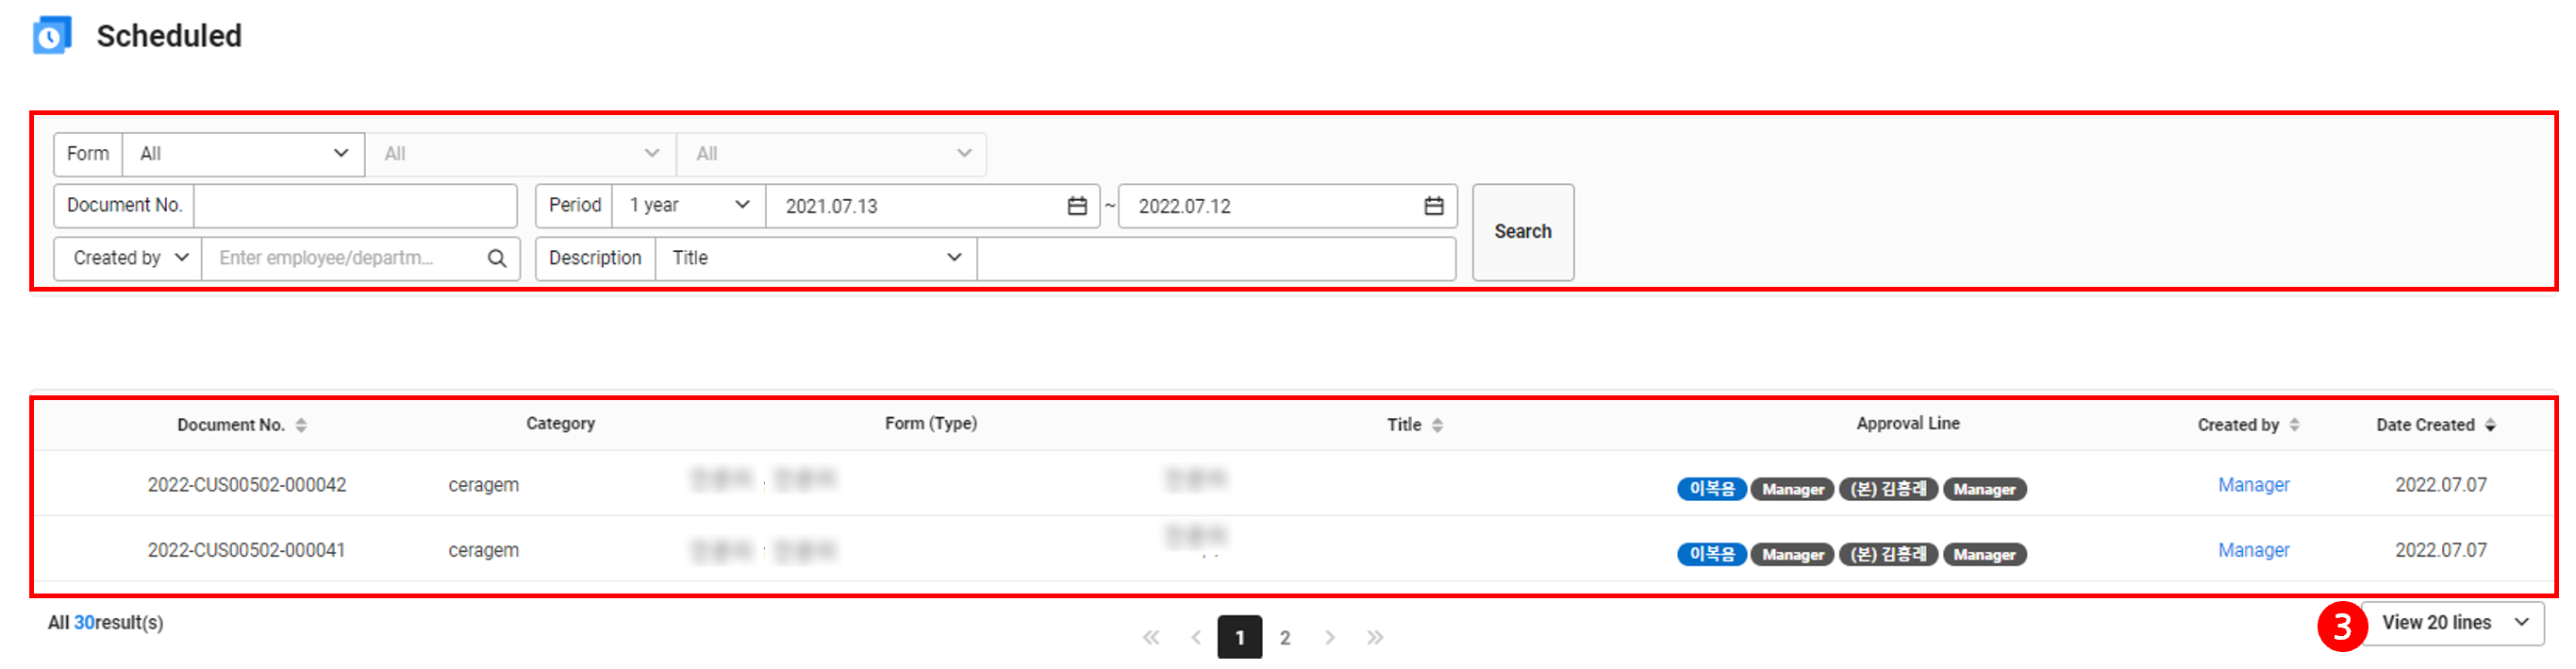
Scheduled Document
In the Scheduled Document menu, you can view documents that are to be approved.
The Scheduled Document page is laid out as follows.
- If you use pre-approval, then the scheduled document can be processed regardless of your turn to approve. (See Approve Document)
- In the event you are included multiple times in the approval line, documents you already approved may be viewed in the ‘Scheduled’ document box.
| Area | Description |
|---|---|
| ① Search Window | Search documents based on the form, document number, period, creator, approver, shared recipient, drafting department, company (when using as a corporate group), and content conditions
|
| ② Document list |
|
| ③ Number of displayed items | Set the number of documents to be displayed on a single page of the list |
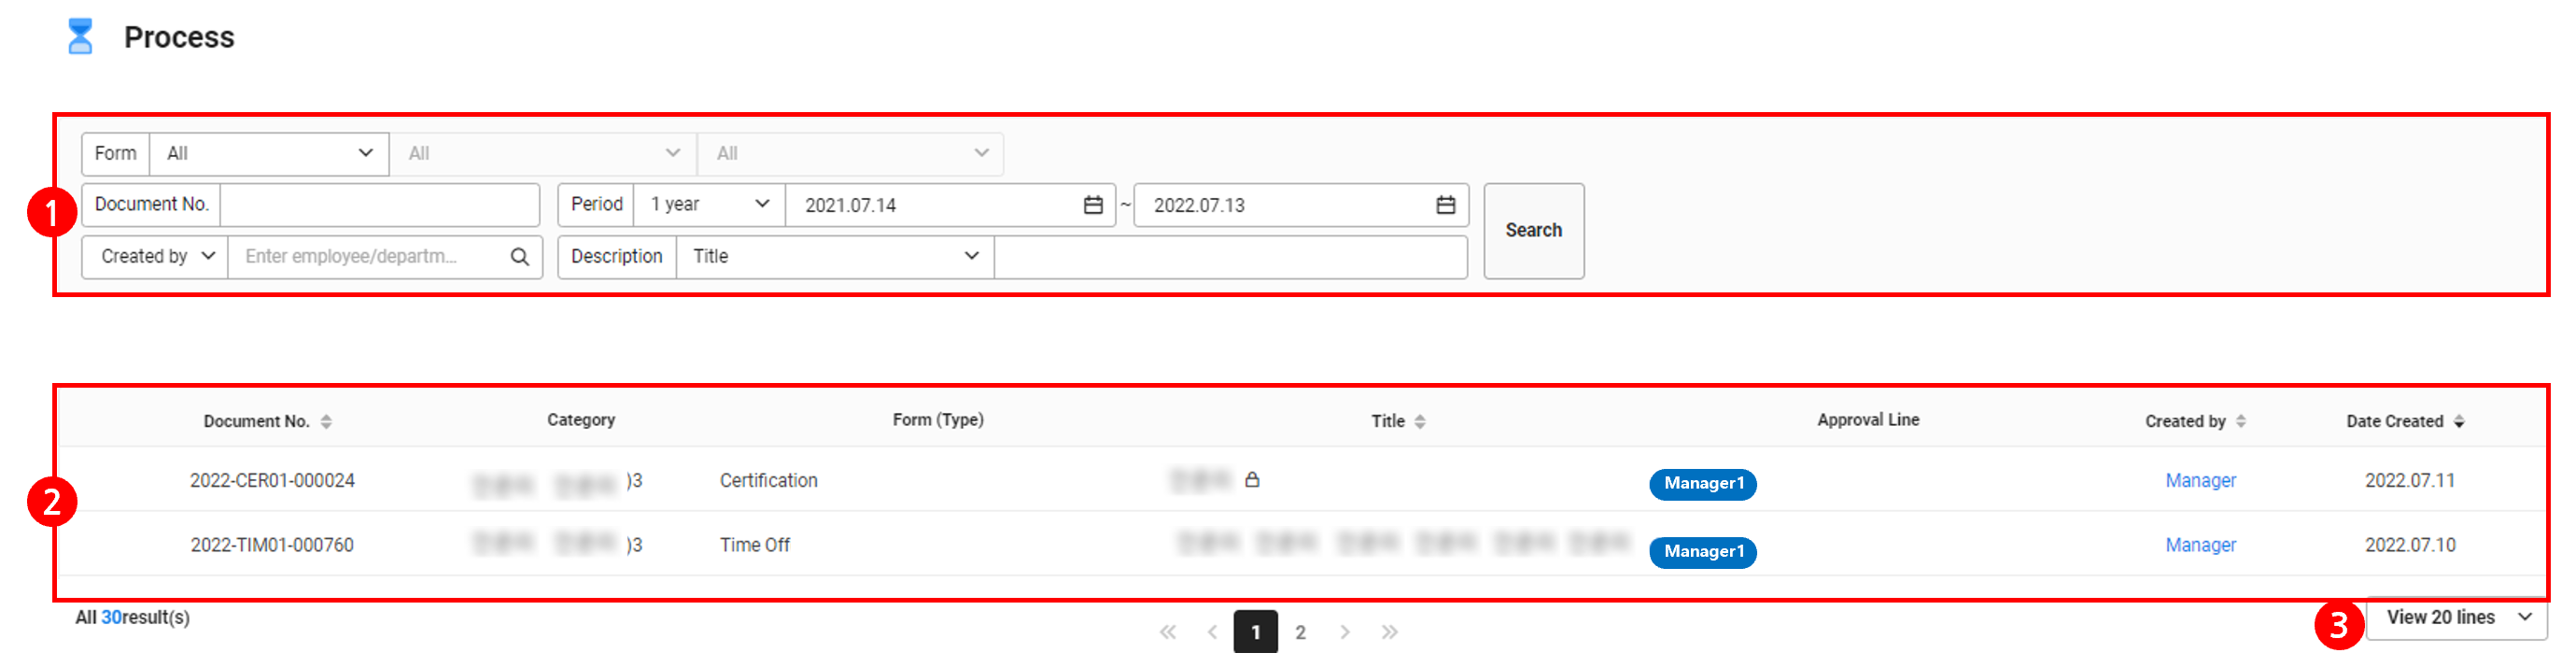
Ongoing Document
In the Ongoing Document menu, you can view documents you created or approved. Once approval of a document is completed, it is displayed in the ‘Completed Document’ or ‘All Documents’ menu.
The Ongoing Document page is laid out as follows.
| Area | Description |
|---|---|
| ① Search Window | Search documents based on the form, document number, period, creator, approver, shared recipient, drafting department, company (when using as a corporate group), and content conditions
|
| ② Document list |
|
| ③ Number of displayed items | Set the number of documents to be displayed on a single page of the list |
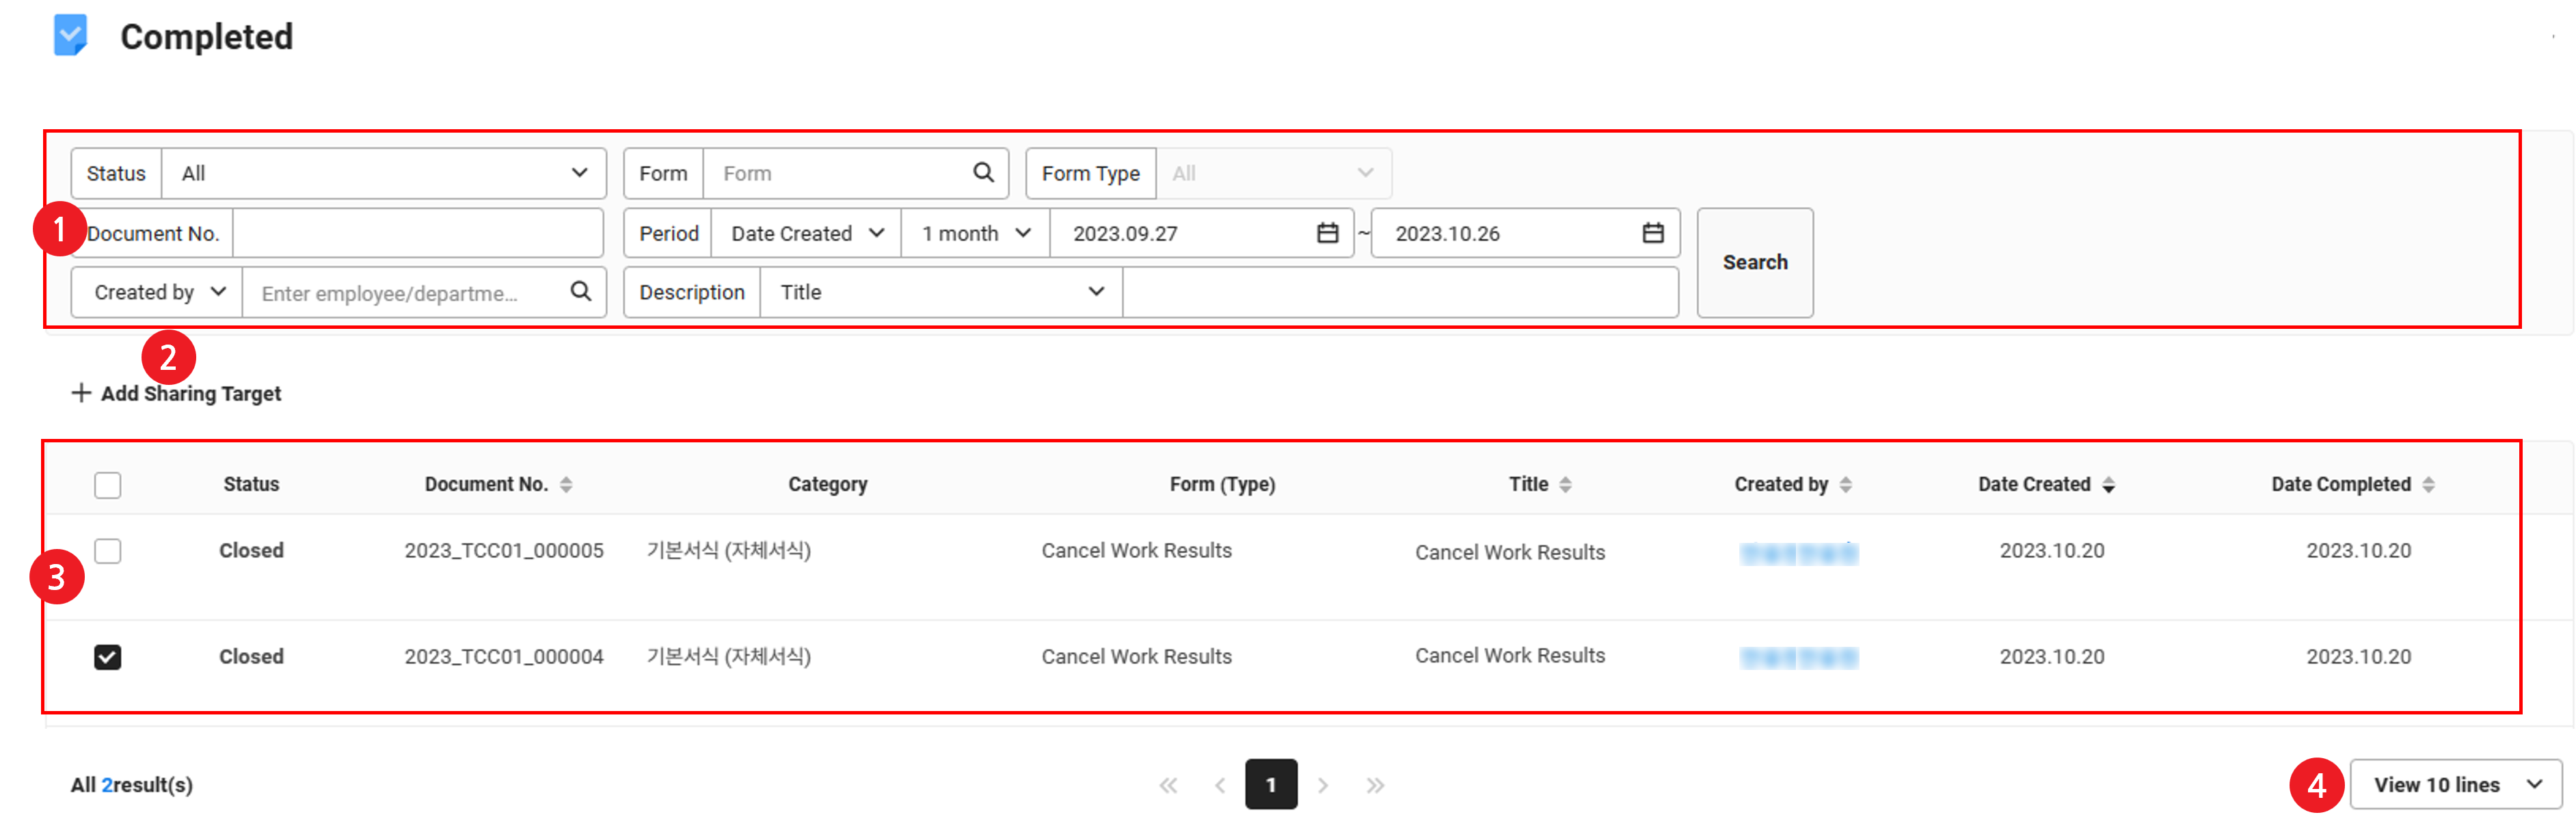
Completed Document
In the Completed Document menu, you can view completed documents that you created or approved.
The Completed Document page is laid out as follows.
| Area | Description |
|---|---|
| ① Search Window | Search documents based on the form, document number, period, creator, approver, shared recipient, drafting department, company (when using as a corporate group), and content conditions
|
| ② Add Sharing Target | Add bulk sharing target to the selected document (See 'Add Sharing Target') |
| ③ Document list | Click the title to view details of the document Document Status:
|
| ④ Number of displayed items | Set the number of documents to be displayed on a single page of the list |
All Documents
In the All Documents menu, you can view all documents that you created or approved.
The All Documents page is laid out as follows.
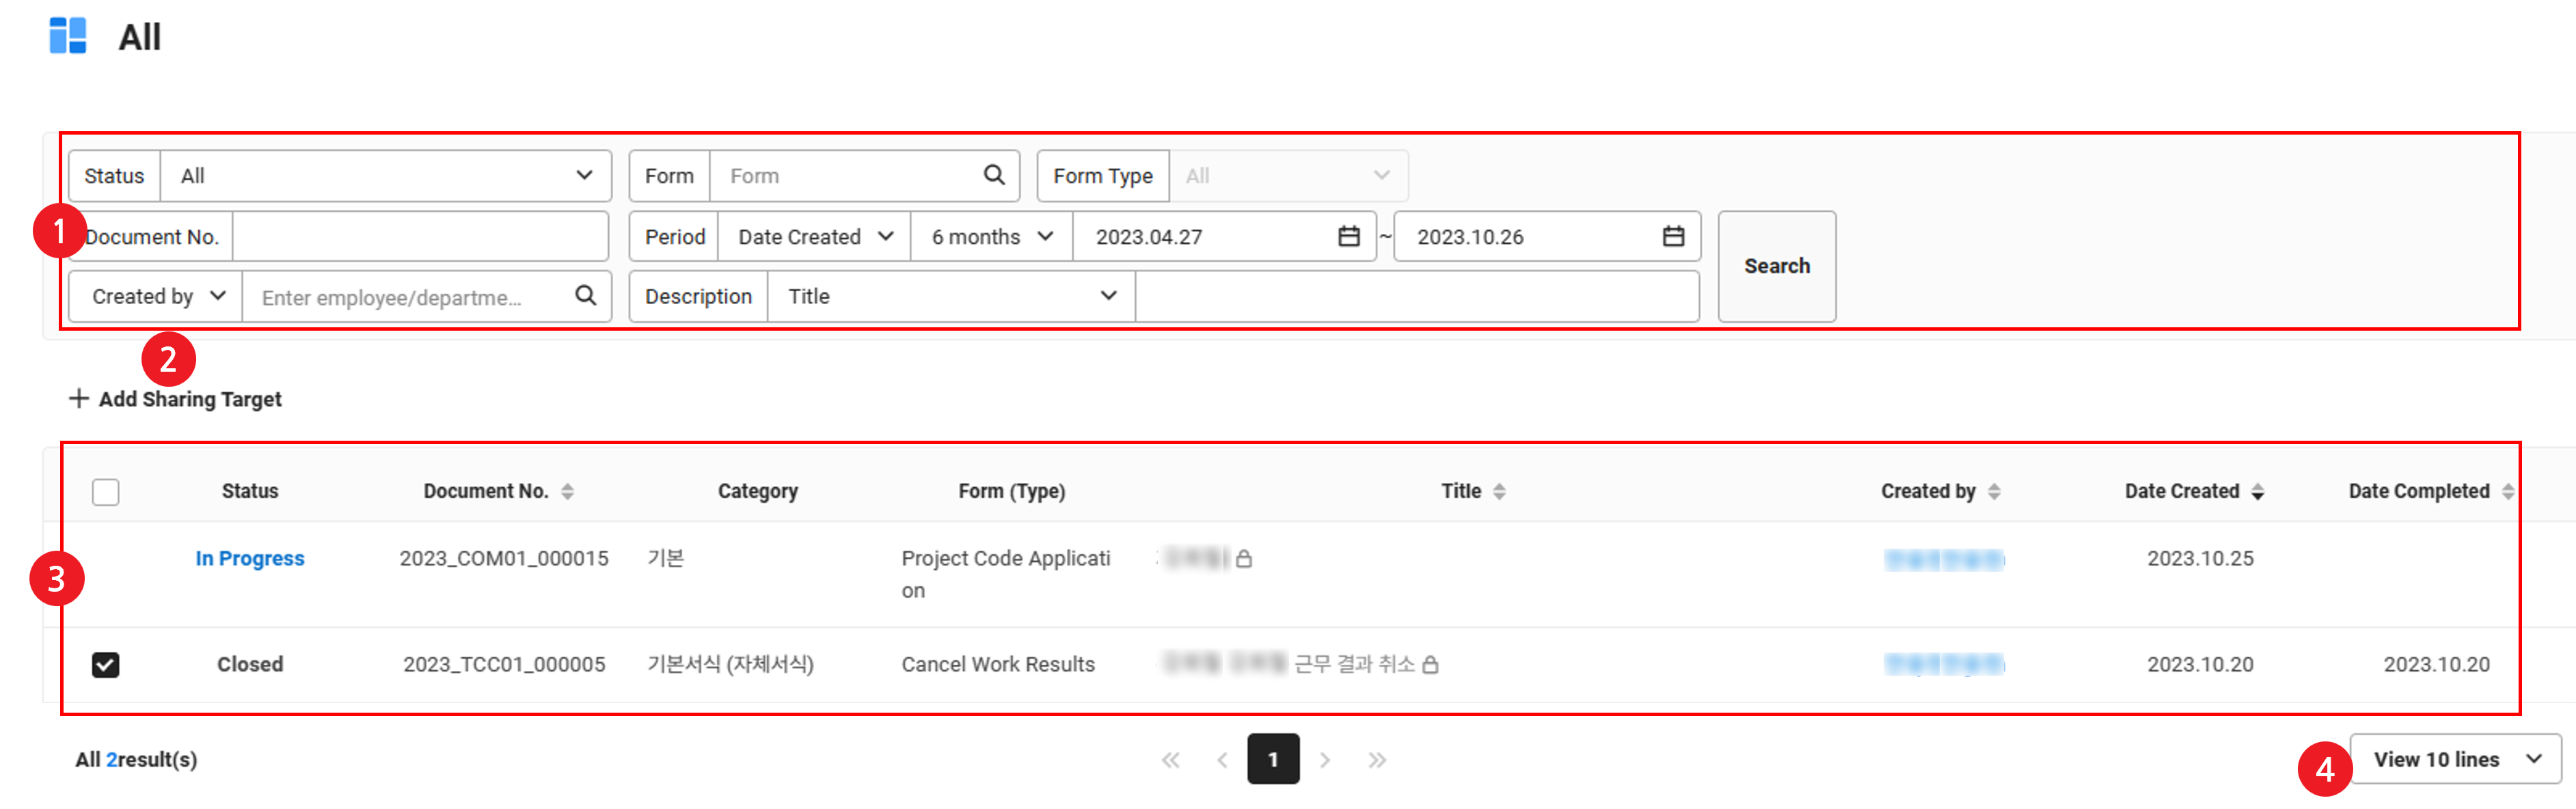
| Area | Description |
|---|---|
| ① Search Window | Search documents based on the form, document number, period, creator, approver, shared recipient, drafting department, company (when using as a corporate group), and content conditions
|
| ②Add Sharing Target | Add bulk sharing target to the selected document (See 'Add Sharing Target') |
| ③ Document list | Click the title to view details of the document Document Status:
|
| ④ Number of displayed items | Set the number of documents to be displayed on a single page of the list |
Temporarily Saved
In the Temporarily Saved menu, you can view documents you created and saved temporarily.
The Temporarily Saved Document page is laid out as follows.
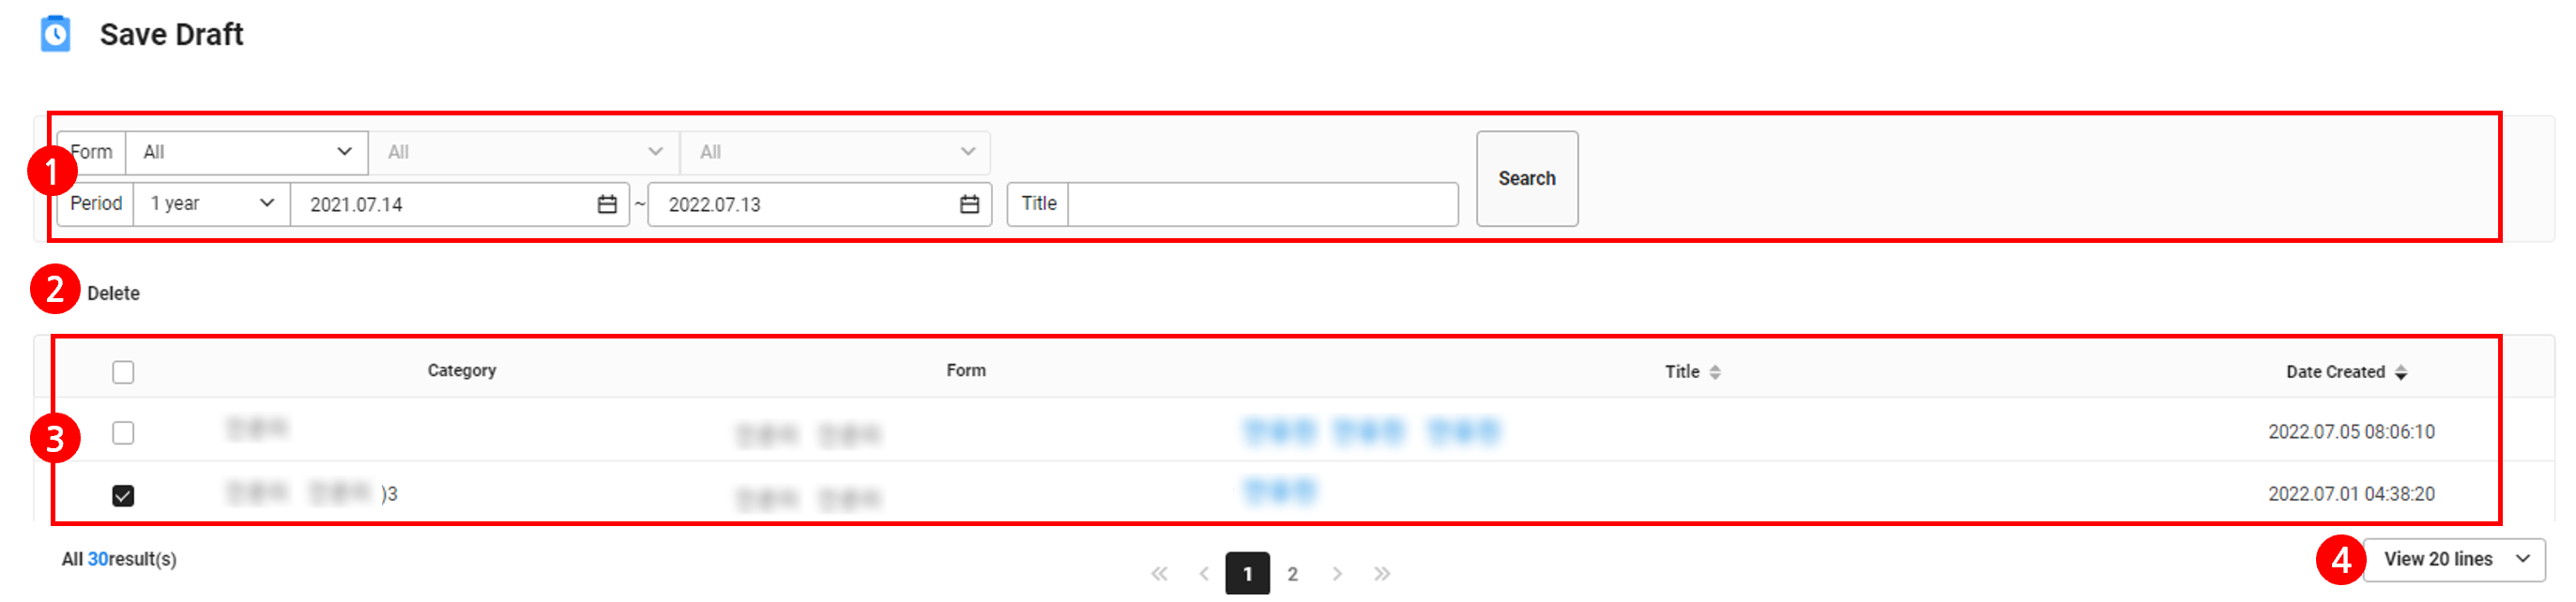
| Area | Description |
|---|---|
| ① Search Window | Search documents based on form, period, and title conditions
|
| ② Delete | Click to delete a temporarily saved document. Once deleted, the document can't be restored |
| ③ Document list | Click the title to view details of the document |
| ④ Number of displayed items | Set the number of documents to be displayed on a single page of the list |
Shared Document
In the Shared Document page, documents shared with you are displayed.
The Shared Document page is laid out as follows.
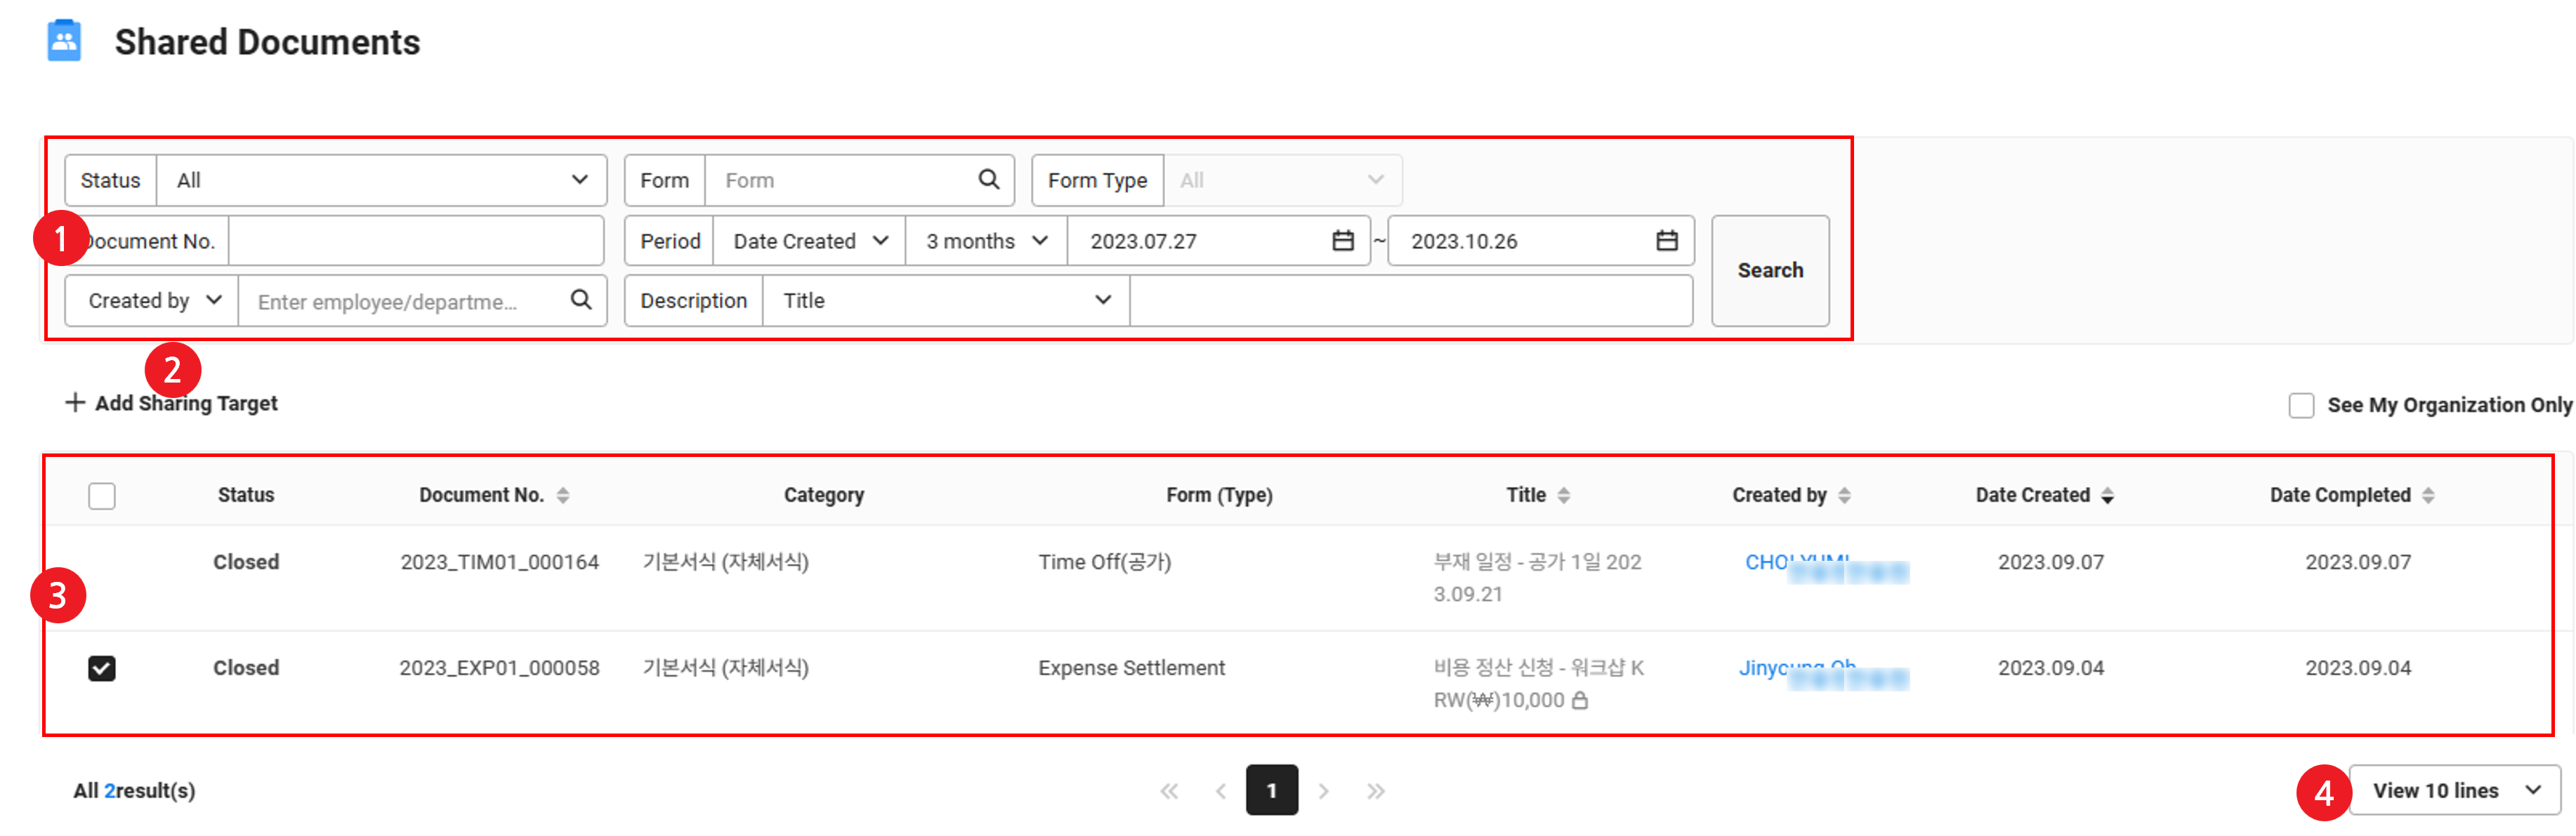
| Area | Description |
|---|---|
| ① Search Window | Search documents based on the form, document number, period, creator, approver, shared recipient, drafting department, company (when using as a corporate group), and content conditions
|
| ② View My Organization Only | It only displays documents that have been shared by the member of your department |
| ③Add Sharing Target | Add bulk sharing target to the selected document (See ‘Add Sharing Target’) |
| ④ Document list | Click the title to view details of the document Document Status:
For completed documents, the completion date is displayed |
| ⑤ Number of displayed items | Set the number of documents to be displayed on a single page of the list |
Add Sharing Target
The creator, approver, or shared recipient (for sharing options with Share to selected) of a document can select documents in the document box to bulk share and share them to the sharing target.
The following describes how to add sharing targets.
- Select the document to bulk share from the document box (Completed, All, Shared documents).
- Depending on the document box, you may only be able to select documents for which you're the creator, approver, or shared recipient.
- Only completed (including rejected) documents can be selected.
- You can only add documents whose sharing option is set to Share to selected.
- You can bulk share up to 50 documents at a time.
- Click 'Add Sharing Target'.
- In the Add Sharing Target pop-up window, select the sharing target and click ‘Add’.
- They can be added as an employee or a department.
- Department: It is shared additionally to the members of the selected department. If you select ‘Include Suborganizations’, then the members of suborganizations are also included. It shares in the unit of departments by default. If you select ‘Enter affiliated members individually’, you can individually share to affiliated members at the time of creation.
- Employee: It is shared additionally to the selected employee.
- After sharing is complete, added sharing targets are displayed in the shared recipient area on the right side of the View Document page.
- They can be added as an employee or a department.
- You can't exclude someone from the sharing target after specifying them as an additional sharing target.
- Users set as the additional sharing target can view documents in the ‘Approval Home > Shared Document’ menu.
- If the Allow Change of Sharing Target option for the form is set to ‘Not allow’, you won't be able to view the document even if you've been specified as an additional sharing target.(See Manage Approval > Sharing Settings)
- If the sharing time of the form is set to Share after completion, then you'll be able to view it after the approval is complete, even if you're specified as an additional sharing target during the approval process.
- A notification is sent to specified additional sharing targets. However, depending on the notification settings of individuals, if they're not receiving notifications when they're added as a shared recipient of a document, they won't be able to receive notifications.
- Adding bulk sharing targets for imported documents can be managed from the ‘Manage Approval > Manage Document Sharing > Manage Imported Document Bulk Sharing’ menu.
Document for Viewing
Document for Viewing displays documents for which you have viewing permissions.
The Document for Viewing page is laid out as follows.
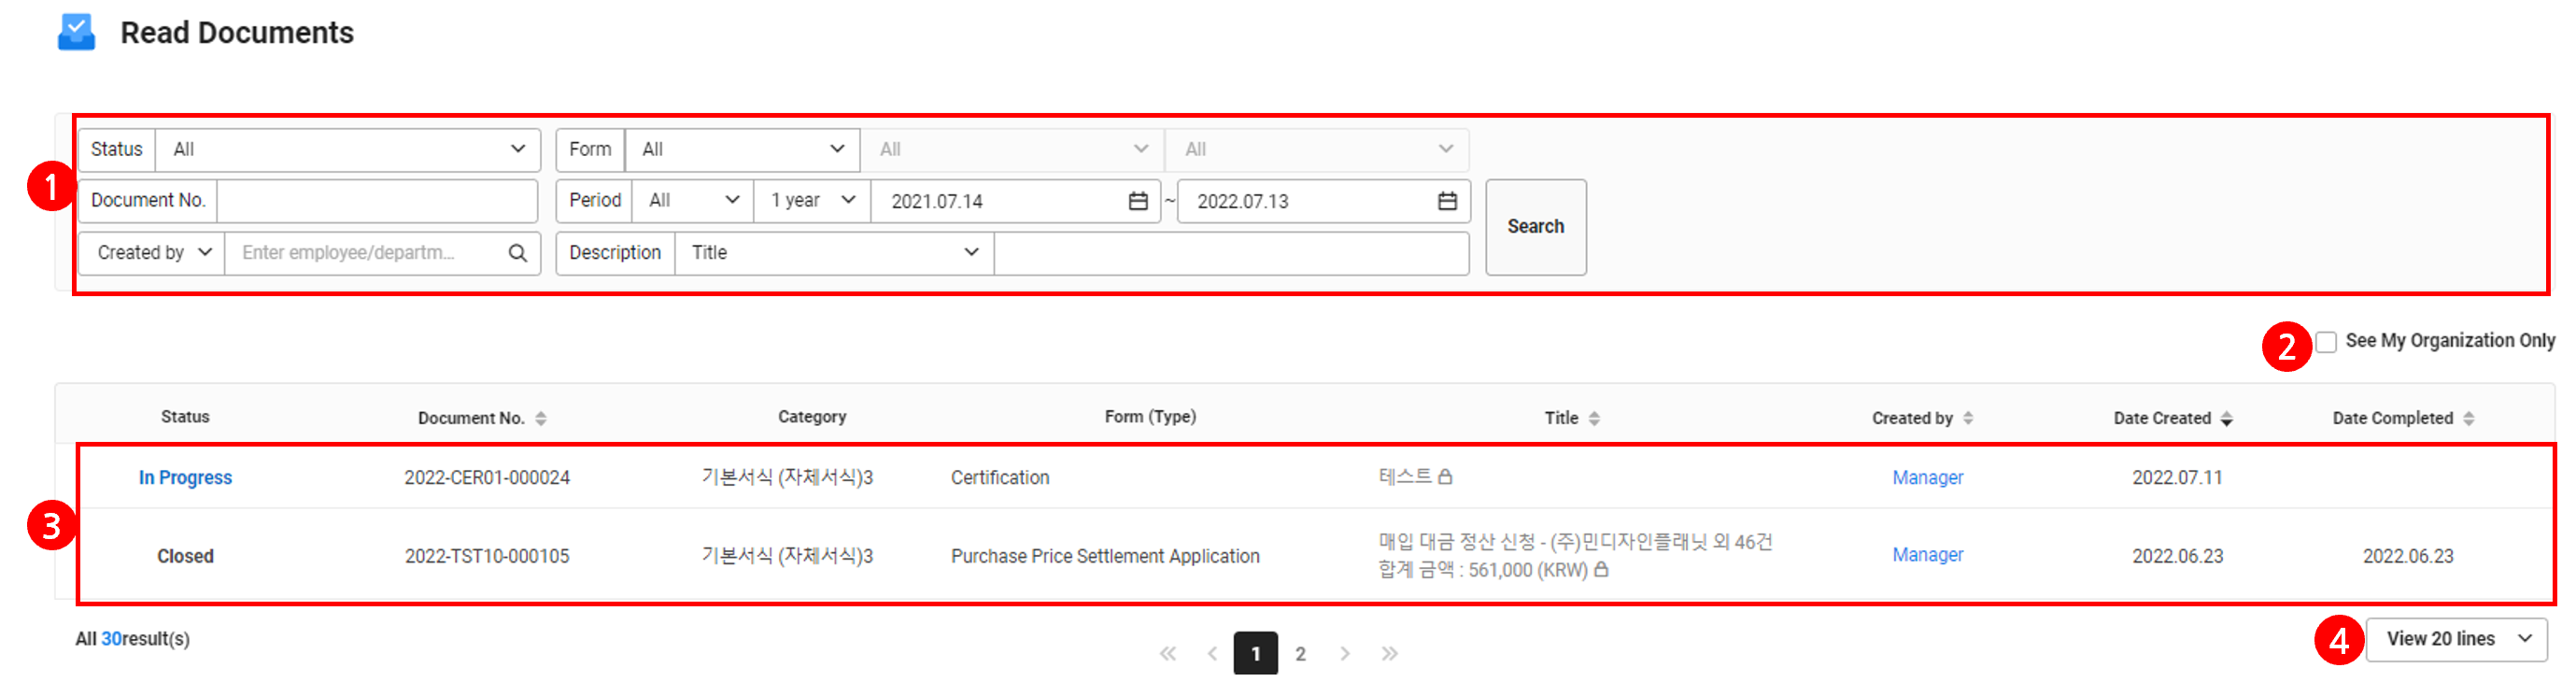
| Area | Description |
|---|---|
| ① Search Window | Search documents based on the form, document number, period, creator, approver, shared recipient, drafting department, company (when using as a corporate group), and content conditions
|
| ② View My Organization Only | It only displays documents that have been shared by the member of your department |
| ③ Document list | Click the title to view details of the document Document Status:
For completed documents, the completion date is displayed |
| ④ Number of displayed items | Set the number of documents to be displayed on a single page of the list |
Document Receipt and Sending
If the company sets the form-specific Receipt Usage Status to ‘Use’, then you can set and send documents by setting its recipient. The recipient can receive the document and report an ongoing document based on the content of the original document.
- Receipt Usage Status of a form is set by the Approval admin. (See Receipt Settings)
- A sender is a creator and approver of an original document.
- A recipient can be selected as an individual member or a department.
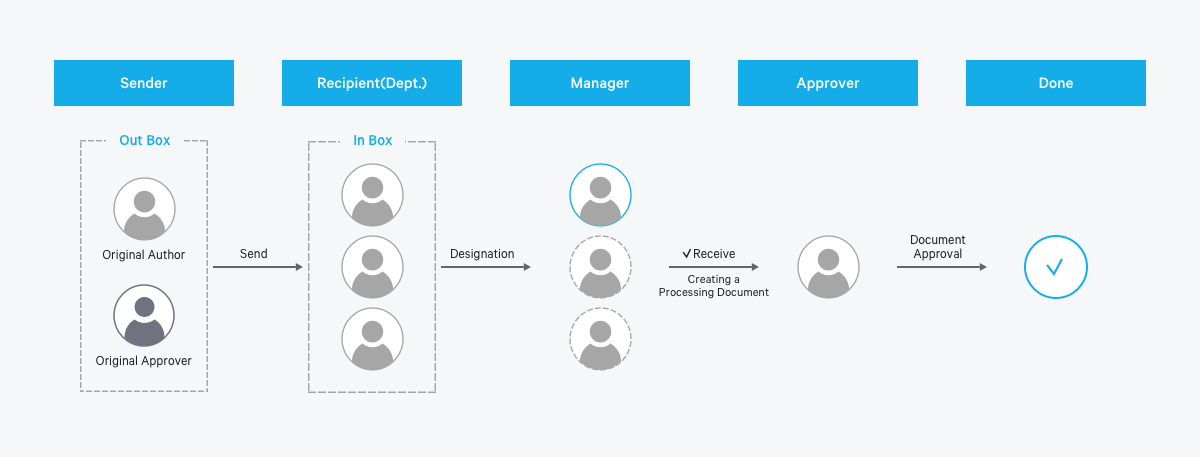
Document Receipt Flow by Recipient:
A sender can view documents in the ‘Outbox’ menu while a member set as a recipient can view and accept documents in the ‘Inbox’ menu.
If the recipient is an individual member: The member is the receipt manager and accepts a document.
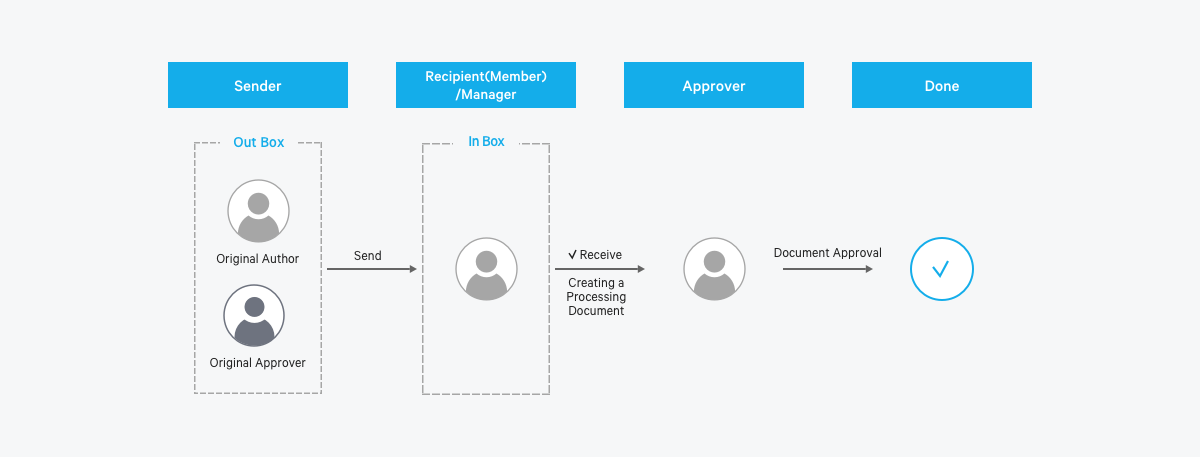
If the recipient is a department: All members of the department are recipients and one of them is specified to accept a document.
Outbox
In the Outbox menu, you can view documents you sent as a creator or approver and view the receipt status. In addition, if the admin has set to ‘Allow’ Change of Recipient for each form, you can retrieve a sent document not yet accepted by the recipient.
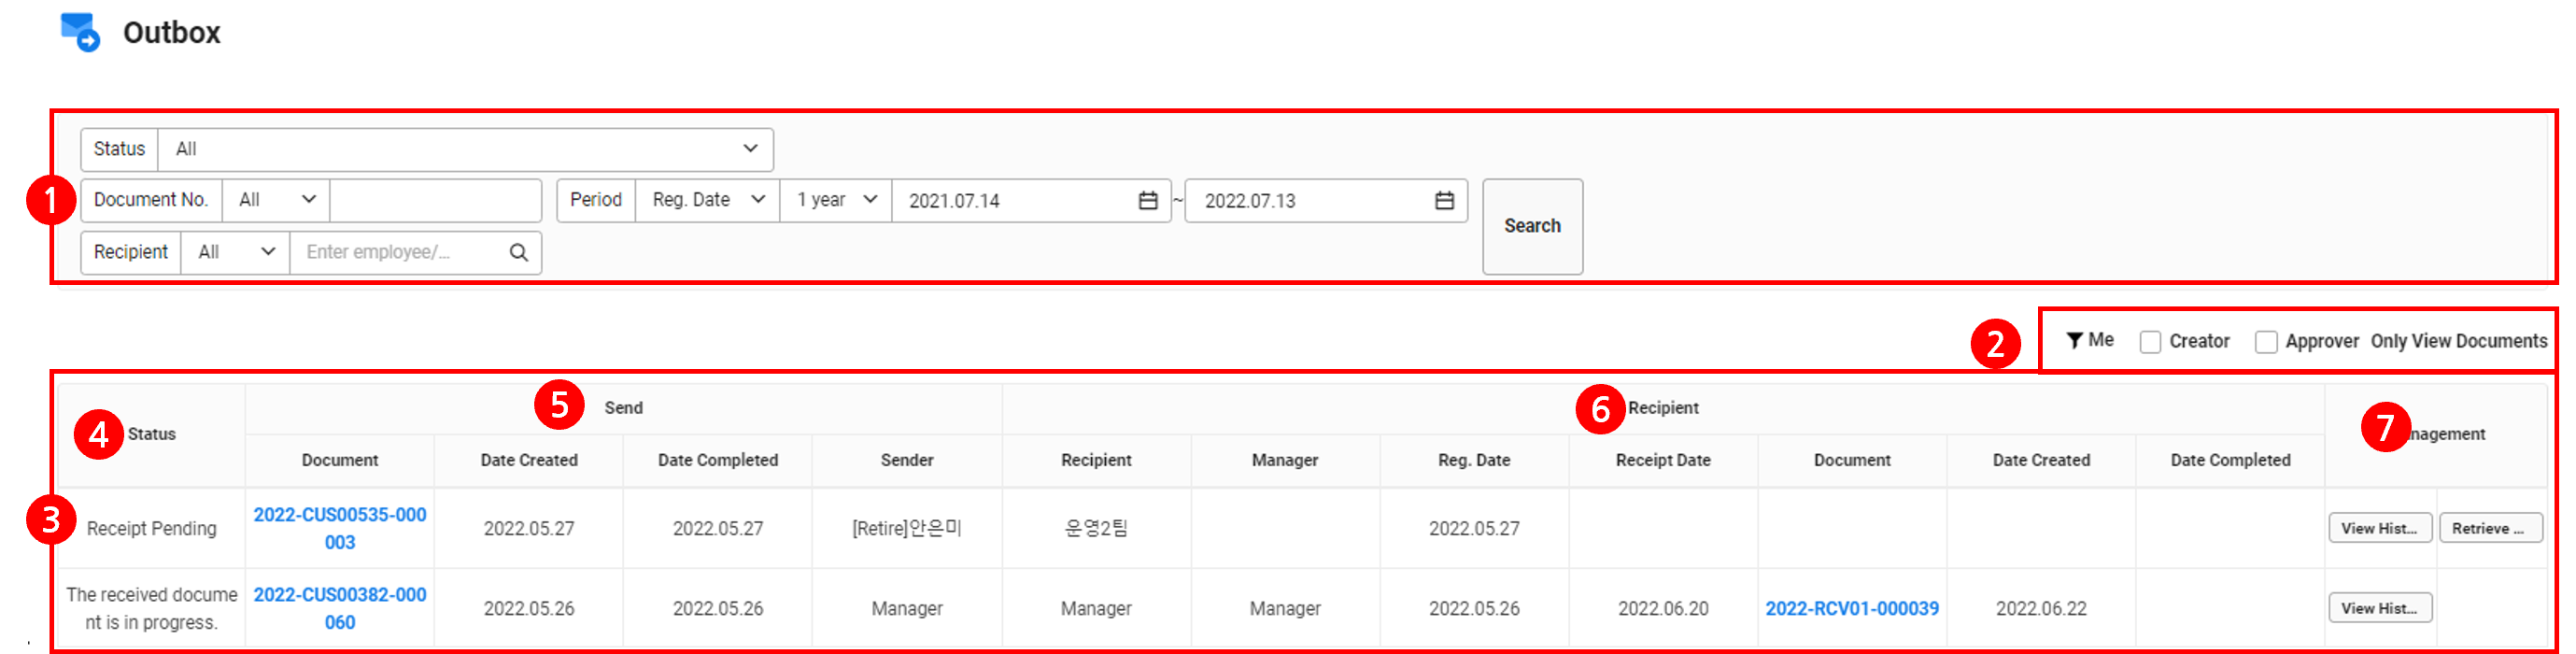
The Outbox page is laid out as follows.
| Area | Description |
|---|---|
| ① Search Window | Search the document based on the status, document number, period, and recipient conditions
|
| ② Filter | Select conditions of documents to be displayed in the list
|
| ③ Document list | It displays the list of sent documents |
| ④ Document status | It displays the status of sent documents
|
| ⑤ Sent documents | It displays the information of sending
|
| ⑥ Received documents | It displays the receipt information
|
| ⑦ Manage |
|
| ⑧ Number of displayed items | Set the number of documents to be displayed on a single page of the list |
Outbox Document Status
For retrievability of a sent document and acceptance by recipient status, see the following table.
| Status | Status Description | Retrievability of Sent Document | Receipt and Acceptance Status |
|---|---|---|---|
| Sent Document in Progress | Approval for the sent original document is in progress | Retrievable | Acceptance not available |
| Pending Receipt | The recipient has not accepted the document | Retrievable | Not accepted |
| Received and Accepted | The recipient has accepted the document | Not retrievable | Accepted |
| Received and Returned | The recipient has returned the document | Not retrievable | Returned |
| Received Document in Progress | The recipient has accepted the document and is proceeding with approval for the ongoing document | Not retrievable | Accepted |
| Completed Upon Receipt Acceptance | The recipient completed the document upon acceptance | Not retrievable | Accepted |
| Received Document Completed | The recipient accepted the document and then reported the ongoing documents and completed approval | Not retrievable | Accepted |
| Received Document Rejected | The recipient accepted the document and reported the ongoing documents but the approver rejected it | Not retrievable | Accepted |
Retrieve Sent Document
You can retrieve a document that has not been accepted by a recipient.
- A sender (creator/approver) can retrieve a document with the status of Sent Document in Progress or Pending Receipt.
- When retrieving a sent document, the document is deleted from the outbox of all senders.
- You can retrieve a sent document only when the admin has set to Allow Change of Recipient for each form.
The following describes how to retrieve a sent document.
- Click the ‘Approval Home > Outbox’ menu.
- Click ‘Retrieve Sent Document’ for the document you want to retrieve.
- Select the scope of recipient for the retrieval in the pop-up window.
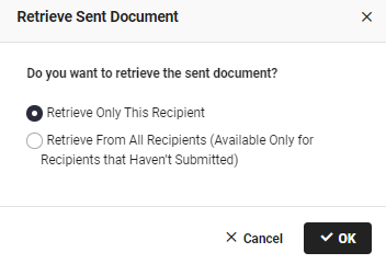
- Only retrieve from the applicable recipient: Document is only retrieved from the selected recipient and deleted from the recipient's inbox.
- Retrieve from all recipients (for only the recipient that has not accepted the document): Document is retrieved from all recipients that have not accepted the document and is deleted from the inbox of all such recipients.
View Sent Document
You can view sent documents and the receipt status. If necessary, you can add a recipient.
The following describes how to view and manage sent documents.
- Click the ‘Approval Home > Outbox’ menu.
- Click the number for a document to view.
- For information on how to view details of a searched document, see View Approval Document Details.
- View the receipt status in the Receipt area to the right, or if necessary, add a recipient.
- Click ‘History’ to see the recipient change history.
- Search for an employee/department to add it as a recipient, or delete a recipient you have added.
- You can view the receipt status per recipient.
Recipient Classification Description Member name For the case when a recipient is an individual member. It displays the Not accepted status Member name, and acceptance/completion date and time If the recipient is an individual member - Accepted: It displays the document acceptance status and date and time
- Completed: It displays the ongoing document report status and date and time
- It displays the document number for the ongoing document
Department name If the recipient is a department. It displays the Not accepted status Department name, and acceptance/completion date and time If the recipient is a department - Accepted: It displays the document acceptance status and date and time
- Completed: It displays the ongoing document report status and date and time
- It displays the document number for the ongoing document
- Create by Copying: It is displayed for a sent document with approval completed. If necessary, you can click it to copy the document to quickly create it.
- When copying and creating, only the recipients set by the form-specific admin remain the same.
- For information retained when copying and creating, see Create by Copying Document.
- Retrieve: It is displayed for a document with the Sent Document in Progress status. If necessary, you can click it to retrieve the sent document. (See Cancel Document)
- Print: If necessary, click it to print the sent document. (See ‘Print Sent Document’)
View History
You can view the recipient change history of a sent document.
- You can view the recipient change history for each document.
- The recipient change history is displayed based on the time of viewing.
The following describes how to view the recipient change history.
- Click ‘Approval Home > Outbox’.
- Click ‘View History’ under the ‘Manage’ item.
- To view details and history of a sent document, click the number for the sent document and click ‘History’ in its details page.
- In the pop-up window, view the recipient change history. For history classification and changed by descriptions, see the following table.
History Classification Changed by Description Received and Returned Recipient It is displayed when a document is returned Recipient Added Sender (creator, approver) It is displayed when a recipient has been added Recipient Accepted Manager It is displayed when the document has been accepted Sent Document Retrieved Sender (creator, approver) It is displayed when the sent document has been retrieved Manager Specified Manager (department) It is displayed when a manager is specified Completed Upon Receipt Acceptance Manager It is displayed when acceptance has been made with Accept and Complete Receipt Processing Received Document Completed Manager It is displayed when the approval for the ongoing document has been completed Received Document Rejected Approver of the ongoing document It is displayed when the ongoing document has been rejected Recipient Changed Approval admin It is displayed when an invalid recipient (department) has been changed Manager Changed Approval admin, Manager (department recipient) It is displayed when an invalid manager has been changed. It is displayed when the manager is changed (documents pending receipt whose manager is specified)
Add/Delete Recipient
A sender can add or delete a recipient.
The following describes how to change a recipient.
- Click ‘Approval Home > Outbox’.
- Click the number for a document to view.
- Enter the name of the employee/department you want to add in the recipient area to the right, and then click
 .
. - Select a member or department from the search result and add it.
- is displayed for the recipient you have added, which can be clicked to delete the recipient.
Add/Delete Recipient:
- The recipient set by the form-specific admin can be changed when the change of recipient is set to be allowed.
- You can add a recipient while creating or approving a document or closing approval. The same recipient can't be added in duplicates.
- You can only delete a recipient when it has not accepted a document.
- You can't delete the recipient set by another sender.
Print Sent Document
The following describes how to print a sent document.
- Click the ‘Approval Home > Outbox’ menu.
- Click the number for a sent document to print.
- From the document details page, click ‘Print’.
- Select a print option in the pop-up window.
- To print the recipient information, select ‘Recipient’ from the option. For a description of other print options, see Print Document.
- Click 'Print'.
Inbox
In the Inbox menu, you can accept and process a document for which you (or your organization) are a recipient.
- If the recipient is a department, then all members of the department at the time of receipt are included in the recipients.
- The time point when a document is received into the inbox depends on the Approval admin's receipt time point settings. Starting from that time point, documents can be received into the inbox. (See Receipt Settings)
- A recipient can be added by a sender (original document creator, approver) at the document creation or approval stage or even after approval completion. As necessary, the Approval admin can also change a recipient.
The Inbox page is laid out as follows.
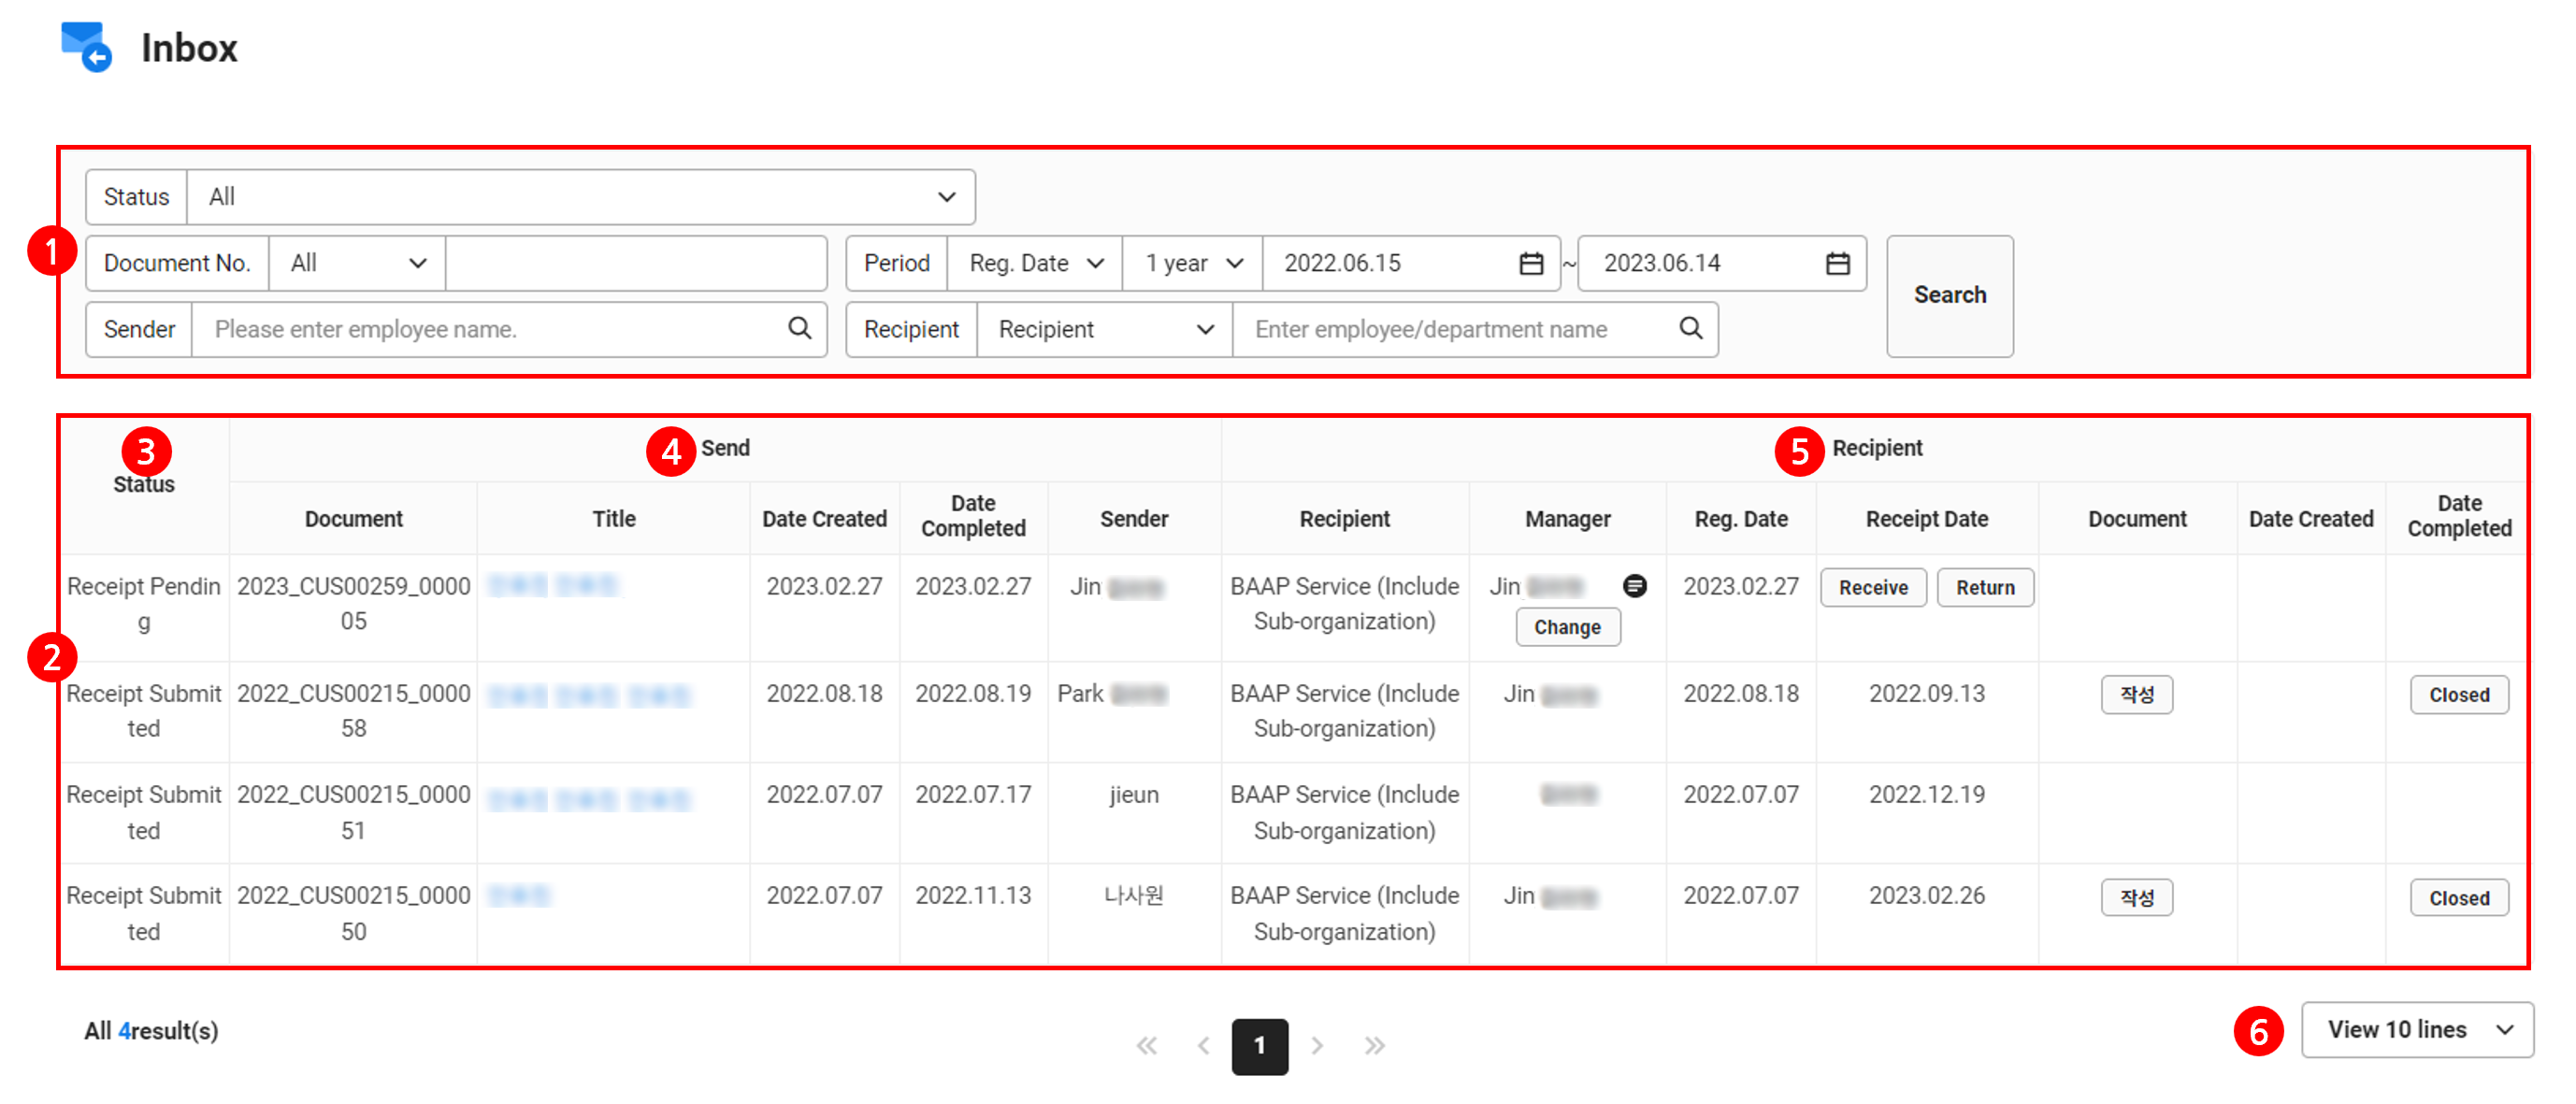
| Area | Description |
|---|---|
| ① Search Window | Search the document based on the status, document number, period, sender, and recipient conditions
|
| ② Document list | It displays the list of received documents |
| ③ Document status | It displays the status of received documents
|
| ④ Sent documents | It displays the information of sending (original document)
|
| ⑤ Received documents | It displays the receipt information
|
| ⑥ Number of displayed items | Set the number of documents to be displayed on a single page of the list |
Inbox Document Status
For the manager specification status, acceptance availability, and ongoing document status, see the following table.
| Status | Status Description | Manager (Recipient - Department) | Acceptance/Return | Ongoing Document | Ongoing Document Approval |
|---|---|---|---|---|---|
| Sent Document in Progress | Approval for the sent original document is in progress | Specify not available | Acceptance not available | - | - |
| Pending Receipt | The recipient has not received the document | Specify available | Acceptance available | - | - |
| Received and Accepted | The recipient has received and accepted the document | Specified | Accepted | Not Created or Creating | - |
| Received and Returned | The recipient has returned the document | Specified | Returned | - | - |
| Received Document in Progress | The recipient accepted the document and then reported the ongoing document. Approval is in progress | Specified | Accepted | Created | In progress |
| Completed Upon Receipt Acceptance | The recipient completed the document upon acceptance | Specified | Accepted | - | - |
| Received Document Completed | The recipient accepted the document and then reported the ongoing documents and completed approval | Specified | Accepted | Created | Completed |
| Received Document Rejected | The recipient accepted the document and reported the ongoing documents but the approver rejected it | Specified | Accepted | Created | Rejected |
Manager Specified
If the recipient is a department, then a manager needs to be specified to handle acceptance of documents. Any member belonging to the department can be specified as a manager, and you can change the manager before document is accepted.
- If you're unable to accept documents, contact the admin to change the manager. (See Manage Invalid Approval)
- If the Approval admin or any other member in a department has already specified a manager, then the manager is displayed.
The following describes how to specify a manager.
- Click ‘Approval Home > Inbox’.
- Click ‘Specify’ for the document to specify a manager.
- In the pop-up window, enter the name of the employee to be specified as the manager and click .
- Select a member from the search result.
- If necessary, fill in the note for manager specification.
- Click 'OK’.
- The member specified as a manager will receive an email.
Accepted
A manager can accept a document with the Pending Receipt status.
The following describes how to accept a document.
- Click ‘Approval Home > Inbox’.
- Click ‘Accept’ for the Acceptance Date item of the document you want to accept.
- If necessary, click ‘Return’ to return the document.
- To view details of the document before acceptance, click the number for the sent document, and then click ‘Accept’ in the Recipient area to the right of the details page.
- Select an acceptance option in the pop-up window.
- Accept and Continue to Create Document: The ongoing document creation page opens as soon as acceptance so that you can create an ongoing document. (See ‘Create Ongoing Document’)
- Accept Only and Create Document Later: Upon acceptance, ‘Create’ is displayed under the document item, which can be clicked to proceed with Create Ongoing Document.
- Accept and Complete Receipt Processing: The document is completed upon acceptance with no ongoing document creation.
- Click 'OK’.
Create Ongoing Document
The ongoing document creation page is laid out as follows.
- Only the acceptance manager can create an ongoing document.
- A ongoing document is created with the ‘General Document (Receipt)’.
- When creating an ongoing document for a received document, a recipient can't be set. You can view the reported ongoing document by clicking the ongoing document number in the inbox/outbox. View the document in the document box by approval status.
The following describes how to create an ongoing document.
- Check the original document content displayed in the ongoing document creation page.
- Create an ongoing document. (See Create Approval Document)
- Manually set the approval line and sharing options.
- If the Approval admin has set the default approval line, then it is displayed and can't be changed.
- Click ‘Save’.
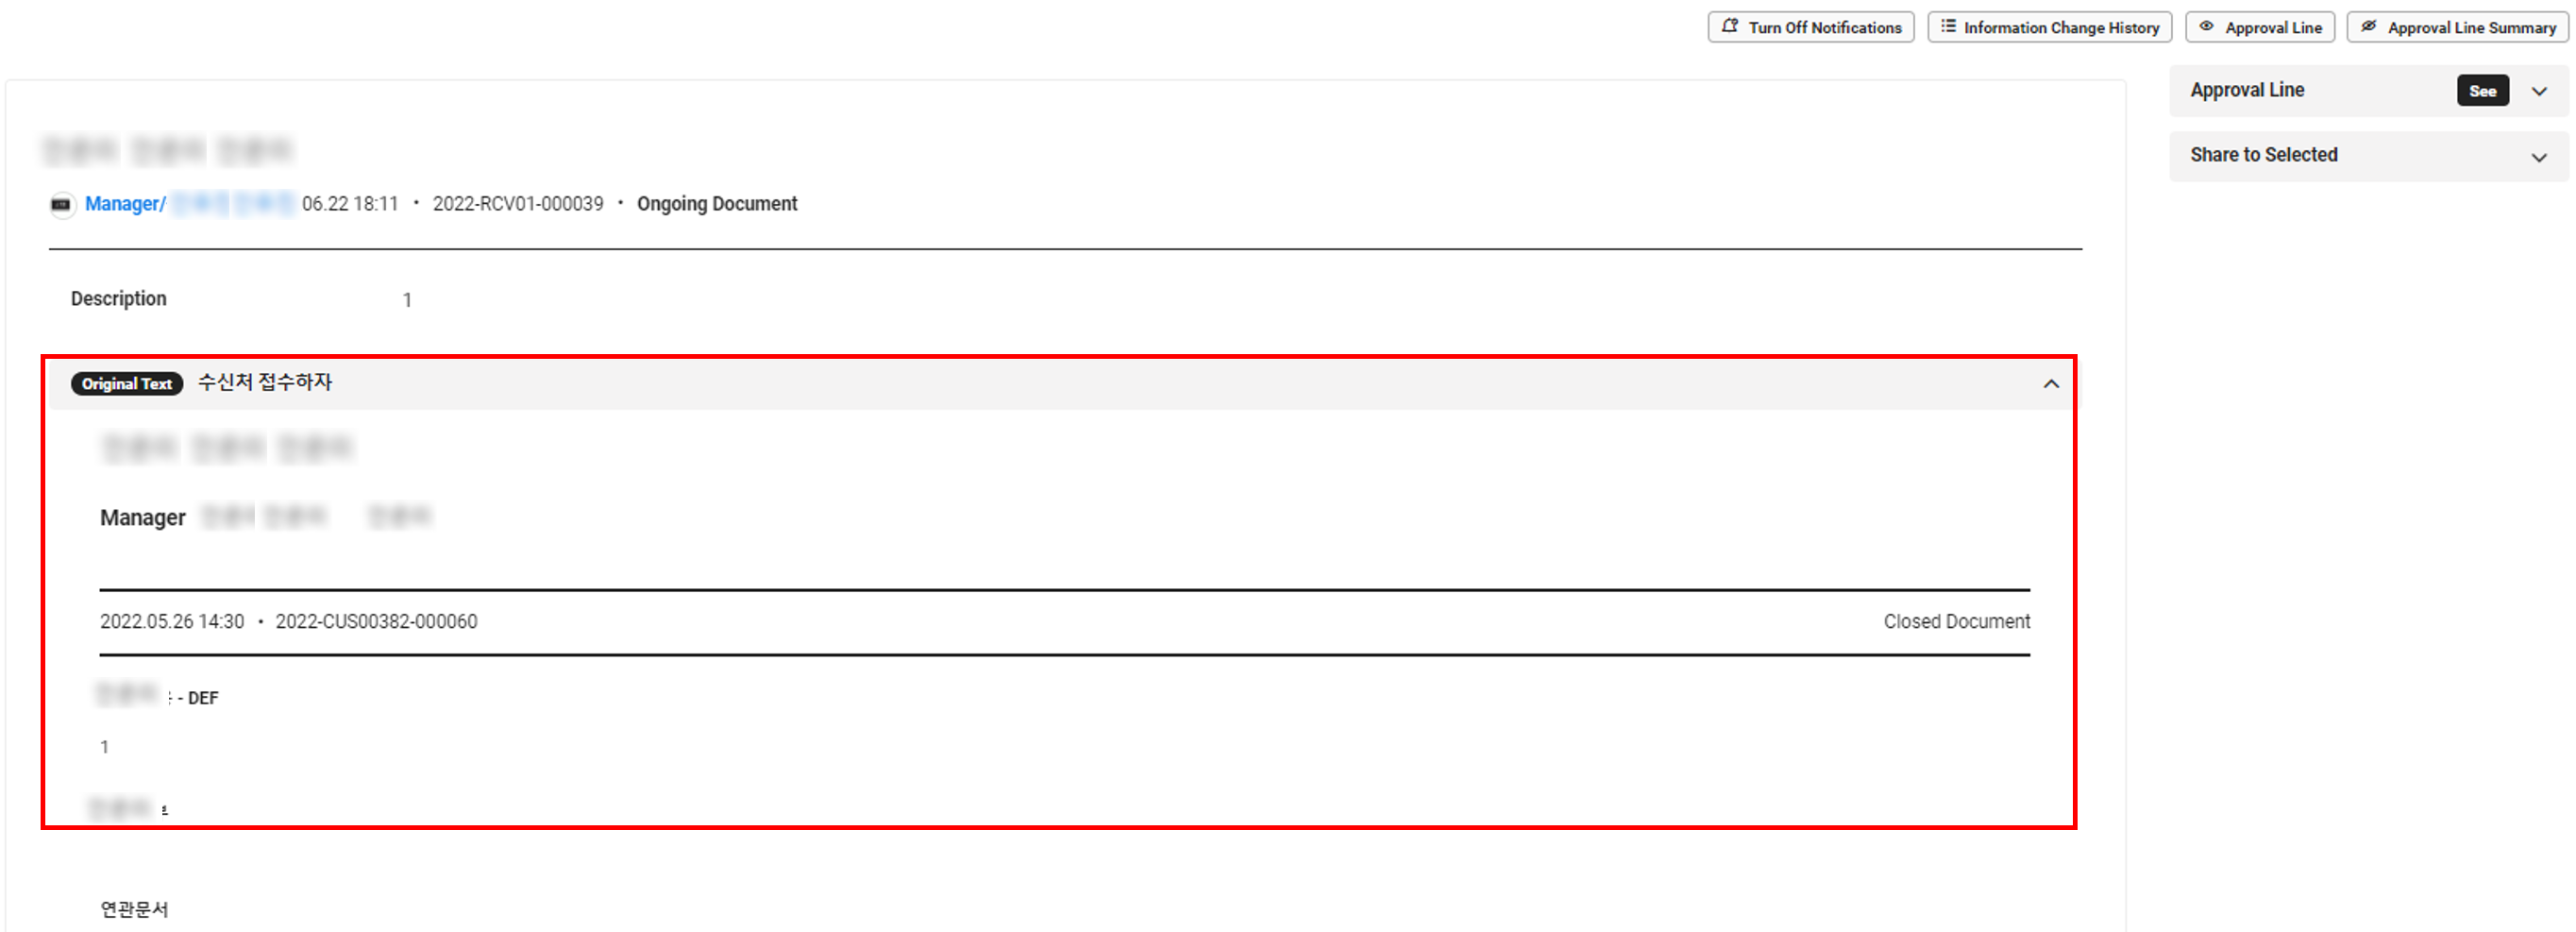
View Ongoing Document
The following describes how to view ongoing documents you created.
- Click ‘Approval Home > Inbox’.
- Click the number for an ongoing document to view from the Received Document area.
- For information on how to view details of a searched document, see View Approval Document Details.
- The ongoing document content and original document content are displayed.
- For printing an ongoing document, see ‘Print Ongoing Document’.
Print Ongoing Document
The following describes how to print an ongoing document.
- Click ‘Approval Home > Inbox’.
- Click the number for an ongoing document to print.
- From the document details page, click ‘Print’.
- Select a print option in the pop-up window.
- To print the received original document, select the ‘Received Original Document’ option. For a description of other print options, see Print Document.
- Click 'Print'.
Official Document Box
When the company has set Official Document Receipt and Sending to ‘Use’, the user can Request Receipt or Request Sending of official documents. The creator or approver of official document receipt and sending can view the receipt and sending history of official documents in the official document box. They can also print requested official documents for sending or save them in the PDF file format.
View Sending History
In the Sending tab, you can view the history of requested official documents for sending, for which you're a creator or approver, and print them.
The View Sending History page is laid out as follows.
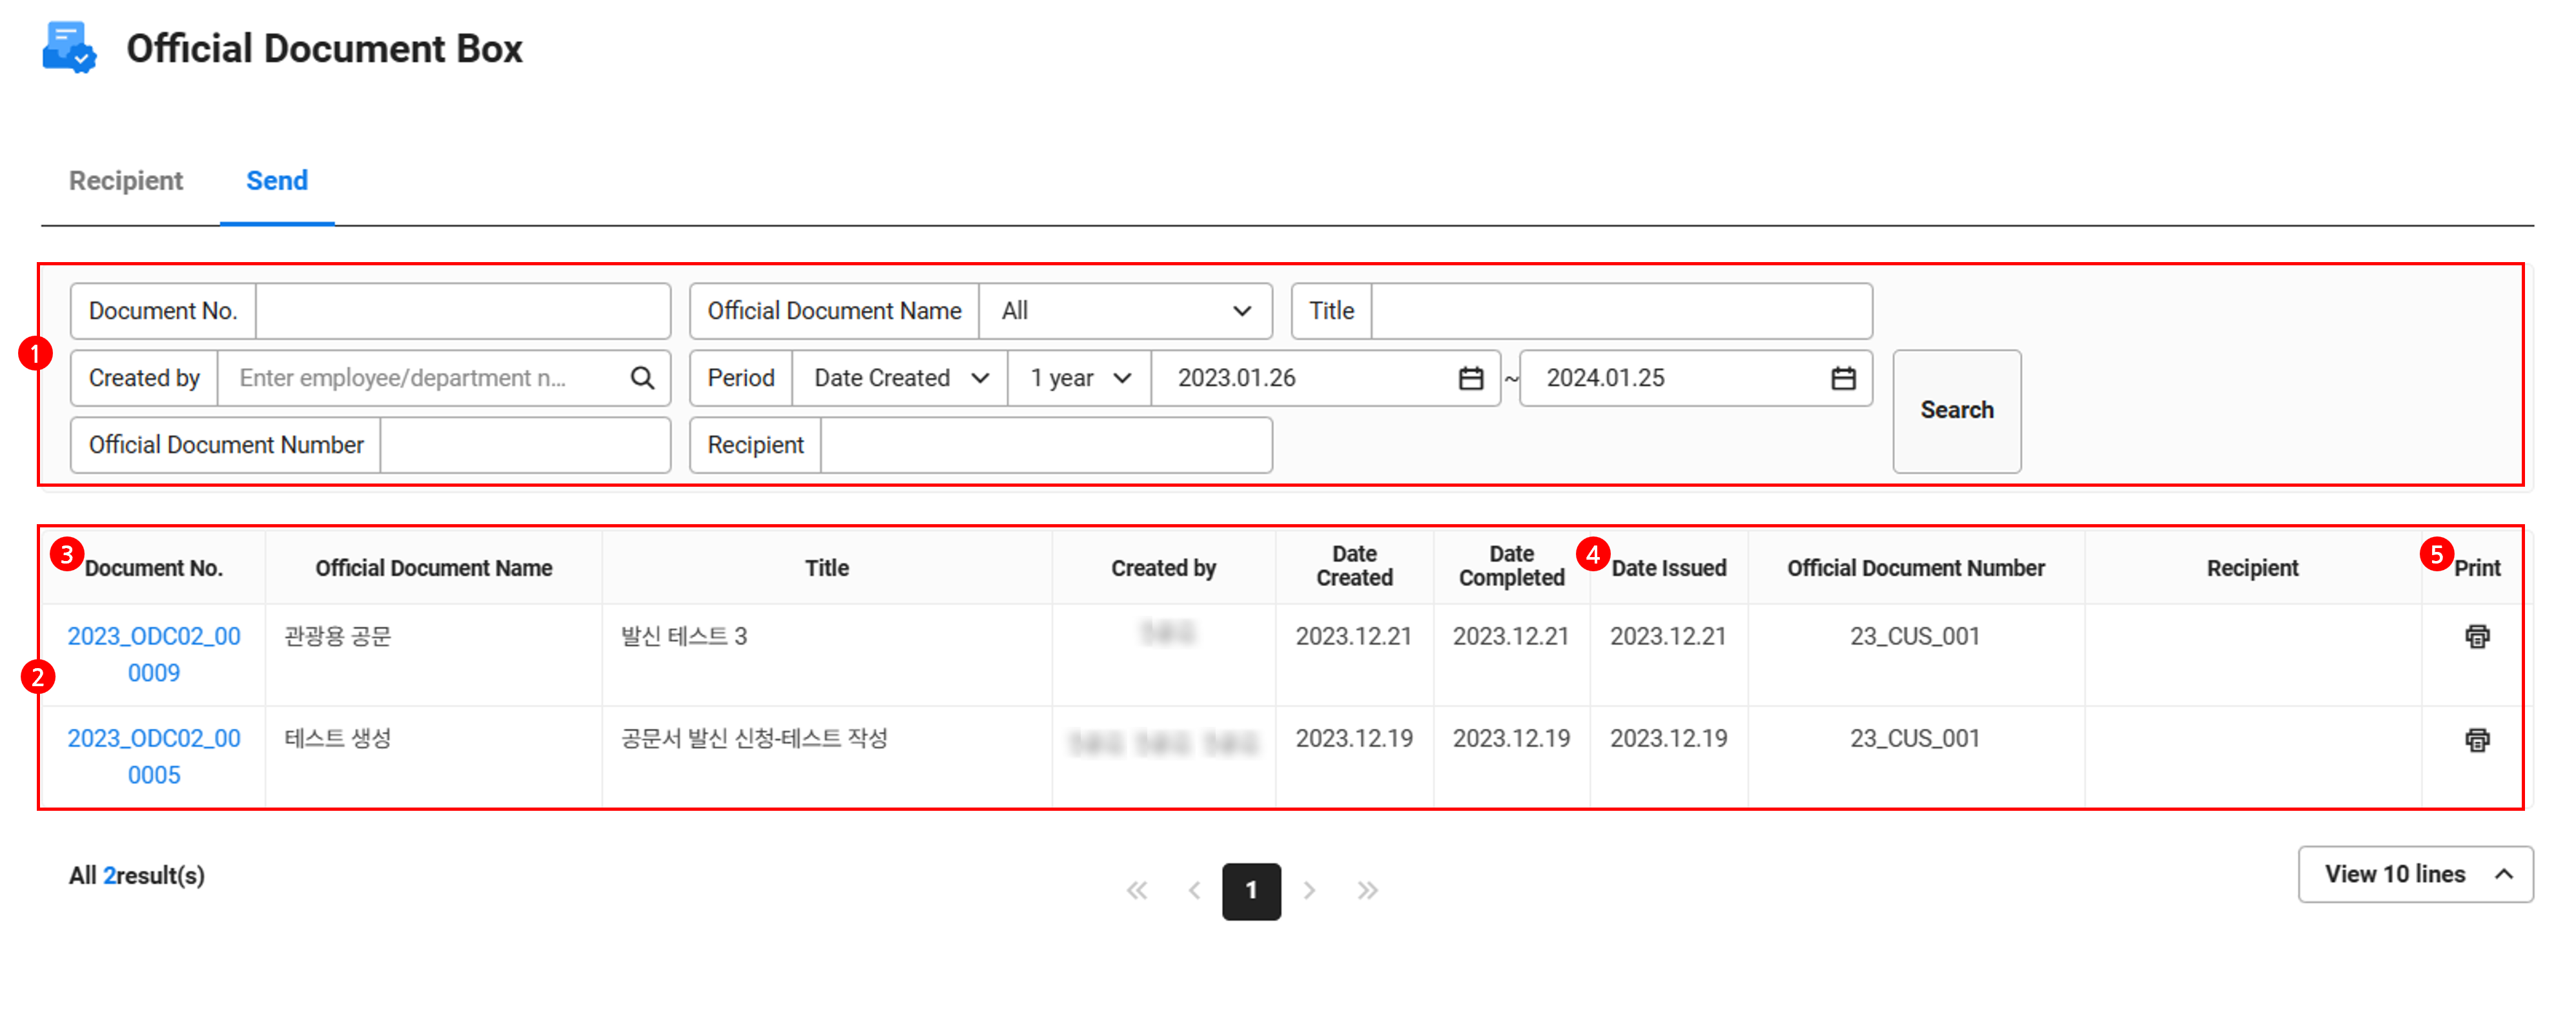
| Area | Description |
|---|---|
| ① Search Window | Search the requested official documents for sending based on document number, official document name, title, creator, creation date, official document number, and recipient conditions |
| ② Document list | It displays the list of requested documents for sending
|
| ③ Document number | Sending request document number; Click to view the requested document for sending |
| ④ Issue date | It displays the final print date of the official document |
| ⑤ Print | Click to Print Official Document Requested for Sending |
Print Official Document Requested for Sending
The creator or approver of official document sending can print or download the official document requested for sending.
The following describes how to print an official document requested for sending.
- Click ‘Approval Home > Official Document Box’.
- Click the ‘Sending’ tab.
- From the document list, click the print icon of the official document to print. Or, click the document number, and then click ‘Print Official Document’ from the document details page.
- When you print an official document, the final print date is displayed on the ‘Issuance Date’ field in the sending request list. If the admin was the last person to print that official document, the issuance date can be changed to the final print date.
- Click 'Print' in the pop-up window.
- If necessary, click ‘Download’ to download it in the PDF file format.
If there is a change in information between creating the official document and completing the approval:
- Information such as the sending official letter items, company name, and representative job title is displayed based on the time of creating the official document, and image information such as the seal image and logo image is displayed based on the time the approval is completed.
View Receipt History
In the Receipt tab, you can view the history of requested official documents for receipt, for which you're a creator or approver.
The View Receipt History page is laid out as follows.
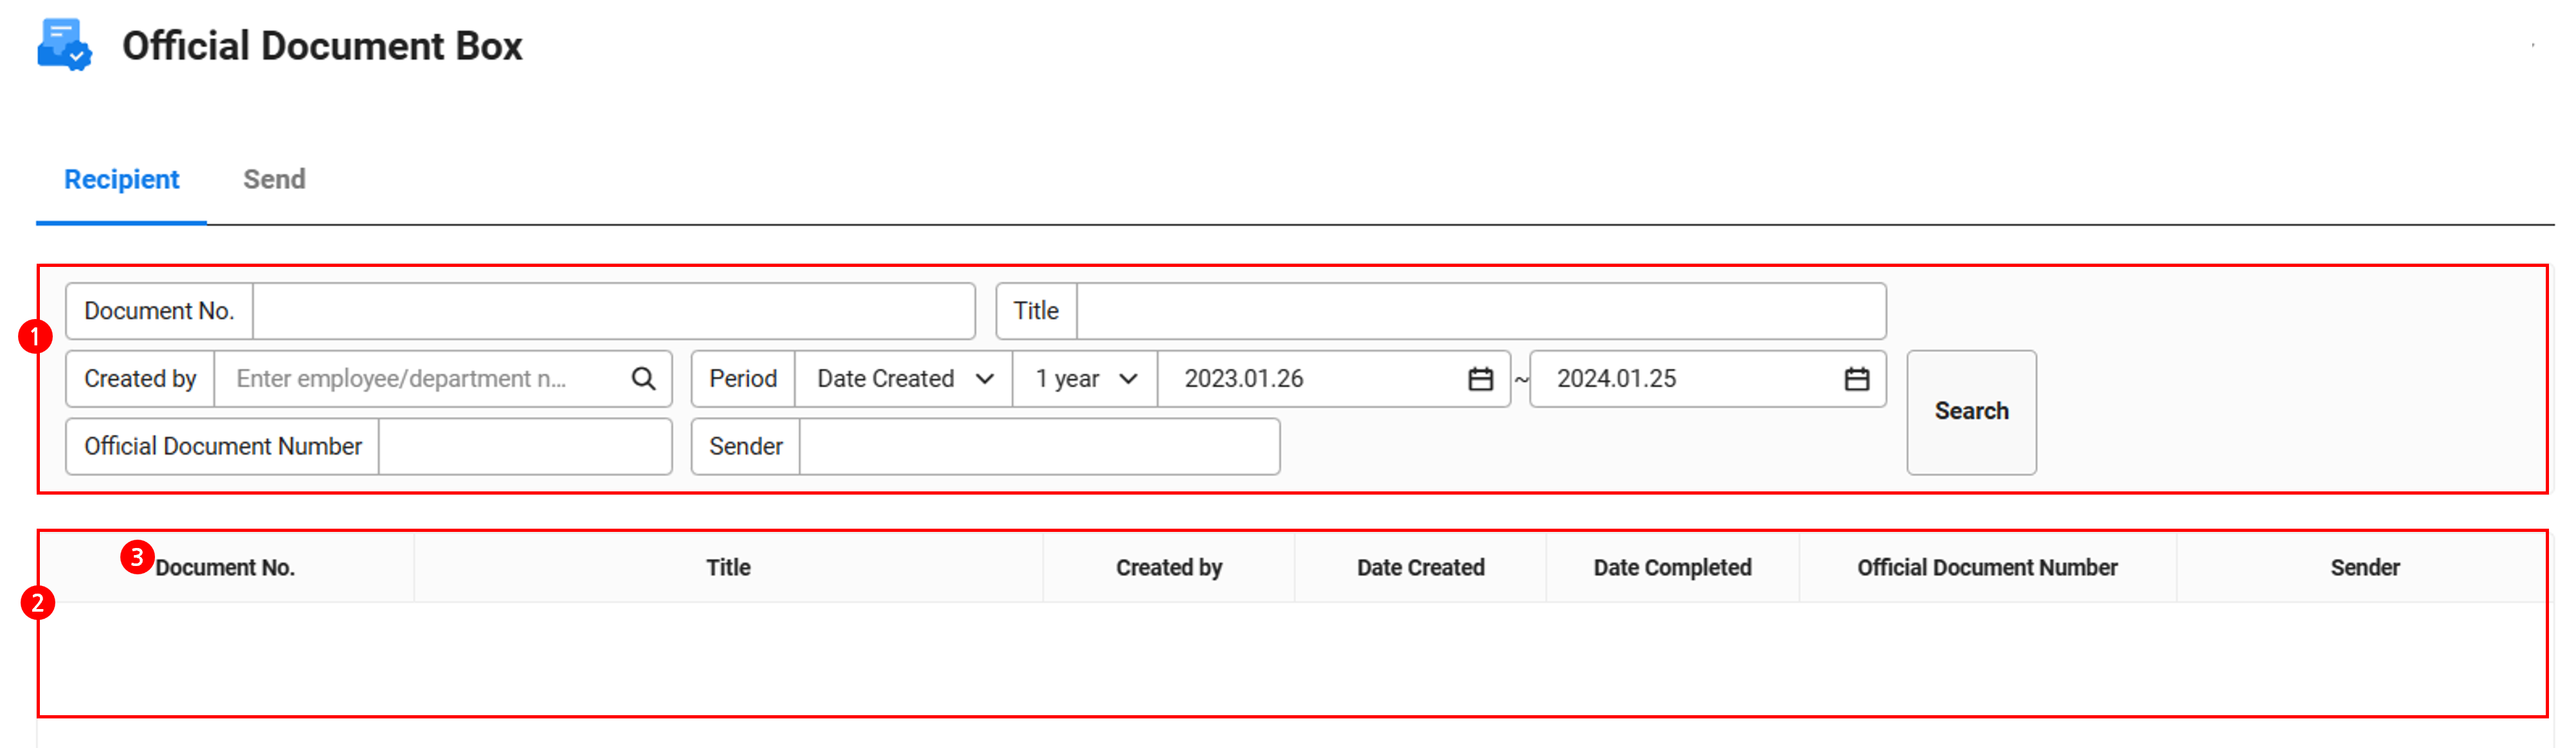
| Area | Description |
|---|---|
| ① Search Window | Search the requested official documents for receipt based on document number, title, creator, creation date, official document number, and sender conditions |
| ② Document list | It displays the list of requested documents for receipt
|
| ③ Document number | Receipt request document number; Click to view the requested document for receipt |
View Approval Document Report
In the View Approval Document Report menu, you can view approval document reports you have viewing permission for, and analyze the result to use them for aggregation.
- The View Approval Document Report menu is displayed to employees granted with the approval form report viewing permission if the form is set to ‘Use’ by the admin.
The View Approval Document Report page is laid out as follows.
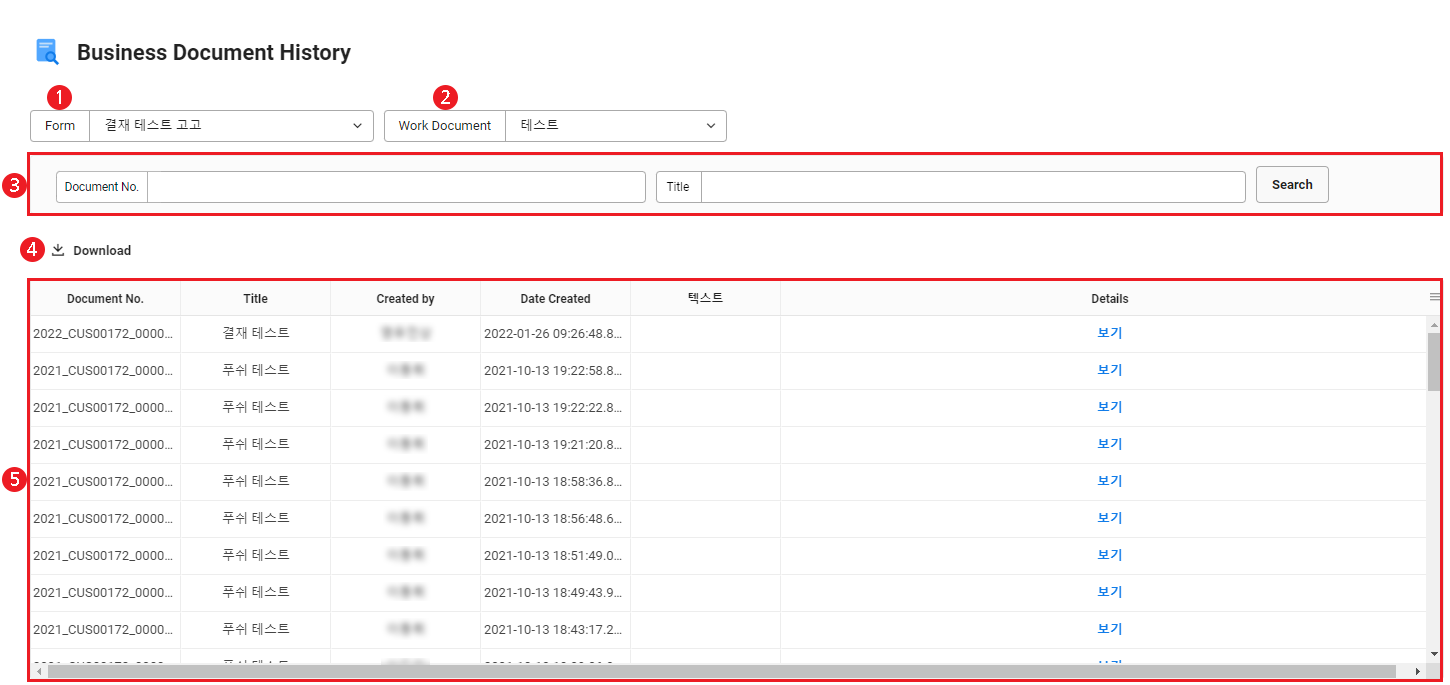
| Area | Description |
|---|---|
| ① Form | Select a form from approval document reports for which you have permissions |
| ② Report Name | Select an approval document report for which you have permissions |
| ③ Search window | Search for a document based on the document number, title, creator, and creation date conditions |
| ④ Download | Download search results as an Excel file |
| ⑤ Approval document basic table | It displays the basic details of the report
|
| ⑥ Approval document details table | If the admin has set to display the details by item when setting approval document reports, then the item details are displayed
|
Imported Document
You can import documents created in other corporate management systems. You can view the imported document in ‘Approval Home > Imported Document’. If the sharing scope is 'Some shared', you can add shared recipient and create shared comments.
- For more information on how to import documents created in other corporate management systems, see Import Data.
- The Imported Document menu is only displayed to employees who have been granted the permission according to the sharing settings by document.
The View Imported Document page is laid out as follows.

| Area | Description |
|---|---|
| ① Search Window | Search for a document by the form, creator, title, document number, and period conditions |
| ② Document list | Check the document details
|