You can create approval documents. The forms provided by default and created by the company are displayed. You can select a form to draft a document immediately.
Compose Document
The following describes how to create approval documents.
- Click the
 icon at the top right of the PC web screen, and then click ‘Approval’ in the pop-up window.
 - Click
 at the top left of the screen.
 - Click ‘Compose Document’ from the menu.
- Proceed with the following steps in order.
1. Select Approval Document Form
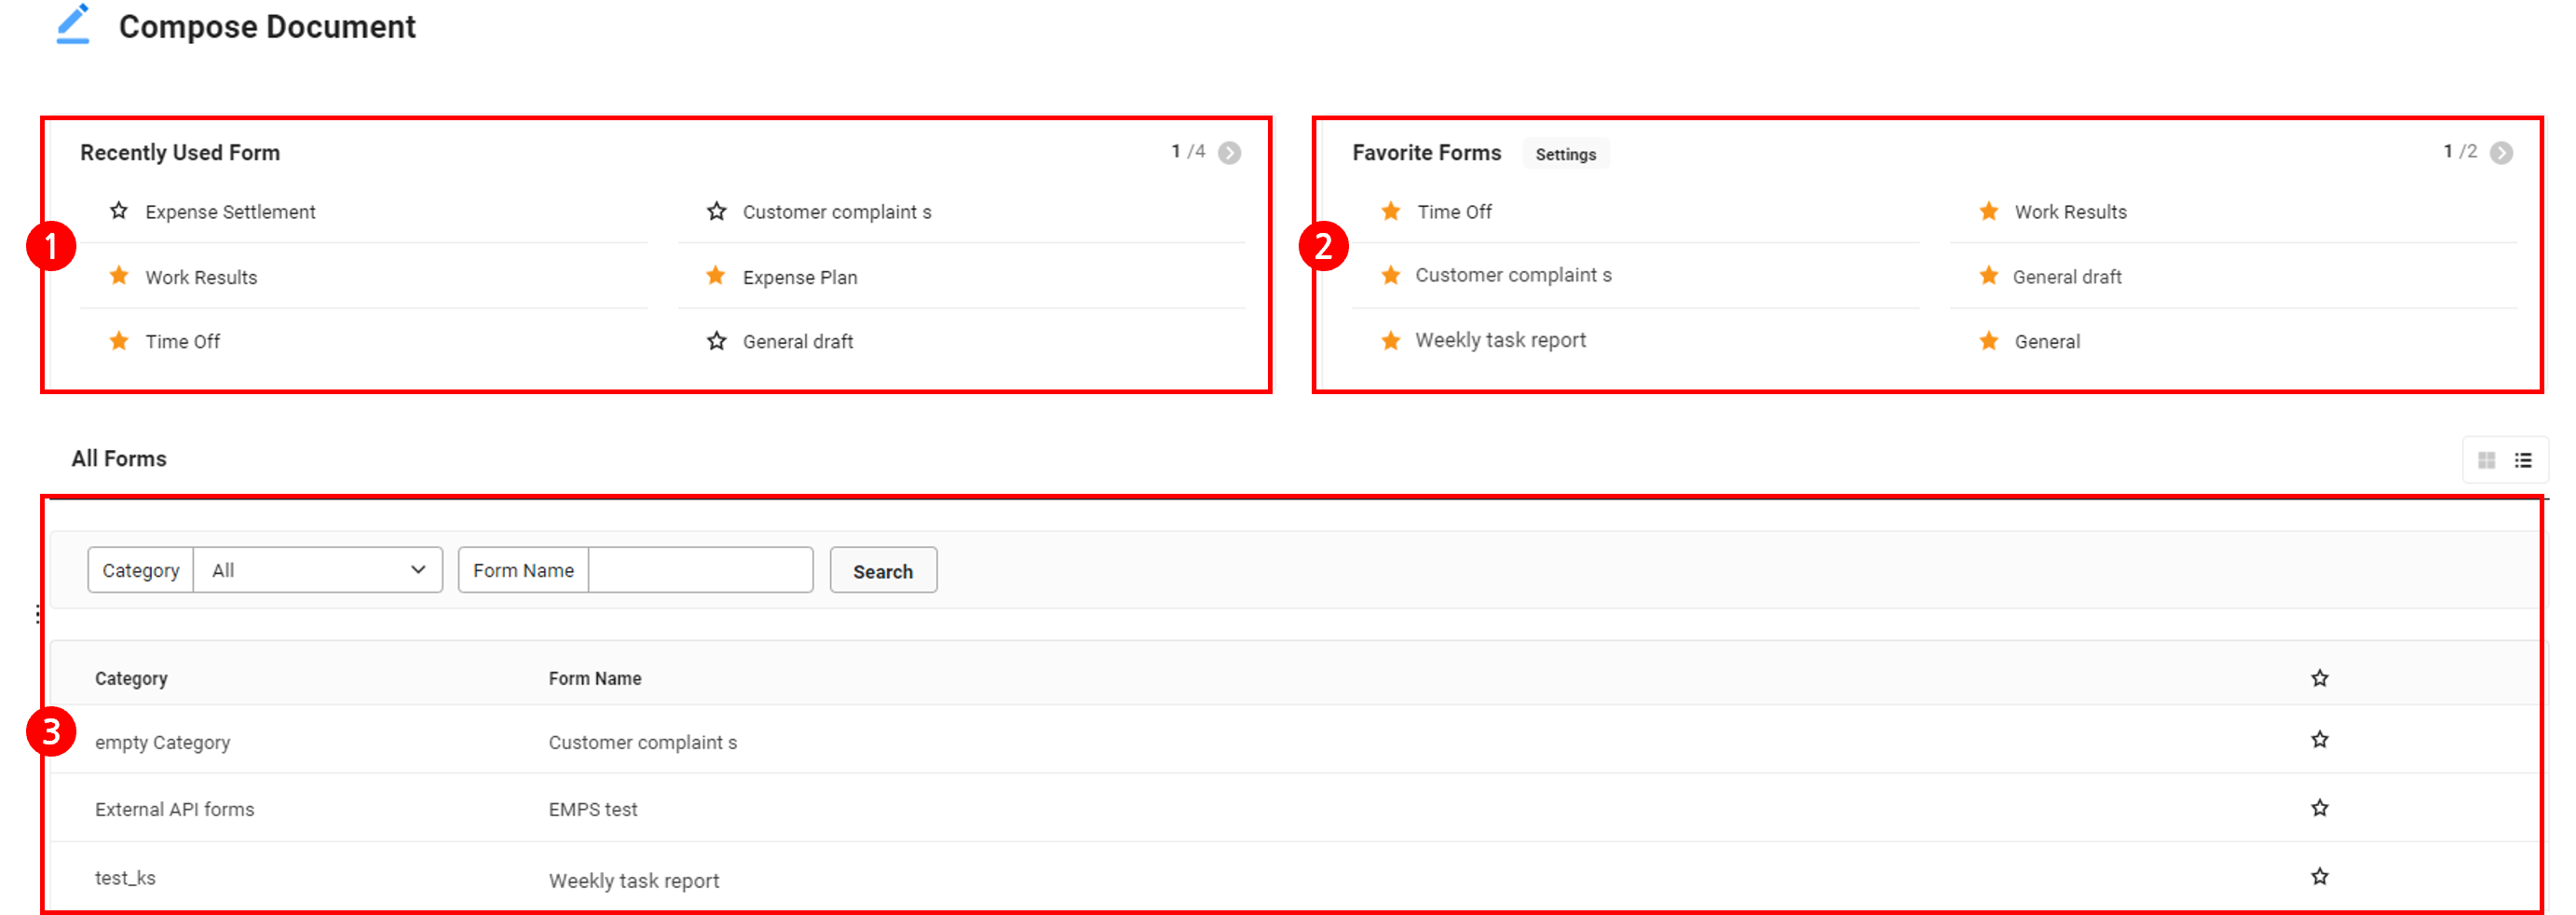
The Compose Document page is laid out as follows.
| Area | Description |
|---|---|
| ① Recently Used Forms list | It displays the list of forms used within the last one year.
|
| ② Favorite Forms list | It displays the list of Favorite Forms
|
| ③ All Forms list | It displays all available forms.
|
| ④ Number of Displayed Items | It sets the number of forms to be displayed on a single page of the list |
Select the approval document form you want to create.
- General Document: a form to be used for work that needs the company's consent, or that needs to be shared (e.g., training request, office supply request, business related)
- Expenditure Report (when using Finance): a form to request a plan for future expenditure
- Expenditure Resolution Report (when using Finance): a form for the company to settle payment for its vendors
- Certificate Request: a form used to request various certificates issued by the company
- Absence Schedule (when using Attendance): a form used for processing all absence schedules such as annual leaves, family events, business trips, outside work, and work from home
- Absence Schedule Cancellation (when using Attendance): a form to cancel an approved document among those created with the Absence Schedule Form
- Work Result Request (when using Attendance): a form to obtain approval for the requests for changes in the clock-in/out record or for the overtime if you have worked extended hours on a workday or worked on a holiday
- When the document is saved, it is reflected in the work hour status, even before the approver gives consent. When they decline it, the reflected content is canceled.
- Work Plan Request (when using Attendance): a form to register work plans if you have a plan for doing overtime on a workday or working on a holiday or day off
- If the work plan is not registered, then you can't request work results for the overtime work on corresponding dates.
- Work Result Request Cancellation (when using Attendance): a form to cancel an approved document among those created with the Work Result Request Form
- Annual Leave Usage Plan (when using Attendance): a form for employees subject to annual leave usage facilitation to submit their usage plans for remaining annual leaves, when the company is using the facilitation policy for use of annual leave
- Expense Plan Request (when using Finance): a form to request the plan for expenses to be spent
- You can share the expenditure plan to attendees in advance.
- Expense Settlement Request (when using Finance): a form to request the settlement of business expenses spent
- Expenses can be settled with a variety of evidence such as corporate credit card, personal credit card, cash, etc.
- When integrated with credit card companies, you can settle it quickly with the approved corporate credit card history.
- When an expense plan has been created, you can request the settlement based on the information on the approved plan document.
- Payroll Certificate Request (when using Payroll): a form used for requesting receipt for wage and salary income tax withholding, income tax withholding confirmation, and book of wage and salary income withheld
- Project Code Request: a form that requests a new project code or modification/deletion of an existing project code
- Vendor Request: a form that requests a new vendor or modification/deletion of existing vendor information
- Official Document Sending Request: used to request to send an official document with a form created to match the format of official document the company sends
- Official Document Receipt Request: used to request approval of an official document received by the company
- Leave Request (Part-timer) (when using Attendance): a form for part-time employees to request leaves
- Work Result Request (Part-timer) (when using Attendance): a form for part-time employees to obtain approval for their request for the change in the clock-in/out record and for extended work, holiday work, and overtime as work hours
- When the document is saved, it is reflected in the work hour status, even before the approver gives consent. When they decline it, the reflected content is canceled.
- Work Plan Request (Part-timer) (when using Attendance): a form for part-time employees to register work plans if they have a plan of doing overtime on a workday or of working on a holiday or day off
- You can‘t request work plans if your work arrangement is not configured.
Forms provided by default are as follows: General Document, Absence Schedule (Cancel), Certificate, Work Plan and Result Requests (Cancel), Expense Plan and Settlement Requests, Expenditure Report/Expenditure Resolution Report, Payroll Certificate, Project Code Request, and Vendor Request. In addition to forms provided by default, the admin can create and use additional forms required for the operation of the company.
- Work-related forms (Work Result Request, Work Plan Request, Cancel Work Result Request) are only provided if the Attendance service is enabled.
- Expense-related forms (Expense Plan Request, Expense Settlement Request) are provided only if the Finance is requested and Expense service is enabled.
- Expenditure-related forms (expenditure statements, expenditure resolutions) are provided only if Finance is requested and Expenditure service is enabled. Expenditure report and expenditure resolution report are forms used the company to make payments to its vendors. A variety of evidence can be selected, such as tax invoice, corporate credit card, personal credit card, and cash receipt. To request settlement of expenses that the company must pay its internal employees, use the Expense Settlement Request form.
- Payroll Certificate Request form is displayed only if the company enables the Payroll service.
- Project Code Request is a form provided when project codes are set to be integrated with Approval.
- Vendor Request is a form provided when vendors are set to be integrated with Approval.
When using in a corporate group, for employees holding concurrent positions in a corporate group, forms for both the primary company and the concurrent company may be displayed.
- For Work Plan/Result Request, Absence Schedule, General Document, Certificate, Payroll Certificate, Project Code Request, and Vendor Request forms, only the primary company‘s forms are displayed.
- Expense-related forms (Expense Plan Request, Expense Settlement Request) for both the primary and concurrent companies are displayed together, and the name of the concurrent company is displayed on the forms for the concurrent company.
- For the company forms, forms of both the primary company and the concurrent company are displayed.
Set Favorite Forms
The following describes how to set Favorite Forms.
- Click ‘Approval Home > Compose Document’.
- Click ‘Settings’ from the Favorite Forms area.
- From the pop-up window, click
 of the form name.
- The form is set as a favorite form.
- To remove it from favorite forms, click
 of the form.
 - You can change the displayed order of favorite forms.
- Click ‘Save’.
- It is displayed in the ‘Favorite Forms’ widget of the home page.
2. Create Content
Create the content of the selected form.
- For details on how to fill out each form, see the following.
- Create General Form
- Create Expenditure Report (when using Finance)
- Create Expenditure Resolution Report (when using Finance)
- Create Certificate Request Form
- Create Absence Schedule Form (when using Attendance)
- Create Absence Schedule Cancellation Form (when using Attendance)
- Create Work Result Request Form (when using Attendance)
- Create Work Plan Request Form (when using Attendance)
- Create Work Result Request Cancellation Form (when using Attendance)
- Create Annual Leave Usage Plan Form (when using Attendance)
- Create Expense Plan Request Form (when using Finance)
- Create Expense Settlement Request Form (when using Finance)
- Create Payroll Certificate Request Form (when using Payroll)
- Create Project Code Request Form
- Create Vendor Request Form
- Create Official Document Sending Request Form
- Create Official Document Receipt Request Form
- Leave Request (Part-timer) (when using Attendance):
- Work Result Request (Part-timer) (when using Attendance)
- Work Plan Request (Part-timer) (when using Attendance)
- To create by loading temporarily saved documents, click ‘Save Temporarily’ at the top right of each form creation page and click the desired document. Once a document is deleted from the temporarily saved document list, it can't be restored. You can also select a temporarily saved document in ‘Approval Home > Save Temporarily’.
3. Set Approval Line
If there are approval lines set by the admin, then the name and original department of approvers are displayed.
- If the admin has set a department, job title, or job position as an approval line, then the creator must select one employee belonging to the relevant department/job title/job position. Select the approver, and then click ‘OK’.
- If the approval line is set as Nth Reports To by the admin, then the creator must select one approver. Select the approver, and then click ‘OK’.
- If the admin has set the integration with Approval for vendors or project codes as ‘Use’ and specified a representative admin, then the representative admin is automatically included in the approval line of the vendor request form and project code request form. (See Business Support Settings > Common Codes > Manage Common Code)
- If the admin has set the Approval Line Requirement Status of the form to be ‘Required’ and there is no Approval Line set by the admin, the creator must add the Approval Line to report the document.
- If the admin has set the Allow Status of Approval Line Change to be ‘Allow’, you can change the Approval Line set by the admin. If the admin has set to ‘Not allow’, you can't delete but you can add.
Add Approval Line
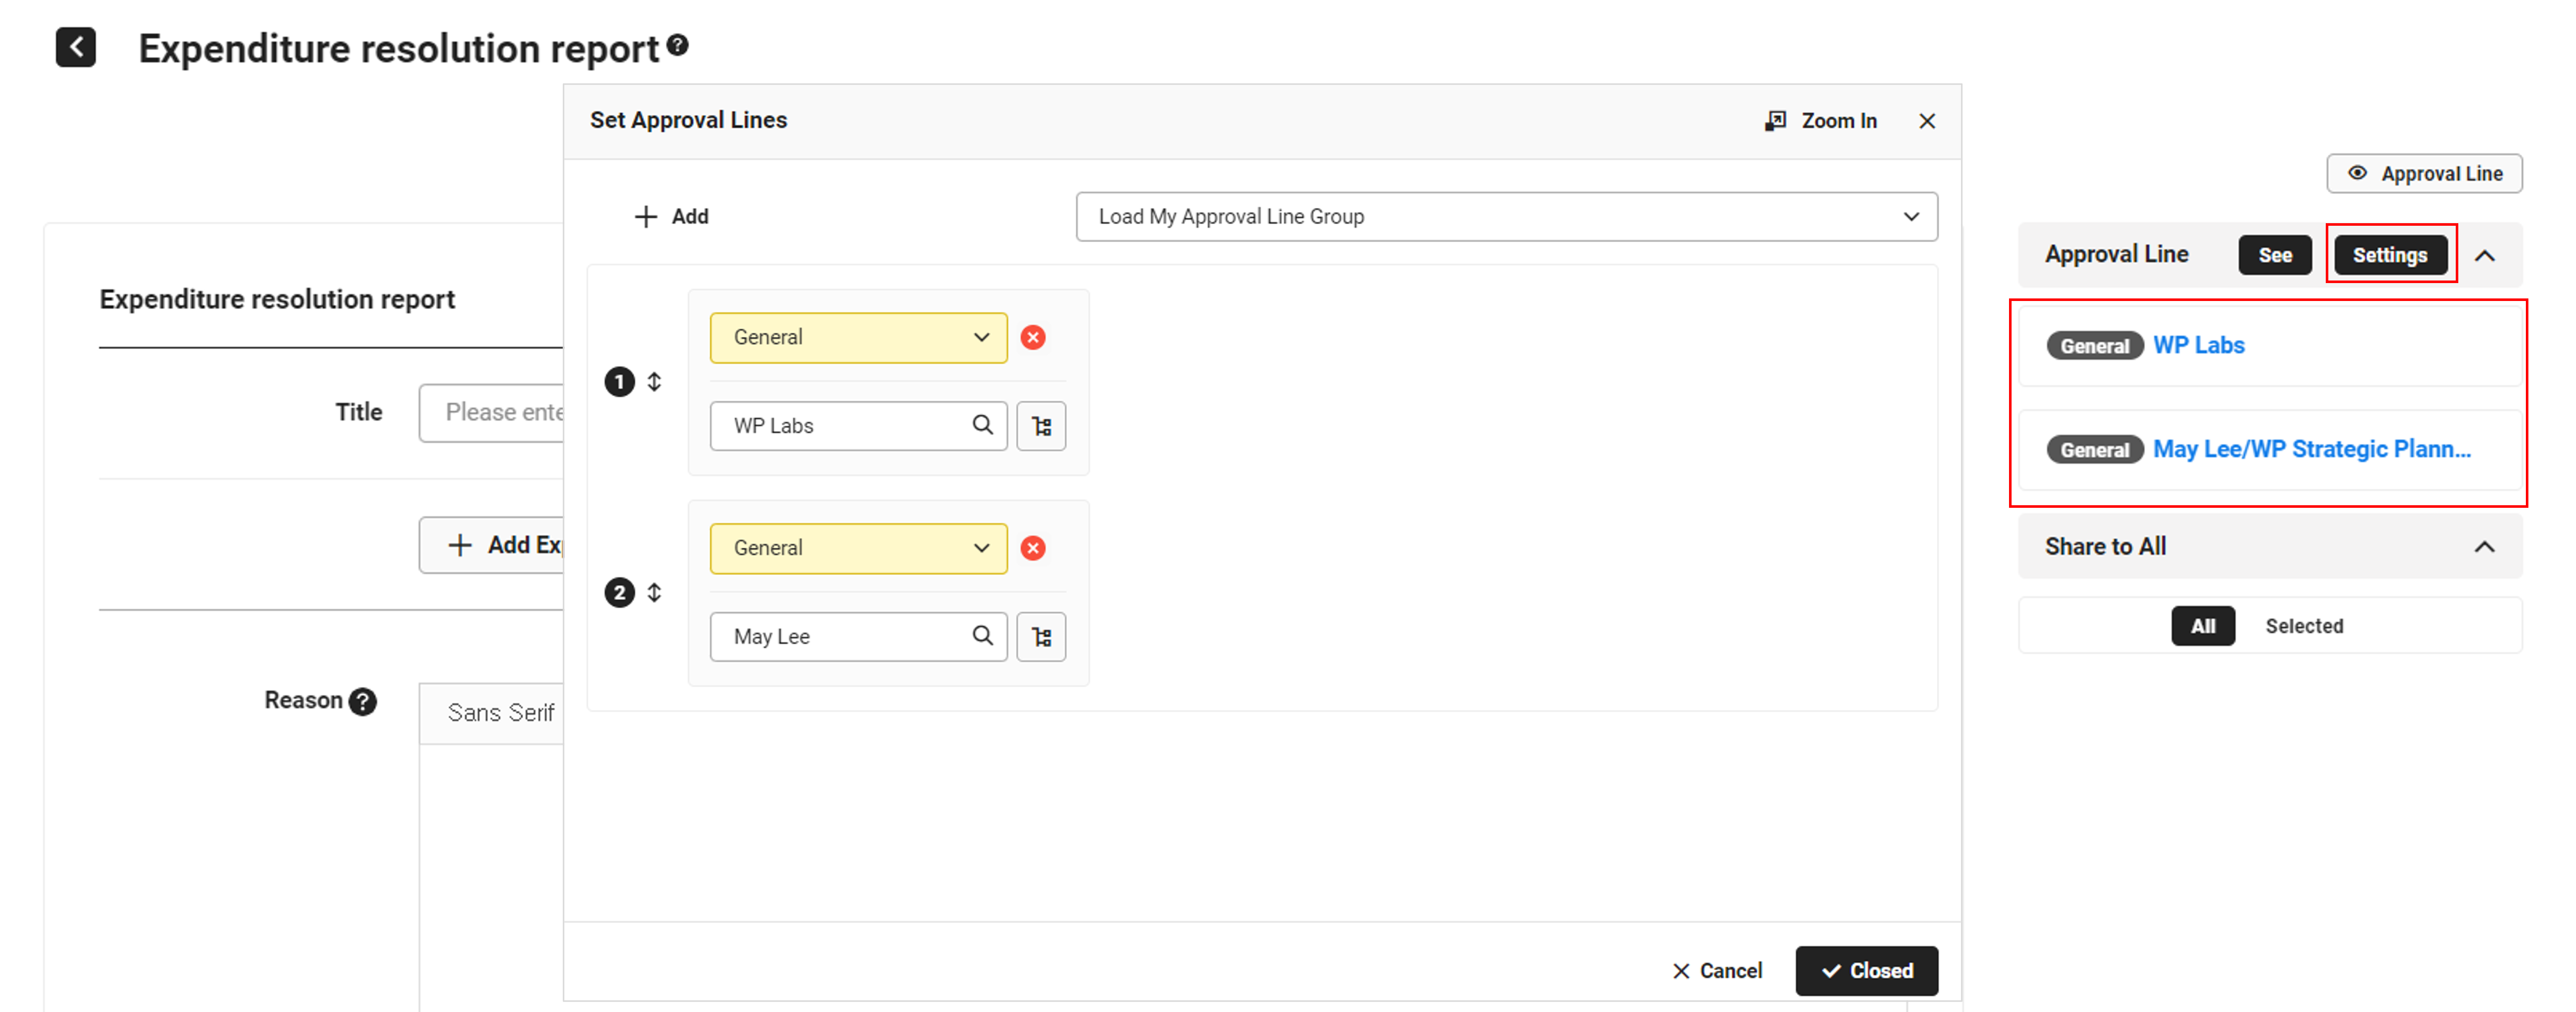
- Click ‘Settings’ in the Approval Line area.
- You can add it by loading from frequently used approval lines (set in the ‘My Approval Line’ menu) or add it manually.
- You can load the approval line only if there is no approval line set by the admin or change of approval line is allowed. See ‘Load My Approval Line’ below.
- To manually add an approver, click ‘Add’ and sequentially proceed from Step 3.
- Select the approval type.
- For more information on approval type, see’ Approval Type’ below.
- Search and select an approver. They can be added as an employee or a department.
- Employee:
- You can select by using auto complete by entering two or more characters for the employee’s name.
- The search auto complete results are displayed in the form of ‘Name (department/job title/job position/nickname)’. For employees with concurrent positions, all of their concurrent departments are displayed. (E.g., Gildong Hong/Operation team, Gildong Hong/HR team) Check and select the appropriate information.
- Job title/job position is displayed if the company is using job title/job position and the employee has a job title/job position assigned to them.
- Nickname is displayed if a nickname is entered in the employee's personnel information.
- The search auto complete results are displayed in the form of ‘Name (department/job title/job position/nickname)’. For employees with concurrent positions, all of their concurrent departments are displayed. (E.g., Gildong Hong/Operation team, Gildong Hong/HR team) Check and select the appropriate information.
- Click
 to select an approver from the organization chart tree.
- Select one from department members displayed after selecting the department. You can select after searching by the employee or department name in the Search window at the top of pop-up window.
- You can select by using auto complete by entering two or more characters for the employee’s name.
- Department:
- You can select by using auto complete by entering two or more characters for the department‘s name.
- Click to select a department from the organization chart tree, and then select the applicable department from the list displayed on the right.
- The approval type can't be set to Automatic Consent (or Referenced Approval, Referenced, Notification). (See ‘Approval Type’)
- When it's time to approve the document, the approval notification is sent to all employees in the department, and you can view the document to be approved in the ‘Approval > Pending’ or ‘Scheduled’ document box.
- The approval can be made by anyone in that department at the time of approval. For more information, see Approve Document.
- Any employee in the department can view the document before, during, or after approval.
- Click 'OK’.
- Check the selected approver and click ‘OK’ in the notification pop-up window.
- When using as a corporate group, you can select any employee or department in the group as the approver.
- You can add multiple approvers by repeating Steps 2 to 4.
- If the admin has set an parallel approval (agreement) line, then you can add parallel approvers by clicking ‘Add Parallel’.
- If the company has allowed the use of sequential approval, then ‘Add Sequence’ is displayed. You can add approvers to be processed sequentially within the parallel approval (agreement). (See the description of ‘Sequential Approval’ in ‘Approval Type’)
- Employee:
- Change the approval order if necessary.
- To change the approval order, select
 , and drag it to the desired position. (The order of approval lines set by the admin can't be changed.)
 - If the admin has set the Allow Status of Approval Line Change of the form to be ‘Allow’, you can remove the Approver set by the admin from the Approval Line. Click
 to remove.
- To change the approval order, select
- Click ‘Complete’.
Load My Approval Line
The following describes how to load and use a preset approval line.
- Click ‘Settings’ in the Approval Line area.
- Click ‘Load My Approval Line Group’ in the Set Approval Line pop-up window to select the approval line group to use.
- If there are no preset approval line groups in the ‘Approval > My Approval Line’ menu or the approval line is invalid, Load My Approval Line Group is not displayed.
- Approvers of the selected approval line group are displayed.
- Click to exclude a specific approver of the approval line group from the approval line.
- See ‘Add Approval Line’ to manually add an approval line.
- Change the approval order if necessary.
- Click ‘Complete’.
- Click ‘View’ in the Approval Line area to view the entire approval line.
- If you select ‘View Agreement Separately’, then you can view approvals (Consent/Automatic Consent/Parallel Approval) and agreements (Parallel Agreement) separately.
- You can select a vertical or horizontal view according to the order of approval.
- When a part-time employee requests a work plan or work result, the approver setting area is not displayed. The manager of part-time employees is set as the default approver. More approvers may be added, depending on the setting of Approval admin.
- The approval line of expense-related forms is determined according to the Expense admin's settings, and an approval line that is different from default approval line (e.g., a violation approval line that includes the approval by CEO) can be applied depending on the content.
- For expenditure resolution request and expense settlement request forms, approval lines by amount according to the total amount in the document depending on the admin settings. (See Set Approval Line > Conditional Approval Line)
- When using as a corporate group, you can add employees or departments of the corporate group as approvers.
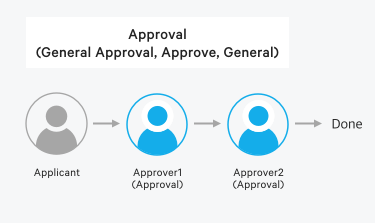
Approval Type
The approval types include Consent, Automatic Consent, Agreement, Parallel Approval, and Parallel Agreement. The name of the approval types may be applied in the same way for all forms or displayed differently by form according to the Approval admin's settings. (See Manage Name)
Methods that process documents in the order of the approval line
- Consent (General Approval, General Document): It's a type of approval for making decisions in general documents.
- Automatic Consent (Referenced Approval, Referenced, Notification): It's a type of approval for automatically processing the document.
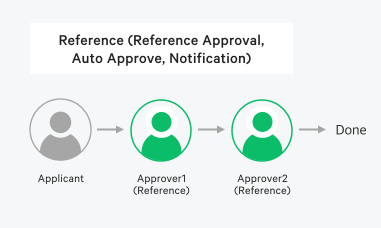
- The automatic consent is identical to ‘Referenced Approval’ of a general approval services. It can be used when a user is on the approval line but does not provide consent (approvals).
- When approved through automatic consent, employees on the approval line does not need to provide their consent. A notification for the automatic consent is sent to the employee whose document has been approved through automatic consent.
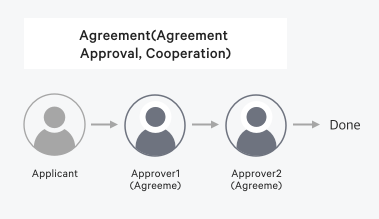
- Agreement (Agreement Approval, Cooperation): An approval type that is processed the same as ‘Approval’, but the decisions regarding proceedings of the document are made by an external handler other than an internal approval line (Handling process is identical to ‘Consent’, but it is displayed as ‘Agreement’).
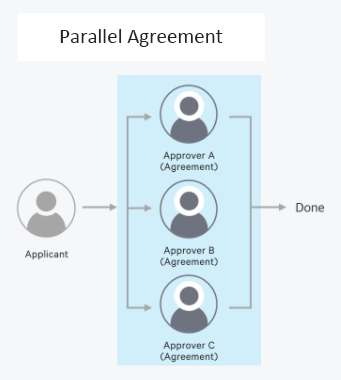
Methods where approvers on the same level approve the document at the same time
- Parallel Approval: It's an approval type where multiple regular approvals are made on the same stage at the same time. (E.g., if there is a meeting of 10 department heads and the result needs to be approved, then you can set each department head as a parallel approver to set up an approval line to their approvals all at once.)

- Parallel Agreement: It's the same type of processing as ‘Parallel Approval’, but the decision is made through external approvers outside of the internal approval line. (The process is identical to ‘Parallel Approval’, but displayed as ‘Parallel Agreement’.)
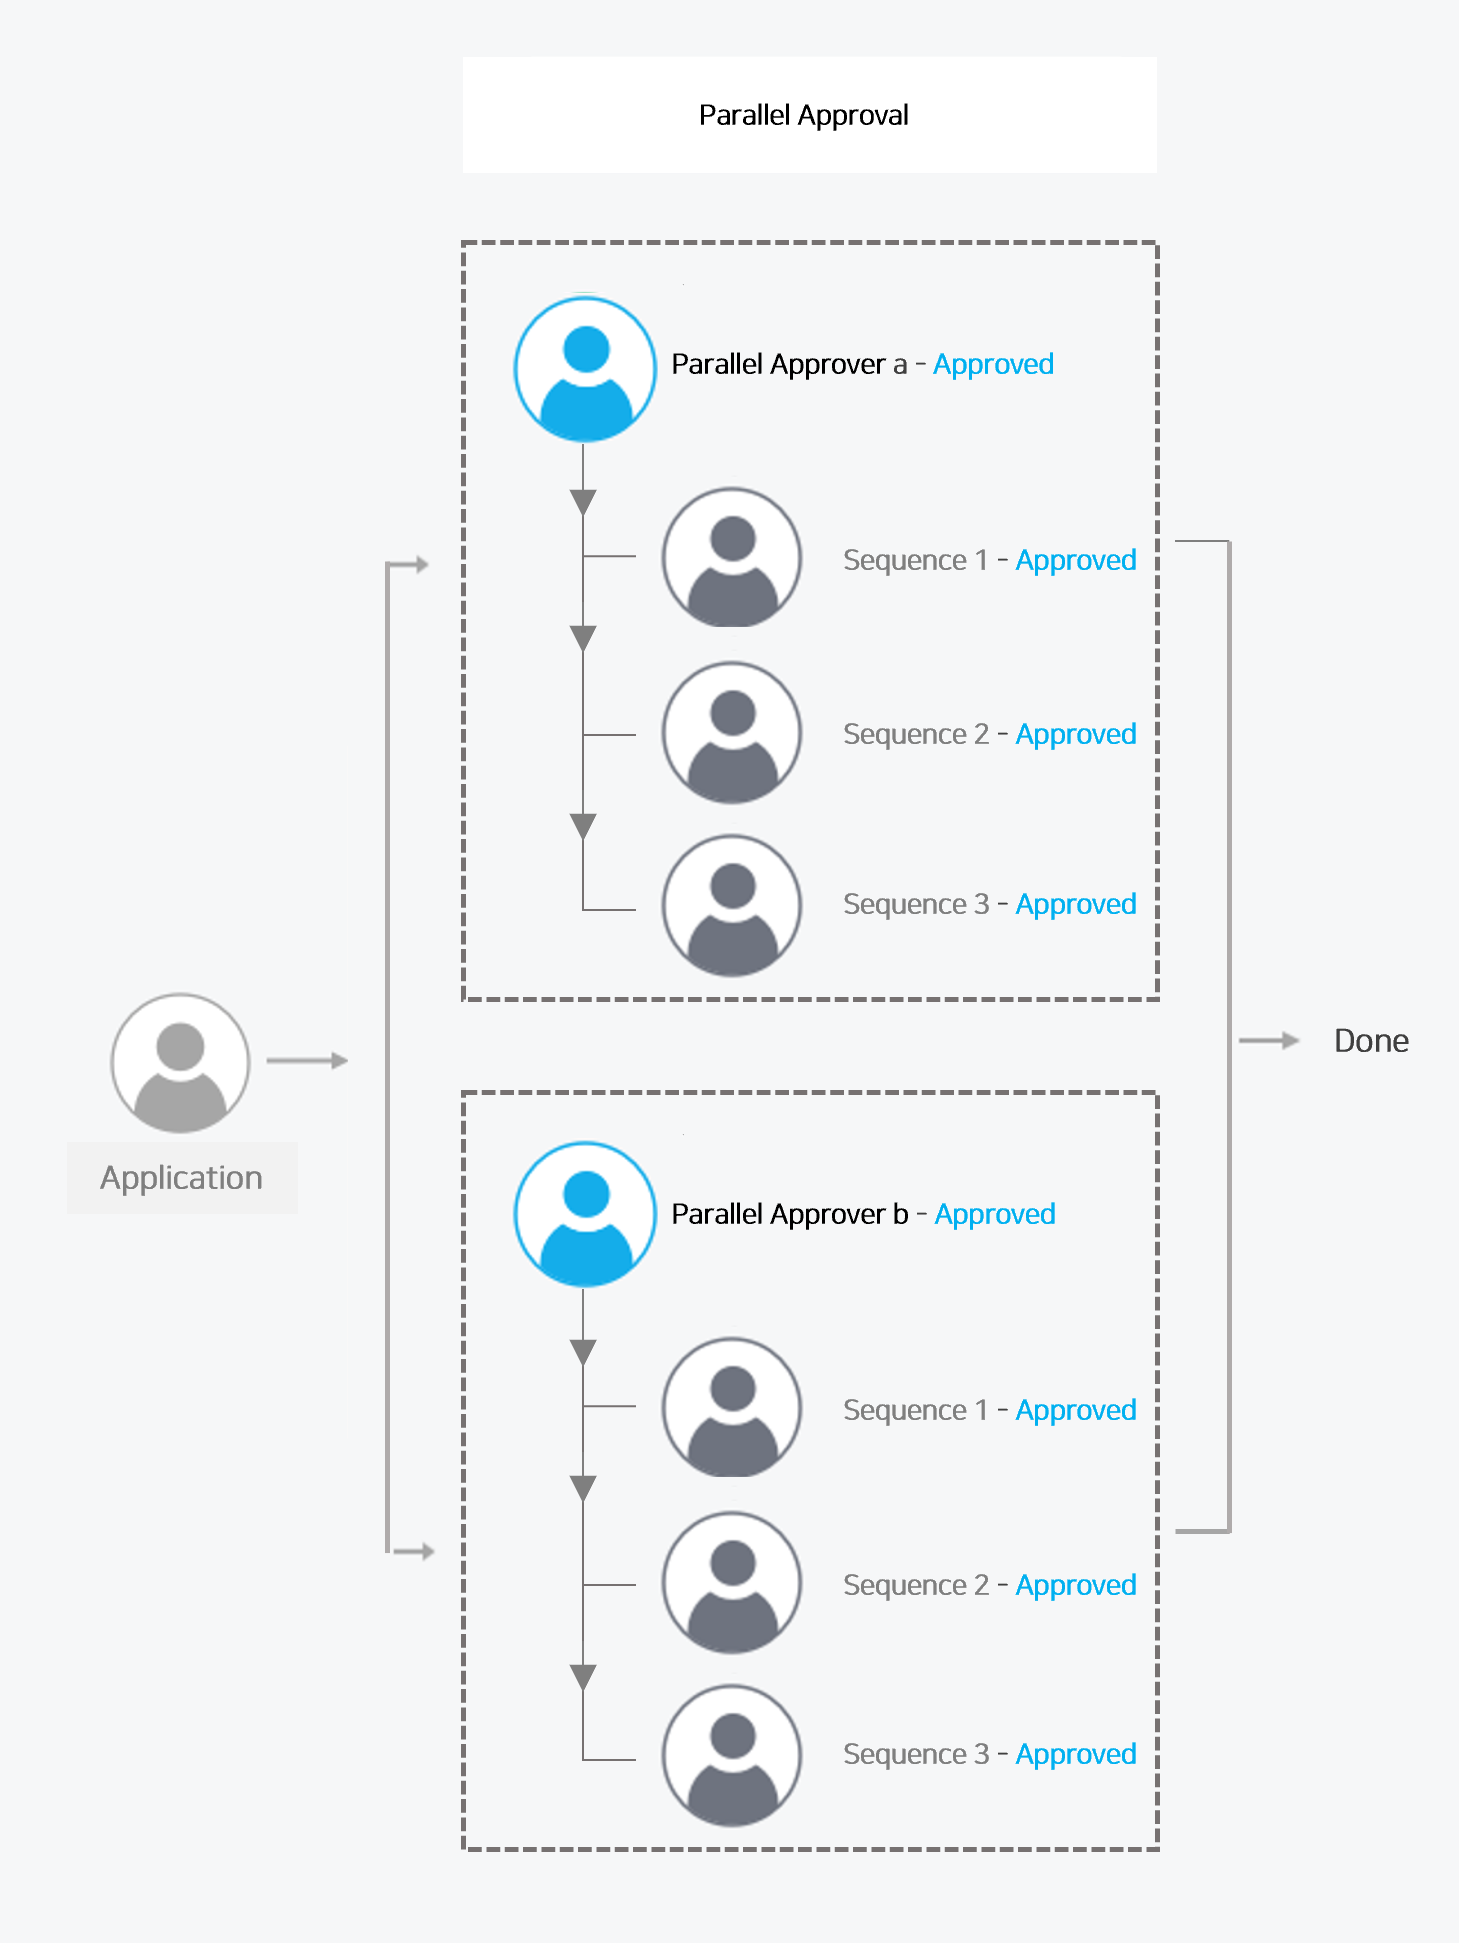
- Sequential Approval: It's an approval type where documents are approved by the order placed in the approval line within ‘Parallel Approval (Agreement)’.
- If the admin sets Sequential Approval to Use (‘Sequential Approval’ item in ‘Manage Approval > Settings menu’), sequential approvers can be added in Parallel Approval and Parallel Agreement
- The document approval is completed only when approvers from the entire parallel unit, including the approver for Parallel Approval (Agreement) and sequential approvers below, all agree.
4. Receipt Settings
When the form-specific Receipt Usage Status is set to ‘Use’ by the admin, the Recipient area is displayed. (See Receipt Settings)
If there are recipients set by form-specific admins, then they are automatically displayed.
- If the admin has set Change of recipient to ‘Not allow’, you can't change the recipient set by the admin.
Add Recipient
If the admin has set to ‘Allow’ change of recipient, you can add recipients when creating documents.
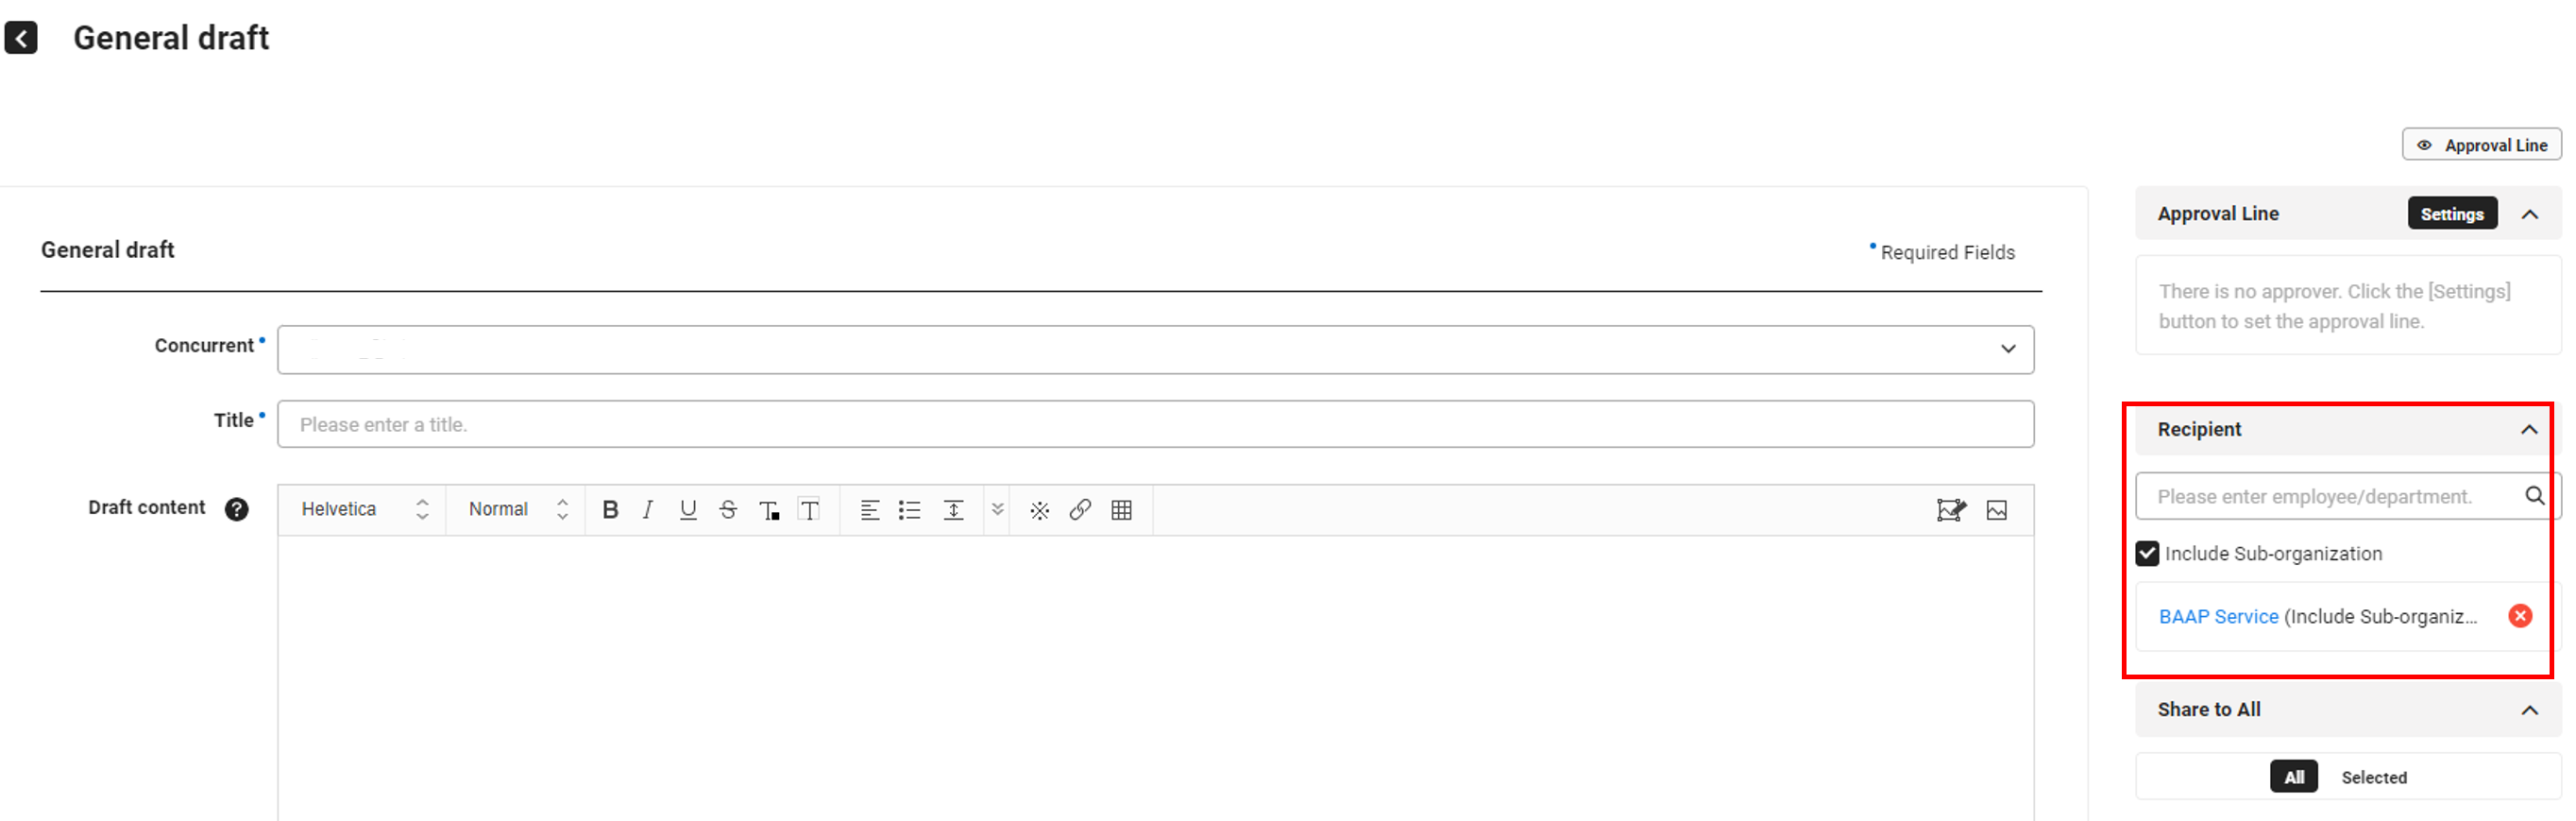
The following describes how to add a recipient.
- You can add it by loading from the frequently used recipient group (set in the ‘My Approval Line’ menu) or add it manually.
- You can load recipient groups only if change of recipient is allowed. See Load My Recipient Group.
- To manually add a recipient, sequentially proceed from Step 2.
- Select a recipient type. A recipient can be selected as an employee or a department.
- Select a recipient from the search result.
- Employee: Enter two or more characters of the employee name and click
 to search.
 - Department: Enter the name of a department and click to search.
- If a recipient is set to a department, all members of the department may receive. If you mark the ‘Include Suborganizations’ option, then the members who belong to those suborganizations are also included in recipients.
- Click to select a recipient department from the organization chart tree.
- A user used as a recipient can view documents in ‘Approval Home > Inbox’. (See Inbox)
- Click to exclude the recipient you've added from the recipient.
- If the admin has set Change of Recipient to ‘Allow’, you can remove a recipient set by the admin. Click to remove.
- Employee: Enter two or more characters of the employee name and click
- The receipt time point may vary by form according to the Approval admin‘s settings. A document can be received starting from the time of document creation or after approval closure.
- When using as a corporate group, you can add a department or member of the corporate group as a recipient.
Load My Recipient Group
The following describes how to load and add a frequently used recipient group.
- Click ‘Load My Recipient Group’ in the recipient area.
- If there are no preset recipient groups in the ‘Approval > My Approval Line’ menu or the recipient group is invalid, ‘Load My Recipient Group’ is not displayed.
- Select a recipient group to use.
- All recipients in the selected recipient group are displayed.
- See ‘Add Recipient’ to manually add recipients.
- Click to exclude a specific recipient from the recipients.
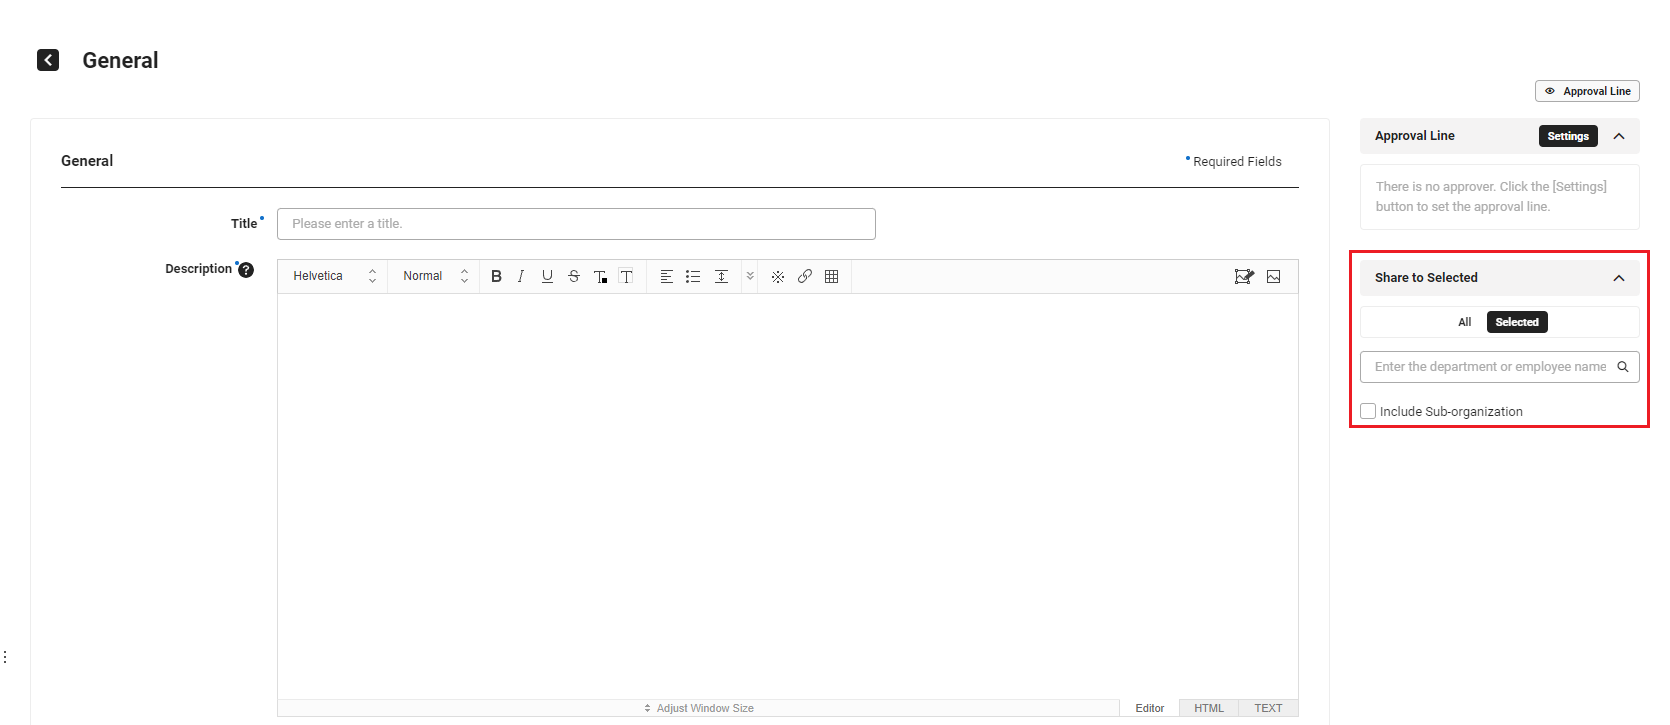
5. Sharing Settings
Check Sharing Settings of Admin
The sharing options set by the admin are automatically displayed.
- If the admin has set ‘Change of sharing targets’ to ‘Not allow’, you can't change (including add and delete) the sharing settings by the admin.
- If the admin has set ‘Change of sharing targets’ to ‘Allow’, you can change the sharing settings. For information on the sharing settings of documents, see Share Document.
6. Save and Report
- To save what you have written and report it, click ‘Report’.
- Click ‘Save Temporarily’ to save the document temporarily.
- The approver, sharing settings, and recipients are saved with the user information at the time of saving temporarily.
- You can view a temporarily saved document in ‘ Approval Home > Save Temporarily’.
- For forms such as the work plan request, work result request, certificate request, expenditure report, expenditure resolution report, payroll certificate request, and those created by the company (Manage Approval > Create Form), click ‘Preview’ to preview the created content.
- Click ‘Save Temporarily’ to save the document temporarily.
- Check the details in the confirmation pop-up window, and then click ‘OK’.
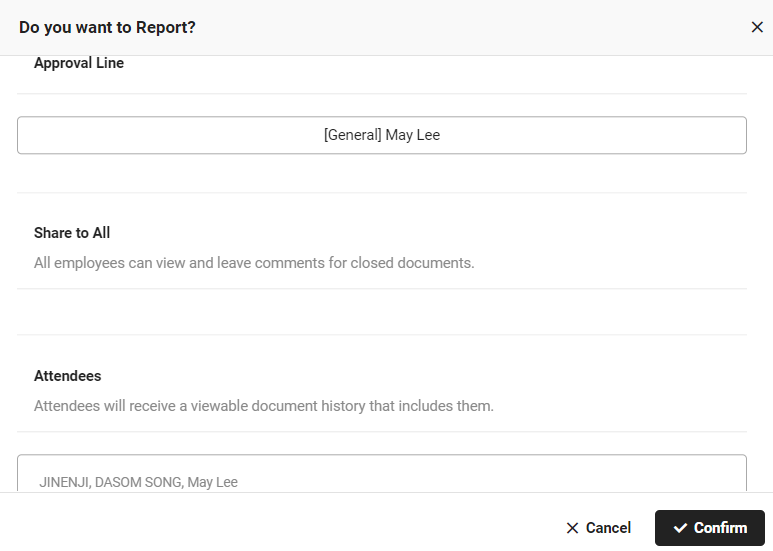
- The created document is saved and reported to the approver.
When the attendees are allowed to view the expense settlement history in the Expense service (set from ‘Expense > Set Expense’), internal attendee information is displayed in the pop-up window when reporting expense settlement request document for approval, and the details of the expense settlement request document are shared with the applicable attendees.
- The created document is saved and reported to the approver.
Items to check when saving documents:
- Audit Item Check: For expense plans and settlement documents, compliance with audit items is checked upon document submission. If violations are found, then they will be displayed in a pop-up window and you won‘t be able to complete the request. However, if the Expense admin applied an approval lines other than the default approval line (e.g., violation approval line including CEO approval), you can complete the approval, even if there are violations. As there are no default audit item values, the Expense admin must Set Audit Item for expense items according to company regulations.
- Exceeded Expense Plan Amount: When you request expense settlements by searching an expense plan, if the settlement amount exceeds the amount in the expense plan, then whether the settlement document can be reported for approval is determined by the option set for Reports Exceeding Expense Plan Amount. You can report it for approval only if this option is set to ‘Report available’. Also the default approval line or violated approval line may be applied according to the admin's settings. (See ‘Set Expense’)
- Exceeded Budget: If budgets are set to be used in the Expense or Expenditure service and if budget control of the budget is set to ‘Yes’, budget overruns are checked as follows.
- For expense settlement requests and expenditure resolution requests, if the budget exceeds the available budget at the time of request, then an insufficient budget message is displayed in the pop-up window and the request can‘t be completed. In this case, request budget increase to the Expense admin, or request the settlement within the available budget.
- Accounting Closing: If accounting admin has closed the accounting for the month for the subject month (based on date of use), then you can't request approval. Contact the Accounting admin.
Content Creation Method By Form
- For details on how to fill out each form, see the following.
- Create General Form
- Create Expenditure Report (when using Finance)
- Create Expenditure Resolution Report (when using Finance)
- Create Certificate Request Form
- Create Absence Schedule Form (when using Attendance)
- Create Absence Schedule Cancellation Form (when using Attendance)
- Create Work Result Request Form (when using Attendance)
- Create Work Plan Request Form (when using Attendance)
- Create Work Result Request Cancellation Form (when using Attendance)
- Create Annual Leave Usage Plan Form (when using Attendance)
- Create Expense Plan Request Form (when using Finance)
- Create Expense Settlement Request Form (when using Finance)
- Create Payroll Certificate Request Form (when using Payroll)
- Create Project Code Request Form
- Create Vendor Request Form
- Create Official Document Sending Request Form
- Create Official Document Receipt Request Form
- Leave Request (Part-timer) (when using Attendance)
- Work Result Request (Part-timer) (when using Attendance)
- Work Plan Request (Part-timer) (when using Attendance)
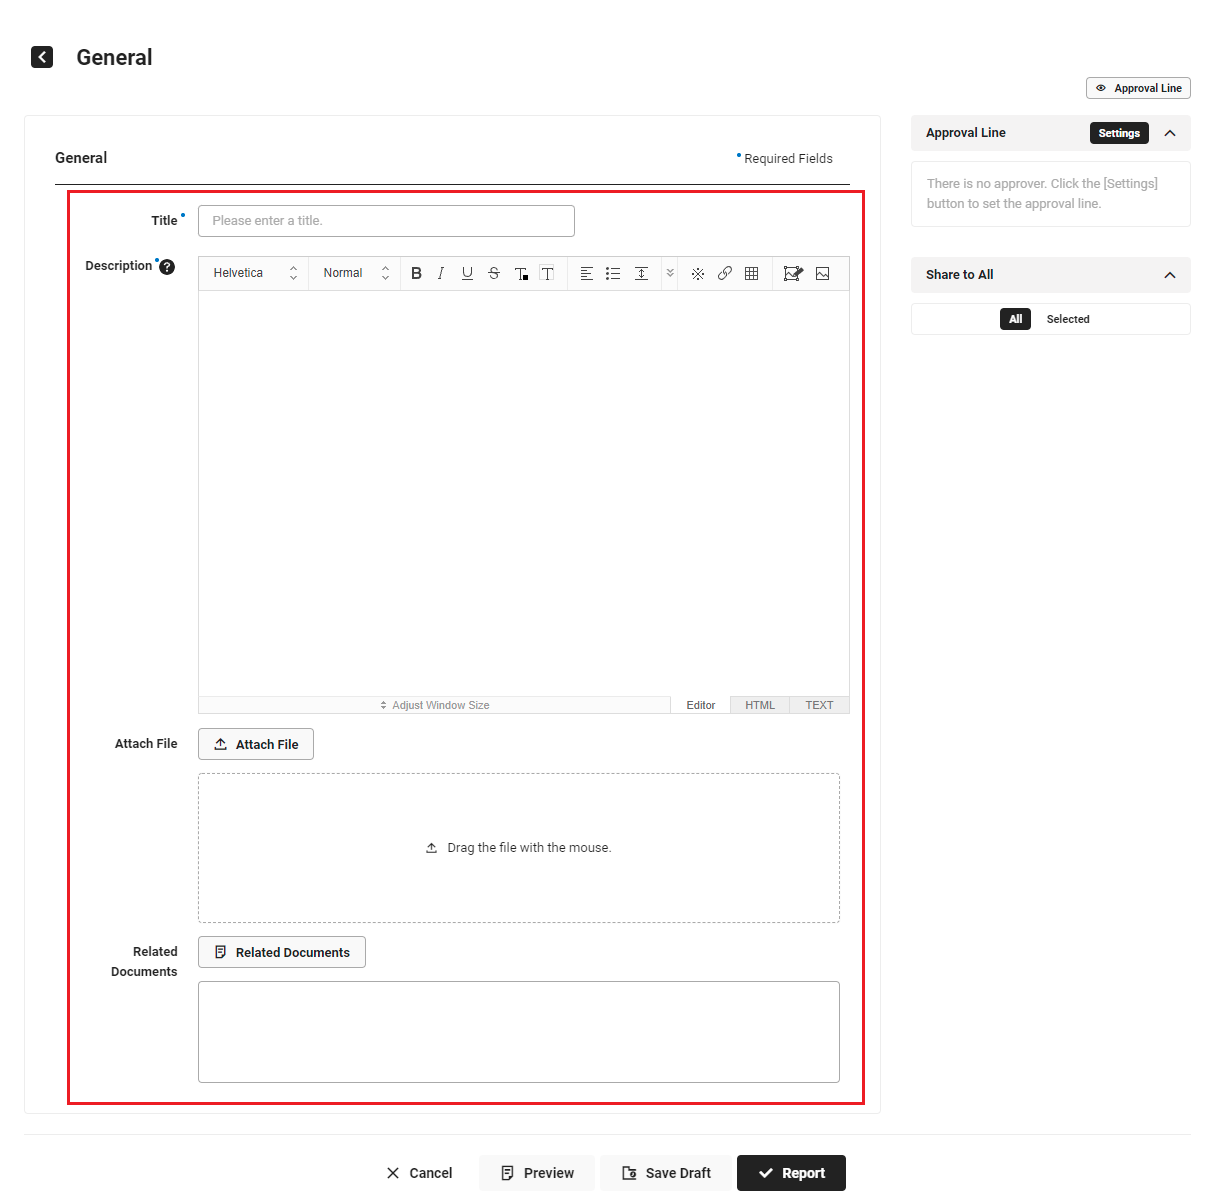
Create General Form
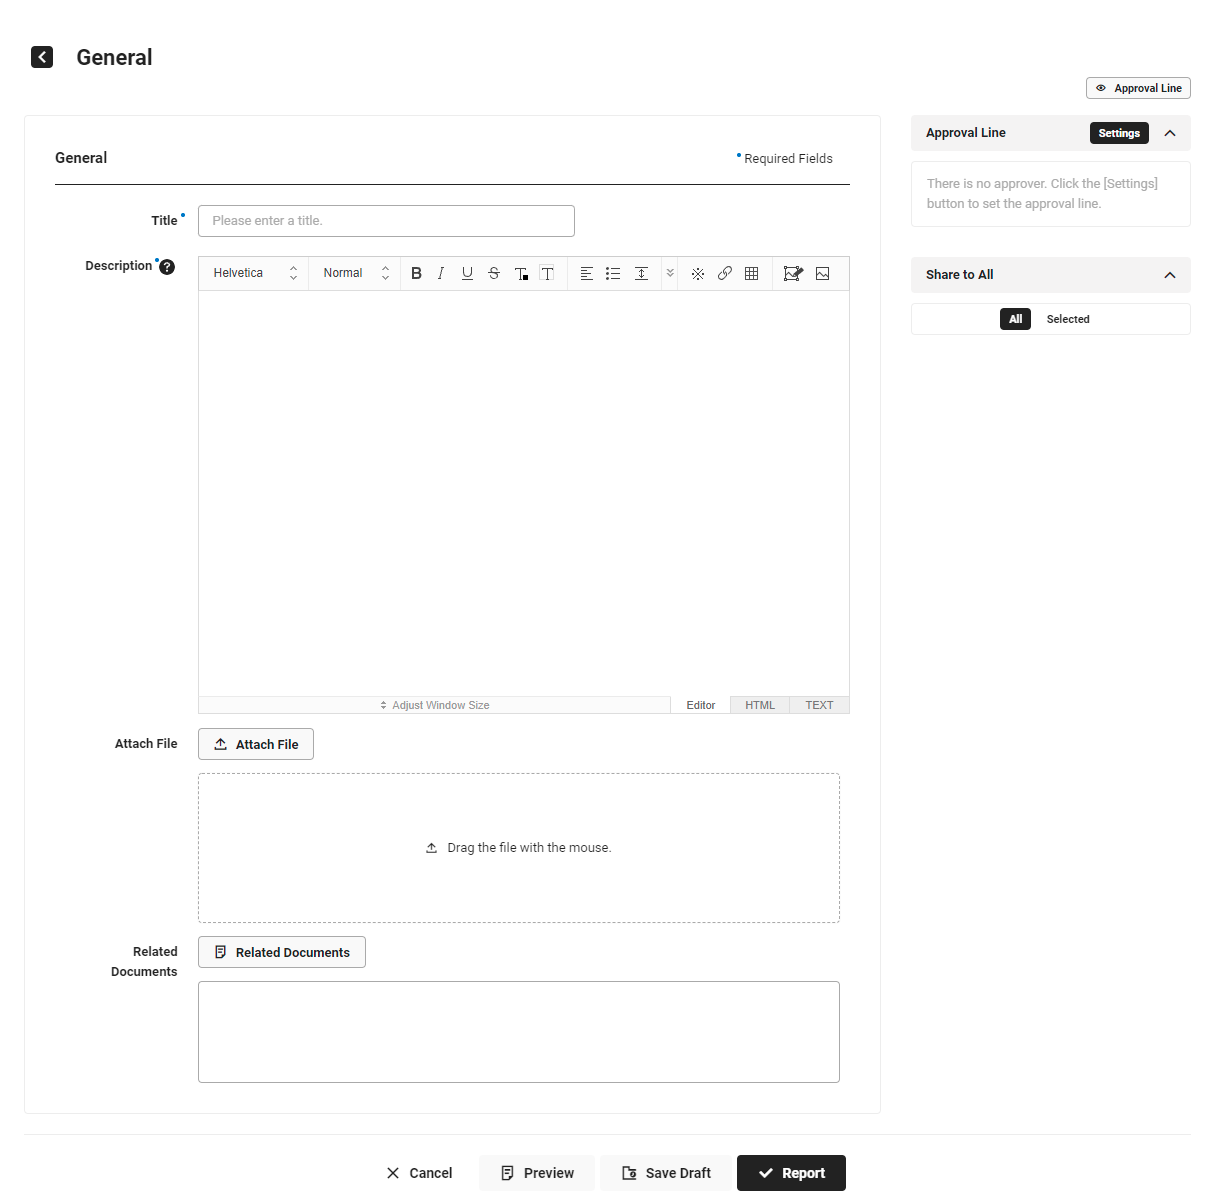
- Enter the title.
- Title is a required field.
- Enter the content according to the form.
- A blank form is displayed if the Approval admin has set the form to ‘Not use’, or has not registered any forms.
- To attach a file, click ‘Attach File’ and select the file to attach, or drag and drop the file to attach into the box.
- If there are documents related to the document you are creating, click ‘Related Document’ and select the related document.
Create Expenditure Report
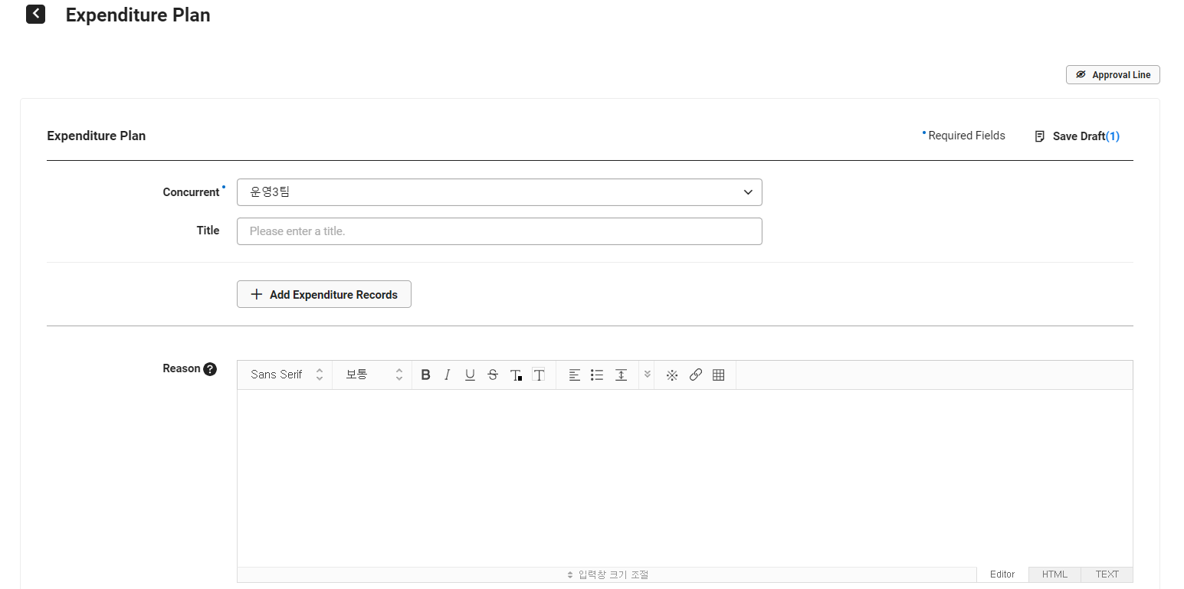
- If you have two or more affiliated departments, then select the department.
- If you belong to only one department, then the concurrent position item will not appear.
- Enter the title.
- Click ‘Add Expenditure Records’ and enter the details.
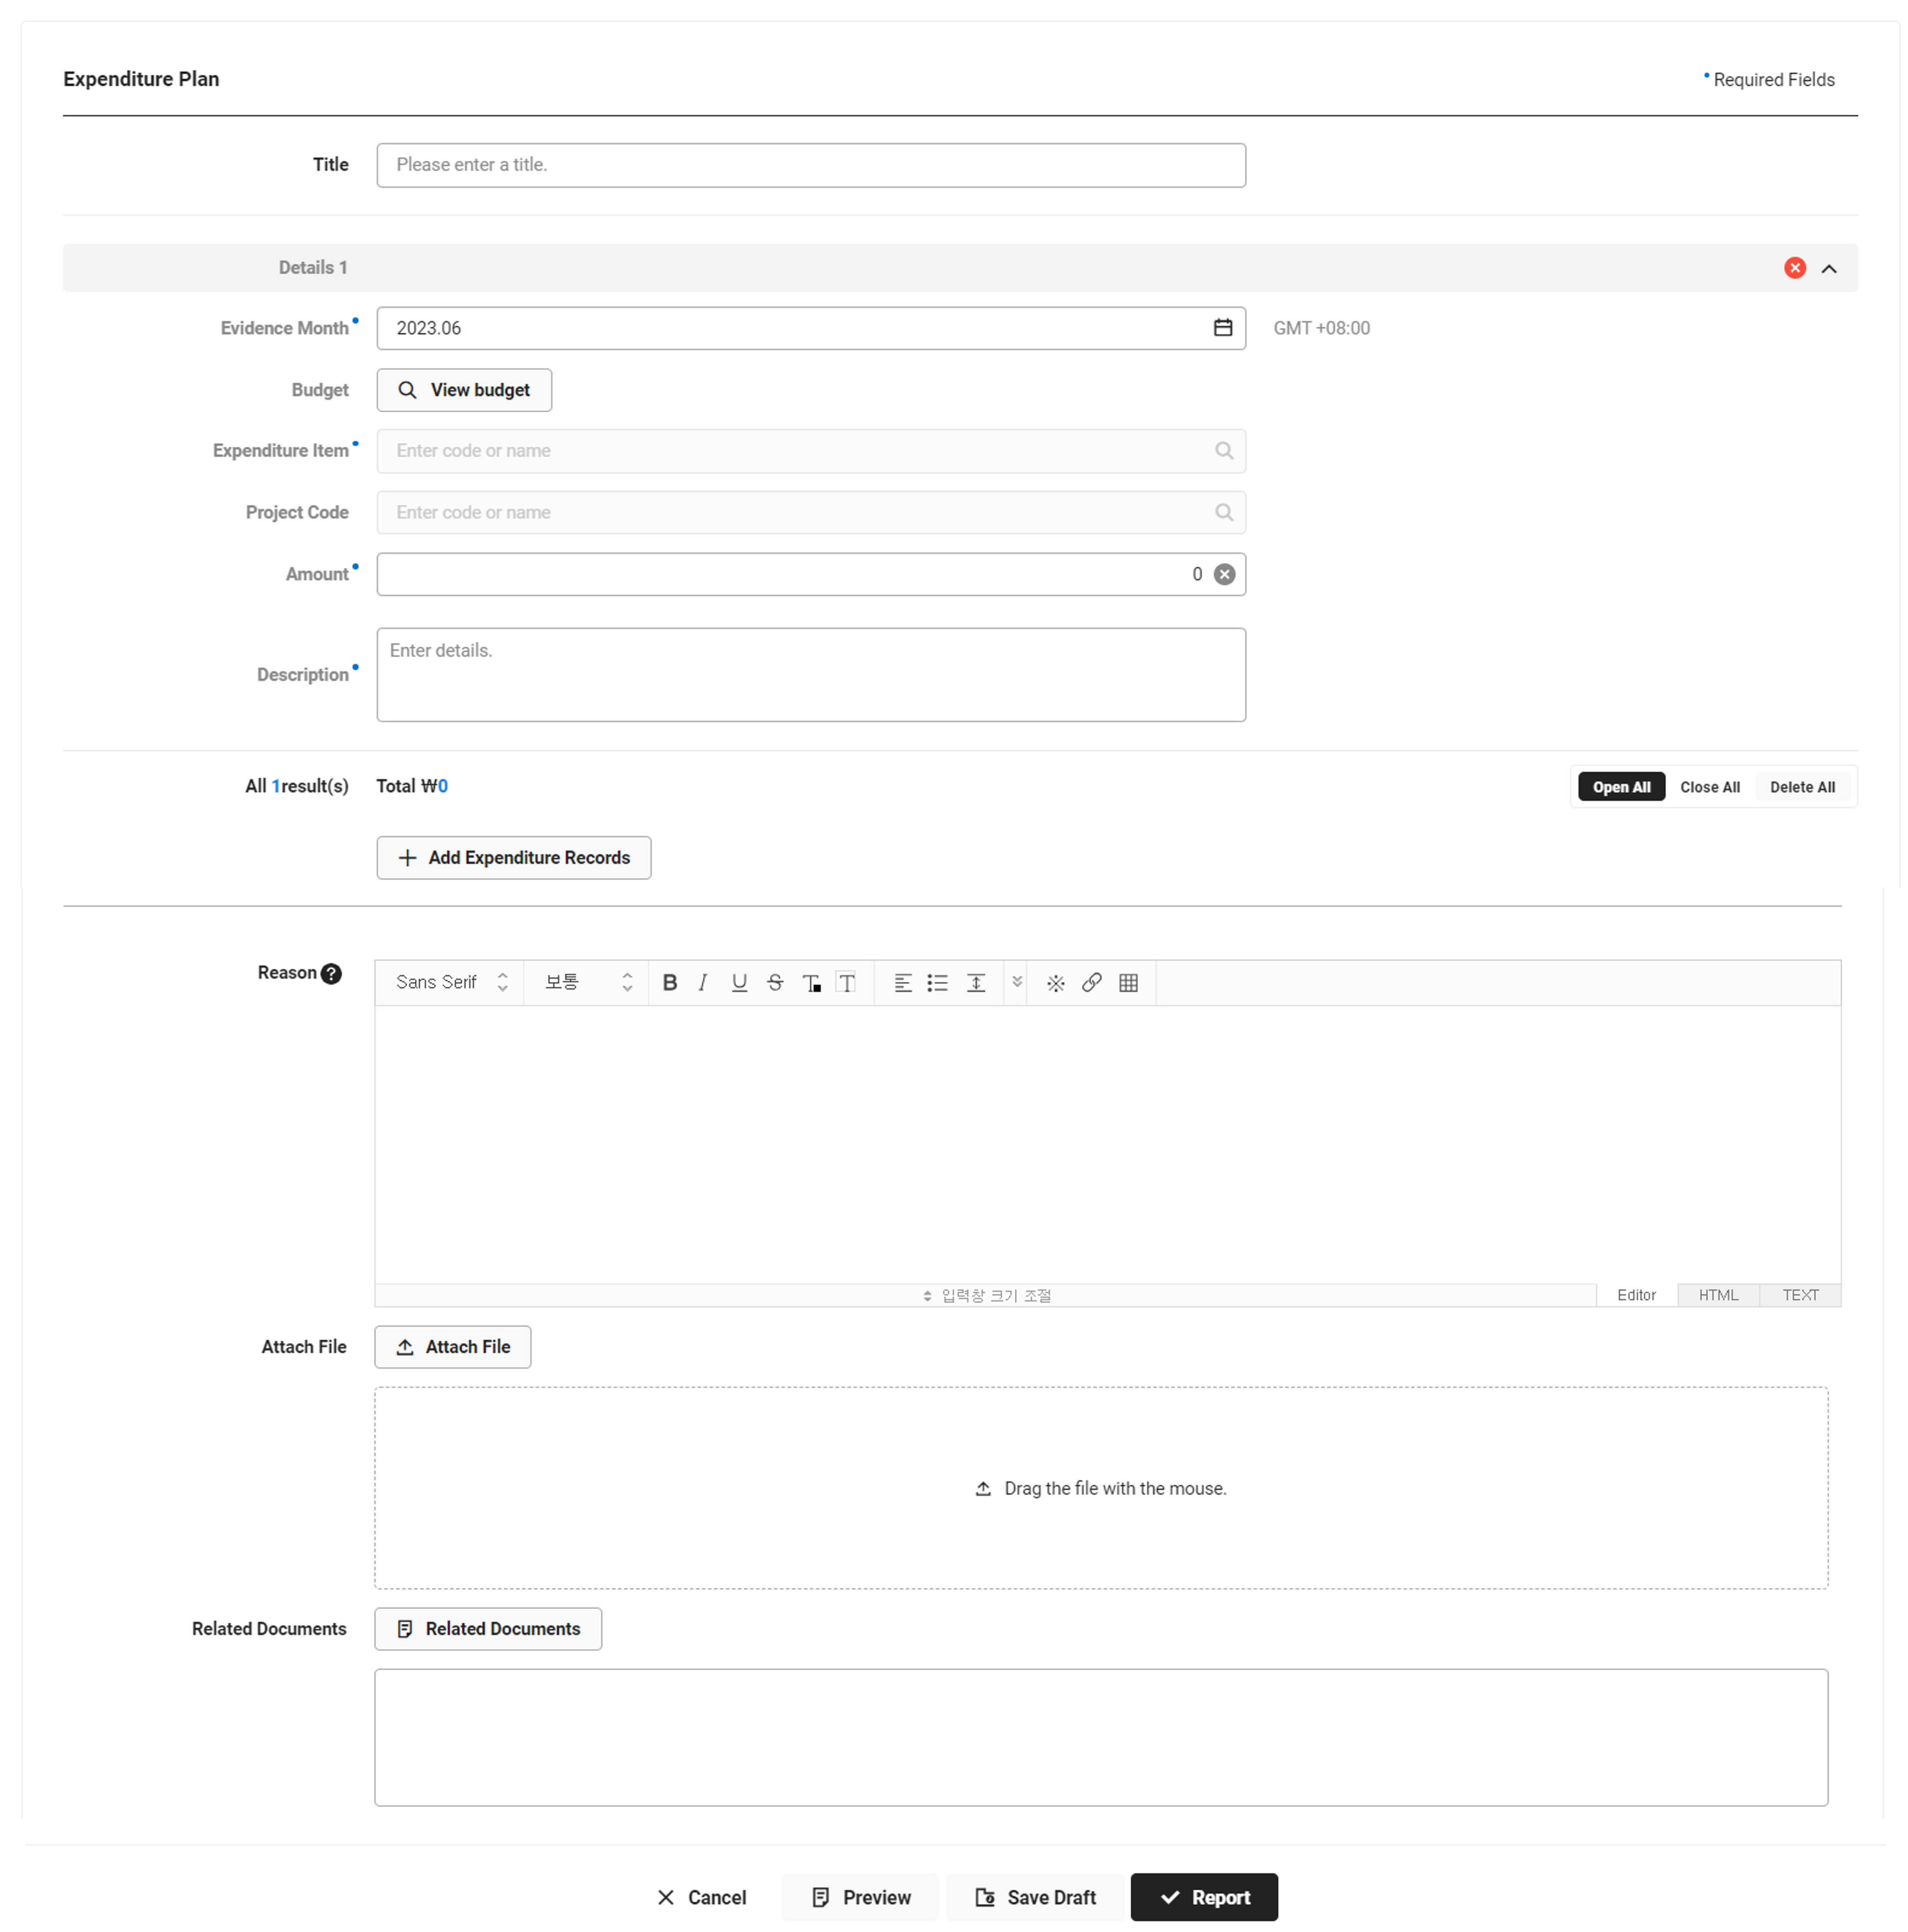
| Item | Description |
|---|---|
| Evidence Month | Select the evidence month (expenditure usage month) |
| Budget | Select budget when using budgets
|
| Expenditure Item | Select an expenditure item.
|
| Project Code | It is displayed if the company has set Project Code to ‘Use’. Select the project code
|
| Amount | Enter the sum of the supply price and VAT amount |
| Description | Enter details related to the expenditure report request
|
- If you have additional items you need to request, then repeat Step 3.
- Enter the reason for request.
- To attach a file, click ‘Attach File’ and select the file to attach, or drag and drop the file to attach into the box.
- If there are documents related to the document you are creating, click ‘Related Document’ and select the related document.
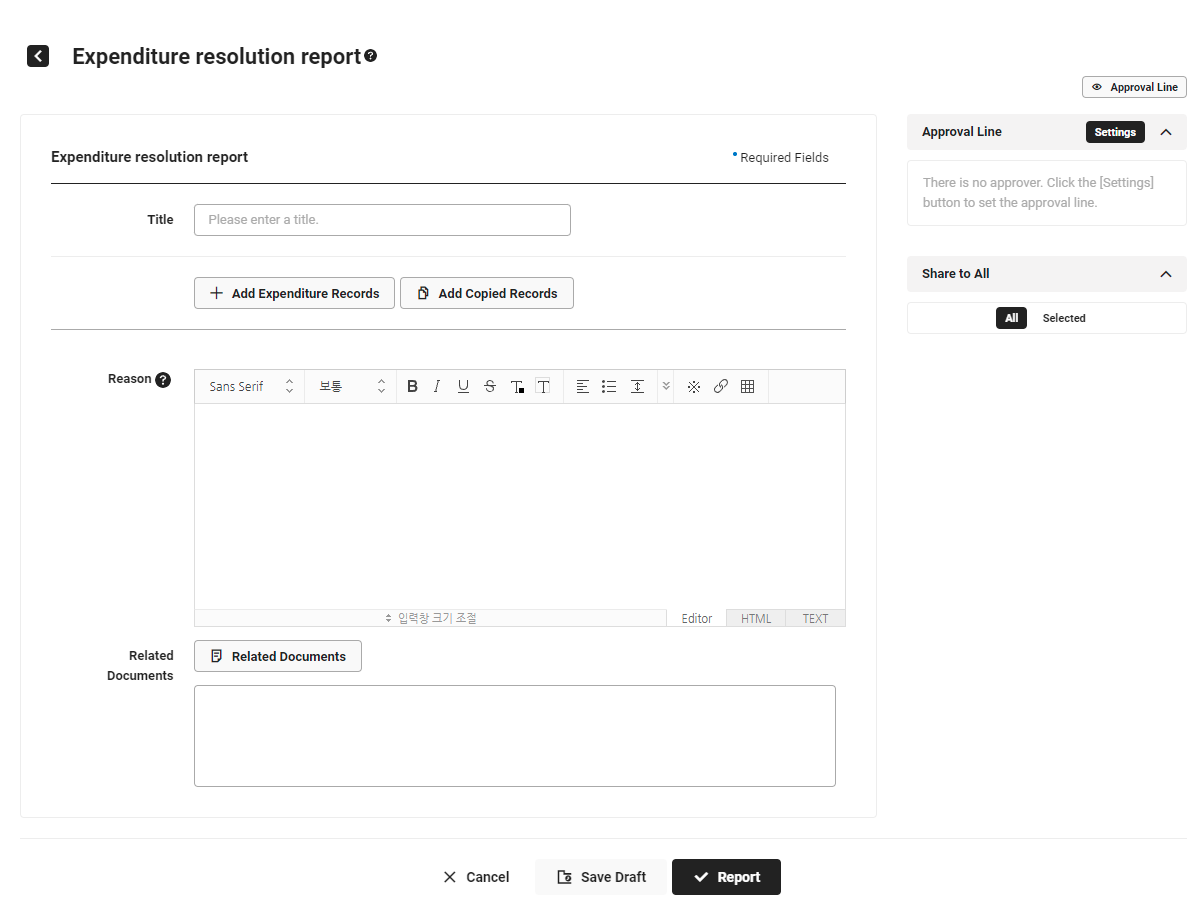
Create Expenditure Resolution Report
- If you have two or more affiliated departments, then select the department.
- If you belong to only one department, then the concurrent position item will not appear.
- Enter the title.
- Click ‘Add Expenditure History’ and enter the details.
| Item | Description |
|---|---|
| Expenditure Report | It is displayed if expenditure report is set to ‘Use’
|
| Evidence Type | Select the evidence type
|
| Evidence Date | Enter the evidence date (expenditure usage date)
|
| Place of Use | When selecting corporate credit card or corporate credit card integration history as the evidence type, then the place of use is displayed automatically |
| Approval Number | When selecting corporate credit card or corporate credit card integration history as the evidence type, then the approval number is displayed automatically |
| Budget | Select budget when using budgets
|
| Expenditure Item | Select an expenditure item.
|
| Project Code | It is displayed if the company has set to Use Project Code. Select the project code
|
| Type | Select an expenditure type (General expenditure/Asset acquisition).
|
| Fixed Asset | It is displayed when ‘Asset acquisition’ is selected for the expenditure type
|
| Tax Code | It is displayed when ‘Asset acquisition’ is selected for the expenditure item. Select a tax code |
| Vendor | Select the vendor to make the payment to
|
| Account Number | Select the account number to deposit payment to
|
| Quantity | It is displayed when ‘Asset acquisition’ is selected for the expenditure item. Enter the quantity |
| Amount | Enter the supply price, VAT amount, and fees (displayed when ‘Asset acquisition’ is selected for the expenditure item).
|
| Evidence Data | Attach evidence files such as receipts
|
| Description | Enter details related to expenditure request
|
- If you have additional items you need to request, then repeat Step 3.
- You can click ‘Add Copied History’ to copy and add the selected details.
- Enter the reason for request.
- If there are documents related to the document you are creating, click ‘Related Document’ and select the related document.
Create Certificate Request Form
- Enter the title.
- Select a certificate to be issued.
- Enter the number of copies to be issued. It is an item displayed when the certificate being requested is in the ‘Request original (no seal)’.
- If there are additional items set by the admin to be entered, then enter the corresponding items.
- Enter the purpose of issuance.
- In case of requesting the issuance of a certificate registered with ‘Issue manually (seal stamped)’, fill out the certificate request form and click ‘Report’, then you are directed to the Request Certificate page with ‘Issue’ displayed. You can issue the certificate manually by clicking the button.
- After clicking ‘Issue’, check the certificate details in the pop-up window that appears, and then click ‘Print’.
- For manual issuances, you can‘t only issue it once. To make additional issuances, create the approval document again.
- In case of requesting a certificate registered with ‘Issue original (no seal)’, ‘Issue’ isn’t displayed in the Request Certificate page. The admin will issue the certificate, stamp it, and deliver it to the requestor in person.
- The form style of the certificate follows the admin settings for the issuance.
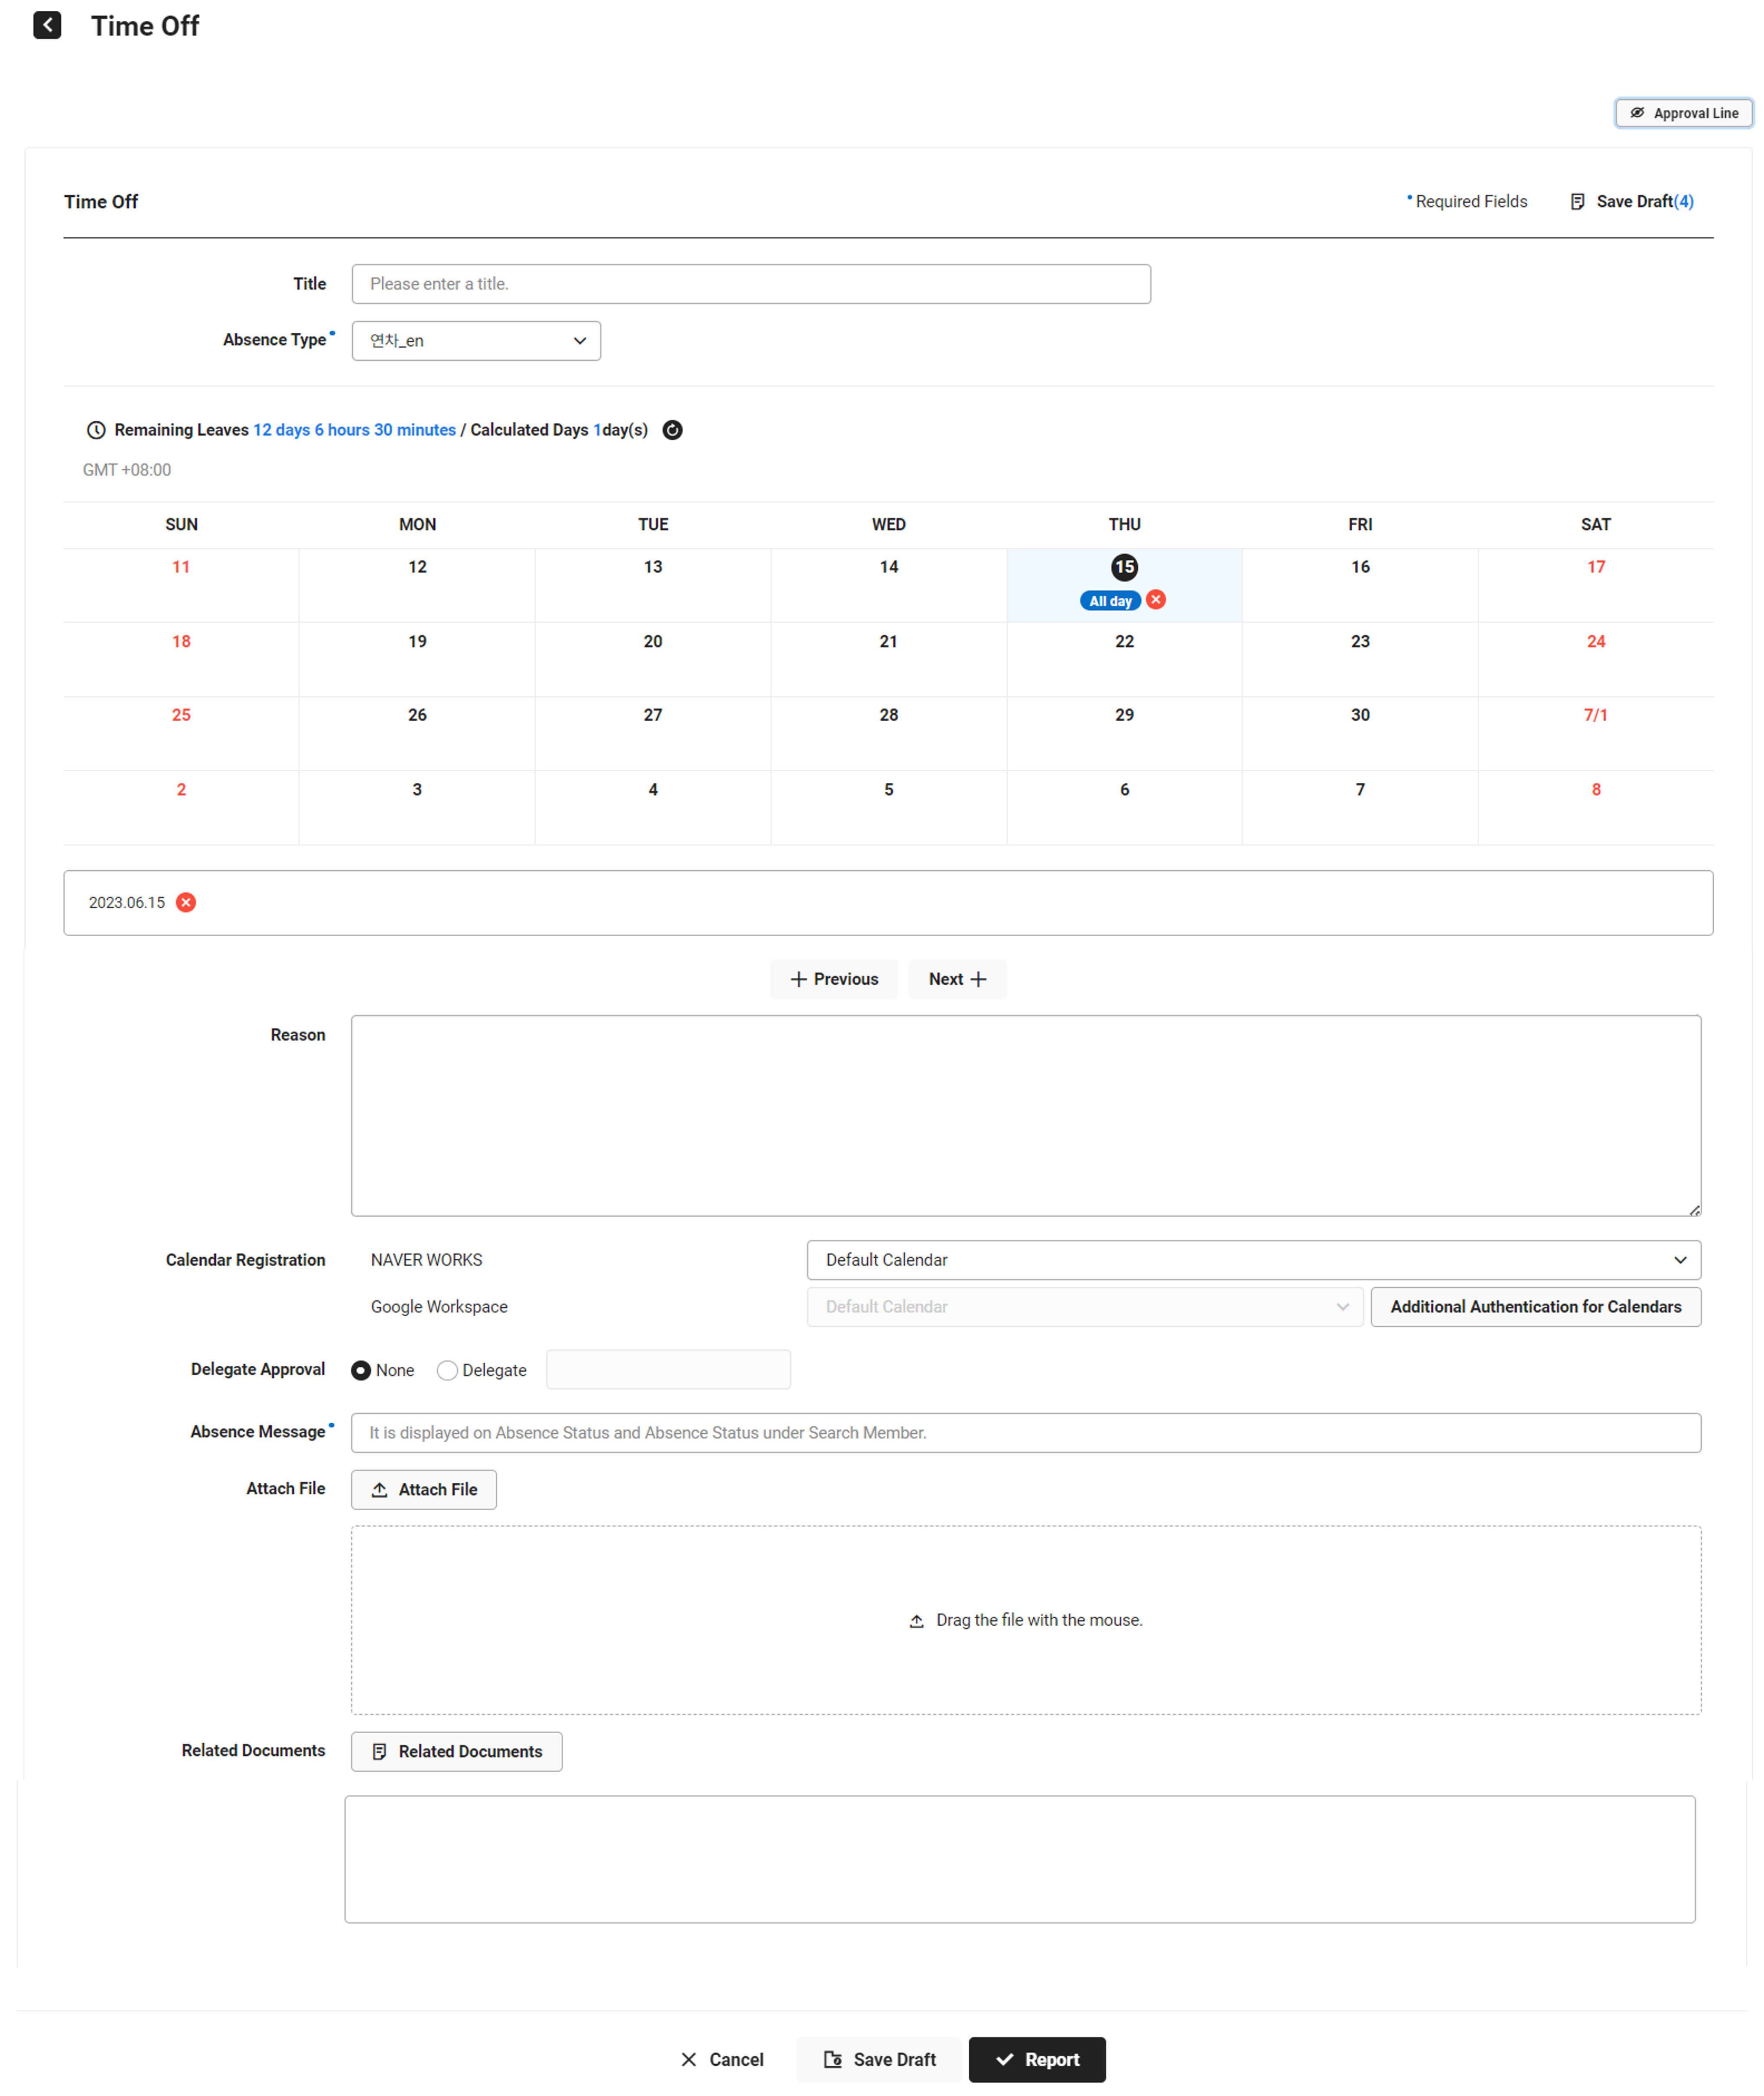
Create Absence Schedule Form
When an employee create an absence schedule, the absence status and the absence item name are displayed in the member information of Contacts. In addition, you can search the absence schedule date, reason, and absence message in 'My Work > Manage Attendance > Absence Status'.
-
- Enter the title.
- Select the absence item.
- If you select ‘Biztrip’ as the absence item, then select the business trip destination.
- If you select ‘Family event leave’ as the absence item, then select the family event type and relationship.
- If you've selected ‘Family event leave’ as the absence item, then select the work result request document.
- Select absent dates on the calendar.
- If you've selected ‘Annual leave’ as the absence item, then you can set it as follows, depending on the time unit settings in Manage Absence Item.
- All day unit: Click the date to use for an annual leave or drag the mouse from the start date to end date of an annual leave, to enter an all-day leave.
- Half-day unit: When you click the date to use for absence, a pop-up window appears where you can select the duration of absence from all-day, morning or afternoon.
- When you select Morning, the start time is the general work start time based on the work arrangement setting and the end time is automatically filled out as the end of the first half a day. You can change the time when necessary.
- (E.g., if the work hours are from 9:00 AM to 6:00 PM, the start time is 9:00 AM and the end time is 1:00 PM.)
- When you select Afternoon, the start time is the start of the last half a day based on the work arrangement setting and the end time is automatically filled out as the end of general work hours (for the selection system, the end of the daily standard work hours). You can change the time when necessary.
- (E.g., if the work hours are from 9:00 AM to 6:00 PM, the start time is 2:00 PM and the end time is 6:00 PM.)
- 30 minutes/1 hour/2 hours unit: When you click the date to use for absence, a pop-up window appears where you can select the duration of absence from 30 minutes, 1 hour or 2 hours.
- When requesting the absence schedule using the 30 minutes, 1 hour or 2 hours unit, you can enter the start/end time.
If the base work hours are 8 hours, then 8 hours would be all-day and 4 hours would be half a day.
Even though the base work hours change later following a work arrangement change, the all-day/half a day duration is based on the work arrangement at the time of requesting absence.
The entered start-end time of absence is used for sharing and does not affect the absence duration included in work hours.
When creating a work result request form, the start and end times are displayed in the ‘Absence Item’ under reference information.
- When you select ‘Annual leave’ as the absence item and select an absence schedule in the calendar, the remaining number of annual leaves and the relevant calculated days are displayed at the top of the calendar.
- You can check the expiration of the remaining annual leaves by hovering the cursor over
 or clicking .
 - Clicking
 reset the selected absence schedule.
 - If the company has enabled the annual leave in unit of hours and the base work hours of the work arrangement (Daily Standard Work Hours in case of Flex Time System) has not changed during the annual leave usage period, then the remaining annual leave duration is displayed in the ‘day(s) + hour(s) + minute(s)’ format. (e.g., 15 days 5 hours 30 minutes).
- If the base work hours change following a work arrangement change in the middle or if an annual leave in unit of hours is not used, then the remaining annual leave duration is displayed up to 3 decimal places (e.g., 15.625 days).
- When selecting Biztrip as the absence item, click the start date and end date of the business trip or select from the start date to end date of the business trip.
- You can check the expiration of the remaining annual leaves by hovering the cursor over
- If you select ‘Family event leave’ as the absence item, then you can configure it as follows according to the company's settings.
- If the company has set it to ‘Split usage not allowed’ for family event leaves, then when you click the start date, the predefined day(s) for the selected family event leave will be automatically applied.
- If the company has ‘enabled split usage’ of family event leaves, then you can split it into 2 or 3 leaves. Select the date to use in the calendar.
- For split use, you can request it by selecting non-consecutive dates from the absence schedule form, or request them multiple times on different absence schedule forms. For split use in the same absence schedule form, the end date is automatically selected for the last division of the split use according to the number of remaining days once you select the start date.
- If you select dates by exceeding the number of divisions set by the company, then the selected dates are reset.
- If the company has set to ‘Allow Usage of Days Less Than or Equal to the Number of Granted Days’, you can manually select the number of days to request within the provided number of dates range. Select the date to use in the calendar.
- If you select dates by exceeding the number of holidays provided by the company, the selected dates are reset.
- If the company has set to ‘Not Allow Usage of Days Less Than or Equal to the Number of Granted Days’, when you click the start date, the predefined number of days for the selected family event leave is automatically applied.
- If you select family event leave as the absence item, the accounting processing job for the payment of family event benefit is conducted automatically. If the family event benefit is paid on a date whose month has been closed in Accounting (based on usage date), then the family event leave can't be requested. Contact the Accounting admin. (The accounting processing is integrated only when you're using the family event absence item provided.)
- If you've selected Compensation holiday in the absence item, then you can use it within remaining compensation holidays, and you can select it according to the time unit settings in Manage Absence Item. For more information on selecting time units, see the case where Annual leave is selected as the absence item.
- If you've selected ‘Annual leave’ as the absence item, then you can set it as follows, depending on the time unit settings in Manage Absence Item.
- Enter the reason for request.
- Select whether to register it on the calendar.
- When the admin has set that calendar registration is ‘Not required’, the absence schedule requestor can select whether to register the absence on the calendar.
- If the admin has set the calendar registration as ‘Required’, then you can register it on the default calendar or personal calendar. For personal calendars, click ‘Authenticate Additional Calendar’ to authenticate login.
- If there are one or more calendars available to be registered, you can select the calendar to register. To register in Google Calendar, you need to register individual Google Workspace IDs of employees in 'Personnel Information > Linked Information'.
- The calendar displays the absence item name and the requestor information. (<example> Annual leave by Sawon Kim)
- To delegate approvals during the absence period, select the Delegate Approval to be ‘Delegate’ and designate the delegator. When using as a corporate group, you can select any employee in the group as the delegator.
- Enter the absence message. If the admin has set that entering an absence message is required, you must enter the absence message.
- To attach a file, click ‘Attach File’ and select the file to attach, or drag and drop the file to attach into the box.
- If there are documents related to the document you are creating, click ‘Related Document’ and select the related document.
- If split-using family event leave, then attach the previously-used absence schedule documents as related documents.
The absence request is not available for the following cases. Contact the admin.
- When requesting duplicated absences of same type in the same period, excluding family event leaves
- When requesting absences during the leave period
- When annual leave request is unavailable
- If the employment date is not entered under Employee Information in ‘HR > Member > Manage Employees’
- If the request is made for a date that the annual leave hasn‘t been generated (before the start of annual leave requests for the next year)
- If the request is made for a date that the annual leave usage period has expired (after the end of annual leave requests for the previous year)
- If the annual leave request is made with a schedule that exceeds the remaining annual leaves
- When you request for an annual leave duration exceeding the base work hours while the admin uses the setting that doesn’t allow such request
- When using the Attendance service, if the annual leave is requested for a date before the closing date after the work schedule has been confirmed up to the closing date, when the annual leave is set to be added to the work hours
- If the base work hours are exceeded during the calculation period according to the employee‘s work arrangement, when the annual leave is set to be added to the work hours
- When selecting the number of annual leave days (hours), a request restriction message is displayed. (E.g., Flexible Clock-in/out work arrangement -> The remaining work hours are 0 hours. Annual leave that exceeds the base work hours can't be requested.)
- The base work hours depend on the work arrangement of an employee (e.g., 8 hours a day).
- If an absence that exceeds the standard work hours is requested on a date that has a clock-in/out record, when using the fixed hour work system and having worked the entire general work hours
- If the employee is subject to the flex time system and has fully fulfilled general work hours, then the employee can request an absence, but hours exceeding the base work hours are not recognized. (For recognition of hours exceeding the base work hours, the Work Result Request Form is required.)
- When requesting an absence with hours (days) that exceeds the maximum extension time allowed for work hours
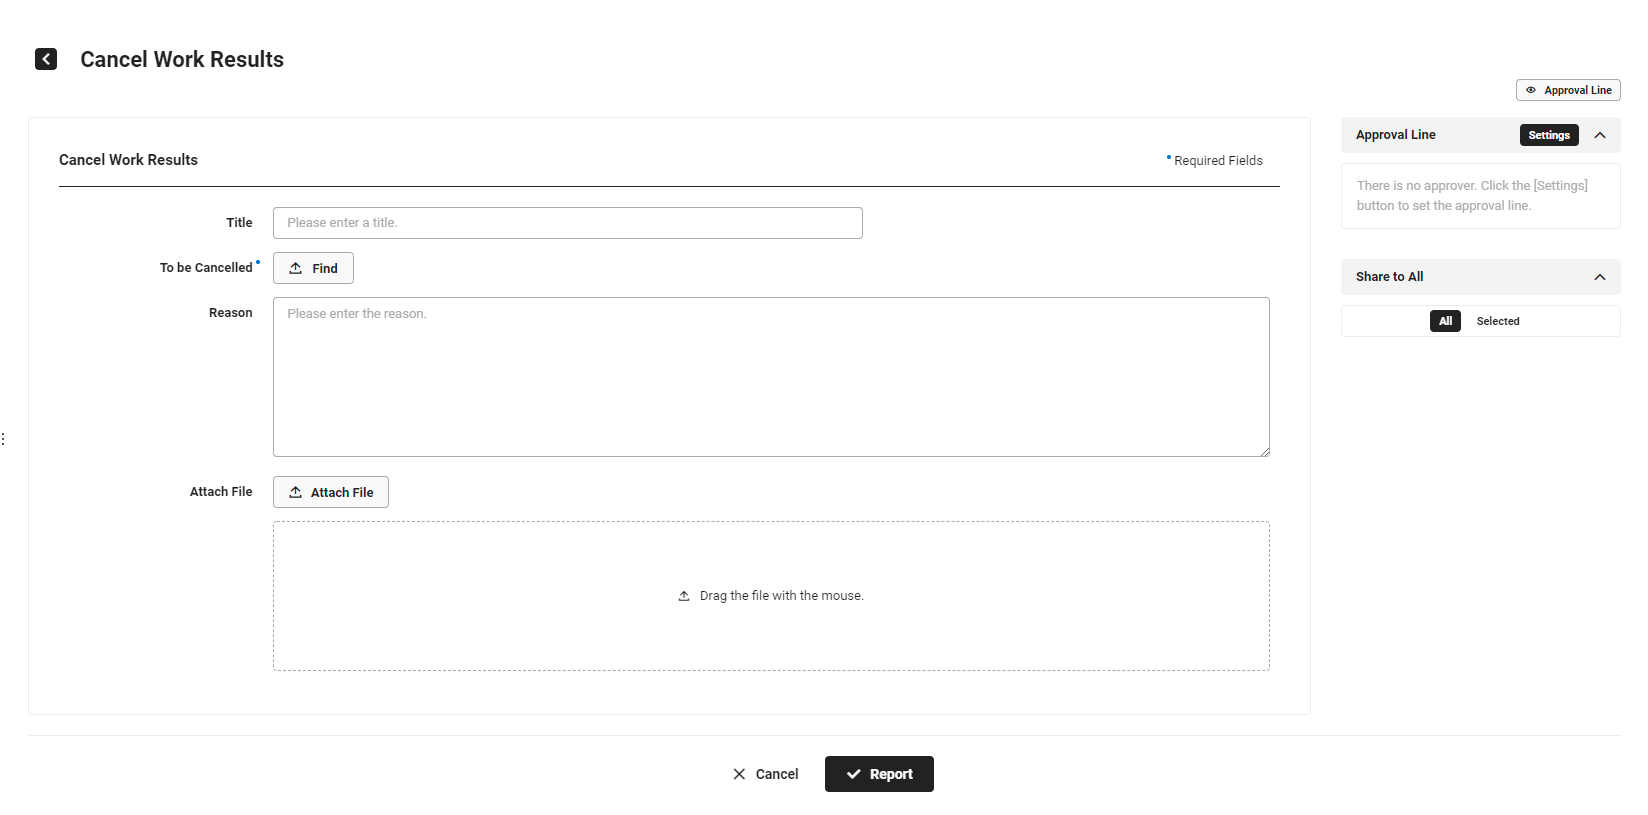
Create Absence Schedule Cancellation Form
- Enter the title.
- Click ‘Find’ and select the absence schedule document to cancel.
- Enter the reason for request.
- To attach a file, click ‘Attach File’ and select the file to attach, or drag and drop the file to attach into the box.
Create Work Result Request Form
- The Work Result Request form can be created only if the company is using the Attendance service.
- If the company has set to use work plans, then the work result requests can be made only when the work plan has been requested.
- If an overtime work result request needs be made without a work plan request, then the Attendance admin may create a work result request form on your behalf. Contact the Attendance admin. (See Work Result Request Status)
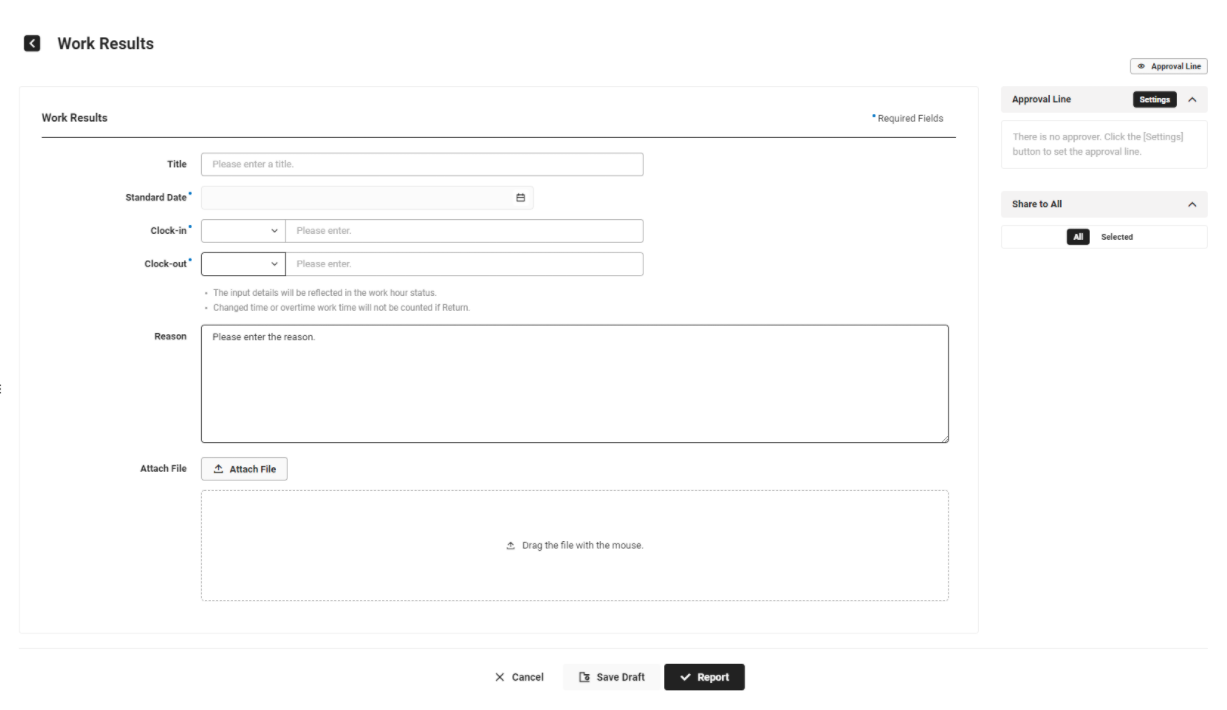
- Enter the title.
- Enter the base date for which you want to request work result.
- You can‘t enter dates later than the date the document is being created on.
- If a document from the same date, which has been requested using the work result request form, is in progress, then additional requests for that date can't be made.
- When you enter the base date, the following information is displayed in ‘Reference Information’.
- If the company is using work plans, then the document number of the work plan request with approval closed on the base date is displayed. Clicking the document number displays the work plan request form.
- If there are clock-in/out records on the base date, then the ‘Clock-in/out Record item’ is displayed.
- If the base date includes an absence schedule added to work hours requested by the user, then the ‘Absence’ item is displayed. If you used a half-day or hourly absence schedule, the total absence time used and the start and end times (if entered) are displayed.
- If the base date is a holiday according to the work arrangement of the user, then the ‘Compensation Holiday’ item is displayed.
- When you request a work result for holiday work, a compensating holiday is automatically created and the number of days accrued and expiration date are displayed. The compensation holiday settings of the Attendance admin determine the number of compensation holidays accrued and their expiration date. (See Manage Absence Item)
- The Work Hour area is displayed for employees whose work arrangement is ‘Select a Set Time to Clock-in/out’ upon selecting a base date.
- If the admin has set it to ‘Allow selection of general work hours regardless of the clock-in time,’ you can select and request from displayed work hours, regardless of the selected work hours when clocking in/out. If it is set to ‘Do not allow selection of general work hours regardless of the clock-in time,’ then hours earlier than the clock-in time are displayed as inactive. When clocking in later than all hours, it is fixed to the latest hours.
- When using the ‘Report Approval of Work Schedule’ method, the ‘Work Schedule’ of the day is automatically displayed and other hours can't be selected.
- However, you can freely select work hours for a date for which the work schedule is not registered.
- The remaining workdays and base work hours during the calculation period are displayed under ‘Daily Average Remaining Time’.
- For employees whose work arrangement is ‘Clock-in/out at a Fixed Time’ or ‘Select a Set Time to Clock-in/out’, one week is considered as the calculation period. The standard work hour for a week compared to the sum of the general, overtime, night, holiday general, holiday overtime, and holiday night up to the current point of the week is displayed under ‘Accumulated Time During Specified Period’.
- For employees whose work arrangement is ‘Flexible Clock-in/out’, it is based on the ‘Calculation Period’ determined from Set Work Arrangement. The base work hour for the calculation period compared to the accumulated work hours up to the current point is displayed under ‘Accumulated Time During Specified Period’.
- The displayed daily average remaining time and accumulated time during specified period include work hours that are currently being created.
- When you request a work result for holiday work, a compensating holiday is automatically created and the number of days accrued and expiration date are displayed. The compensation holiday settings of the Attendance admin determine the number of compensation holidays accrued and their expiration date. (See Manage Absence Item)
- Enter the clock-in and clock-out times.
- Work location items are displayed when the company has set to use the work location. Enter a work location of the base date among work locations set by the company admin. If you already entered, you can edit the work location and the last changed work location is saved.
- Add a break time if necessary.
- The break time set by the company is entered by default, and additional breaks can be entered according to the employee's work arrangement settings.
- If necessary, add outside work hours.
- The input field for outside work hours is displayed according to the work arrangement settings.
- Automatic breaks do not apply to the additionally entered outside work hours even though breaks are provided based on the work hours. Enter a time excluding break time or manually add a break time.
- Enter the reason for request.
- To attach a file, click ‘Attach File’ and select the file to attach, or drag and drop the file to attach into the box.
Create Work Plan Request Form

- Enter the title.
- Enter the base date for which you want to request work plan.
- You can only enter the date the document is being created on or later dates.
- Click ‘Add’, and enter the date and time for overtime work request.
- You can select a date among the day before the base date, base date, and the day after the base date.
- To enter multiple dates, click ‘Add’ again.
- Enter the reason for request.
- To attach a file, click ‘Attach File’ and select the file to attach, or drag and drop the file to attach into the box.
Create Work Result Request Cancellation Form
- Enter the title.
- Click ‘Find’ and select the work result request to cancel, and then click ‘OK’.
- Only approved work result request forms will be displayed.
- Enter the reason for request.
- To attach a file, click ‘Attach File’ and select the file to attach, or drag and drop the file to attach into the box.
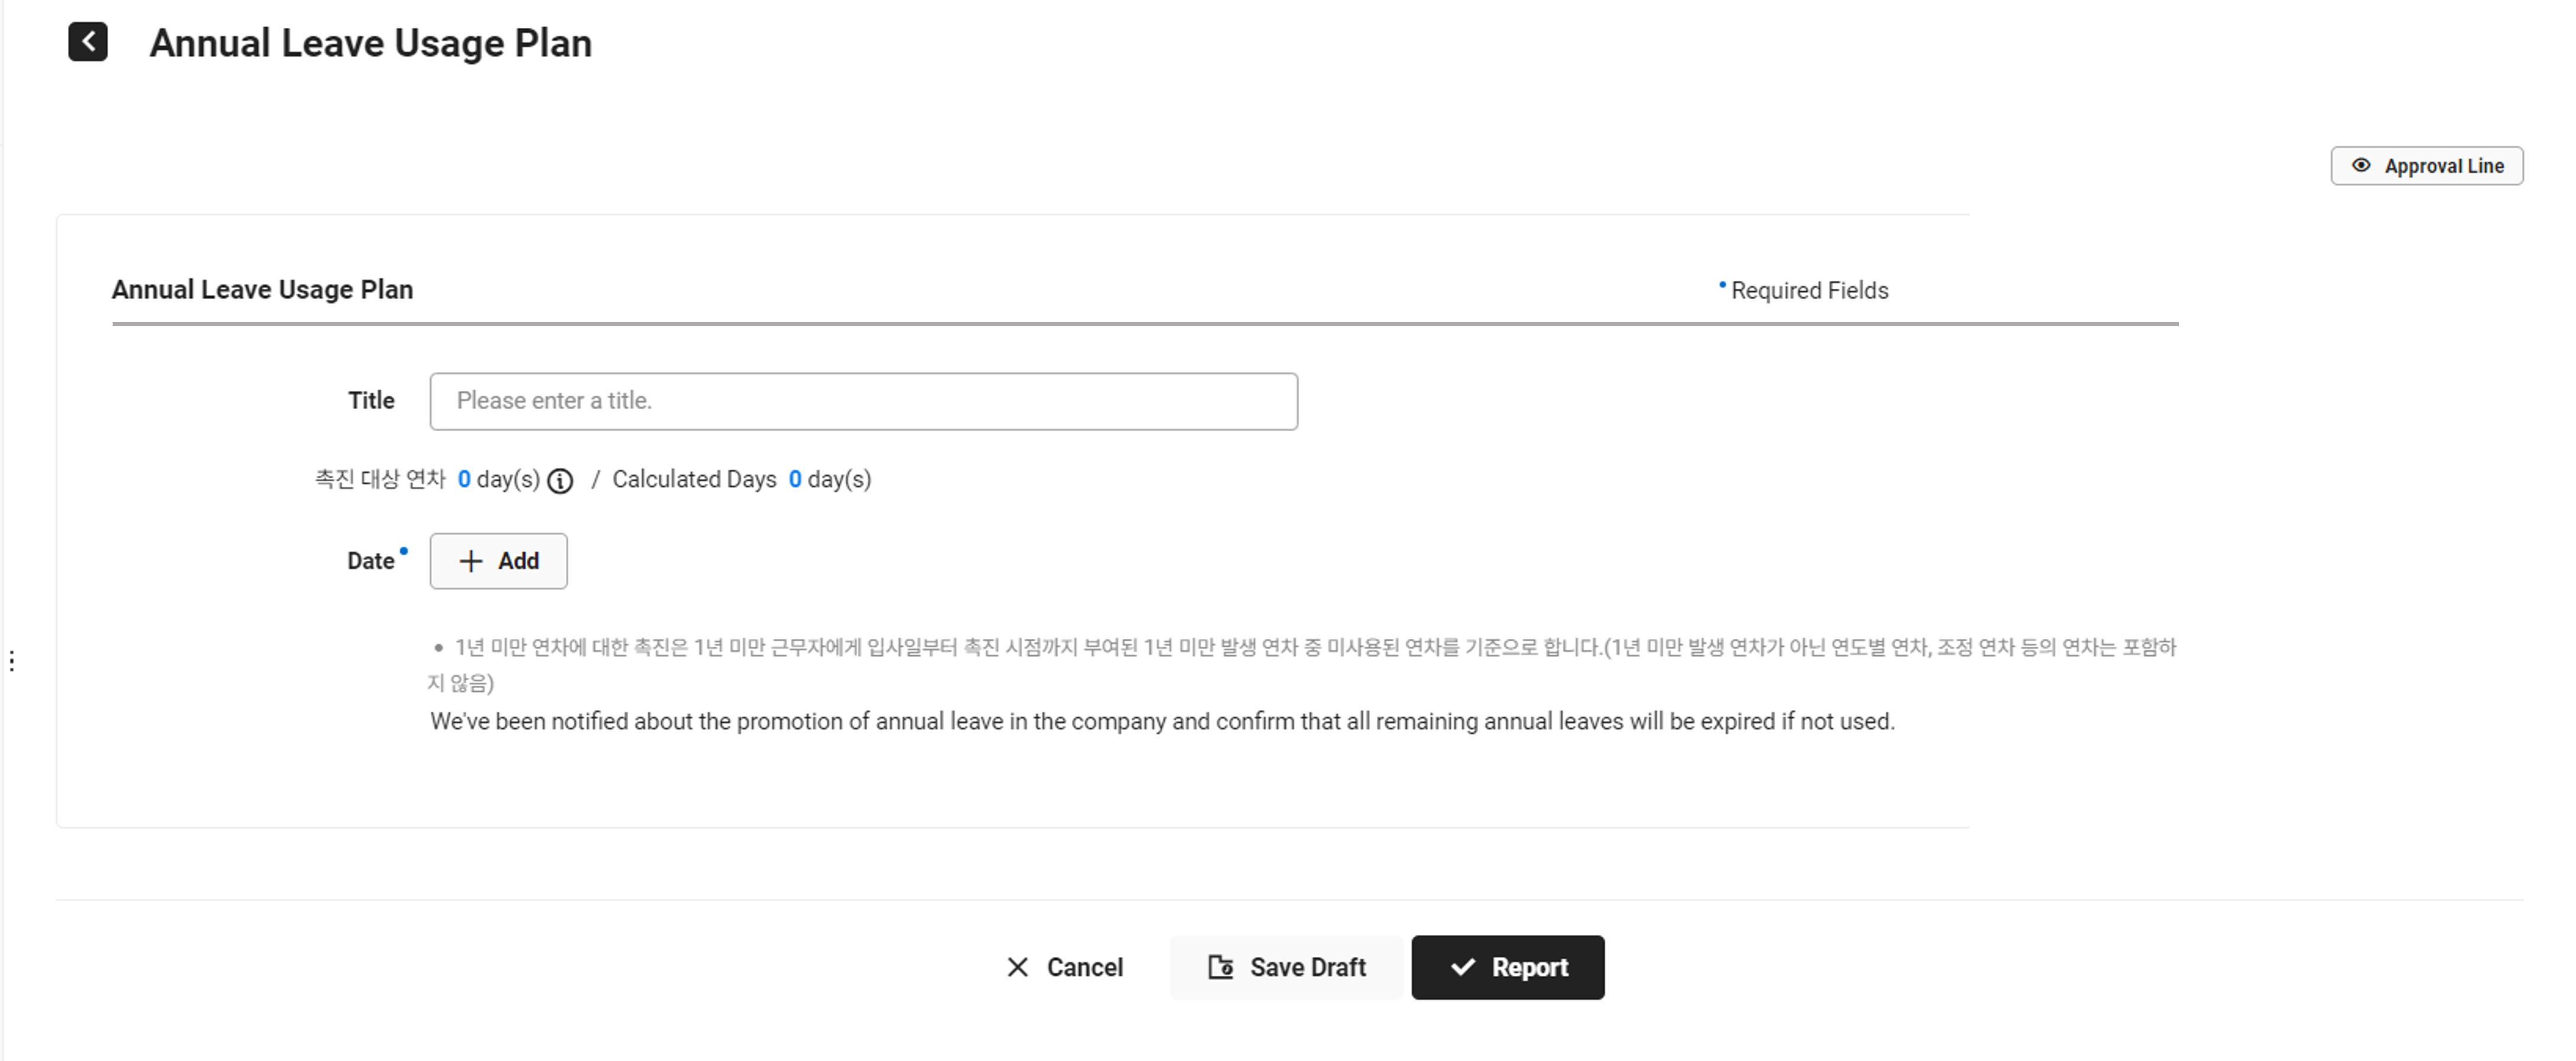
Create Annual Leave Usage Plan Form
- The facilitation policy for the use of annual leave is a policy introduced to promote the use of paid annual leaves, which is the right of employees. It is a policy that facilitates the use of annual leaves by notifying the remaining annual leaves to employees before the use period of paid annual leaves expires.
- The Annual Leave Usage Plan form is a form provided when the company uses the promotion policy for use of annual leave, and it can be created only if you‘re subject to all of the following.
- Annual leave usage urge target employee
- Within 10 days of receiving the company‘s promotion instruction email
- If the company is using the promotion policy for use of annual leave, employees that have any unused annual leave granted, between the employment date and time of promotion for employees with less than one year of service and between the annual leave start date and time of promotion for employees with one year or more of service, are subject to annual leave usage urge. The company searches for the target employees and sends the instruction email for submission of annual leave usage plan. The employees that receives this email can create annual leave usage plan form upon receiving the annual leave promotion email, and they need to submit the remaining annual leave usage plan within the urge period (within 10 days of receiving the email). If they don‘t submit the plan, then the company specifies the annual leave usage dates and notifies them, and the remaining annual leaves will expire.
- The submission of annual leave usage plan doesn’t deduct the actual annual leave days left.
Annual Leave Usage Plan Form for Employees With Less Than a Year of Service
Annual Leave Usage Plan Form for Employees With a Year or More of Service
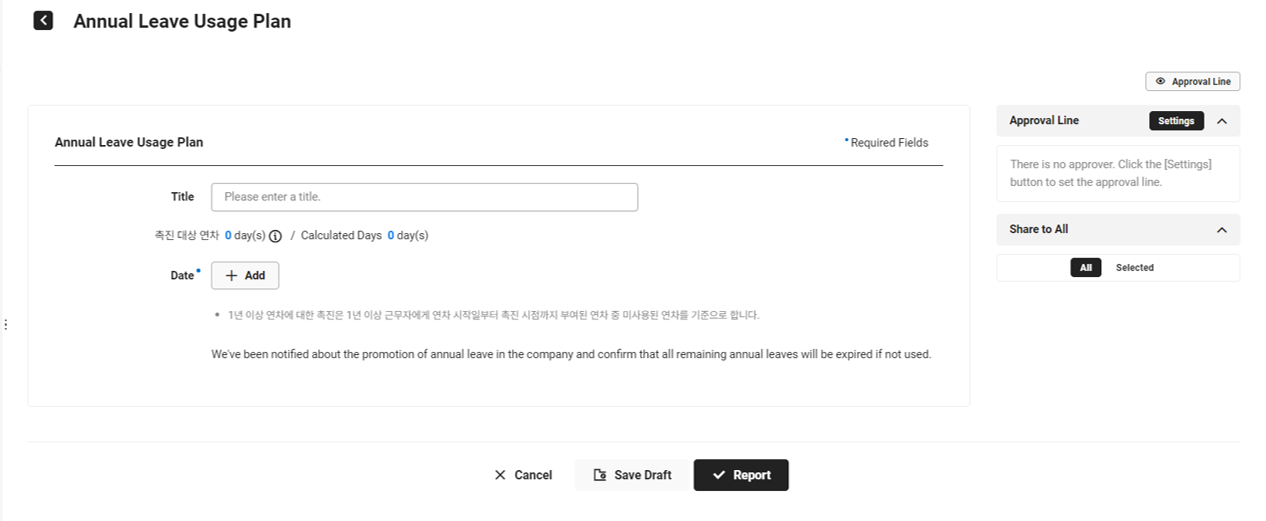
- Enter the title.
- Check the remaining annual leaves.
- If you're eligible for promotion of annual leaves for less than a year of service as well as annual leaves for a year or more of service, the annual leave usage plan areas for both less than a year and a year or more are displayed, and you can select the area to fill in.
- If you're subject to either less than a year or a year or more, skip this step.
- Click ‘Add’ and enter the usage date.
- Select a date later than today.
- You can‘t enter dates later than the annual leave end date.
- Add until the remaining annual leaves become 0.
- According to the annual leave usage unit set by the admin, you can also add annual leave plans in units of half-day or hours. If the annual leave usage unit is set as ‘All day’, then you can't use it by splitting them in units of half-day or hours.
Create Expense Plan Request Form
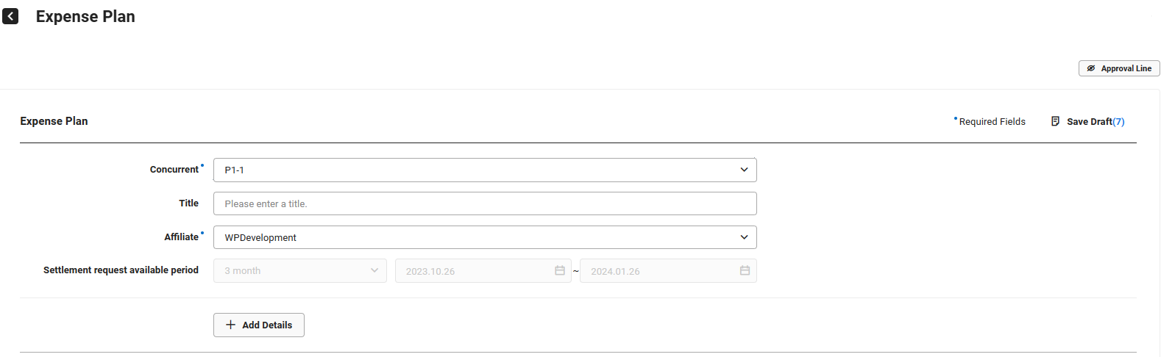
- If there are two or more affiliated departments, then select the concurrent departments.
- If you belong to only one department, then the ‘Concurrent Position’ item will not appear.
- Enter the title.
- If you have two or more affiliated departments, then select the affiliated department that is appropriate for the content of the expense plan.
- Sets the settlement request available period for the expense settlement.
- It is the period for which you can view and create an expense plan document in Expense Settlement Form.
- If the Expense admin has set a settlement request available schedule, the creator can‘t edit it and can only view it.
- Click ‘Add Expense Item’ and enter the details.
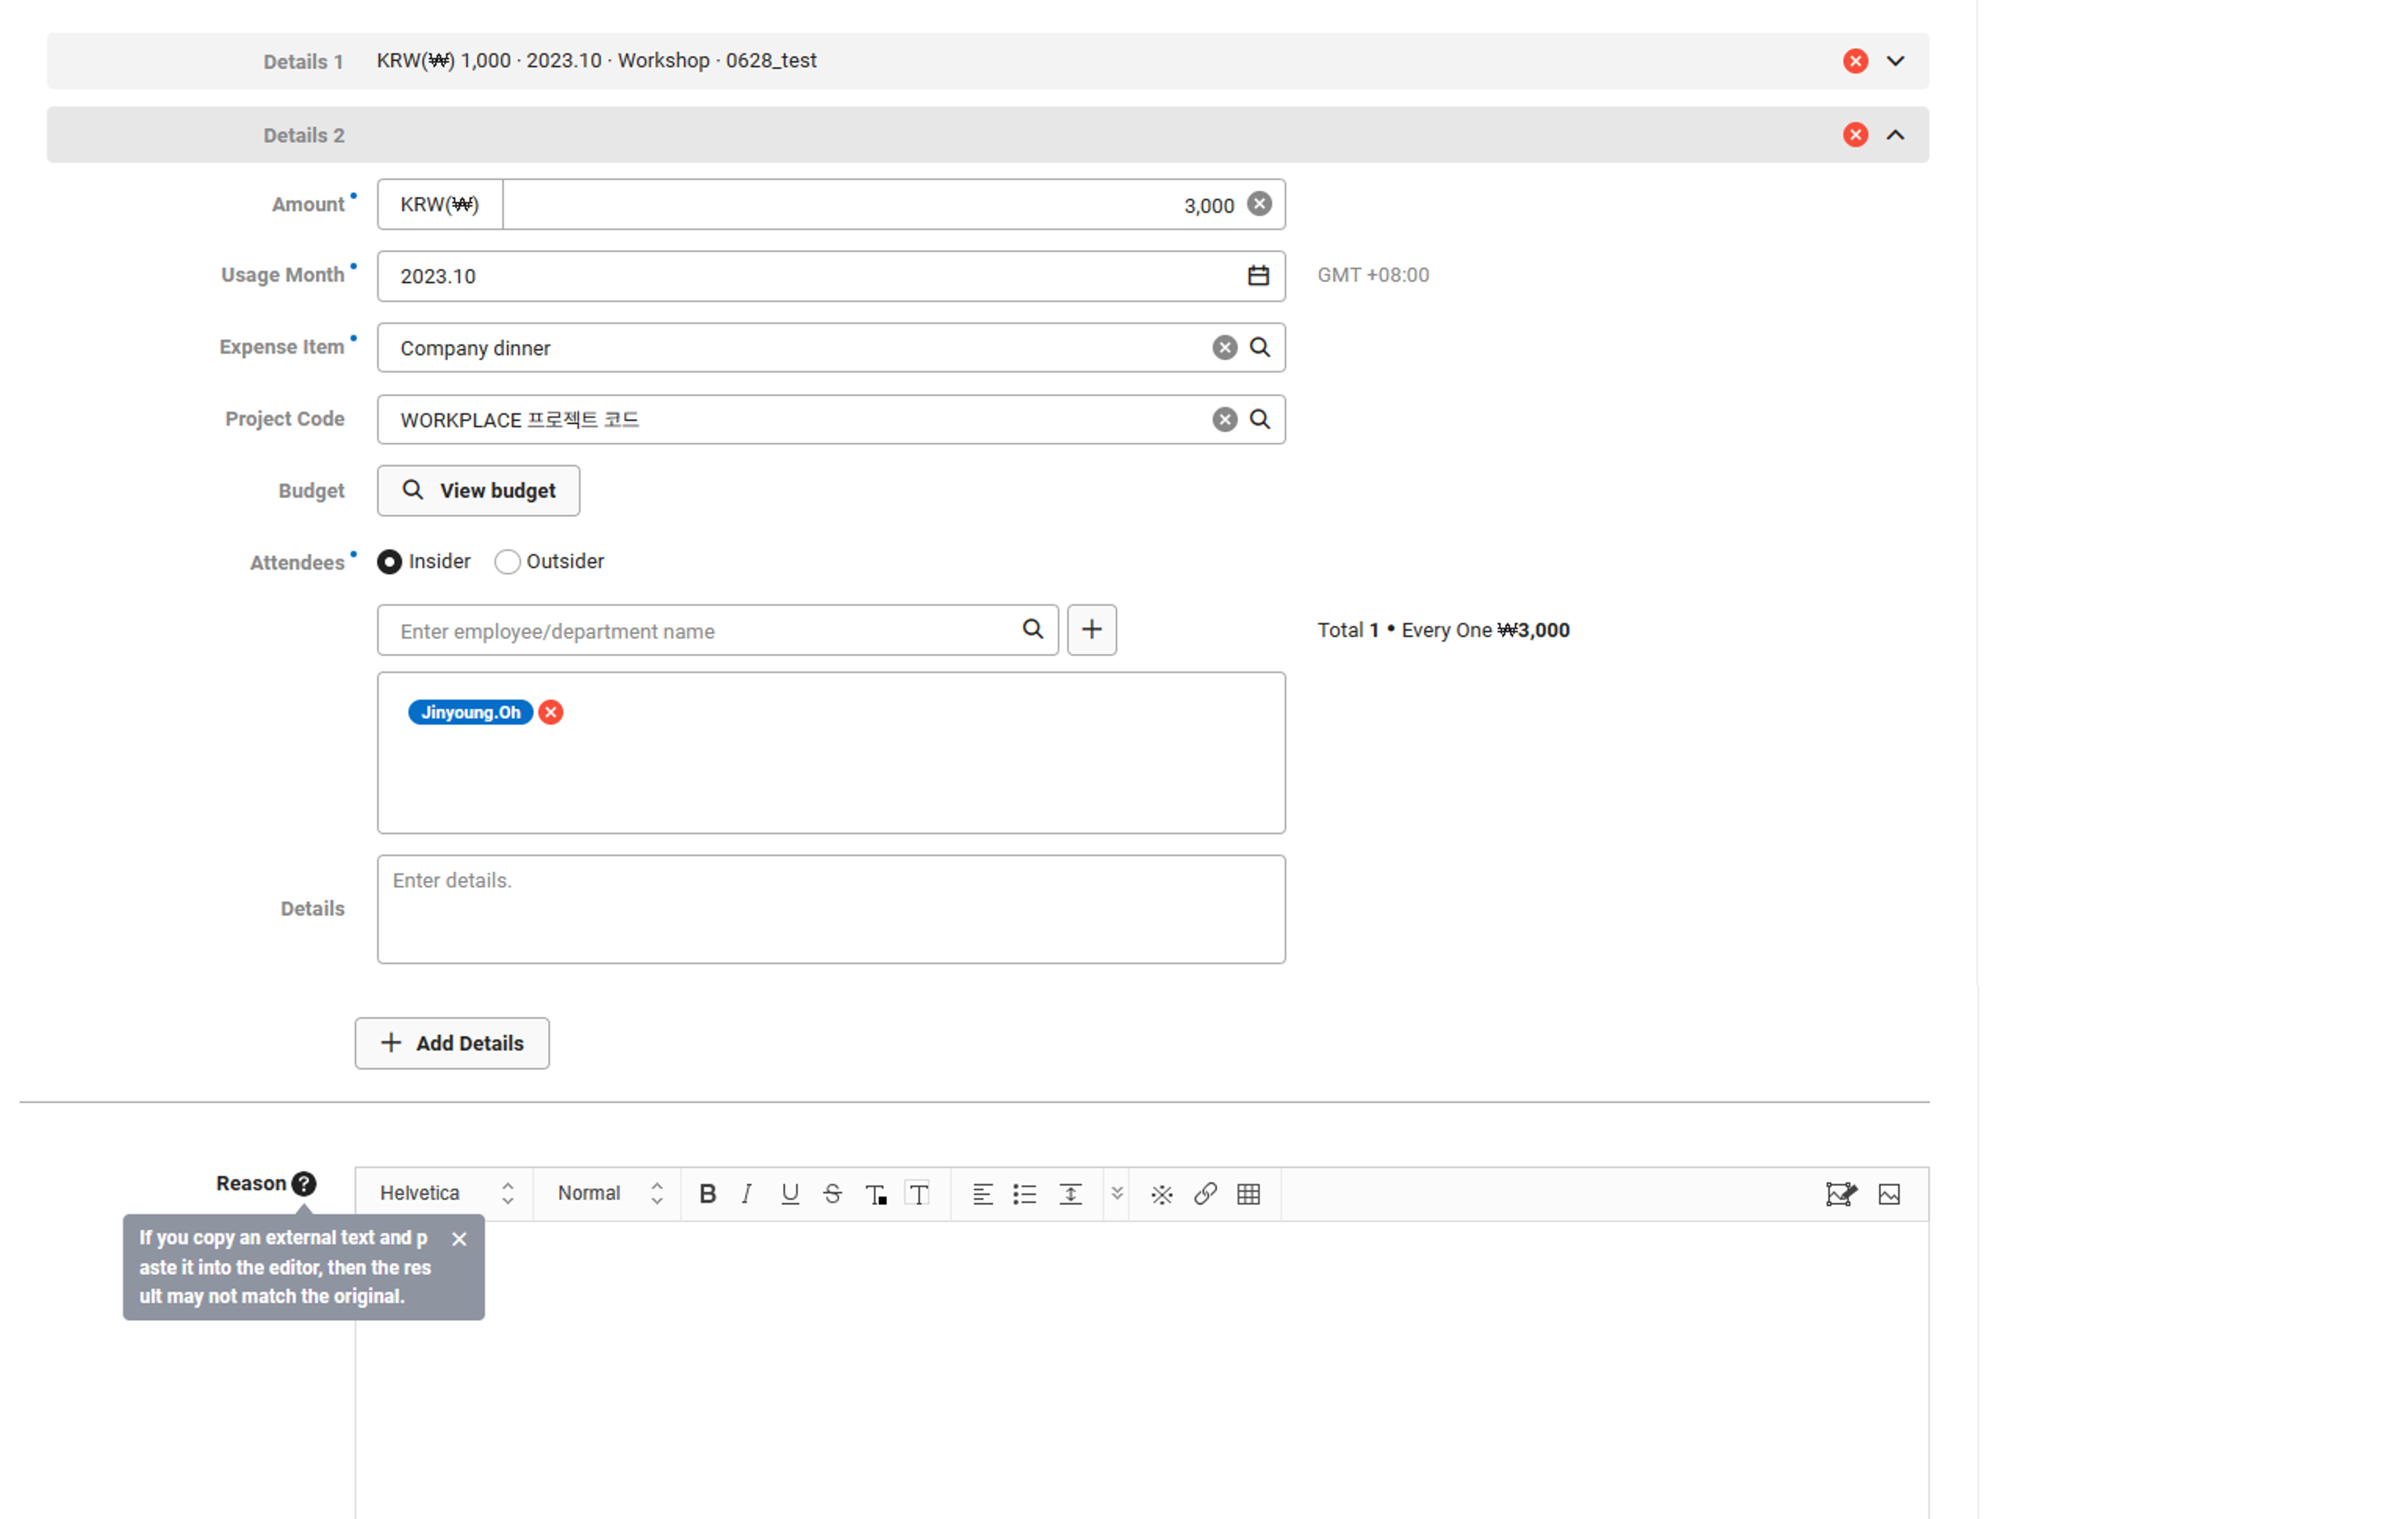
| Item | Description |
|---|---|
| Amount | Enter the amount to use
|
| Usage Month | Select the expense usage month
|
| Expense Item | Select the expense item
|
| Project Code | It is displayed if the company has set to use project codes. Select the project code (If the desired code is not displayed in the project code list, then contact the company admin.) (See Manage Project Code) |
| Budget | Select budget when using budgets
|
| Outsider/Attendee | Select outsiders and add attendees
|
| Details | Enter the details related to the expense plan |
- If there are additional requests to submit, then repeat Step 5.
- It displays the grand total for the added expense plan request history, as well as the grand total by expense item.
- Enter the reason for the expense plan.
- If there are documents related to the document you are creating, click ‘Related Document’ and select the related document.
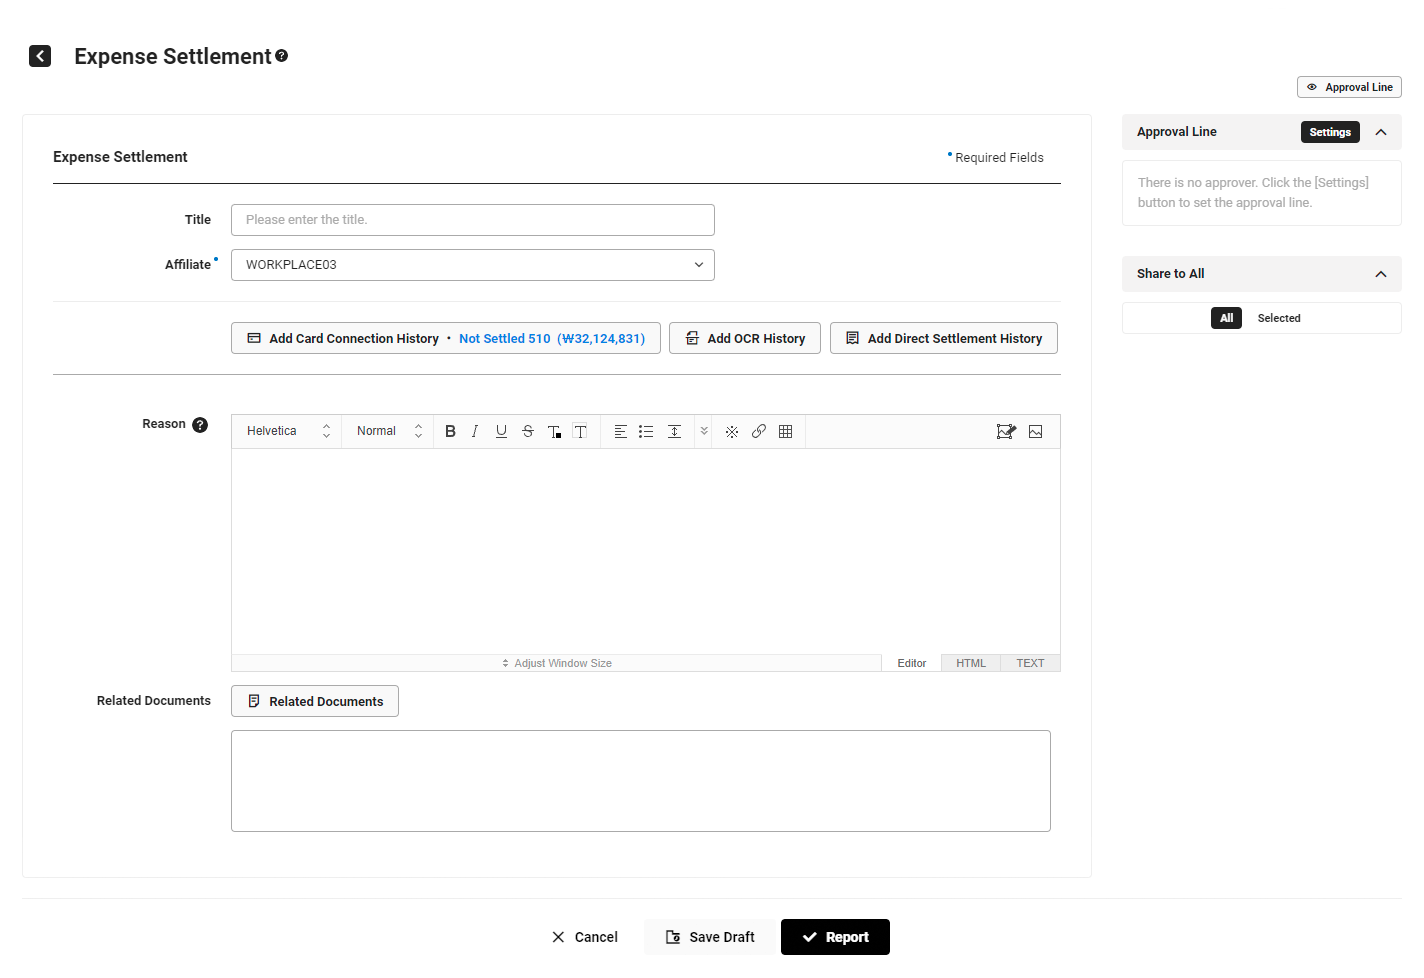
Create Expense Settlement Request Form
Fill out the expense settlement request form, depending on whether an expense plan is used and a corporate credit card is integrated.
- If You’re Using Expense Plans and Have Integrated Corporate Credit Cards
- If You‘re Using Expense Plans and Don‘t Have Integrated Corporate Credit Cards
- If You’re Not Using Expense Plans and Have Integrated Corporate Credit Cards
- If You‘re Not Using Expense Plans and Don‘t Have Integrated Corporate Credit Cards
If You’re Using Expense Plans and Have Integrated Corporate Credit Cards
- If there are two or more affiliated departments, then select the departments under the concurrent position item.
- If you belong to only one department, then the concurrent position item will not appear.
- Enter the title.
- Select the affiliated department.
- The affiliated department or employee name of the requestor is selected and displayed by default according to the basing settings for the affiliated department set by the Expense admin. (See Set Expense)
- If the affiliated department setting is set to Department: The primary department is displayed by default, and for concurrent positions, you can select the applicable affiliated department for the expense settlement content.
- If the affiliated department setting is set to Employee: The employee name is displayed by default if there's any budget allocated for the individual at the time of the settlement request. If there's no allocated budget, then the primary department is displayed.
- The affiliated department or employee name of the requestor is selected and displayed by default according to the basing settings for the affiliated department set by the Expense admin. (See Set Expense)
- Click ‘Add Integrated Settlement History’.
- ‘Add Integrated Settlement History’ is displayed if unsettled items exist in corporate credit cards you have or corporate credit cards whose settlement has been delegated to you from the card owner.
- Select the corporate credit card to settle and the settlement history from the pop-up window, and then click ‘OK’.
- If you are using as a corporate group, then the corporate credit cards for which you are registered as card holder by the corresponding company are displayed on the selected expense settlement form.
- The history with expired settlement period can‘t be searched. For more details on settlement period, contact the Expense admin. (See Set Expense)
- The approved history that have been excluded from settlement or delegated can‘t be searched.
- Settled history can‘t be searched.
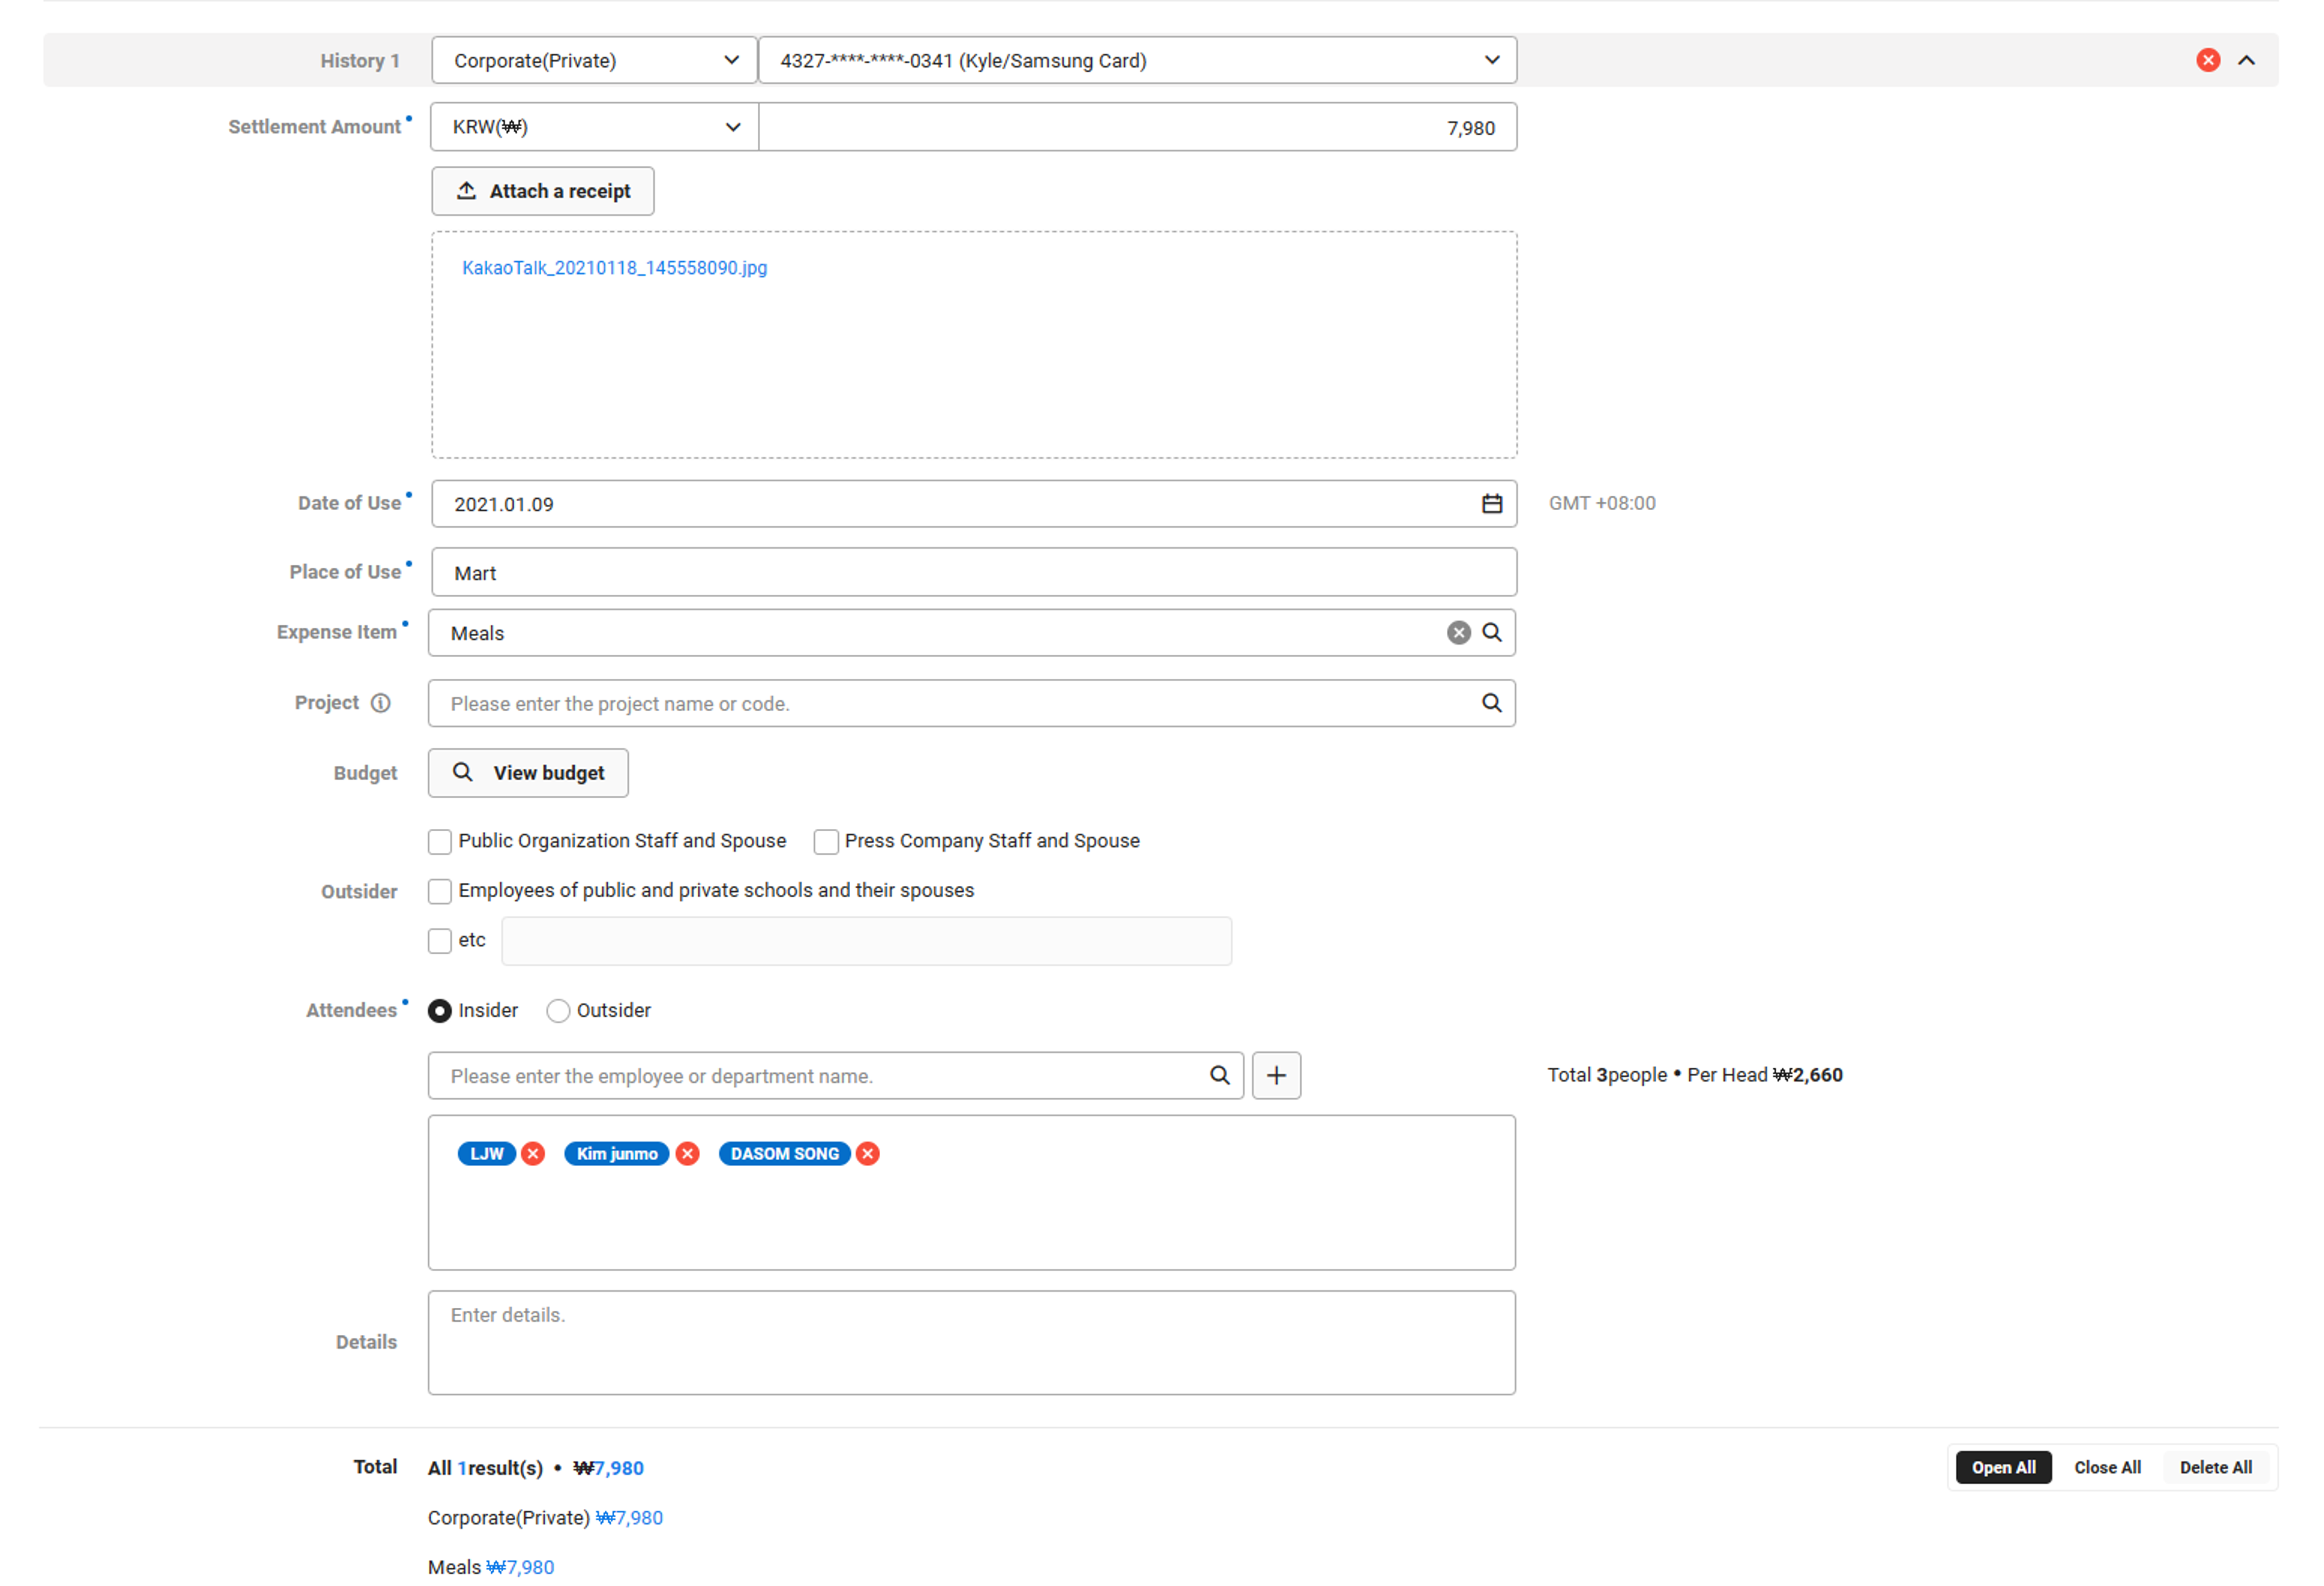
- Check and edit your payout details.
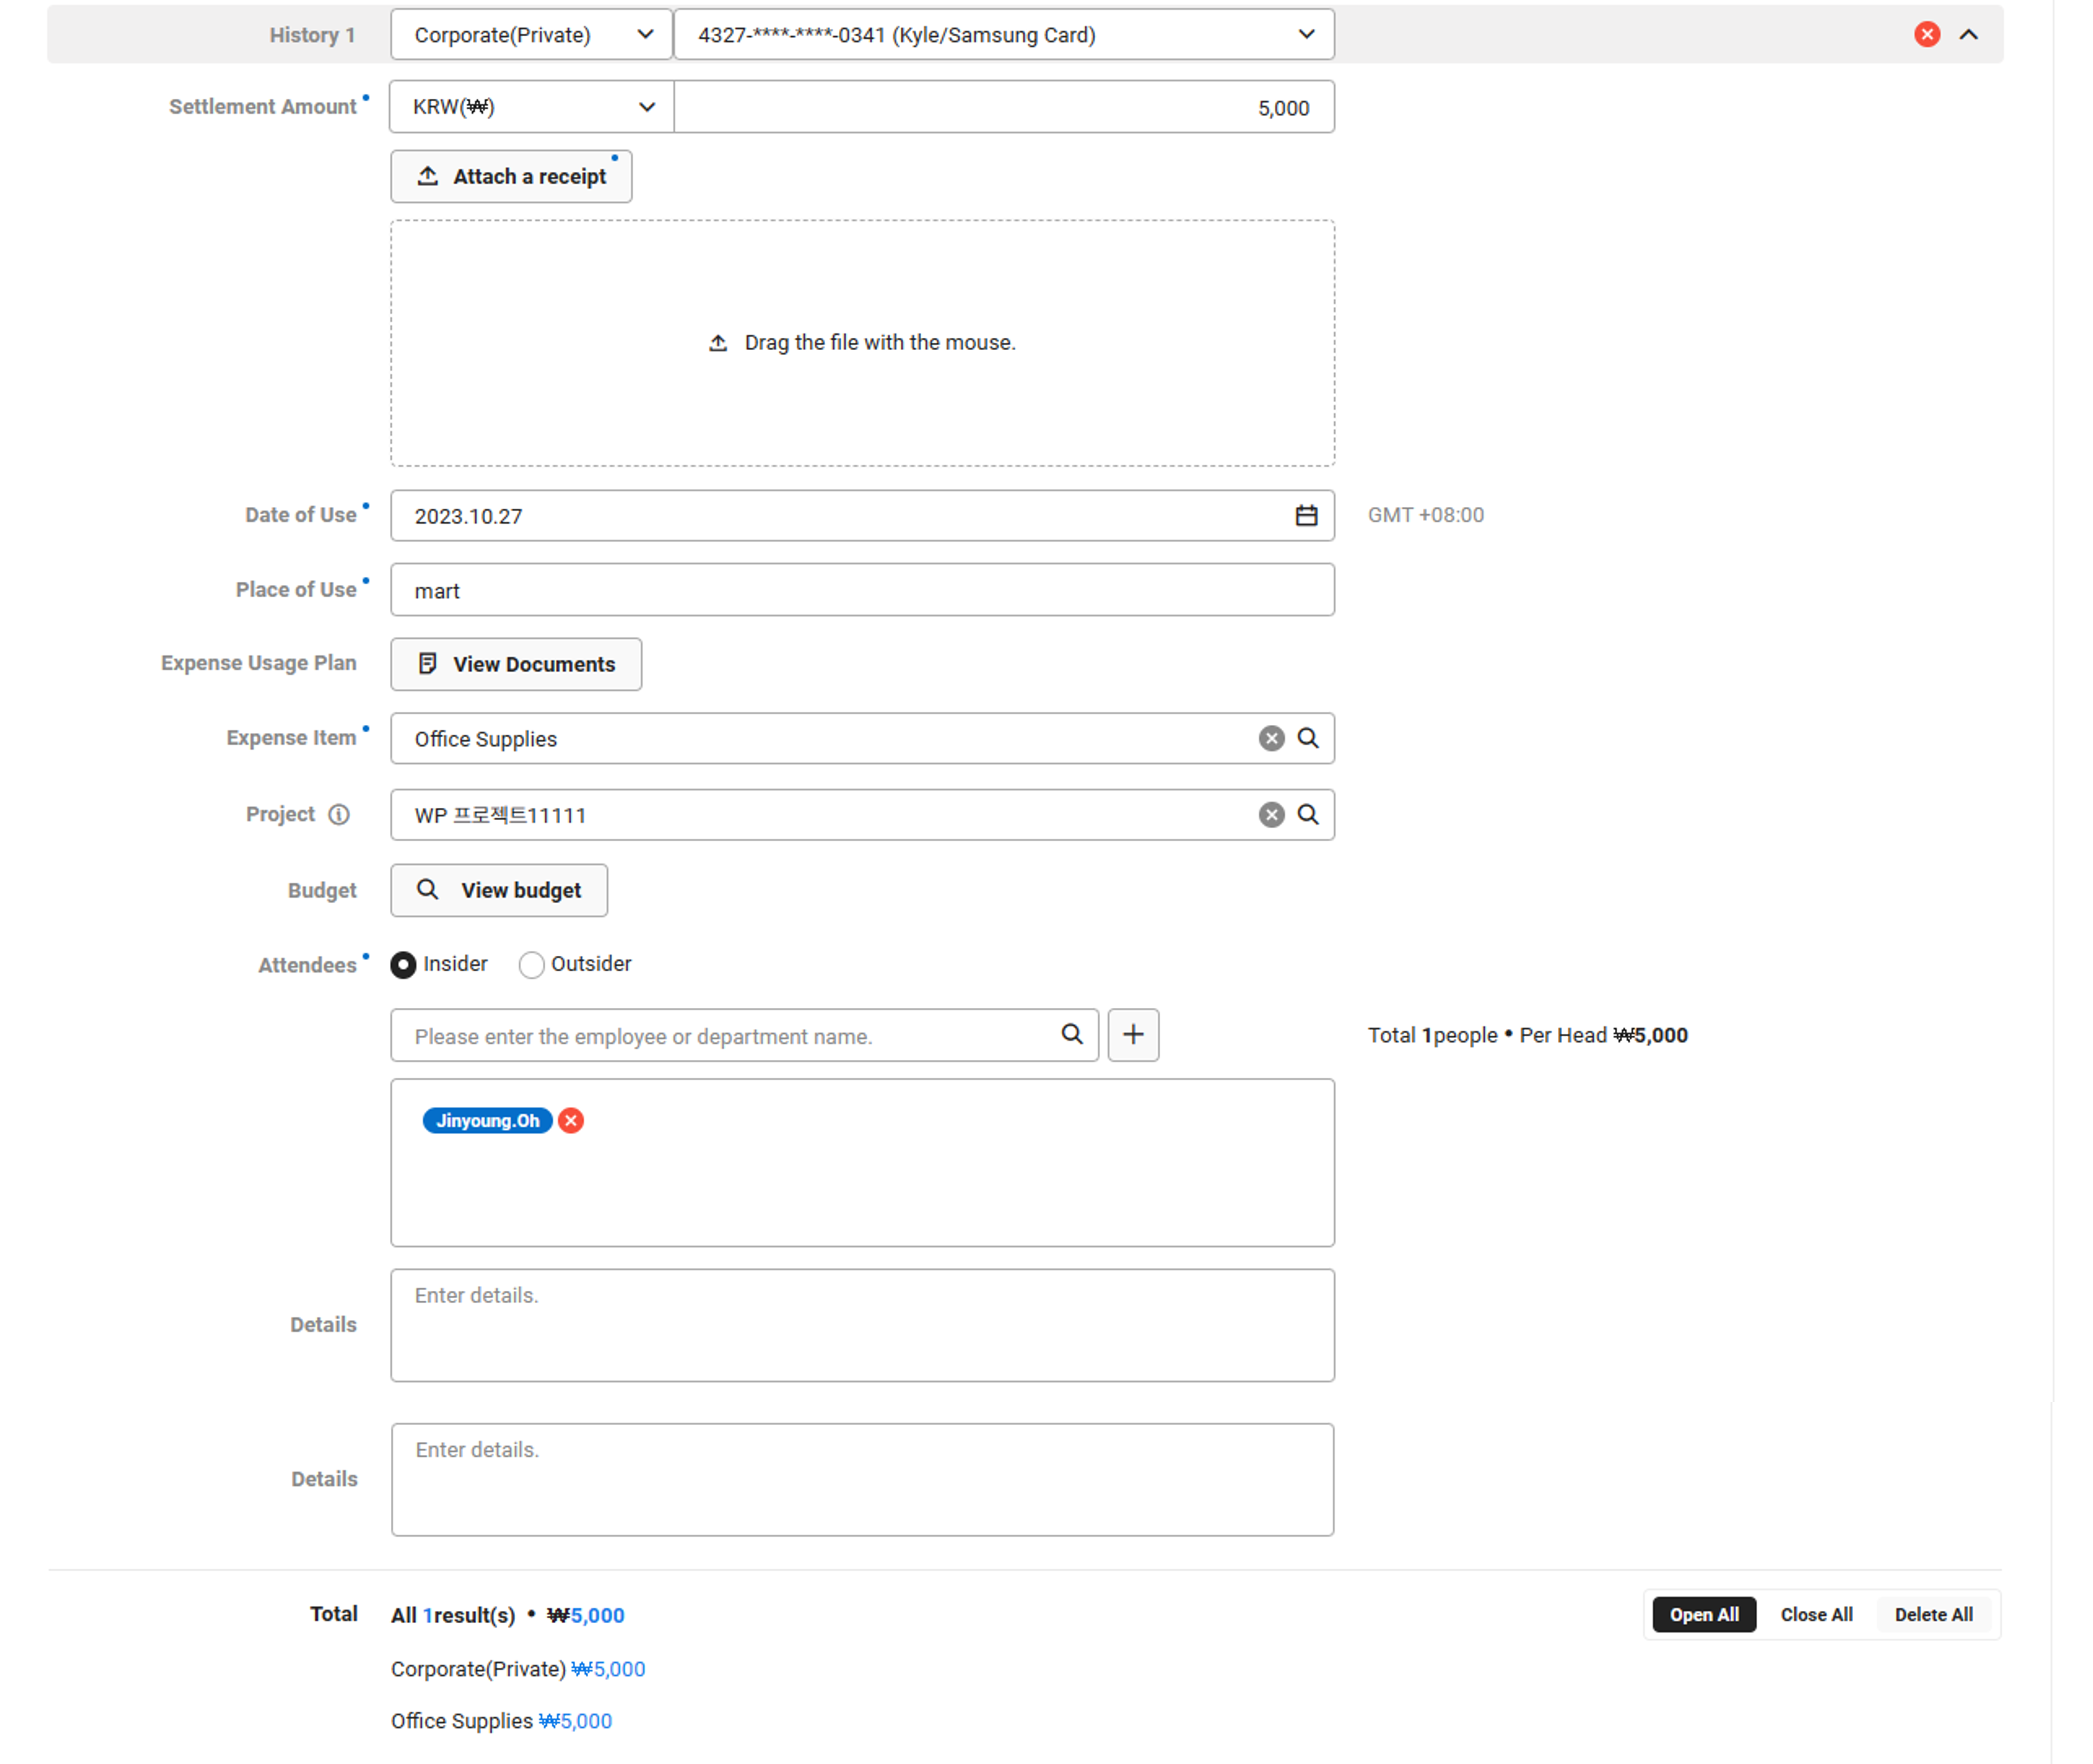
| Item | Description |
|---|---|
| Approval Amount/Settlement Amount |
|
| Attach Receipt | Click to attach receipts
|
| Expense Usage Plan | Click ‘View Document’, select the expense plan form pertaining to the settlement, and then click ‘OK’
|
| Expense Item | When you import an expense plan document, the expense items on the document are automatically displayed |
| Project Code | If the project code has been set to use, then the project code of the document is displayed automatically once you import the expense plan document (See Manage Common Code) |
| Budget | Display the item when using budget, Apply ‘Required’ selection status by based on the admin's budget requirements for each expense item (See Expense > Settings)
|
| Outsider | When you import the expense plan document, the outsiders of the document are displayed automatically and can be edited if needed |
| Attendee | When you import the expense plan document, the attendees of the document are displayed automatically and can be edited if needed |
| Details | When you import the expense plan document, the details for the document are displayed automatically and can be edited if needed |
- Click ‘Add OCR History’ and select the receipt to settle to read receipt information and add an entry.
- This feature is available only when the company has set to use the AI OCR feature.
- Once you upload the receipt, the data of the receipt is automatically entered in each field. Check the details and edit it if necessary.
Item Description Evidence Type Depending on the payment method, the types such as Corporate (public), Corporate (personal), Corporate (debit), Personal card, and Cash are displayed automatically Settlement Amount The total amount on the receipt is automatically displayed Usage Date/Place of Use It automatically displays the expense usage date and place of use for the receipt Receipt File Name It displays the file name of the attached receipt. Image format receipts displays image of the receipt when clicked Expense Usage Plan Click ‘View Document’, select the expense plan form pertaining to the settlement, and then click ‘OK’ - To import an expense plan document, you need to satisfy all of the following conditions: matching affiliated department, valid estimated schedule of the expense plan request form, and yourself as the creator or attendee
- When the expense plan document is imported, expense item, outsiders, attendees and details of the document are automatically displayed
Expense Item When you import an expense plan document, the expense items on the document are automatically displayed Project Code If the project code has been set to use, then the project code of the document is displayed automatically once you import the expense plan document (See Manage Common Code) Budget Display the item when using budget, Apply ‘Required’ selection status by based on the admin's budget requirements for each expense item (See Expense > Settings) - If set to ‘Required’, select Budget as Required
- If set to ‘Required if budget is allocated'
- If a budget is allocated to the expense requestor or their affiliated department as the using department, select Budget as Required
- Click ‘View All Budgets’ to view all available budget (budget name, affiliated department, budget type, budget item, and usage period)
- If the selected affiliated department, expense item, and project code (optional) match, it displays the budget to the expense settlement requestor specified as the using department
- If set to 'Not required', selecting a Budget is not required
- Select the budget to display the budget balance next to the expense item
Outsider When you import the expense plan document, the outsiders of the document are displayed automatically and can be edited if needed Attendee When you import the expense plan document, the attendees of the document are displayed automatically and can be edited if needed Details - The item names on the receipt are displayed automatically
- When you import the expense plan document, the details for the document are displayed automatically and can be edited if needed
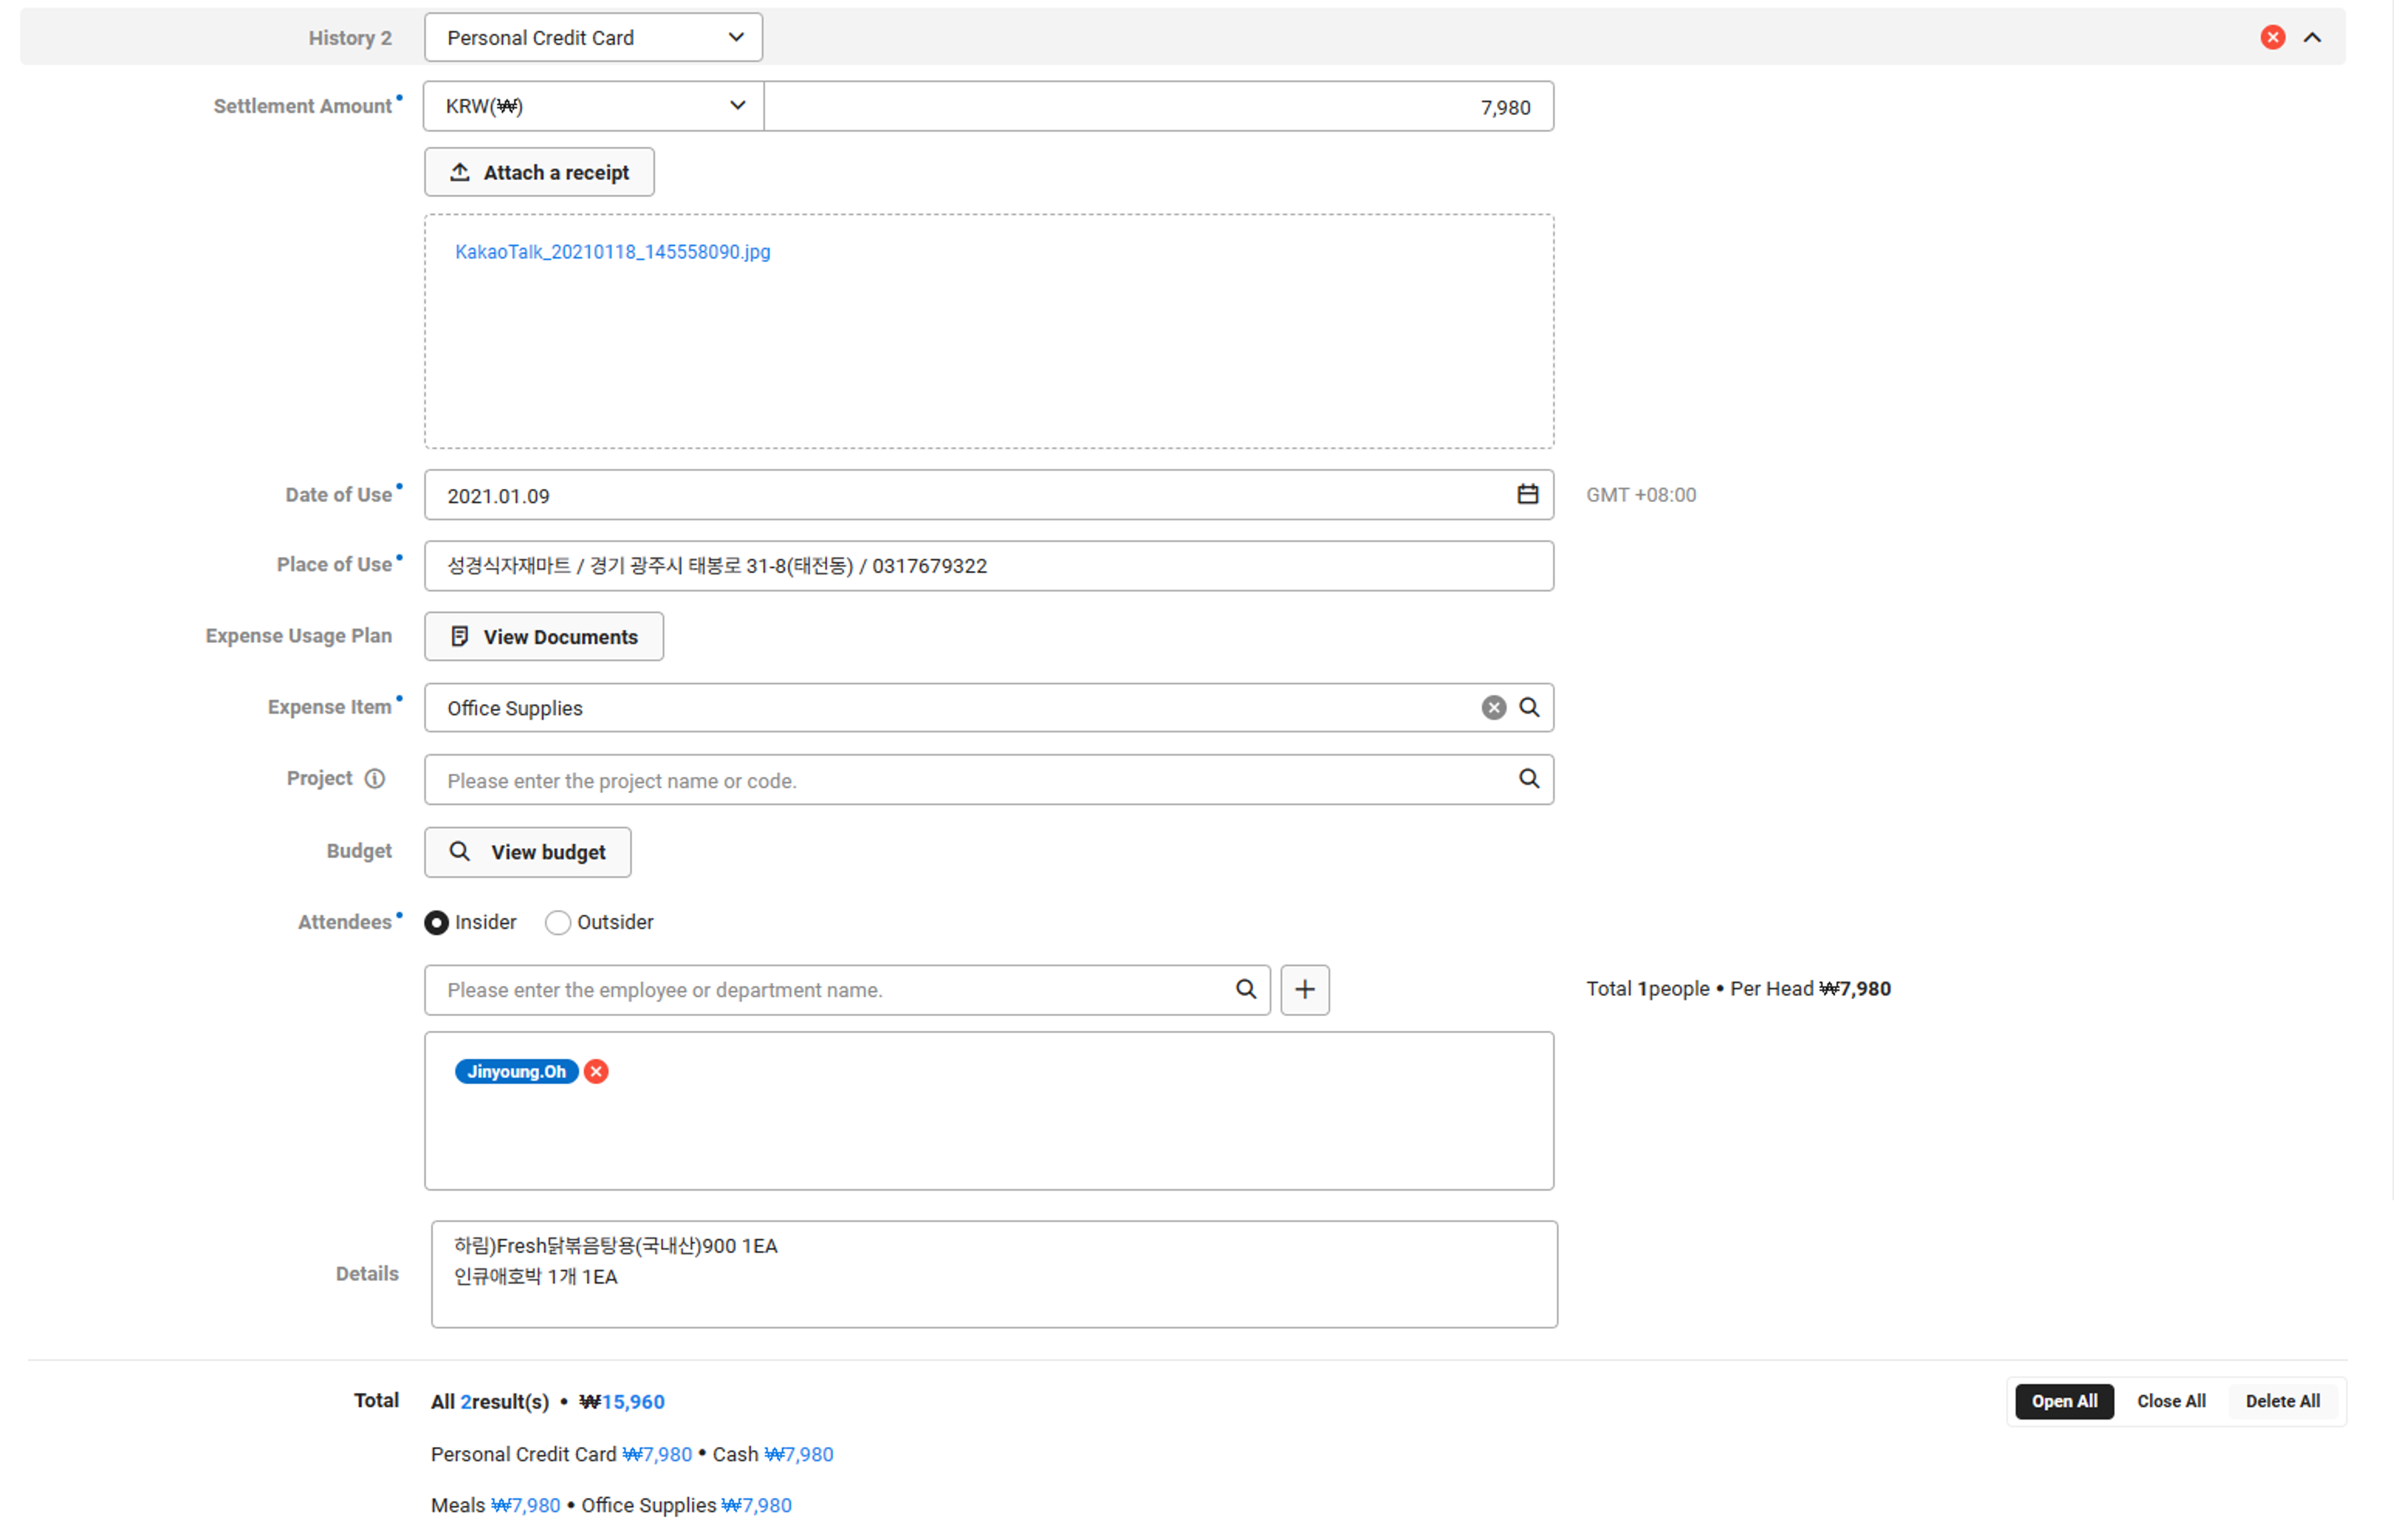
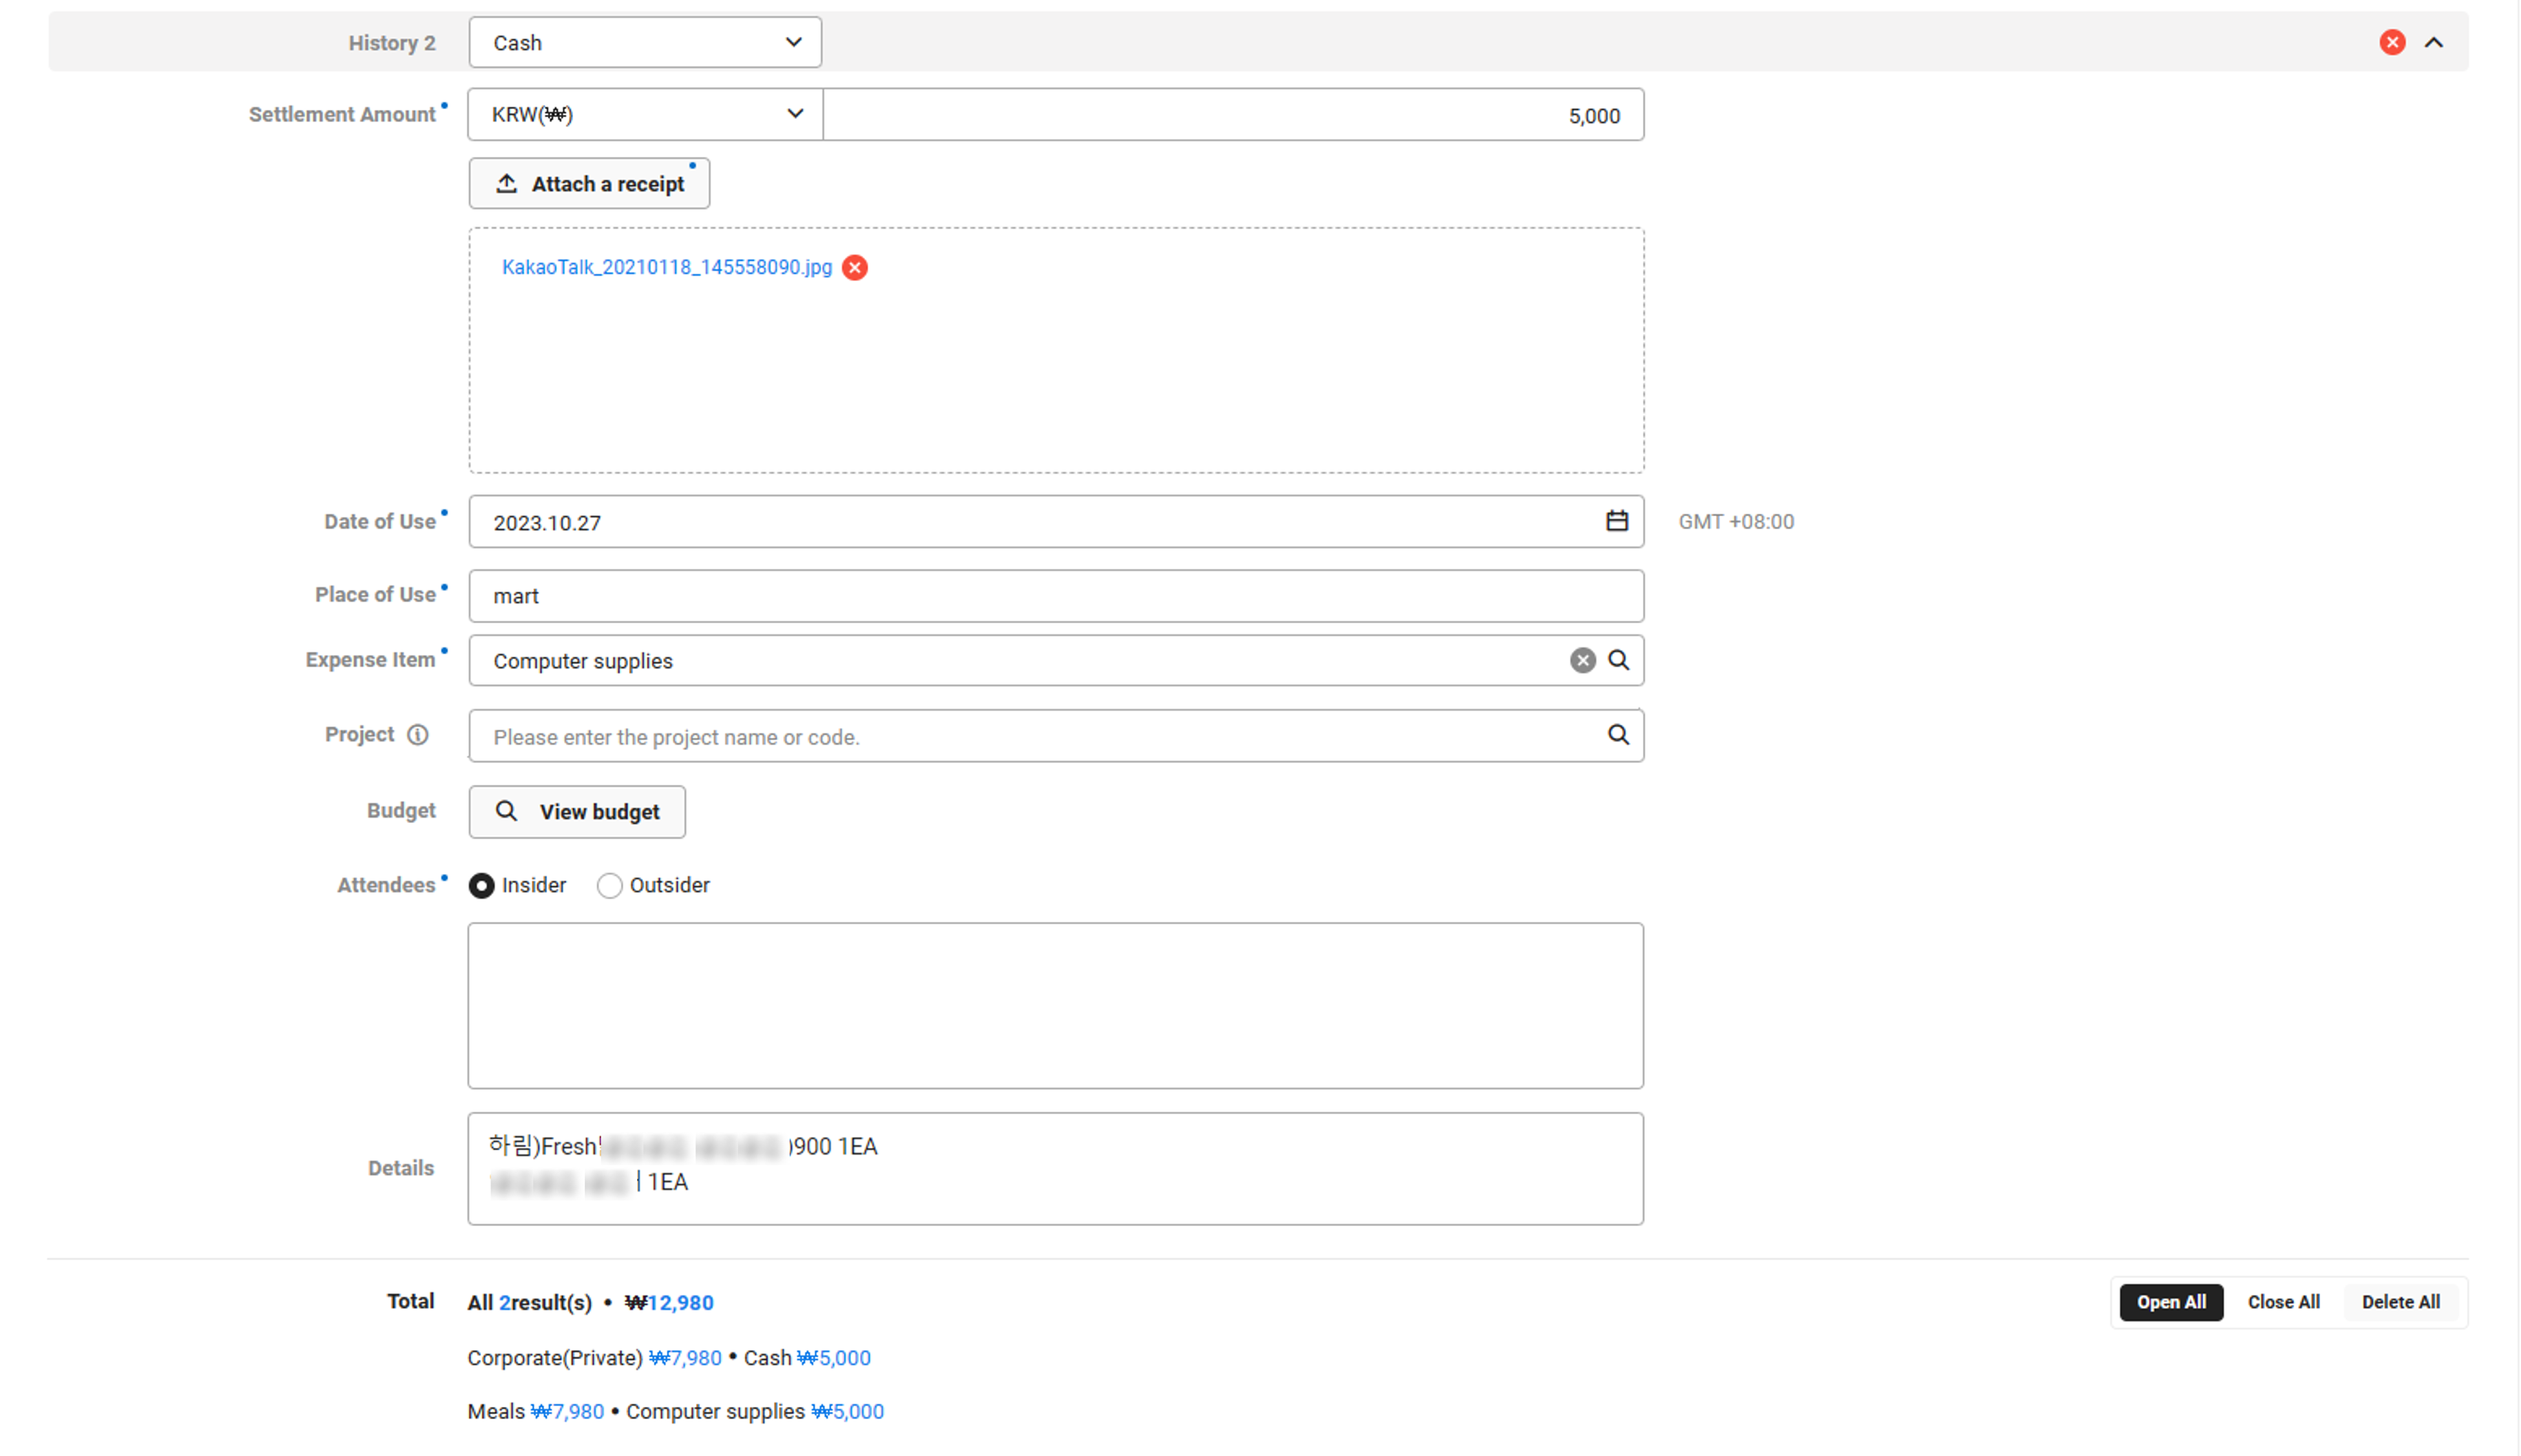
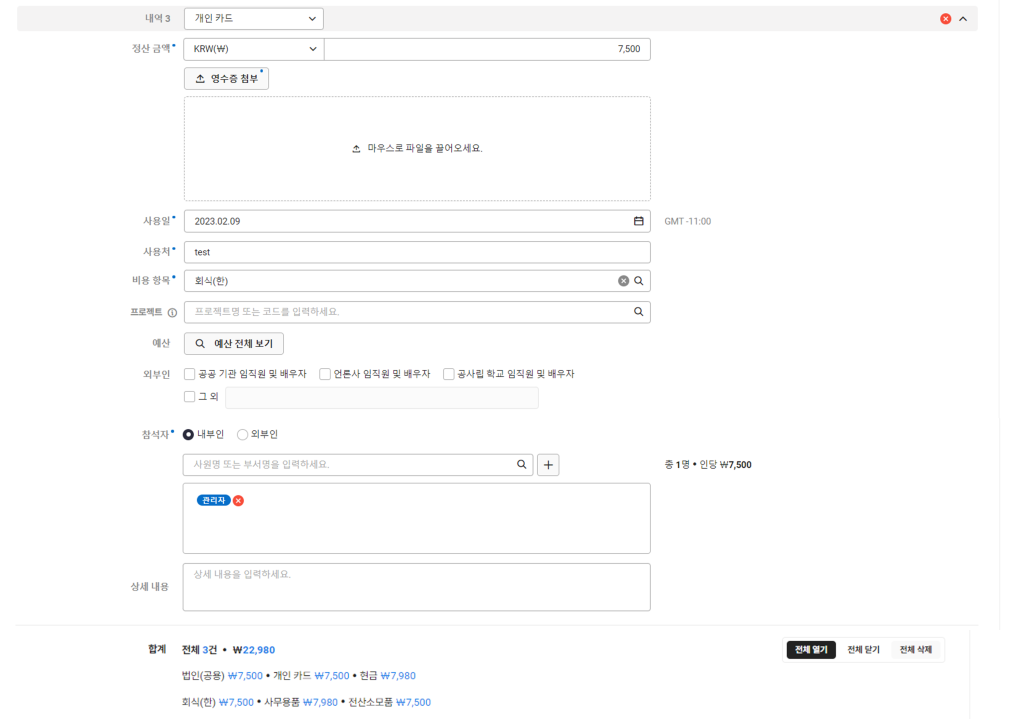
- To add another credit card or cash usage history other than the integrated corporate credit card, click ‘Add Manual Settlement History’ and fill out the subsections.
Item Description Evidence Type You can select from Corporate (public), Corporate (personal), Corporate (debit), Personal card, and Cash (If you don't have personal corporate credit card, then the ‘Corporate (personal)’ item is not displayed.)
The display order of the evidence type selection values follows the admin settings (set from ‘Set Evidence Type’ of the ‘Expense > Settings’ menu)Settlement Amount Enter the same amount as that on the receipt in the standard currency set by the company - In the case of foreign currency, select the currency type and enter the amount used in local currency, standard currency, and standard amount respectively
- You can upload receipts by clicking ‘Attach Receipt’.Receipt attachment is required or optional based on the admin's settings for each expense item (See Expense > Settings)
- In addition to image files, .pdf, .excel, .word, and .ppt format files can be attached
Usage Date/Place of Use Enter the expense usage date and place of use Expense Usage Plan Click ‘View Document’, select the expense plan form pertaining to the settlement, and then click ‘OK’ - To import an expense plan document, you need to satisfy all of the following conditions: matching affiliated department, valid estimated schedule of the expense plan request form, and yourself as the creator or attendee
- When the expense plan document is imported, expense item, outsiders, attendees and details of the document are automatically displayed
Expense Item When you import an expense plan document, the expense items on the document are automatically displayed Project Code If the project code has been set to use, then the project code of the document is displayed automatically once you import the expense plan document (See Manage Common Code) Budget Display the item when using budget, Apply ‘Required’ selection status by based on the admin's budget requirements for each expense item (See Expense > Settings) - If set to ‘Required’, select Budget as Required
- If set to ‘Required if budget is allocated'
- If a budget is allocated to the expense requestor or their affiliated department as the using department, select Budget as Required
- Click ‘View All Budgets’ to view all available budget (budget name, affiliated department, budget type, budget item, and usage period)
- If the selected affiliated department, expense item, and project code (optional) match, it displays the budget to the expense settlement requestor specified as the using department
- If set to 'Not required', selecting a Budget is not required
- Select the budget to display the budget balance next to the expense item
Outsider When you import the expense plan document, the outsiders of the document are displayed automatically and can be edited if needed Attendee When you import the expense plan document, the attendees of the document are displayed automatically and can be edited if needed Details When you import the expense plan document, the details for the document are displayed automatically and can be edited if needed - If you have additional history you need to settle, then repeat Steps 4 to 6, 7, or 8 according to the type.
- It displays the grand total for the entire settlement, as well as the total amounts by evidence type and expense item.
- Enter the reason for the expense settlement.
- If there are documents related to the document you are creating, click ‘Related Document’ and select the related document.
If You‘re Using Expense Plans and Don‘t Have Integrated Corporate Credit Cards

- If you have two or more affiliated departments, then select the department.
- If you belong to only one department, then the concurrent position item will not appear.
- Enter the title.
- Select the affiliated department.
- The affiliated department or employee name of the requestor is selected and displayed by default according to the basing settings for the affiliated department set in ‘Expense > Settings’ by the Expense admin.
- If the affiliated department setting is set to Department: The primary department is displayed by default, and for concurrent positions, you can select the applicable affiliated department for the expense settlement content.
- If the affiliated department setting is set to Employee: The employee name is displayed by default if there's any budget allocated for the individual at the time of the settlement request. If there's no allocated budget, then the primary department is displayed.
- The affiliated department or employee name of the requestor is selected and displayed by default according to the basing settings for the affiliated department set in ‘Expense > Settings’ by the Expense admin.
- Click ‘Add OCR History’ and select the receipt to settle to read receipt information and add an entry.
- This feature is available only when the company has set to use the AI OCR feature.
- Once you upload the receipt, the data of the receipt is automatically entered in each field. Check the details and edit it if necessary.
Item Description Evidence Type Depending on the payment method, the types such as Corporate (public), Corporate (personal), Corporate (debit), Personal card, and Cash are displayed automatically Settlement Amount The total amount on the receipt is automatically displayed Usage Date/Place of Use It automatically displays the expense usage date and place of use for the receipt Receipt File Name It displays the file name of the attached receipt. Image format receipts displays image of the receipt when clicked Expense Usage Plan Click ‘View Document’, select the expense plan form pertaining to the settlement, and then click ‘OK’ - To import an expense plan document, you need to satisfy all of the following conditions: matching affiliated department, valid estimated schedule of the expense plan request form, and yourself as the creator or attendee
- When the expense plan document is imported, expense item, outsiders, attendees and details of the document are automatically displayed
Expense Item When you import an expense plan document, the expense items on the document are automatically displayed Project Code If the project code has been set to use, then the project code of the document is displayed automatically once you import the expense plan document (See Manage Common Code) Budget Display the item when using budget, Apply ‘Required’ selection status by based on the admin's budget requirements for each expense item (See Expense > Settings) - If set to ‘Required’, select Budget as Required
- If set to ‘Required if budget is allocated'
- If a budget is allocated to the expense requestor or their affiliated department as the using department, select Budget as Required
- Click ‘View All Budgets’ to view all available budget (budget name, affiliated department, budget type, budget item, and usage period)
- If the selected affiliated department, expense item, and project code (optional) match, it displays the budget to the expense settlement requestor specified as the using department
- If set to 'Not required', selecting a Budget is not required
- Select the budget to display the budget balance next to the expense item
Outsider When you import the expense plan document, the outsiders of the document are displayed automatically and can be edited if needed Attendee When you import the expense plan document, the attendees of the document are displayed automatically and can be edited if needed Details - The item names on the receipt are displayed automatically
- When you import the expense plan document, the details for the document are displayed automatically and can be edited if needed
- Click ‘Add Settlement History’ and fill out the subsections.

Item Description Evidence Type You can select from Corporate (public), Corporate (personal), Corporate (debit), Personal card, and Cash (If you don't have personal corporate credit card, then the ‘Corporate (personal)’ item is not displayed.)
The display order of the evidence type selection values follows the admin settings (managed from ‘Set Evidence Type’ of the ‘Expense > Settings’ menu)Settlement Amount Enter the same amount as that on the receipt in the standard currency set by the company - In the case of foreign currency, select the currency type and enter the amount used in local currency, standard currency, and standard amount respectively
- You can upload receipts by clicking ‘Attach Receipt’.Receipt attachment is required or optional based on the admin's settings for each expense item (See Expense > Settings)
- You can attach multiple receipts, and they can be viewed individually or batch downloaded when viewing the document
- In addition to image files, .pdf, .excel, .word, and .ppt format files can be attached
Usage Date/Place of Use Enter the expense usage date and place of use Expense Usage Plan Click ‘View Document’, select the expense plan form pertaining to the settlement, and then click ‘OK’ - To import an expense plan document, you need to satisfy all of the following conditions: matching affiliated department, valid estimated schedule of the expense plan request form, and yourself as the creator or attendee
- When the expense plan document is imported, expense item, outsiders, attendees and details of the document are automatically displayed
Expense Item When you import an expense plan document, the expense items on the document are automatically displayed Project Code If the project code has been set to use, then the project code of the document is displayed automatically once you import the expense plan document (See Manage Common Code) Budget Select budget when using budgets - If budget is designated to the expense requestor or affiliated department of the requestor as the using department, click ‘View All Budgets’ to view all available budget (budget name, affiliated department, budget type, budget item, and usage period)
- If the selected affiliated department, expense item, and project code (optional) match, it displays the budget to the expense settlement requestor specified as the using department
- Select the budget to display the budget balance next to the expense item
Outsider When you import the expense plan document, the outsiders of the document are displayed automatically and can be edited if needed Attendee When you import the expense plan document, the attendees of the document are displayed automatically and can be edited if needed Details When you import the expense plan document, the details for the document are displayed automatically and can be edited if needed - If you have additional history you need to settle, then repeat Step 4 or 5 according to the type.
- It displays the grand total for the entire settlement, as well as the total amounts by evidence type and expense item.
- Enter the reason for the expense settlement.
- If there are documents related to the document you are creating, click ‘Related Document’ and select the related document.
If You’re Not Using Expense Plans and Have Integrated Corporate Credit Cards
- If you have two or more affiliated departments, then select the department.
- If you belong to only one department, then the concurrent position item will not appear.
- Enter the title.
- Select the affiliated department.
- The affiliated department or employee name of the requestor is selected and displayed by default according to the basing settings for the affiliated department set in ‘Expense > Settings’ by the Expense admin.
- If the affiliated department setting is set to Department: The primary department is displayed by default, and for concurrent positions, you can select the applicable affiliated department for the expense settlement content.
- If the affiliated department setting is set to Employee: The employee name is displayed by default if there's any budget allocated for the individual at the time of the settlement request. If there's no allocated budget, then the primary department is displayed.
- The affiliated department or employee name of the requestor is selected and displayed by default according to the basing settings for the affiliated department set in ‘Expense > Settings’ by the Expense admin.
- Click ‘Add Integrated Settlement History’.
- ‘Add Integrated Settlement History’ is displayed if unsettled items exist in corporate credit cards you have or corporate credit cards whose settlement has been delegated to you from the card owner.
- Select the corporate credit card to settle and the settlement history from the pop-up window, and then click ‘OK’.
- If you are using as a corporate group, then the corporate credit cards for which you are registered as card holder by the corresponding company are displayed on the selected expense settlement form.
- The history with expired settlement period can‘t be searched. For more details on settlement period, contact the Expense admin. (See Set Expense)
- The approved history that have been excluded from settlement or delegated can‘t be searched.
- Settled history can‘t be searched.
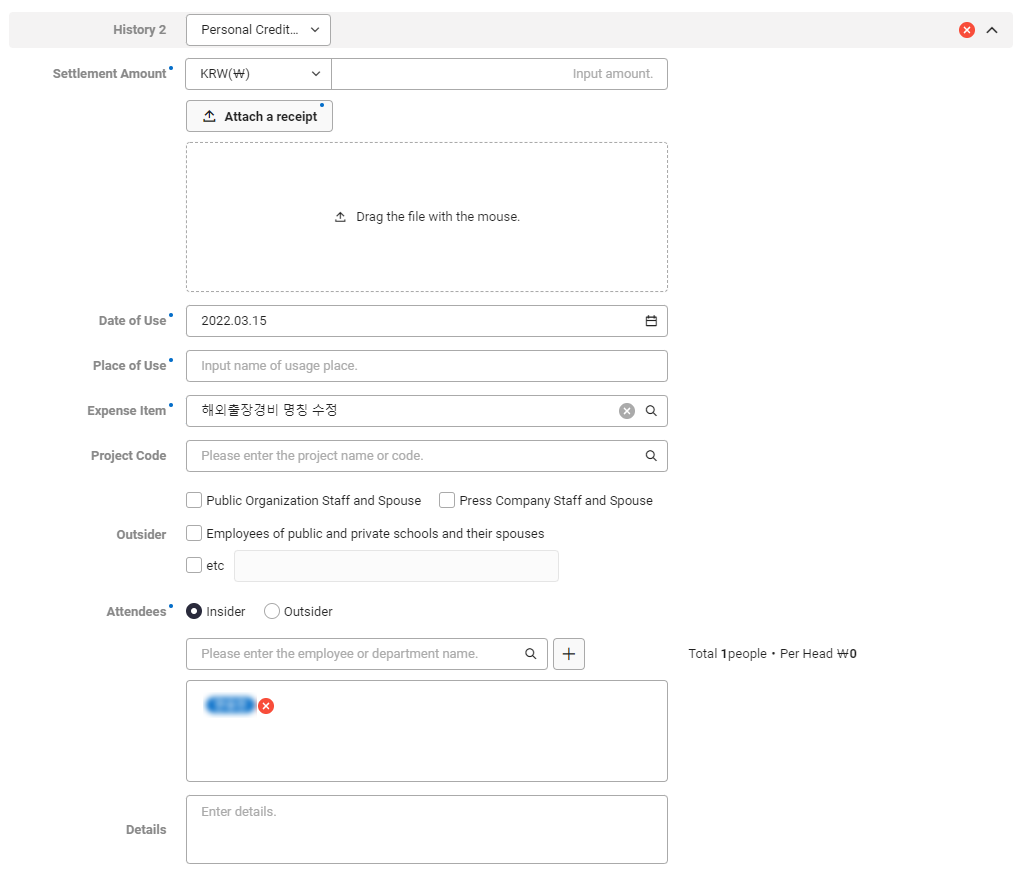
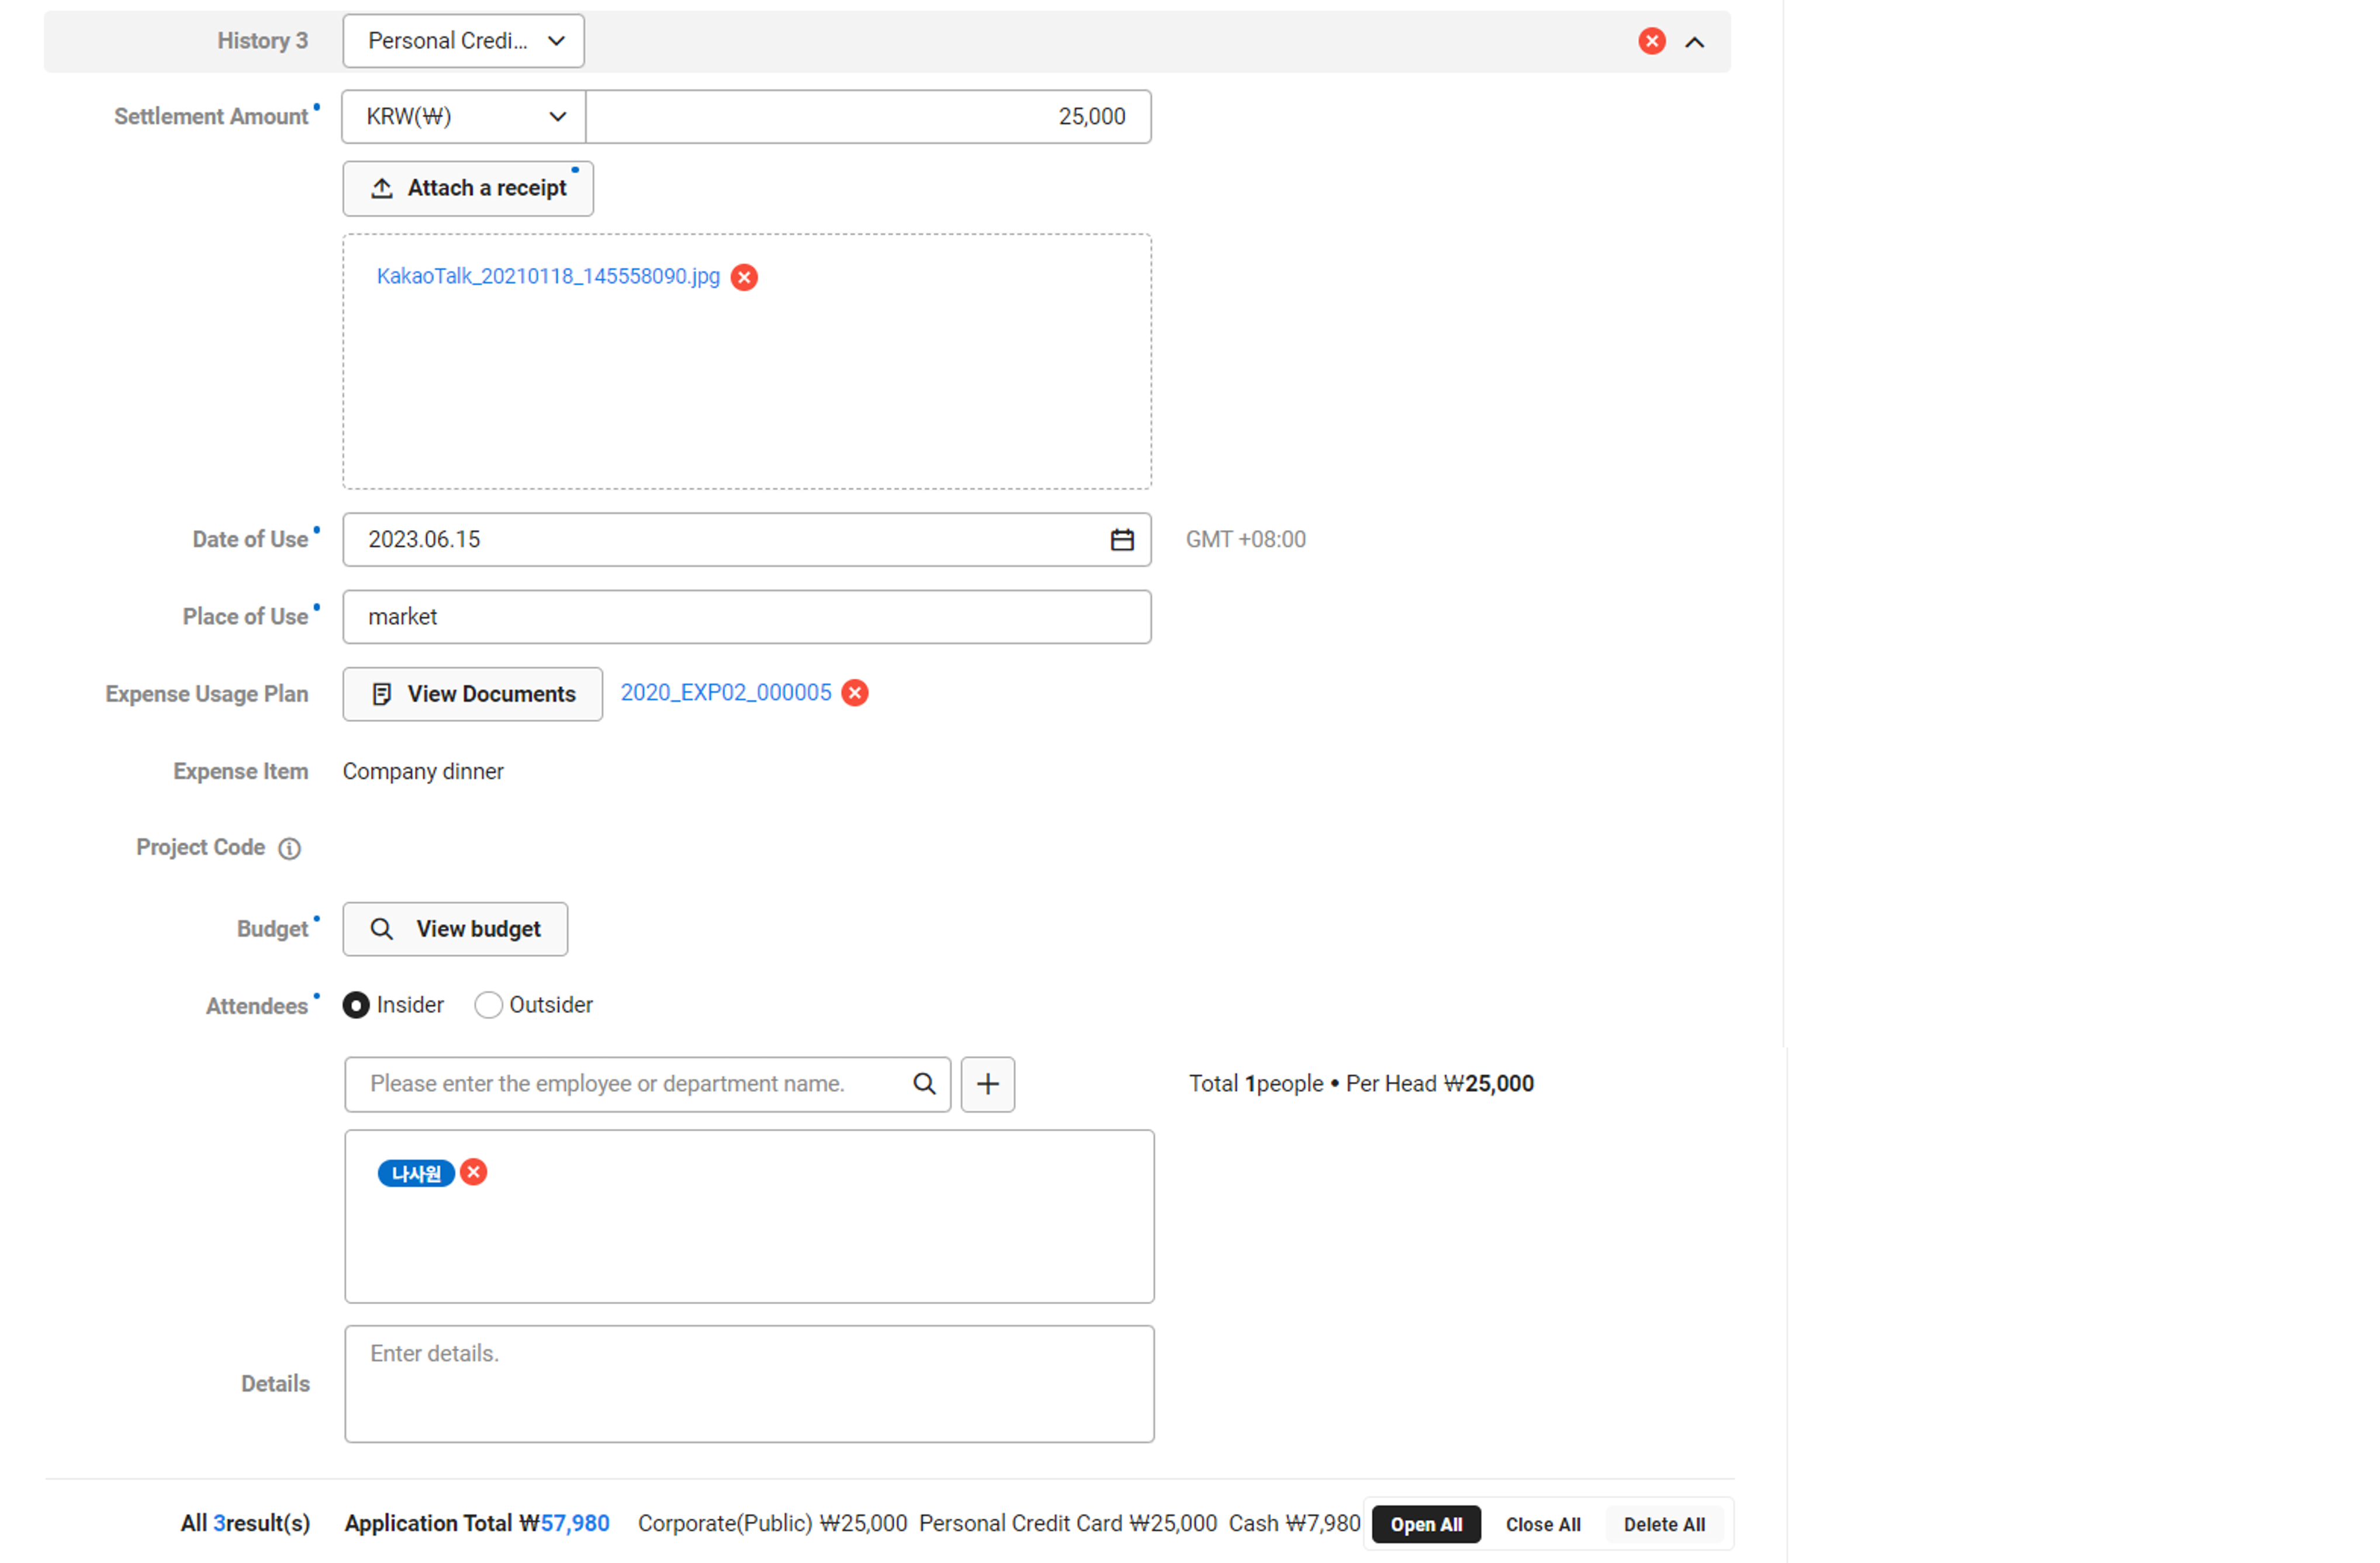
- Check and edit your payout details.
| Item | Description |
|---|---|
| Approval Amount/Settlement Amount |
|
| Attach Receipt | Click to attach receipts
|
| Expense Item |
|
| Project Code | It is displayed if the company has set to use project codes. Select the project code (If the desired code is not displayed in the project code list, then contact the company admin.) (See Manage Project Code) |
| Budget | Display the item when using budget, Apply ‘Required’ selection status by based on the admin's budget requirements for each expense item (See Expense > Settings)
|
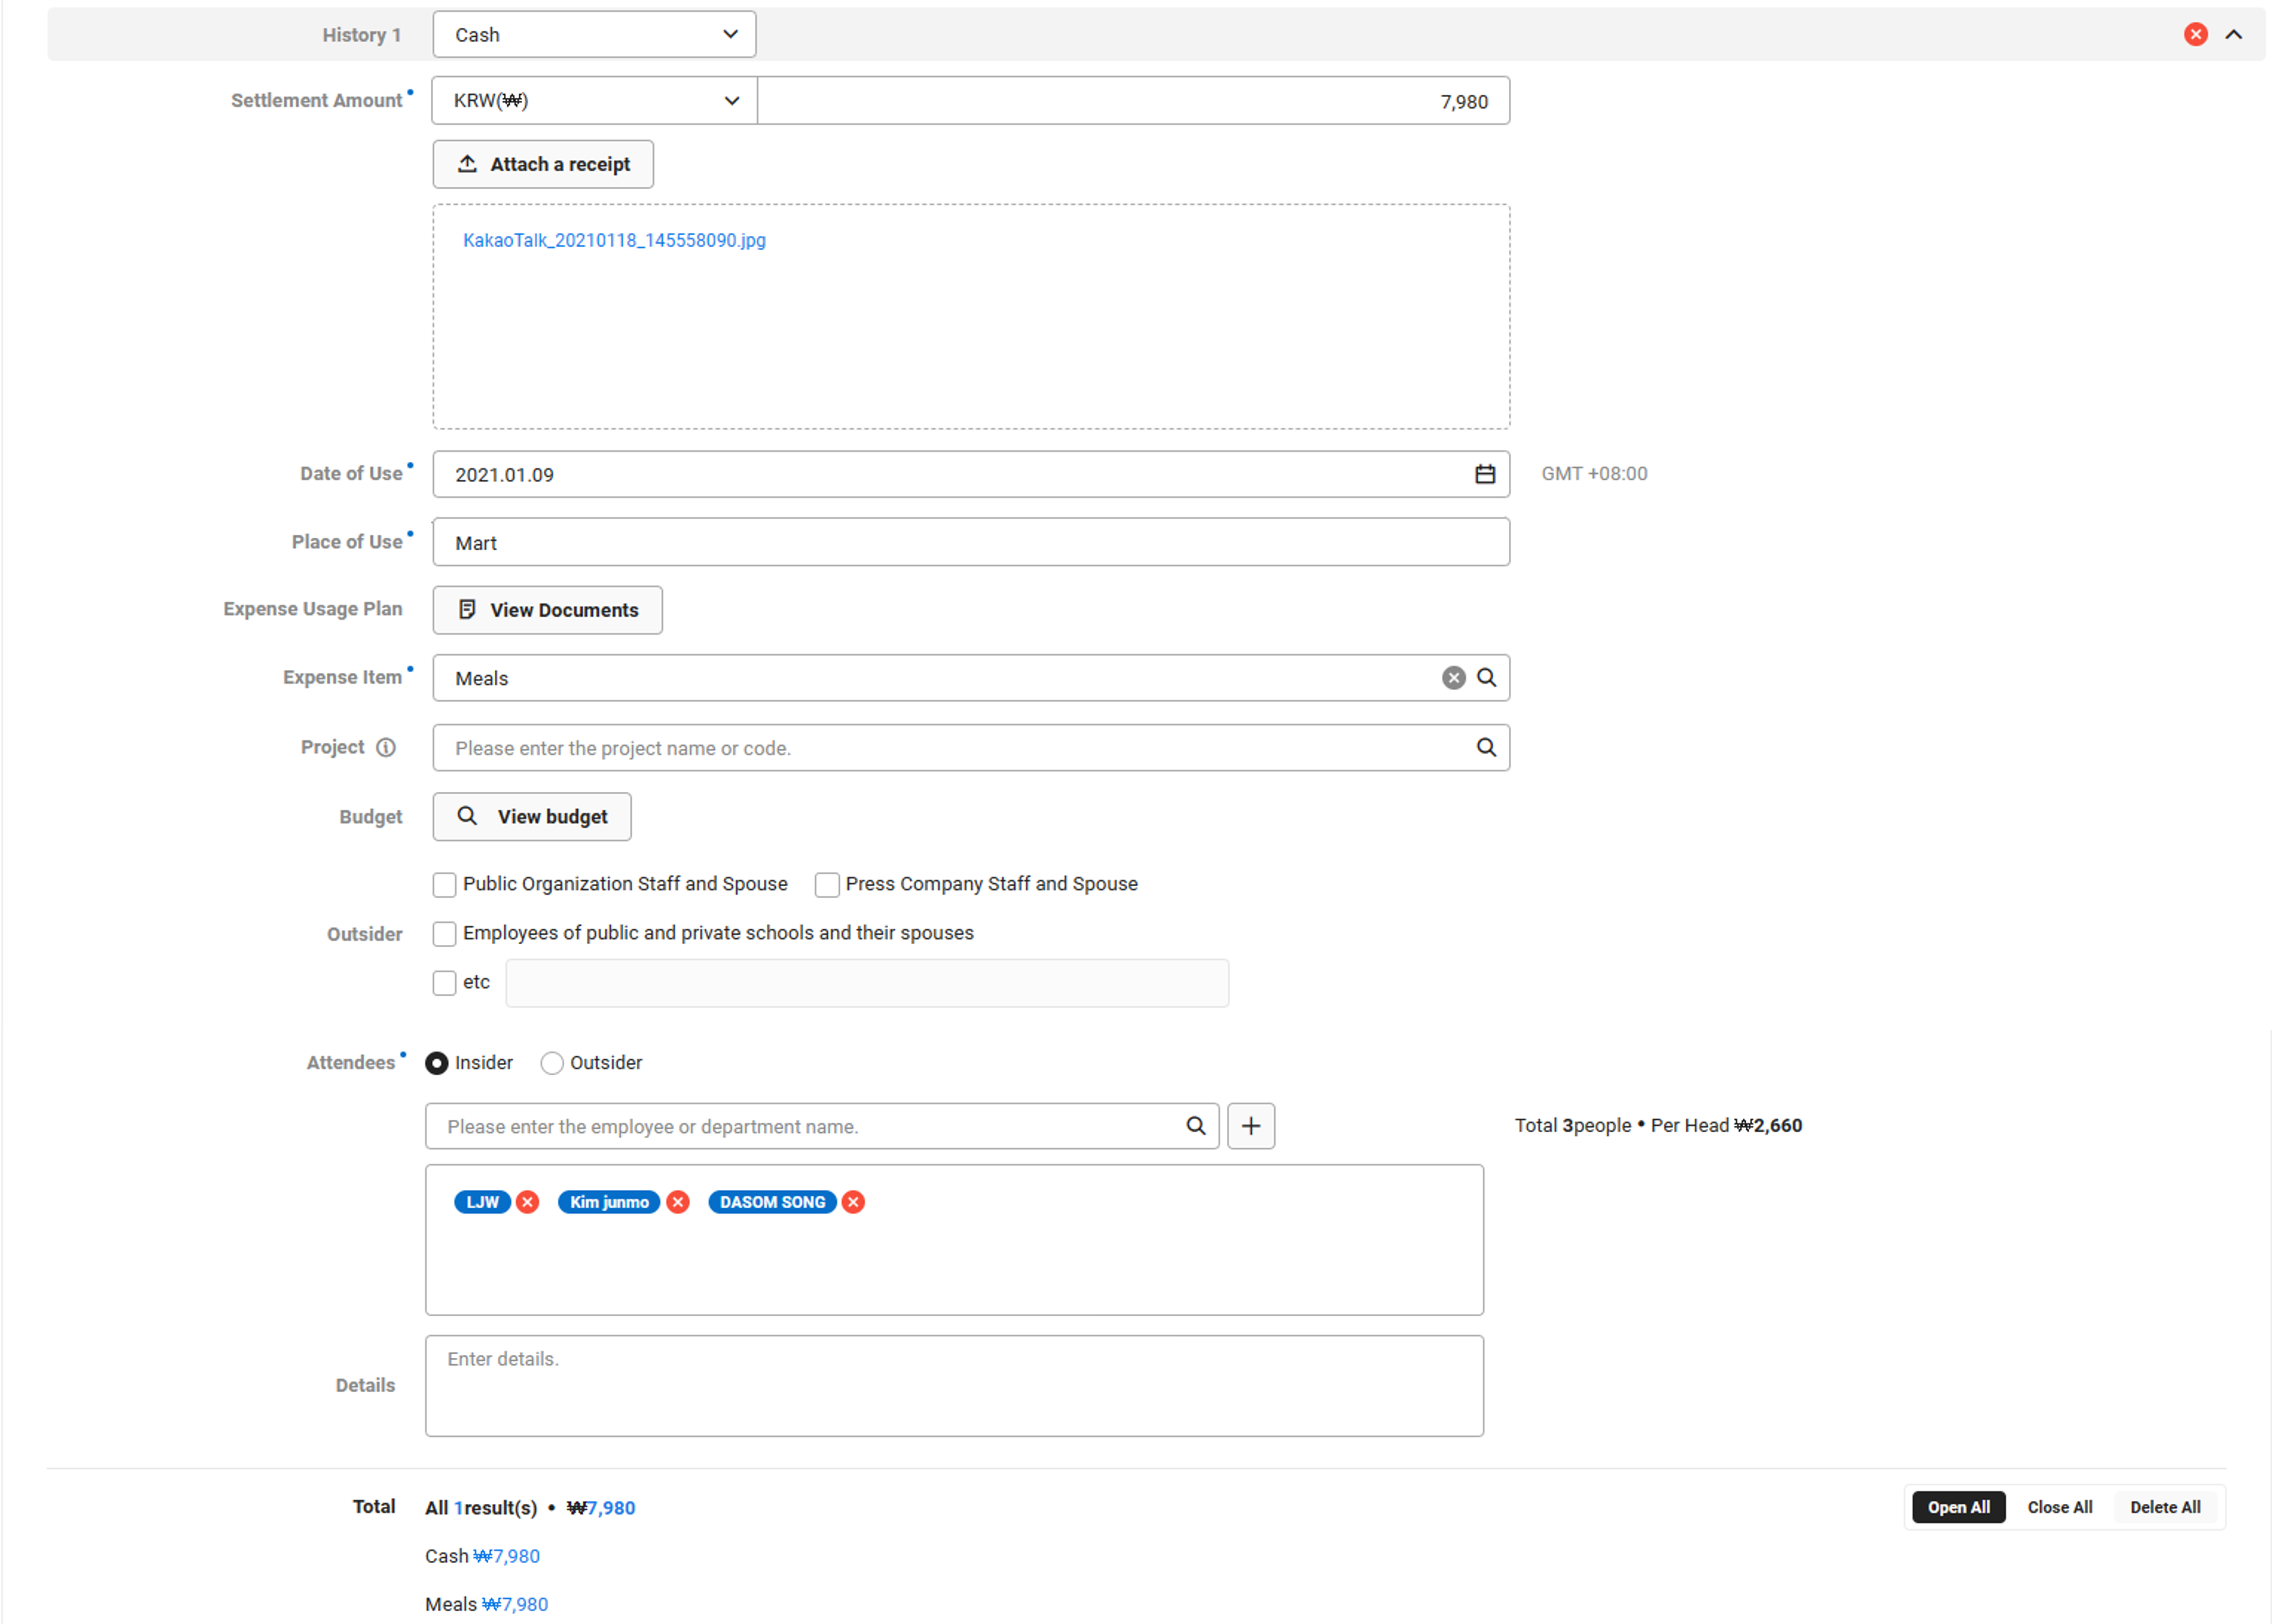
| Outsider | People subject to the Anti Graft Law can be selected if the employees of public institutions, media, public/private school, and their spouses are included in the settlement in accordance with the Improper Solicitation and Graft Act |
| Attendee |
|
| Details | Enter the details related to the expense settlement |
- Click ‘Add OCR History’ and select the receipt to settle to read receipt information and add an entry.
- This feature is available only when the company has set to use the AI OCR feature.
- Once you upload the receipt, the data of the receipt is automatically entered in each field. Check the details and edit it if necessary.
Item Description Evidence Type Depending on the payment method, the types such as Corporate (public), Corporate (personal), Corporate (debit), Personal card, and Cash are displayed automatically Settlement Amount The total amount on the receipt is automatically displayed Usage Date/Place of Use It automatically displays the expense usage date and place of use for the receipt Receipt File Name It displays the file name of the attached receipt. Image format receipts displays image of the receipt when clicked Expense Item - Outsider and Attendee fields are displayed according to the expense item
- Whether you can add outsiders and attendees according to the expense item depends on the Expense admin's settings (See Manage Expense Item Code)
Project Code It is displayed if the company has set to use project codes. Select the project code (If the desired code is not displayed in the project code list, then contact the company admin.) (See Manage Project Code) Budget Display the item when using budget, Apply ‘Required’ selection status by based on the admin's budget requirements for each expense item (See Expense > Settings) - If set to ‘Required’, select Budget as Required
- If set to ‘Required if budget is allocated'
- If a budget is allocated to the expense requestor or their affiliated department as the using department, select Budget as Required
- Click ‘View All Budgets’ to view all available budget (budget name, affiliated department, budget type, budget item, and usage period)
- If the selected affiliated department, expense item, and project code (optional) match, it displays the budget to the expense settlement requestor specified as the using department
- If set to 'Not required', selecting a Budget is not required
- Select the budget to display the budget balance next to the expense item
Outsider People subject to the Anti Graft Law can be selected if the employees of public institutions, media, public/private school, and their spouses are included in the settlement in accordance with the Improper Solicitation and Graft Act Attendee - You can register internal employees and outsiders separately
- The creator themselves is set as an attendee by default
- To add an employee, search the employee’s name or department name and click

- If you add a department, then all members of that department are added as attendees
- To add an outsider, enter their organization and name and click
- To delete an attendee that was added, click
Details The item names on the receipt are displayed automatically - To add another credit card or cash usage history other than the integrated corporate credit card, click ‘Add Manual Settlement History’ and fill out the subsections.
Item Description Evidence Type You can select from Corporate (public), Corporate (personal), Corporate (debit), Personal card, and Cash (If you don't have personal corporate credit card, then the Corporate (personal) item is not displayed.)
The display order of the evidence type selection values follows the admin settings (managed from ‘Set Evidence Type’ of the ‘Expense > Settings’ menu)Settlement Amount Enter the same amount as that on the receipt in the standard currency set by the company - In the case of foreign currency, select the currency type and enter the amount used in local currency, standard currency, and standard amount respectively
- You can upload receipts by clicking ‘Attach Receipt’.Receipt attachment is required or optional based on the admin's settings for each expense item (See Expense > Settings)
- You can attach multiple receipts, and they can be viewed individually or batch downloaded when viewing the document
- In addition to image files, .pdf, .excel, .word, and .ppt format files can be attached
Usage Date/Place of Use Enter the expense usage date and place of use Expense Usage Plan Click ‘View Document’, select the expense plan form pertaining to the settlement, and then click ‘OK’ - To import an expense plan document, you need to satisfy all of the following conditions: matching affiliate department, expense plan documents within the settlement request available period set by the admin or expense plan requestor
- When importing the expense plan document, expense items, external parties, attendees, and document details are automatically displayed and can be edited if necessary
Expense Item - Outsider and Attendee fields are displayed according to the expense item
- Whether you can add outsiders and attendees according to the expense item depends on the Expense admin's settings (See Manage Expense Item Code)
Project Code It is displayed if the company has set to use project codes. Select the project code (If the desired code is not displayed in the project code list, then contact the company admin.) (See Manage Project Code) Budget Display the item when using budget, Apply ‘Required’ selection status by based on the admin's budget requirements for each expense item (See Expense > Settings) - If set to ‘Required’, select Budget as Required
- If set to ‘Required if budget is allocated'
- If a budget is allocated to the expense requestor or their affiliated department as the using department, select Budget as Required
- Click ‘View All Budgets’ to view all available budget (budget name, affiliated department, budget type, budget item, and usage period)
- If the selected affiliated department, expense item, and project code (optional) match, it displays the budget to the expense settlement requestor specified as the using department
- If set to 'Not required', selecting a Budget is not required
- Select the budget to display the budget balance next to the expense item
Outsider People subject to the Anti Graft Law can be selected if the employees of public institutions, media, public/private school, and their spouses are included in the settlement in accordance with the Improper Solicitation and Graft Act Attendee - You can register internal employees and outsiders separately
- The creator themselves is set as an attendee by default
- To add an employee, search the employee’s name or department name and click
- If you add a department, then all members of that department are added as attendees
- To add an outsider, enter their organization and name and click
- To delete an attendee that was added, click
Details Enter the details related to the expense settlement - If you have additional history you need to settle, then repeat Steps 4 to 6, 7, or 8 according to the type.
- It displays the grand total for the entire settlement, as well as the total amounts by evidence type and expense item.
- Enter the reason for the expense settlement.
- If there are documents related to the document you are creating, click ‘Related Document’ and select the related document.
If You‘re Not Using Expense Plans and Don‘t Have Integrated Corporate Credit Cards
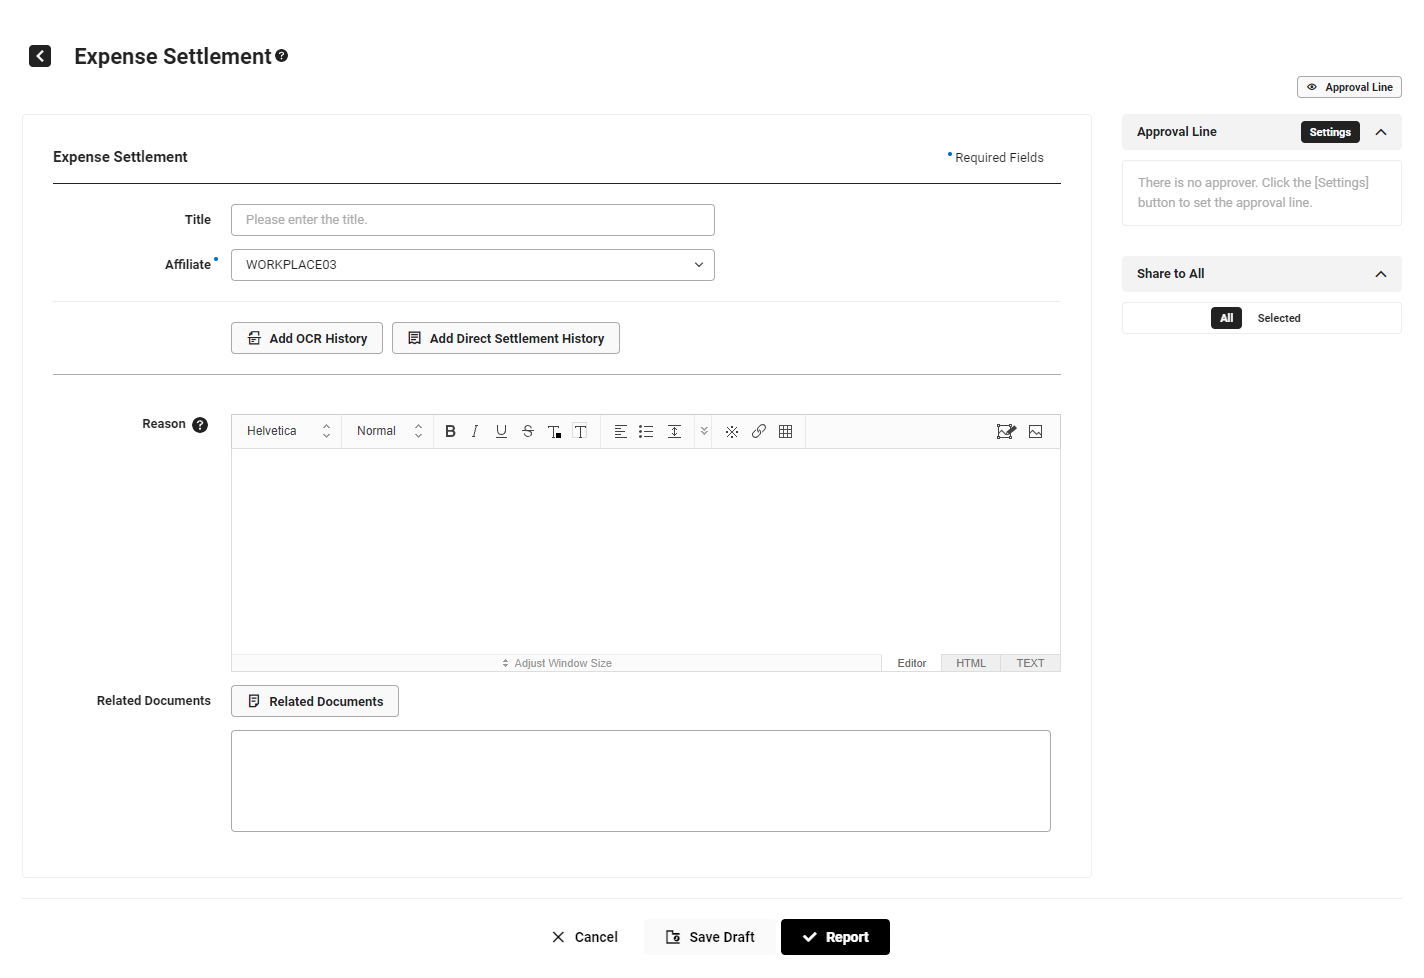
- If you have two or more affiliated departments, then select the department.
- If you belong to only one department, then the concurrent position item will not appear.
- Enter the title.
- Select the affiliated department.
- The affiliated department or employee name of the requestor is selected and displayed by default according to the basing settings for the affiliated department set in ‘Expense > Settings’ by the Expense admin.
- If the affiliated department setting is set to Department: The primary department is displayed by default, and for concurrent positions, you can select the applicable affiliated department for the expense settlement content.
- If the affiliated department setting is set to Employee: The employee name is displayed by default if there's any budget allocated for the individual at the time of the settlement request. If there's no allocated budget, then the primary department is displayed.
- The affiliated department or employee name of the requestor is selected and displayed by default according to the basing settings for the affiliated department set in ‘Expense > Settings’ by the Expense admin.
- Click ‘Add OCR History’ and select the receipt to settle to read receipt information and add an entry.
- This feature is available only when the company has set to use the AI OCR feature.
- Once you upload the receipt, the data of the receipt is automatically entered in each field. Check the details and edit it if necessary.
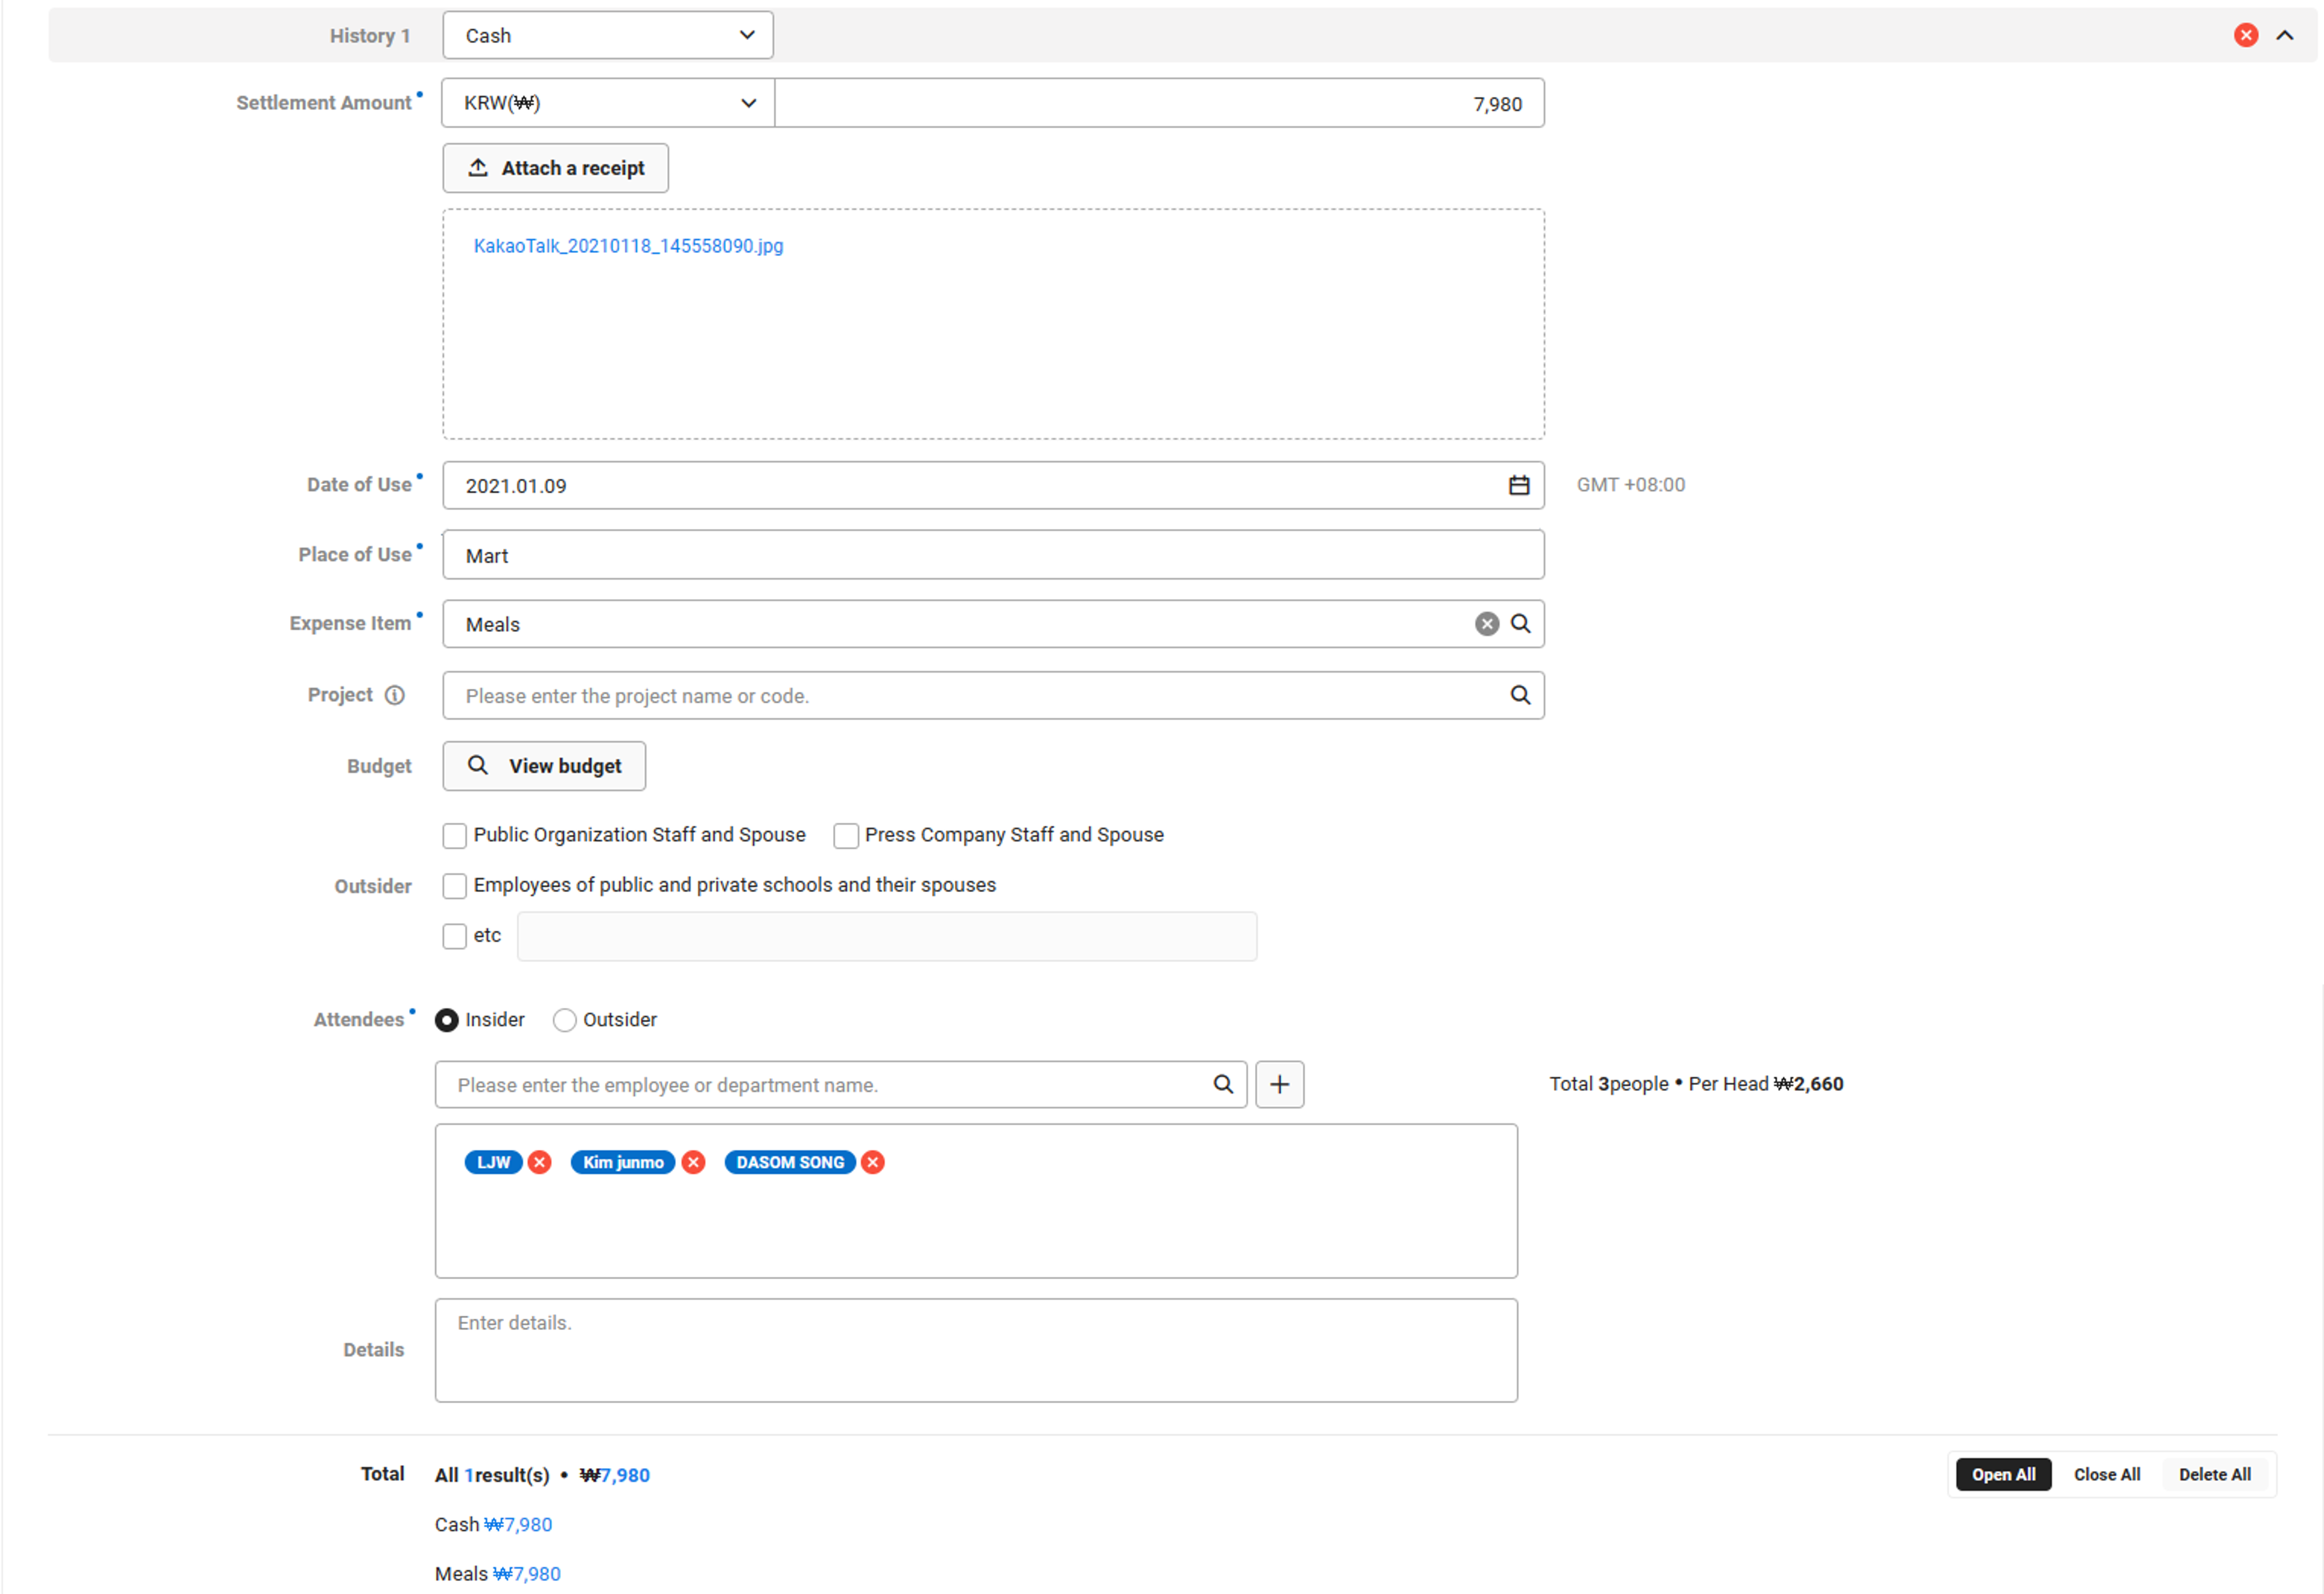
Item Description Evidence Type Depending on the payment method, the types such as Corporate (public), Corporate (personal), Corporate (debit), Personal card, and Cash are displayed automatically Settlement Amount The total amount on the receipt is automatically displayed Usage Date/Place of Use It automatically displays the expense usage date and place of use for the receipt Receipt File Name It displays the file name of the attached receipt. Image format receipts displays image of the receipt when clicked Expense Item - Outsider and Attendee fields are displayed according to the expense item
- Whether you can add outsiders and attendees according to the expense item depends on the Expense admin's settings (See Manage Expense Item Code)
Project Code It is displayed if the company has set to use project codes. Select the project code (If the desired code is not displayed in the project code list, then contact the company admin.) (See Manage Project Code) Budget Display the item when using budget, Apply ‘Required’ selection status by based on the admin's budget requirements for each expense item (See Expense > Settings) - If set to ‘Required’, select Budget as Required
- If set to ‘Required if budget is allocated'
- If a budget is allocated to the expense requestor or their affiliated department as the using department, select Budget as Required
- Click ‘View All Budgets’ to view all available budget (budget name, affiliated department, budget type, budget item, and usage period)
- If the selected affiliated department, expense item, and project code (optional) match, it displays the budget to the expense settlement requestor specified as the using department
- If set to 'Not required', selecting a Budget is not required
- Select the budget to display the budget balance next to the expense item
Outsider People subject to the Anti Graft Law can be selected if the employees of public institutions, media, public/private school, and their spouses are included in the settlement in accordance with the Improper Solicitation and Graft Act Attendee - You can register internal employees and outsiders separately
- The creator themselves is set as an attendee by default
- To add an employee, search the employee’s name or department name and click
- If you add a department, then all members of that department are added as attendees
- To add an outsider, enter their organization and name and click
- To delete an attendee that was added, click
Details The item names on the receipt are displayed automatically - Click ‘Add Settlement History’ and fill out the subsections.
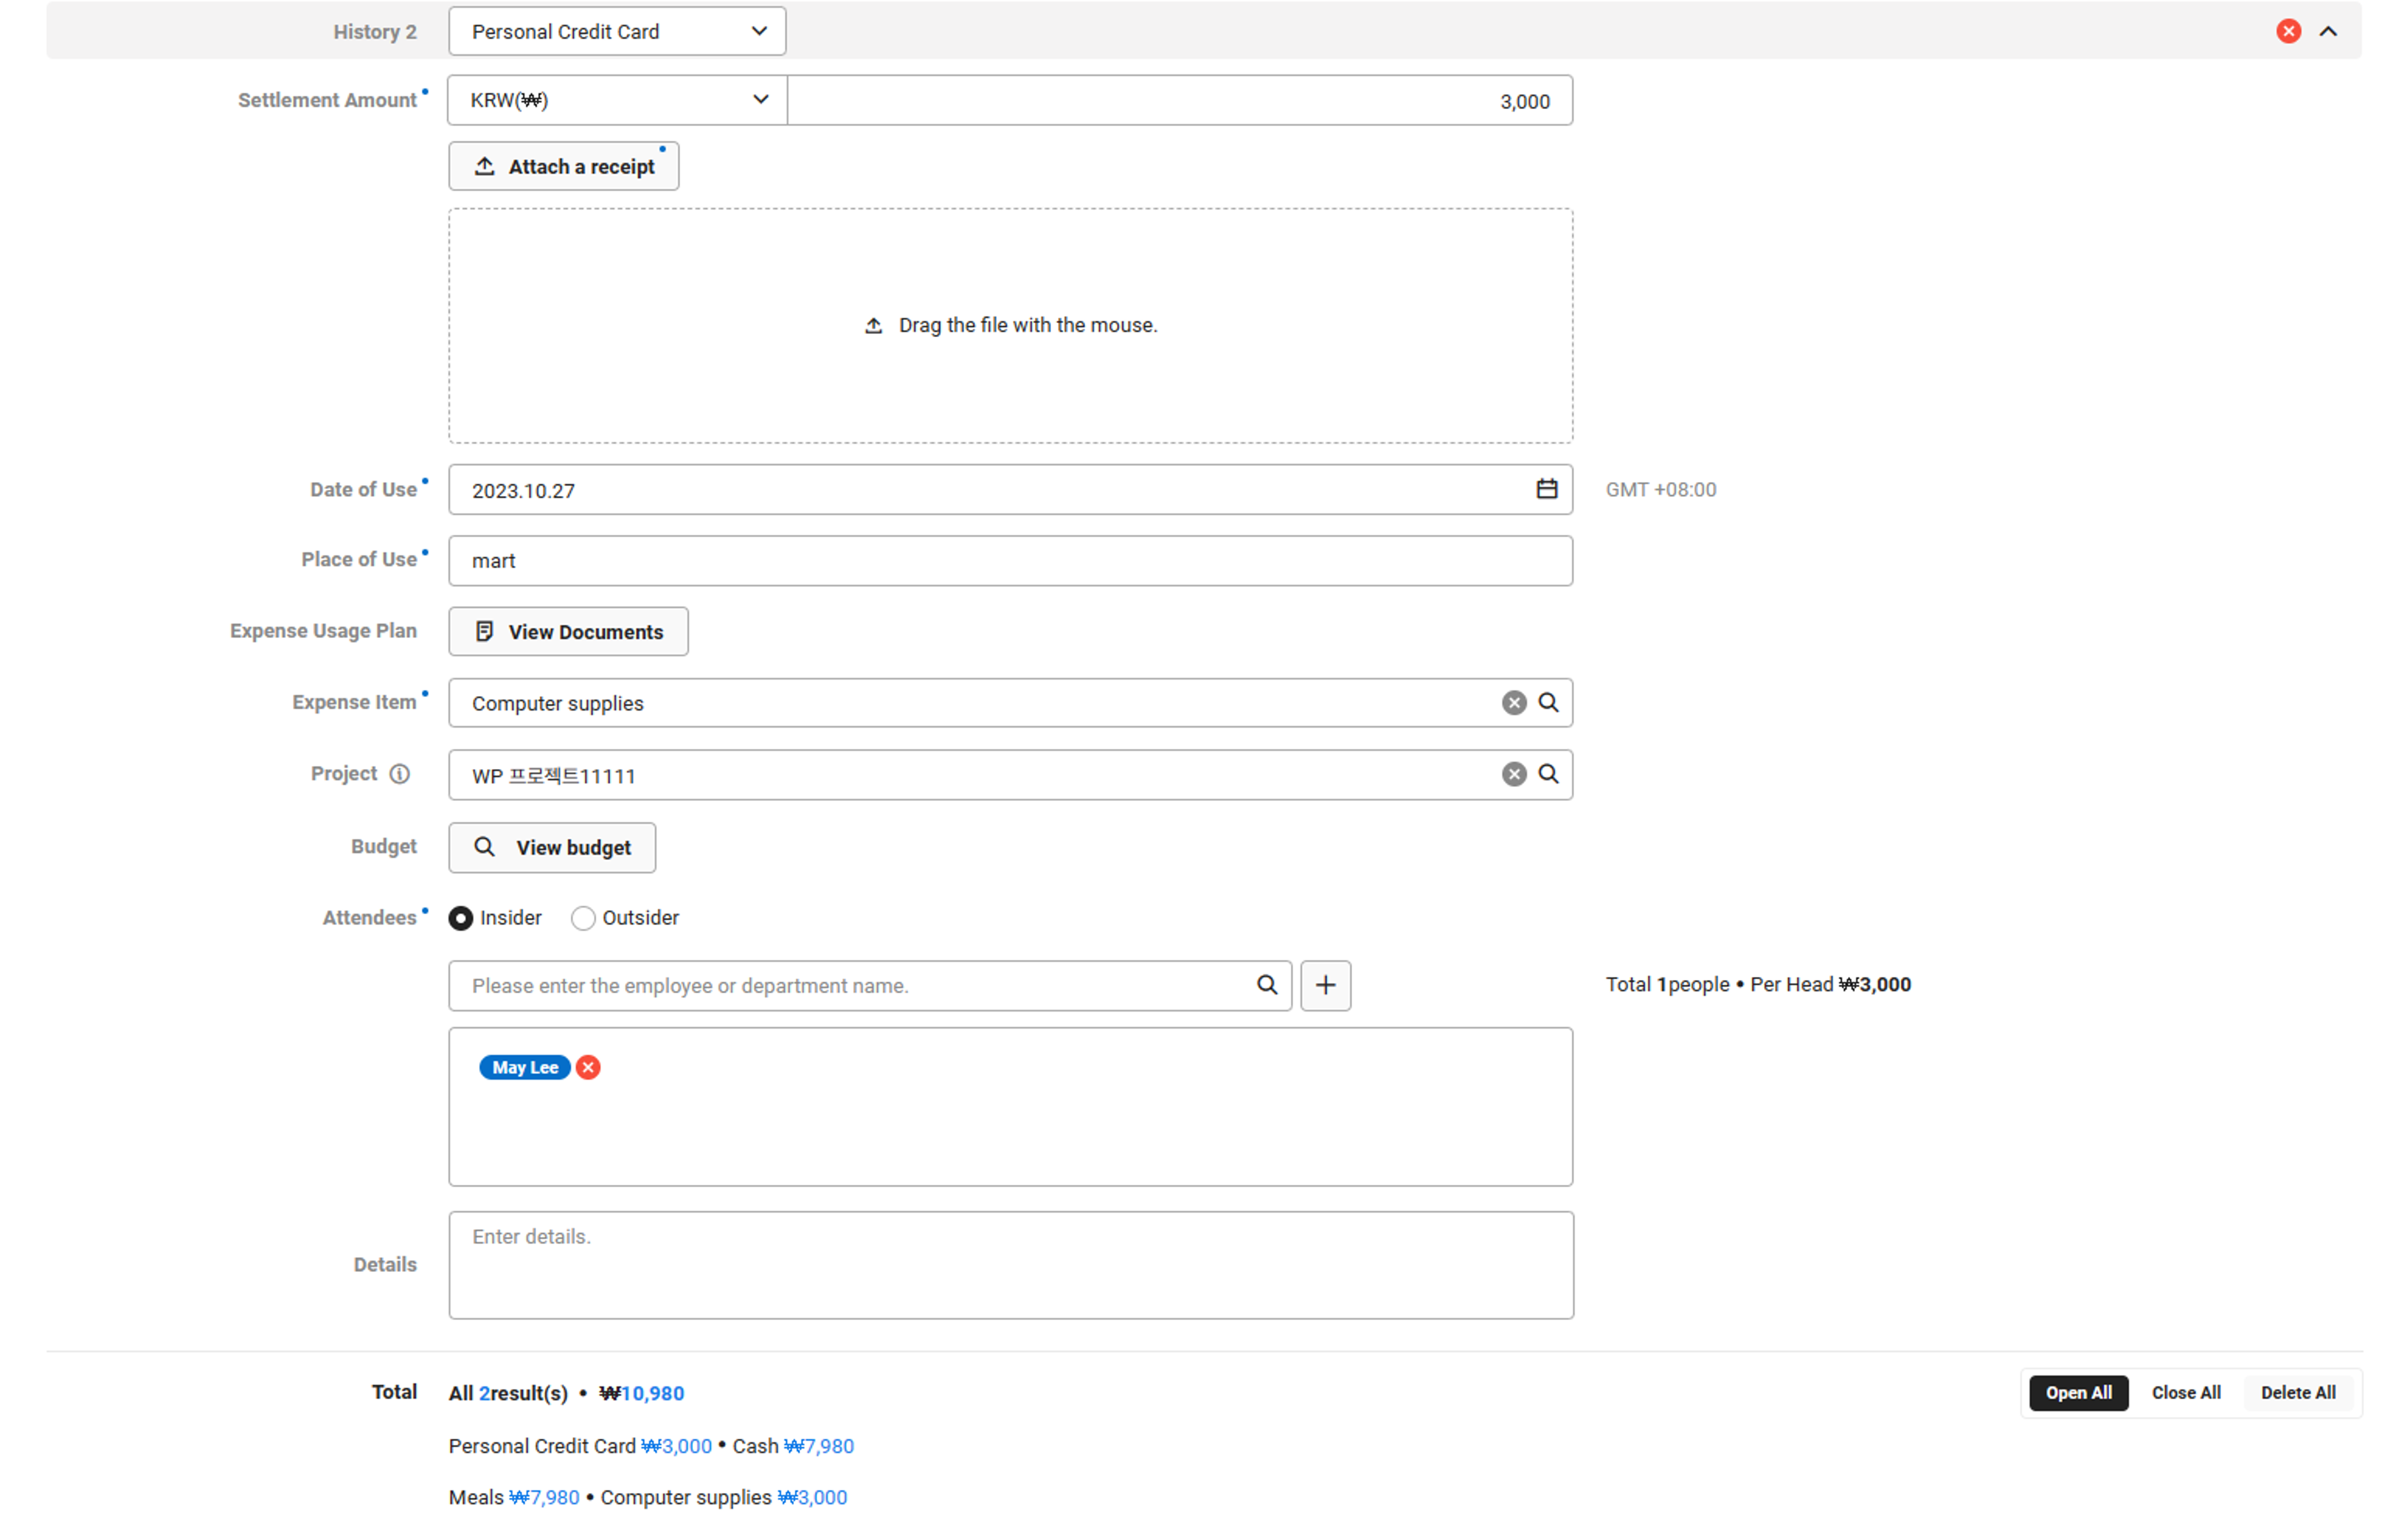
Item Description Evidence Type You can select from Corporate (public), Corporate (personal), Corporate (debit), Personal card, and Cash (If you don't have personal corporate credit card, then the Corporate (personal) item is not displayed.)
The display order of the evidence type selection values follows the admin settings (managed from ‘Set Evidence Type’ of the Expense > Settings menu)Settlement Amount Enter the same amount as that on the receipt in the standard currency set by the company - In the case of foreign currency, select the currency type and enter the amount used in local currency, standard currency, and standard amount respectively
- You can upload receipts by clicking ‘Attach Receipt’.Receipt attachment is required or optional based on the admin's settings for each expense item (See Expense > Settings)
- You can attach multiple receipts, and they can be viewed individually or batch downloaded when viewing the document
- In addition to image files, .pdf, .excel, .word, and .ppt format files can be attached
Usage Date/Place of Use Enter the expense usage date and place of use Expense Item - Outsider and Attendee fields are displayed according to the expense item
- Whether you can add outsiders and attendees according to the expense item depends on the Expense admin's settings (See Manage Expense Item Code)
Project Code It is displayed if the company has set to use project codes. Select the project code (If the desired code is not displayed in the project code list, then contact the company admin.) (See Manage Project Code) Budget Display the item when using budget, Apply ‘Required’ selection status by based on the admin's budget requirements for each expense item (See Expense > Settings) - If set to ‘Required’, select Budget as Required
- If set to ‘Required if budget is allocated'
- If a budget is allocated to the expense requestor or their affiliated department as the using department, select Budget as Required
- Click ‘View All Budgets’ to view all available budget (budget name, affiliated department, budget type, budget item, and usage period)
- If the selected affiliated department, expense item, and project code (optional) match, it displays the budget to the expense settlement requestor specified as the using department
- If set to 'Not required', selecting a Budget is not required
- Select the budget to display the budget balance next to the expense item
Outsider People subject to the Anti Graft Law can be selected if the employees of public institutions, media, public/private school, and their spouses are included in the settlement in accordance with the Improper Solicitation and Graft Act Attendee - You can register internal employees and outsiders separately
- The creator themselves is set as an attendee by default
- To add an employee, search the employee’s name or department name and click
- If you add a department, then all members of that department are added as attendees
- To add an outsider, enter their organization and name and click
- To delete an attendee that was added, click
Details Enter the details related to the expense settlement - If you have additional history you need to settle, then repeat Step 4 or 5 according to the type.
- It displays the grand total for the entire settlement, as well as the total amounts by evidence type and expense item.
- Enter the reason for the expense settlement.
- If there are documents related to the document you are creating, click ‘Related Document’ and select the related document.
Create Payroll Certificate Request Form
If the company uses Payroll service, then the payroll certificate request form is provided.
- If you have two or more affiliated departments, then select the department.
- If you belong to only one department, then the concurrent position item will not appear.
- Enter the title.
- Select a payroll certificate to be issued from Certificate Item. Fill out the information displayed according to the certificate to be issued by referring to the following table.
| Certificate Item | Description |
|---|---|
| Receipt for wage and salary income tax withholding | Select imputed year: Select it based on the previous year
Select whether to display personal information. |
| Certificate of income tax withheld | Select the payroll month.
Enter the purpose of use. |
| Book of wage and salary income withheld | Book of wage and salary income withheld is a form issued for the period during which the issuance of labor income withholding tax receipts is unavailable. It is issued as the wage and salary income receipt once year-end tax settlement is completed. Select the payroll month.
Enter the purpose of issuance. |
- Enter the number of copies to be issued.
- If the payroll tax form issuance method is Issue manually (seal stamped), fill out the payroll certificate request form and click ‘Report’, then you are directed to the Request Certificate page with ‘Issue’ displayed at the bottom. You can issue the certificate manually by clicking the button.
- After clicking ‘Issue’, check the certificate details in the pop-up window that appears, and then click ‘Print’.
- For manual issuances, you can‘t only issue it once. To make additional issuances, create the approval document again.
- If the payroll tax form issuance method is Issue original (no seal), then ‘Issue’ isn’t displayed in the Request Certificate page. The admin will issue the certificate, stamp it, and deliver it to the requestor in person.
Create Project Code Request Form
Project Code Request is a form provided when project codes are set to be integrated with Approval. (See Business Support Settings > Common Code > Manage Common Code)
Project codes are required for the company‘s projects. You can request new project codes, or request modification or deletion of the existing project code information. Once the document approval is completed, it is reflected on the project code list, and you can use codes in the "Used" status.
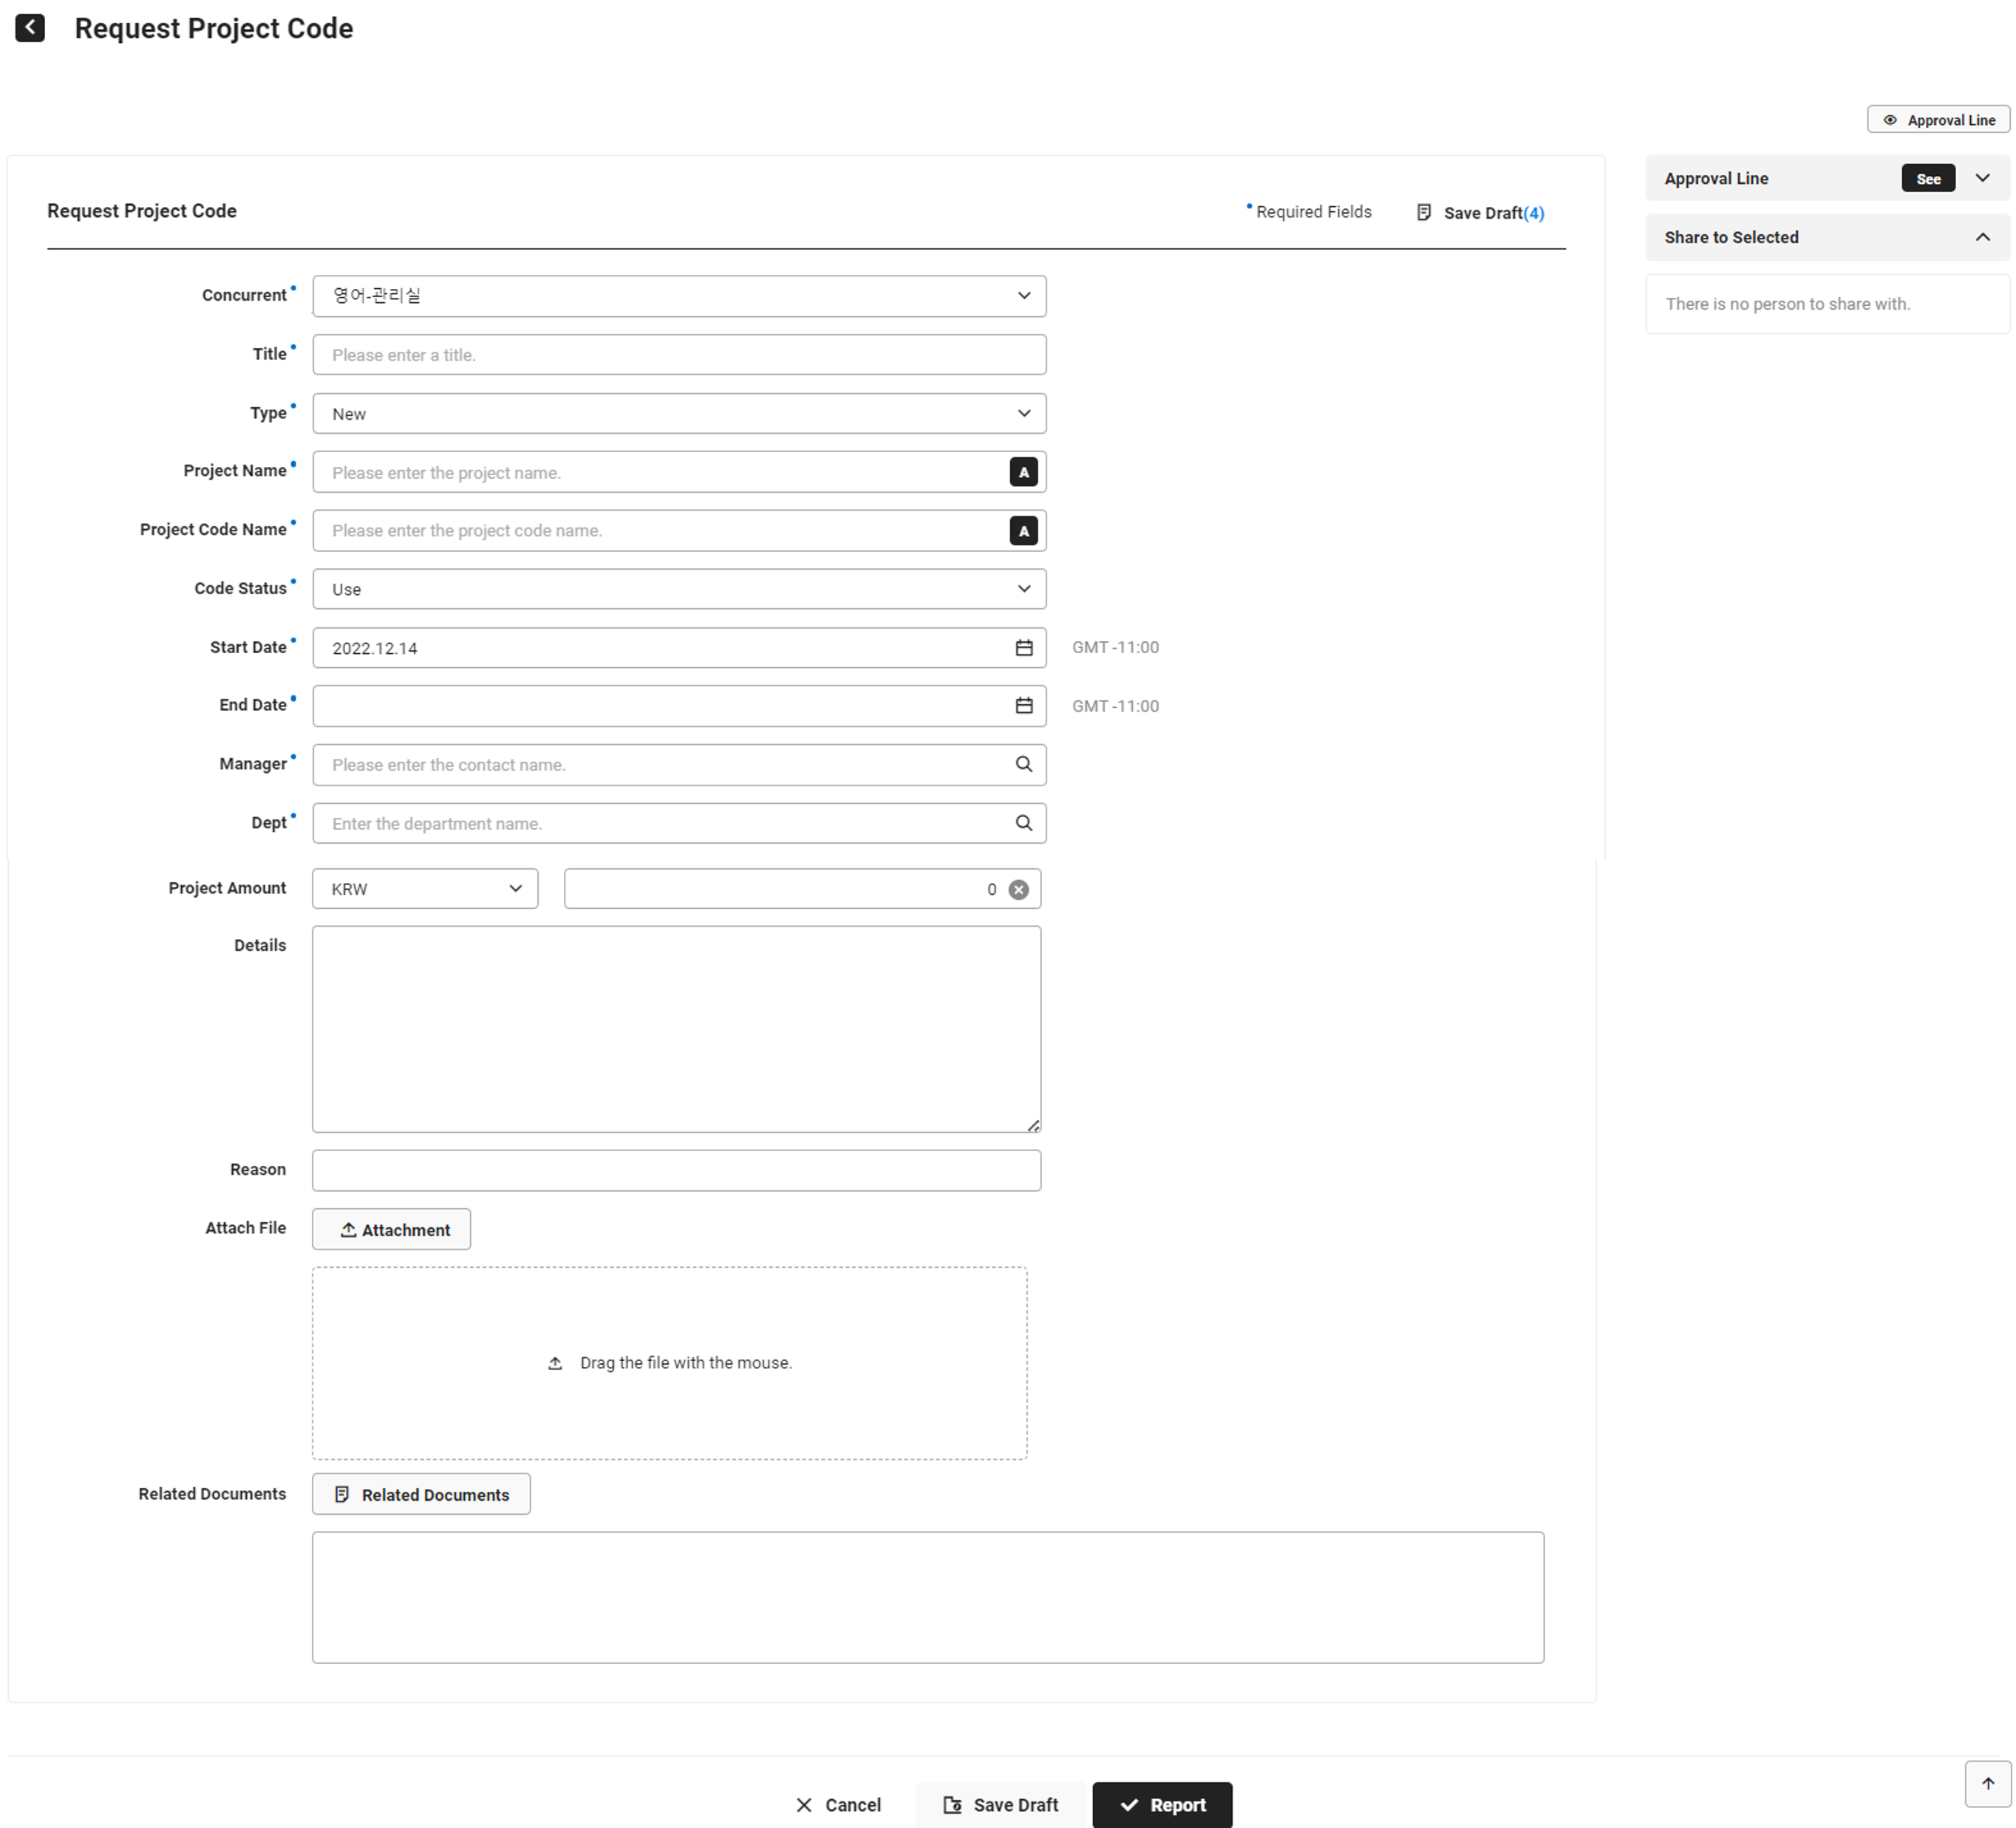
- If you have two or more affiliated departments, then select the department.
- If you belong to only one department, then the concurrent position item will not appear.
- Enter the title.
- Select the request type, and enter the information.
- New: Request new project codes. (See ‘New Request’)
- Modification: Request modification of existing project code information. (See ‘Request Modification’)
- Deletion: Request deletion of existing project codes. (See Request Deletion)
New Request
You can request new project codes.
- Select New from the type.
- Enter the project name.
- Enter the project code name.
- The code status can be selected between ‘Used’ and ‘Not used’. If ‘Not used’ is selected, then it is only saved and not displayed when entering or viewing project codes.
- For the code status that can be selected by type, see the following ‘Project Code Status Available for Selection by Request Type’ table.
- Enter the start and end dates for the project.
- Search and select the manager. When selecting the person in charge, their department is displayed automatically.
- The currency of the project amount can be entered by selecting one of the currencies managed in the Manage Basic Code menu.
- Enter the details.
- To attach files, click ‘Attach File’ or drag and drop the files into the ‘Drag the file with the mouse.’ area.
Request Modification
You can request modification of the existing project code information.
- Select ‘Modification’ from the type.
- Click ‘View Project Code’ to search for the code you want to edit and select it.
- The selected project code information is displayed automatically.
- Edit the information by referring to the items available for modification by the status of the code you want to edit.
Item ‘Not used’ Code ‘Used’ Code ‘Closed’ Code ‘Deleted’ Code Project Name O O O X Project Code Name O O O X Code Status
Can be selected between ‘Used’ and ‘Closed’ (See the ‘Project Code Status Available for Selection by Request Type table’.)
(If you want to edit it to ‘Not used’, Request Deletion of the code.)O O O X Project Start Date O O O X Project End Date O O O X Manager
(The department is displayed automatically when modifying the person in charge.)O O O X Currency Code O X X X Project Amount O X X X Project Details O O O X Reason O O O X Attachment O O O X
Request Deletion
You can request deletion of project codes in the Not used status.
- Select ‘Deletion’ from the type.
- Click ‘View Project Code’ to search for the code you want to edit and select it.
- The selected project code information is displayed automatically.
- Check the information of the project code you want to delete.
- When requesting deletion, select the code status as ‘Deleted’.
- Once it‘s approved, the project code is permanently deleted and can‘t be restored.
Project Code Status Available for Selection by Request Type
The project code status are categorized into Not used, Used, Closed, and Deleted. (See Manage Project Code)
See the following table for the code status available for selection by request type.
| Type | Not used | Used | Closed | Deleted |
|---|---|---|---|---|
| New Request | O | O | X | X |
| Request Modification | X | O | O | X |
| Request Deletion | X | X | X | O |
Create Vendor Request Form
It is a form provided when vendor requests are set to be integrated with Approval. (See ‘Business Support Settings > Common Codes > Manage Common Code’)
You can request new vendors, or request modification or deletion of the existing vendor information. Once the document approval is completed, it is reflected on the vendor list, and you can use vendors in the "Used" status.
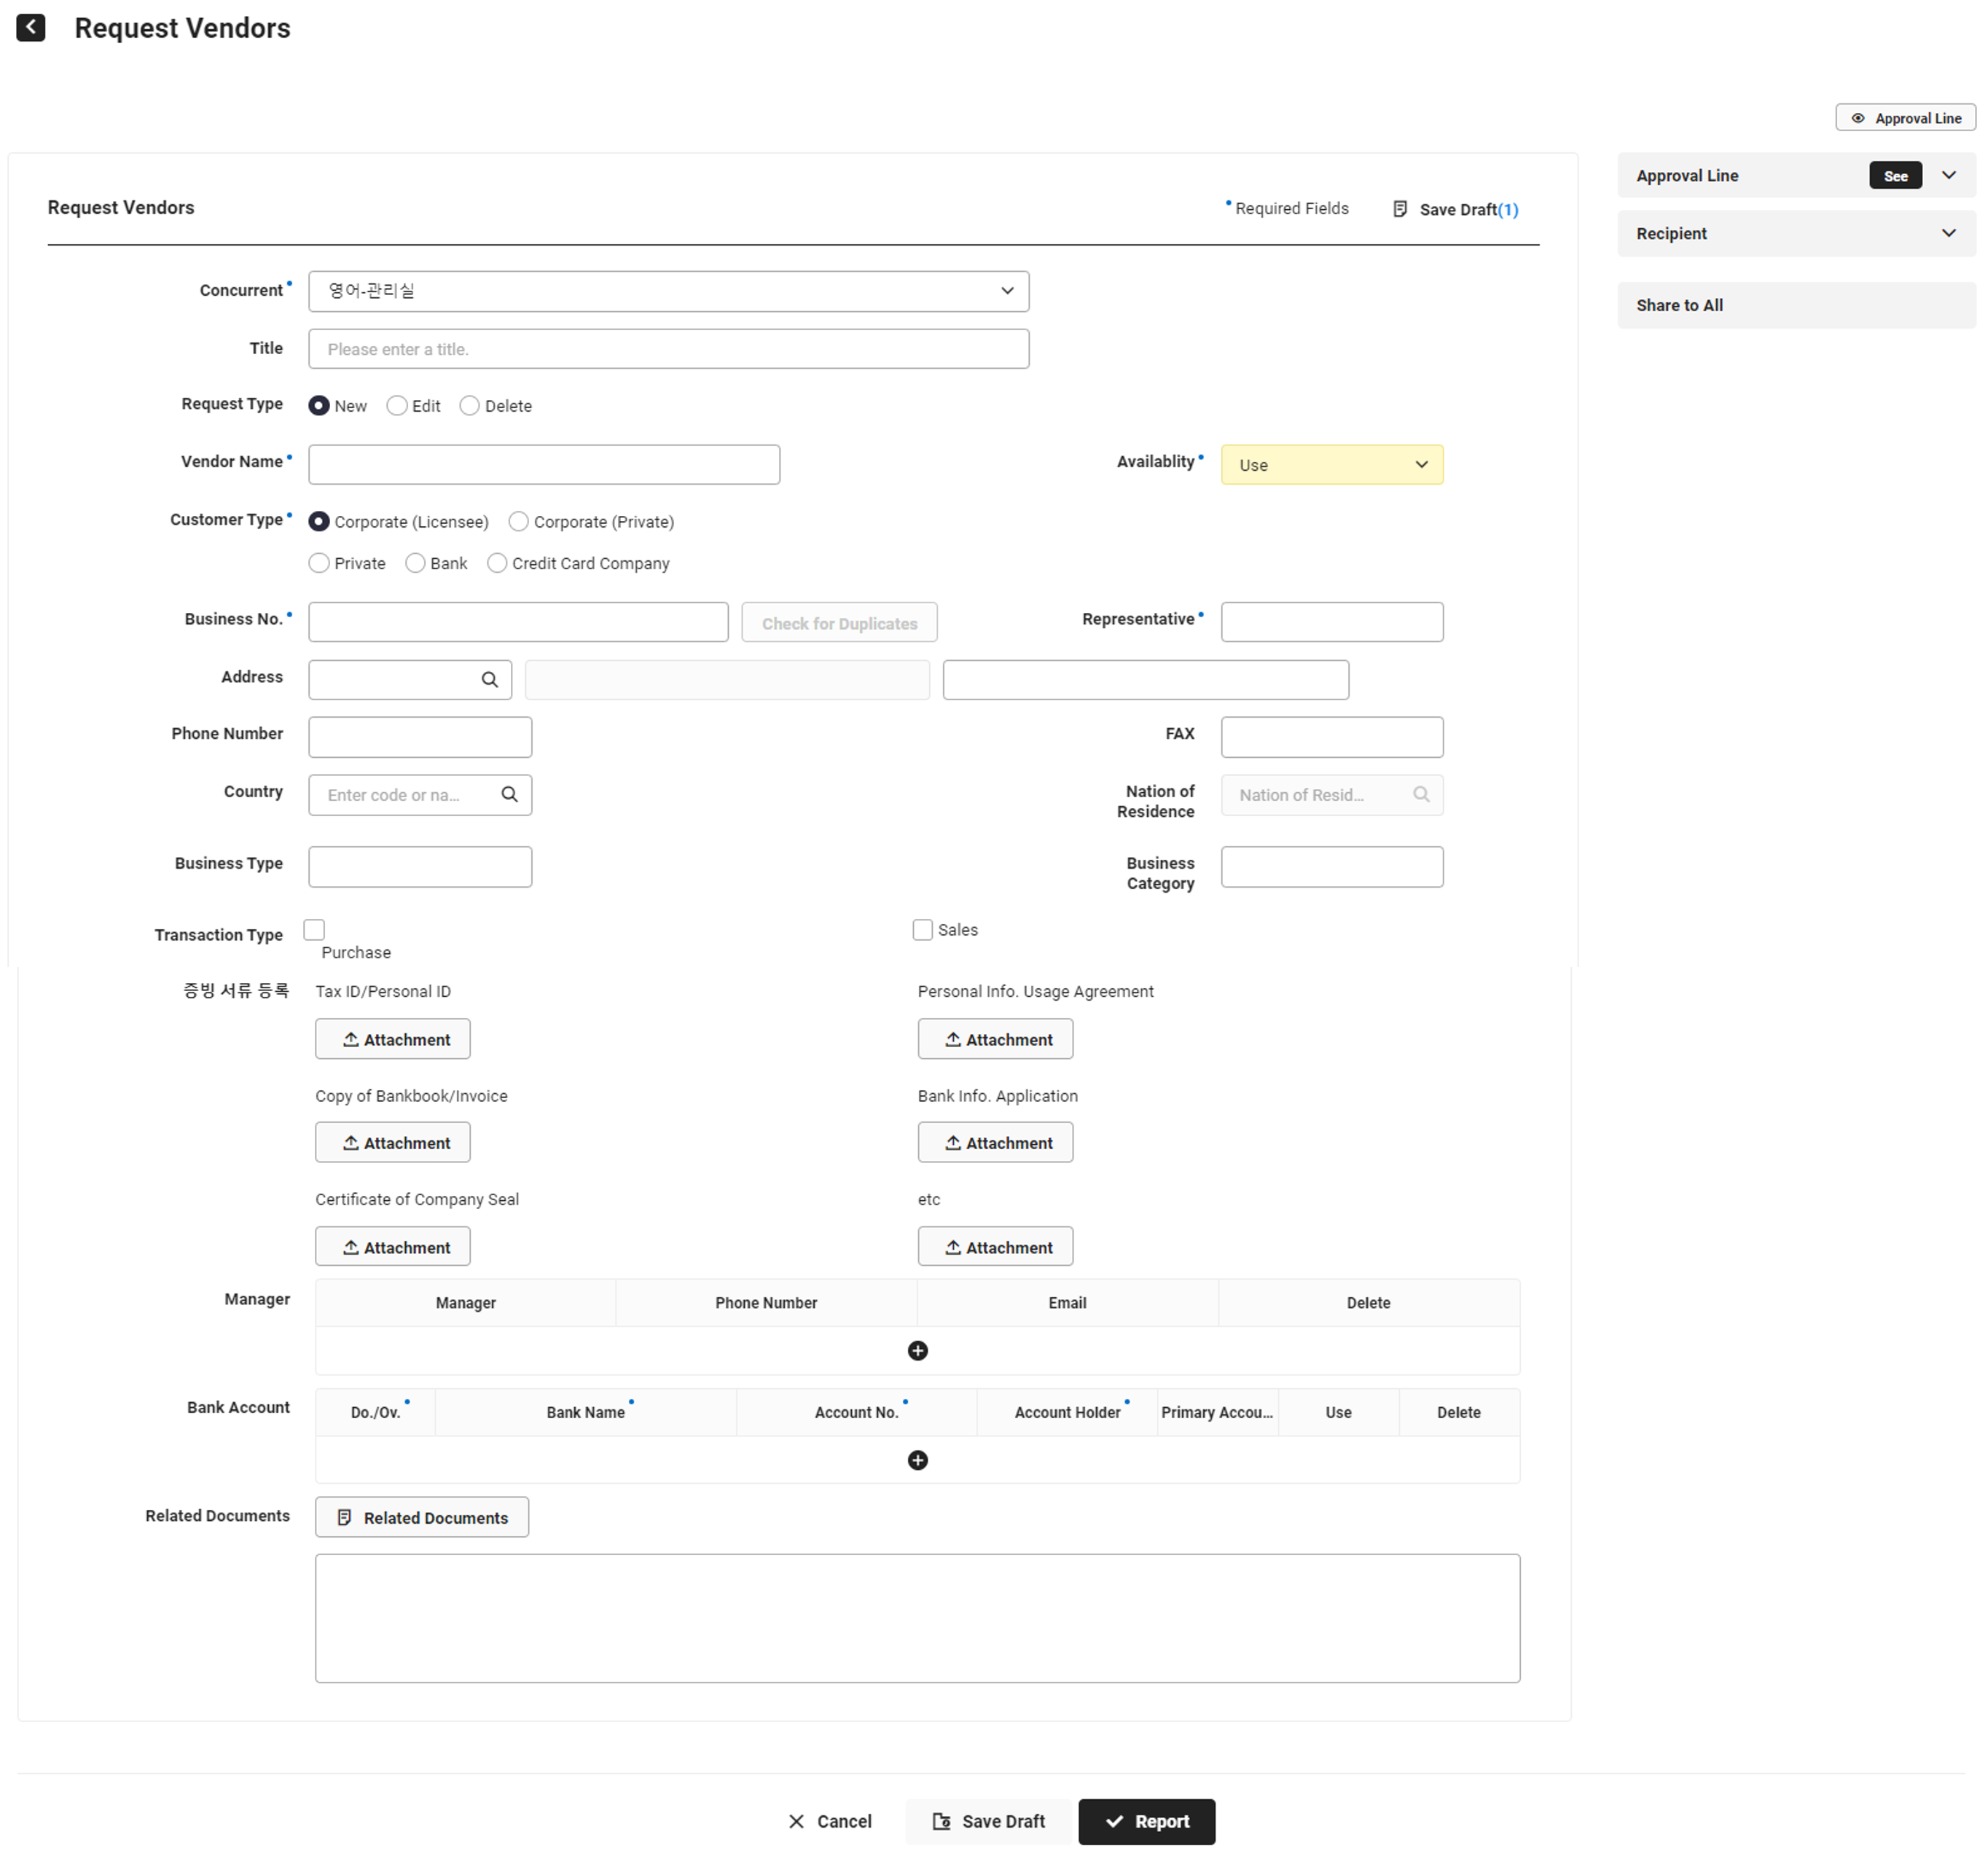
- If you have two or more affiliated departments, then select the department.
- If you belong to only one department, then the concurrent position item will not appear.
- Enter the title.
- Select the request type, and enter the information.
- New: Request new vendors. (See ‘New Request’)
- Modification: Request modification of existing vendor information. (See ‘Request Modification’)
- Deletion: Request deletion of existing vendors. (See ‘Request Deletion’)
New Request
You can request new vendors.
- Select ‘New’ from the request type.
- Enter the vendor name.
- Select the usage status. You can select between ‘Used’ and ‘Not used’. If ‘Not used’ is selected, then it is only saved and not displayed when entering or viewing vendors.
- Select the vendor type.
- Enter the vendor information.
- Enter the business registration number, and then click the ‘Check for Duplicates’ button to check if it is duplicated. If it's identified to be a duplicated, then a notification for creation of modification request is displayed. If you agree, then the request type is switched into ‘Modification’. (See ‘Request Modification’)
- Click the ‘Attach File’ button and attach evidence documents.
- Enter the information of the manager.
- Enter the account information.
- If you have any related documents, attach them.
Request Modification
You can request modification of the existing vendor information.
- Select ‘Modification’ from the type.
- Search for the vendor you want to edit from Vendor Name and select it.
- The selected vendor information is displayed automatically.
- Edit items available for modification.
- You can't edit the usage status, vendor type, representative, or business registration number.
- Enter the reason for modification.
Request Deletion
You can delete vendors with no usage history.
- Select ‘Deletion’ from the request type.
- Search for the vendor you want to delete from Vendor Name and select it.
- The selected vendor information is displayed automatically.
- Check the information of the vendor you want to delete.
- Once it's approved, the vendor is permanently deleted and can't be restored.
- You can't delete vendors that have usage history in related services.
- If you have any related documents, attach them.
Create Official Document Sending Request Form
When the company has set Official Document Receipt and Sending to ‘Use’, you can request sending of official documents. The official document sending request forms can be created in advance by the official document admin. (See Manage Approval > Official Document > Manage Official Document)
Users can request to send official documents by filling out the official document sending request form in the ‘In use’ status. The official document sending requestor or approver can view and print the official document requested to be sent from Approval Home > Official Document Box after the document approval is completed.
The following are the required fields when requesting to send an official document.
- Concurrent position, official document name, official document title, official document content
- If there are two or more affiliated departments, then select the concurrent departments.
- If you belong to only one department, then the concurrent position item will not appear.
- Enter the official document sending title.
- If you don't enter a title, it will be automatically displayed in the form of ‘Template name_official document title.’
- Select the name of the official document to send.
- You can only select official documents set to ‘Use’ by the admin.
- Official letter items are displayed if they're set to be displayed by the admin. Enter the content if needed.
Official Letter Item Description Sender/Sender Address/Phone Number If the admin has selected a company name or business place as the sender, that information is automatically displayed in the Sender/Sender Address/Phone Number fields - If there are multiple business places, then selecting from the list of business places displays the information for that business place
- If the relevant company or business place information is not entered in the ‘Business Support Settings > Company Information > Manage Company Information and Manage Business Place’ menus, then the information may not be displayed. Request after entering relevant information
- If the admin has set Sender to ‘Enter Manually’, you can enter the sender information yourself.
Manager The creator name is automatically displayed and can be edited Implementation Date The creation date of the sending request form is displayed automatically and can be edited Recipient/Receipt Details You can enter the recipient information Reference/Reference Details You can enter the reference information - Enter an official document title. If there are official document titles set by the admin, then they are automatically displayed. If it is set to be not editable by users, the requestor can't edit the title.
- Enter the official document content. If the admin has set a text format, fill it out according to the format.
- Click ‘Preview Official Document’ to preview the entered content. You can only view it in the style of the official document set by the admin.
- Attach the evidence data if needed.
- If you have any related documents, attach them.
Create Official Document Receipt Request Form
It is a form provided by default when using official document receipt and sending. Users fill out the official document receipt request form to save the received official document in the official document box through approval. The official document receipt requestor or approver can view and print the official document requested to be received from Approval Home > Official Document Box after the document approval is completed.
- If there are two or more affiliated departments, then select the concurrent departments.
- If you belong to only one department, then the concurrent position item will not appear.
- Enter the official document receipt request title.
- Enter the name of the official document to receive.
- Enter the official letter items.
- Storing Department: If necessary, you can select the storage department for the received official document.
- Official Document Number: If necessary, you can enter the official document number.
- Implementation Date: If necessary, it will automatically be marked as the creation date of the official document receipt request form, and it can be edited.
- If necessary, you can enter the sender and sender details.
- Enter an official document title.
- Enter the remarks if needed.
- Attach the evidence data if needed.
- Select the related document if necessary.
Create Part-time Employee Form
If the company has set to use part-time employees, then leave request, work result request, and work plan request forms are provided to part-time employees.
Since they are forms for part-time employees, the form names are displayed with ‘(Part-timer)’.
Create Leave Request (Part-timer) Form
- The part-time employees can only request leaves if they have leaves given according to the Attendance admin's Set Leave Standard for Part-timers. If you aren‘t given any leaves, then contact the Attendance admin and your workplace manager.
- For the leave request of part-time employees, the workplace manager is set as the default approver. More approvers may be added, depending on the Approval admin's settings. (See Manage Approval Line)
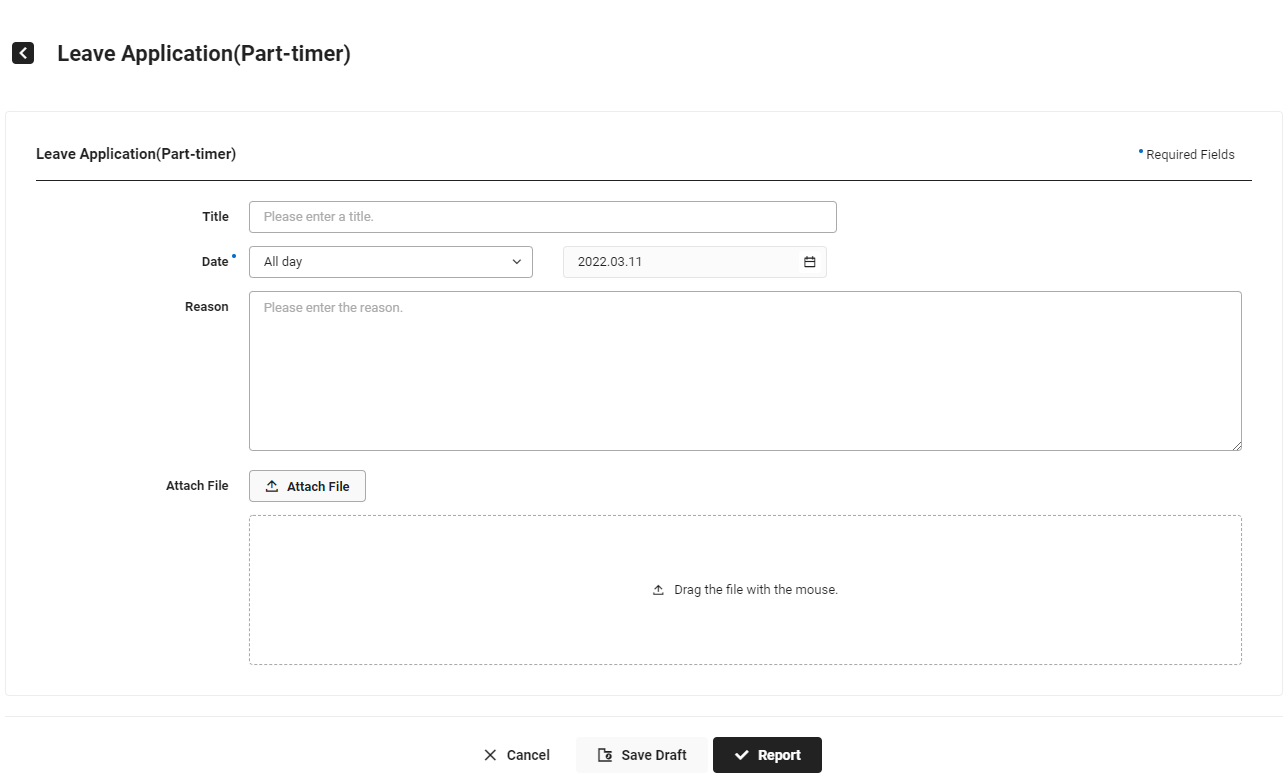
- Enter the title.
- Select the unit and date of leave you want to request.
- The unit of leaves can be selected according to Attendance admin’s settings in Leave Standard for Part-timers.
- All day unit: You can only request all-day leaves.
- Half day unit: You can request by selecting from All day/Morning/Afternoon.
- 2 hour unit: You can request leaves by units of 2 hours.
- 1 hour unit: You can request leaves by units of 1 hour.
- 30 minute unit: You can request leaves in units of 30 minutes.
- Enter the reason for request.
- To attach a file, click the ‘Attach File’ button and select the file to attach, or drag and drop the file to attach into the box.
Create Work Result Request (Part-timer) Form
- The Work Result Request form can be created only if the company is using the Attendance service.
- If the company has set to use work plans, then the work result requests can be made only when the work plan has been requested.
- If an overtime work result request needs be made without a work plan request, then the Attendance admin may create a work result request form on your behalf. Contact the Attendance admin. (See Work Result Request Status)

- Enter the title.
- Enter the base date for which you want to request work result.
- You can‘t enter dates later than the date when the document is being created.
- If a document from the same date, which has been requested using the work result request form, is in progress, then additional requests for that date can't be made.
- When you enter the base date, the following information is displayed in Reference Information.
- If the company is using work plans, then the document number of the work plan request with approval closed on the base date is displayed. Clicking the document number displays the work plan request form.
- If there are clock-in/out records on the base date, then the Clock-in/out Record item is displayed.
- If the base date includes an absence schedule added to work hours requested by the user, then the Absence item is displayed.
- If the base date is a holiday according to the work arrangement of the user, then the Compensation Holiday item is displayed.
- The Work Hour area is displayed for employees whose work arrangement is Select a Set Time to Clock-in/out upon selecting a base date.
- If the admin has set it to ‘Allow selection of general work hours regardless of the clock-in time,’ you can select and request from displayed work hours, regardless of the selected work hours when clocking in/out. If it is set to ‘Do not allow selection of general work hours regardless of the clock-in time,’ then hours earlier than the clock-in time are displayed as inactive. When clocking in later than all hours, it is fixed to the latest hours.
- When using the ‘Report Approval of Work Schedule’ method, the Work Schedule of the day is automatically displayed and other hours can't be selected.
- However, you can freely select work hours for a date for which the work schedule is not registered.
- The remaining workdays and base work hours during the calculation period are displayed under Daily Average Remaining Time.
- For employees whose work arrangement is ‘Clock-in/out at a Fixed Time’, one week is considered as the calculation period. The standard work hour for a week compared to the sum of the general, overtime, night, holiday general, holiday overtime, and holiday night up to the current point of the week is displayed under Accumulated Time During Specified Period.
- For employees whose work arrangement is Flexible Clock-in/out, it is based on the Calculation Period determined from Set Work Arrangement. The base work hour for the calculation period compared to the accumulated work hours up to the current point is displayed under Accumulated Time During Specified Period.
- The displayed daily average remaining time and accumulated time during specified period include work hours that are currently being created.
- When you request a work result for holiday work, a compensating holiday is automatically created and the number of days accrued and expiration date are displayed. The compensation holiday settings of the Attendance admin determine the number of compensation holidays accrued and their expiration date. (See Manage Absence Item)
- Enter the clock-in and clock-out date and time.
- Work location items are displayed when the company has set to use the work location. Select a work location of the base date from among work locations set by the company admin.
- Enter the reason for request.
- To attach a file, click ‘Attach File’ and select the file to attach, or drag and drop the file to attach into the box.
Once work result request form is saved, it is considered approved, even before the actual approval. Then, the requested hours are reflected in ‘My Work > Manage Attendance > Work Hour Status’. When the approval is rejected, changes to the clock-in/out times, leaves, or outside work hours from that date, as well as overtime hours outside of normal work hours, are not recognized and changed back.
Work Plan Request (Part-timer)
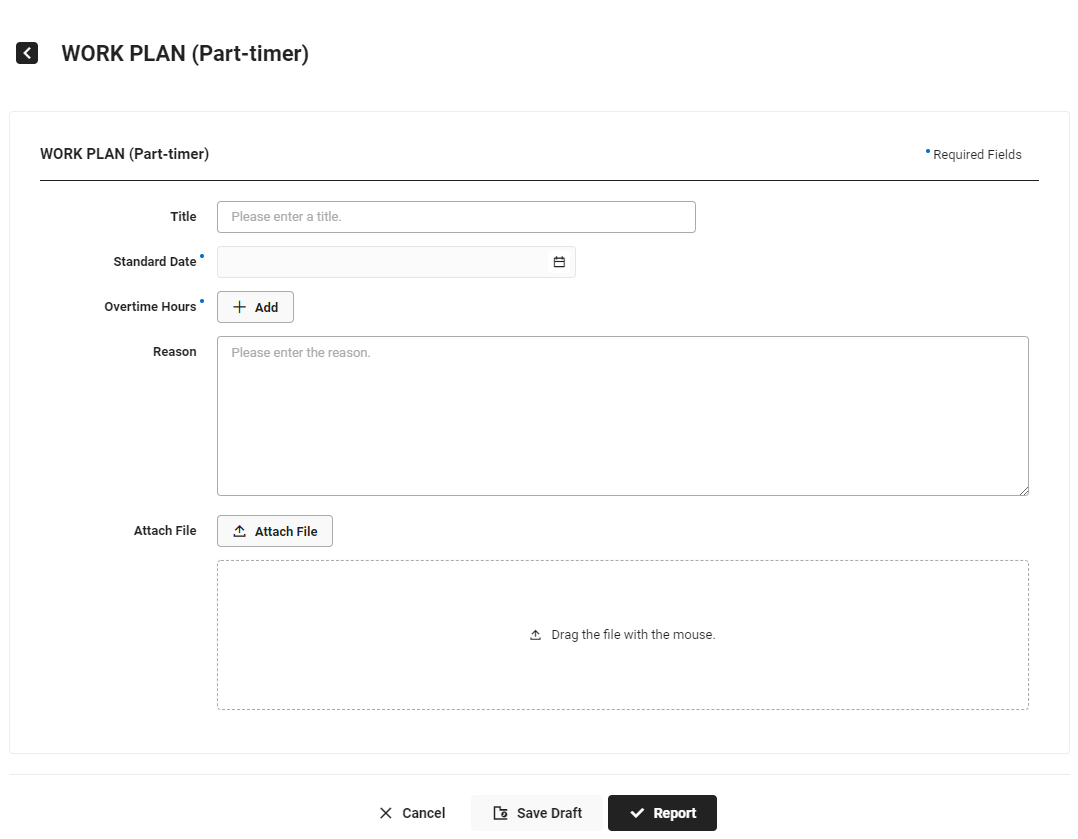
- Enter the title.
- Enter the base date for which you want to request work plan.
- You can only enter the date the document is being created on or later dates.
- Click ‘Add’, and enter the date and time for overtime work request.
- You can select a date among the day before the base date, base date, and the day after the base date.
- To enter multiple dates, click ‘Add’ again.
- Enter the reason for request.
- To attach a file, click ‘Attach File’ and select the file to attach, or drag and drop the file to attach into the box.
Create by Copying Document
You can copy completed (including declined or canceled) documents to quickly create documents.
The following describes how to create a document by copying.
- Click the icon at the top right of the PC web screen, and then click ‘Approval’ in the pop-up window.
- Click at the top left of the screen.
- Click ‘Approval Document > Completed’ from the menu.
- Click the title of the document you want to copy and create.
- Click ‘Create by Copying’.
- The document edit page is displayed with major items of the selected document filled with the existing content.
- Make the necessary changes, and then click ‘Save’.
- The document is saved, and the approval request is sent.
The following are the items loaded with the existing content by form when creating by copying.
| Form Name | Maintained Items When Copying and Creating |
|---|---|
| Absence Schedule | Title, Reason, Absence Status Sharing, Attach File, Related Document (However, items other than Title are not maintained when the form resets due to changes in other items.) |
| Absence Schedule Cancellation | Title, Reason, Attach File |
| Work Result Request | Title, Reason, Attach File, Clock-in, Clock-out, Breaks, Outside Work (However, the Clock-in, Clock-out, Breaks, and Outside Work items are not maintained when the form resets due to changes in other items.) |
| Work Result Cancellation | Title, Reason, Attach File |
| Work Plan Request | Title, Reason, Attach File |
| Certificate Request | Title, Certificate Item, items entered by requestor (set by admin), Purpose of Issuance |
| General Document | Title, Attach File, Related Document |
| Expense Plan Request (limited to documents yet to be settled) | Title, Estimated Schedule, Amount, Details, Reason, Related Document |
| Expense Settlement Request | Additional Direct Settlement for Linked Settlement: Evidence Type, Settlement Amount, Usage Date, Place of Use Manual Settlement: Expense Item, Outsider, Details, Reason, Related Document |
| Expenditure Resolution Report | Title, Budget, Expense Item, Evidence Type, Vendor, Account, Date of Evidence, Amount, Details, Related Document |
| Payroll Certificate Request | Receipt for Wage and Salary Income Tax Withholding: Title, Certificate Item, Number of Copies, Imputed Year, personal information, Language, Purpose of Issuance Certificate of Income Tax Withheld: Title, Certificate Item, Number of Copies, Payroll Month, Purpose of Use, Place of Submission, Creation Date, personal information, Language, Purpose of Issuance Book of Wage and Salary Income Withheld: Title, Certificate Item, Number of Copies, Payroll Month, Purpose of Issuance |
| Project Code Request | All items |
| Vendor Request | All items |
Cancel Document
To cancel a document you created, see how to cancel a document in different approval situations.
- Before the first approver of the approval line approves on the document: Open the document and click ‘Retrieve’ to cancel the document.
- If any approver has proceeded with approval, including ‘Automatic Consent,’ then ‘Retrieve’ will not appear.
- A document without an approver is instantly closed, so ‘Retrieve’ will not be shown.
- In the case of a document reported from an external solution, ‘Retrieve’ is not shown and ‘Delete’ is displayed. Click to delete the document. (For more information on creating with the NAVER WORKS Approval form from an external solution, see Create External Approval Document.)
- If you recall a document, then it will be saved as draft and switched to the edit mode along with its content. You can edit the content and create by copying.
- While approval is in progress: Check the approver who approved in the document details page or ‘Approval Document > Ongoing’. Request approval cancellation to that approver.
- When approval has been completed: If you can't find the document in the ‘Ongoing’ document box, then this means that the document has been completed. Proceed as instructed as follows.
- For the Absence Schedule document, ‘Compose Document > Absence Schedule Cancellation’ form needs to be created to proceed with cancellation.
- For the Work Result Request document, ‘Compose Document > Cancel Work Result Request’ form needs to be created to proceed with cancellation.
- For other forms, cancellation request is not available. In this case, contact the Approval admin to ask for the document to be hidden or deleted.
If you can't manually create the Absence Schedule Cancellation or Cancel Work Result Request form, then ask the admin to cancel the document. (See Absence Schedule Document Cancellation by Admin, Cancel Work Result Document)