You can reserve available resources or check My Reservation status.
Space
In the ‘Space > Meeting Room’ menu, you can reserve meeting rooms and view reservation details. This menu is displayed if there are meeting rooms you have permissions for.
The meeting room reservation page is laid out as follows.
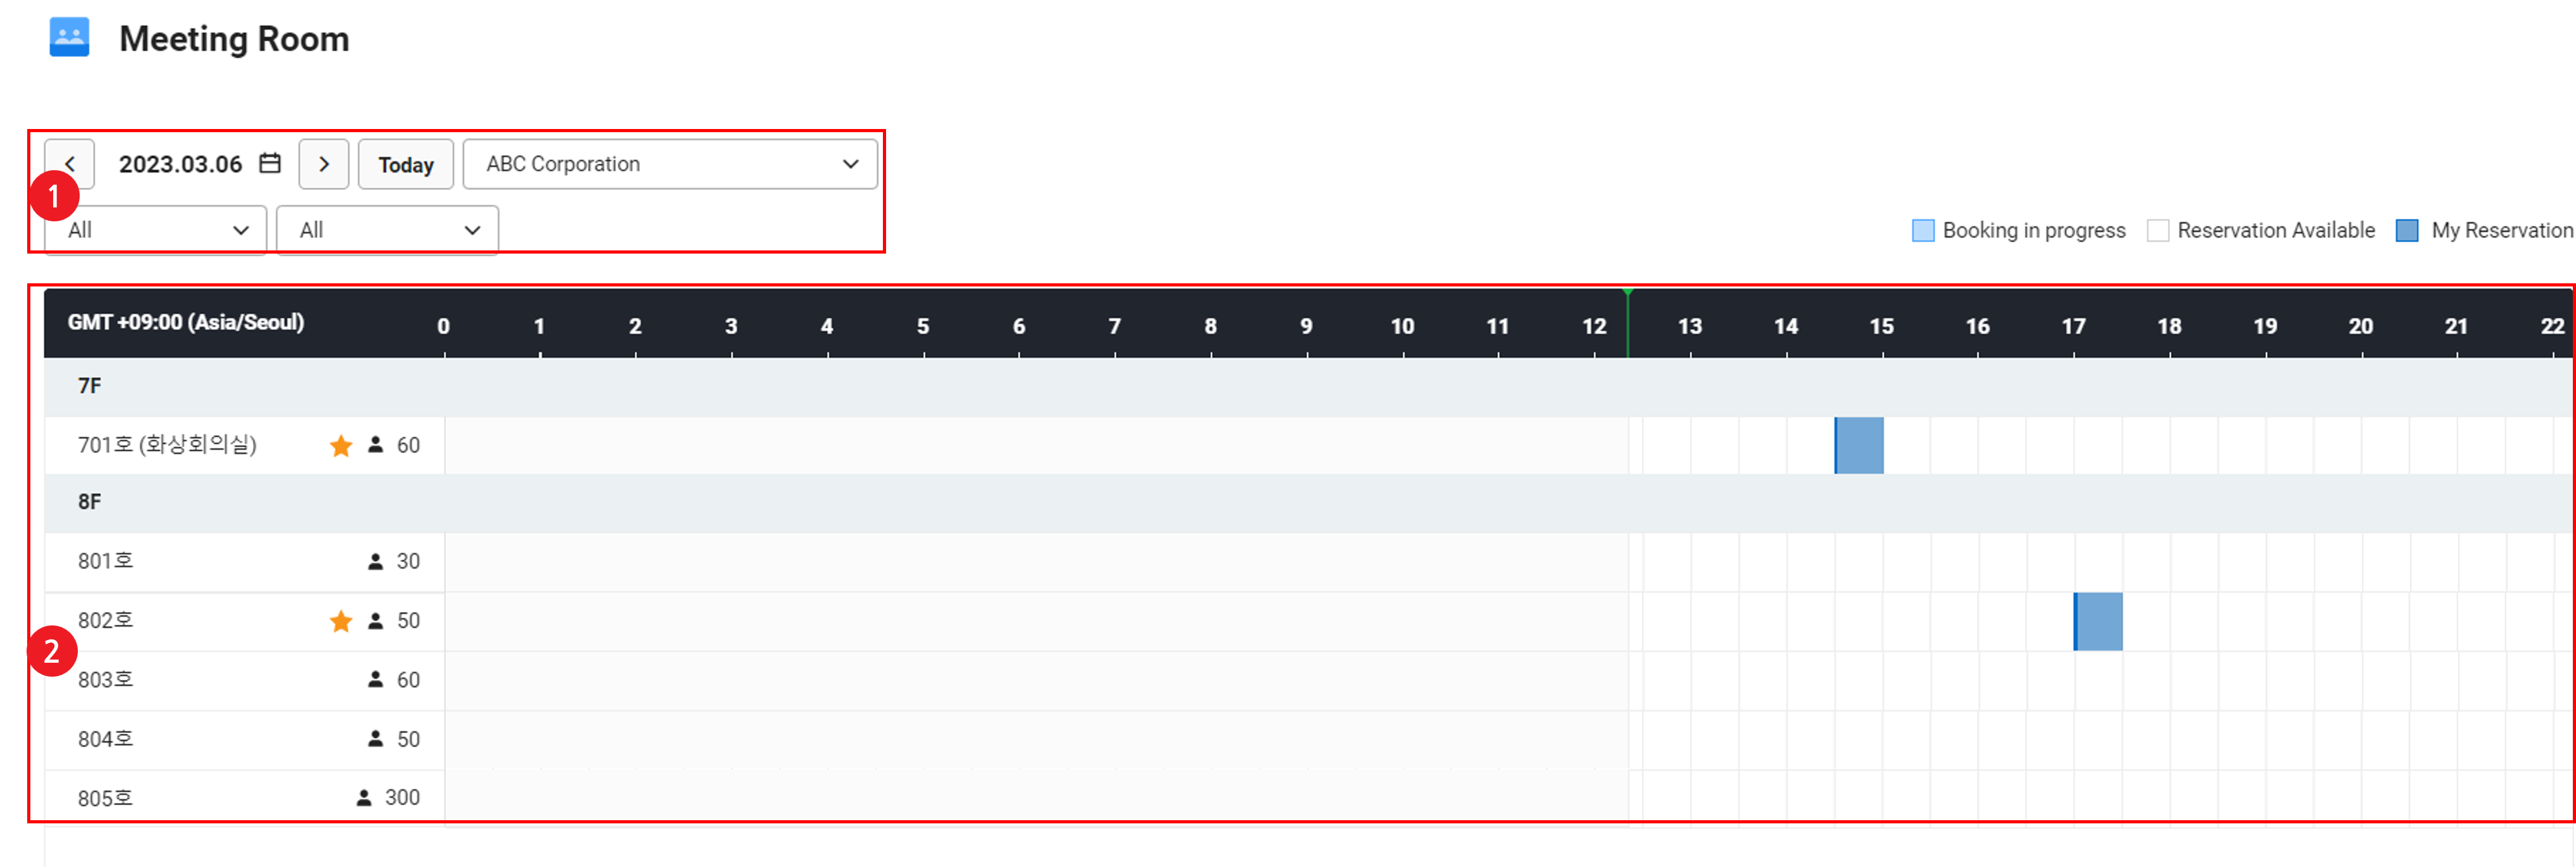
| Area | Description |
|---|---|
| ① Search area | Search based on date, office, location, and capacity conditions |
| ② Meeting room reservation status | It displays the list of meeting rooms each user has permissions for
|
Reserve Meeting Room
The following describes how to reserve a meeting room.
- Click the
 icon at the top of your PC web screen, and then click ‘Reservation’ in the pop-up.
 - Click
 at the top left of the screen, and then click ‘Space > Meeting Room’ from the menu.
 - Select the date you want to reserve.
- Today's date is displayed by default.
- Click
 to select the date to reserve or click the left or right arrow to select a desired date.
 - You can select from today up to the maximum number of dates available for reservation set by the admin.
- You can't select the date the admin restricted the use of the resource.
- Search by selecting the office, location, and capacity.
- You can select a location only if the location is registered by the admin.
- Among meeting rooms that meet the conditions, only rooms you have permissions for are searched.
- From the timetable for the meeting room you want to reserve, click the time you want to reserve from the available times.
- You can't reserve a time slot that is ‘Reserved’ or ‘My Reservation’. You can check the reservation information by hovering the cursor over the time slot.
- You can't reserve a time that is before the current time.
- You can't reserve times before the opening hour for same-day new reservations set by the admin or times after 23:59.
- In case of general reservations, for resources to which reservation limits are set, you can't reserve once the reservation limit set by the admin are exceeded.
- Enter the reservation information in the meeting room reservation pop-up window.
- For general reservations, enter the information in the ‘General Reservation’ tab. (See ‘Meeting Room General Reservation’)
- For multi-reservations such as long-term reservations and repeated weekly reservations, enter the information in the ‘Multi-reservation’ tab. (See ‘Meeting Room Multi-reservation’)
Meeting Room General Reservation
The following describes how to make general reservations for meeting rooms.
- Click the ‘General Reservation’ tab in the meeting room reservation pop-up window.
- Enter the reservation content.
- Select the reservation date and time.
- Date:
- You can't select a date earlier than today.
- You can't select a date after the maximum date available for reservation set by the admin.
- You can't select the date the admin restricted the use of the resource.
- Time:
- You can't reserve times before the current time or before the opening hour for same-day reservations set by the admin.
- You can reserve up to 23:59 on the same day.
- You can't reserve times shorter than the minimum reservation time or longer than the maximum reservation time set by the admin.
- You can reserve in increments of time based on the reservation base time set by the admin.
- E.g., If the reservation base time is set to 20 minutes, you can reserve in increments of 20 minutes, such as 20 minutes, 40 minutes, 60 minutes, or 80 minutes. At this time, if the minimum reservation time is set to 30 minutes, then you can't reserve for 20 minutes and can only reserve for 40 minutes or longer.
- You can't select times that have already been reserved.
- Date:
- Check the meeting room displayed in the Meeting Room field. To change to another meeting room, click ‘Change Meeting Room’ to change it.
- The following describes how to change the meeting room.
- In the Change Meeting Room pop-up window, select the meeting room you want to change to in the available meeting room area.
- You can only change to a meeting room registered in the same office.
- If no meeting rooms are available, change the reservation time and search again.
- Click 'Change' to change the meeting room.
- The following describes how to change the meeting room.
- Add attendees.
- You can search by employee/department name to add them.
- When using as a corporate group, you can add corporate group employees as attendees.
- The meeting room reservation notification email is sent to added attendees. Attendee can set Reservation notifications in the Set Notifications to get notifications.
- Enter the reservation note.
- If there's a note set by the Resource admin, enter by referring to the content.
- Select whether to register it on the calendar.
- If you select ‘Register’, then calendars available for selection are displayed.
- By default, it is registered in the default calendars of attendees and the booker.
- If the booker wants to register it to their personal calendar in Google Calendar, they can click ‘Authenticate Additional Calendar’ to authenticate login and select it.
- If you select ‘Register’, then calendars available for selection are displayed.
- Click ‘Reserve’.
- General reservation of the meeting room is completed. The meeting room reservation notification email is sent to the booker.
Meeting Room Multi-reservation
You can reserve a meeting room for multiple time slots at once, or for multiple dates.
Multi-reservations of meeting rooms are only available for meeting rooms that are set to allow multi-reservations.
The following describes how to make multi-reservations for meeting rooms.
- Click the ‘Multi-reservation’ tab in the meeting room reservation pop-up window.
- Enter the reservation content.
- Select the reservation time.
- Select ‘All day’ for all-day reservations.
- For unavailable times, see Step 3 of Meeting Room General Reservation.
- Select the reservation settings.
- Week: Make a recurring reservation on the same day of the week.
- Custom: Manually select and reserve dates, and both consecutive and non-consecutive dates can be reserved.
- Long-term reservation: Long-term reservations (dates from today up to the maximum date available for reservation set by the admin can be reserved). Only ‘All day’ reservations are available.
- Select the multi-reservation period.
- This field is applicable for weekly or long-term reservations.
- A one-month period from tomorrow's date is set by default, and you can set the desired period.
- For the reservation start date, you can't select today or a date earlier than today.
- For the reservation end date, you can't select a date after the maximum date available for reservation set by the admin.
- If you've selected Week in the reservation settings, select the repeating week unit and repeated days of the week. (E.g., Tuesdays and Wednesdays every week)
- Skip this step if you've selected Custom or Long-term reservations.
- The reserved meeting rooms are displayed in the Meeting Room field. Check the availability of the meeting room.
- Available for reservation: Available dates and days of the week are displayed. You can click the ‘X’ icon to delete dates you don't want.
- Unavailable for reservation: Dates and days of the week that are unavailable during the set reservation period are displayed.
- You can click ‘Change Meeting Room’ to change the meeting room. For information on changing meeting rooms, see the description on changing meeting rooms in Meeting Room General Reservation.
- If the settings have been changed during reservation, ‘Confirm Date’ is displayed. Click the button to confirm the reservation availability again.
- Add attendees.
- You can search by employee name to add them.
- When using as a corporate group, you can add corporate group employees as attendees.
- The meeting room reservation notification email is sent to added attendees. Attendee can set Reservation notifications in the ‘Set Notifications’ to get notifications.
- You can search by employee name to add them.
- Enter the reservation note.
- If there's a note set by the Resource admin, enter by referring to the content.
- Click ‘Reserve’.
- Multi-reservations of the meeting room are completed. The meeting room reservation notification email is sent to the booker.
- Multi-reservations are not registered in WORKS Calendar and external calendars.
View Meeting Room Reservation Details
You can view your meeting room reservation details, and edit or cancel reservations that haven't ended.
The following describes how to view the reservation information.
- Click the icon at the top of your PC web screen, and then click ‘Reservation’ in the pop-up.
- Click at the top left of the screen, and then click ‘Space > Meeting Room’ from the menu.
- If necessary, enter the date, office, location, or meeting room name in the search area to search.
- Click your reservation you want to view.
- The reservation details are searched in the meeting room reservation information pop-up window.
- If you need to edit or cancel the reservation, click ‘Edit Reservation’ or ‘Cancel Reservation’.
- For meeting rooms with multi-reservations, ‘Cancel All’ is displayed. If you click ‘Cancel All’, the multi-reservations are canceled entirely, and if you click ‘Cancel Reservation’, only the reservation on that date is canceled.
Work Device
In the Work Device menu, you can reserve laptops, digital devices, and other devices, and view their reservation details. This menu is displayed if there are work devices you have permissions for.
The work device reservation page is laid out as follows.
| Area | Description |
|---|---|
| ① Search area | Search based on date and office conditions |
| ② Work device list and reservation status | It displays the list of work devices each user has permissions for
|
Reserve Work Device
The following describes how to reserve a work device.
- Click the icon at the top of your PC web screen, and then click ‘Reservation’ in the pop-up.
- Click at the top left of the screen, and then click ‘Work Device > Laptop’ or ‘Digital Device’ from the menu.
- Select the date you want to reserve.
- Today's date is displayed by default.
- Click to select the date to reserve or click the left or right arrow to select a desired date.
- You can select from today up to the maximum number of dates available for reservation set by the admin.
- You can't select the date the admin restricted the use of the resource.
- Select an office.
- Among work devices that meet the conditions, only devices you have permissions for are searched.
- From the timetable for the work device you want to reserve, click the time you want to reserve from the available times.
- You can't reserve a time slot that is ‘Reserved’ or ‘My Reservation’. You can check the reservation information by hovering the cursor over the time slot.
- You can't reserve a time that is before the current time. If you place the cursor over an unavailable time slot, the unavailable times are displayed.
- You can't reserve times before the opening hour for same-day new reservations set by the admin or times after 23:59.
- In case of general reservations, for resources to which reservation limits are set, you can't reserve once the reservation limit set by the admin are exceeded.
- You can't reserve a time slot that is ‘Reserved’ or ‘My Reservation’. You can check the reservation information by hovering the cursor over the time slot.
- Enter the reservation information in the work device reservation pop-up window.
- For general reservations, enter the information in the ‘General Reservation’ tab. (See ‘Work Device General Reservation’)
- For multi-reservations such as long-term reservations and repeated weekly reservations, enter the information in the ‘Multi-reservation’ tab. (See ‘Work Device Multi-reservation’)
Work Device General Reservation
The following describes how to make general reservations for work devices.
- Click the ‘General Reservation’ tab in the work device reservation pop-up window.
- Enter the reservation content.
- Select the rental date and time.
- Date:
- You can't select a date earlier than today.
- You can't select a date after the maximum date available for reservation set by the admin.
- You can't select the date the admin restricted the use of the resource.
- Time:
- You can't reserve times before the current time or before the opening hour for same-day reservations set by the admin.
- You can reserve up to 23:59 on the same day.
- You can't reserve times shorter than the minimum reservation time or longer than the maximum reservation time set by the admin.
- You can reserve in increments of time based on the reservation base time set by the admin.
- E.g., If the reservation base time is set to 20 minutes, you can reserve in increments of 20 minutes, such as 20 minutes, 40 minutes, 60 minutes, or 80 minutes. At this time, if the minimum reservation time is set to 30 minutes, then you can't reserve for 20 minutes and can only reserve for 40 minutes or longer.
- You can't select times that have already been reserved.
- Date:
- Check the work device displayed in the Digital Device field. To change to another device, click ‘Change Digital Device’ to change it.
- The following describes how to change the work device.
- In the Change Digital Device pop-up window, select the device you want to change to in the available digital device area.
- You can only change to a work device registered in the same office and location with the same type.
- If no devices are available, change the reservation time and search again.
- Click 'Change' to change the digital device.
- The following describes how to change the work device.
- Enter the reservation note.
- If there's a note set by the Resource admin, enter by referring to the content.
- Click 'Reserve' to complete a general reservation of the work device.
- The work device reservation notification email is sent to the booker.
Work Device Multi-reservation
You can reserve a work device for multiple time slots at once, or for multiple dates. Multi-reservations are only available for work devices with multi-reservation enabled.
The following describes how to make multi-reservations for work devices.
- Click the ‘Multi-reservation’ tab in the work device reservation pop-up window.
- Enter the reservation content.
- Select the reservation time.
- Select ‘All day’ for all-day reservations.
- For unavailable times, see Step 3 of Work Device General Reservation.
- Select the reservation settings.
- Week: Make a recurring reservation on the same day of the week.
- Custom: Manually select and reserve dates, and both consecutive and non-consecutive dates can be reserved.
- Long-term reservation: Long-term reservations (dates from today up to the maximum date available for reservation set by the admin can be reserved).
- Set the multi-reservation period.
- This field is applicable for weekly or long-term reservations.
- A one-month period from tomorrow's date is set by default, and you can set the desired period.
- For the reservation start date, you can't select today or a date earlier than today.
- You can't select a date after the maximum date available for reservation set by the admin.
- If you've selected ‘Week’ in the reservation settings, select the repeating week unit and repeated days of the week from the Repeated Days of the Week field. (E.g., Tuesdays and Wednesdays every week)
- Skip this step if you've selected Custom or Long-term reservations.
- The selected work device is displayed in the Digital Device field. Check the availability of the work device.
- Available for reservation: Available dates and days of the week are displayed. You can click the ‘X’ icon to delete dates you don't want.
- Unavailable for reservation: Dates and days of the week that are unavailable during the set reservation period are displayed.
- You can click ‘Change Meeting Room’ to change the work device.
- For information on changing work devices, see the description on changing work devices in Work Device General Reservation.
- If the reservation content (reservation time, reservation settings, multi-reservation period, repeated days of the week) has been changed during reservation, ‘Confirm Date’ is displayed. Click the button to confirm the reservation availability again.
- If there are unavailable dates, ‘Add Digital Device’ is displayed. Click to select a device.
- You can only select a device in the same office and location and with the same type.
- Select a digital device available for rental, and then click ‘Add’.
- Repeat Step 7 to check the reservation availability of the added digital device.
- Enter the reservation note.
- If there's a note set by the Resource admin, enter by referring to the content.
- Click ‘Reserve’.
- Multi-reservation of the work device is completed. The work device reservation notification email is sent to the booker.
Vehicle
In the Work Vehicle menu, you can reserve vehicles and check their reservation status. This menu is displayed if there are vehicles you have permissions for.
The work vehicle reservation page is laid out as follows.
| Area | Description |
|---|---|
| ① Search area | Search based on date and office conditions |
| ② Vehicle list and reservation status | It displays the list of vehicles available for reservation
|
Reserve Work Vehicle
The following describes how to reserve a work vehicle.
- Click the icon at the top of your PC web screen, and then click ‘Reservation’ in the pop-up.
- Click at the top left of the screen, and then click ‘Vehicle > Work Vehicle’ from the menu.
- Select the date you want to reserve.
- Today's date is displayed by default.
- Click the calendar icon to select the date to reserve, or click the left or right arrow to select a desired date.
- You can select from today up to the maximum number of dates available for reservation set by the admin.
- You can't select the date the admin restricted the use of the resource.
- Select an office you want to reserve from.
- The list of vehicles available for reservation is displayed.
- From the timetable for the vehicle you want to reserve, click the time you want to reserve from the available times.
- You can't reserve a time slot that is ‘Reserved’ or ‘My Reservation’. You can check the reservation information by hovering the cursor over the time slot.
- You can't reserve a time that is before the current time. If you place the cursor over an unavailable time slot, the unavailable times are displayed.
- You can't reserve times before the opening hour for same-day new reservations set by the admin or times after 23:59.
- In case of general reservations, for resources to which reservation limits are set, you can't reserve once the reservation limit set by the admin are exceeded.
- In the vehicle reservation pop-up, enter the information in the ‘General Reservation’ tab. (See ‘Vehicle General Reservation’)
Vehicle General Reservation
The following describes how to make general reservations for vehicles.
- Click the ‘General Reservation’ tab in the vehicle reservation pop-up window.
- Enter the reservation content.
- Select the reservation date and time.
- Date:
- You can't select a date earlier than today.
- You can't select a date after the maximum date available for reservation set by the admin.
- You can't select the date the admin restricted the use of the resource.
- Time:
- You can't reserve times before the current time or before the opening hour for same-day reservations set by the admin.
- You can reserve up to 23:59 on the same day.
- You can't reserve times shorter than the minimum reservation time or longer than the maximum reservation time set by the admin.
- You can reserve in increments of time based on the reservation base time set by the admin.
- E.g., If the reservation base time is set to 20 minutes, you can reserve in increments of 20 minutes, such as 20 minutes, 40 minutes, 60 minutes, or 80 minutes. At this time, if the minimum reservation time is set to 30 minutes, then you can't reserve for 20 minutes and can only reserve for 40 minutes or longer.
- You can't select times that have already been reserved.
- Date:
- Enter the note.
- If there's a note set by the Resource admin, enter by referring to the content.
- Click ‘Reserve’.
- General reservation of the vehicle is completed. A vehicle reservation notification email is sent to the booker.
My Reservation
You can view your reservation history, or reservations for which you are an attendee, and cancel or edit your reservation based on your resources.
View My Reservation
The View My Reservation page is laid out as follows.
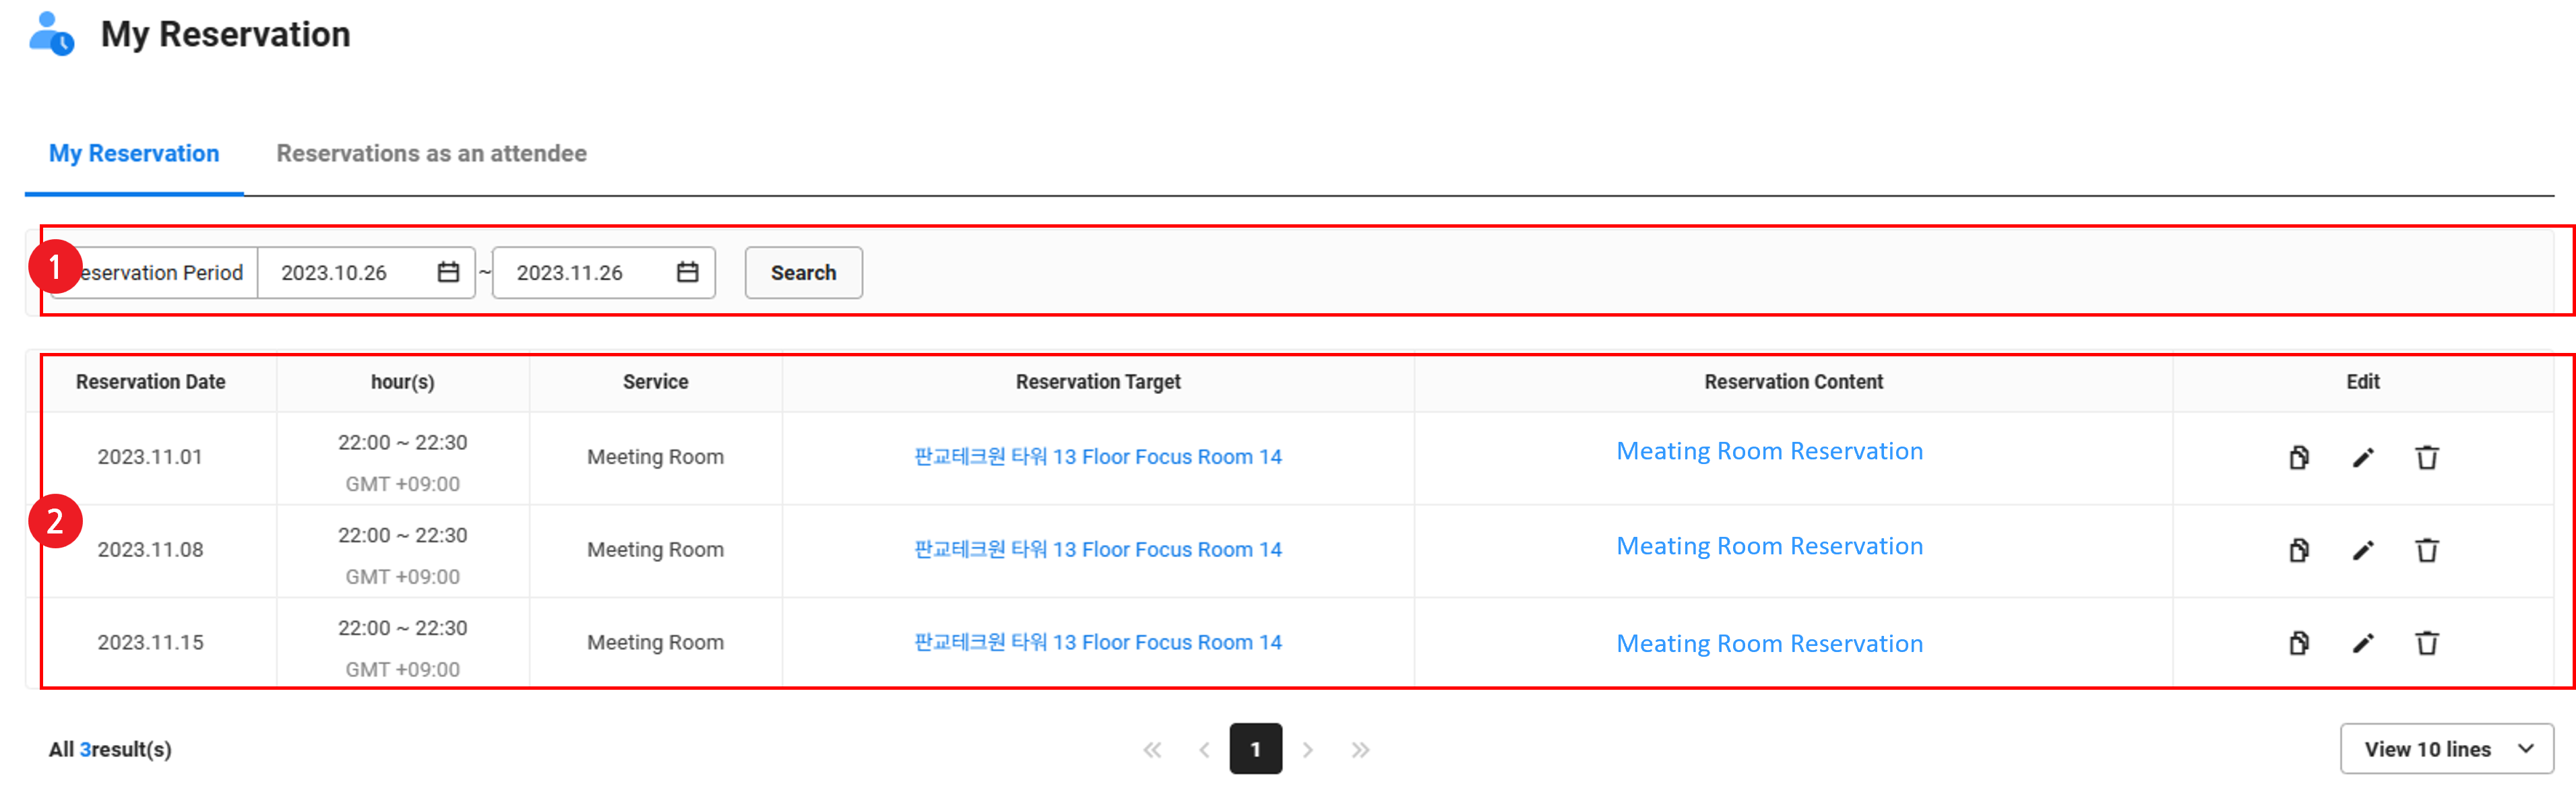
| Area | Description |
|---|---|
| ① Search area | Search based on reservation period condition |
| ② My Reservation list | View your reservations in a list
|
View Reservation as Attendee
You can view reservations for which you are an attendee, and attendees who have been granted permissions to the resource can edit or cancel reservations.
The View Reservation as Attendee page is laid out as follows.
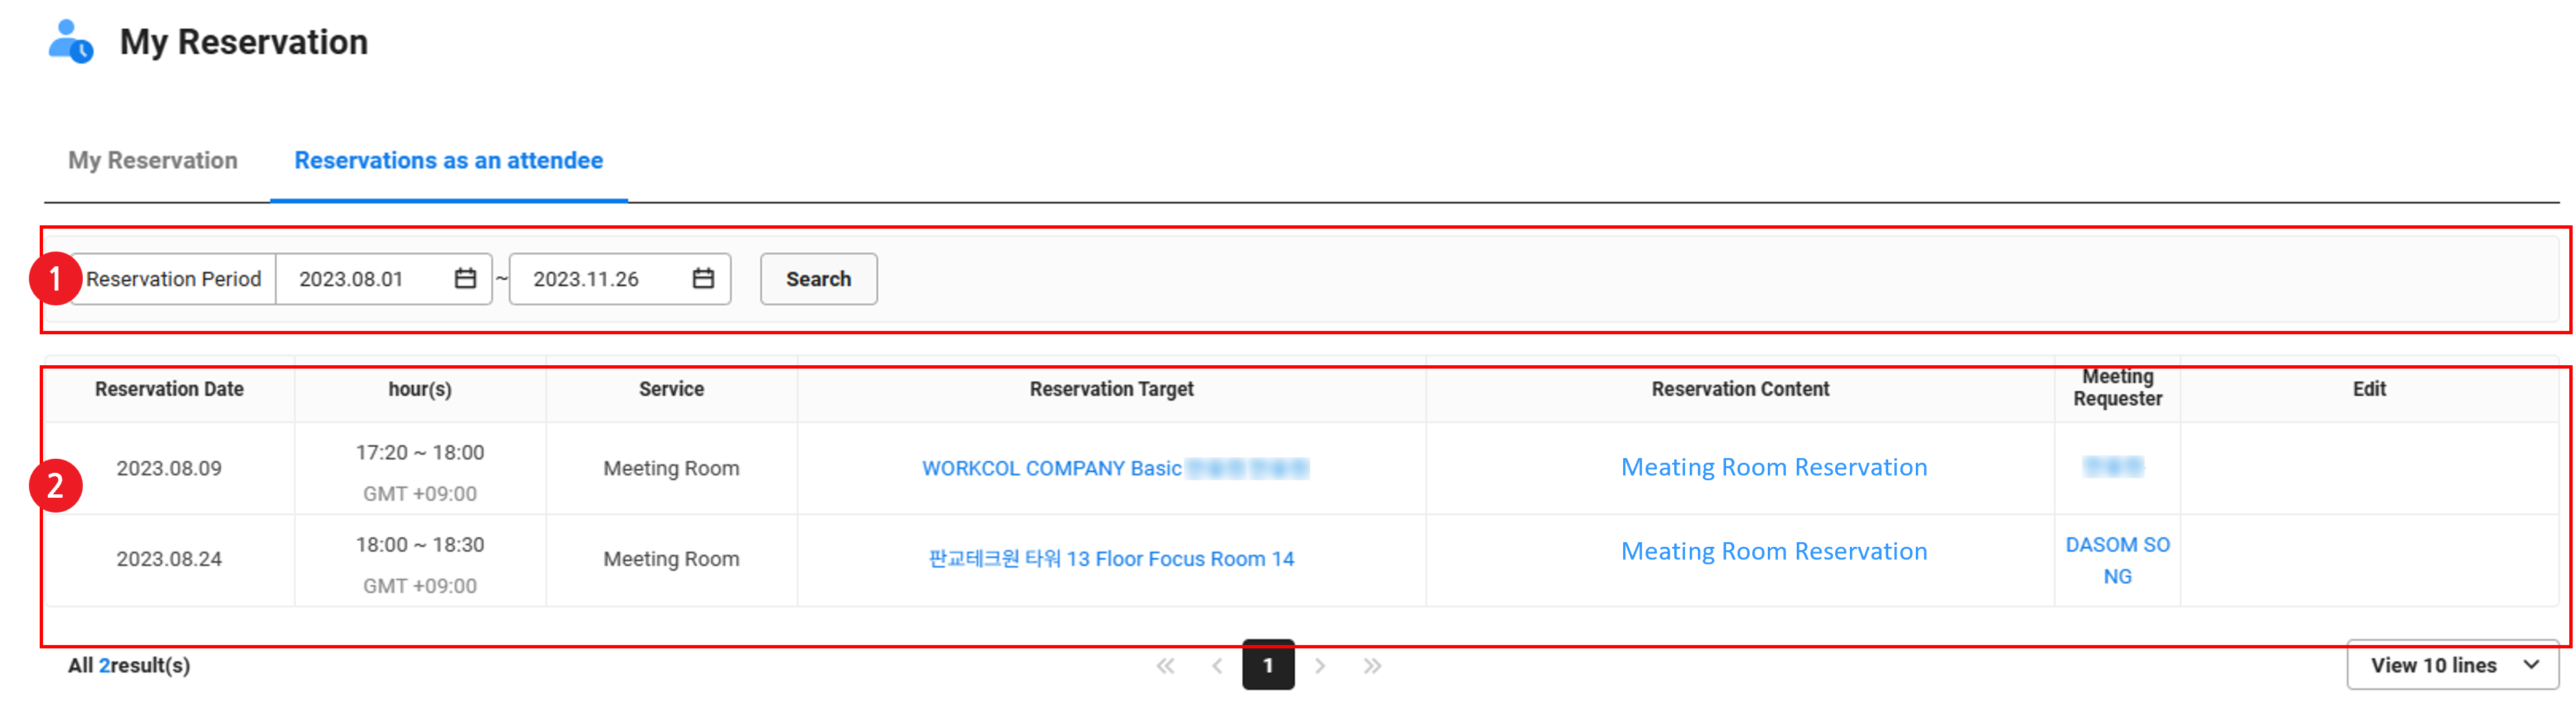
| Area | Description |
|---|---|
| ① Search area | Search based on reservation period condition |
| ② List of reservations where you are an attendee | View meeting room reservations for which you are an attendee as a list
|
If the user doesn't have usage permissions for the resource, they can only view the reservation content in the ‘Reservation as Attendee’ tab.
Add Meeting Room Reservation by Copying
You can add reservations by copying the meeting room reservation details.
The following describes how to add a reservation by copying.
- Click the icon at the top of your PC web screen, and then click ‘Reservation’ in the pop-up.
- Click at the top left of the screen, and then click ‘My Reservation’ from the menu.
- Click ‘Copy’ of the meeting room reservation you want to copy.
- Apply the reservation content in the meeting room reservation pop-up window, and then click ‘Reservation’.
- Enter the reservation content.
- Select the reservation date and time.
- Select the available meeting room for the selected date and time.
- Click ‘Change Meeting Room’.
- In the Change Meeting Room pop-up window, search by entering the meeting room name you want to change to.
- Select the meeting room from the list of available meeting rooms.
- Click ‘Change’.
- Enter the name or department name of attendees, and then click
 to add attendees.
- Click ‘X’ to delete the added attendees.
- An email is sent to added attendees.
- If necessary, fill out the reservation note.
- Select whether to register it on the calendar.
- If you select ‘Register’, then calendars available for selection are displayed. Select the calendar to register the reservation details.
- By default, it is registered in the default calendar. To register it to your personal calendar in Google Calendar, click ‘Authenticate Additional Calendar’ to authenticate login and select it.
- If you're copying from a multi-reservation, the calendar registration is not displayed, and it is added as a general reservation for the selected date and time.
Edit Reservation
You can only edit reservations whose reservation start time hasn't arrived.
The following describes how to edit reservation information.
- Click the icon at the top of your PC web screen, and then click ‘Reservation’ in the pop-up.
- Click at the top left of the screen, and then click ‘Space > Meeting Room’, ‘Work Device’ or ‘Vehicle’ from the menu.
- Click the reservation you want to edit, then click 'Edit Reservation'.
- If you can edit a reservation from ‘My Reservation’, click
 of the reservation to edit.
 - If you're editing after viewing the meeting room reservation details, click the reservation target or reservation content, and then click ‘Edit Reservation’ form the pop-up window.
- If you can edit a reservation from ‘My Reservation’, click
- Apply the edited content in the Edit Reservation pop-up window, and then click ‘Edit’.
- Editable items can differ depending on the resource.
- For more information on how to edit reservations, see Reserve Meeting Room, Reserve Work Device, and Reserve Vehicle.
- Attendees who have been granted permissions to the resource can edit the reservation.
Long-term reservations can't be edited.
Change of reservation time for currently reserved resource:
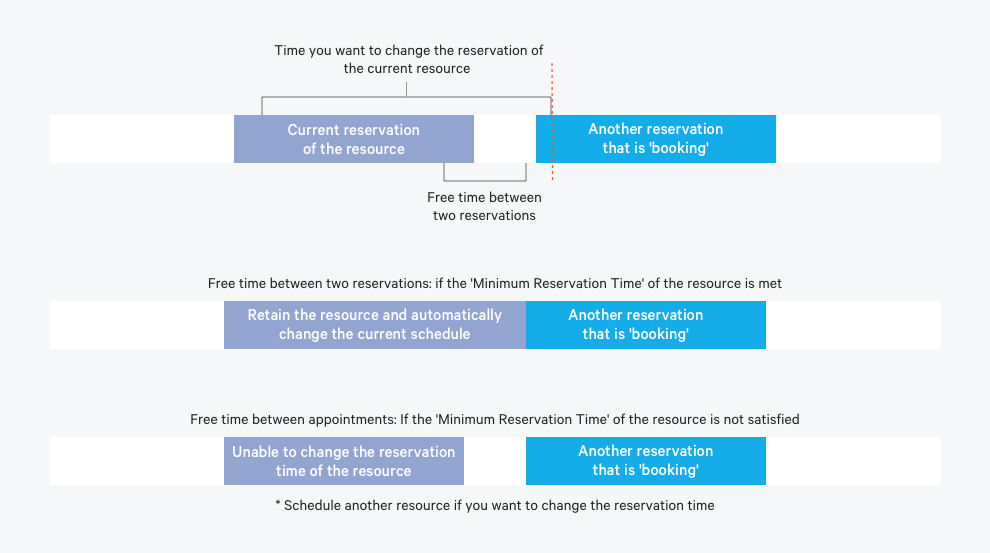
- If the time you want to change to partially overlaps with another reservation that is in the ‘Reserved’ status, the free time will automatically be changed to the minimum reservation time and then selected if it meets the resource's Minimum Resource Reservation Time, in which case you can keep the current resource.
- If it doesn't meet the minimum resource reservation time, you won't be able to change the reservation time and will be prompted to reserve another resource.
- The time after the change may be shorter than the time you want to change to.
Cancel Reservation
You can only cancel reservations whose reservation start time hasn't arrived.
The following describes how to cancel a reservation.
- Click the icon at the top of your PC web screen, and then click ‘Reservation’ in the pop-up.
- Click at the top left of the screen, and then click ‘Space > Meeting Room’, ‘Work Device’ or ‘Vehicle’ from the menu.
- Click the reservation you want to cancel, then click 'Cancel Reservation'.
- If you're canceling a reservation from the ‘My Reservation’, click
 of the reservation you want to cancel.
 - If you're canceling after viewing the meeting room reservation details, click the reservation target or reservation content, and then click ‘Cancel Reservation’ form the pop-up window.
- To cancel the multi-reservations, click ‘View Details’ from the reservation information pop-up window, and then click the ‘Cancel All’ or ‘Cancel Reservation’.
- If you click ‘Cancel All’, the multi-reservations are canceled entirely. If you click ‘Cancel Reservation’, only the reservation on that date is canceled.
- Attendees who have been granted permissions to the resource can cancel the reservation.
- If you're canceling a reservation from the ‘My Reservation’, click
End Reservation
If the use of the resource has ended earlier than the reserved end time, you can return the remaining time by ending the reservation.
The following describes how to end a reservation.
- Click the icon at the top of your PC web screen, and then click ‘Reservation’ in the pop-up.
- Click at the top left of the screen, and then click ‘Space > Meeting Room’, ‘Work Device’ or ‘Vehicle’ from the menu.
- If necessary, enter the reservation period in the search area to search.
- Click the reservation whose reservation time has started.
- Click ‘End Reservation’.
- Once the reservation is ended, the remaining time is switched to available time.