PC Web Services Guide
The services provided on PC web and their features are as follows.
User:
- Home: search menus and forms, favorite settings, admin menu (only displayed for administrators), user guide, fixed link menu, check widgets by feature
- Approval: create approval documents, view approval documents, view inbox/outbox, view official documents
- Resource Reservation: reserve resources, view my reservation
- My Work: check Attendance, Expense, Budget status, checklist, pledges, Payroll, payroll statement (part-time employees)
- Personnel Information: view and edit my personnel information, manage signatures, and manage linked information
- Notification Settings: set to receive notifications
Admin:
- HR: manage company’s organization, members, part-time employees, business accounts, checklists, issue certificates, and appoint personnel.
- Manage Approvals: manage documents, forms, post forms, approval lines, people to share with, recipients, official documents, and document permissions
- Manage Resource Reservation: manage resources/office buildings/locations, view reservations, manage reservations for spaces/work devices/vehicles
- Pledge: view pledge status, send/retrieve/delete pledges, manage pledge forms
- Attendance: view attendance status, manage working employees, work arrangement, work schedule, manage absence (annual leave, business trip, family event leave, special leave)
- Payroll: manage payroll, retirement benefit, retirement income tax, year-end tax settlement, and non-wage income
- Expense: view expense plan and settlement status, manage budget, manage integrated credit cards, request explanation
- Expenditure: organize/allocate/close budget, view expenditure-related status, manage expenditure items
- Budget: plan/allocate budgets and budget standards, view budget usage, view reports
- Accounting: manage slips/receivables and payables/fixed assets/capital/taxes, integrate financial account, report VAT, settle accounting, manage financial statements, view ledger, manage vendors/account titles/common codes, view exchange rate
- Sales: manage sales plan/inventory/orders/sales, set sales standard information
- Electronic Tax Invoice: manage issuance, manage invoice submissions, manage accounting submissions, reports, view closed vendors, usage status
- Business Support Settings: manage company information, manage company holidays, manage business places and vendors, manage security, audit log, manage service settings, integrate external solutions, manage common code
Use PC Web
The basic explanation for using PC web is as follows.
| Area | Description |
|---|---|
| ① Logo | Displayed once a company logo is registered in Admin |
| ② Favorites | Check favorite menus (see Favorite Menus ) Search menus with permissions and available forms by name (see Search Menu/Form) |
| ③ Admin Menu | Search menus with permissions and available forms by name (see Search Menu/Form)
Displays management menus with permissions. Click to go to each management service (see Accessing the Admin Menu)
|
| ④ User Guide | Displays the user guide for the current menu |
| ⑤ Fixed link menu | If the fixed link menu set by the company exists, it is displayed. Click to go to the set link in a new window |
| ⑥ Approval | Click to go to 'Approval Home' (see Approval Home ) |
| ⑦ My Work | Click to go to 'My Work' (see My Work) |
| ⑧ Reservation | Click to go to 'Reservation Home' (refer to Reservation Home ) |
| ⑨ Shortcuts | Click to go to the shortcut menu set by the company |
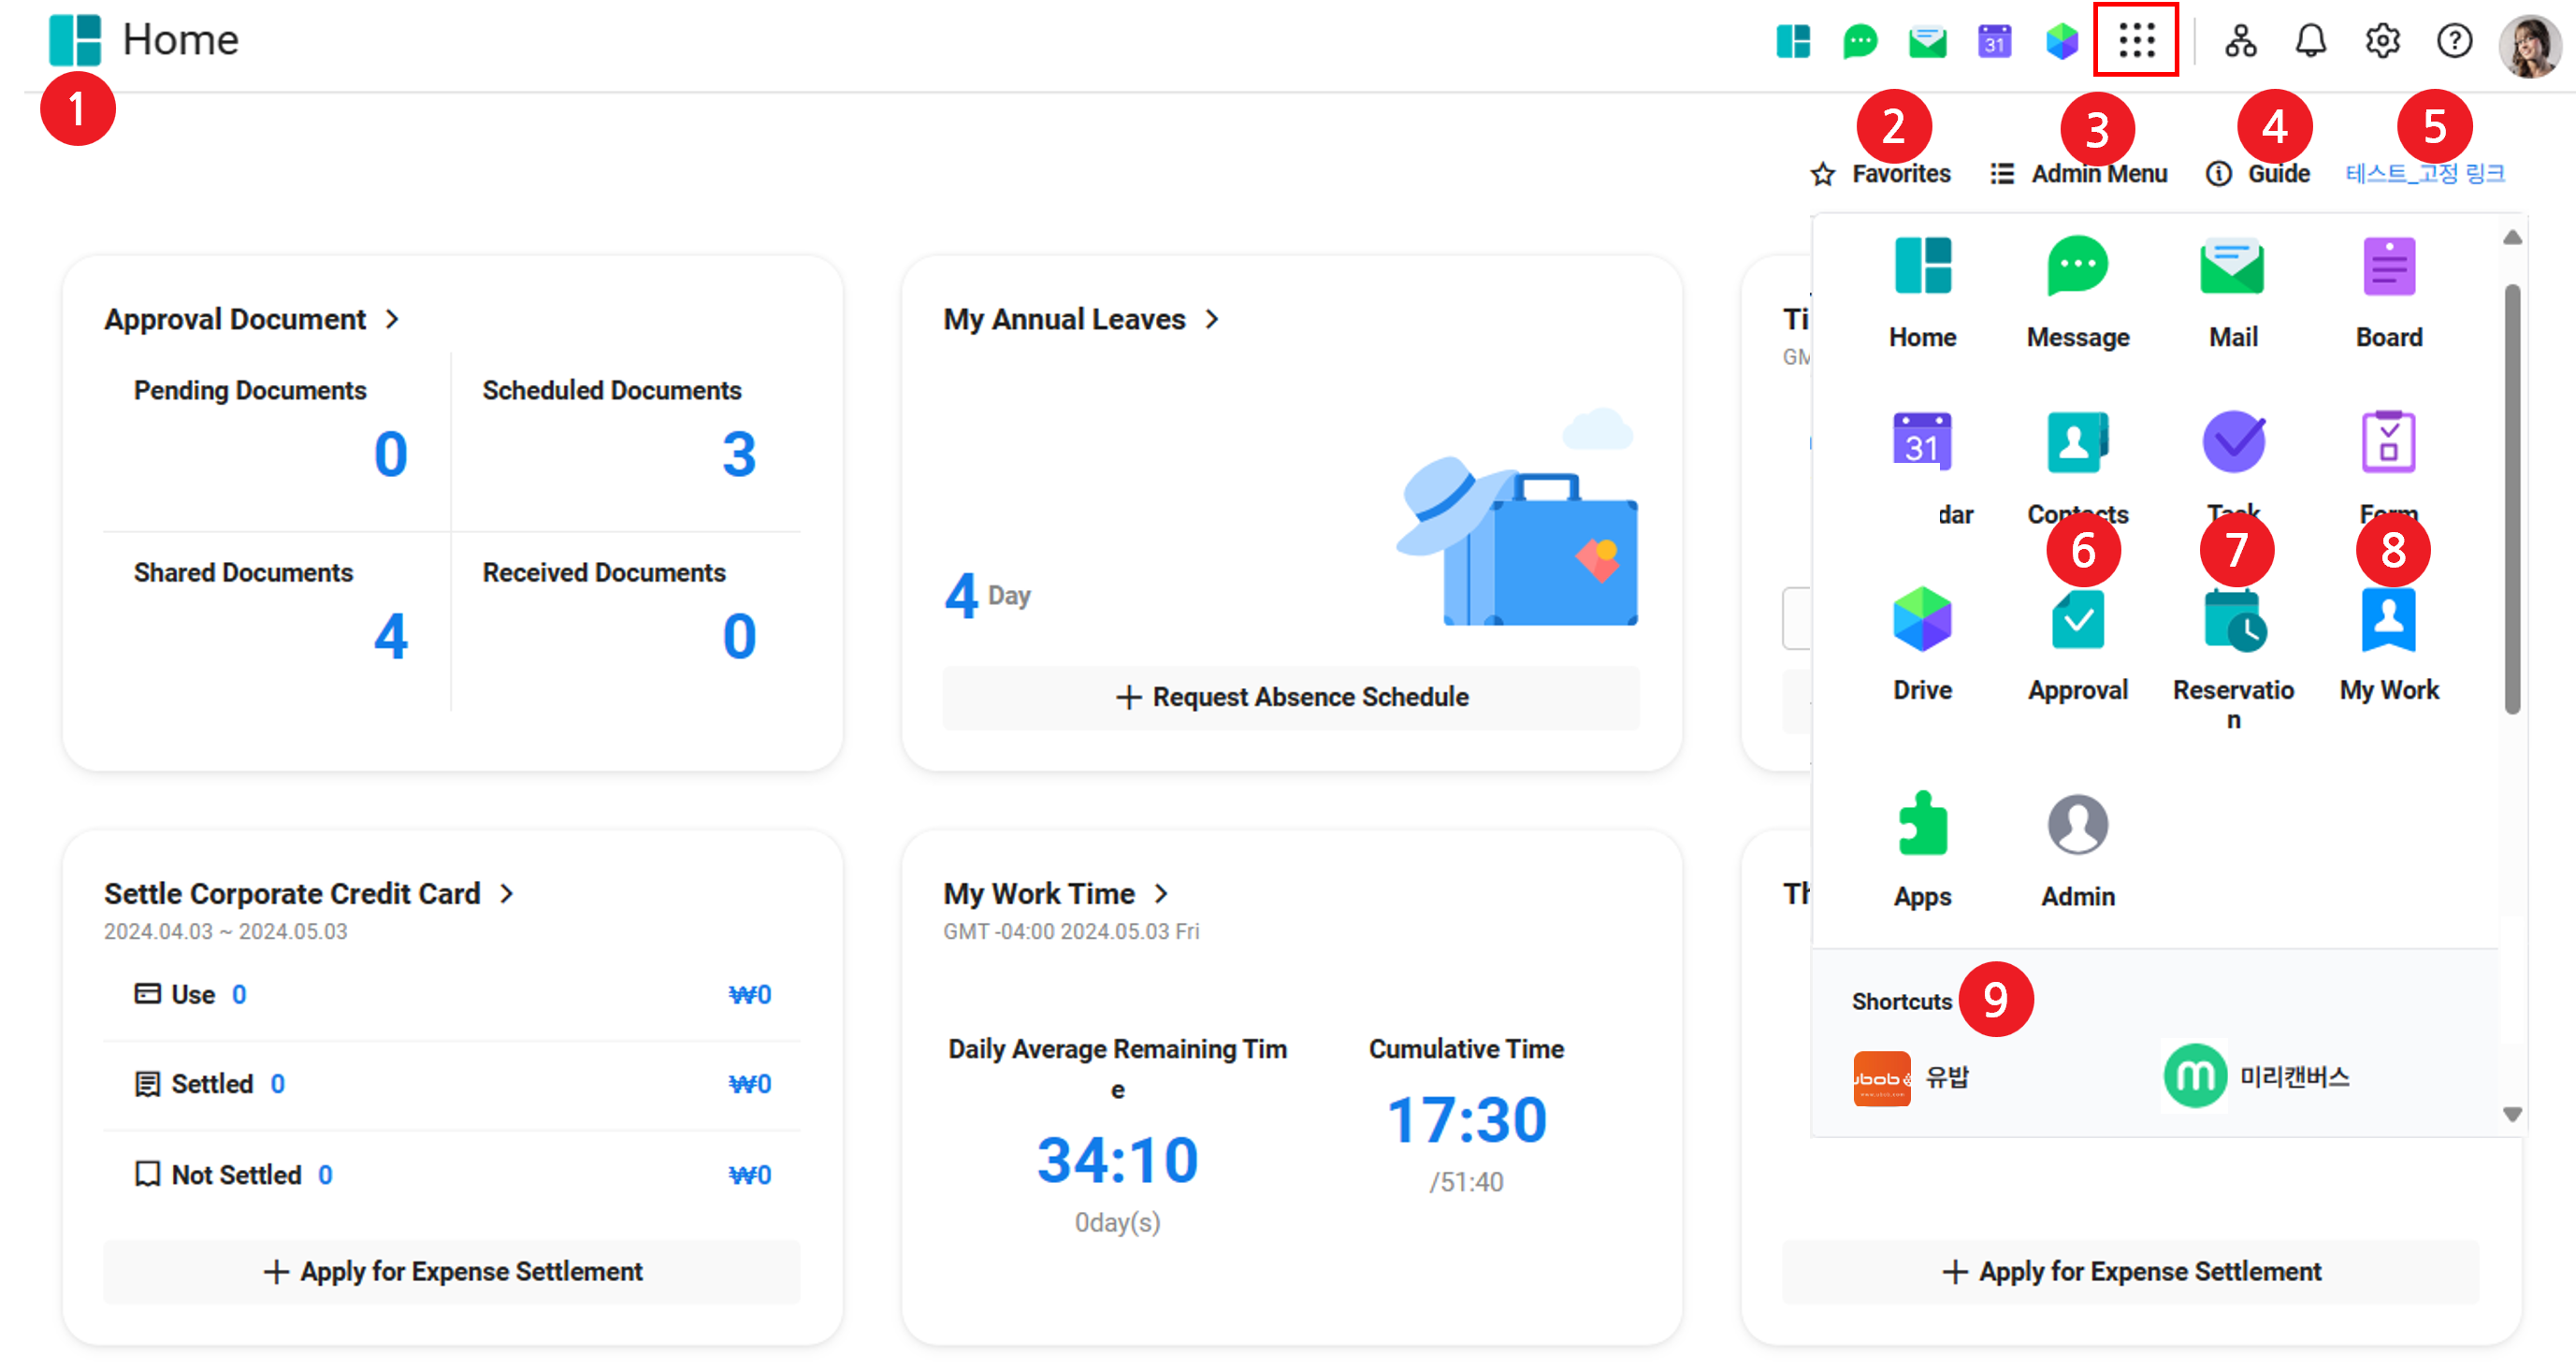
Access the User Menu
If you click ![]() in the upper right corner of the PC web screen, the 'Approval' and 'My Work' menus will be displayed. If you are using the Reservation Service, the 'Reservation' menu is displayed. Also, if your company has set up a shortcut menu, you will see the shortcut menu.
in the upper right corner of the PC web screen, the 'Approval' and 'My Work' menus will be displayed. If you are using the Reservation Service, the 'Reservation' menu is displayed. Also, if your company has set up a shortcut menu, you will see the shortcut menu.
Access the Admin Menu
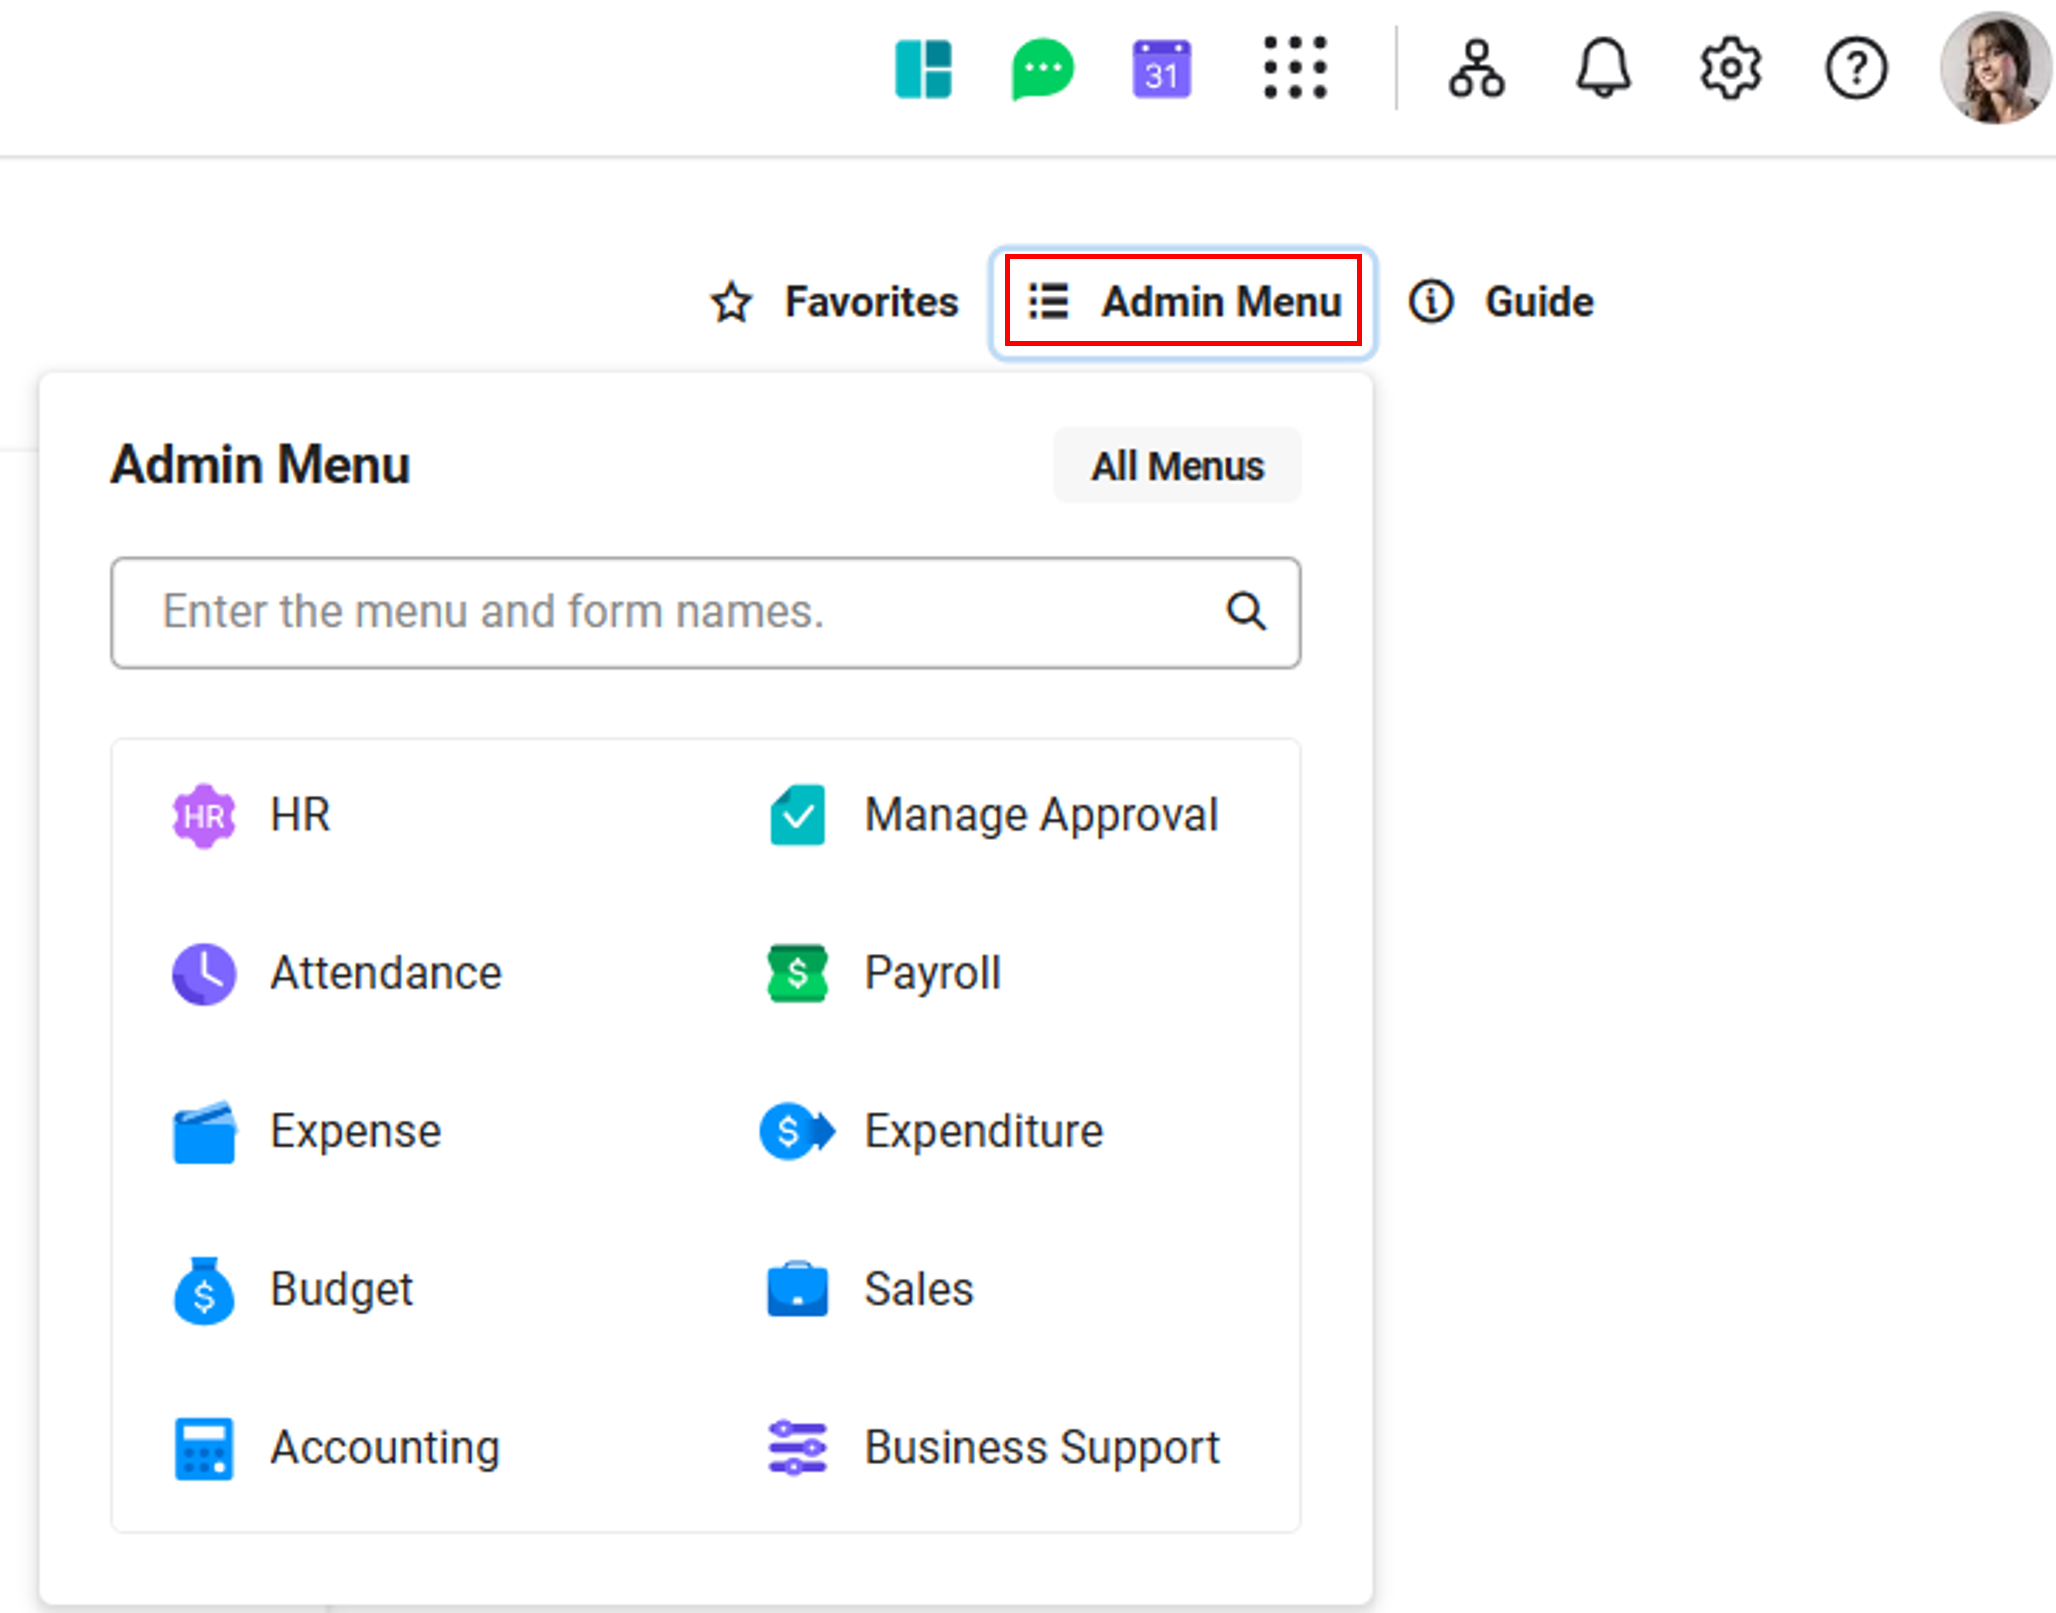
Users who have been given Admin permissions will see the Admin menu.
- Click the 'Admin Menu' in the upper right corner of the PC web screen.
- The Admin menu with appropriate permissions will be displayed.
- When using a corporate group, the management menu of the group company will be displayed for users with management rights of the group company.
- Click the menu to go to the Admin screen.
Favorite Menus

You can view and quickly navigate to your favorite menus.
- Click Favorites in the top right corner of your PC web screen.
- The menus you have favorited will be displayed.
- Click the menu to move to.
- To add a favorite menu, click 'All Menus', then click
 of the menu you want to set as your favorite menu in the All Menus list.
- It will be added as a favorite menu.
- To remove a favorite menu, click on
 of the favorite menu.
Search Menus/Forms
You can search menus and approval forms.
You can only search menus or forms according to the product in use or the user permissions.
The following describes how to search.
- Click the Admin Menu or Favorites in the top right corner of the PC web screen.
- Enter what you want to search for in the menu/form field at the top of the pop-up, then click
 .
.
- The searched menu names and form names are displayed in the search result area.
- If there are many items to be displayed, you can click ‘View More’ to display the complete search list.
- All Menus: click to view all menus you can use.
- The searched menu names and form names are displayed in the search result area.
View and Edit Personnel Information
You can view or edit your personnel information, signature, and linked information.
- Click
 in the upper right corner of your PC web screen.
 - Click 'Personal Information' from the menu.
- Click on the 'Personnel Information' area on the right side of the screen.
- The 'Personnel Information' area is displayed only when you are using Business Support. In Personnel Information, you can manage user information related to the use of Business Support.
- View your personnel information in the 'Personnel Information' pop-up window. If you want to edit, click 'Edit' at the bottom.
- On the 'Personnel Information' tab:
- The items that can be viewed or modified depend on the usage and modification permissions of personnel information set by the HR Admin.
- Basic Information: You can view 'Employment Status', 'Business Unit', and 'Reports To'/'Direct Reports' information. When used in the form of corporate groups, the ‘Group Company Transfer Date’ is displayed for transferred employees of the corporate group.
- Additional information: If you are using the Payroll service, entering your nationality and resident registration number is mandatory. However, if the employee’s nationality is not 'Korean', these inputs are optional.
- Supplementary Information: If there is supplementary information set by the HR Admin, those items will be displayed.
- 'Manage Signature' tab:
- You can register and manage your signatures to be displayed on Pledge or Approval documents. You can register signatures by attaching images, drawing them manually, or by creating a stamp.
- Once you register a signature, you can display the signature in the ‘Individual Signature' field of pledge forms. For more information, see Sign Pledge.
- When the document approver registers a signature, you can attach the signature of the approver in the Approval Line area of the printed page. For more information, see View Document.
- Register Signature Image
- The signature image is recommended to have a transparent background and be 74 x 74 pixels or larger. To register a signature image, click 'Attach File' and upload the signature image.
- Draw Signature
- If you do not have a signature, you can draw one to register. Click 'Draw Signature', then use your mouse to draw your signature in the pop-up window.
- Create Signature Stamp
- You can register your signature as a stamp. To create a stamp, click 'Create Stamp', enter the name you want to engrave on the stamp, then click 'Create'. You can enter a name between 2 to 6 characters.
- After selecting the stamp sample, click 'Save' and the signature will be registered in the selected stamp style.
- Click ‘Delete’ to delete the registered signature. Deleted signatures can't be recovered.
- You can register and manage your signatures to be displayed on Pledge or Approval documents. You can register signatures by attaching images, drawing them manually, or by creating a stamp.
- ‘Linked Info’ tab:
- The ‘Linked Info’ tab is displayed only when you have integrated external solutions.
- Enter the linked information for each integrated solution.
- For how to enter or authenticate linked information for each integrated solution, refer to 'Business Support Settings > Settings > Manage Service Integration'.
- On the 'Personnel Information' tab:
- Edits will also be reflected in the employee personnel card in ‘HR > Member > Manage Employees’.
Part-time employees can view the business place, place of work, and manager information in the 'Personnel Information' tab. The 'Linked Info' tab is not displayed for part-time employees.
If your business account has supplementary information added by your HR Admin, the 'Personnel Information' tab will appear, and you can view and edit the supplementary information of your business account.
Set Notifications
You can set whether to receive notifications for Approval, Attendance, Reservation, and Expense services. If you have an external solution (Kakao Talk, LINE, Google Chat, Slack) that your company has integrated, you can set to receive notifications on external messengers.
- Attendance notifications can only be configured by employees with set work arrangements given that the company uses the Attendance service.
- Part-time employees do not have access to notification settings.
- Business accounts do not have access to Attendance and Expense notifications.
You can turn on notifications as follows.
- Click at the top right of the PC web screen.
- Click 'Notifications > Notifications by Service' from the menu.
- Click 'Business Support' at the bottom.
- In the pop-up window, set notifications for each service based on notification item and channel.
- 'Service Notification' and 'Mail' channels are provided by default. If there are external solutions that your company has integrated, they will appear on the right.
- If you are using multiple external solutions, click to select the external channel you want to receive notifications.
- If you select 'All Items', you can add all notification items for that service.
- Click
 to set notification settings for each detailed item of the selected service.
 - If it is displayed as
 , the notification setting is on, and if it is displayed as
  , then the notification setting is off.
 - The items that the admin has enabled notifications for are displayed as
 , and settings for these items can't be changed by the user.
 - When setting the Attendance notifications, please see the following.
- When you set to use the notification for an item, the time selection field is activated. If the clock-in/out record does not exist by the set time, then a notification is sent at the set time.
- You can change the on/off notification settings for each notification channel, but the set notification time will be uniform across all channels.
- You will not receive notifications on days you have requested absences that count towards working hours or holidays and days off according to your work arrangement. If you select 'Consider as having worked during entered hours even if clock-in/out times are missing' in Set Work Arrangement, you will not receive notifications.
- When setting the Expense notifications, please see the following.
- Notifications for requested explanations regarding an audit item violation is sent to the expense settlement requestor.
- Notification for corporate credit card settlement delegation is sent to the user to whom the settlement was delegated.
- 'Service Notification' and 'Mail' channels are provided by default. If there are external solutions that your company has integrated, they will appear on the right.
- Click ‘Save’.
Set Board Notification Channel
You can receive Board notifications and set up notification channels. If your company uses an external solution, you can receive notifications through the external messenger.
You can turn on notifications as follows.
- Click at the top right of the PC web screen.
- Click 'Notifications' from the menu.
- Click 'Board > Email/External Integration Notifications'.
- In the pop-up window, select the channel you want to receive notifications from. You must select whether to want to receive 'Email' by default. If your company has integrated external solutions, select whether to receive for each integrated solution.
- Click ‘Save’.